
WHBS 62F LT K - Basket WHIRLPOOL - Free user manual and instructions
Find the device manual for free WHBS 62F LT K WHIRLPOOL in PDF.
| Product type | Decorative hood |
| Brand | Whirlpool |
| Model | WHBS 62F LT K |
| Dimensions (H x W x D) | 62-114 cm x 59.8-89.8 cm x 45.5 cm |
| Exhaust pipe diameter | 15 cm |
| Number of speeds | 4 (including 2 Power Boost) |
| Special functions | 6th Sense automatic, Power Boost, Zen mode |
| Lighting | LED, not replaceable by user |
| Grease filter type | Metallic, dishwasher safe |
| Charcoal filter type | Active, not washable, replace every 4 months |
| Minimum distance from hob | 55 cm (electric) / 65 cm (gas) |
| Power supply | 220-240 V, 50/60 Hz |
| Installation mode | Extracting or recirculating (optional kit) |
| Grease filter maintenance | Monthly, manual or dishwasher cleaning |
| Charcoal filter maintenance | Replace every 4 months |
| Safety | Automatic shut-off, recommended omnipolar disconnection |
Frequently Asked Questions - WHBS 62F LT K WHIRLPOOL
User questions about WHBS 62F LT K WHIRLPOOL
0 question about this device. Answer the ones you know or ask your own.
Ask a new question about this device
Download the instructions for your Basket in PDF format for free! Find your manual WHBS 62F LT K - WHIRLPOOL and take your electronic device back in hand. On this page are published all the documents necessary for the use of your device. WHBS 62F LT K by WHIRLPOOL.
USER MANUAL WHBS 62F LT K WHIRLPOOL
EN Instruction for use
- Do not make electrical or mechanical changes on the product or on the exhaust pipes. Before doing any cleaning or maintenance work, disconnect the product from the mains power supply by removing the plug or turning off the mains switch.
- For all installation and maintenance operations, always wear work gloves. The product can be used by children over the age of 8 and by people with reduced physical, sensory or mental capabilities or without experience or the necessary knowledge, as long as they are properly supervised or have been instructed on how to safely use the device and understand the inherent dangers. Children must be supervised to make sure that they do not play with the product. Cleaning and maintenance must never be performed by children unless they are properly supervised. The room must have sufficient ventilation when the product is used at the same time as other appliances burning gas or other fuels. The product must be cleaned frequently both inside and out (AT LEAST ONCE A MONTH); always follow the instructions given in the maintenance manual. Failure to comply with the rules indicated for cleaning the product and replacing/cleaning the filters may result in the risk of fire. It is strictly forbidden to cook food on the flame under the product. Warning: When the hob is on, the accessible parts of the product may become hot. Do not connect the product to the electrical power supply until the installation is complete. The regulations laid down by local authorities must be strictly followed with regard to the technical and safety measures to adopt for fume extraction. The extracted air must not be conveyed through the same ducts used to extract the fumes generated by gas combustion or other types of combustion products. Do not use or leave the product without appropriately installed lamps, as this may result in the risk of electric shock. The product must NEVER be used without the grille correctly fitted. The product must NEVER be used as a support surface unless expressly indicated.
- Range hoods and other cooking fume extractors may adversely affect the safe operation of appliances burning gas or other fuels (including those in other rooms) due to back flow of combustion gases. These gases can potentially result in carbon monoxide poisoning. After installation of a range hood or other cooking fume extractor, the operation of flued gas appliances should be tested by a competent person to ensure that back flow of combustion gases does not occur.
- Use only the fastening screws supplied with the product for its installation, or if not supplied, purchase the correct type of screws. Use screws of the right length, as indicated in the installation guide.
- Please note! Failure to install screws and fasteners in accordance with these instructions may result in electrical hazards.
- To replace the lamp, only use the lamp indicated in the maintenance/lighting system section of this manual. - Using a naked flame may damage the filters and cause a fire hazard, and must therefore be avoided under all circumstances.
Extra care must be taken when frying to prevent the oil from overheating and catching fire. In case of doubt, contact the authorised service centre or similar qualified personnel.
Please note! Do not use with a programmer, timer, separate remote control or any other device that activates automatically.
- The minimum distance between the container support surface on the cooker and the lower part of the hood must be at least equal to 55~cm (not less than 65~cm only for Australia and New Zealand) in case of electric cookers and to 65~cm in case of gas or mixed cookers.
If the installation instructions of the gas cooker specify a greater distance, take it into account.
Keep children under the age of 3 away from the appliance. Without the constant supervision of an adult, keep the appliance out of the reach of children under the age of 8.
ATTENTION: the appliance is not designed to be operated using an external device or a separate remote control system.
This appliance is not intended for professional use. Do not use the appliance outdoors.
To avoid the risk of personal injury, the appliance must be handled and installed by two or more people.
Installation operations, including any water supply connections (if any) and the electrical connections, and repairs must be carried out by qualified personnel. When installation is complete, keep the packaging material (plastic parts, polystyrene, etc.) out of the reach of children to avoid the risk of suffocation.
Do not use the appliance when barefoot or wet.
Never use steam cleaning appliances - risk of electric shock.
The packaging material is 100% recyclable and is marked by the recycling symbol
The device may have different aesthetic features with respect to the illustrations in this handbook, however the operating, maintenance and installation instructions remain the same.
Strictly observe the instructions in this manual. All liability is declined for any problems, damage or fires caused by failure to comply with the instructions in this manual. The device is intended for domestic use only, to cook food and extract the fumes generated by cooking. No other use is allowed (e.g. heating rooms). The manufacturer declines any liability for inappropriate use or incorrect control settings.
- Read the instructions carefully: they contain important information on installation, operation and safety.
- Do not make electrical changes to the device.
- Before installing the device, make sure that none of the components are damaged. Otherwise, contact the dealer and do not continue with the installation.
- It is important to keep all the manuals accompanying the product so that they can be consulted at all times. If sold, transferred or moved, make sure it remains with the product.
ELECTRICAL CONNECTION
The mains voltage must correspond to the voltage indicated on the rating plate located inside the hood. If equipped with a plug, connect the hood to a wall socket that complies with current standards located in an area that can be accessed even after installation. If it does not feature a plug (direct connection to the mains) or the plug is not located in an accessible area, even after installation, apply a standard double pole switch that ensures complete disconnection from the mains in category III overvoltage conditions, in accordance with the installation rules.
- Please note! Before reconnecting the circuit to the mains power supply and making sure that it is working correctly, always check that the power cable is correctly installed.
Do not use extension cords, power strips or adapters.
Mains voltage and frequency
Refer to the value indicated on the rating plate inside the hood.
Wire connection
:yellow/green
N: blue
L: brown
Replacing the power cable
The hood features a special power cable; if the cable is damaged, contact the Service Centre for a replacement.
AIR OUTLET
(for suction versions)
Connect the hood to wall-mounted exhaust pipes and holes with a diameter equivalent to the air outlet (connecting flange).
The use of pipes and outlet holes in the wall with a smaller diameter will reduce the extraction performance and drastically increase the noise level.
All responsibility in this regard is therefore denied.
! Use a ducting pipe with the shortest length necessary.
! Use a ducting pipe with the least number of bends possible (maximum bend angle: 90^ ).
! Avoid drastic changes in the ducting pipe diameter.
! The company shall not be held responsible if these regulations are not complied with.
Filtration OR SUCTION?
! Your hood is read to be used in the suction version.
To use the hood in the filtration version, the special ACCESSORY KIT must be installed.
Check, on the first pages of this manual, whether the ACCESSORY KIT is already supplied or needs to be purchased separately.
Note: If supplied, in some cases, the additional activated carbon filtering system may already be installed on the hood. Information on how to convert the hood from the suction version to the filtration version is already contained in this manual.
Extraction version
Vapours are evacuated outside through an exhaust pipe attached to the connecting flange.
ATTENTION
The evacuation pipe is not supplied and must be purchased.
The diameter of the exhaust pipe must be equivalent to the diameter of the connecting ring.
If the hood features one or more carbon filters, they must be removed.
Filtration version
The suctioned air will be degreased and deodorised before it is sent back into the room. To use the hood in this version, it is necessary to install an additional activated carbon filter system.
CONTROLS
The hood is equipped with a control panel with a suction speed control and a light control to light up the hob.

T1. Fan motor OFF / Decrease speed
T2. Fan motor ON / Increase speed
T3. "POWER BOOST" Function
T4. 6th sense function (AUTO mode) ON/OFF
T5. Operation "ZEN Mode"
T6. Grease/charcoal filter alarm-reset
T7. Main light ON / OFF
CAUTION! This hood has an automatic operation system (see below "T4. 6th sense function (AUTO mode) ON/OFF").
Calibration occurs automatically each time the hood is reconnected to the electrical network (e.g.: the first time it is installed after a blackout).
It can also be performed manually (see paragraph "Sensor set up").
During calibration, which lasts for 5 minutes, T4 will flash and lights can be used.
T1. FAN MOTOR OFF / DECREASE SPEED
Press to decrease speed and switch the extraction motor OFF. Press and hold to directly switch the extraction motor OFF.
T2. FAN MOTOR ON / INCREASE SPEED
Press to switch the extraction motor ON and increase speed. Press and hold to set 3th speed directly.
T3. "POWER BOOST" FUNCTION
Press T3 to activate the "POWER BOOST 1" intensive extraction speed (time-controlled).
Please note: the hood will go back to running at the 3th speed, after five minutes.
With the extraction motor on, in "POWER BOOST1", press again T3 to activated the "POWER BOOST 2" additional intensive extraction speed (time-controlled).
Please note: the hood will go back to running at the 3th speed, after five minutes.
Please note: press again T3, during the five minutes, the hood will go back to running in "POWER BOOST 1".
T4. 6TH SENSE FUNCTION (AUTO MODE) ON/OFF
The hood set the extraction speed automatically if the sensor in the hood detects changing on ambient conditions.
Please note: to make sure this function is used correctly first configure sensor (see "Sensor set up" below).
Please note: if you change any other functions that control the speed, the "6th sense" function will switch off.
- Sensor set up
This can be done when the hood is OFF. In normal ambient conditions press T4 for 5secs, T4 flashes for 5 mins to indicate hood is performing sensor calibration, then switches off to indicate the calibration has ended.
- Setting cooktop: Press and hold T1 and T2 simultaneously. Both lit to indicate hood is ready to accept cooktop parameter calibration.
Press T1 to choose Gas hob (T1 starts to flash for 3 secs to indicate hood parameters are set for gas hob).
Press T2 to choose Induction hob (T2 starts to flash for 3 secs to indicate hood parameters are set for induction hob).
Press to activate or deactivate the "ZEN" extraction mode.
This function makes it possible to activate an extraction speed with the perfect balance between quietness and extraction efficiency.
T6. GREASE/CHARCOAL FILTER ALARM/RESET
At regular intervals, the hood signals the need to perform filter maintenance.
Please note: The indicators will only work when the hood is on.
T6 lit: Carry out maintenance on the grease filter.
T6 flashing: carry out maintenance of the charcoal filter.
Resetting the filter saturation indicators:
Please note: This must be done with the hood switched on.
Press and hold T6.
Please note: T6 and hood switch off, to indicate alarm reset is done.
The reset of the Grease Filter and Charcoal Filter is performed using the same key. If both filters alarms are active, the reset procedure will reset the counter one by one, with priority to the Charcoal.
- Activating the carbon filter saturation indicator
Please note: This must be done with the extraction motor switched off.
This indicator is usually deactivated - press and hold T3 and T7 simultaneously to activate the function: Both will lightup to indicate activation.
To deactivate the function, press and hold the same buttons again: Both will flash briefly and then switch off to indicate deactivation.
T7. MAIN LIGHT ON/OFF
Press to switch the hob lights on or off.
MAINTENANCE
-
Cleaning: For cleaning, simply use a cloth moistened with neutral liquid detergents. Do not use cleaning tools or instruments.
-
Grease Filter: It must be cleaned once a month (or when the filter saturation indication system - if any - indicates the need for it), with non-aggressive detergents, either by hand or in a dishwasher at a low temperature and on a short cycle.
When cleaned in the dishwasher, the metal grease filter may discolour, but its filtering characteristics remain unchanged.
Evaded carbon filter NOT washable (for
filter version only): the saturation of the carbon filter can occur after somewhat prolonged use depending on the type of cooking and how regularly the grease filter is cleaned. In any case, the cartridge must be replaced at least every four months. It CANNOT be washed or regenerated.
Assembly: first attach the activated carbon filter at the back on the metal tab of the hood, then at the front with the two knobs.
Disassembly: remove the activated carbon filter by turning the knobs attaching it to the hood by 90^ .
Illumination
-
The lighting system is based on LED technology. LEDs provide optimal illumination, last up to 10 times longer than conventional lamps and save 90% of electricity.
-
Lighting system : The lighting system cannot be replaced by the user, contact Customer Service in case of malfunction.
END-OF-LIFE DISPOSAL

This device is marked in compliance with the European Directive 2012/19/EC - UK SI 2013 No.3113, Waste Electrical and Electronic Equipment (WEEE).
Make sure that this product is disposed of correctly. The user helps prevent potential negative consequences for the environment and for health. The symbol on the product or accompanying documentation indicates that this product should not be treated as household waste but should be handed over at a suitable collection point for the recycling of electrical and electronic equipment. Dispos of it in accordance with local regulations for waste disposal. For further information about the treatment, recovery and recycling of this product, please contact your local authority, the collection service for household waste or the shop from where the product was purchased.
The packaging material is 100% recyclable and is marked by the recycling symbol

REGULATIONS
Equipment designed, tested and manufactured in compliance with safety regulations: EN/IEC 60335-1; EN/IEC 60335-2-31, EN/IEC 62233. Performance: EN/IEC 61591; ISO 5167-1; ISO 5167-3; ISO 5168; EN/IEC 60704-1; EN/IEC 60704-2-13; EN/IEC 60704-3; ISO 3741; EN 50564; IEC 62301. EMC: EN 55014-1; CISPR 14-1; EN 55014-2; CISPR 14-2; EN/IEC 61000-3-2; EN/IEC 61000-3-3.
OPERATING ERRORS
If something does not seem to be working, perform the following simple checks before contacting the Service Centre:
If the hood is not working:
Check that:
-There is no power failure
-A speed has been selected
If the hood has poor performance:
Check that:
- The selected motor speed is sufficient for the amount of fumes and steam released.
- The kitchen is sufficiently ventilated to allow an air intake.
- The carbon filter is not worn out (hood in filtration version).
- If the hood has switched off during normal operation:
Check that:
-There is no power failure.
- The safety cut-off device has not tripped.
In the event of any malfunctions, disconnect the appliance from the electrical power supply for at least 5 seconds by unplugging it and then reconnect it, before contacting the Service Centre. If the malfunction persists, contact the Service Centre.
TECHNICAL SPECIFICATIONS
| Height (cm) Width (cm) Depth | (cm) Φ of the exhaust pipe (cm) | ||
| 62-114 | 59.8-89.8 45.5 15 | ||
| 71-114 |
CE

Components not supplied with product

To download the safety instructions, user manual, technical data sheet and energy data:
- Visit the website docs.whirlpool.eu
- Use the QR code
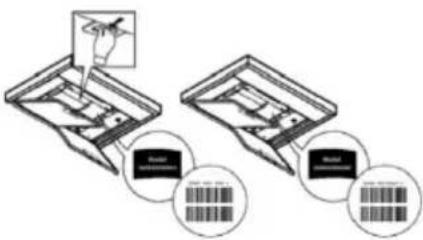
- Alternatively, contact Customer Service (using the phone number indicated on the warranty booklet). When contacting Customer Service, communicate the codes on the product rating plate.
DE
T3. FUNC TIE "POWER BOOST"
El fabricante no accepts responsibilities for his or her products. In the event that he or she is not responsible for any of his or her actions, he or she will be subject to a liability for damages and/or actions.
ANOPPIH IPOIONTOE TO TEAOE THE ZQHE TOY

H ouokun autn fepei onmavon oumwva me tvv Eupwnaikn Odyia 2012/19/EK - UK SI 2013 Ap.3113, AIOBNTa Hktpkou kai Hktpovikou Eotlioou (AHHE).
Bεαiθeite oɪ n απoρipηn autou Tou πpioovtoc ekteλeitai ωστá. O xphoŋsc ouμβαλe i Σny TpóληnTwv Tlθavw apvntikwv ETITIWOWEV yia To TEPiβaALov kai tyn uyeia.To 0uβoLo ETVAVU OTo Tpoiov n Ota Ouvodutika evypapa utObeivcE1 OT TO EV λoyw TPOIOV δev TpETe i va atoppiTTetai pa zi e Ta oikia KaToppipmuata aaaa TpeTtva Tnpadibetai OE katalno oneio oulloync yia tn v avakukawon nEktpikoou kai nektpovikou Eotlaioou.H atoppiou n Tou TPOIOVTOG BA TPETEI VA YIVETAI OUPWVA ME Touc totIKOUc KAVOVIOUG SIAEeONCTW V AOTBIANTW.VI a TEPIOOTepes c TII npoopoeic oxETIKA ME TNY ETEEPyAia, avaktnn KAI avakukawon autnc TNC OUKeunC, ETIKOIVWvnte ME TO apoio ypaepio Tou bHou oac, TNV UINPeosia TEPiouLAAoync oikiaKwv atoppipmuatw v n e To katAOTNμa aT' OTou ayopaoate TN OuaKEUn.
To uliko tnc ouokewuaia c evai 100% avakukwaiko kai pepi to oujo lo tn s avakukwong

KANONIEMOT
Egotiaooc Tou exi oxediaoei, Dokipaaotei kai kataaekuaotei umpwva e ta potuia yia tv Aopala: EN/IEC 60335-1, EN/IEC 60335-2-31, EN/IEC 62233. Atiodoo: EN/IEC 61591, ISO 5167-1, ISO 5167-3, ISO 5168, EN/IEC 60704-1, EN/IEC 60704-2-13, EN/IEC 60704-3, ISO 3741, EN 50564, IEC 62301. HApopayntikn Suβatoteta: EN 55014-1, CISPR 14-1, EN 55014-2, CISPR 14-2, EN/IEC 61000-3-2, EN/IEC 61000-3-3.
ПЮВАHMATA AEITOYOYPГIA
Eav paivetai TWC KATI DEV LEIToupyei, PPTOU KAeOeTe TNV YINPeoia YTOOTnPiGns PPaymuTOnoiote Touc Tnapakatw anlouc ELeyxouc:
Eav o aToppoqnInpaC AIToupye:
Eπβεβαιωτε οι
-Δev unapexi diakotn peuato
-Exεi επλεγί κατοία ταχύτητα
Eav n aTódooTou aToppopnTnpa eivai
Eπiβεβαιωτε ΕΙΟ
-H EπIaEvμeνη TaxUτητa Tou μoTeρ επIapkei γia Tny TIOOσTNTa Tou KαTIVou Kai Tuv αTμov.
-H Kouziva aepizetai eTAPKwC wote va eTTIPETeai n EIOOos tou aepa.
-To i t a v p a k a e i katavaaw0e (aToppoopntnpac oEk0o n 1IATpapioatos).
Eav o aToppoepnTnpaS Obetae KaTa Tn diApkeia Tns Kavovikn Tou Aetoupyias:
Eπβεβαιωτε Ει:
- E UTTAPXEI DIAKOTNI PEUMATOC.
-nTIOAUToIaIKnbiataqNdiakOtIncEevEvepyOToiInhKe.
T2. START / ØKNING AV HASTIGHET I VIFTEMOTOR
Trykk pa donne tasten for a sla pa avtrekksmotoren og for a oke hastigheten. Hvis man holderinne knappen vil hastighet 3 aktiveres direkte.