
CAM520 Pro - Video conferencing system AVer - Free user manual and instructions
Find the device manual for free CAM520 Pro AVer in PDF.
| Product Type | Video Conferencing System |
| Brand | AVer |
| Model | CAM520 Pro |
| Maximum Resolution | 1080p at 60 fps (USB 3.0) |
| Connectivity | USB 3.1 type B, HDMI, Ethernet, RS232 |
| Power Supply | 12V DC power adapter or PoE+ (advanced model) |
| Main Features | Pan, Tilt, Zoom, SmartFrame (intelligent framing), WDR, IP streaming (RTSP/RTMP) |
| Control | IR remote control, AVer PTZApp, web browser, IP Finder |
| Software Compatibility | Zoom, Microsoft Teams, Skype, Google Hangouts, Cisco WebEx, etc. |
| Installation | L-shaped wall mount, drilling according to provided template, screw fixing |
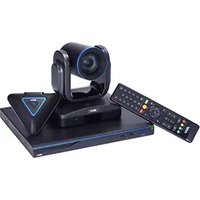
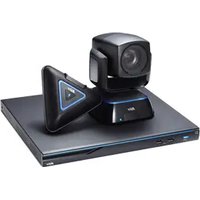
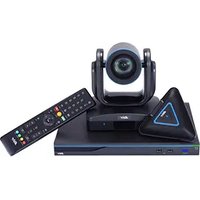
| Package Contents | Camera module, remote control, power adapter, USB 3.0 cable, RS232 cable, HDMI cable, L-bracket, screws, drilling template, quick start guide, warranty card |
| Security | Kensington lock |
| Maintenance and Cleaning | Clean with a soft dry cloth, do not use solvents |
| Repairability | Spare parts available via AVer after-sales service |
| General Information | Advanced model supports HDMI, PoE+, DIP switch; backward compatible USB 2.0 |
Frequently Asked Questions - CAM520 Pro AVer
User questions about CAM520 Pro AVer
0 question about this device. Answer the ones you know or ask your own.
Ask a new question about this device
Download the instructions for your Video conferencing system in PDF format for free! Find your manual CAM520 Pro - AVer and take your electronic device back in hand. On this page are published all the documents necessary for the use of your device. CAM520 Pro by AVer.
USER MANUAL CAM520 Pro AVer
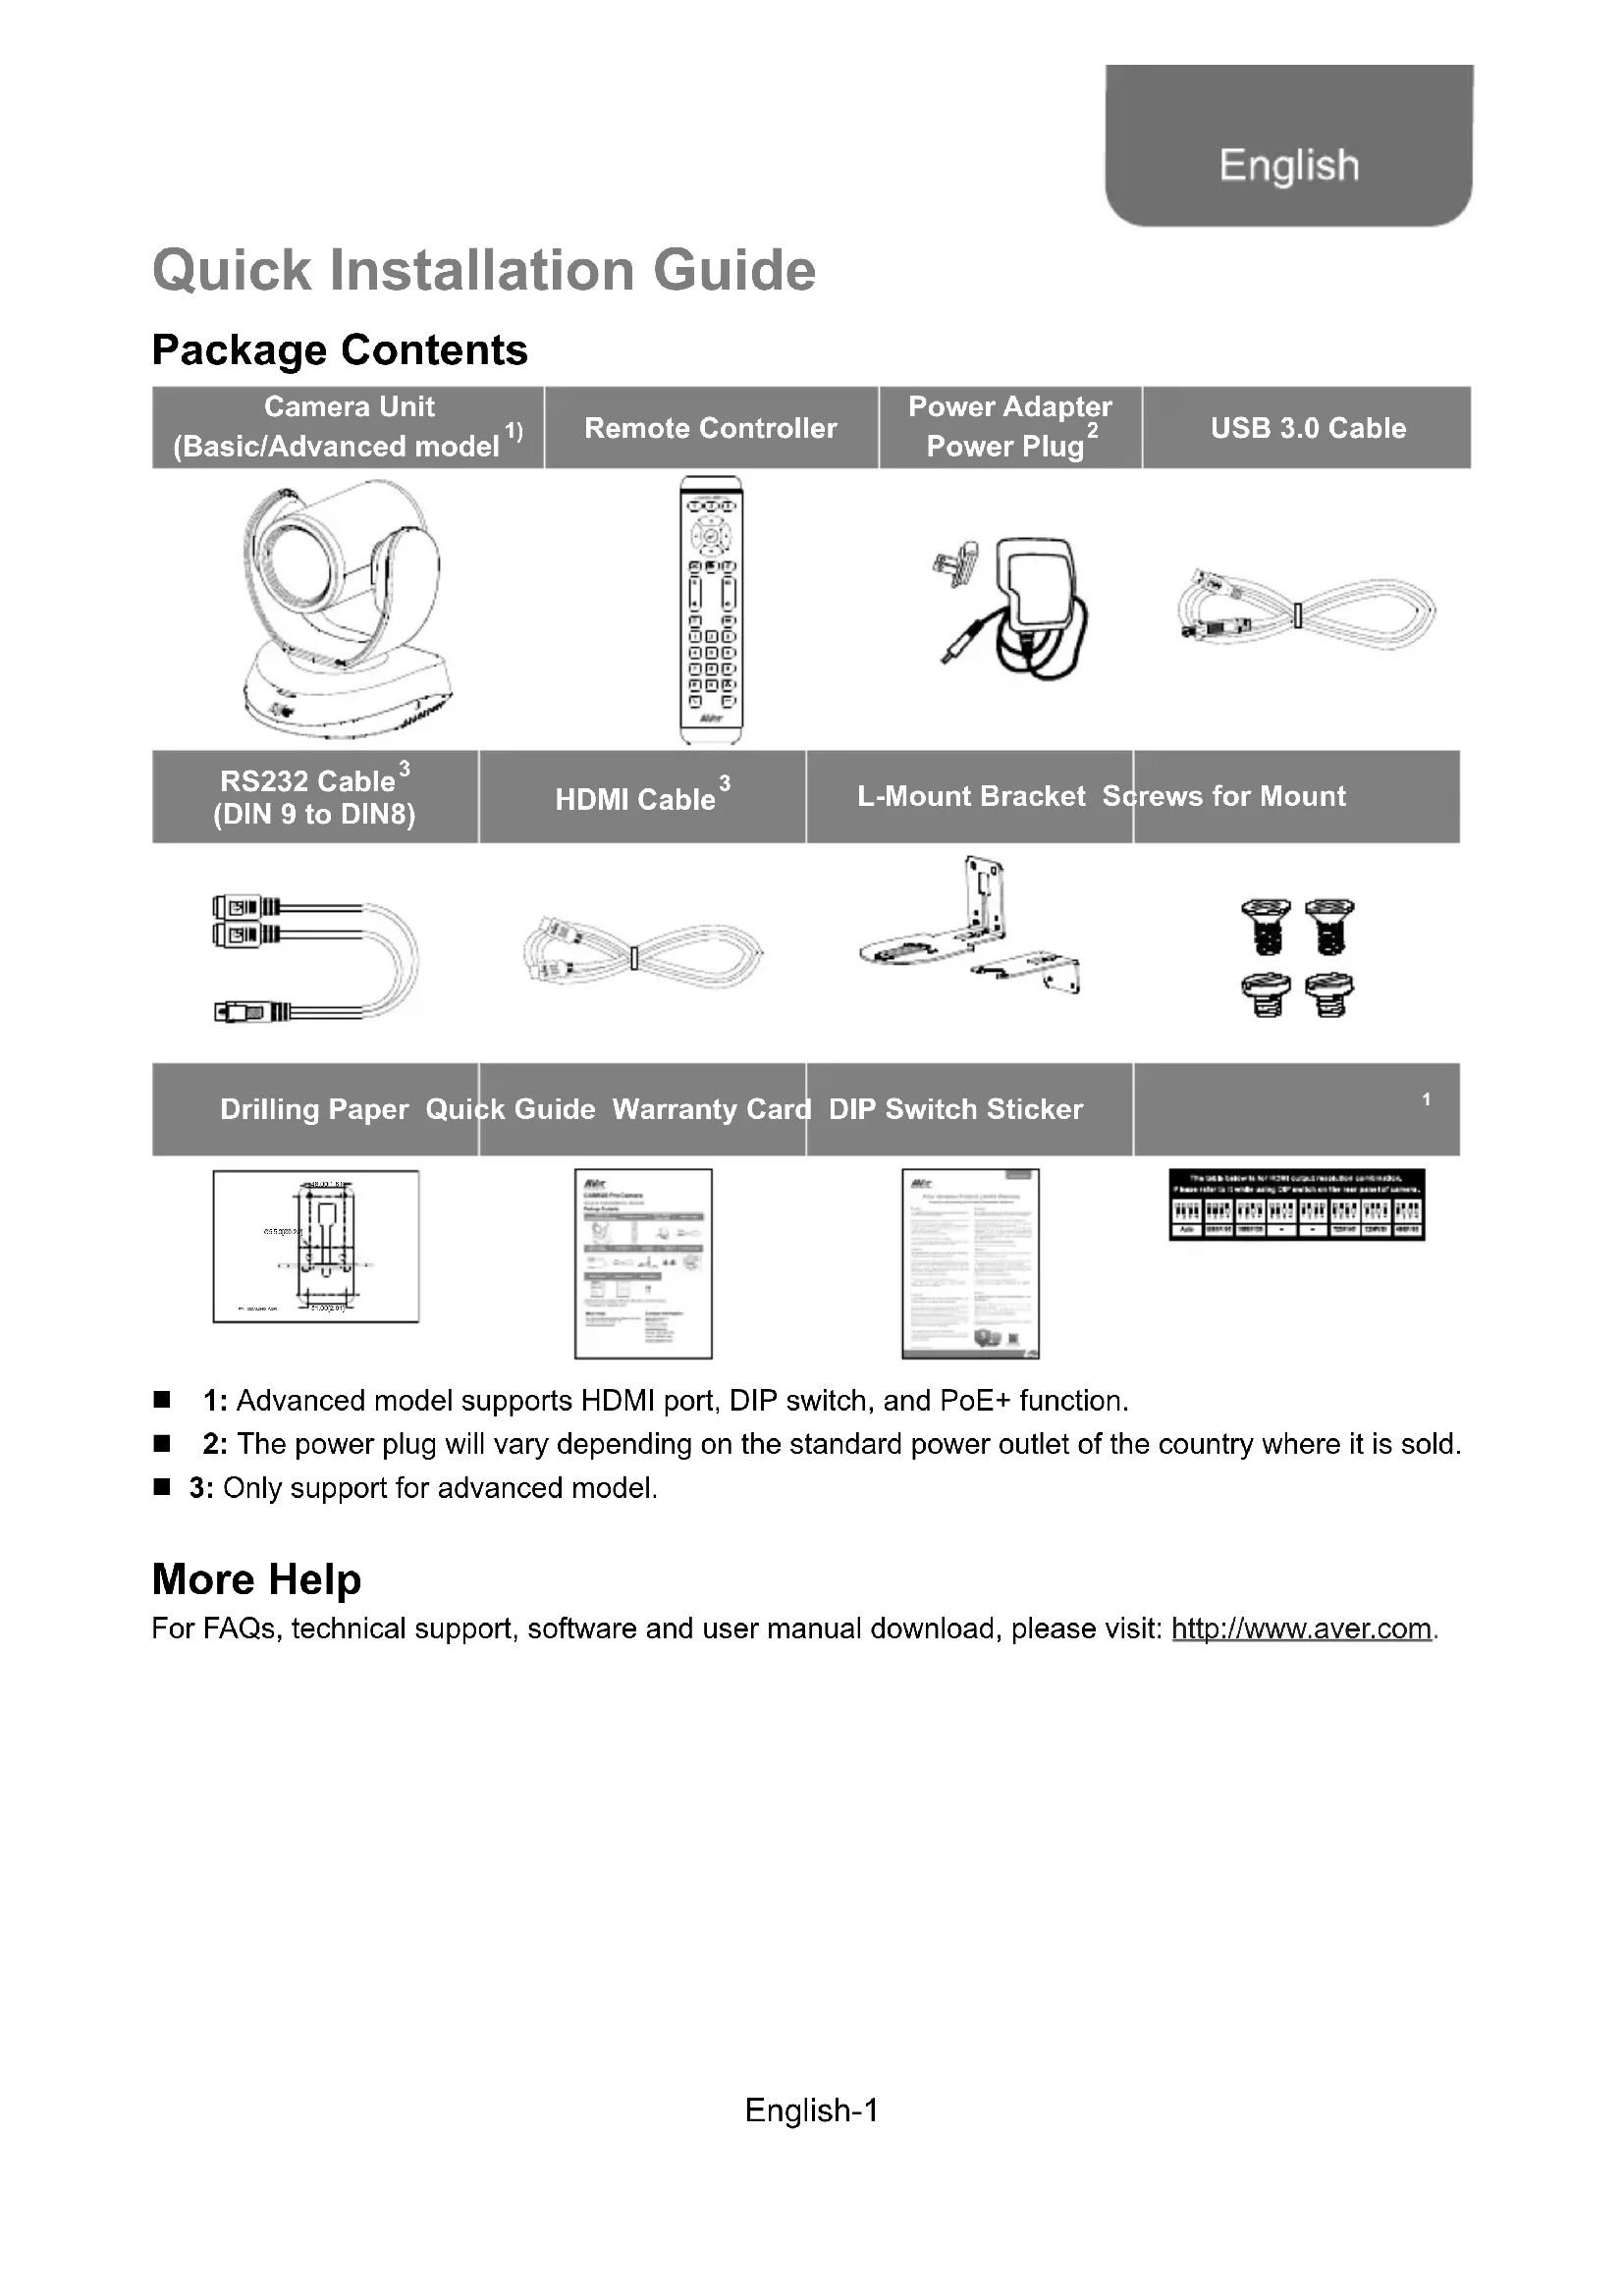
| Camera Unit (Basic/Advanced model 1) | Remote Controller | Power Adapter Power Plug 2 | USB 3.0 Cable |
| RS232 Cable 3 (DIN 9 to DIN8) | HDMI Cable 3 | L-Mount Bracket Screws for Mount | |
| Drilling Paper Quick Guide Warranty Card | DIP Switch Sticker | 1 | |
1: Advanced model supports HDMI port, DIP switch, and PoE+ function.
2: The power plug will vary depending on the standard power outlet of the country where it is sold.
3: Only support for advanced model.
More Help
For FAQs, technical support, software and user manual download, please visit: http://www.aver.com.
Overview
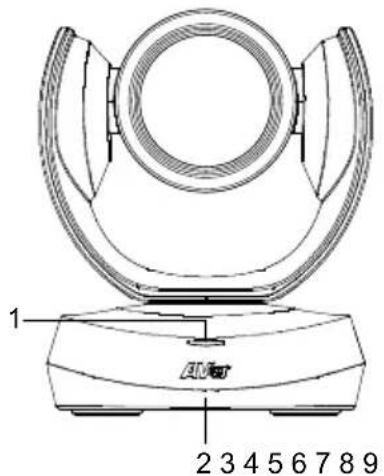
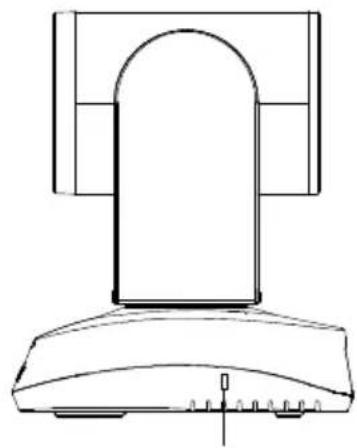
1 Status LED 4 HDMI port
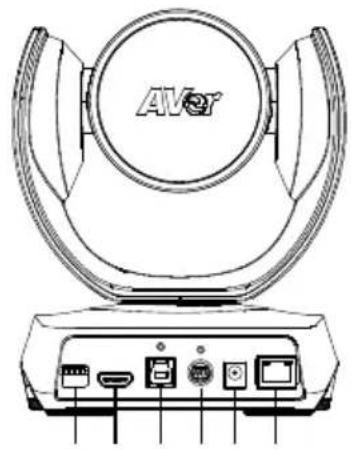
1 7 DC 12V power plug
2
2 IR sensor 5 USB3.1 Type B port 8 Ethernet port
3 DIP switch RS232 in/out port 9 Kensington Lock
1: Only support for advanced model. DIP Switch is for HDMI output resolution settings. Check user's manual (page 2) for more details.
2: Advanced model supports PoE+.
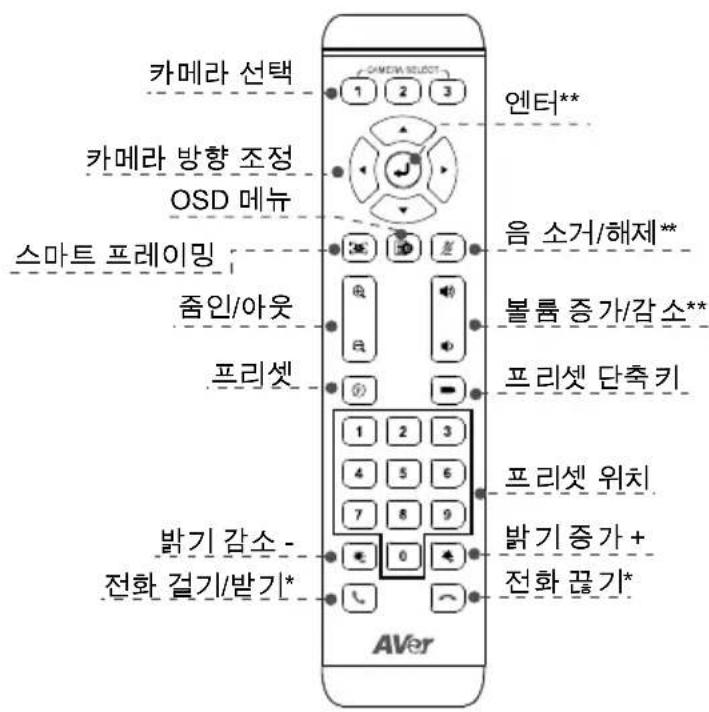
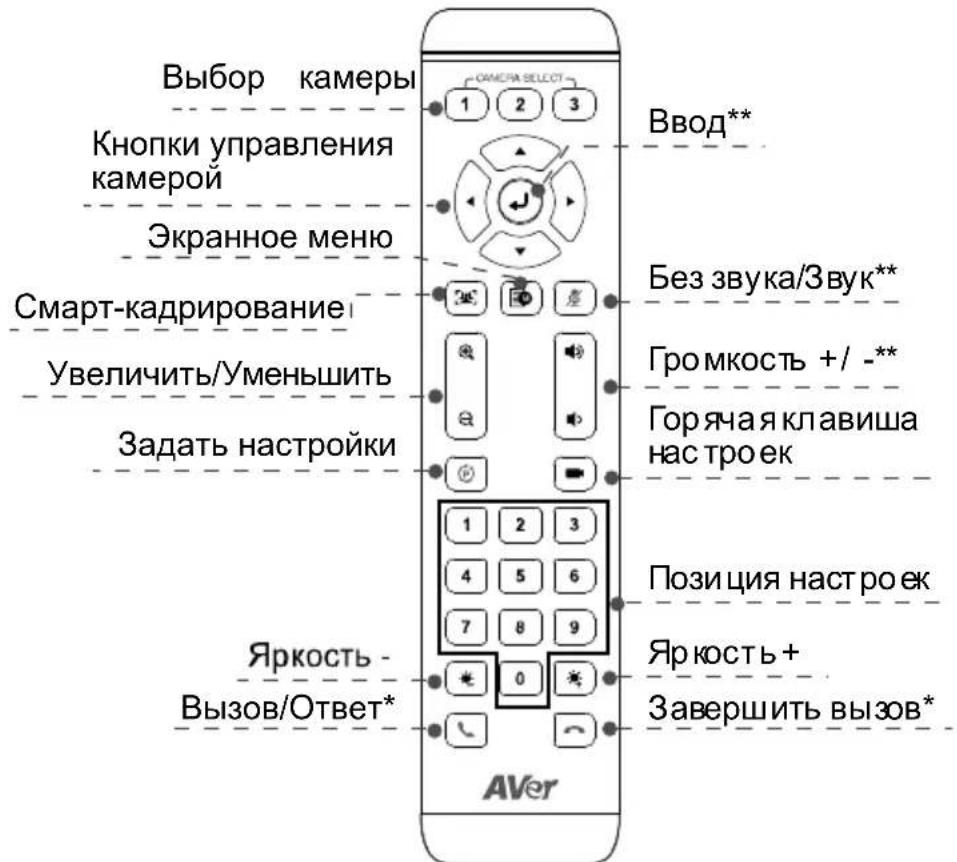
Remote Controller
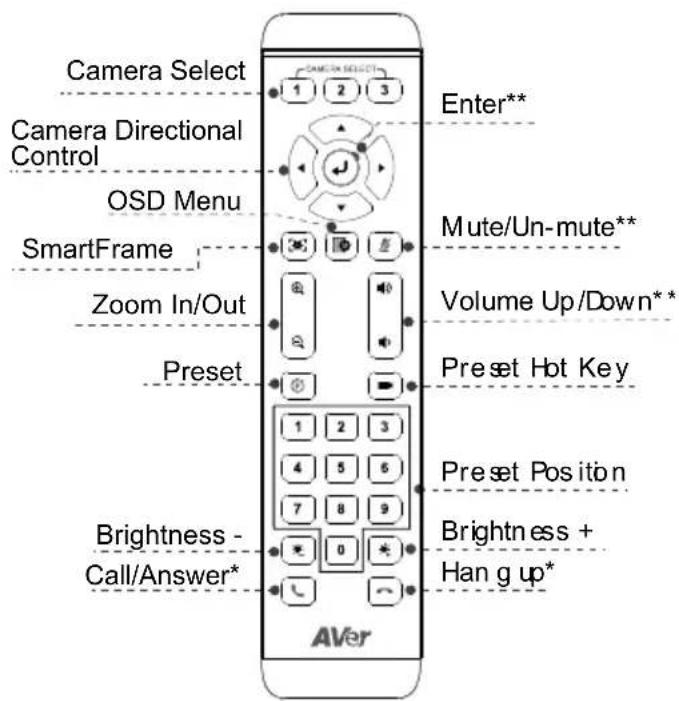
*Function requires AVer PTZApp
**Not support for CAM520 Pro
Press and hold the number button 1 can turn on or off the WDR function.
AAA Batteries (required)
Camera select: If you only have one camera and don't need to do any setting, the default is camera 1. If you press camera 2 or 3 on the remote control, you will find your remote can't control your camera. In this case, please press camera 1 on your remoter again.
OSD Menu: Only available for advanced model.
SmartFrame: Press for 1 second can switch the SmartFrame function between auto and manual. A message (as figure shown) will display on the screen to indicate in auto or manual mode.
Auto Framing
Manual Framing
[Note] While in conferencing meeting, participants must face the camera for face detection. Side face is not detectable. Refer to page9 or user's manual (p.14) for more details.
Installation
- Connect the camera to power outlet.
Power cord
2. Connect the necessary cables.
[Note]
USB and RS232 cable need to secure the cable with attached screw.
Make sure the cable is well connected to the connector on the camera before securing the cable.
3. Connect the camera to the computer.
[Note]
Use the USB 3.0 cable that is included in package.
- CAM520 Pro is USB 2.0 backward compatible. Maximum resolution/fps for USB2.0 and USB3.0 port as below shown.
| M-JPEG/ fps | NV12/ fps | YUV/fps | ||
| USB | 1080@ | 720p@ | 720p@ | USB cable |
| 2.0 | 60 fps | 10 fps | 10 fps | |
| 480p@ | 480p@ | |||
| 30 fps | 30 fps | |||
| USB | 1080p@ | 1080p@ | 1080p@ | |
| 3.0 | 60 fps | 30 fps | 30 fps |
4. Connect RJ45 cable for IP streaming and remote camera control or Power over Ethernet.
[Note]
Only advanced model supports PoE+ function.
To ensure stability of IP video streaming, please use CAT 5e FTP cable.
For PoE switch hub, suggest using Gigabit PoE switch to ensure stable power supply.
![AVer CAM520 Pro - [Note] - 1](/content/2026/03/503799/images/1051f34b5eb2df5d0c1fd563e8e6fc40925d8cb1b53e6cec0928eac5eeb75f74.jpg)
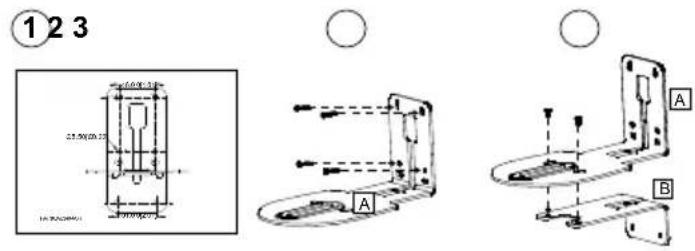
Wall Mount Installation
- Use the drilling paper included in the package to drill the holes in the wall where the user wants to mount the camera.
- Use the screw to secure the A L-mount bracket on the wall.
- Then, assemble the + L-mount bracket with screws (included in package).
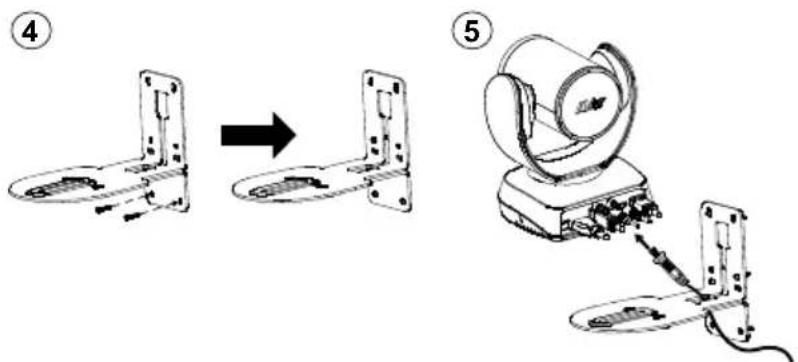
- After assembling the L-mount bracket, secure the lower part of L-mount bracket on the wall.
- Pass the cables through the hole on the L-mount bracket and connect the cables to corresponding connection ports.
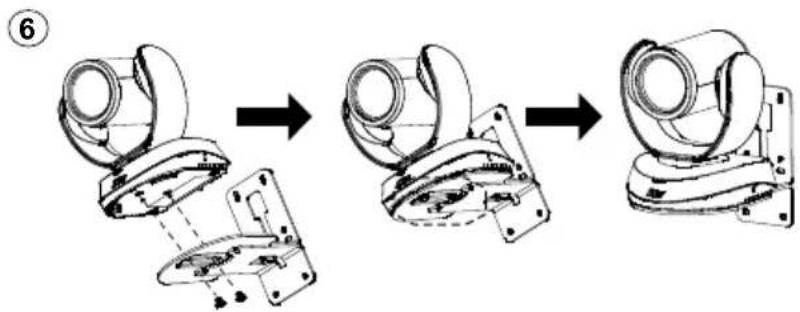
- Use the remaining screws (included in package) to secure the cameras on the L-mount bracket.
English-4
Making a Video Call
A computer is required to use this device.
Step 1: Open your video collaboration application such as Zoom, Microsoft Teams, Skype for Business, Skype, Google Hangouts, Intel® Unite™, RingCentral, BlueJeans, V-Cube, LiveOn, CyberLink U Meeting ®, TrueConf, Adobe Connect, Cisco WebEx ®, Fuze, GoToMeeting™, Microsoft Sync™, Vidyo, vMix, WebRTC, Wirecast, XSplit.
Step 2: Set the CAM520 Pro as your primary camera device in your application (Please consult your application setup guide for details).
Step 3: Ready to make a video call.
[Note] CAM520 Pro is a Plug-n-Play Conference Camera. The system requires no special drivers. For advanced setting and firmware update, please download AVer PTZApp.
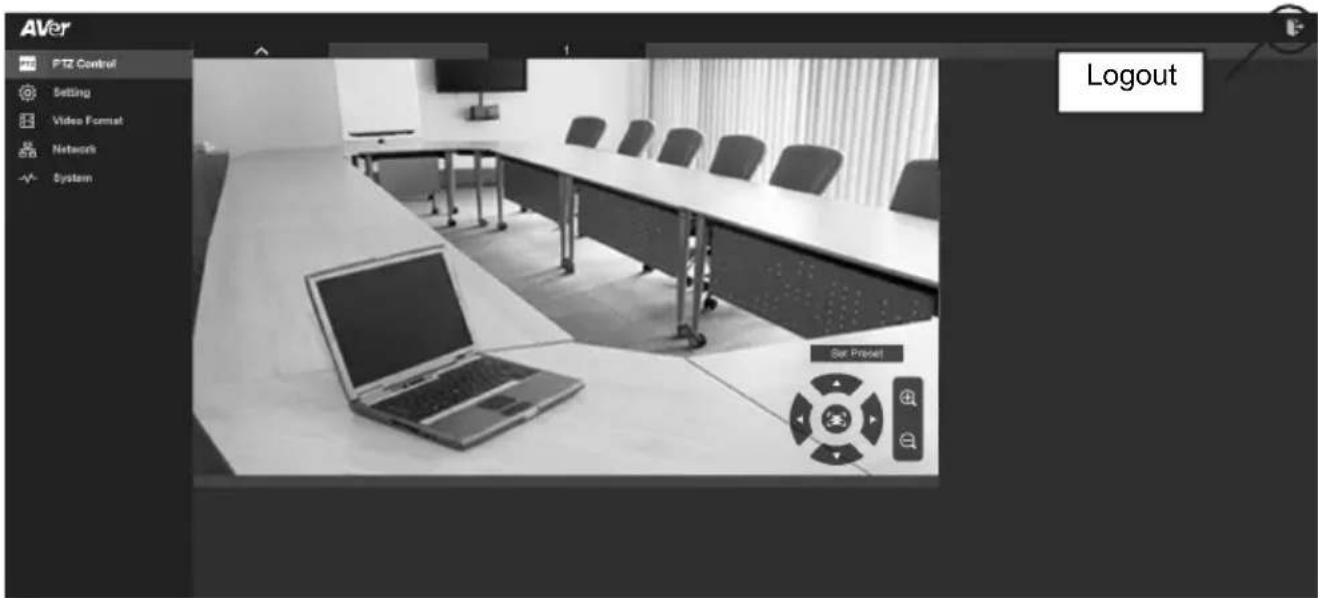
Setup the Camera through the Web Browser
CAM520 Pro has an Ethernet port for IP streaming and allows administrators to remotely control and set up the camera via an internet access. Moreover, CAM520 Pro also supports RTSP and RTMP functions. For more details, please refer to user's manual or contact our technical support.
- Make sure the CAM520 Pro has an internet access connection.
- Open the browser and enter the IP address of the camera.
[Note] The browser supports:
-
Chrome: version 76.x or above
-
Firefox: version 69 or above
IE: Doesn't support
The camera default IP address is 192.168.1.168. User can use "AVer IP Finder" app to find the camera (Please refer to "Using AVer IP Finder to Find the Camera" section).
- When login screen is shown, enter the password (default password is aver4321).
- The web main screen is displayed.
English-5
Using AVer IP Finder to find the Camera
To find the IP address of your cameras, you can use the AVer IP Finder application. Follow the below steps to find the IP address of camera.
- Download the IP Finder from http://www.aver.com/download-center.
- Run the IP Finder.
- Click "Search", and all available devices will be listed on the screen.
- Select a camera from the list. The corresponding fields of IP address will display.
- To change the IP address of camera, user can select "DHCP" or "Static IP".
The DHCP should get the IP address from local dynamic IP sever. The static IP, user can enter the specific IP address. Click "Apply" to apply the setting to the camera. The login password is required (default password is aver4321; same as web access password).
- Click "Search" button to re-scan the camera.
- Double-click on the IP address of camera from the list can connect to camera through the browser.
[Note] If IP Finder cannot find the camera, please check following:
Please make sure the Ethernet connection of camera is well connected.
The camera and PC (IP Finder) are in the same LAN segment.

Install AVer PTZApp
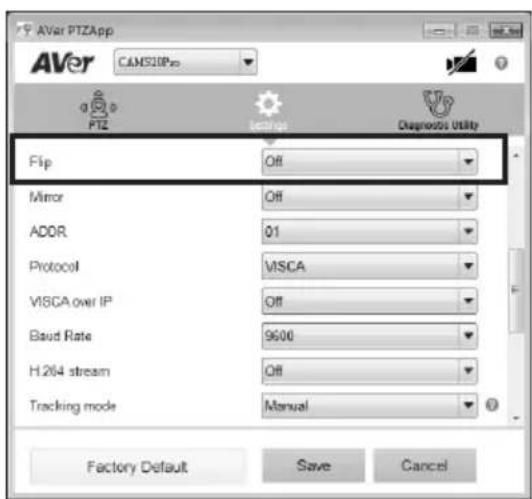
In AVer PTZApp, user can configure the parameters of the camera.
Please go to http://www.aver.com/download-center to download the AVer PTZApp. After downloading, double-click on the file and follow the on-screen instructions to complete the installation.
Use AVer PTZApp
- After installing the AVer PTZApp, double-click on the AVer PTZApp icon to run the application.
- During your video call, you can use the AVer PTZApp to pan, tilt and zoom the camera in/out and enable/disable the backlight feature, set up camera Home or Sleep mode preset points. For more details, please refer to the user manual.
- Tracking mode: It is SmartFrame functions which can auto detect faces of people to find the best view for all meeting participants. Users can change SmartFrame function status in AVer PTZApp. In AVer PTZApp, select "Settings" > "Tracking mode" > "Auto frame/Manual frame/off".
Also, pressing the remote for 1 second can switch the SmartFrame function between auto and manual; a message (as figure shown) will display on the screen to indicate in auto or manual status. [Note] While in conferencing meeting, participants must face the camera for face detection. Side face is not detectable.

Auto Framing
Manual Framing
- Flip: If the camera is installed in the upside down position, please enable the "Flip" function in the AVer PTZApp, and the screen will display normally.
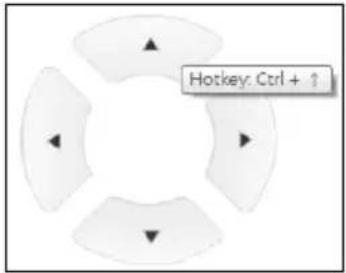
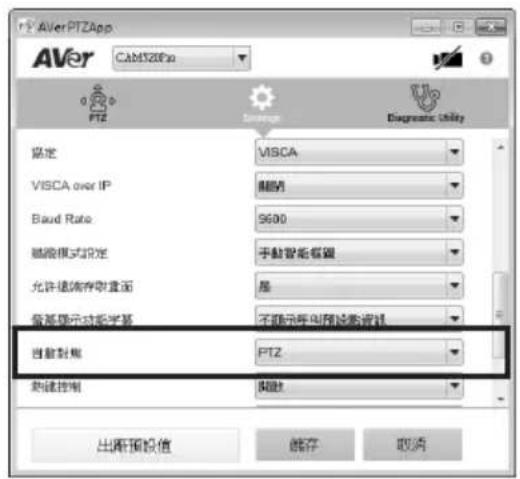
- Hotkey Control: Enable hotkey control to use keyboard control camera's movement and backlight. The default is off.

A hotkey tip will display when mouse is moved to the PTZ control button in PTZ mode.
If the hotkey function is enabled after installed PTZApp, PTZApp auto launch next time while PC reboot. Therefore, the customer can use all the hotkey commands since PTZApp is auto running in system tray.
Contact Information
Global
AVer Information Inc.
www.aver.com
8F, No.157, Da-An Rd., Tucheng Dist.,
New Taipei City
Taiwan
European Headquarters
AVer Information Europe B.V.
Westblaak 140, 3012KM, Rotterdam, Netherland
Tel: +31(0)10 7600 550
Technical support: EU.RMA@aver.com
Federal Communication Commission Interference Statement
NOTE: This equipment has been tested and found to comply with the limits for a Class A digital device, pursuant to part 15 of the FCC Rules. These limits are designed to pro-ride reasonable protection against harmful interference when the equipment is operate din a commercial environment. This equipment generates, uses, and can radiate radiofrequency energy and, if not installed and used in accordance with the instruction manual, may cause harmful interference to radio communications. Operation of this equipment in a residential area is likely to cause harmful interference in which case the user will be required to correct the interference at his own expense.
FCC Caution: Any changes or modifications not expressly approved by the party responsible for compliance could void the user's authority to operate this equipment.
This device complies with part 15 of the FCC Rules.
Operation is subject to the following two conditions:
(1) This device may not cause harmful interference, and
(2) this device must accept any interference received, including interference that may cause undesired operation.
Warning:
This is a class A product. In a domestic environment this product may cause radio interference in which case the user may be required to take adequate measures.
CAUTION
-
Risk of explosion if battery is replaced by an incorrect type.
-
Dispose of used batteries in a safe and proper manner.
©2019 AVer Information Inc. All rights reserved.
簡易安装手冊
包装内容物
Auto Framing
Manual Framing
1: 1
2:goqHgMoE+toJi
L
- IP SriTrlMng MfWeyKKaMeLa KHeA ToN PoE (Power over Ethernet) Rj45 KeiBnIe to EnGelHniD.
[查卫]
- http://www.aver.com/download-center/where IP Finder将二元码互连网
- IP Finder 肯定
- "Search"(eng)le kIeKJH eUg hJH JHJH HJH HJH HJH HJH HJH HJH HJH HJH HJH HJH HJH HJH HJH HJH HJH HJH HJH HJH HJH HJH HJH HJH HJH HJH HJH HJH HJH HJH HJH HJH HJH HJH HJH H
- 5
- ヤーマローの IP 主要を専端な方式に“DHCP”は哪种“Static IP”を選択'?
©2019 AVer Information Inc. All rights reserved.
i AVer Information Inc. of AVer Information Inc. of AVer Information Inc. of AVer Information Inc. of AVer Information Inc. of AVer Information Inc. of AVer Information Inc. of AVer Information Inc. of AVer Information Inc. of AVer Information Inc. of AVer Information Inc. of AVer Information Inc. of AVer Information Inc. of AVer Information Inc. of AVer Information Inc. of AVer Information Inc. of AVer Information Inc. of AVer InformationInc. of AVer Information Inc. of AVer Information Inc. of AVer Information Inc. of AVer Information Inc. of AVer Information Inc. of AVer Information Inc. of AVer Information Inc. of AVer Information Inc. of AVer Information Inc. of AVer Information Inc. of AVer Information Inc. of AVer Information Inc. of AVer Information Inc. of AVer Information Inc. of AVer Information Inc. of AVer Information Inc. of A Ver Information Inc. of A Ver Information Inc. of A Ver Information Inc. of A Ver Information Inc. of A Ver Information Inc. of A Ver Information Inc. of A Ver Information Inc. of A Ver Information Inc. of A Ver Information Inc. of A Ver Information Inc. of A Ver Information Inc. of A Ver Information Inc. of A Ver Information Inc. of A Ver Information Inc. of A Ver Information Inc. of A Ver Information Inc. of A Ver Information Inc.
Installation du support mural
8F, No.157, Da-An Rd., Tucheng Dist.,
New Taipei City
Taiwan
Siège européen
AVer Information Europe B.V.
Westblaak 140, 3012KM, Rotterdam, Pays-Bas
Tel: +31(0)10 7600 550
Assistance technique: EU.RMA@aver.com
Guía de instalación
8F, No.157, Da-An Rd., Tucheng Dist.,
New Taipei City
Taiwan
Sede europea
AVer Information Europe B.V.
Westblaak 140, 3012KM, Rotterdam,
Netherland
Tel.: +31(0)10 7600 550
Soporte专业技术: EU.RMA@aver.com
KpaTKoe pyKOBoIDCTBO NO yCTaHOBKe
Copejxmoe ynaKOBKn
1KK-nHnKatop cTaTyca
4 NopT HDMI
7 Pa3bem nHTaHn 12 B noct. toka
2 NK-daTuk
5 NopT USB3.1 Type B
8 Nopt Ethernet
3 DIP-nepekIIOuataTeNb
6 IopT BBOda/BbIBOda RS232
9 3amok KeHcHrToHa
1:ПодержИВаETСТОЛБКВ расирЕнHоМоДeП. DIP-пepeклЮчATEЛь пeднa3нaчЕн ДЯн Habстpoй ВыхODHorO pa3peшENH HDMI. ПрOBepbTe pyKOBODCTBO noMb3OBaTeJЯ ДЯ 6Опee ПодрбН ИФOPMaUIN.
2: PacunpeHHbIe MoDeJI NIOJIepKINBaIOT cyHKnIO PoE+.
KoHTaKTHa INΦOpMaζη
Becb_Mnp
AVer Information Inc.
www.aver.com
8F, No.157, Da-An Rd., Tucheng Dist.,
New Taipei City
Taiwan
Ebponecka wTa6-KBaptnpa
AVer Information Europe B.V.
Westblaak 140, 3012KM, Rotterdam, Netherland
Tel: +31(0)10 7600 550
Texnuecka noDpekka EU.RMA@aver.com
©2019 AVer Information Inc. Bce npaba 3aunneHbl.
NynbT Ny
War 1: OTPonTe npiloxeHne nBnDeo3BOHkoB, Hapmep Zoom, Microsoft Teams, Skype for Business, Skype, Google Hangouts, Intel® Unite™, RingCentral, BlueJeans, V-Cube, LiveOn, CyberLink U Meeting®, TrueConf, Adobe Connect, Cisco WebEx®, Fuze, GoToMeeting™, Microsoft Sync™, Vidyo, vMix, WebRTC, Wirecast, XSplit.
War 2: B CBOEM npINOxHn 3aJaTe KaMepy CAM520 Pro B KaueCTBe OCHOBHO (corlacho onicaHHIO B pyKOBoIDCTBE No HacTpoIe npINOxHn).
War 3:Bce roTOBO dIy BbINONHeHnBnDeOBbl3OBA.
- More Help
- Overview
- Remote Controller
- Installation
- Connect the necessary cables.
- [Note]
- Connect the camera to the computer.
- Connect RJ45 cable for IP streaming and remote camera control or Power over Ethernet.
- Wall Mount Installation
- Making a Video Call
- Setup the Camera through the Web Browser
- Using AVer IP Finder to find the Camera
- Install AVer PTZApp
- Use AVer PTZApp
- Contact Information
- Global
- European Headquarters
- Federal Communication Commission Interference Statement
- Warning:
- CAUTION
- 簡易安装手冊
- 包装内容物
- L
- [查卫]
- Installation du support mural
- Siège européen
- Guía de instalación
- Sede europea
- KpaTKoe pyKOBoIDCTBO NO yCTaHOBKe
- Copejxmoe ynaKOBKn
- KoHTaKTHa INΦOpMaζη
- NynbT Ny
Brand : AVer
Model : CAM520 Pro
Category : Video conferencing system