PMFW 310 A1 - Power Tools PARKSIDE - Free user manual and instructions
Find the device manual for free PMFW 310 A1 PARKSIDE in PDF.
| Brand | Parkside |
| Model | PMFW 310 A1 |
| Product type | Oscillating multi-tool |
| Intended use | Sawing, cutting, sanding wood, plastics, non-ferrous metals, tiles |
| No-load speed | 15,000 – 21,000 oscillations/min |
| Protection class | II (double insulation) |
| Power supply | Mains (cable with plug) |
| Sound pressure level (LpA) | 84.97 dB(A) (K=3 dB) |
| Sound power level (LWA) | 95.97 dB(A) (K=3 dB) |
| Vibration (sanding) | 8.38 m/s² (K=1.5 m/s²) |
| Variable speed control | Yes, selection wheel |
| Dust extraction system | Yes, adaptable with included connector |
| Included accessories | Plunge saw blades 20/32 mm, segment blade, spatula, sanding pad, 18 abrasive sheets, hex key, case |
| Tool change | Via clamping screw and hex key |
| Maintenance and cleaning | Clean regularly with dry cloth, vacuum cleaner, brush. No solvents. |
| Warranty | 3 years (subject to conditions) |
| After-sales service France | Tel. 0800 919270, email: kompernass@lidl.fr |
| After-sales service Belgium | Tel. 070 270 171 (€0.15/min), email: kompernass@lidl.be |
| Disposal | Recycling according to WEEE directive, do not dispose of with household waste |
Frequently Asked Questions - PMFW 310 A1 PARKSIDE
User questions about PMFW 310 A1 PARKSIDE
0 question about this device. Answer the ones you know or ask your own.
Ask a new question about this device
Download the instructions for your Power Tools in PDF format for free! Find your manual PMFW 310 A1 - PARKSIDE and take your electronic device back in hand. On this page are published all the documents necessary for the use of your device. PMFW 310 A1 by PARKSIDE.
USER MANUAL PMFW 310 A1 PARKSIDE
MULTI-PURPOSE TOOL PMFW 310 A1
GB IE
MULTI-PURPOSETOOL
Operation and Safety Notes
Translation of original operation manual
SE
MULTIFUNKTIONSVERKTYG
Before reading, unfold both pages containing illustrations and familiarise yourself with all functions of the device.
F
GB/IE Operation and Safety Notes Page 5
Features and equipment.. 6
Included items.. 6
Technical data.. 6
General power tool safety warnings
1.Work area safety. 7
-
Electrical safety Page 7
-
Personal safety.. 7
-
Power tool use and care.. 8
-
Service Page 8
Safety advice relating specifically to this multifunction tool Page 8
Advice on use 9
Assembly
Vacuum extraction of dust/debris. 9
Connecting a vacuum dust extraction device . Page 10
Selecting the right tool.. Page 10
Changing the attached tool.. Page 11
Place a sanding sheet on the backing plate.
Bringing into use
Switching On/Off
Selecting the oscillation speed.. 11
Maintenance and cleaning.. Page 11
Service
Warranty
Disposal
Translation of the original declaration of conformity / Manufacturer
Multi-Purpose Tool PMFW 310 A1
Introduction
We congratulate you on the purchase of your new device. You have chosen a high quality product. The instructions for use are part of the product. They contain important information concerning safety, use and disposal. Before using the product, please familiarise yourself with all of the safety information and instructions for use. Only use the unit as described and for the specified applications. If you pass the product on to anyone else, please ensure that you also pass on all the documentation with it.
- Proper use
The device is intended for sawing, cutting and sand- ing. The preferred materials on which the device can be used are: wood, plastic, drywalling, non-ferrous metals, fixings (e.g. nails, screws) and wall tiles. It is particularly suitable for working close to edges and precise work. Any other use or modification to the device shall be considered as improper use and could give rise to considerable dangers. We will not accept liability for loss or damage arising from improper use. Not suitable for commercial use.
- Features and equipment
1 ON/OFF switch
2 Oscillation speed setting wheel
3 Ventilation slots
4 Clamping plate
5 Plunge saw blade (20 mm) Z20 A2
6 Plunge saw blade (32 mm) Z32 A2
7 Backing plate
Segment saw blade Z85 A2
9 Scraping knife Z52 A2
10 Clamping screw
11 Allen key
12 Sanding sheet
13 Vacuum dust extraction assembly (3-piece)
13a Housing attachment
13b Vacuum dust extraction duct
13c Ring connector
- Included items
1 Multi-Purpose Tool PMFW 310 A1
1 Plunge saw blade (20 mm) Z20 A2
1 Plunge saw blade (32 mm) Z32 A2
1 Clamping screw and clamping plate (prefitted)
1 Backing plate
1 Segment saw blade Z85 A2
1 Scraping knife Z52 A2
18 Sanding sheets
1 Dust extraction system
1 Allen key
1 Carrying case
1 Operating instructions
- Technical data
Rated power consumption: 310 W
Rated voltage: 230V 50Hz
No-load rotational speed: r_0 15000 - 21000 min ^-1
Protection class: II/

Noise and vibration data:
Measured values for noise are determined in accordance with EN 60745. The A-weighted noise level of the electrical power tool are typically:
Sound pressure level: 84.97 dB(A)
Sound power level: 95.97 dB(A)
Uncertainty K: 3 dB
Wear ear protection!
The total vibration (vector sum of three directions) is calculated in accordance with EN 60745:
Sanding:
Vibration emission value q_h = 8.38 m/s^2
Uncertainty K = 1.5m / s^2
WARNING! The vibration level specified in these instructions was measured in accordance with an EN 60745 standardised measurement process and can be used to compare equipment. The vibra
tion emission value specified can also serve as a preliminary assessment of the exposure.
The vibration level will change according to the application of the electrical tool an in some cases may exceed the value specified in these instructions. Regularly using the electric tool in such a way may make it easy to underestimate the vibration.
Note: If you wish to make an accurate assessment of the vibration loads experienced during a particular period of working, you should also take into account the intervening periods of time when the device is switched off or is running but is not actually in use. This can result in a much lower vibration load over the whole of the period of working.
- General power tool safety warnings

WARNING! Read all safety warnings and all instructions.
Failure to follow the warnings and in
structions may result in electric shock, fire and / or serious injury.
Save all warnings and instructions for future reference.
The term "power tool" in the warnings refers to your mains-operated (corded) power tool or battery-operated (cordless) power tool.
1. Work area safety
a) Keep work area clean and well lit. Cluttered or dark areas invite accidents.
b) D not operate power tools in explosive atmospheres, such as in the presence of flammable liquids, gases or dust. Power tools create sparks which may ignite the dust or fumes.
c) Keep children and bystanders away while operating a power tool. Distractions can cause you to lose control.
2. Electrical safety
a) Power tool plugs must match the outlet. Never modify the plug in any way. Do not use any adapter plugs with earthed (grounded) power tools. Unmodified plugs and matching outlets will reduce risk of electric shock.
b) Avoid body contact with earthed or grounded surfaces, such as pipes, radiators, ranges and refrigerators.
There is an increased risk of electric shock if your body is earthed or grounded.
c) Do not expose power tools to rain or wet conditions. Water entering a power tool will increase the risk of electric shock.
d) Do not abuse the cord. Never use the cord for carrying, pulling or unplugging the power tool. Keep cord away from heat, oil, sharp edges or moving parts. Damaged or entangled cords increase the risk of electric shock.
e) When operating a power tool outdoors, use an extension cord suitable for outdoor use. Use of a cord suitable for outdoor use reduces the risk of electric shock.
f) If operating a power tool in a damp location is unavoidable, use a residual current device (RCD) protected supply. Use of an RCD reduces the risk of electric shock.
3. Personal safety
a) Stay alert, watch what you are doing and use common sense when operating a power tool. Do not use a power tool while you are tired or under the influence of drugs, alcohol or medication. A moment of inattention while operating power tools may result in serious personal injury.
b) Use personal protective equipment. Always wear eye protection. Protective equipment such as dust mask, non-skid safety shoes, hard hat, or hearing protection used for appropriate conditions will reduce personal injuries.
c) Prevent unintentional starting. Ensure the switch is in the off-position before connecting to power source and / or battery pack, picking up or carrying the tool. Carrying power tools with your finger on the switch or energising power tools that have the switch on invites accidents.
d) Remove any adjusting key or wrench before turning the power tool on. A wrench or a key left attached to a rotating part of the power tool may result in personal injury.
e) Do not overreach. Keep proper footing and balance at all times. This enables better control of the power tool in unexpected situations.
f) Dress properly. Do not wear loose clothing or jewellery. Keep your hair, clothing and gloves away from moving parts. Loose clothes, jewellery or long hair can be caught in moving parts.
g) If devices are provided for the connection of dust extraction and collection facilities, ensure these are connected and properly used. Use of dust collection can reduce dust-related hazards.
4. Power tool use and care
a) Do not force the power tool. Use the correct power tool for your application. The correct power tool will do the job better and safer at the rate for which it was designed.
b) Do not use the power tool if the switch does not turn it on and off. Any power tool that cannot be controlled with the switch is dangerous and must be repaired.
c) Disconnect the plug from the power source and / or the battery pack from the power tool before making any adjustments, changing accessories, or storing power tools. Such preventive safety measures reduce the risk of starting the power tool accidentally.
d) Store idle power tools out of the reach of children and do not allow persons unfamiliar with the power tool or these instructions to operate the power tool.
Power tools are dangerous in the hands of untrained users.
e) Maintain power tools. Check for misalignment or binding of moving parts, breakage of parts and any other condition that may affect the power tool's operation. If damaged, have the power tool repaired before use. Many accidents are caused by poorly maintained power tools.
f) Keep cutting tools sharp and clean. Properly maintained cutting tools with sharp cutting edges are less likely to bind and are easier to control.
g) Use the power tool, accessories and tool bits etc. in accordance with these instructions, taking into account the working conditions and the work to be performed. Use of the power tool for operations different from those intended could result in a hazardous situation.
5. Service
a) Have your power tool serviced by a qualified repair person using only identical replacement parts. This will ensure that the safety of the power tool is maintained.
- Safety advice relating specifically to this multifunction tool
When working, hold the electrical power tool firmly with both hands and keep a proper footing and balance. It is safer to guide the electrical power tool using both hands.
Secure the workpiece. A workpiece held in a clamp or vice is kept more securely in place than one held by your hand.
- Keep your working area clean. Mixtures of materials can be particularly dangerous. Light metal alloy dust may burn or explode.
- Do not operate the device if the mains lead or mains plug is damaged.
Do not touch the mains lead if it becomes damaged or cut through while
you are using the device. Pull the plug out of the mains socket immediately and have the device repaired by a suitably qualified person or at your service centre. Damaged mains leads increase the risk of electric shock.
Wear protective gloves when replacing a tool in the device. Tools heat up with prolonged use.
Use the electrical power tool only for dry abrading/sawing/cutting.
- Do not operate the device if it is damp and do not use it in a damp environment. Water entering an electrical device increases the risk of electric shock.
- Keep your hands away from the area of the saw blade. Do not grip the underside of the workpiece. Contact with the saw blade may result in injury.
Use a suitable detector to locate concealed services supply cables / pipes or approach your local public utilities services providers. Contact with electricity cables can lead to fire or electric shock. Damaging a gas pipe can lead to an explosion. Penetration of a water pipe can lead to property damage or to electric shock.
If you use the device outdoors, always connect it through a residual current device (RCD) with a maximum trip current of 30mA . If using an extension lead, always use one that is approved for outdoor use.
AWARNING! Any harmful/noxious dusts generated from sanding represent a risk to the health of the person operating the device and to anyone near the work area. Wear safety glasses and a dust protection mask!
Ensure that there is adequate ventilation when working on plastic, paint, varnish etc.
- Do not soak the materials or the surface you are about to work on with liquids containing solvents.
- Advice on use
Principle of operation:
The oscillating drive causes the attached tool to vibrate backwards and forwards up to 21000 times per minute. This means the tool can produce precise work in the tightest of spaces.
Sawing /cutting:
Use only undamaged, defect-free saw blades. Distorted, blunt or otherwise damaged saw blades could break.
When sawing lightweight building materials, observe the statutory requirements and the manufacturer's recommendations.
Use the device in plunge sawing mode on soft materials such as wood, gypsum plaster board etc. only!
Sanding:
Ensure that you use even contact pressure. This will increase sanding sheet life.
Assembly
Vacuum extraction of dust/debris
Do not use the tool on materials containing asbestos. Asbestos is a known carcinogen.
WARNING! DANGER OF FIRE! There is the danger of fire when working with electrical devices that have a dust box or can be connected to a vacuum cleaner. Under certain conditions the wood dust in the dust extraction bag (or in the vacuum's dust bag) may ignite, e.g. as a result of flying sparks generated when abrading metals or metal objects left in wood. This can happen particularly if the wood dust is mixed with paint residue or other chemicals and the abraded particles are hot from prolonged abrasion. Therefore you must empty the device's dust collection box and the vacuum cleaner's dust bag before taking a break or stopping work and always avoid overheating of the abraded particles and the device.
Wear a dust mask!
Always use vacuum dust extraction.
Ensure that your working area is well ventilated.
Observe the regulations applicable in your country for the materials you are working on.
- Connecting a vacuum dust extraction device
Slide together the extraction duct 13b and ring connection 13c. Attach the dust extraction 13 to the unit. Secure by hooking the case mounting 13a into the vent slots 3 (see Fig. H).
Push the hose of an approved dust extraction equipment (e.g. a workshop vacuum cleaner) on to the adapter for external exhaust suction.
- Selecting the right tool
Note: The attachment system with easy tool exchange is suitable for popular accessories.
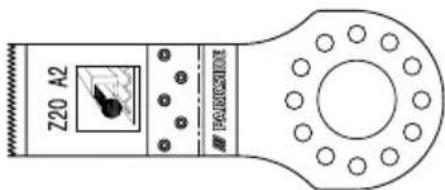
Plunge saw blade (20 mm) Z20 A2 5
Materials:
Sheet and tube up to approx. 3mm made of aluminium, copper
Use:
Cutting and trimming to length of tube and sheet (see Fig. J)
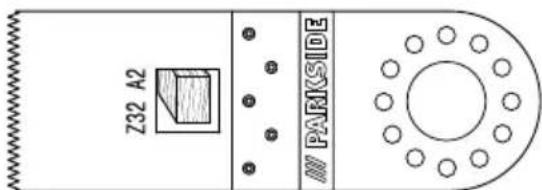
Plunge saw blade (32 mm) Z32 A2 6
Materials:
Wood, plastic, plasterboard and other soft materials
Use:
Cutting and plunge sawing
- Close to the edge sawing, even in difficult to access areas
Example: Sawing of recesses in lightweight walls. (see Figs. B and D)

Backing plate 7
Materials:
Wood (sanding sheets included), paint*, stone* depending on the sanding sheet
Use:
- Sanding at edges and in difficult to access areas (see Figs. G and H)

Segment saw blade Z85 A2 8
Material:
Wood, metal
Use:
Cutting and plunge sawing
- Close to the edge sawing, even in difficult to access areas
Example: Laying parquet and other floor coverings, including plunge sawing. (see Figs. C, E and F)
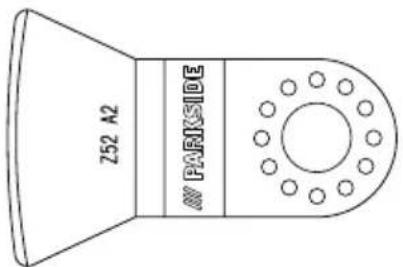
Scraping knife Z52 A2 9
Materials: Mortar/concrete residues, tile/carpet adhesives, paint/silicone residues
Use:
- Removal of material residues, for example tile adhesive when replacing damaged tiles (see Fig. 1)
- Changing the attached tool
NOTE: If you would like to use the vacuum dust extraction device, you must connect it before attaching or changing the attachment (see section on "Connecting a vacuum dust extraction device").
WARNING: DANGER OF INJURY! Pull the mains plug out of the mains socket before you carry out any task on the electrical power tool.
Remove any tool already inserted. To do this, release the clamping screw using the Allen key and take off the tool.
Place the tool (e.g. plunge saw blade 6) on the tool mount.
NOTE: You can place the tool in any of the possible positions on the tool mount.
Fasten the tool in place with the clamping screw and clamping plate. Tighten the clamping screw using the Allen key.
Check that the tool is firmly seated. Incorrectly or insecurely attached tools could become lose during use and injure you.
- Place a sanding sheet on the backing plate
Offer up the sanding sheet 12 to fit flushly on one side of the backing plate, then apply the sanding sheet to the backing plate.
Bringing into use
- Switching On/Off
Slide the ON/OFF switch 1 forwards to switch on the device.
Slide the ON/OFF switch 1 backwards to switch off the device.
- Selecting the oscillation speed
Preselect the required oscillation speed using the oscillation speed setting wheel 2.
NOTE: The required oscillation speed depends on the material and the working conditions and can be determined by means of a practical test.
- Maintenance and cleaning
WARNING! DANGER OF INJURY! Pull the mains plug out of the mains socket before you carry out any task on the electrical power tool.
Do not use sharp objects for cleaning the device. Do not allow any liquids to enter the device. Otherwise the device could be damaged.
Clean the device frequently; for best results, do this immediately after you have finished using it.
Use a dry cloth to clean the housing - under no circumstances use petrol, solvents or cleaning agents that attack plastic.
A vacuum cleaner is required to thoroughly clean the device.
Ventilation openings must always be kept free.
Remove any adhering dust with a narrow paint brush.
Service
AWARNING! Have your device repaired at the service centre or by qualified specialist personnel using original manufacturer parts only. This will ensure that your device remains safe to use.
WARNING! If the plug or lead needs to be replaced, always have the replacement carried out by the manufacturer or its service centre. This will ensure that your device remains safe to use.
Note: Spare parts not listed (e.g. carbon brushes, switches) can be ordered through our call centre.
Warranty
The warranty for this appliance is for 3 years from the date of purchase. The appliance has been manufactured with care and meticulously examined before delivery. Please retain your receipt as proof of purchase. In the event of a warranty claim, please make contact by telephone with our Service Department. Only in this way can a post-free despatch for your goods be assured.
The warranty covers only claims for material and manufacturing defects, but not for transport damage, for wearing parts or for damage to fragile components, e.g. buttons or batteries. This product is for private use only and is not intended for commercial use.
The warranty is void in the case of abusive and improper handling, use of force and internal tampering not carried out by our authorized service branch. Your statutory rights are not restricted in any way by this warranty.
The warranty period will not be extended by repairs made unter warranty. This applies also to replaced and repaired parts. Any damage and defects extant on purchase must be reported immediately after unpacking the appliance, at the latest, two days after
the purchase date. Repairs made after the expiration of the warranty period are subject to payment.
GB Service Great Britain Tel.: 0871 5000 720 (0.10 GBP/Min.)
e-mail: kompernass@lidl.co.uk
IAN 102784
IE
Service Ireland
Tel: 1890 930 034
(0.08 EUR/Min. (peak)
0.06 EUR/Min. (off peak))
e-mail: kompernass@lidl.ie
IAN 102784
- Disposal

The packaging is wholly composed of environmentally-friendly materials that can be disposed of at a local recycling centre.

Do not dispose of electric tools in the household waste!
In accordance with European Directive 2012 / 19 / EU (covering waste electrical and electronic equipment) and its transposition into national legislation, worn out electrical power tools must be collected separately and taken for environmentally compatible recycling.
Contact your local refuse disposal authority for more details of how to dispose of your worn out electrical devices.
Translation of the original declaration of conformity / Manufacturer (€
We, KOMPERNASS HANDELS GMBH, the person responsible for documents: Mr Semi Uguzlu, BURG-STRASSE 21, 44867 BOCHUM, GERMANY, hereby declare that this product complies with the following standards, normative documents and EU directives:
Machinery Directive (2006/42/EC)
EU Low Voltage Directive (2006/95/EC)
Electromagnetic Compatibility (2004/108/EC)
RoHS Directive (2011/65/EU)
Applicable harmonized standards
EN 60745-1:2009+A11
EN 60745-2-4:2009+A11
EN 55014-1:2006+A1+A2
EN 55014-2:1997+A1+A2
EN 61000-3-2:2006+A1+A2
EN 61000-3-3:2013
Type/Device description:
Multi-Purpose Tool PMFW 310 A1
Date of manufacture (DOM): 08-2014 Serial number: IAN 102784
Bochum, 31.08.2014
Semi Uguzlu
- Quality Manager -
We reserve the right to make technical modifications in the course of further development.
Aluksi
Asetahiomapaperi hiomalevyle
Fourniture.. Page 34
Allumage/extinction.
Consummation nominale:310W
Tension nominale: 230V 50Hz
Directive Machines (2006/42/EC)
Directive CE Basse tension (2006/95/EC)
RoHS Directive (2011/65/EU)
WAARSCHUWING! BRANDGEVAAR!
A WARNING! BRANDGEFAHRI!
KOMPERNASS HANDELS GMBH
BURGSTRASSE21
44867BOCHUM
GERMANY
Last Information Update · Tietojen tila · Informati
onsstatus · Version des informations · Stand van de