
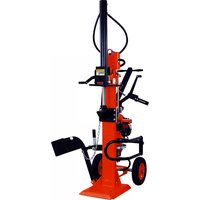
ASP 12 TS2 - Log splitter ATIKA - Free user manual and instructions
Find the device manual for free ASP 12 TS2 ATIKA in PDF.
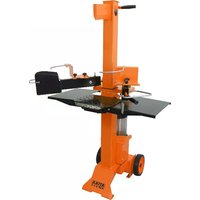
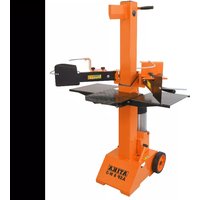
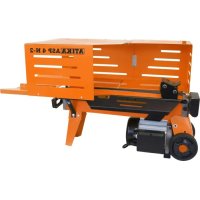
| Product Type | Vertical Log Splitter |
| Brand | ATIKA |
| Model | ASP 12 TS2 |
| Splitting Force | 120 kN (12 tons) |
| Hydraulic Pressure | 24.0 MPa (240 bar) |
| Entry Speed (fast) | 0.23 m/s (23.2 cm/s) |
| Entry Speed (slow) | 0.04 m/s (4.2 cm/s) |
| Return Speed | 0.05 m/s (5.2 cm/s) |
| Admissible Log Length | 560 to 1040 mm |
| Admissible Log Diameter | 100 to 300 mm |
| Splitting Stroke | 850 mm |
| Power Supply | 400 V three-phase 50 Hz |
| Motor Power | 3500 W (S6 40%) |
| Oil Tank Capacity | 7.0 liters |
| Sound Pressure Level | ≤ 80.0 dB(A) |
| Dimensions (L × W × H) | 1440 × 1350 × 2280 mm |
| Weight | 178.4 kg |
| Recommended Hydraulic Oil Type | Shell Tellus T 22 or equivalent |
| Safety Function | Two-hand control, emergency stop, overload protection |
| Included Equipment | Protection arm, safety hook, lifting tool, wheels, transport drawbar |
| Warranty | In accordance with the provided warranty statement |
Frequently Asked Questions - ASP 12 TS2 ATIKA
User questions about ASP 12 TS2 ATIKA
0 question about this device. Answer the ones you know or ask your own.
Ask a new question about this device
Download the instructions for your Log splitter in PDF format for free! Find your manual ASP 12 TS2 - ATIKA and take your electronic device back in hand. On this page are published all the documents necessary for the use of your device. ASP 12 TS2 by ATIKA.
USER MANUAL ASP 12 TS2 ATIKA
Original instructions
Notice originale
PbKOBOCTBO 3a ekcnnoataun
Do not operate machine before having read the operating instructions, understood all the notes and assembly the machine as described here.
Keep the instructions in a safe place for future use.
Contents
Extent of delivery 13
Symbols machine / operating instructions 13/14
Normal intended use 14
Residual risks 14
Safety instructions 14
Description of device / spare parts 16
Assembly 17
Location 17
Commissioning 17
Working with the log splitter 18
Maintenance and care 19
Transport instructions 20
Storage 20
Guarantee 20
Possible faults 21
Technical data 22
Wiring diagram 22
Hydraulic diagram 22
EC Declaration of Conformity 180

Extent of delivery
After unpacking, check the contents of the box for
completeness
possible transport damage.
| 1 | Pre-assembled device unit | 7 | Transport support wheel |
| 2 | Protective arm | 8 | Fastener bag |
| 3 | Safety hook | 9 | Operating instructions |
| 4 | Log lifter | 10 | Assembly and operating instruction sheet |
| 5 | Wheel | 11 | Warranty declaration |
| 6 | Wheel axle |
Report any damage or missing items to your dealer, supplier or the manufacturer immediately. Complaints made at a later date will not be acknowledged.
Symbols on the machine

Carefully read operator's manual before handling the machine.

Wear hearing protection when working with the machine to protect your hearing.
Wear safety goggles when working with the machine to protect the eyes from chips and splinters.

Wear safety shoes when working with the machine to protect the feet from falling logs.

Wear safety gloves when working with the machine to protect the hands from chips and splinters.

Do not expose to rain. Protect against humidity.

It is prohibited to remove or modify protective and safety devices.
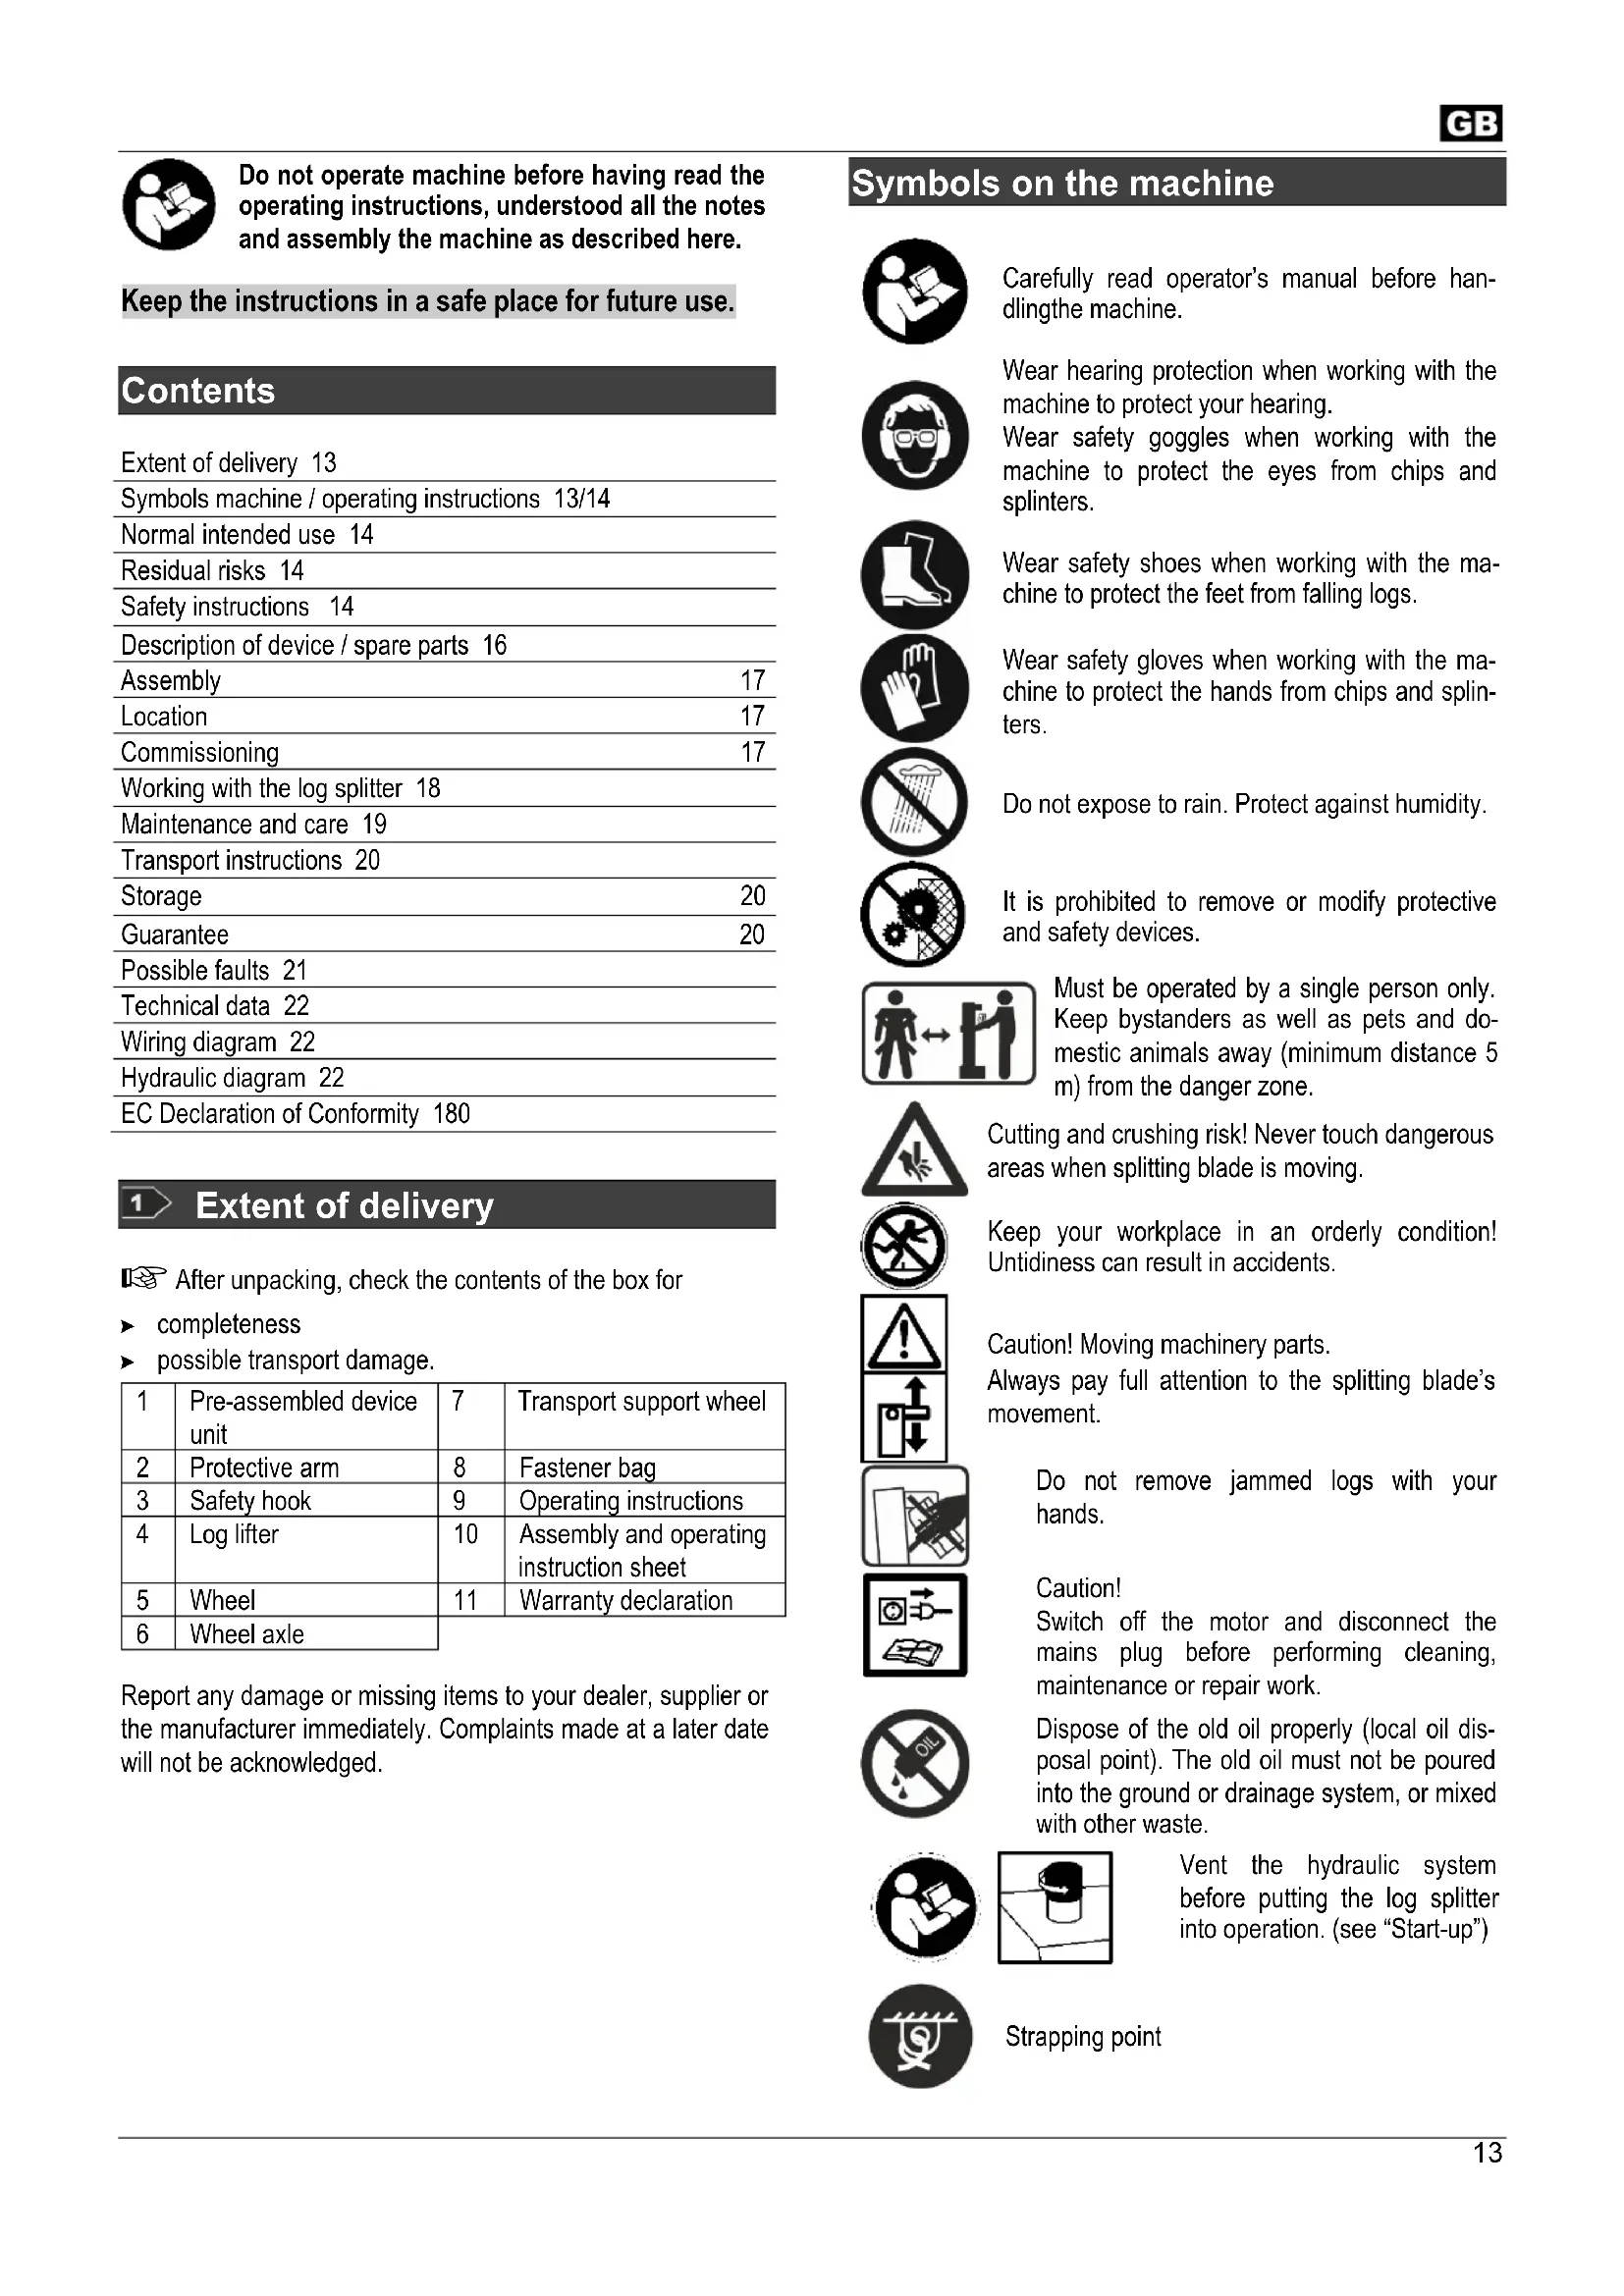
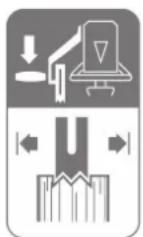
Must be operated by a single person only. Keep bystanders as well as pets and domestic animals away (minimum distance 5 m) from the danger zone.

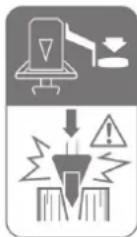
Cutting and crushing risk! Never touch dangerous areas when splitting blade is moving.

Keep your workplace in an orderly condition! Untidiness can result in accidents.

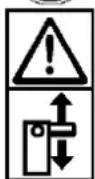
Caution! Moving machinery parts.
Always pay full attention to the splitting blade's movement.

Do not remove jammed logs with your hands.
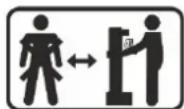
Caution!
Switch off the motor and disconnect the mains plug before performing cleaning, maintenance or repair work.

Dispose of the old oil properly (local oil disposal point). The old oil must not be poured into the ground or drainage system, or mixed with other waste.

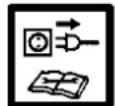
Vent the hydraulic system before putting the log splitter into operation. (see "Start-up")

Strapping point


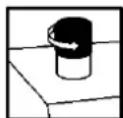
Make sure that the motor turns in the correct direction (see
motor arrow), because operation in the wrong direction damages the oil pump. (see "Start-up")

This product complies with European regulations specifically applicable to it.
Electrical devices do not go into the domestic rubbish.
Give devices, accessories and packaging to an eco-friendlyly recycling.
According to the European Directive 2012/19/EU on electrical and electronic scrap, electrical devices that are no longer serviceable must be separately collected and brought to a facility for an environmentally compatible recycling.

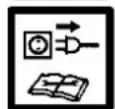
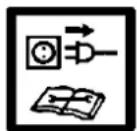
See , Working with the log splitter "
Symbols operating instructions

Potential hazard or hazardous situation. Failure to observe these instructions may lead to injuries or cause damage to property.

Important information on proper handling. Failure to observe these instructions may lead to malfunction.

User information. This information helps you to use all the functions optimally.

Assembly, operation and servicing. Here you are explained exactly what to do.

Please refer to the attached assembly and operating instruction sheet for references to figure numbers in the text.

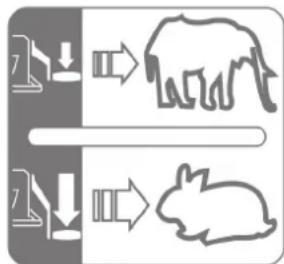
Normal intended use
- The log splitter must only be used for splitting logs.
- The log splitter is only applicable for the private utilization in the field of house and hobby.
- Only straight-cut logs are suitable for use with the log splitter.
- Metal parts (nails, wire etc.) must be removed from logs before splitting.
- The intended usage also includes compliance with the operating, servicing and repair conditions prescribed by the manufacturer and following the safety instructions included in the instructions.
- The relevant accident prevention regulations for the operation as well as the other generally acknowledged occupational medicine and safety rules must be complied with.
- Every other form of use is considered improper use. The manufacturer accepts no liability for any damages resulting from improper use, and any risk is in this case borne solely by the user.
-
Unauthorised modifications on the log splitter exclude a liability of the manufacturer for damages of any kind resulting from it.
-
Only persons who are familiarised with the device and informed about possible risks are allowed to prepare, operate and service this device. Repair works may only be carried out by us or by a customer service agent nominated by us.
Residual risks
Even if used properly, residual risks can exist even if the relevant safety regulations are complied with due to the design determined by the intended purpose.
Residual risks can be minimised if the "Safety advices" and the "Intended usage" as well as the whole of the operating instructions are observed.
Observing these instructions, and taking proper care, will reduce the risk of personal injury or damage to the equipment.
- Risk of injury from ejected wood pieces.
- Risk of injury to feet from wood dropping down
- Risk of injury to fingers when detaching jammed wood pieces
- Noncompliance with safety instructions may result in injuries of the operator or property damages.
- Carelessness, failure to comply with the safety regulations and incorrect use can result in injuries to your hands and fingers when the splitting blade is moving.
- Risk from electricity when using improper electrical connections.
- Touching live parts of opened electrical components.
- Risk of fire and slipping by leaking hydraulic fluid.
- Impairment of hearing when working on the machine for longer periods of time without ear protection.
In addition, in spite of all the precautionary measures taken, non-obvious residual risks can still exist.
Safety instructions
Before starting this device, read and keep to the following advice. Also observe the preventive regulations of your professional association and the safety provisions applicable in the respective country, in order to protect yourself and others from possible injury.
Pass the safety instructions on to all persons who work with the machine.
① Keep these safety instructions in a safe place.
- Persons who work with the firewood splitter must have received proper instructions about the intended work and be familiar with the use of the firewood splitter and the safety instructions.
- Make yourself familiar with the equipment before using it, by reading and understanding the operating instructions.
- Do not use the machine for unsuitable purposes (see "Normal intended use" and "Working with the log splitter").
-
Be attentive. Be observant. Attend to what you do. Start working with rationality. Do not use the device when you are tired or under the influence of drugs, alcohol or medications. One moment of carelessness when using the device can result in serious injuries.
-
Children and young persons under 18 years of age as well as persons who have not read the instruction manual are not allowed to operate this product.
- Never work while persons, in particular small children, or pets are close to you.
- Do not allow other persons, especially children, to touch the tool or motor.
Personal protective equipment
-
Never work without suited protective equipment.
-
Do not wear loose-fitting clothes or jewellery, they could be caught by movable parts.
Hairnet in case of long hair - eye and ear protection
Solid shoes with toe protection caps (safety shoes) - Long pants
- protective gloves
- First-aid material
- Mobile telephone if required
Safety instructions - before working
Carry out the following checks before the initiation and regularly during the working process. Observe the relevant sections in the operating instruction manual:
Is the device assembled completely and properly?
Is the device in good and safe condition?
- Are the handles clean and dry?
- Before starting your work make sure that:
-
no other persons, children or animals stay within the working area,
you can always step back without any barriers,
you have always a secure standing position. -
Is workplace free of risks to stumble? Keep your workplace in an orderly condition! Untidiness can result in accidents - Risk of stumbling!
-
Take environmental influences into consideration:
-
Do not work under insufficient light conditions (e.g. fog, rain, snow flurry or twilight).
- Do not work in bad weather conditions (e.g. risk of lightning, rain, snow flurry).
-
Do not use this machine near inflammable liquids or gases.
-
The operator is responsible for accidents or risks which occur to other persons or their properties.
- Ensure that you have stand in a secure standing position and maintain your balance at all times.
- Do not modify the machine or parts of it.
Safety instructions - operating
Take up a working position which is close to the controls.
- Never stand on top of the machine.
- Turn off the device when taking a break so that nobody is at risk. Secure the device against unauthorized access.
Safety notices for firewood splitters
The log splitter may only be operated by a single person.
- Never try to split logs containing nails, wire or other similar objects.
- Already split wood and wood chips create a dangerous working area. The operator may stumble, slip or fall. Always keep the working area neat and tidy.
- Never place the hands on or near any moving parts of the machine when it is switched on.
- Only split wood that corresponds to the dimensions to be processed.
Safety instructions - while working
- Never work alone. Keep acoustic and visual contact to other persons at all times to allow immediate first aid in emergency cases.
- Immediately stop the engine at imminent danger or in emergency cases.
- Never leave the device running unattended.
- Immediately stop working when you feel unwell (e.g. headache, dizziness, nausea, etc.). Otherwise there is an increased risk of accidents.
- Do not overload the machine! You work better and safer in the given performance range.
- Take breaks when working so that the engine can cool down.
Behaviour in an emergency situation
- Initiate all required first aid measures suited for the injury and seek qualified medical advice as quick as possible.
- Protect the injured person against further injuries and immobilise the injured person.
General safety instructions
- Use the machine, accessories, tools etc. in compliance with these instructions. When doing so take the work conditions and the activity to be carried out into account. The use of the machine for other than the intended applications may cause dangerous situations.
- Do not spray machine with water. (origin of danger electric current).
- Do not leave the machine standing in the rain or use when raining.
-
Maintain the machine carefully:
-
Follow the maintenance instructions.
-
Keep handles dry and free of oil, resin and grease.
-
Check the machine for possible damage:
Before further use of the machine the safety devices must be checked carefully for their proper and intended function. Only operate the device with complete and correctly attached safety equipment and do not alter anything on the device that could impair its safety.
- Check whether movable parts function perfectly and do not stick or whether parts are damaged. All parts must be
correctly installed and fulfil all conditions to ensure perfect operation.
Damaged safety devices and parts must be properly repaired or exchanged by a recognized, specialist workshop; insofar as nothing else is stated in the instructions for use.
- Damaged or illegible safety labels have to be replaced.
- Do not allow any tool key to be plugged in!
Before switching on, checking always that all tools are removed. - Store unused equipment in a dry, locked place out of the reach of children.
-
Switch the machine off and remove the mains plug from the socket when
-
Carrying out repair work.
Performing maintenance and cleaning work. - Eliminating faults.
- checking of connection cables whether they are swallowed or damaged
Storage and transport - Leaving unattended (even during short interruptions).

Do not carry out repair operations on the machine other than those described in section "Maintenance" but contact the manufacturer or authorized customer service centres.

Repairs to other parts of the machine must be carried out by the manufacturer or one of his customer service points.

Use only original spare parts and accessory parts. Accidents can arise for the user through the use of other spare parts. The manufacturer is not liable for any damage or injury resulting from such action.
Electrical safety
- Design of the connection cable according to IEC 60245 (H 07 RN-F) with a core cross-section of at least
5× 1.5mm^2 for a maximum cable length of up to 10m - Never use the machine with a power supply cable of over 10 m in length. Longer power supply cables will cause a drop in voltage. The motor will not be able to provide its maximum performance and the operation of the machine will be impaired.
- Plugs and coupler outlets on connection cables must be made of rubber, non-rigid PVC or other thermoplastic material of same mechanical stability or be covered with this material.
- The connector of the connection cable must be splash-proof.
- When installing the power supply cable observe that it does not interfere, is not squeezed, bended and the plug connection does not get wet.
- Wind off completely the cable when using a cable drum.
- Do not use the cable for purposes for which it is not meant. Protect the cable against heat, oil and sharp edges. Do not use the cable to pull the plug from the socket.
- Regularly check the extension cables and replace them if they are damaged.
-
Do not use any defective connection cables.
-
When working outdoors, only use extension cables especially approved and appropriately labelled for outdoor use.
- Do not set up any provisional electrical connections.
- Never bypass protective devices or deactivate them.

The electrical connection or repairs to electrical parts of the machine must be carried out by a certified electrician or one of our customer service points. Local regulations - especially regarding protective measures - must be observed.

12 Description of device / Spare parts

Please refer to the attached assembly and operating instruction sheet.
| Pos. | Order no. | Designation |
| 1 | × | Preassembled device |
| 2 | × | Protective arm |
| 3 | × | Safety hook |
| 4 | × | Log lifter |
| 5 | 359827 | Wheel |
| 6 | × | Wheel axle |
| 7 | × | Transport support wheel |
| 8 | × | Fastener bag |
| 9 | × | Operating instructions |
| 10 | × | Assembly and operating instruction sheet |
| 11 | × | Warranty declaration |
| 12 | × | Operating handle left |
| 13 | × | Operating handle right |
| 14 | × | Fixing claw |
| 15 | × | Base plate |
| 16 | × | Handle |
| 17 | 359865 | Splitting bl(ASP 10 / 12 TS-2) |
| 359885 | Splitting blade (ASP 14 TS-2) | |
| 18 | × | Splitting column |
| 19 | × | Locking screw for lifting height adjustment |
| 20 | 359872 | On/Off sw(ASP 10 / 12 TS-2) |
| 359883 | On/Off switch (ASP 14 TS-2) | |
| 21 | 359871 | Motor (ASP 10 / 12 TS-2) |
| 359882 | Motor (ASP 14 TS-2) | |
| 22 | 359867 | Oil tank lock 13 |
| 22A | Dip stick 22 | |
| 23 | × | Oil seal (not illustrated) |
| 24 | 359863 | Cylinder (ASP 10 TS-2) |
| 359878 | Cylinder (ASP 12 TS-2) | |
| 359880 | Cylinder (ASP 14 TS-2) | |
| 25 | × | Return lever |
| 26 | × | Transport drawbar |
| 27 | × | Safety chain |
| 28 | 359868 | Return spring |
| 29 | 359869 Oil drain plug | |
| 30 | 359873 Hydraulic valve (not illustrated) | |
| 31 | 400142 Hydraulic oil (1 litre) | |
| 32 | 359807 | Safety label |
Connect the firewood splitter to the power supply system only after having finished the complete assembly.
Mount the wheels, the protective arm, the safety hook, the log lifter and the transport support wheel as shown in Figures 2 - 9 in the assembly and operating chart.
Make sure after mounting that all screws are tightened firmly.
Ensure that the working area meets the following conditions:
- secured against slipping
- even
- free of tripping hazards
- adequate light
Do not operate the machine in the direct vicinity of gas or petrol pipes or containers, or any other easily inflammable materials.
-
Check that the machine is completely and correctly assembled.
Before each use, check -
Connection cables for defects (cracks, cuts, etc.).
Do not use any defect cables
- there are no damages at the machine (see „safety instructions“)
all screws are tight. - check the hydraulic system for any possible leaks
- hydraulic hoses and fittings
- shut-off devices
the oil level
Bleeding
Vent the hydraulic system before putting the log splitter into operation.
Unscrew the oil cap (22) by several turns so that air may escape from the oil tank.
Leave the oil cap open during operation.
Close the oil cap before moving the log splitter, as otherwise oil will leak at this point.
If the hydraulic system is not vented, the trapped air will damage the seals and cause permanent damage to the log splitter.
Mains connection
-
Compare the voltage given on the machine model plate with the mains voltage and connect the machine to the relevant and properly earthed plug.
-
Only use extension cables with sufficient core cross-section.
- Connect the machine via a 30mA fault current safety switch.
① Fuse protection: 16 A time-lag
Switching on:
Press the green button.
Switching off
Press the red button.
Prior to every use, check the function of the disconnection mechanism (by switching on and off).
Do not use any device where the switch can not be switched on and off. Damaged switches must be repaired or replaced immediately by the customer service.
Restart protection in case of power failure (zero-voltage initiator)
① The equipment will switch off automatically if there is a power cut. Repress the green button to switch it on again.
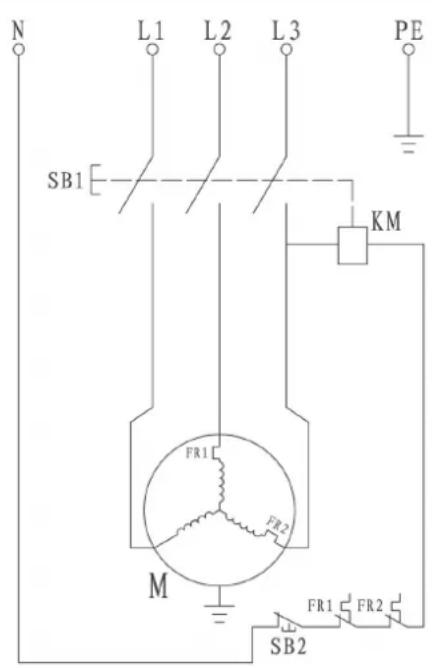
Log splitter with 400 V 3~
Make sure that the motor turns in the
correct direction (see motor arrow), because operation in the wrong direction damages the oil pump.
Check the direction of rotation:
Start the motor.
Actuate both operating handles, the splitting blade moves down.
If the splitting blade is already in the lowest position: actuate the return lever, the splitting blade moves up.
If the splitting blade does not move, switch off the motor and change the direction of rotation.
You can change the direction by placing a screw-driver in the slot provided in the plug collar, and adjust the correct direction by moving to the left or right applying slight pressure.
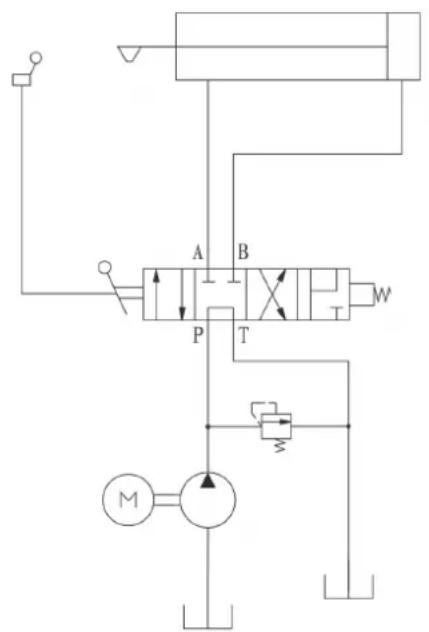
Hydraulics
Check the hydraulic lines and hoses before each use.
- Never operate the machine in the event of any possible danger from hydraulic fluid.
- Ensure that the machine and working area are clean and free of oil.
Danger of slippage or fire!
- Check the hydraulic reservoir regularly to ensure that it contains enough hydraulic oil (see "Care and maintenance").
Capacity:
ASP 10 TS-2 : approx. 7.0 litres
ASP 12 TS-2: approx. 7.0 litres
ASP 14 TS-2 :approx. 7.5 litres
Working with the log splitter
What type of logs can I split?
Size of logs
Log length min. 560 - max. 1040 mm
Log diameter min. 100 - max. 300 mm
The log diameter is a recommended guideline figure, because:
thin logs can be difficult to split if they contain knots or if the fibres are too strong.
Do not try to split green logs. Dry logs are much easier to split, and do not cause jams as often as green (damp) wood.

Hardwood tend to bursting: Exercise utmost caution! Be aware that wood with knots can burst open. Never split wood that has not been debranched beforehand.
Special instructions for splitting logs:
Preparations
The logs to be split should be cut to the maximum dimensions. Ensure also that the logs are cut straight and square. Wood with slanting ends can slip off during splitting.
Place the log properly on the log splitter, so as not to cause any risk of stumbling or falling to the operator.
i
Check before splitting if the splitting column has been sufficiently lubricated to allow its trouble-free retraction and extension.

Operating
Two-hand operation

This log splitter shall be operated by a single person only. Never allow that two or more persons operate this log splitter.

Never block the control handles.
- Press the green switch on the electric motor. Wait a few moments until the motor has reached its operating revolutions and the required pressure has been built up in the hydraulic pump.
1 Check the direction of the motor in the log splitter with threephase motor (400V3) because operation in the wrong direction damages the oil pump.
- 16 Push down the operating handle on the left (12) until the log is held by the fixing claw (14).
① Adjust the fixing claw according to the height of the log. Loosen the wing screw (A) and adjust the fixing claw.
- Press and hold the operating handle left (12) and push the operating handle right (13) down to the half to split the log slowly first.
- Then press the right-hand control handle all the way down to split the log to the end.
Splitting speed
1 with the right operating handle (13) you can adjust the splitting force according to the type of wood:
Maximum splitting force at lower speed for splitting particularly hard or stored logs or at the beginning of the splitting process
middle position of the operating handle.
High splitting speed with lower splitting force for splitting normal logs or at the end of the splitting process lower position of the operating handle.
Reverse
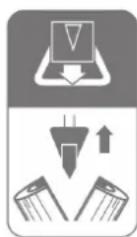
19 Push down the return lever (25) until the splitting blade (17) is in the highest position again.

Before each use, make sure that the operating handles function properly.
Adjusting the stroke height
In case of shorter wood pieces the efficiency can be increased by shortening the return of the splitting cutter.
- Place the log on the base plate and move the splitting blade down to approx. 2cm from the log by pressing down the two operating handles.
- Release the operating handles so that the splitting blade remains in this position and switch off the unit.
- Pull out power plug
- 12 Shorten the return path at the rod fitted to the side by fixing the holding screw at the necessary height.
Log lifter
You can use the log lifter to raise the log for large and heavy pieces of wood.
- 20 Release the safety hook (3) from the log lifter (4).
- Now lower the splitting knife until the log lifter is on the ground.
- Now place the log on the log lifter and let the splitting blade move up again.
- Now you can place the log on the base plate.
Splitting logs:
- Place the log to be split vertically on the base plate.
1 1 Make sure that the log is level and stands independently on the base plate. Never try to split the log horizontally.
1 Only split the logs in the direction of the wood fibres. The machine can be damaged if you try to split wood across the grain.
16 Make sure that the fixing claw (14) is adjusted according to the height of the log.
- Hook the safety hook into the log lifter.
Remove split wood pieces from your direct working area. This helps to avoid accidents.
- Never try to split two logs at once.
- Never try to remove or replace the log during the splitting process.
① Never try to force the splitting of the log by maintaining the pressure for several seconds. This can lead to damage to the machine.
Position the log again on the base plate and repeat the splitting operation or put the log to one side.
How to release a jammed log?
There is a risk of knotted logs getting stuck during the splitting process.
- Switch machine off and disconnect the power.
- Do not remove jammed logs with your hands.
- Carefully move the stuck log with a crowbar backwards and forwards to loosen it. Don't damage the splitting pillar.
Never hammer on the stuck log.
Never use a saw to cut the stuck log out of the machine.
Do not enlist the aid of a second person - this is a one-man job.
Finishing work:
Move the splitting blade to the highest position (retracted state).
Switch off the machine and disconnect the mains plug.
Follow the care and maintenance instructions.
Maintenance and care

Before each maintenance and cleaning work
- Switch off device.
- Pull out power plug
Maintenance and repair work other than those described in this chapter is only allowed to be carried out by service staff.
For maintaining and cleaning, removed security devices must unconditionally be mounted properly and proved again.
Only use genuine spare parts. Other than genuine parts may result in unpredictable damages and injury.
Be sure to have removed any tools from the machine after completion of service work.
Wear protective gloves in order to avoid injury to the hands.
Observe the following in order to keep the log splitter in good working order:
- Clean the machine thoroughly after you have finished using it.
- Remove any resin remains on the machine.
-
Check the oil level and change the oil as necessary.
-
Check the device for obvious defects such as
-
loose fastening elements
- worn or damaged components
-
correctly assembled and faultless covers and protective devices.
-
Check hydraulic hoses and hose connections regularly for any leaks and firm fitting.
- 14 Lubricate the splitting column (18) regularly or oil it using environmentally friendly spray oil.
Sharpening the splitting blade
① After longer operating periods, for reduced splitting performance or slight deformation of the cutting edge, grind the splitting blade or sharpen it with a fine file (remove burrs).
How do I check the oil level?
- The splitting blade must be in the highest position.
- Now remove the dipstick (22A).
- Clean the dipstick and the oil seal.
- Replace the dipstick fully into the oil reservoir.
- Now remove the dipstick again, and read off the oil level.
The oil level must lie between MIN and MAX.
Replenish the same type of oil if the level is too low (MIN or less).
- Check the oil seal and replace it if it is damaged in any way.
- Replace the dipstick into the oil reservoir.
When should I change the oil?
The first oil change should be carried out after 50 operating hours, and then every 500 operating hours.
Two persons are required.
Changing the oil:
- The splitting blade must be in the highest position.
- Now remove the dipstick (22A).
- Place a container under the log splitter to catch the old oil. The container should have a capacity of at least 3.5 litres.
- 21 Screw off the drain plug (29) to allow the oil to flow out.
- Insert the seal and drain plug again.
GB
- 254 in the new hydraulic oil (Quantity, see "Technical Data") using a clean funnel.
- Clean the dipstick and the oil seal.
- Check the oil seal and replace it if it is damaged in any way.
- Replace the dipstick into the oil reservoir.
- After an oil change, let the splitting blade move up and down several times without load.
Dispose of the old oil properly (local oil disposal point). The old oil must not be poured into the ground or drainage system, or mixed with other waste.
Hydraulic oil
We recommend the following hydraulic oils for the hydraulic cylinder:
Shell Tellus T 22
Aral Vitam Gf 22
BP Energol HLP 22 order no. 400142 (1 litre)
Mobil DTE 11
or equivalent
Do not use any other types of oil. The use of any other type of oil will adversely affect the operation of the hydraulic cylinder.
Transport instructions
Before each transport

Move the splitting blade up
- Switch off device.
- Close the oil cap.
- Pull out power plug
- Remove the split wood
9 Loosen the locking pin (A) and fix the transport support wheel (7) in position C for transport.
- Grasp the handle and carefully tilt the firewood splitter towards you.
10 If necessary, swivel the transport drawbar down.
Now you can easily transport the firewood splitter.
Use the lifting point (A) provide for transport with a crane.
- Secure the device against tipping over or sliding away when transporting it by crane.
- When transporting the unit in a car put it on a separate loading area.
11 While doing so, secure the log splitter at the points provided with straps.
Storage
Before each storage
Move the splitting blade up
- Switch off device.
- Close the oil cap
- Pull out power plug
Store machines that are not in use in a dry locked place protected against frost and outside the reach of children and unauthorized persons.
Before extended storage, please observe the following to increase the service life of the device and to ensure smooth operation:
Thoroughly clean the device.
- Check the device for damaged or worn parts.
Guarantee
Please observe the enclosed terms of guarantee.
Possible faults

Before each fault elimination:
- Switch off device.
Pull out power plug
| Problem | Possible Cause Remedy |
| Logs are not being split properly (insufficient splitting performance) | → The log is not positioned correctly → The log exceeds the maximum dimensions or the wood is too hard for the performance of the machine → Splitting blade does not split log → Oil leak → Hydraulic pressure too low → Incorrect connecting lead (longer than 10 m or too small cable cross-section). |
| Splitting blade extends wobbling or with strong vibrations | → Air in the circuit → Splitting column not sufficiently lubricated or oiled |
| Splitting blade does not extend | → Hydraulic pump defective → Motor turns in wrong direction |
| Motor starts, but the splitting blade does not extend | → No power supply. → 2-phase mode in threephase motor. → Mains cable defective. → Electric motor defective |
| Motor does not start | → Check fuses. → Have fuse and lead checked by qualified electrician. → Replace the connection cable or have it checked by an electrician → To correct the problem, refer to the manufacturer |
In case of further faults or inquiries please contact your local dealer.
Technical data
Type / Model ASP 10 TS-2 ASP 12 TS-2 ASP 14 TS-2
year of construction see last page
Splitting force 100kN (10 t) 120 kN (12 t) 140 kN (14 t)
Hydraulic pressure 25.5 Mpa (255 bar) 24.0 Mpa (240 bar) 24.6 Mpa (246 bar)
Feed speed 1 ca. 0.05m / sek (4.9 cm/sec) ca. 0.04m / sek (4.2 cm/sec) ca. 0.04m / sek (4.2 cm/sec)
Feed speed 2 ca. 0.23m / sec (23.2 cm/sec) ca. 0.23m / sek (23.2 cm/sec) ca. 0.22m / sek (21.8 cm/sec)
Return speed ca. 0.06 m/sec. (6.1 cm/sec) ca. 0.05 m/sek. (5.2 cm/sec) ca. 0.05 m/sek. (5.2 cm/sec)
Log length 560 - 1040 mm
Log diameter 100 - 300 mm
Stroke 850 mm
Hydraulic oil (max.) 7.0 Liter 7.5 Liter
Electric motor performance P_1 = 3300W S6 40% P_1 = 3500W S6 40%
Power supply 400 V 3~ 50 Hz
Sound pressure level L_PA ≤ 80.0 dB (A)
Dimensions Length 1440 x Width 1330 x Height 2280 mm Length 1440 x Width 1350 x Height
Weight 172.5 kg 178.4 kg 184.9 kg
Wiring diagram
Hydraulic diagram

Equipment de protection personnel
He n3naraaTe Ha dbxJ. Na3eTe ot BnaIa.

3a6paheHo e da ce OTcpanraBAt mnn da ce npomehr npedna3n npncnocoblenny npncnocoblenya 3a 6e3oNachoct.
3a pa60ta cmo Ha eHN YOBek! Nua, KOnto He BImat yactne, KaKTo N DOMaUNH N NOE3HN XNBOTHN Tp8Ba Da 6bDat DbPxAHn daJeu OT Onachata o6NaCT (MNHMaHNO pa3cTOnHHe 5 m).

Onachoct OT nopra3BaHe n Ipema3BaHe; HNKORA Da He ce DOKacBaT onaChn oBlaCTn, KOrato Ce DvKn pa3nopHnKlnH.

Iopdbpkaite pa6oTHata Bn o6naCT nopehen! IuncaT ha peM MoKe da DoBee do 3nononyk.
BHHMaHHe! DvXeUc Ce MaunHHn Yactn!
BnHaN Da ce BHMaBa 3a DvXeHneTo Ha nIb3rauHa CTBOJIOBete.

Ja He ce OTCpaHЯBa HNKora C pBue cTe6JNo, KOETO e3aceHaIbIO B KInHa.
BHHMaHHe:
IpeDn peMOHT, TexHueecka noDpBxKKa N
noUcTbaHe n3KnIOyTe DBNrAteJIa N
n3DbpNaIte uenCeHa OT KOHTaKTa.

N3xBpIeTe HaJIeXHo OTPa6oTeHTo MaCNo (c6opeH NyHKT 3a OTPa6oTeHn Macna Ha MrcTo). 3a6paHeHO e OTPa6oTeHTo MaCNo Da Ce m3nycka B 3eMaTa Nn da ce CmecBa C OTnadbUnte.

Ipei Da nychete MaunHaTa 3a
ceneHe Ha DbpBa
06e3Bb3dyweTe XnDpaBnHnHaT a
cnCTema. (Bx."Pnyck")

Touka 3a ykpeneBaHe


BHHMaBaIte 3a nocokata Ha BbptHe Ha DnBraTeTJ (BNK
CTpeKata Ha DnBraTeJ), TbN KaTO pa6oTaTc HnnpaBnHa nOcoka Ha BbpTeHe NOBpeXda MacJeHaTaNOMna. (Bxk. "Pyck")

IpoDyKTbT OTROBapHa CneuΦnHnte 3a IpoDyKTA DeNCTBaun EBPOeNCKn DInpeKTNB.

EneKtpnuecknte ypeHn He 6nBa da ce n3XBpJrB KOHTeHepNTe 3a 6nTOBN OTnabu.
YpeIe, pInnHaIeJXHocTne n ONAKOBKeTe TpA6Ba Da ce npEaBaT 3a npepa6oTKa B CbOTBeTCTBne c pa3npoeI6Ne 3a ona3BaHe Ha OKOIHaTa CpeJa.
Cnopee ebponeckata dnpkeTnBa 2012/19/EO 3a ctapnte eektpueeckn n eektpoHn npdeN HEN3NON3BaEMNTe eektpueeckn ypeDn Tpr6Ba da ce cb6nP aP3dEHO n da ce peuKnPaT, 6e3 da ce BpeDu Ha OKOJHaTa Cpea.

BnK Pa6oTa C ypeDa 3a ceneHe Ha IbpBa 3a ropeHe
CnmboHnHa pBkoBODCTBOTO 3a eknloatauia

Ipo3a onachoc nnn onacha cnTuacn. Hecna3BaHeTo Ha Te3u yka3aHnM oMe da IOBepe Do HapaHbAHn UIN MaTePnaJIHn UeTn.

Baxn yka3aHna 3a npabunha pa6ota. Hecn3BaHeTo Ha Te3u yka3aHnMoKe da DoBeDe Do HEn3npaBHOCTN.

Yka3aHna 3a noJ3BaTeJIe. Te3n yKa3aHnI ue BN NOMOHTa Da n3noJ3BaTe ONTImaJIHO BCNUKn FyHKUIN.

MOnTaX, 6cbnyBaHe n TexHnueCa noDpBxKa. TyK ce o6rchBa KaKBO ToH0 Tpr6Ba Da HanpaBnte.

MOnI B3eMeTe Ha NOMOu npINIOXeHOTo pBkoBOdCTBO 3a MOHTaK I O6cLyXBaHe, KOraTO B TEkCTa IMa yKa3aHne KbM HOpE Ha fHypra.

BhImaHne n npedna3nIBoCT hamaJIbBaT pNcKa oT HapaHaBaHnI yBpeKdHaHnHa Iuca.
OnachOCT OT HapaHraBaHe OT JETaI npaTeTa DbpBO.
- OnachocOT HapaHraBe Ha CTbnaJaTa OT nadaaHauehen MaTePnA
- OnachocT OTHapaHraBaHe Ha npbCTnTe Ha pbcTe npn ocbo6oxdabaHe Ha 3aceHaJIn napyeTa dbpBO.
IrhOpupanu nn nponychaTm MepKn 3a 6e3onacHocT Morat Da DOBeDaT Do HapaHbAHHa NpN O6cnykBaUTo Nnue nn Do yBpeKdaHeTo Ha co6ctBeHoCT.
HeBnMaHHeTo, HeCnTa3BaHeTo Ha yKa3aHnraTa 3a 6e3oNaChOCT n HEnpaBnHata yNtpe6a Morat da DOBeedat Do HapaHbAHe Ha pKaTaNn PpbCTHTe Ha pKaTAt OT DnXKeUne Ce HOx.
OnachocT nocpeDCTBOM eJektpnueckn TOK, npu ynoTpe6ata Ha eJektpnueckn npncbeHnHTeHN npoBOHNiK, KOTo He ca N3npabHn.
-ДоирdoЧастипднанржениппOTВОЕн eNeKTPuYeCKn eJeMeHTN.
CbuecTByBa onaHocT OT noXap n noxlb3BaHe npaI IN3TEKna XnpaBnUHa TeHocT.
- Ybpejdahe Ha cnya npn no-npOdbJnxnteJHa pa6ota 6e3 3aunTa 3a cnya.
Bbnpekn Bcunkn npednpnetm Mepkn Morat da cbuectByBaT octTaBHyn pncKOBe, KOnto He ca OyeBnuHn.
Hnctpykun 3a 6e3onacnoct
Ipei Nyckahe B DeiCTBHe Ha TOBa N3deJIne IpOoTeTe n Cna3BaIte CneHnTe yKa3aHnY, KaKTo N BaNdHnTe 3a CbOTBeTHaTc TpaHa pa3nope6n No 6e3onacHocT, 3a Da npEpa3nte ce6e cn N dpyrInTe OT Bb3MOxHH HapaHbAHn.
IpeaTe yka3aHnraTa 3a 6e3oNaCHOCT Ha BCuKn dpynnuca, KOnTo pa6OraT cMaunHaT.
CbxaHraBaIte Do6pe yka3aHnTa 3a 6e3oNaChocT.
- KoIto pa6Otn C ypeDa 3a cIeIeHn Ha IbPbA 3a orpeB, CboTBetHO Tp6Ba Da e HNCTpyKTIpaH 3a npeBnIeHaTa ynoTpeBa N Da e 3ano3HaT C yNoTpe6bata Ha ypeDa 3a cIeIeHn Ha IbPbA 3a orpeB n Yka3aHnraTa 3a be3oNaCHOCT.
- PnpuynoTpe6a ce 3ano3HaTe c ypea c nOMOua Ha pkoBOCTBOTO 3a ekCnNoTaun.
He n3non3BaIte ypea 3a ceiN, 3a KOINTo He e npedHa3Hauen (nOrJIeHN ,yNoTpe6a no npedHa3HauHene" n,Pa6ota cypea 3a HaeINBaHe Ha dIbPba 3a RopeHe ).
-Бьдete BHMaTeHn. BHmAbaTe KaKBO npaBte. IodxoKdaTe pa3ymHo KbM pa6otata. He n3noJ3BaTe ypeDa, aKO cTe ymOpEn uNc cTe noD BnIaHHeTo Ha HapKOTuN, aIKoXOJI Nn MeINKaMeHTn. MomeHTOto HeBHmAHne npN 3NoJ3BaHe Ha ypeDa MoKe da DoBeDe Do cepNo3Hn HapaHbAHn. - Deça mnaékni noi 18 roDHH n Iuca, KOnTo He ca 3aNo3HaTn CpkoBOdCTBOTO, He 6bBa da obcnykBat ypeda.
HnKora He pa6oTe,doKaTo B 6n3OCT mma Xopa,HaB-Beue Deua nn Domaun HxNBOTHN.
He pa3pewaabaTe dpyrn nua, Hau-Beue deua, da nnaTnHCTpyMeHTa nn DnBraTeJra.
JnHn npedna3n cpeCTBa
- Hnkora He pa6oTe 6e3 noxodn npedna3Hn cpeCTBa:
He Hocete Unpoko 6bnkno nyn ykpaueHn, Te MoarTa da 6bdat 3axbaHATN OT NOBNUKHNTE YACTN
aKo IMATEbJIN KOCN, CIOXeTe CN MpeKa 3a KOca.
Hocete 3aunTHn OuHa n JIIC 3a cnya.
- 3dpabN O6yBKn C 60m6eTa 3a 3aunTa Ha npbCTnTe (npedna3Hn 60yBkn)
-Дыгп naHTaJOHn
pa6oTHn pbKaBnU
MaTePnAn 3a nbpBa nOMOU
- nHn Heo6xOaMocT Mo6JIeH TeJefoH
Yka3aHn 3a 6e3oNaChocT -Ipeu pa6ota
Ipeu nyckaheTo B ekcnnoataunn peoBHO no BpeMe Ha pa60Ta n3BbPwBaIte cneHInTe npOBepKn. BImaIte npEbnCBoTBHTHe pa3denn C pKOBODCTBOTo 3a ynoTpe6a:
- YpeDbT MOHTnpaH JIe N3JNo N CbflaCHO npedncaHnraTa?
- Hamnpa Jn ce ypeBbT B do6po N 6e3oNaCHO cbctOAHHe?
PbkoxBaTKTe YnCTn n cyxNn ca? - Ппени заочьни на паразота обешиейтова,
B O6XBATA Ha ekCnnoataaJa He npE6nBaBAT dpYnxopa, Deua nn JxBOTHN
- da 6bde ocInypeHo 6e3npenTCTBeHO OTKNOHBAHe 3a Bac ha3aI
- da 6bnde ocunpyena 6e3oNa cStoKa.
- IMa Jn Ha pa60THOTo MRCTo ONaCHOCT OT npenbBaHe? NpOdbpxKaIte pa60Thata Bn 0bnact NpOpeDen! Be3peJeNo To MoKe Da IMa 3a CneDCTBne 3NOnonyKn - ONaCHOCT OT cTbBAHe!
BHIMabaIte 3a Bb3dEeCTBnTa Ha OKoHaTa cpeJa:
-He pa6oTe Te npn HeoCTnHa CBeTnHa (Hapmep npn Mbrna, DbKd, CnneH CheroBaNex Nnn 3npa).
- He pa6oTeB IIOso BpeMe (HapnMep DbKd, onaCHOCT OT CBETKaBUN, CNJEN CHEROBaNEK).
-He n3noJ3BaIte MaunHata B 6n3oCT do 3aapanMn TeuHOCTn nnra3OBe - onaCHOCT OT noXkap!
- Iotpe6nteIe e OTROBOpEn 3a 3IOIOJyKu N ONaCHOCTN, KOnTO Bb3HnKBat CnpAIMO dpyrN JIna NIN CnpAIMO TExHa CO6CTBeHOCT.
-ДрбжтЕТЯЛOTOCNВCTaБИНО NOJIOJOHNE NBB BCEKN MOMENT Na3eTe paBHOBeCne.
He npomehnTe MaunHaTa uJIn Yactnte Ha MaunHaTata.
Yka3aHn 3a6e3oNaChOcT-06cnyKBaHe
3aemepepa6oTHa cToKa, KOrTO CE haMnpa 3ad uN6bpa B o6nactTa Ha pbkoXBaTKaTa 3a 06cnyKBAHe.
- HnKOra He cToIe Bbpxu MaunHaTata.
- Ппeз почнБКиTe ИЗКЛЮЧВайTe урEDA, тaka ча Да He 3aCTpaшава НИКOrO. OсИгурete урEDA срEu yHe pAspeWeHДOCТьN.
YkaaHna 3a6e3oNaChoc3a ypei 3a ceneHe Ha IbPBA 3a orpeB
- YpeBbT 3a HaueBbHe Ha IbPbMa MoKe Da 6bDe 06cnykBaHOT eDHO eDnHCTBeHo JInCe.
- Hnkora Da He ce HaenBaT CTBOJIOBe, KOINTO cbIbpxKaT npoHn, TeN JIN dpyn ppeMEn.
- Beue haenehata nbpbecnHa n CtbprotnHnte cb3daBat onacha 6nact 3a pa6ota. CbueCTByBa onachoct ot cnbahe, noxnb3BaHe nn naDAhe. BnHar noDbpxaIte peB ba6oTHata 6nact.
Hnkora He noctabraIte pBcTe Bbpxy noDBrXHH qactn Ha MaunHaT npN BKIOUeHa MaUNHa.
Lcene ta mo Ibpa, KOIto OTROBaprHa pa3Mepnte, KOITOMaT da ce 6pbotBaT.
Yka3aHn 3a 6e3oNaCHOCT - NO Bpeme Ha pa6oTaTa
- HNKORA He pa6oTe cam. NocToHNO NOdIbPkaIte 3ByKOB IN BnIM KOHTaKT C dpyrN JInu, 3a da MoKe npN 3JNoJTyKa BeHaRa Da 6bDe OKa3Ha NOMOu.
- BeDHara cnpete DbVaTeIa npu rpo3a onacHocT uNn npu 3Jlononyka.
He octabraye ypea HNKora 6e3 Ha3Op. - Пиклоче pa6ota BeHara, zuom ce nOBaT TeJeCHn onJaKBaHn (HaPmep rIaBo6OJIne, BHe He Ha CBaT, npIloWabaHe n T.H.) - CbIeCTByBa NOBIIeHa OnaCHOCT ot 3IonoJyka!
He npetobapbaTe MaunHa! Bue pa6oTne No-do6pe nno-6e30anchoB 3aJaDeHata OJnact Ha MoUHOCTTa.
- PpaBete nay3n no Bpeme Ha pa6ota, 3a da MoKe DnuratenaT Da ce OxnaN.
TobedeHnBcneuHcnnyan
B cnyuah Ha HapaHrahe OKaXeTe CbOTBEHO Heo6xOdmata nbpBa NOMou N NOBkaTe KOJIKOTO e Bb3MOxHO No-6bp30 KBaJnΦuipaHa JekapcKa NOMOU.
- Ппедназete Наразец OT NO-HaTaTbUHn HapaHЯBaHnI ITO OCTaBeTe B NOKO.
06u yka3aHnna 3a 6e3onacnoct
- N3noJI3BaIe eNEKtpnueckn nHCTpyMeHTN, npHaJneXHOCTN, pa60THn HnCTpyMeHTN n Dp. CNopeyka3aHnraT. Pn TOBa B3EmTe NOB NHMaHne ycNoBnraTa Ha pa6Ota n DeHocTTa, KOTo Tpr6Ba Da ce n3BbPwBa. Ynotpe6ata Ha eNEKtpnueckn HnCTpyMeHTN 3a ueiN u3BbH npDeBnDEHrte MoKe Da npEIN3BnKa ONaCHN CITyaUHN.
He npbckaai Te ypea c Boda. (n3TOUHnK Ha onaCHOCT eJIeKTPnueckn TOK).
MaunHata da He ce octabra Ha dbxN nn da ce pa6oTn npn DbXd. - PoiDlbpxkaIte ypea rpnKJNBO:
CneBaiTe yka3aHnraTa 3a noDpBxka.
IopnbpkaTe pboKoXBaTKTe cyxN HHe3ambpceHn CbC CMOJa, MacJo ngpec.
-
Поберете машина за ebeHTyaanHи NOBpei:
-
PpeHn no-HaTaTbShHa yNoTppe6a Ha ypeDa cIeDbA da 6bDat npOBepen HpEJa3HNTe YcTPOINCTBa NO OTHoWeHHe Ha TxAHOTo 6e3ynpueHo DeiCTBne, Cbo6pa3HO npEJa3HaueHMeTo m. N3noJ3BaInTe ypea camO C KOMNKeKCHn IN PaBUNHO NoCTaBeHN 3aUHTn INPncnoc6JIeHn I He npomeHnTe HnIO B ypeDa, KOETO 6n OrpaHnHIO 6e3OnacHocCTTa.
-Поберete,Далдвижшite ce qactn pa6otЯ 6e3ynpeuho n He 3aJxdat nIi daln mma nobpehen 即Tn. Bcukn yactn Tpr6Ba da ca moHTnpaHn npabuHn O da OTROBaprHa BCNUy cNOBna, 3a da ocNrypTa 6e3ynpeuHata pa6ota Ha TpnoHa
-Поврededиnpedna3н npucnocobneнячactn trpa6Ba da 6bdaT peMOHTupaHn nIN CMEHeH cbrnaCHO npedncaHnraT aOT np3HaT cneuaJIn3npaHa pa60tHnHua,doKoNkOTo He e 3aJaDeHo HeIo Dpyro BVka3aHnEto 3a ynotpe6a.
-NoBpeHHeNte HnH HeeTnBn JneHKn C yKa3aHn 3a 6e3oNaChocT Tpa6Ba Da ce CMeHrT.
He octabrTe nHcTpymeHTBbTpe!
BnHaHn npedn BkNoUbaHe npoBepe, daHn BCnKn HnCTpyMeHTn ca OTCpaHeHn.
- YpeDn, KOnTo He ce NOn3BaT cbXpaHraBaTe B cyxo, 3aKnIOeHO nOmeJeHne, n3BbN o6cera Ha deua.
-
N3KIIOyTe MaUHATA N 3TeTneTe UeNcena OT KOHTaKaTa npN:
-
pemOHTH paBOTN
- pa60n IIO NOIINpbXkata NIOuNCTBaHETO
-OTCTpaHbAHe Ha Heu3npaBHOCTN - npoBepka, daJII 3axpaHbauTe Ka6eJIi ca
ONJIteHNIIOBpeHNI
- TpaHcnpOT n CbXpaHeHne
Hanyckane Ha ypea (cbuio npn KpaTKOBpeMeHHn npeKbCBAHN).
He npednpneMaTe pyrnpemOnTHHa MaunHata OCBEN ONncaHNTe B rnaBata ,NoDpBkKa" a ce 06bPheTe DnpeKTHo KbM npOn3BOUnteIa, CbOTBeTHO KbM KOMnTeHTHn cepBu3.
Pemontte Ha npyn qactn Ha ypea Tp8Ba da 6bDat n3BbpWBAHN OT ctpaHa Ha npou3BOUnteI pecn.OT HAKOIT HerOBNTe cepBN3Hn CEHTPOBE 3a KJNEHTN.
H3noJ3BaIte cMo opnHaJIHn pe3epBHN qactn n npHaJnxKHOCTN. IocpeCTBOM 3noJ3BaHeTo Ha dpyrn pe3epBHN qactn n dpyrn npHaJnxKHOCTN MORa Da Bb3HKnHat 3noJOnyKn 3a Notpe6nteJ. 3a npoJ3TuAaHTe OT TOBa 5eTN npOu3BOaNTeJrT He HOCN OTROBOPHOCT.
EneKtpuecka 6e0nacnoct
- ⅢπbJIHeHne Ha npncbeHNHTeHata JINnra CbIaCHO IEC 60245 (H 07 RN-F) c HanpeHc ceHne Ha XnIaTa HaimaMKo 5× 1,5mm^2 npn Ka6eHa DblxHa do MaKc. 10 m
- HnKora He n3noN3BaIte 3axpaHbAun Ka6eHN Ha10 m. NodJbnPncBcEeHNHTeHN PPOBOHUN PpeIN3BnKBaT Cnad Ha HAnpexKeHTo. DBratJeT Bue He DoCTnMaKcMajHaTa CN MOuHocT, yHKnra Ta Ha MaunHaTa ce HamajBa.
- INHCTaINpuHIne B npNCbEHNHIneJIHIne JINHn ⅢeNCEJIN N CbeHNHTeHN KONTaKTHN KytTN Tp6Ba Da ca N3pa6oTeHN OT ryma, MEK PVC mN nOT dpYr TepMOIJaTcH eH MaTePnaTc Cbc CbUata MExAHuHa JaKoCT nN da HMaT NOKPITne OTO TaKbB MaTePnaI.
- ⅢeCenHTo CbeDnHeHne Ha npCbeDnHInTeJHnKa6eTp8Ba Da e 3aUnTeHO OT nonaHaTe HbOHN pBcKn.
- Ppi nnonaraheTo Ha npncbceHnHteJIHHte JINHN Tp8Ba Da 6bJe 06bphato BHIMAHne Ha TOBA, Te Da He 6bDat npNTNCKAH, pereBbaHn IeNCenHOTcBeHNHeHne Da He 6bJe HAMOKpeHO.
- Ppi yIIOTe6a Ha MaKapa 3a Ka6eIN pa3MOTaIte Ka6eNa HAnbJIHO.
He n3noJI3BaIte Ka6eJa 3a ueH, 3a KOHTo ToH He e npedHa3HaueH. Na3eTe Ka6eJa OT ropeuHa, MacNo N octpn Pb6OBe. 3aunTeTe Ka6eJa OT 3arpaBaHe, MacIO N ocTpi Pb6OBe. He n3noJI3BaIte Ka6eJa, 3a da n3TerIInTe 9eIceJa OT KOHTaKTA. - KoHTpOIpaPte peoBHO yIbJIKInTeJHInTe Ka6eN n 3ameHnTe, KOrATo ca NoBpeHn.
He n3no3BaIte deeKTHn npncbEeHNHTENH Ka6eJI.
Ha otKpnto noJ3BaIte cAmO ydbJNKeTEn, KOnto ca pa3peWeHn 3a TOBa N IMat cbOTBETHTo 0603aueHne.
He n3no13BaITe BpeMeHHeNeKtpnueckn npncbeHNHTeHn Bpb3Kn. - HnKora He 7yHTnpaIte 3aIITHInTe yCTpOInCTBa n He rN3BExKaIte OT DeINCTBne.
Cbbp3BaHTo KbM eJekTpnuyeckata Mpexa, cbOTBeTHo pemOHHTne pa6Ot No eJekTpnuyecknte Yactn Ha MaunHaT TaP6Ba Da ce N3BbPWBaT OT ONpaBOMOseh eJekTpocneuaJIncT HNI OT HAKOI OT HaUNTe cepBN3N. Tp6Ba Da ce cna3BaT MeCTHte pa3npopeBn Hn-Beue Te3N, KOtO ca Cbbp3aHN Cbc 3aunTHnte MEPKn.
YcTPOIcTB03aBdIraHeHaZepeHncaTa
Pn rolemn TeKnn ceneHnM oKeTe da n3noN3BaTe yctpoiCTBOTO 3a BnIraHe Ha ceneHncaTa, 3a da n3npaBnTe ceneHncaTa.
- 20 3a ζηΤΑ ΟΤΙΕΝΕ Φικυραύματα ΚγΚα (3) Θ yctροήσTBΟΤΑ 3a Bπίναης ἀνεηημιατα (4).
- Cnei TOBa OCTaBeTe HOXbT 3a ZeNeHe Da ce cnYcHc HADONY, DOKaTO yCTpOiCTBOTO 3a BdIraHe Ha ZeNeHnCiTa NaerHe Ha noJa.
- Cera noctabete ueeneuata Bbpxy yctpoiCTBOTO 3a Bnrahe Ha ueeneuata N octabeTe HOXbT 3a ueene He OTHOBO da CE BnirHe Harope.
- Cera moke Te Da nocTaBnTe UeneHncaTa Bbpxy OCHOBHaTa nnOua.
HaenBaHe Ha DbpBecnHTa
- IocTaBete ceneHncaTa BepTnKaJHo Bbpxy OCHOBHaTa nnoHa.
BHHMabaTe ceneHncaTa da cTOn paBHO n camocToTeJHo Bbpxy ochOBhata nloa. Hnkora He ceneTe ceneHncaTa IerHaHa nn HappeHo.
① O6pa6oTbaIe IbPbTa cAmO No NocOKa Ha HnUKTe. Ako IbPbTa ce uenr o6paTHo Ha NocOKaTa Ha IbPBeCHnte BnAkHa, MaunHata MoKe da Ce NobpeDi.
16 BnHmBaIte FIKCnpaata Iana (14) da e perynpaHa cnopei BnCOuHata Ha ueHenuata.
- 3aKaHeTeΦnKcnpaunTe KyKn Ha yCTpoiCTBOTO 3a BnIraHe Ha zeneHnIata.
MaxheTe HaueeHnTe DbpBa ot BaWata HeNocepctBeHa pa60tha 30Ha. Taka ue HamaHTe TpyoBHTe 3IonoNyKn.
Hnkora He ceneTe DBe DpbBa HabeHbX.
Hikora He donbIbaTe nIN cMeHnTe dbpBecnHa no BpeMe Ha pa6oTHnI npocc.
1 Da He ce npedn3BnKBa HnKora HaueenBaHe Ha CTBoNa nocpeDCTBOM NOdIbPkaHe Ha NtB3raHTo B npOdbJxKeHne Ha HrkONk cekyHn. Toba MoKe da DoBeDe do nobpeHn Ha MaunHaTa.
IocTabete UeneHuaTa OTHOBO Bbpxy OCHOBHaTa IIOUa I NOBTopeTe UeneHeTO NIM OCTabeTe UeneHuaTa HactpaHa.
Kakceocbo6oxkaaba3akneuiocecte6no?
Ima onachoct dbpbata C KIOHn da 3aJat npu cenehe.
1.ИЗк nullуete урета и Изльрnaит eцencena.
2.Да He ce OTCpaHЯBa HNKOra c pbue cTe6JNo, Koeto e 3aceHANO B KInHa.
3. BHIMATEIHO pa3dBHXKETe 3aIIO TO IbPBO C aHaRa HAnpeiHa3aI, 3a da MoKeTe Da ro ocBo6OuTe. He nobpeXdAitE KOHOHATA 3a ueneHe!
Ipn otJeHnKora He ydpnTe Bbpxy 3aJnatae neHnca.
Hikora He n3BaXdaIte 3aJIoTO DbPBO qpe3 pR3aHe. He MonTe BTOPO Jnue 3a NODKpena.
Kpañ ha pa6oTata
NocTabete HOxHa 3a ceneHe B Hau-TopHO NOIOXeHne (np6paHO nOIOXeHne).
N3KIOUeTe ypea n 13bPnaIte 1enCeJa.
Da ce cna3BaT yka3aHnraTa 3a nOndpBjKkN rpnKn.
TexHnuecka noDpBkka

PpeBn BcKa pa6Ota no noDpBxKkata nnouchTbaHTo :
- n3kHooTe ypeDa
-3dbpnbte uenceja!
Pa60Tu No TexHnueckata NOpdpbXka N NOuNCTBaHETO, pa3nHn OT ONnCaHnTe B HAcTOrnpa3dEe, MORa T da ce n3BbPbBATcmoOT cepBn3a.
3aunTHnTe npncoc6neHna KOnTO ca CbaJeHn c eJn3BbPwBaHe Ha TexHnuecka NOpDpBxxKa n NoOuNCtBaHe, Tpa6Ba Da 6bDat OTHOBo HAnEeKHO MOnTnpaHn n PPOBepeHn.
Ia ce n3noJ3BaT cAmO opunHaHn YactN. Dpyr YactMORAT Da npedn3BnKaT HnepeDnIMM NOpeu N HapaHbAHH.
ObpheTe BHIMaHHe Ha TOBa, da OTCpaHIne INHCTpyMeHTa IraeyHIne KINCHOBE OTHOBO CNeI NOIDpbKkata NIM pEMOHTA.
A da ce HocrT npedna3Hn pbkabu, 3a da ce npedotbpaTBAHapahraBaHnHa pbcTe.
Cna3BaIte cIeHTo, 3a Da 3ana3HTe roDHOCTHa hypeDa 3a HaenBaHe Ha IbPba:
- POnuCTeTe OCHOBHO MaunHaTa CneI npKJIouBaHe Ha pa6Ota.
OTCTpaHete OTIaHaHnO TCMoJa.
PpOBepaBte HNBOTHa MacnTo pecn. CmHrTe macnTO
PpOBepBaTe BepxHnTa pe3aKa 3a OueBnHN HeoCTaTbUN
Xna6aBNBp3Kn.
- H3HOCEHNJINIOBpeHnYactN
- npabnHNO MOHTnpaHn n 3npabHn Kaanu nn 3aunTHn npncnoc6neHn.
PepOBHO npOBepBaIte nIbTHocTt a 3dpabHaTa Ha XnDpaBnUHHTe IJayXOb E JNJayXOBn Bpb3Kn.
14 HamacnBaIte peoBHO MOTOBnKata C eKOJOruHO MacNo 3a npbckaHe.
HaToUBaHe Ha KInHa
Cne npoBnKTeHa eKnnoataaun nn npn Hamaen KaanTet Ha HauenBaHe da ce n3nnn pa3npHn KnHc nHa nna (da ce otctpaHr octpnte p6oBe).
Kak da npoBepra HnBTo Ha Macnot?
- HoxbT 3a ueene Tp8Ba da e B haH-TopHO nonOxehne.
- Pa3BnHTe npbUkaTa 3a n3MepBaHe Ha MacIIOTo.
3.ПочиретепьчкataзИЗмерванHa MacNoTOуЛьтHeHnETo 3a MacNoTO. - NocTabete npbkykata 3a n3mepbahe OTHOBO OTBopa do ynp.
- 13BaTe OTHO BO npBcKaTa 3a 13MePbaHe Ha MacIto.
22 HnBToHaMaCnToTpA6BaDaeMeKdyMINuMAX.
Pn HnCKo HnBO Ha MacnTo (MIN nnn no-MaNKo) DOneTe NoD6Ho MaNo.
- IpoBepTe yIyIbTHHeHnETo 3a MacNoTo. To TpRbBa Da 6bJe CMeHEHO pN IOBpeN.
- 3aBnHTeTe OTHOBOpnbKaTa 3a N3MepBaHe Ha MacNoto.
Kora da cmeHa macnoTo?
PbpbMaHaMaMacnoTo cne50 yacaeknnoataa, cneTOBa Ha BceKn 500 yacaeknnoataa.
Heo6xoDnMn ca Dbama dyn.
CMHa:
- HoxbT 3a ueene Tpr6Ba da e B haN-ropHo nOxKeHne.
- Pa3BnHTe Te npbkyata 3a n3MepBaHe Ha MacIOTO.
- NocTaBePe3epBoap, KOITo MoKe Da MOeMe MNHmAnHO 3,5 Jntpa MacNo, NOI ypeDa 3a HaueBae He Na DpbBecnHa.
- 21 Pa3BbPTeTe KanayKaTa 3a N3nyckaHe (29), 3a da MOKe MaCNOTO Da N3TEYe.
- NocTaBete OTHOBO yNtBTHHeHHeTo n KaNaKaTa 3a HnIyCKaHe.
- 23 HanbIHeTe HOBOTo XnIpaBnHIO MaCIO (KoJIneCTBO BIK, TexHnueCKn DaHHN) C NOMOHTa Ha NcTc FyHnR.
- Nocntete npbukata 3a n3MepBaHe Ha Macnoto yNtBTHHeHTo 3a Macnoto.
- Поберете упьтэнeto 3a macIoTO. To trЯбba da 6bde CMeHeHо пи NOBpeДN.
- 3aBnHTeTe OTHOBOpbYkTa 3a N3MePbaHe Ha MacNoTO.
10.CneI cMaHa Ha MacNoTo OCTaBeTe HOXbT 3a Zeene He da ce DnKn HrKOJI KIO TbTN HArOpE N HADOny 6e3 HATOBapBaHe.
N3XbPteHaIeXHo Otpa6oTeHTo MacNo (c6open nyHKT 3a OTPa6oTeHn Macna Ha MrcTo). 3a6paHeNo e OTPa6oTeHTo MacNo Da ce N3nycka B 3emrTa Hn da Ce CmecBa c OTnadbCHTe.
XnpaBnHmacNo
3a ypeda 3a HaueenBaHe Ha IbpbBecnHa Hne npenopbYBaMe cIeHNTe XmIpaBNIuHn Macna:
Shell Tellus T 22
Aral Vitam Gf 22
BP Energol HLP 22 → Порька-№. 400142 (1 Liter)
Mobil DTE 11
IMpaBHOToH0
Ja He Ce N3NON3BAt Dpyr BnIOBe MacNo. N3NON3BaHeTo Ha Dpyr BNIOBE MacNo OKa3Ba BnHHe Ha FyHKuYraHa ypeD 3a HauenBaHe Ha DbpBa.
Yka3aHnna 3a TpaHcnpTnpaHe
ПпдИ BCSKО TpaHcnpTIpaHe
Bdnrahe Ha HOXa 3a ZeneHe Harope
- N3knIOUeIypeIa
-3aTBopeTe KInOuaKkata Ha MacneHnpe3epBoap
- N3dbpnbAaTe 电费eNa
- Otrpahe Haenmaeepn
9 Ocbo6oTeΦnKcnpaunA uΦT(A) nΦnKcnpaTe TpaHcnpTOOnopHO KJeNo (7) 3a TpaHCnOpTpuaHe B I03uC.
XBaHHepePbKoXBaTKaTaN6abHOHaKnOHeTeMaunHaTa3a 1eNEHeHaDbpBaKbM Bac.
10 3a centa 3abpTe Te TernuHa 3a TpaHcnpTupaHe eBeHTyaIHO HADOny.
Cera moXeTe yDObHo Da TpaHCnOpTnpaTe MaunHaTa 3a CenHe Ha DpbBa 3a OrpeB.
3a TpaHcnpTnpaHe C KpaH n3no3BaIte npeBnDHeHATA 3a ueTta ToKa 3a BnIraHe (A).
■ФИКСИРаTe ypeДa CpeUy npeO6PbUaHe uNn nIb3raHe, KOraTo rTo TpaHcNoptuPaTe cKpaH.
TpaHcnopTnpaIte ypeBa MNC Bbpxy otDenHa TpaHCnOpTHa nnatopma.
11 Pn TOBa 6KcnpaTe ypeHa 3a ceneHe Ha IbpBaHa npeBnDEHnTe ToKn C ykpEnBaun KOJaHn.
CbXpaHHeHne
PpeuBcKaOcbxpaHHeHne
BduraHe Ha Hoxa 3a ZeneHe Harope

- N3kIIOUe Te ypeDa
-3aTbopeTe KJIIOUcAJIkaTa Ha MacJIeHnpe3epBoap - N3dIbPnBaIe Te IeIceJia!
CbXpaHraBaIte ypeiTe, KOITo He ce H3NOJ3BaT, Ha cyxo, 3aTBOpEHO MRCTo, 3aUHTeHO OT 3aMpb3BaHe, HeOCTbNHi 3a DeuHa N HeOTOpN3IupaHn Iuua.
Obphe Te BnMaHne npedn no-npoDbJxNKeIeHc bXpaHeHne Ha cNeHOTo, 3a da yDbJxNte XNBota Ha MaunHaTa n da rapaHTnpate JecHO o6cnyXBaHe:
- PpaBete OCHOBHO NOUcHbAHe.
- PpOBepTe ypeDa 3a noBpeDeHn nn n3HOceHn YactN.
Tapaunz
MOny B3eMeTe IoD BHIMMaHHe npNIOXKeHaTa rapaHcNoHHa deKnapaun.
Bb3MOxHn Hen3npaBHOCTN

PpeDn Bcko OTCTpaHbAhe Ha HEn3npaBHOct
- n3KIIIOUeTe ypeDa
- n3dpbnBaIe Te Iencela!
ASP 10 TS-2: 7,0 liter
ASP 12 TS-2:7,0 liter
ASP 14 TS-2:7,5 liter
Inden hver transport

- Flytning af kløvekniven opad
- Sluk for apparatet
Luk olietankdaekslet
Trak netstikket
Fjernelse af klvet materiale
ASP 10 TS-2: 7,0 liters
ASP 12 TS-2: 7,0 litres
ASP 14 TS-2: 7,5 liters
ASP 10 TS-2: kb. 7,0 I
ASP 12 TS-2: kb. 7,0 I
ASP 14 TS-2: kb. 7,5 I
ASP 10 TS-2:7,0 litri
ASP 12 TS-2:7,0 litri
ASP 14 TS-2:7,5 litri
ASP 10 TS-2:7,0 liter
ASP 12 TS-2:7,0 liter
ASP 14 TS-2:7.5 liter
ASP 10 TS-2: 7,0 litr
ASP 12 TS-2: 7,0 litr
ASP 14 TS-2: 7,5 litr
ASP 10 TS-2:7,0 litri
ASP 12 TS-2:7,0 litri
ASP 14 TS-2:7,5 litri
ASP 10 TS-2: 7,0 liter
ASP 12 TS-2: 7,0 liter
ASP 14 TS-2: 7,5 liter
S
ASP 10 TS-2:7,0 litra
ASP 12 TS-2:7,0 litra
ASP 14 TS-2:7,5 litra
Delos cepilnikom driv
Kaj lahko cepim?
GB under our sole responsibility, that the product
Brennholzspalter (Log splitter) ASP 10 TS-2, ASP 12 TS-2, ASP 14 TS-2
is conform with the above mentioned EC directive as well as with the provisions of the guidelines below: 2014/30/EU, 2011/65/EU

- Contents
- Extent of delivery
- Symbols on the machine
- Caution!
- Symbols operating instructions
- Normal intended use
- Residual risks
- Safety instructions
- Personal protective equipment
- Safety instructions - before working
- Safety instructions - operating
- Safety notices for firewood splitters
- Safety instructions - while working
- Behaviour in an emergency situation
- General safety instructions
- Electrical safety
- Description of device / Spare parts
- Do not use any defect cables
- Bleeding
- Mains connection
- Switching on:
- Switching off
- Restart protection in case of power failure (zero-voltage initiator)
- Check the direction of rotation:
- Hydraulics
- Working with the log splitter
- What type of logs can I split?
- Size of logs
- Special instructions for splitting logs:
- Preparations
- Operating
- Two-hand operation
- Splitting speed
- Reverse
- Adjusting the stroke height
- Log lifter
- Splitting logs:
- Remove split wood pieces from your direct working area. This helps to avoid accidents.
- How to release a jammed log?
- Finishing work:
- Maintenance and care
- Wear protective gloves in order to avoid injury to the hands.
- Sharpening the splitting blade
- How do I check the oil level?
- When should I change the oil?
- GB
- Hydraulic oil
- Transport instructions
- Before each transport
- Storage
- Before each storage
- Guarantee
- Possible faults
- Before each fault elimination:
- Technical data
- Wiring diagram
- Hydraulic diagram
- Equipment de protection personnel
- CnmboHnHa pBkoBODCTBOTO 3a eknloatauia
- Hnctpykun 3a 6e3onacnoct
- JnHn npedna3n cpeCTBa
- Yka3aHn 3a 6e3oNaChocT -Ipeu pa6ota
- Yka3aHn 3a6e3oNaChOcT-06cnyKBaHe
- YkaaHna 3a6e3oNaChoc3a ypei 3a ceneHe Ha IbPBA 3a orpeB
- Yka3aHn 3a 6e3oNaCHOCT - NO Bpeme Ha pa6oTaTa
- TobedeHnBcneuHcnnyan
- 06u yka3aHnna 3a 6e3onacnoct
- EneKtpuecka 6e0nacnoct
- YcTPOIcTB03aBdIraHeHaZepeHncaTa
- HaenBaHe Ha DbpBecnHTa
- Kakceocbo6oxkaaba3akneuiocecte6no?
- Kpañ ha pa6oTata
- TexHnuecka noDpBkka
- HaToUBaHe Ha KInHa
- Kak da npoBepra HnBTo Ha Macnot?
- Kora da cmeHa macnoTo?
- XnpaBnHmacNo
- Yka3aHnna 3a TpaHcnpTnpaHe
- CbXpaHHeHne
- Tapaunz
- Bb3MOxHn Hen3npaBHOCTN
- PpeDn Bcko OTCTpaHbAhe Ha HEn3npaBHOct
- S
- Delos cepilnikom driv
- Kaj lahko cepim?
Brand : ATIKA
Model : ASP 12 TS2
Category : Log splitter