
WHVP 62F LT - Basket WHIRLPOOL - Free user manual and instructions
Find the device manual for free WHVP 62F LT WHIRLPOOL in PDF.
| Product type | Decorative hood |
| Brand | Whirlpool |
| Model | WHVP 62F LT |
| Dimensions (H x W x D) | 71-104.5 x 59.8 x 32.6 cm (adjustable height) |
| Power supply | 220-240 V ~ 50 Hz |
| Exhaust diameter | 15 cm |
| Control type | Push buttons |
| Number of speeds | 3 + Booster |
| Automatic timer | Yes (20 min on T1, 15 min on T2, 10 min on T3) |
| Lighting | LED (replacement by authorized service) |
| Grease filter | Metal, dishwasher-safe |
| Charcoal filter | Optional, replace every 4 months |
| Filter saturation indicator | Yes (LED): 40 h (grease), 160 h (charcoal) |
| Minimum safety distance | 45 cm (electric) / 65 cm (gas or mixed) |
| Usage version | Ducted or recirculating (optional kit) |
| Cleaning of perimeter panel | Monthly with cloth and neutral detergent |
| LED lifespan | Up to 10 times longer than traditional bulbs |
| Automatic booster shutdown | After 5 minutes |
| Material | Stainless steel (estimated) |
| Number of motors | 1 (estimated) |
| Noise level | Not specified |
Frequently Asked Questions - WHVP 62F LT WHIRLPOOL
User questions about WHVP 62F LT WHIRLPOOL
0 question about this device. Answer the ones you know or ask your own.
Ask a new question about this device
Download the instructions for your Basket in PDF format for free! Find your manual WHVP 62F LT - WHIRLPOOL and take your electronic device back in hand. On this page are published all the documents necessary for the use of your device. WHVP 62F LT by WHIRLPOOL.
USER MANUAL WHVP 62F LT WHIRLPOOL
EN Instructions for use
UK IHCtpyKzii 3 BnKOpncTaHHa
OTBEXDAHE HA Bb3dYXA
(3a acnnpupaaBepcn)
Cbpxte acnnapota KbM B3dyxOBOHn Tp6n n OTBOpn B CTeHa. DnaMeTbPbT Ha Tp6nte Tpr6Ba da CbOTBeTCTBa Ha DnaMeTbpa Ha CbeHNHTenHn FNaHeu 3a OTBeKdaHe Ha B3dyxa.
Cbpb3BaHeTo KbMb Bb3dYxOBoHn TpBbN N OTBOpn C No-MaNbK DnaMeTbp HamaJIra Ba KanaIITeTa Ha acnnpipaHe n yBeJIuHaBa 3HaunTeJIHO UyMa No BpeMe Ha pa6ota.
B Te3n cIyuaH pMaTa He Noema HnKaKbA OTROBOPHOCT.
!N3non3BaIte Tpb6a CHeo6XoDImata DbJIiKHa.
I 13noi3BaTe Tpb6a C Bb3MOxHO Hau-MaIKO Tpb6Hn KOJeHa (CMKcIMaJIeH bTbn Ha N3BvBka: 90^
!He npomehraepe3koceehneToHaTpb6nte!
! HnpuMaTa He NoeMa HnKaBa OTROBOpHoc B CnyaHa Hecna3BaHe Ha HactoIte HopMN.
ФИЛТРИРALA ИЛN ACПИРILA BEPCЯ?
! AcnpaTopbTe roTOB 3a ynoTpe6a BbB BapnAHT Ha acnpnpupaBa Bepcna.
3a Da n3no3BaTe acnnpaTopa BbB BapnaHT Ha fHnTpnpaUa Bepcna e Heo6xOdmo da HnctaJnpaTe CneuaHnra DOIbJIHNTEHEKOMNJIeKT.
B NaJIoTo Ha HactoIaHapbUHKe e nocOeHo daJIIN DOIbJIHHTENHnT KOMJIIEKT e IocTaBeH nn Tp8Ba da 6bJe3aKynE hOndienHO.
Benexka: Ako KOMNKeTbTe Beue DoCTaBeH, MmaTe IpeDbUd, Ye B HnKo CnyuAn DonbHnTeJIHaTa FnITpnpaCnCTema Ha 6a3ata Ha fntpu cakTNBeH BbIeH Moke Beue da e IHCTaINpaHa Bbpxy acnPapota.
HOpMaIraTa OTHOCHO TpaHcΦopMnpaHeto Ha acnnpaTopa OT acnpupaAa BbB FInTPpaua BepCna Ce CbDbpxa B HactoIOTo pKOBODCTBO.
AcnnpupaaBepn
IapaTa ce OTBeKda HABbH NocpeDcTBOM Bb3dYXOBODHa Tpb6a Cbbp3aHa Cbc CbeHNHTenHnA ΦnaHeu.
BHUMAHNE!
Bb3dyxOboHaTa Tpb6a He e BkIIOHeHa KbM akcecoapnte n Tp8Ba Da 6bde 3kyneHa OTdJIHO.
IiAmetbpbbHa Bb3dyxOBOdHaTtpb6a Tp86Ba Da OTROBapHa DnAmetbpa Ha CbeHNHTeHnnpbCTeH.
BHUMAHNE!
Ako acnnpatopbt e cha6dene C cnItpn C akTbEn BbIpnOCHnte Tp6Ba da bdaat OcTpaHeH.
Фильтураца Версан.
AcnnpnpaHnT B3dyX ce npeuNCTBa N OCBexaba npedn Da Bne3e OTHO B o6pbueHne B nomeueHneTo. 3a da n3noJI3BaTe acnnpaTopa B To3n BapnaHT Ha pa60Ta Tp8bda Na HcTaJInpaTe DoIbJIHITeJIHa fIITpnpaua CnCTema Ha 6a3ata Ha fIITpn c AKTNBeH BByJleH.
KOMAHДN
A6cop6aTopbT pa3noJa r c KOMaHdEn NaHeI C KOHTpOHa CKOpocNTe Ha 3acMyKBaHe I KOHTpOHa BKNIOyBaHTo Ha CBeTTnHaTa 3a OCBETraBaHe Ha rotBapCKnINot.

T1

T2

T3

T4

T5
PbPbAckopocr (T1)
HaTnchete T1 3a da aKTHBnpuTe nbpBaTa cKOpocr. Korato cyHKunrae e aKTHBnpuHa, LED INHdkaTopbT ce BklnuBa c KHKnPaa CBeTJInha. HaTnchete OTHOBo T1 3a da n3KnUoyHe acnnpaTopa.
Btopa ckopoct (T2)
HaTnCHeTe T2 3a da aKTHBnPaTe BTOpaTa cKOpoc. Korato fYHKunraTa e aKTHBnPaHa, LED nHdkaTopbT ce BKIOUcb CnKcnpaHa CBETJInHa. HaTnCHeTe OTHOBo T2 3a da nKIIIOuHTe acnPaTopa.
Tpeta ckopocn BOOSTER (ycnBateJ) (T3)
Korato acnnpatopbTe deaktnbupan Hnn nbpBataa Nn Btopa Ta ckopoc T ca kTNbupaH, TpeTata cKOPOCT MOKe da 6bde AKTNbupaHa, ype3 6yToHa T3 n LED nHnkaTopbT ce BKIOUcBa C KcnpaHa CBETnHa.
EДно NOВTOPNO HATNCKAHe Bbpxy T3, ue ce BkIIOU booster. Booster moKe da 6bJe aKTINBpuHa, eHnCTBeHO cNei KaTo TpeTaT aCKOpocT, Beue e aKTHBpHa. Korato booester e BkIOUeHa, LED nHnKaTOpbT T3 ue 3anOHe da npUCpa. Dokato booster fYHKUOHnpa, e Bb3MOXHO da ce npemHe Ha nbPba uHn Ha BTOpa CKOpocT, ype3 HaNTCKaHe Ha XeJahn ha ckopocT T1 nIIu T2, booister ue ce n3KIOUHy n36paHata ckopocT ue 6bJe aKTINBpHa.
Korato booster e BkIoueH, HATnCHTe OTHOBo T3 3a Da N3KIIOnHe acnnpaTopbT.
Cne5'boosterce n3KJIIOUba ABtOMaTHUHOITpeTaTcCKOcTe ce aKTINBIPA abtOMaTHHNO.
Taimep (T4)
TaimepbT moxe da 6bde aKTHBpahn, KOrato e aKTUBpapaHa IIpbBa IIN Btopa IIN TpeTa ckopocCT. Korato fynkunra Ta e aKTUBpapaHa, KaKTo LED INdkaTopbT ha Taimepa (T4) taka n To3n Ha ckopocTTa, N3bpaa npedbapntelHO (T1/T2/T3) ce BknUoyBaT c FHKcnpaHa CBETNIHa.
TaimepbT npoDbJnKaBa da e aKtNBHe, B 3aBNCIMOcT OT n36paHaTa ckopocT:
PbBaCKopocT1=npoBJnxHTenHoct 20
Btopa ckopocT T2 = npoDbJnxTeJIHOCT 15'.
Tpeta ckopoct: T3 = npoBjnxnteHocr 10'.
TaimepbT He moke da 6bde aKTUBpah, KoraTo boooster e aKTUBpaH. Cnei n3TuHaHe Ha BpeMeTo, acnPaTopbT ce n3KlIOUBA. Korato edHa ckopocTe c Temnop3aTOp, MoKe da ce npemHe ppe3 dpyrN CKOPoCTn, HATnCKaIKN bYToHa Ha XeJaHaTa CKOpocT, Ta3n Onpauny Ie N3KJIOnu Taimepa.
Korato eHa ckopocct c Temnopn3atop, TaMepbT MoKe da 6bde deaktnBupan, Ype3 HaTnckaHe Ha T4 nIeHa ot dpynte ckopoctn, KoTo He e aktnBupaHa. 3a da n3KnIOHTe acnpaTopa, HATNCheTe OTHOBO ckopocTTa, Ha KOrTo nped ToBa e 6nI npINOxKeH Temnopn3atop.
CBeTJInHa (T5)
CBeTnHaTa MoKe Da 6bDe aKTHBnPaHa BbB BCEKn eH MOpHT, Ype3 HaTnCKaHe Ha 6yToHa T5. Korato yHKunraTa e akTNBnpaHa, LED nHdNkAtopbT ce BKNUcBa c NkCnpaHa CBETnHa.
HacrpoKaHaΦnIITbP
AknBnpaHTo UIN DeaktnbnpaHTo Ha HndkaTopuTe Ha nTbpa MoKe Da ce N3BbPwBa cMo npu N3KIOueH acnpaTOp. 3a DocTbI Do MeHTo 3a KOHpyraun, HATNCHE TPOdJIKITeJHO T2+T3, eINH PtT, B MeHIO T1 ue 3anoHe da Nyncpa HAcTpoKaT a no NoDpa36npaHe e:
-ФиNTbpcpeu Ma3HnHn HndKATop (T2) BKNIOueH, cneNoBaTeIHO e aKTINBupaH;
- pnpmbmHnKATop (T3) n3KnIOHe, cneObaTeHHO e aKTHBupaH.
T2akTNBnpa/JeakTNBnpa INHnkaTopa Ha qnITbpa 3a Ma3HHN. T3akTNBnpa/deakTNBnpa INHnkaTopa Ha qnITbpa 3a MmPn3Mn.
3a n3n3ahe OT MeHIOTo, HATNCHeTe npOdbJnxIeTENHO T1 nn n3yaKaaiTe 10"
Bb3ctahOBraBaHe Ha qntlbp
AcnipaTopbT cnHaHn3npa Ha peoBHN INTePBaN, Ye qnltpnte Tp6Ba da 6bDat noIIOxKeH Na noIdpXkKa:
-ФнгьрсруMa3HnHnHaBcKeN40aca;
-ФИNTbP pOToN B MInp3Mn Ha BCEKn 160 yaca.
B To3n CJIyau, KOrato acnnpaTopbTe n3KJIIOHe, KOrato IOTpe6nteTJDOKOCHe eINH npOn3BOJeH 6yToH, INHTepFeIcBT Tce cnHaJIuN3Ipa 3a 10" DBA Tnna Heo6xOUMocT:
-
ako T1+T2 nyncipat: noDpBxxka Ha qnIITbpa cpeuy Ma3HnHn;
-
ako T1+T3 nyncupaT: noDpBxxka Ha qnIITbp npOTNB MnpN3Mn.
IIO BpeMe Ha 10" e Bb3MOxHNo da Ce Bb3CTaHOBn fNITbPbT IpOTnB Ma3HNH, Ype3 HaNTcKaHe Ha T1+T2 n Da CE Bb3CTaHOBn fNITbPa cpeu Mnp3Mn, Ype3 HATNCKaHe Ha T1+T3. Cnei 3aBpWbaHe Ha Bb3TaHOBraHoTe, KOM6HaunTe OT 6yToHn Ie MmRat 6bp3O DBA nTn. INHTeppeicbT cera ue pa6oTu, KaKTo o6NKHOBeHo.
BHHMaHHe:
IIO Bpeme Ha 10", acnnpaTopbT fynKcHOnHpa HopMaHNo, Ho Hma da nMa Bn3yAnHa o6paTHa Bpb3ka 3a 6yToHnTe 3a ckopocT. Ako IIO Bpeme Ha 10" He ce n3BbPm HnTo eHa onepaun, LED nHnIkatOpnte ige cnpaT da npncipat n Bn3yAnHaTa o6paTHa Bpb3ka ige Ce BbpHe KbM HopMaHnHO.
ПОДДРБЖKA
Почистванe
3a NOHCBAHeTo N3No3BaIte EINHCTBEHO Kbpna, HABJIAXHeHa C HeyTpAln TeyH NoHCBAu npenapTu. HE N3NOJ3BAIte IHCTPymeHTN INI PNUBOPN 3A NOYUCTBAHE!
I368BaTe npenapatN, KOITcBdbpxaT a6pa3nBn Yactu. HE I3NOJ3BAITE CnIPT!
Panael 3a nepimetpaJHa acnnpauza
IOncTbaTe nepMeTpahnHa acnpupaan paHn ToKOBa YecTo, KOJIKOTo NoCTBaTe fNITbpa 3a Ma3HHn. 3a ceJTa n3No3BaTe Kbpna n Cnabo KOHcHTpnpan NoCTBaAs npenapat. He ynoTpe6raBte HNKora npenapatn, KOITo cbDbpxaT abpa3NBn Yacntu.
PoaepbXka Ha qnItpnte 3a
Ma3HHH
ΦHnTbpyT 3aIbpxKa Ma3HHTe YactNcN, OTdJIaHH npn RotBeHe.
IOnuCTBa Ce BeHbX MeceHo C HeYtpaHn Ipenapatn. Mne ce pUHO IIN B CbDOMNHa MaUNHa Ha HnCKa TemepaTpa n KpaTbK peKIM Ha N3MBAhe.
Pn MneHe Ha nTbpa 3a Ma3HHN B CbDomnHa MaunHa e B3MOxHO ToJ da Ce oBe3uBETn, HO TOBa B HnKaKbB ClyuAe He HamaJIyBa cNooc6HocTTa My Ha nIITpnpaHe.
3a da pa3rno6nte cnnTbpa 3a Ma3HHnHTe, npnHeTe dpkKaTc npKHeH MexaHn3bM.
IopdpbKkaHaΦnTbpa cakTNBeH BbyJIeH
3aIbpxHa HnnpnTHHte Mnpn3Mn, KOHTo Ce OTdJIaT npnIbpxKeHe.
ΦnTTbp TnnpoJoxka (npnoJoxeKbM npOyKa).
ФИЛТьрьсakTNBEH BByJIeH MОжеДа 6Бдe NOчNTBaH Ha BCEKINDA MeCEua NIII KOraTO INHДиKaTOpBJ3a HAcNlaHe HaФИПТРИЕ (ako n3бpaHЯrT OT Bac moJen e Cha6dEN C TaKbB) ro nOKa3Ba.Mne ce cToIIa BOJa NODxOJaU npenapatn NIIIBcDOMYHnHa MaHnHa Ha 65^ .BvB BtOpNcnyaB CBdOMYHnHaTa MaHnHa He Tpr6Ba Da IMa dpyrN CBdoBe I Tpr6Ba Da ce n3ПbHn peKIma Ha n3MmBaHe DOKpai.
IOnCywTe BHNMaTeHNO fNtbpa, CneI KOeTo rO nocTaBeBbFyphata 3a OKoNo 10 MmHytn Ha 100^
TeKCTINHHTe B3rnaBHNuHaΦnITbpa TpI6Ba Da ce IOdMeHrT Ha BCEKN TpN rOaHHU INN aKO NOBbpxHOCTTa IM e
YBpeHa.
ФИТьрт TIN NOДNOЖКМОж Да 6БдЕЗAMeH C KpbIлФИТьрсВгЛeH.
Kpbbln qntbpcakTNBeH BbrneH
IocTabeTe NO eINH fNITbP O T BC8Ka CtpaHa, Taka Ye da Ce NOKprrT DBeTe IpeDnA3HN peWetKn Ha paB0THOTo KOJIeNo Ha MOTopa, CneD KoETo 3aBbPTeTe No NOCoka Ha YacOBHnKBoBaTa CTpeIka.
Pn demoHTaxa 3aBbPTeTe B Nocoka O6paHa Ha YacOBHNKOBaTa CTpeJIka.
ΦnntbpbT cakTNBEH BbrneH ce 3anyuBa np6n3HTNHO CNEIbIbIpeNoH Hn3NOJ3BaHe B 3aBNCMOCT OT HaunHa HA rotBeH nOT TOBA KOK YoCTO NOUCTBaTe Φnntbpa .
BbB BCEK cnuyaH e Heo6xOJMo Da NODMeHrTe fNITbpa cAKTINBEH BByIeH Ha BCEK YeTnP MeCeua NN KOrato INHdNKaTOPbT 3a 3acNtAHe Ha fNITpTe POKa3Ba,Ye e HEO6xOJMo.
He ce mne HnTO MoKe da Ce n3PON3Ba NOBTOpHO.

IopMaHa Ha JAmnnte
AcnnpaToptb pa3noIara c ocBETeHnHa cnCTema cbc CBETOIOI.
CBETOIOIDTE rapaHTnpaT ONTMaHNO OCBETHeHne,do 10 nI NO-CNIHO OT TpaNIOHHITE NaMn N IO3BOJIBAr 90% INKOHOMHa eJekTpoeHepn.
3a Da noDmeHnte lamnTe, MoJc CBbpxKeTe C OToPunpaHnCePBn3 3a pe3epBn Yactn.
PEUKNJINPAHE
To3n ypeo otroBaRaHa n3nCKBaHnraHa:
-
Ebponeckata DnpeKtNbA 2012/19/EC - UK SI 2013 No.3113
-
Waste Electrical and Electronic Equipment (WEEE).
YBepraaKe Ce, Ye To3n Upei 6bJe peuKInpaH no Ndoobaaunr 3a TOBa HauH, Bne DOnpinaHacrte 3a ONa3BaHeTo Ha OKoJIHaTa Cpea N BaWeTo 3dPaBe.

CmBOnbT Bbpxu ypea nnB npndpykabaataTo DOKymeHTaunio NocOyBa,Ye To3n npOdyKT He Tp86Ba da 6bde CHTAH 3a DomaueH OTnabk, a Tp86Ba da 6bde npedaeH B cneuaJHO npedHa3NaueHte 3a TOBA PyHKTOBE 3a peuknnpaHe Ha eNektpnuecka n eNektpoHHa Texnka. PnpdbpxaTe ce KBM MeCTHnTe HopMaTHn 3a npepa60Ka Ha OTnaDbu. 3a no-nopobHa INΦopMaucn BvB Bpb3Ka C npedAbaHTo, cbnpaHTo n peuknnpaHTo Ha TO3n npOdyKT BN CbbETBaMe Da ce o6bpHe T kBM KOMPeHTHnTe MecTHn CnyXb, CnyXbnte 3a CbnpaHe Ha DOMaHHn OTnadbUu NIN MaRa3nHbT, B KOITo CTE 3akynlIn To3n en. ypei.
YpeBt e npoeKtnpaH, TcTeBaH n npoN3BeDeH B CbOTBetCTBnC:
- BezoanachocT: EN/IEC 60335-1; EN/IEC 60335-2-31, EN/IEC 62233.
- Pa6oTnX xapaKTepeNtKn: EN/IEC 61591; ISO 5167-1; ISO 5167-3; ISO 5168; EN/IEC 60704-1; EN/IEC 60704-2-13; EN/IEC 60704-3; ISO 3741; EN 50564; IEC 62301.
- EMC - EneKtpomarHHTha cbbMecTmocT: EN 55014-1; CISPR 14-1; EN 55014-2; CISPR 14-2; EN/IEC 61000-3-2; EN/IEC 61000-3-3.
Ipeidloxhenia 3a npabnHa ynoTpe6a, 3a da ce hamaBb3deiCTBneTo Bbpxy oKoJHaTa Cpea: BkIOUyeTe (ON) acnpaTopa Ha MNHmAlHa ckopocT, KOrato 3aNooyHe Ta rotBnTe n To octabeTe da paobTu HraKOJIko MInHyTu CneI npKlIOuBaHe Ha RotBeHTo. YBeNuaBaIte cKOpocTTa CaMo B CnyauHa rOJMAO KOINueCTBO DmM N napu N 3nON3BaIte Ye BvEInueHnte CKOpocTc Camo B EKCTpeMHn CHTyaun. CMeHnTe fNtbpA/ΦnITpnte C aKTINBEH BByIeH, KORAto e HeOBXODIMo, 3a da NpDlbPkaTe Do6pa eFeKTNBHOCT Ha HamaJIbaHe Ha MnpzMaTA. IOnNCTBaIte FNTbpA/ΦnITpnte 3a Ma3HNH, KORAto e HeOBXODIMo, 3a da NpDlbPkaTe Do6pa eFeKTNBHOCT Ha FnITbpA 3a Ma3HNHTE. N3nON3BaIte MAKCImaHnJa DnAmEtbp Ha CnCTeMaTA 3a OTBeJdaHe Ha Bb3dyxa, IocOueH B TOBa pBkoBOIDTOB 3a ONTMn3npaHe Ha eFeKTNBHOCTTA n 3a HamaJIbaHe Ha Wyma.
HEN3PABHOCT BbB ΦyHKUOHNPAHETO
Ako HeIoo He yHKuOHa pa KaKTo Tp6Ba, Ppei Da ce CbPKeTe C TexHueCKoTo 06cIyKBAHe, Hapabete HAKOn cemPi npOBepKn:
AkoacnnpaTOpbT He yHKUHOHpa:
PpOBepeTe daJIa:
- He e npekbcan ToKa;
-e3aadaeHaHraKaBAcKOpocT.
Ako acnnpaTopbT He 3acmykBa DocTaBHyO:
PpOBepeTe daJI:
- N36paHaTcCKOpOCTe nOxOJaA B 3aBnCmOcT OT OTeJeHOTo KOJIuYeCTBO DN M I npa.
-Дали Кухнэта ce npobetрва дocTaTbUHO,3a da ce ocHypn o6mHa Ha Bb3dya.x.
-ФиNTbpbTcakTNBeH BbIJIeH He e N3HOceH (ФиNTpnpauaBepcn).
Ako acnnpaToBt e n3rachan no Bpeme Ha pa6ota:
PpOBepeTe daI:
- He e npekbchaTOKa;
-MHORONOLIOCHNATPpeKbCBaue He e N3KJIIOHIN.
B cnyuHa Hn3npaBnOCT BvB cyHKUHOHpaHeTo, npedI da ce obpheTe KbM TexHnuecknCePBn3, nKIOuTe acnpaTopa OT Mpekata Ha-MAkO 3a 5 ckyHnn, KaTO n3BaNte UeNCena, CneI KoETo rO CBpXeTe OTHOB. B cnuyai, Ye Hn3npaBnocT Ta BCE OSe e HAnlue, obpheTe ce KbM rapaHcNoHHn cepBu3.
TEXHnueCKn DAHHN
Ppwn taxtnta T1 = iapkeia 20
T2 = i a p k e i a 15^
Tpint taxutnta: T3 = δiαρκεια 10'.
To timer IopEvaevpyoTnOeIotavto booster eivai evpyn. Moic 念 o xpovoc, o aToppoPntnpac Obnvei. Otavmu taXUTNTa exxipovio, mIOpeTe va TepaoTe OE aaAec tayutntc TATWvTAC TO EITUUMTO KOUPTI TAXUTNTAC. H evpyea autn 0a to timer (xpovodiaKOTtn).
Otauia taxutntia exei xpovioo, mtoe va anevpyotoinoet to timer patwta c t to T4, eie pia aio tic aaec duo n evpeycs taxutntc. ia va ohoote tov atoppopnnpa, patnoe gava tvaxutnta otnv toia eixate epapuooei nponyoueewc toxpvioo.
(T5)
O oTn 1eToupyia eivai evepoytoinpeyn, to LED avaBcE KTIePTIOvTAc OtaePpO qws.
Pouiqn piaipou
H evepytooinn n aneepeyoioinon twv deiktwv tou piaipu mopei va ktealeotei movo e oBnopevo tov aoppoepntpa.
Tia va eioeEte oTo mevou puOmuoN, Tnote npaetateva ta kouptia T2+T3, kai pOlc eioeAeTe oTo mevou, to T1 0 apxioe va talaetai.
H TPOEeYEvn puOuiO eivai:
- piaTpo kataou aitouc diktns (T2) avaumevos, eioeuvoc evepyó,
- pIATPO kata wv oouw deiktnc (T3) 0noueovs, eioeuvos n evepyó.
T2 Evpyoioi/ aieevpyoioi tov deiktn tou φilpou aiouc. T3 evpyoioei/aeevepyoioei tov deiktn tou φiltpou oμwv. Tia va eEeθeTe aTo to μevou, πatnoe πapateaéva to T1 n πepiéveTE 10"
Etnavapopaipatou
O aToppoepnptac 310nmaivei ava taKa 6iaotmuata oI attaTeiTa ouvtnpon twv iAtpvv:
-
iAtpoKaTaTouAitouc KaOe 40 wpeS,
-
piaTpo kata Twov ooguw Kαθε 160 ωρες.
εaunTnV TEPITIWON, eαβnopevoTov aToppoPntnpa, oTav o xpnoTnc akouptnoeI eva otioobntote koupti, n diTtapn μTopei va εμφavioεi γia 10" duo tuntouc ataitouμevwv evepyiwv:
- av ta T1+T2 παλλονται: συνήρησι φιλτου λίπους,
-av ta T1+T3 nAovtai: ouvtipnO npoiAtpou oOuV.
Kata Tn diapkeia TwV 10" utapxéi duvatotnta etavaopac tou φItpou λIIOUc TATWvTAC T1+T2 kai Etavaopac Tou φIATPOOμwv TAIWTAC T1+T3. Tto TLOS TNS ETTAVAPOPAC, oi ouvduaouoi Twv KOUPTIWv θa avabosnoov ypinyopa duo φopεc. H δiπaφη πλeov θa λεitoupyei ως uvnθως.
Pnoooxh:
Kata n diapkeia twv 10", o atoppopnnpac th a aeitoupye i kavoviká, wotóo dev th a utpexi ontikn avatpoodotno n otakoupiia twv taxutntwv. Av kat n diapkeia twv 10" dev npaymuotoine kaia evepyia, ta LED th a otaatnouv va taaovtai kai n ontikn avatpoobotno n th eavéthe onnv kavovikn ts katotaon.
SYNTHPHSEH
Kaθαρισμός
Tia ToV Kaapoiopxnpoioiote ANOKAEIETIKA eva uypo Tavi e ouoTEpa Upa aToppuavtikc. MHN XPHSIMONIOEITE EPAAEA H MESA KAOAPIMOY!
ATOpuyTe Tn xpnoan aeavtkwv eoov. MH XPHZIMONIOIEITE AAKOOA!
Nivakac TEPiEETPIKns avappoqno
KaapicTe nTv peipetpiKn EtniPavEia atoppopnonc Me Tnv 10ia ouxvotnta Te Nv otioia yivetai n ouvtnponTwv piItpwvi ta liTn, xpoIpoToiWvTacavi kai n OumTuKvwepo atopputtavtiko. ATOpuyETn XpOAn AEIAVTIKWpeow.
Suvtnpnon twv φiltpwv liiouc
Suykpatei ta oomegaia iinouc nou poepxovtai aTTo mayepua.
PpTeIva KaBapicetai iia foopaTov mivae atoppuavtik a Tou dev xapaocuv, eite oTo xeipn oTo Pauvtnpio Tiatwv, to otio pTei va puthetai oE xaunAn Eepokpaia kai o Suvtopo KukAo. Me To Pauoipo OTo Pauvtnpio Tiatwv, to 1aTpo yia ta aiin npoei Eaawpwc va xaee ITO xpwa Tou aa auto dev eTaaalei tic idiotntc pfapipogatos. Tia va byalete to 1aTpo yia ta aiin npae nge tnV aBn anouanlokns.
SuvtnpnoTou φiltpou avθpaka
Anoppoqa TIC duapeotec oou tro poepxovta ano to payeipua.
- Before any cleaning or maintenance operation, disconnect hood from the mains by removing the plug or disconnecting the mains electrical supply.
- Always wear work gloves for all installation and maintenance operations.
- This appliance can be used by children aged from 8 years and above and persons with reduced physical, sensory or mental capabilities or lack of experience and knowledge if they have been given supervision or instruction concerning use of the appliance in a safe way and understand the hazards involved.
Children shall not be allowed to tamper with the controls or play with the appliance. - Cleaning and user maintenance shall not be made by children without supervision.
- The premises where the appliance is installed must be sufficiently ventilated, when the kitchen hood is used together with other gas combustion devices or other fuels.
- The hood must be regularly cleaned on both the inside and outside (AT LEAST ONCE A MONTH).
- This must be completed in accordance with the maintenance instructions provided. Failure to follow the instructions provided regarding the cleaning of the hood and filters will lead to the risk of fires.
- Do not flambe under the range hood.
- Do not remove filters during cooking.
- For lamp replacement use only lamp type indicated in the Maintenance/Replacing lamps section of this manual.
The use of exposed flames is detrimental to the filters and may cause a fire risk, and must therefore be avoided in all circumstances.
Any frying must be done with care in order to make sure that the oil does not overheat and ignite.
CAUTION: Accessible parts of the hood may become hot when used with cooking appliances.
- Do not connect the appliance to the mains until the installation is fully complete.
- With regards to the technical and safety measures to be adopted for fume discharging it is important to closely follow the regulations provided by the local authorities.
- The air must not be discharged into a flue that is used for exhausting fumes from appliance burning gas or other fuels.
WARNING! Failure to install the screws or fixing device in accordance with these instructions may result in electrical hazards.
- Do not use or leave the hood without the lamp correctly mounted due to the possible risk of electric shocks.
- Never use the hood without effectively mounted grids.
- The hood must NEVER be used as a support surface unless specifically indicated.
- Use only the fixing screws supplied with the product for installation or, if not supplied,
purchase the correct screws type.
- Use the correct length for the screws which are identified in the Installation Guide.
- In case of doubt, consult an authorized service assistance center or similar qualified person.
WARNING! Do not use with a programmer, timer, separate remote control system or any other device that switches on automatically.
Very young children (0-3 years) should be kept away from the appliance. Young children (3-8 years) should be kept away from the appliance unless continuously supervised.
CAUTION:The appliance is not intended to be operated by means of an external switching device, such as a timer, or separate remote controlled system.
This appliance is not for professional use. Do not use the appliance outdoors.
The appliance must be handled and installed by two or more persons-risk of injury.
Installation, including water supply (if any), electrical connections and repairs must be carried out by a qualified technician. Once installed, packaging waste (plastic, styrofoam parts etc.) must be stored out of reach of children - risk of suffocation.
Do not use the appliance when you are wet or barefoot.
Never use steam cleaning equipment - risk of electric shock.
The packaging material is 100% recyclable and is marked with the recycle symbol

The hood can look different to that illustrated in the drawings in this booklet. The instructions for use, maintenance and installation, however, remain the same.
Closely follow the instructions set out in this manual. All responsibility, for any eventual inconveniences, damages or fires caused by not complying with the instructions in this manual, is declined. This appliance is intended to be used in household and similar application such as: - staff kitchen areas in shop, offices and other working environments; - farm houses; - by clients in hotels, motels and other residential type environments; - bed and breakfast type environments.
It is important to conserve this booklet for consultation at any moment. In the case of sale, cession or move, make sure it is together with the product.
- Read the instructions carefully: there is important information about installation, use and safety.
- Do not carry out electrical or mechanical variations on the product or on the discharge conduits.
Before proceeding with the installation of the appliance verify that there are no damaged all components. Otherwise contact your dealer and do not proceed with the installation.
- The minimum distance between the supporting surface for the cooking equipment on the hob and the lowest part of the range hood must be not less than 45cm from electric cookers and 65cm from gas or mixed cookers.
If the instructions for installation for the gas hob specify a greater distance, this must be adhered to.
ELECTRICAL CONNECTION
The mains power supply must correspond to the rating indicated on the plate situated inside the hood. If provided with a plug connect the hood to a socket in compliance with current regulations and positioned in an accessible area, after installation. If it not fitted with a plug (direct mains connection) or if the plug is not located in an accessible area, after installation, apply a double pole switch in accordance with standards which assures the complete disconnection of the mains under conditions relating to over
current category III, in accordance with installation instructions.
WARNING! Before re-connecting the hood circuit to the mains supply and checking the efficient function, always check that the mains cable is correctly assembled.
If the cable is not fitted with a plug, connect the wires according to the following table:
Mains voltage and frequency
Refer to the rating indicated on the plate inside of the hood
Wire connection

N:blue
L:brown
Replacing the power cable
The hood is provided with a special power cable; if the cable is damaged, request a new one from Technical Service.
AIR VENT
(for the suction versions)
Connect the hood and discharge holes on the walls with a diameter equivalent to the air outlet (connection flange).
Using the tubes and discharge holes on walls with smaller dimensions will cause a diminution of the suction performance and a drastic increase in noise.
Any responsibility in the matter is therefore declined.
! Use a duct of the minimum indispensable length.
! Use a duct with as few elbows as possible (maximum elbow angle: 90^ ).
! Avoid drastic changes in the duct cross-section.
! The company declines any responsibility whenever these regulations are not respected.
FILTERING OR DUCTING?
! Your cooker hood is ready to be used in suction version.
To use the hood in filtering version the special ACCESSORY KIT must be installed.
Check on the first pages of this manual if the ACCESSORY KIT is furnished or must be bought separately.
Note: If furnished, in certain cases, the additional activated carbon filtering system may be installed on the hood.
Information about the conversion of the hood from suction version to filtering version is present in this manual.
Ducting version
In this case the fumes are conveyed outside of the building by means of a special pipe connected with the connection ring located on top of the hood.
CAUTION!
The exhausting pipe is not supplied and must be purchased apart.
Diameter of the exhausting pipe must be equal to that of the connection ring.
CAUTION!
If the hood is supplied with active charcoal filter, then it must be removed.
Filter version
The aspirated air will be degreased and deodorised before being fed back into the room.
In order to use the hood in this version, you have to install a system of additional filtering based on activated charcoal.
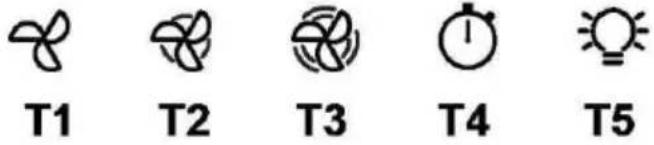
CONTROLS
The hood is fitted with a control panel with aspiration speed selection control and a light switch to control cooking area lights.

First speed (T1)
Press T1 to activate the first speed. When the function is activated, the LED turns on with a fixed light. Press T1 again to turn the hood off.
Second speed (T2)
Press T2 to activate the second speed. When the function is activated, the LED turns on with a fixed light. Press T2 again to turn the hood off.
Third speed and BOOSTER (T3)
When the hood is off or with the first or second speed active, the third speed can be activated by pressing the button T3 and the LED will turn on with a fixed light.
If T3 is pressed again, the booster tums on. The booster can only be activated if the third speed is already active. When the booster is on, the LED T3 starts to flash. While the booster is working, it is possible to switch to the first or second speed by pressing the desired speed button T1 or T2, the booster will turn off and the selected speed will be activated.
When the booster is on, press T3 again to turn the hood off.
After 5' the booster automatically turns off and the third speed is automatically activated.
Timer (T4)
The timer can be activated when the first, second or third speed is active. When the function is activated, both the LED of the Timer (T4) and that of the previously selected speed (T1/T2/T3) turn on with a fixed light.
The duration of the timer depends on the selected speed:
First speed T1 = duration 20'
Second speed T2 = duration 15'.
Third speed T3 = duration 10'.
The timer cannot be activated when the booster is active. When the time expires, the hood turns off. When a speed is timed, it is possible to switch to other speeds by pressing the desired speed button, this operation will turn the timer off.
When a speed is timed, the timer can be deactivated by pressing T4, or one of the other two inactive speeds. To turn the hood off, press the speed again to which the timer had previously been linked.
Light (T5)
The light can be activated at any time by pressing key T5. When the function is activated, the LED turns on with a fixed light.
Filter setting
Activation or deactivation of the filter indicators is only possible with the hood off.
To access the configuration menu, hold pressed T2+T3, once inside the menu T1 will start to flash.
The default setting is:
-
grease filter indicator (T2) on, therefore active;
-
odour filter indicator (T3) off, therefore not activated.
T2 activates/deactivates the grease filter indicator. T3 activates/deactivates the odour filter indicator. To exit the menu, hold pressed T1 or wait 10"
Filter reset
The hood signals the need for filter maintenance at regular intervals:
-
grease filter every 40 hours;
-
odour filter every 160 hours.
In this case, with the hood off, when the user touches any button the interface signals two types of needs for a period of 10":
-if T1+T2 flash: grease filter maintenance;
- if T1+T3 flash: odour filter maintenance.
During the 10^ it is possible to reset the grease filter by pressing T1+T2 and to reset the odour filter by pressing T1+T3. After the reset, the button combinations will flash rapidly twice. The interface will now work as normal.
Please note:
During the 10^ , the hood will work normally but without any visual feedback regarding the speed buttons. If during the 10^ no operations are carried out, the LEDs will stop flashing and the visual feedback will return to normal.
MAINTENANCE
Cleaning
Clean using ONLY a cloth dampened with neutral liquid detergent. DO NOT CLEAN WITH TOOLS OR INSTRUMENTS. Do not use abrasive products. DO NOT USE ALCOHOL!
Perimeter aspiration panel
Clean the perimeter aspiration panel with the same frequency as the anti-grease filter, using a cloth and not too concentrated liquid detergent. Do not use abrasive substances.
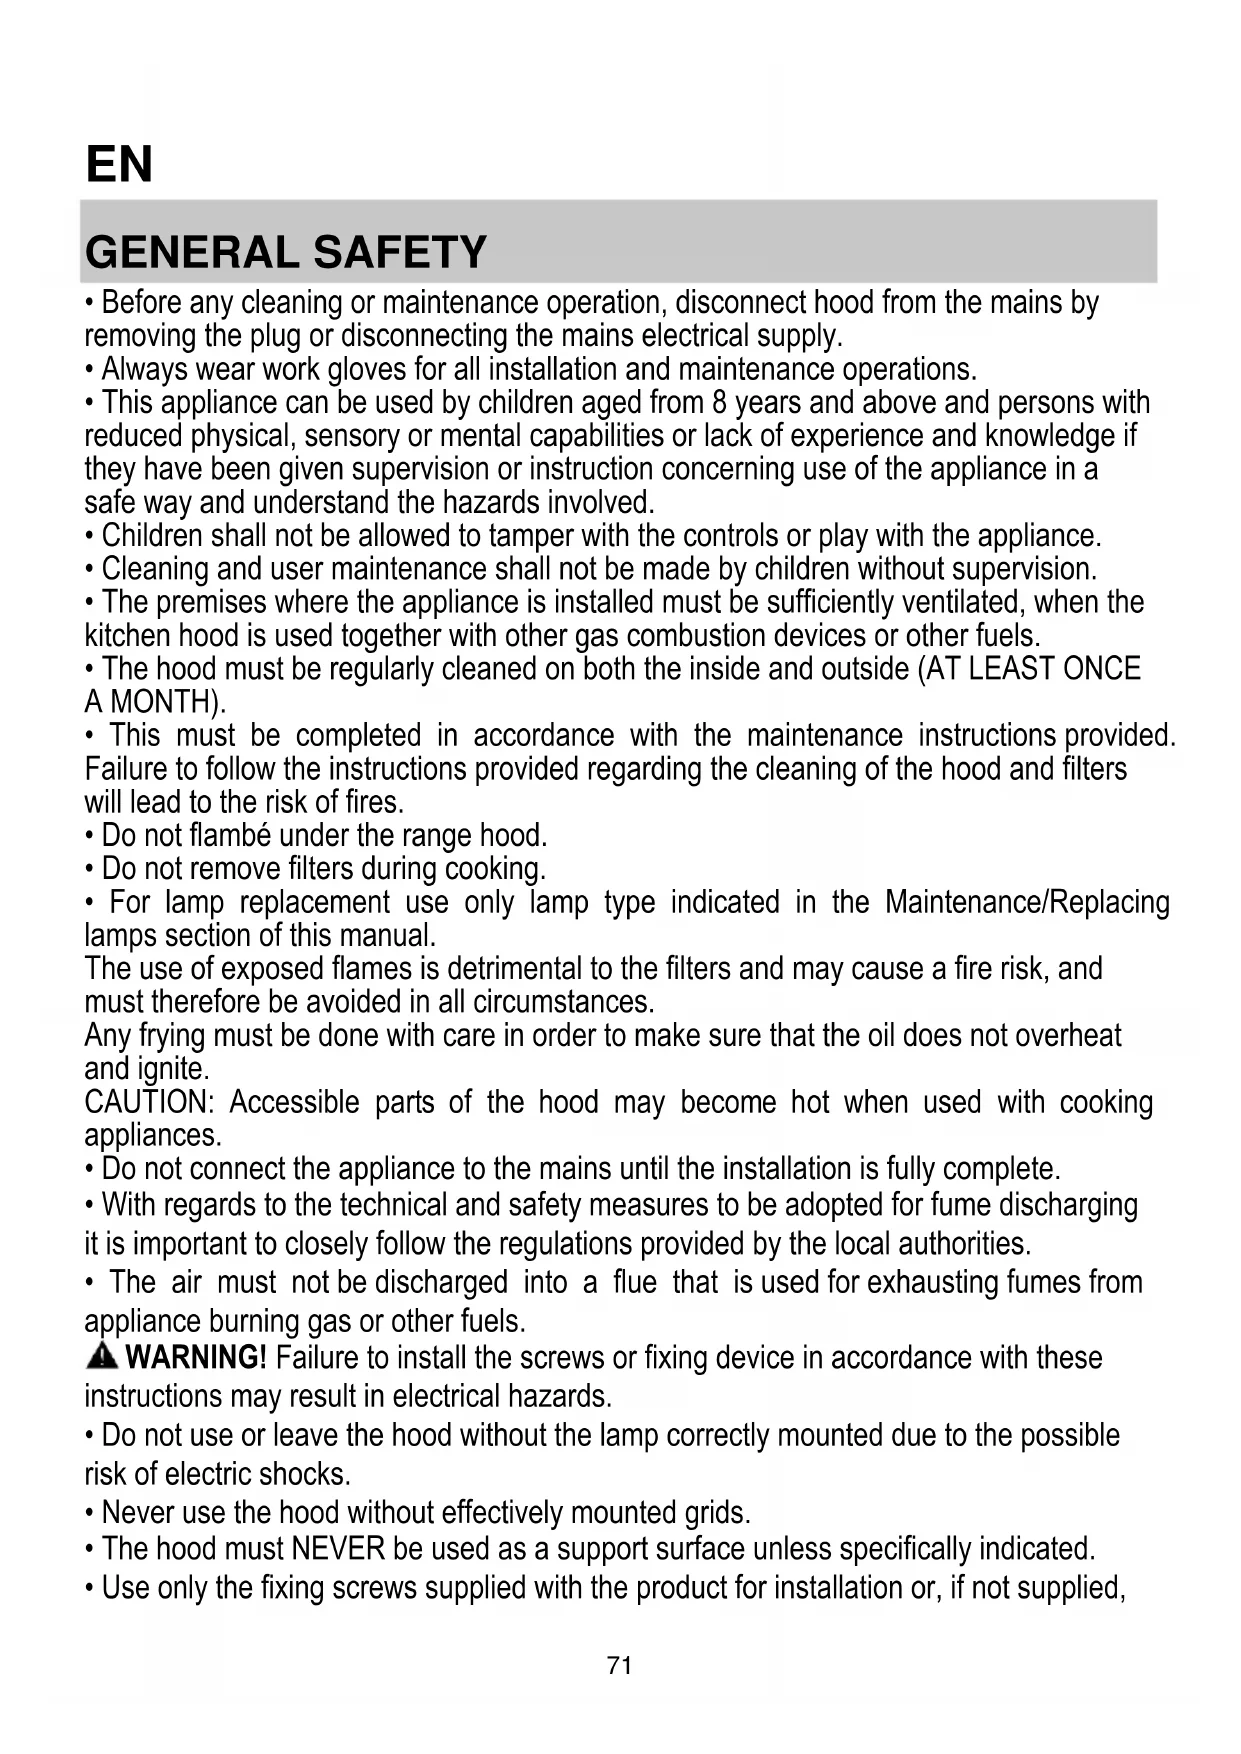
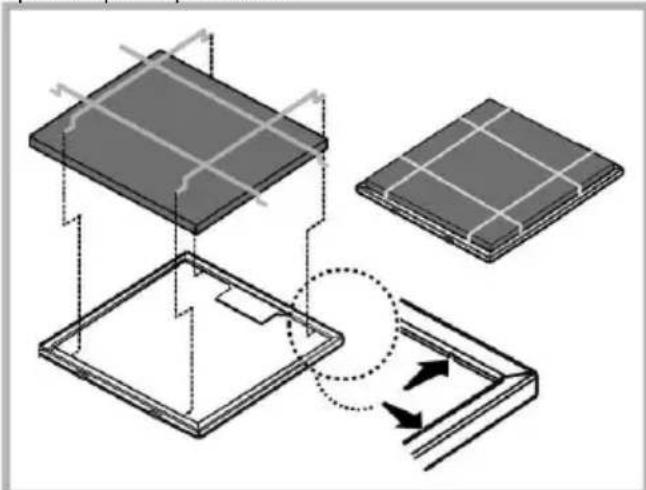
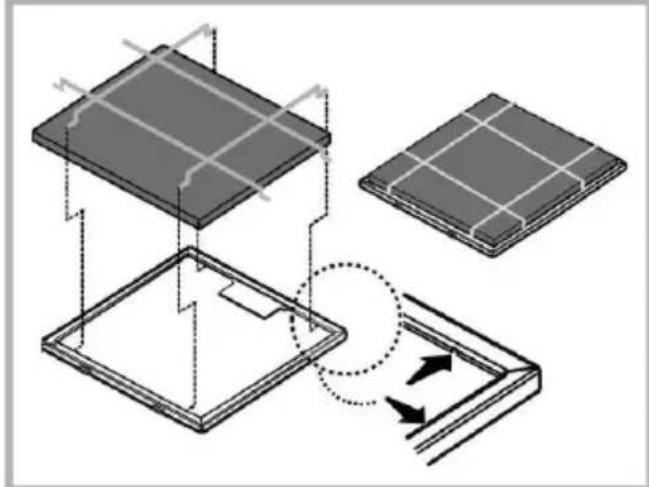
Maintenance of the anti-grease filters
Traps cooking grease particles.
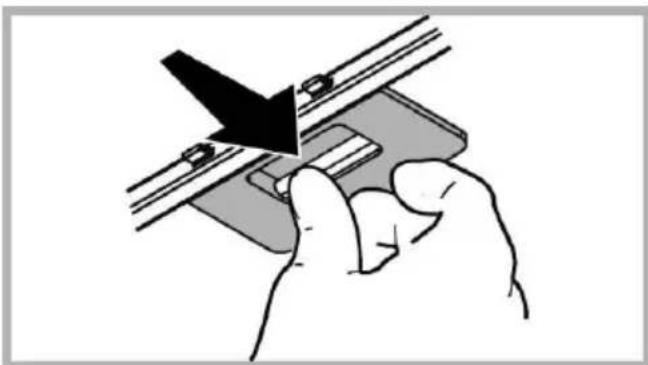
The grease filter must be cleaned once a month using non aggressive detergents, either by hand or in the dishwasher, which must be set to a low temperature and a short cycle. When washed in a dishwasher, the grease filter may discolor slightly, but this does not affect its filtering capacity. To remove the grease filter, pull the spring release handle.
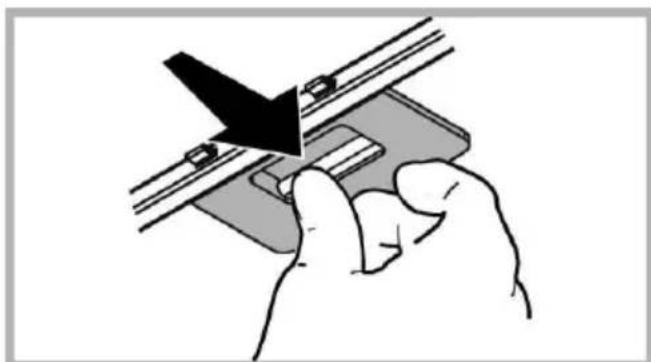
Maintenance of the charcoal filter
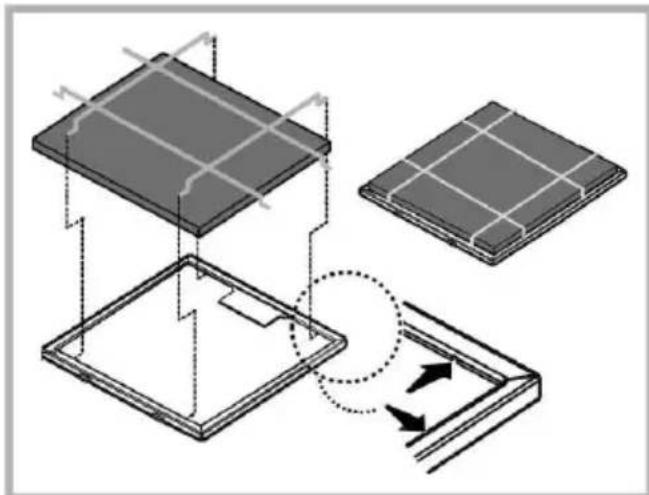
It absorbs unpleasant odors caused by cooking. Synthetic mat filter (supplied with the product)
The charcoal filter can be washed once every two months (or when the filter saturation indication system – if envisaged on the model in possession – indicates this necessity) using hot water and a suitable detergent, or in a dishwasher at 65^ (if the dishwasher is used, select the full cycle function and leave dishes out).
Eliminate excess water without damaging the filter, then put it in the oven for 10 minutes at 100^ C to dry completely. Replace the mattress every 3 years and when the cloth is damaged.
The synthetic mat filter can be replaced with the round carbon filter.
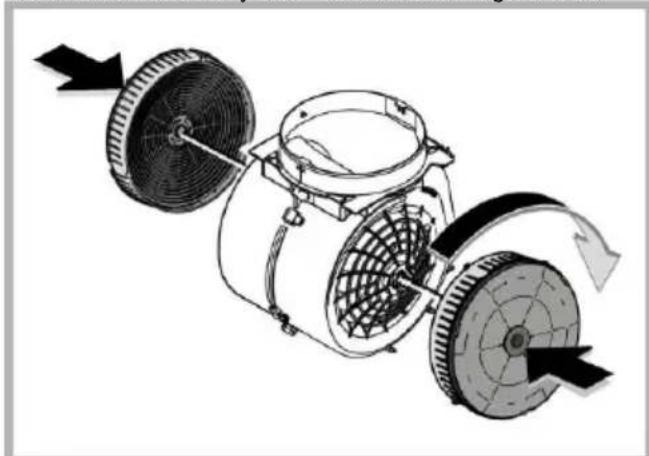
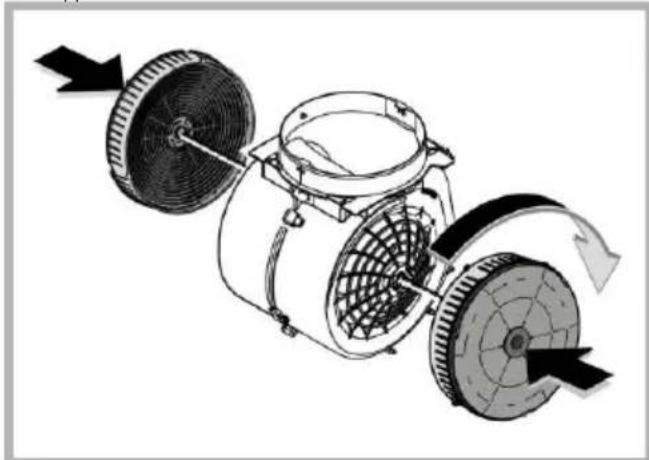
Circular charcoal filter
Apply one on each side as cover to both the shield grids of the motor impeller, then turn clockwise.
For the disassembly, turn counter-clockwise.
The saturation of the charcoal filter occurs after more or less prolonged use, depending on the type of cooking and the regularity of cleaning of the grease filter.
In any case it is necessary to replace the cartridge at least every four months.
The charcoal filter may NOT be washed or regenerated.
Replacing lamps
The hood is equipped with a lighting system based on LED technology.
The LEDs guarantee an optimum lighting, a duration up to 10 times longer than the traditional lamps and allow to save 90% electrical energy.
To replace lights, contact authorised spare part center.
DISPOSAL
- This appliance is marked according to the European directive 2012/19/EC - UK SI 2013 No.3113 on Waste Electrical and Electronic Equipment (WEEE).
- By ensuring this product is disposed of correctly, you will help prevent potential negative consequences for the environment and human health, which could otherwise be caused by inappropriate waste handling of this product.

- The symbol on the product, or on the documents accompanying the product, indicates that this appliance may not be treated as household waste. Instead it should be taken to the appropriate collection point for the recycling of electrical and electronic equipment. Disposal must be carried out in accordance with local environmental regulations for waste disposal.
- For further detailed information regarding the process, collection and recycling of this product, please contact the appropriate department of your local authorities or the local department for household waste or the shop where you purchased this product.
Appliance designed, tested and manufactured according to:
- Safety: EN/IEC 60335-1; EN/IEC 60335-2-31, EN/IEC 62233.
- Performance: EN/IEC 61591; ISO 5167-1; ISO 5167-3; ISO 5168; EN/IEC 60704-1; EN/IEC 60704-2-13; EN/IEC 60704-3; ISO 3741; EN 50564; IEC 62301.
- EMC: EN 55014-1; CISPR 14-1; EN 55014-2; CISPR 14-2; EN/IEC 61000-3-2; EN/IEC 61000-3-3. Suggestions for a correct use in order to reduce the environmental impact: Switch ON the hood at minimum speed when you start cooking and kept it running for few minutes after cooking is finished. Increase the speed only in case of large amount of smoke and vapor and use boost speed(s) only in extreme situations. Replace the charcoal filter(s) when necessary to maintain a good odor reduction efficiency. Clean the grease filter(s) when necessary to maintain a good grease filter efficiency. Use the maximum diameter of the ducting system indicated in this manual to optimize efficiency and minimize noise.
MALFUNCTIONS
If something appears not to be working properly, do the following simple checks before calling Technical Service:
- If the hood is not working:
Check that:
- The power has not been disconnected.
- A speed has been selected.
- If the hood performs inefficiently:
Check that:
- The motor speed selected is sufficient for the amount of smoke and vapours released.
- The kitchen is sufficiently ventilated to allow air intake.
-
The charcoal filter is not worn (hood in filtering version).
-
If the hood has turned off during normal functioning:
Check that:
- The power has not been disconnected.
- the omnipolar disconnection device has not tripped.
If the hood fails to operate correctly, briefly disconnect it from the mains power supply for almost 5 sec. Then connect it in again and try once more before contacting the Technical Assistance Service.
TECHNICAL DATA
| Height (cm) | Width (cm) | Depth (cm) | Ø of the exhaust tube (cm) |
| 71-104,5 | 59,8 | 32,6 | 15 |
| 79,5-104,5 | |||
| 71-104,5 | 79,8 | 32,6 | 15 |
| 79,5-104,5 |
CE
Components not provided with the product

You can download the Safety Instructions, User Manual, Product Fiche and Energy data by:
- Visiting our website docs.whirlpool.eu
Using QR Code - Alternatively, contact our After-sales Service (See phone number in the warranty booklet). When contacting our After-sales Service, please state the codes provided on your product's identification plate.
ES
SEGURIDAD GENERAL
Controller of: Controller dat:
Controller of: Controller dat:
Hikon He BnKOpncToByTe napoBipnpnaDnIyNueHHe - np3NK ypaXeHH eEKeTpnuHm CTpyMOM.
NakybaJIbHn MaTepiAHa 100% niIdaTbcpepeo6ci i no3HaHeHn CmBOLom pepeo6kn

Kyxohna BntaKa MoKe MaTn Dn3aH, 0o BiDpi3HReTcB CbiD BntaKKn 3O6paKeHHoi Ha MaJIHOHKax ciCi IHCTpyKii ane B 6yDb-akomy BnnaKny IHCTpyKii 3 MOtAky, TexHiNHO 06cNHyROByBaHHra ekCnNyaTaui 3aJInuHaOTc 6e3 3Mih.
Hcnpabnocti, 36nK a6o noxexy, 0 moe mat Ni Mice npn BnkopncTahni npntpoBnacnIDok HbNKOHnHnHCTpykui, npnbdehenx B daHOMy keipBnCtBI. BuTJHKN KObnK cPoeKTOBAHm DnB CMOKtyBaHHa NIMy Ta npay, 0 yTBOpOeTbcnIac npriotybaHH iXi Ta npn3Naehn nIwpe Inyo6yTOBOrB NKOPNCtAHn..
Baxnbo 36epertn ci ihctpykii dna toro, uo6 moxha 6yno 3bepHytnca Do Hnx B 6yd-kyn qac. Y BnnaKny npodaKy, nepeaui nepei3dy, nepekoHaTncBa TOMy o6 ihctpykii 6yni pa3om 3 Bnpobom.
- YBaXHo IpoUHTaTn IHCTpyKuIiB HNX MICTNTbCBAxNIBa IHOpMaIg 3 BCTaHOBNeHHe, BnKOpNCtAHHe Ta 6e3neKn.
3a60pOHeNo BVKohyBaTn eIeKtpuHi nMexAhHi 3MiHn y Bnpo6i nY bVbIHNx KaHaJax.
- IepH hIX npIcTynITn Do MOHTaKy BInpo6y nepeBipTe YN Bci KOMNoHEtN 6e3 DeΦeKtIB Ta He E noWkoJKeHmN. Y npOTINexKHOMy BUnaKy 3BepHiTbC B Micue npOdaKy Ta 3ynHItb MoHTyBaHHa BInpo6y.
Bicntb Hxhboi BiuactnHn BtJkN Do nocdy Ha kyxohni nnTi Ma 6ytn He MeHwe 45cm, y BNanky eJeKtpnHnx nnT, ta 65 cm, y BNanKy ra3OBHX Ta KOMbiHOBAHNX nnT.
Heo6xio npnMaTu Do yBaru BiDcTaHi, kki Bka3yIObCraBHCtpyKci 3 iHCTaJIra3OBOi PNTu.
EJEKTPNUEHNEIID'EDHAHH
Hanpyra B eIeKtpomepexi MaE BiINOBiDaTn Bka3aHm XapaKTePncTnKam Ha etNKeTci,
Як 3нхоДиТьСВCEРEDINH BNTJXK.Якв KOMПЛeKT BxODHTB BILKA NiD'EDHaHHB EJIeKTPOMepeJy,TO CnId NiD'EDHaTHN BNTJXKy Do PO3eTKN,SO BiIDNoBIDAc IChYIOHM HOpMaT Ta 3HaxOДиTbCBA DOCTUHNOMY MlCi,SO MOxHa BIKOHATN NicJa IHCTaJIaJI. JKsoЖ BnIka He BXODITB B KOMPJIeKT (nprame NiD'EDHaHHB EJIeKTPOMepeJy),abo PO3ETKa He 3HaxOДиTbCBA DOCTUHNOMY MlCi, TAKoK i NicJa IHCTaJIaJI,TO CnId BMOHTyBaTN HaJIeKHi N DBOX-NOHCHN BIMiKaU,ЯКИ 3a6e3neuHTb NOBHe BiIDKnIOueHNe BId MepeXi ByMOBax NepeHAnpyrN lI KaTERopi,B NobHIn BiIDNoBIDHOCTI 3 npabUNamn IHCTaJIaJI.
YBAGA! nepeT TIm YK 3HOBy NiIKNIOHTN BNTJCKy Do eJIeKTpOMePexi i nepeBipTN npaBnIbHicTB pO6OTn, 3aBXdN KOHTPOJIOnTe 506 shyp MepeXi 6yB 3MOHTOBAHn BiPHo.
Ka6eBHe OChaueHn BnKIO, NiKnIOuHTb ApoTn 3rINO 3 HAcTyNHO Ta6JIneO:
Hanpyra i yactota mepeksi
ДиВiTbCЯ3HaueHЯ,Вka3aHe Ha Ta6nUci 3 daHIMN BCEpeDInHi BNTJXKN.
PiiknueHH npotIB
:KOBTH/3eJIeHm
N:cunhi
L:KopuHcBm
3amHa eIekTpoka6eJia
BntjxHn KObnak Mae cneiaIbHn IpoBiJ XNBJIeHHr; y BnPaIky N0WKoJKeHHn IpoBOy, 3aMOBe Ioro y cny6i TexHicHoro o6cIyROByBaHHra.
BnBID NOBITP
(Дя ВИКОннг 3 BiDBoOM)ПID'EDHaTи KOBnak Do HAcTiHHOI BVBiHoi Tpy6n Ta BVBiHOrO OTBOpy 3 ODAKOBIM DiAmetpom BIXOdy NOBITpr (3'EDHyOnHmФnaHeu).
BnKOpncTahHn HactiHHnx BnBiDnHex Tpy6 Ta OTbOpIB 3 MeHmIM diaMetpOM npNBede DO 3MeHWeHHe eEeKTNbHOCTI BCMOKTyBaHHaTa 3NaUHe 36InbWeHH pIBH IyMy.
Tomy m3himaem0 3ce6 6ydb-ky BiIOBIaIbHicTb no Bnuecka3aHOMy.
! BnKOpNCToBvIe HauKOpOTuN BtJxHn KaHaJI.
! BnKOpNCTOByIe BNTJxHNI KaHaJI 3 HaMeHNIO KJIbKICTHIO NOBOPOTIB (MAKcMaJIbHNI KYT NOBOPOTY: 90^
! YnkaTe pi3kX 3mH nIooJI nepepi3y BntraKHO KaHaNy.
!PiinpncMCTBO 3Himae 3ce6b-yky BiJIOIaIbHiCtB, kUo diiChi
3PEUKNPKyIaIeIOuN3BIDBODOM
Bawa Bntjka roToBa Do BnKOpNCtHaHbpeXmBiDBody.
ДяТоTOIIOB BnKOpNcTObYBaTи BnTЯKKy BpeKmipeuKyraJIH Heo6xIDHO BCTaHOBTu N OJATKOBI KOMPJIeKT.
Ipebeipte Ha nepiKax daHoro nociHnka, YBxOHTb DOATKOBI KOMNIEKT y noCTaBky a6o Ioro Heo6XiHo npudbaTn OKpEmo.
Pnmitka: KIO BxOHTb B NOCTABky O6IaHaHH, B DeKnx BInaKax, OdaTKOBn KOMnNeKT ByinbHnx φinbTpB MoKe BKe 6yTN BCTAHOBneHn Ha BtAku.
IhOpmaucia 10do npeBedeHn BNTaekn 3 pexmMy BiDBeHn B pexm peunpkylaqii Bxve BxoNtby daHn noCi6Hk.
BnKoHaHHa 3 BiDbOdom
Napu BvBOyra Tbc H30BHi Yepe3 BvBiHy Tpy6 3akpinneHy Do fPhaHc 3'EdHaHn.
YBAGA!
BvIiHa Tpy6a He NoCTaHaTbCra I TOMy Heo6XiHIO II npuI6aTaN OkpemO.
IiAmetp BvBIDHO Tpy6n NobuHEn BiINOBiDaTu N iAmetpy 3'edHyBaJIbHoro KInbya.
YBAGA!
Ku BoTJXHn KOBnak Mae ByrIbHi φiNbTpN, To ix Tpe6a 3HrtN.
BnkoHaHHa 3 peunpkyIaIcIeIO
BtHyTe nobitpr 3Hexuioctbca Ta Ouyuetybca Ta 3HOBy NOeptaeTbC B npimiuHn. ITo toro, uO6 BnKOpncTObyBaTu KOBnak y cybomy peximi, Heo6xidno BCTaHOBUTN DoaTkoBY CNTEmy fInbtpi 3 AKTNBOAHIM Byrllm.
KOMAHДN
BntaKa oHaHa haHa nHeJIIO KOMH3 KOHTPOeM WbNdkocTi BNTaKoHTPOeM CbiTaIg OCBtneHHa BapnIbHOi nobepxHi.
Nepwa wBnDkictb (T1)
HaTnCKyIe T1 dny BkNIOUeHHNEpwoi WbNdkocTi. Ppi BkNIOUeHHI ciie cyHKci, BiINOBiHN CId cnaJaxye i ropntb noctinHM CbitlOM. 3HOBy HaTnCKyIe Ha T1 dny BkNIOUeHHBtRKHoro KOBnaka.
Dpyra wBnKicTb (T2)
HaTnckyIe T2 dIy BkIIOUeHHA pyroI uBnIKoCT. Ipn BkIOUeHHI uei FyHKuII, BiNIOBIDH N CId cnaJaxye i ropntb noctinHM CbiTlOM. 3HOBy HATnCKyIe Ha T2 dIy BkIIOUeHH BITXKHorO KOBnaka.
Tpeta WbnuKicb i BOOSTER (IIDCNJIIOBAU) (T3)
PnB BMKHeHOMy BITJXHOMy KOBNaky, a TAKOX npn BKNHOeHNx nepui a6o dpyri WBNKOCTI, MOKHBA KIOHTN TpeTIO WBNDICTb HATNCHEHHM KHONK T3 i cnaaxhe noctiHMM CBITJOM BiINOBIDHMI CII.
Iopalbwe HATNCHeHHa KhoNky T3 3anyctntb booster. Booster moke 6ytu BKnOueHn Nnue nicra toro, k 6yna BkNoeHa TpeTt WbNDKCTb. PnB KnoeHomy booster, CI D KhoNk T3 noynha nylbcybatn. B xoi piobotn booster moxHa nepeenTdo nepwoi afo pyrooi WbNDKocTI Jnaxom HATnckaHHa Ha KhoNky BiDnOBIDHOI WbNDKocTi T1 a6o T2, iDCnIOBaU BmKHeTbcra, a o6pana WbNDKCTb BKNOHTbcra.
Дя ВИКПЮЧЕНЯ BИТЯЖНО КOBнакApnВКПJOчEHOMy booster,3HOBy HaTиСHTb Ha KHONky T3.
Yepe3 5 xBnHnH po60tn booster abTomauHO BmNkaeTbca, a BntjKkna NOBepTaetbcr do TpeBoI WnDkoCTi.
Timer (Taimep) (T4)
Timer MoXHa BKnOHTn pRn BKnIOeHnx nepo, dpyro a6o TpeTb0i WBNKocTi. RaIcUa FyHKzIg BKNIOeHa, to CI Timer (T4) i CIpaHHe oBpaHOI WBNKOCTi (T1/T2/T3) 6dyTB rOpITn NOCTIHMM CBITNOm.
Tpnbajicbpo60t timeraJneKHTBbID o6paHOI Wbnkocti:
Pepwa WbNdkicTb T1 = TpnbaiicTb 20 XbNnH
Dpyra WbNdkicTb T2 = trpBaNictb 15 xBnlnH.
Tpêra Wbɪdɪkɪctb: T3 = tpɪbaɪnɪctb 10 xBnɪnH.
Hemoxnbo Bknohtn timer, noKn npaoc booster . Picna 3akHcHnAcy BntJHKn KOBnK BmNkaetbca. Konn Oda 3 WBnKoTei npaoc 3 TaIMepom, MoXHa nepeKIOHTn Ha iHsy HATnCKaHHM KHONn NOTpioHOI WbNDKocTi. Lr onepaiz BmKHe TaIMep.
KoHn Onda 3 WbNdkOCTe npaIOE 3 TaImePOM, MoXHa BmKHyTn timer HaTNCHeHHM KhONKn T4, a60 J HAtNCHeHHM KhONKn 6yDb- koi iHooi He BKNIOyeHOI WbNdkOci. IINB NKIOueHHB BNTKHO RO KOBnaka HATNCKyTe 3HOBy Ha KONKy Tiei WbNdkOcTi, do Kaoi 6yB 3actocobAHn TaImeHn pexim po60tn.
Писвиьанн(T5)
PiicbiuybaHHMOe BKNIOUATNcB 6yIb-RAKIM MOMENT HAUCHEHNM KHONK T5. PnB BKIOUeHHI ciE cyHKii, BiINOBiHN CIcnpaJaxye i roptnb noCTIHMM CBITTOM.
HanaawTyBaHHaΦInbTp
BknHcHnI BnKIOeHHnIHmKaTOpIB fIbTpMy MoKe 3dInCHOBaTnCra Jnue y BmKHeHO BnTJXHO KOBNaKa.
IINIOHO KOHPIpyaui noTpi6HO BIKOHATN IOBRE HA TNCHEHHA KHNKn T2+T3, IICnBxOy B MeHIO T1 NOHHe nybcByATn.
IpeBCTaHOBnHe HanaWtYBaHHr Take:
- JxnpoyNoBnIOBaJIbHm φijIbTp iHnKaTOp (T2) Ropntb, To6To BkJIHOeHn;
- de3oOpuyoun fInbtp IHdkaTOp (T3) He ropntb, T6To He BKJIOueHm.
T2 BKNUaE / BUNKae INDnKaTOP XInpoynOBnBaIbHoro φINbTpY. T3 BKNUoAe / BUNMkae INDnKaTop De3OOpyOuro φINbTpY. DnBHXOy 3 MeHIO BNKOHaTe TpINBaJe HATNCKAHHa KHOInky T1 a6o noeKaTe 10 cekyHd
BidnoBneHHcTatyCypinbtpib
Yepe3 neBHI iHTepBaHn BNTJxKHN KObNAc CnHAni3yE npo Heo6XiHicThb Texo6CyroBvBaHHaJIbTpib:
- KInpooyIOBnIOBaJIbHnΦIbTpKoXHi 40 roDnH;
-De3oOpuyOuHnΦiIbTpKoXhI 160 roUH.
Y TaKnx BnnaKaX, npn BmKHeHomy KOBNaKy, B MOMENT dOtnKy KopncTyBaHa 6ydb-RAKOI KHONKn, iHTeppeic 6yde cunHaJIi3yBaTN npotrarom 10 cekynd npo DBOX TINax Heo6xidnHex onepaui:
-
kT1+T2 nybcIyIb: texo6cnyroByBaHnJxipoynoblaBHorO fIbtpy;
-
kT1+T3 nyIbcyIOb: texo6cnyroByBaHnJe3oDopyuOro fInbtpy.
IpoTAYOM 10 cekyHd MoXHa CkHyTN iHNkaUIO XmPoYNoBnObaNbHO rO fIbTpY HaTNCHeHHaM T1+T2 iINnKaUIO De3oOpuyOro oIbtpy HATNCHeHHaM T1+T3. IicJI BnKoHaHHa ZbOrO CkndaHHa, KOM6iHauiu xnx KhoNOK WbNko 6bnMHyTB dBi.i. Tene pIHTepein cyHKioHYBaTMe, k3aBXdN.
ybara:
IpoTAROM 10 cekyHd BITJxKHN KOBnak 6yde npaioBaTH HOpMaNbHO, aNe He 6yde Bi3yaIbHoro 3B'3ky Ha KHONkAX BKIOUeHHa WbNdkocTe. JXO B XODi 10 cekyHd He 6yde BIKOHaHO XoDHnx Di, CIIN nepeCTaHTb NylbcyBatn, i Bi3yaIbHNI 3BOPOTHNI 3B'3OK NOBepHeTcA DO HopMaJIbHorO peKIMy.
TEXHlYHE O6CJIyROByBAHHa
UH
ДячNTКВИКОПUCTOBYTEЛИWEcneцiaьну cepBetky, HAMOCHENy HeITpaJIbHIMpiIaKIM MInIOvHIM 3acOBom. HE BIVKOPUCTOBYITE 3ACOBIB ABO IHCTPYMEHTIBДЯ OCHUSEHH!
He BnKOpNCTOByTe 3ac06n 10 MaIOb a6pa3NBi MaTepiAn. HE BnKOpNCTOByTE CnIPT!
PepmEpnHa nHaJIb BCMOKTyBaHHa
UcHTnT3OBHIuHIO naHeJI BCMOKTyBaHHa 3 OINHaKOBOu
UactOTOI IO i JInpOBn FInbTp, BnKOpNCTOByBaTN dN
UboTe CepBeTKy Ta He KOHcHTpOBaHm MInOHn 3ac6.
HikOnn He BnKOpNCTOByBaTN abpa3NBi peoBHN.
06cnyroByBaHHx HnpOBnx fInbTpib
3aTpmyc xnpoBi cnoJyehnHa, 0o BnHkaotb nid yac npuroTyBaHHia.
IobHHe HcTnTcB OINH pa3 Ha MicaB He CNbHOIOUHMM MIOUHMN 3acO6AMn, BpyHy a6o B NocydomnHi MaunHi npn Hn3kI TeMnepaTypi i 3 KOpOTKm UKNOM.
Pn MNTTI B NOcyDOMHHi MaunHi MeTaeBn FjIbTp 3aTPMKN JNpy MoKe BtpATuN KOIp, ane Noro XapakTePNCNI 3 FJIbTpYBaHHJ XODHM YINHom He 3MIHTBCr.
IЯ 3HATTaIbtpy 3aTpMkn Xnpy NotarHitb Ha ce6e npyKHHpy pyky BiUeHJIeHHa IjIbtpy.

06cnyroByBaHHa ByrInbHoro φinbtpy
B6npac HnpeMHI 3anax Kyxhi.
ΦIbTp-npoknaKa(BKOMnJIeKTI3 npoDyKTOM).
ByrIbHnFIOBTPMOKHaMUTNKOKHIDBaMICaJI(aOBOHN CNTemaIHINKaUII NpePONBEHHaIPIB,AKUoEyBAWIM MOeJI, Bka3ye Ha daHy Heo6xHicHTb) B Tenni BODi 3 BiNDOBiHMMNHOUMN3acobAMn a6oB NOcyDMHOuyi MaunHi npT Temnepatypi 65^ (B OCTAHbOMy BNnAdky, BIKOHaHTe NOBn cNKmMTTg6e3 nocdy BCEpeDNI HOCyDMHOOJMaunHn).
3nHn HADNIuKOBy BDOy 6e3 nooKoJKeHHa pInbtpy, nicna YORO 3HOBy nocTaBHTn Ioro y dYxOBky Ha 10 XB. npn 100°dnn NOBHOrO OcyUyBaHHa.
IpykmyiHn pa3 Ha TprpOKn, a6o JK KOxHoro pa3y, KOnTkaHnha BnBnEcbn NOKoJKeHOJ.
ΦiNbTp-πpOKλaKу MoKHa 3aMiHIOBaTn Ha KpyroBm
ByrilbHnΦilbTp.
Kpyrnn ByrIbHn FInbTp
PnKJactn pIbtpn no 06nbI CTOpOH nIy NOKpTT3axmchnx PnuiTOK potopa DnBryHa, nicra Yoro NOBepHytn pIbTp 3a roHHNKOBIO CTpiIKHO.
IJI 3HATT- NOBepHyTN pIpOTn rOuHHKOBOI cTPIKN. IpeBipKa ByrInbHoro pIbtpy Ha HacuHHeNn npOBODtbcra nicJ6JIbM MeH uOBoro nepioDy BnKOpNCtAHnB 3aJIeXHOCTi BiD TUNy KxHi i peryIaRpHOCTi OChCTKn pIbtpy XnpiB. Y 6yDb-akOMy BnAAdKy Heo6XiHo 3aMIHTn NaTPOH MAKcIMyM KOxHi YoTnpn Micci.
HEpiIJaRAe MNTTIO qn NoHOBJeHHIO.
3amHa lamnoyok
Bttjka obnadha ha cnteMOO OCBtIeHHa Ha ochobi texhonorii iioib (LED).
IIOIN 3a6e3neyIOb ONTmAbHe OCBiTNeHHra, TpNBAnCTb IX B 10 pa3 Bnua BiD 3BnuaHnx JAmnoOK Ta daHOt 90% ekOHOMII eEKeTpoeHeprii.
ДяЗamилamн KOHTaKTyBaTN aBTopn3ObaHn cepbichn ueHtp 3anachnx YactNH.
YTNJI3AUJIA
Данн Вирб помарковань BiDnoBIDNo Do CBPonecBkoI DupeKTHBn 2012/19/EC - UK SI 2013 No.3113, ytniiaqia eNeKtpuHoro i eNeKtpoHHoro obnaHaHHa (WEEE). 3a6e3neuyuHn BIPHy ytini3auio cIboro Bnpo6y, Bn donomoxete nonepedntn notehiiHi HeraTnBHI Hacniikn dny OTOyUOHO cepedOBu7a i 3doob'Я liOnHIn, KOTpi MOrNb 6 MaTI MlCeB nPoTNJExKHOMy BnApkky.

Cnmbon Ha cAmOy Bnpo6i abo Ha cynpobodkyohomy Ioro DoKymHt Bka3ye, 10 npy ytni3aui 2b0r O Bnpo6y 3 Hm He MoXHa NOBOnTncra k 3i 3BnuaHmN N6byTOBMn BIDxOaMn. BIn Mae 3daBaTncs y BiDnOBiHn nyHKT npHm OeKtpnHOr o i eNeKTPOHOro 06laHaHH nI naNbWoI ytni3aui. 3daBaHH Ha 3Iam NobHH BkOHyBaTncs 3riHO 3 MicueBmN npabnAmn no ytni3aui BIDxOIB. DnA Binbwe DeTanbHOi INfopMaui np npabnA nobOdoHnn 3 TaHMM Bnpo6Amn, ix ytni3aui i nepepobkn 3BepTaTeCb B MicceBi opraHn Bna, B cnj6y no ytni3aui BIDxOIB, a6o B MaraHN, B kOMy Bn npd6aHn daHn Bpi6.
Pnnaad cnpoeKToBaHo, BInpo6yBaHO i BInroTOBneHO 3riDHO 3:
- Bezneka: EN/IEC 60335-1; EN/IEC 60335-2-31, EN/IEC 62233.
- EKcnnyatauihi kocti: EN/IEC 61591; ISO 5167-1; ISO 5167-3; ISO 5167-4; EN/IEC 60704-1; EN/IEC 60704-2-13; EN/IEC 60704-3; ISO 3741; EN 50564; IEC 62301.
- EMC: EN 55014-1; CISPR 14-1; EN 55014-2; CISPR 14-2; EN/IEC 61000-3-2; EN/IEC 61000-3-3. Поради ду павиьою ekсл�ацii та ду знжени вллу hy сеpeдовице: Вмкайт eвгжу hy мінімалыну wвдкICTь neped поатkom nprirotybaня iki, iЗалшаite ii npaцьовати hy.Deкільka xвлпин Nicязakihченя nprirotybaня. 36iьшу ntew SwidkICTb Tlbrky u pazi BeJHKoi KIIbKocTi dmy i napy ta BnKopncToByte NaDyB TiIbky kpaHix BnJaDCkax. Ду nIDTPmAHHry BucOKoi efeKTNBHOCTi BvdaJIeHnna3anaxiB, 3a HeobxidiHocTi, BnKOHyTe 3amHy ByrInbHor(-nx) φiNbtpy(-iB).Ду nIDTPmAHHry BucOKoi efeKTNBHOCTi φiNbtpy JxnpiB, 3a HeobxidiHocTi, BnKOHyTe YNCTKy φiNbtpy(-iB) XnpiB. BnKopncToByte MaKcmaJIbHni DiAmETp CnCTemN nobITpoBODiB, ув BKa3aHni y IncTpyKuüd py onTNIMi3aui efeKTNBHOCTi ta MInimiauaqiy My.
3БОΙ Y ΦΥΗΚΟΥΗΒΑΗ
KIO He npaioe HaneXHIM YHOM, nepeT NIM K 3BepHyTnC B Cnyk6y no TexHCHOMy o6cIyROByBaHHIO, BVKOHaTe. NaCTynHi npocTI nepeBipKn:
-ЯкutoВитяжka He npaцюe:
NepebipnT:
- Yu He 6yINo nepepBaHO noJaCy cTpyM.
- YuIbO o6paHOb 6yDb-ЯKU WbNdkiCtB.
-JaBnO BnTjKa noraHo npaueo: nepeBipTu:
- UNOcbpaHa WbNdkicTb DnBryHa DoCTaTHa DN BnPo6NeHoi' KInbKoCTi DNMy i nap.
- YI KxHJ DoCTaTHbO npoBITpeHa dIra TORO, IIO6 BnTgKka MoRNa BnKOHaTH 3a6ip NobiTPra.
- Yn ByrIbHnΦIbTp He BiIpaCbObaHn (BNTaJka B pexKmI 3 peuPKyIaIcIO nobITpR).
- RaBnTgKBA BmKHyIacBa XoDi HopMaJIbHOi po6Ot: nepeBipuTu:
- Yu He 6yINo nepepBaHO noJaCy CTpyM.
- Yu He CnpaQOBAB ODHONOJIHCHN BIMNKaH anapaty.
Y pa3i moKJIINBUX 360Ib y po6oTI, nepeT TIm k 3BepHyTncrdo cnykBoTeXHOrO o6cnyroBvBaHH BIKIOHTN BiEneKTPOKINBJeHH anapat mInmym Ha 5 cekyH, BnMaIOuN Bnky i nOtim 3HOBy niD'EDHaTn Ioro. Raio aHomaiR Bpo6oI npoOBKyEc icHyBAtn 3BepHyTncr B cnykBy texo6cnyroBvBaHH.