CHEF VACUUM - Multi-cooker Create - Free user manual and instructions
Find the device manual for free CHEF VACUUM Create in PDF.
| Product type | Multi-cooker with sous vide function |
| Brand | Create |
| Model | CHEF VACUUM |
| Power supply | 220V-50Hz |
| Heating power | 800 W |
| Motor | High power (unspecified) |
| Maximum capacity (cold) | 1750 ml |
| Maximum capacity (hot) | 1400 ml |
| Container material | Transparent borosilicate glass |
| Number of blades | 8 stainless steel blades |
| Automatic functions | Soy milk, soup, puree, smoothie, milkshake, granita, almond milk, vegetable cream, fruit compote, warming (40-100°C), blend/clean |
| Screen | Large touch screen |
| Built-in vacuum pump | Yes, for vacuum extraction |
| Safety | Overheat protection, lid lock, automatic shutdown in case of overload, lid safety switch |
| Cleaning | Automatic cleaning mode (Blend/Clean), do not immerse the body |
| Included accessories | Stirring container, lid, small glass lid, stirring rod, anti-vibration pad |
| Maximum continuous working time | 6 minutes (then 20 minutes cooling) |
| Non-slip feet | Yes, rubber |
Frequently Asked Questions - CHEF VACUUM Create
User questions about CHEF VACUUM Create
0 question about this device. Answer the ones you know or ask your own.
Ask a new question about this device
Download the instructions for your Multi-cooker in PDF format for free! Find your manual CHEF VACUUM - Create and take your electronic device back in hand. On this page are published all the documents necessary for the use of your device. CHEF VACUUM by Create.
USER MANUAL CHEF VACUUM Create
Security instructions 6
List of parts and functions 8
Main features 8
Function description of the operating panel 9
Instructions for use 10
Cleaning and maintenance 12
Troubleshooting 13
PORTUGUES
Thank you for choosing our heating and vacuum blender. Before using the appliance, and to ensure the best use, carefully read these instructions.
The safety precautions enclosed herein reduce the risk of death, injury and electrical shock when correctly adhered to. Keep the manual in a safe place for future reference, along with the completed warranty card, purchase receipt and package. If applicable, pass these instructions on to the next owner of the appliance. Always follow basic safety precautions and accident prevention measures when using an electrical appliance. We assume no liability for customer failing to comply with these requirements.
SECURITY INSTRUCTIONS
When using any electrical appliance, basic safety precautions should always be observed.
- Please make sure the ground connection is working before using it. At the same time, please make sure that the voltage is 220V-50HZ.
- In case of the power flexible line is damaged, replacement must be conducted by professionals assigned by manufacturer, maintenance department or similar departments to avoid risk.
- Please don't use an extension socket of poor quality and don't share the socket with other electric appliances in case of fire or personal injury.
- Please check the power line, the parts and components or the product structure for any damage before usage. If any damages are found, please stop using the product and contact with the after-sales service department of the company or go directly to the repair point designated by the company for maintenance. Do not disassemble or repair the product by yourself in case of danger.
- The machine shall be put on a stable and solid table when used. It's forbidden to use the product on an inclining or unstable table.
- Please make sure dismountable parts are perfectly installed before powering on, such as the stirring container and the covers.
- Please make sure the power is off before carrying, dismantling or debugging any part of the product.
- Please cover the steam cover to prevent spraying of the liquid
- Running with no water in the machine is forbidden in case that the partial high temperature caused by the high rotating speed of spinning burns the water-proof seal ring.
- Placing the product too close to the stove or surfaces with high temperature is forbidden in case the product is damaged or causes fire or personal injury.
- When the machine is working, please don't open the container cover and grab the food inside. Then the product shall not be moved and any moving parts shall not be touched to prevent accidental injury.
-
The temperature on the surface of the stirring container will rise when the machine is working, so please don't touch it with your hand to avoid burns.
-
It's forbidden to put hand, metal, wood stick or any other foreign matters in the stirring container when the power is on. And please don't use any parts or components that don't belong to this product to avoid fire or personal injury.
- This product has an overheating protection device. In abnormal use or in serious overload operation of the motor, the product will automatically stop for protection. After 30 minutes, if it still cannot start, please contact with the after-sales service department of the company or go directly to the repair point designated by the company for maintenance. Do not lay-up by yourself to avoid danger.
- The continuous working time of the product shall not exceed 6min. And if the machine is overheated during operation, please turn it off for about 20 min and continue operation only after it cools down.
- Please clean out the parts in direct contact with food after usage to avoid smells from the rusted residues after long time of no using.
- If the product is shut down during usage, please turn off the power immediately, take off the power plug, the vessel, and the food that causes the shutdown of the blade, and continue operation only after the motor fully cools down.
- This product should be stored in places out of reach of children and do not let persons with physical impairment, feeling or mental abnormalities or persons lacking related experience or knowledge (including children) to use or play with this product.
- Please don't use the product with nobody's supervision
- Please keep the product at least 30cm away from other electric appliances in the kitchen.
- After usage, please wait for the motor and blades to stop moving, make sure the power is off and then take off the dismountable parts.
To realize a long life cycle of the product, please set the working time at the highest gear under 3min manually. - Never immerse the machine body or the stirring container into the water or any other liquid, or wash them with water or other liquids.
- In case of long idle time of the machine, please take off the plug and store it at cool and dry places after cleaning it off.
- The blades of the machine are very sharp, so please be careful when taking out the blades, emptying or cleaning the vessel to avoid cuts.
- The product is only for domestic use. When blending soft foods, operate the blender in one minute intervals. For hard foods, operate in 15 second intervals. After 3 cycles, please allow for the blender to cool down to avoid burning the motor.
- To reduce the risk of injury, never place the cutting blade on the base without first putting the bowl properly in place.
- Please, make sure the lid is securely locked into place before operating the appliance.
- Use a damp cloth to clean the motor body.
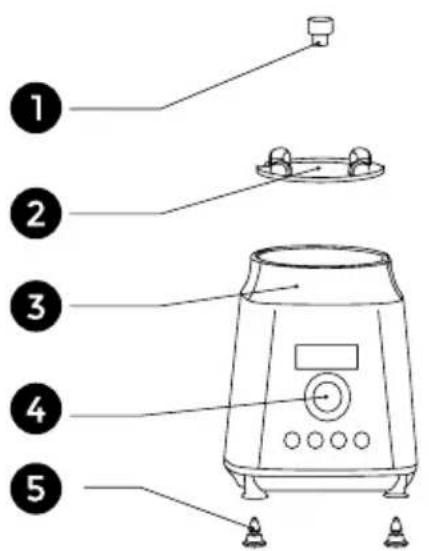
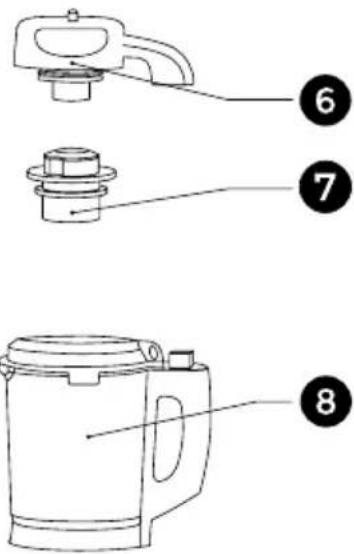
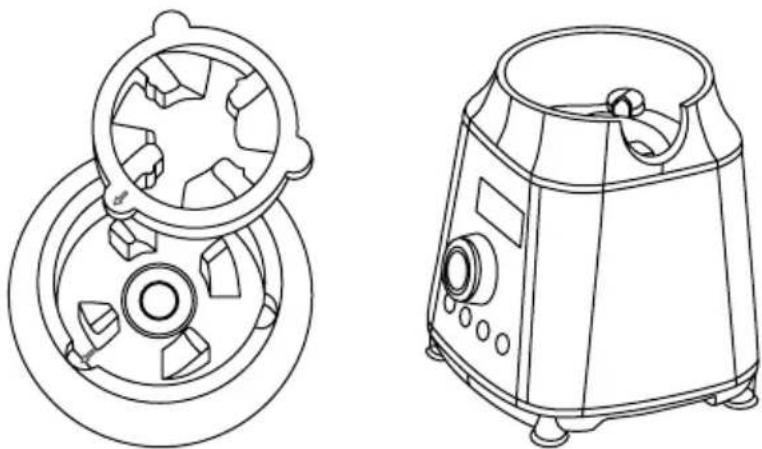
| Number and name | Function |
| 1. Linkage head | It is used for connecting the connecting head of the stirring glass, so that the upper and the lower connecting heads are automatically aligned for the convenience of fetching. |
| 2. Antivibration pad | It has the function of absorbing shock and reducing noise, so that the main body of the machine and the blender work more smoothly. |
| 3. Main body of enclosure | It is the main component of this machine, including motor inside. It is the power source of this machine. |
| 4. Rotary knob | Main component of the machine: menu functions and selection. |
| 5. Rubber feet | Shock absorption and skid resistance. |
| 6. Little glass lid | Used on the top of the lid to vacuum the container and keep the inside of the container fresh, so that the food does not oxidize. |
| 7. Container cover | It is covered on the blending glass, playing the role of safety protection and cleaning protection, especially for preventing the liquid overflow when the appliance is working. |
| 8. Stirring container | It is used for storing and processing food with stirring knife and heating plate inside. It can be used to make Soybean Milk, fruit juice, soup, rice paste etc. |
MAIN FEATURES
- Large touchscreen, allowing one-key operation to make delicious food.
Over-thick high borosilicate glass that is transparent and heat-resistant.
High-power motor, offering stronger blending power. - Triple safety design, ensuring high safety.
- 8 blades for dimensional blending, making the stirring more delicate.
- Combination of intelligent procedures and manual mode, easily handling with any kind of ingredients.
- 800W high-power heating tube with an intelligent heating program to make the ingredients fully cooked.
- Stainless blades with high hardness and corrosion resistance, making a longer life cycle.
Button Function
| Start/Stop button: In standby state, choose the menu function before pressing Start/Stop, and then the machine begins to work. When the menu function is not chosen, pressing the Start/Stop button is invalid. In standby state, any button except Start/Stop is invalid. After pressing Start/Stop, the machine will stop working and return to the ready mode. After the programme runs for 1 minute, keep pressing for 3 seconds to cancel the programme. | |
| Reheat button: In the standby state, press this button, the buzzer will sound, the rewarm indicator will remain on, the digital tube will display the corresponding set temperature value, and the knob can be turned cyclically (40°C - 100°C) | |
| Blend/Clean button: For automatic cleaning mode press the Blend/Clean button in the standby state and press the Start/Stop button to start. | |
| In the standby state, turn the knob, select the desired function menu, and press Start/Stop to start. The programme runs automatically, and after the end, the buzzer stops after six times beeping. | |
| Fruit and vegetable juice button: Put the chopped fruit into the mixing container, add the appropriate amount of water (cannot exceed the maximum scale line of 1750 ml), cover the container lid tightly and turn the knob to the juice function. At this time, the button lights up, press Start, the juice programme runs automatically. First vacuum for 20 seconds, then stir, and finally vacuum for 40 more seconds. Do this about 3 minutes and you will enjoy a delicious juice. | |
| Milkshake and smoothie button: Pour 500 ml of milk and 20 ml of honey. Add about 250 g of frozen fruit (cut into 20 mm chunks first) and select the Milkshake function. The button lights up. Press Start, the programme runs automatically. First, pump vacuum for 20 seconds, stir and finally vacuum for 40 more seconds. After about 3 minutes the milkshake is finished. | |
| Slush button: Put a proper amount of ice cubes (about 250 g) in the ice tray of the refrigerator, put it into the mixing container, cover the container with the lid and tighten it, and select the slush function. The button lights up, press Start and the slush programme runs automatically. 1 minute and 20 seconds or so after, your slush is finished. | |
| Mashed potatoes button: Put boiled and peeled potatoes (not over 400 grams) into the mixing container, add about 250 ml of water or milk and 50 g of butter or 50 ml of oil. Cover the container lid tightly and select the mashed potatoes function. At this moment, the button lights up. Press Start, the programme runs automatically and about 1 min later, the delicious mashed potatoes is finished. You can add salt and spices to your taste. | |
| Soymilk function: Put a small quantity of cleaned soybeans (about 100 grams) into the mixing container, add about 1000 ml of water, cover the container and tighten it. Select the soymilk function. At this moment, the soy milk button lights up. Press Start, the soymilk programme runs automatically and about 36 minutes later, a delicious soy milk is finished. | |
| Almond milk button: Put a small quantity of almonds (100 g) previously washed and soaked for around 12 hours into the mixing container, add about 500 ml of water, cover the container and tighten it. Select the function, then the button lights up. Press Start, the programme runs automatically and about 5 minutes later, a delicious almond milk is finished. | |
| Soup button: Put 250 g of ingredients as you prefer, add 1150 g of water. Cover the lid, turn the knob to select the soup function, then press the Start button to start the programme until the programme ends automatically. Pour it out, then a delicious soup is finished. | |
| Vegetable cream and fruit compote button: Put 800 g of boiled vegetable or fruit (carrot, pumpkin and leek; or apple, pear and banana, for instance) and around 400 ml of water or orange juice, in the case of making compote. Add salt or sugar to your taste. Cover the container and tighten it. Select the cream function, then the button lights up. Press the Start button and the programme will run automatically, between 5 or 10 minutes later you will enjoy a delicious cream or compote. | |
Tips: If you open the container lid during its proceeding, the function will be stopped immediately. It will continue within 3 minutes. If you need it, you can open the feeding cover to add ingredients.
INSTRUCTIONS FOR USE
Before using it
- Please thoroughly clean the part in direct contact with the food (refer to "Cleaning and Maintenance").
- The product shall only be used at places with altitude below 1500m , otherwise the food may be raw or overflow, and you can even suffer scorches.
- The exterior surface of the machine and the stirring container can be wiped with a dry cloth. Never immerse the machine body or the stirring container into water or any other liquid, or wash them with water or other liquids in case of electric leakage or damages to the components.
- Please wash the inside of the stirring container and the components with clean water and wipe it dry when cleaning. The blades are very sharp, so please be careful when cleaning to avoid cuts.
- Do not use abrasive cleaners or corrosive liquids (such as petrol or acetone) to clean this product.
- The volume shall not be higher than 1400ml when you make hot drinks.
- Please clean the ingredients and cut them into cubes no larger than 5 ~cm .
- Never stir or grind any dry products and hard herbs.
How to use it
- Cut the ingredients into pieces of about 5cm in size. (If meat, cut them into strips.)
- Use the measuring container to introduce the appropriate quantity of ingredients according to the recipe and personal taste.
- Put the measured ingredients in the stirring container, and fill with the appropriate water quantity. (Add appropriately with reference to the recipe. The stirring container shall be kept clean without any impurities.)
- Align the flaps on the two sides of the container cover with the container's convex rib, and gently press the cover into the glass container. Rotate the container cover clockwise to fasten it with the stirring container and finally screw the feeding cap securely onto the container cover. (The stirring container has a protective switch to prevent the cover from opening. If the container cover is not rotated in place, the startup of the equipment will be impossible.)
- Place the stirring container onto the main body of the equipment correctly.
-
Insert the power plug, power on and the display screen will light up with a buzz.
-
Press the function key and switch between functions as desired.
- Press the Start/Stop button, the equipment starts. (During operation, the motor runs intermittently with variable speed, which is normal.)
- Upon completion of the operation, a buzz rings as a reminder, and the equipment returns to the standby status. Unplug the power line and remove the stirring container. Then open the container cover. (Please mind the steam upon opening the container cover, to avoid scald.)
- Pour out the cooked food, and add seasonings according to personal taste. (Pay attention when pouring out, to avoid scald due to splashing of the high-temperature fluid.)
- Clean the stirring container timely, and clean the housing with a wet cloth. After the surface water is wiped, air dry the main equipment and the stirring container to prevent peculiar smell. (Do not rinse the main equipment and the stirring container directly.)
Quick warm
- When cooking porridge, paste, soup, etc., please make sure to select the correct function programme, otherwise, the food delivered after cooking will be in poor taste and may not be thoroughly cooked. In severe cases, the ingredients may be pasted to the bottom or overflowed.
- If Soybean Milk, Porridge, Corn Juice or Rice Paste function is not correctly selected, please switch the function, and please press the Start/Stop key to cancel the current operation. Before countdown, you can directly select the corresponding function, and then simply press the Start/Stop key to start. If the countdown is activated, it's recommended to replace the ingredients and then select the correct function to start.
- Ingredient volumes as described in the recipes are to be mixed with standard water levels. When in use, the user shall adjust the water level according to the ingredients and the required water volume. For heating functions, the water volume shall not exceed 1400 ml, and for cooling functions, the water volume shall not exceed 1750 ml.
- In cooking fruits and vegetables, please first remove the kernels before putting them into the stirring container, and then fill in appropriate water or milk.
- Please do not directly heat soybean milk, cold porridge, milk and other sticky food, otherwise it may lead to pasting, creating strange smell and wastes.
- Do not add sugar in hot drinks before programme completion, otherwise, it may lead to pasting.
- When heating, put non-sticky ingredients underneath (such as soybean, black bean, etc.) and sticky ingredients on the top (such as sweet potato, pumpkin, etc.).
- When the equipment is operating, please mind the steam from the container and boiled liquid splashing after the liquid in the stirring container is boiled, and do not open the container cover to avoid scald.
- Before powering on, please make sure that all removable parts of the equipment have been installed in place.
- Do not introduce your hands or fingers, metals, wood sticks and other hard objects into the stirring container. If stir is needed, please make sure to use the stirring rod accompanied with the equipment, and do not use other accessories and fittings not accompanied with the equipment, so as to avoid personal injury or product damage.
Assembly and disassembly of clutch anti-vibration pad
- The clutch anti-vibration pad is a fragile accessory. If the clutch anti-vibration pad is damaged and needs to be replaced, use a flat-blade screwdriver to pick it up and remove it.
- Then align the new clutch in the direction of the arrow below and follow the clutch.
Note: When replacing the clutch, please be careful to avoid accidental injury. If necessary, you can look for a professional to replace it.
CLEANING AND MAINTENANCE
- Upon completion of the cooking process, pour the cooked food out of the stirring container, and then immediately fill it with clear water and use the Blend/Clean mode multiple times to better clean the stirring container. Do not put the stirring container into water or other liquids, nor rinse it in water or other liquids, so as to avoid electric leakage or mechanical damage.
- Before cleaning the main equipment, make sure to power it off. Use a wet cloth to scrub the exterior of the main equipment, and do not put the main equipment into water or other liquids, nor rinse it in water or other liquids, so as to avoid electric leakage or mechanical damage.
- When cleaning, please use clean water to rinse interior of the stirring container and its fittings, and then wipe it dry. When cleaning the interior of the stirring container, please pay attention to the blades and avoid injury.
- Do not use lacquer thinner, gasoline, cleanser, hard brush or stainless steel wool to rub, so as to avoid scratching the stirring container's surface and leading to strange smell or allowing regeneration of bacteria.
Fruits and vegetables release pigments during breakage, which may lead to colorization of the product's plastic parts, but it's normal, though it's difficult to clean. - Do not clean the stirring container until it's cooled down, so as to avoid scald due to residual heat.
- When the residues in the stirring container are hardened and difficult to remove, please first fill with appropriate water to soak it for at least 30min and then clean and wipe it.
- If the heating pan's bottom is not cleaned appropriately after multiple cleaning, a light brown attachment layer will emerge from the bottom. For that, please use detergent for long-time soaking, and then use a cleaning cloth dipped with vinegar and scrub the bottom along the pattern.
- Do not soak any power consumption part of the main equipment, stirring container, power line, etc.
- Do not directly rinse the exteriors of the main equipment and the stirring container.
- Do not directly expose the product, power line and packing and accessory to sunlight.
- The product is adaptable to frequent use, so as to keep the motor and the interior of the main equipment dry.
- If the product is to stay vacant for a long period, please keep proper custody of the product, ensure all parts are cleaned and dry, and store it in a dry and well-ventilated place.
| PROBLEM POSSIBLE | CAUSE SUGGESTED SOLUTION | |
| Indicator off. | Whether the power plug is plugged appropriately. | Insert the power plug well. |
| Container cover not mounted in place. | Remount the container cover in place (a buzz will ring upon mounting). | |
| Indicator on, but equipment malfunc-tion. | After selection of the func-tion, press the Start/Stop key. | After selection of the function, press the "Start/Stop" key |
| No water in the container, temperature controller pro-tection. | Please fill with appropriate water. | |
| Buzzer alarming during op-e-ration. | Unplug the power cord, and then plug it again and operate as per normal procedures. | |
| Heating can't be stopped. | Product failure. | Please contact our service point or dealer. |
| No response of the key. | Short power-off interval, and the product is reset. | Power-off for at least 3 min, and then power on. |
| Product is operating. Normal phenomenon. | ||
| Ingredients can't be crushed. | Excessive or inadequate wa-ter. | Please fill water to the appropriate water level or according to the re-cipe. |
| Too low voltage. | Operate after voltage stabilization, or use a voltage stabilizer. | |
| Excessive or inadequate in-grams. | Please add food materials ap-ropriately or according to the re-cipe. | |
| Product failure. | Please contact our service point or dealer. | |
| Bottom pasting. | The container interior is not clean. | Thoroughly clean the container be-fore reuse. |
| Excessive ingredients. Please | proceed as per the recipe. | |
| Incorrect function menu is se-lected. | Select the correct function menu. | |
| Error code E1. | Temperature sensing probe short-circuited. | Contact with dealers. |
| Error code E2. | Temperature sensing probe open-circuited. | Whether the glass container is po-sitioned correctly. |
| Error code E3. | Over-temperature of the he-ating pan as detected by the temperature sensing probe. | Clean bottom after the product is cooled. |
| Shut down during operation. | Motor over-temperature, overheat protector activated. Automatic power cut-off is to protect the motor, which is normal. | Let it cool down to normal temperature naturally before automatic startup. |
| Operating power exceeds the motor's maximum load power due to excessive or pasty ingredients, and the overload protector automatically disconnects, which is normal. | Reduce the ingredient volume or fill in water for dilution, and reduce the viscosity or re-energize to power on after the overload protector automatically connects. | |
| Abnormal noise. | Severe wear of the transmission. | Please contact our service point or dealer. |
| Blade unit's bearing damaged. | ||
| Severe wear of the blade unit's stainless steel spline. | ||
| Severe wear of the blade unit's anti-wear waterproof gasket. | ||
| Intermittent motor operation. | Motor carbon brush may be worn. | Please contact our service point or dealer. |

In compliance with Directives: 2012/19/EU and 2015/863/EU on the restriction of the use of dangerous substances in electric and electronic equipment as well as their waste disposal. The symbol with the crossed dustbin shown on the package indicates that the product at the end of its service life shall be collected as separate waste. Therefore, any products that have reached the end of their useful life must be given to waste disposal centres specialising in separate collection of waste electrical and electronic equipment, or given back to the retailer at the time of purchasing new similar equipment, on a one for one basis. The adequate separate collection for the subsequent start-up of the equipment sent to be recycled, treated and disposed of in an environmentally compatible way contributes to preventing possible negative effects on the environment and health and optimises the recycling and reuse of components making up the apparatus. Abusive disposal of the product by the user involves application of the administrative sanctions according to the laws.