MeteoClock Elegance SM1800 - Weather Station LEXIBOOK - Free user manual and instructions
Find the device manual for free MeteoClock Elegance SM1800 LEXIBOOK in PDF.
| Product type | Weather station with clock, thermometer, hygrometer and barometer |
| Brand | Lexibook |
| Model | MeteoClock Elegance SM1800 |
| Color | Not specified (gray/black likely) |
| Main unit dimensions | Approximately 140 x 44 x 30 mm (estimated) |
| Outdoor sensor dimensions | 140 x 44 x 30 mm |
| Weight | Approximately 300 g (estimated) |
| Main unit power | 2 LR6/AA batteries (not included) |
| Outdoor sensor power | 2 LR3/AAA batteries (not included) |
| Display type | Blue backlit LCD |
| Indoor temperature measurement range | 0°C to +50°C |
| Outdoor temperature measurement range | -50°C to +70°C |
| Indoor humidity measurement range | 20% to 95% |
| Display resolution | 0.1°C |
| Transmission frequency | 433 MHz |
| Transmission range | Up to 30 m in open space |
| Main functions | Clock with alarm, perpetual calendar until 2069, weather forecast (icons), moon phases, tides, max/min temperature memory, temperature alerts, up to 3 wireless sensors, 12/24h display |
| Weekday languages | English, German, French, Spanish, Italian, Dutch, Danish, Russian |
| Maintenance and cleaning | Clean with a soft, slightly damp cloth. Do not use detergents. Avoid direct sunlight and heat sources. |
| Safety | Compliant with EN60950, EN300220, EN301489 standards. Do not disassemble or expose to moisture. |
| Warranty | 2 years (check conditions with retailer) |
| Included accessories | 1 outdoor sensor (ASM30), rotating base and wall mount |
Frequently Asked Questions - MeteoClock Elegance SM1800 LEXIBOOK
User questions about MeteoClock Elegance SM1800 LEXIBOOK
0 question about this device. Answer the ones you know or ask your own.
Ask a new question about this device
Download the instructions for your Weather Station in PDF format for free! Find your manual MeteoClock Elegance SM1800 - LEXIBOOK and take your electronic device back in hand. On this page are published all the documents necessary for the use of your device. MeteoClock Elegance SM1800 by LEXIBOOK.
USER MANUAL MeteoClock Elegance SM1800 LEXIBOOK
MeteoClock® "Elegance"
SM1800 + ASM30 - Owners manual
LEXIBOOK
GB English
FR -Frangois
ES -Espanol
PT Portuguese
IT -Italiano
DE -Deutsch
NL -Nederlands
GR EAAynik
Copyright © Lexilbook 2008
MeteorClock® "Elegance" SM1800 + ASM30 -Instruction Manual
INTRODUCTION
Congratulations on your purchase of this weather station, MeteorClock SM1800 "Elegance". Please take the time to read and understand this manual so you can begin to enjoy the convenience and features this product has to offer.
What exactly is a Weather Station?
Lexbook digital stations measure not only the time in progress - thanks to their built-in clock- but also the actual and upcoming weather.
The Meteoclock SM1800 incorporates the following functions:
- Thermometer:
The temperature is displayed in real time to the nearest tenth of a degree Celsius. Thanks to its wireless sensor, the weather station can give you the temperature reading outside or in another room.
Hygrometer
The indoor hygrometry is displayed as a percentage of the air's moisture content. The so-called 'Comfort Zone' for the human body ranges from 35 to 65% (ideally 60% ) hygrometry for a given temperature between 18 and 24^ .
- Barometer:
The station also monitors the atmospheric pressure and, based on its pattern of evolution, displays a weather forecast as a user-friendly icon: sun, clouds, rain... That's the weather to be expected in the next 8 to 12 hours.
And many extra features:
-Animatedicons-Wallmountingstand
- Pivoting and rotating base - Blue backlit LCD display
Copyright © Lexilbook 2008


MAIN FEATURES
Main Display Unit SM1800
Perpetual Calendar up to year 2069.
12/24 hour time display selectable.
Local temperature and Indoor humidity display.
Animated weather forecast symbols.
Receives and monitors temperature from up to 3 remote sensors via RF technology of 433MHz (One Wireless Thermo Sensor Included).
Temperature trend indicator.
Maximum/Minimum Memory for Indoor / Outdoor Temperature and Indoor Humidity.
Days of week selectable in 8 Languages.
Wall Mount or base selectable.
Lunar and tidal phases
User selectable ^ C or ^F
Battery: 2 x AA size
Thermo sensor unit
Drip-proof design with LCD
Temperature display in user-selectable ^ C or ^ F
Wall-mountable
Transmission range: up to 30 meters in open area.
Battery type :2 x AAA size
GETTING STARTED
Copyright © Lexilbook 2008
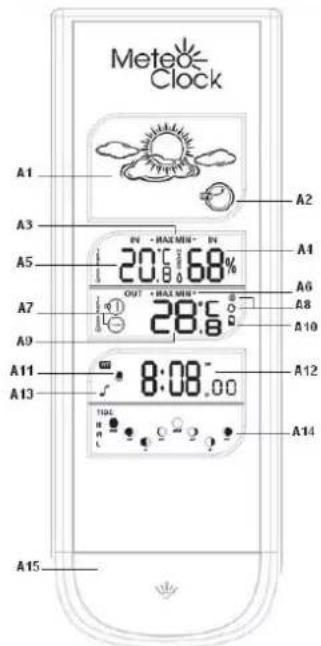
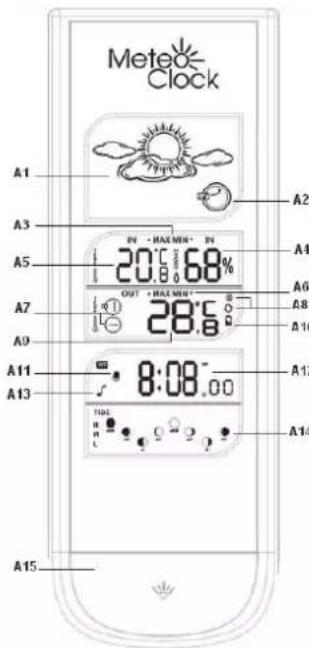
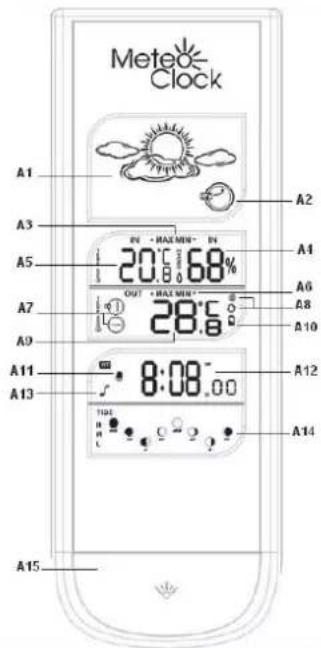
A. Main unit LCD Display
A1 - Animated weather forecast symbols
A2 - Pressure trend indicator
A3 - Indoor Max/Min temperature & humidity memory
A4 - Indoor Humidity
A5 - Indoor temperature
A6 - Outdoor Max/Min temperature memory
A7 - Remote sensor channel # (CH) & outdoor temperature trend
A8 - Alternate channel display & signal search
A9 - Outdoor Temperature
A10-Low battery indicator
A11-Alarmmode
A12-Time Display
A13-Alarm on/off icon
A14 - Tide and moon phase indicators
A15-Blue backlit


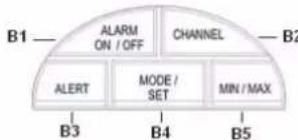
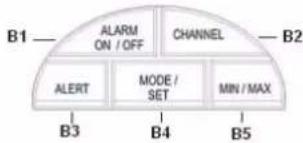
B. Main unit function keys
B1 - Alarm on/off: to turn the alarm on/off
B2 - Channel: to toggle between channel 1, 2 and 3.
B3 - Alert: to set the temperature alert.
B4 - Mode/Set: to enter and set the time, date, and alarm clock.
B5 - Min/Max: to enter the max/min outdoor and indoor temperature, plus the max/min Indoor humidity records.
- Located on top of the main unit
B6- (+12 / 24) button: to adjust the alarm clock and the alert, to select the 12/24 display mode. Press and hold to adjust digits at a faster rate.
B7--(C/F) button/Weather: to adjust the alarm clock and the alert, to select ^ C or ^ F in indoor and outdoor temperature display. Press and hold to adjust digits at a faster rate.
** Located at the back of the main unit

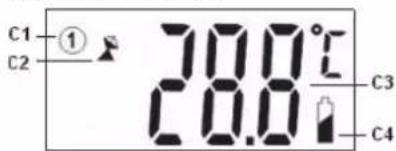
C-Sensor unit-LCD Display
C1-Channel number
C2-Automatic learn function icon
C3 - Outdoor temperature
C4-Low battery indicator

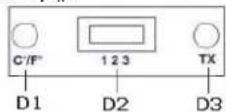
D. Sensor Unit Function keys
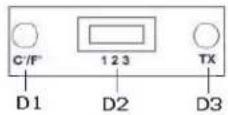
D1-°C/F button: to select oC or oF display.
D2 - Channel selection switch: to set the
sensor unit to channel 1, 2 or 3.
D3-TX button: to synchronize the remote sensor with
new ^a^a or channel settings.
Located at the back of the sensor unit, inside the
battery compartment.
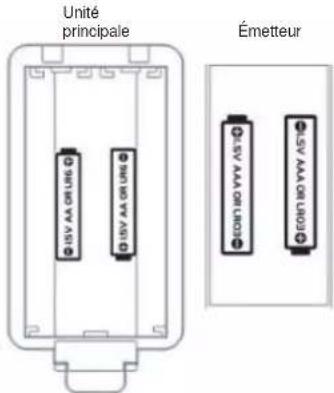
POWER SUPPLY
Your Meteoroclock works with 2 AA batteries for the main unit and 2 AAA for the remote sensor (all not included).
Battery installation
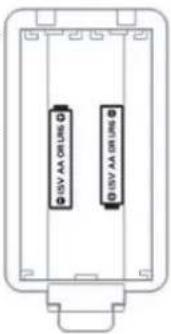
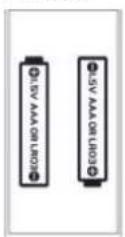
- Remote Sensor: Use a screwdriver to open the battery door located at the back of the remote sensor unit. Insert 2 AAA batteries according to the polarity. Close back the battery compartment and tighten the screw.
- Main Unit: Use your finger to lift the battery door located at the back of the main unit. Insert 2 AA batteries according to the polarity. Close back the battery compartment.
LOW BATTERY INDICATION: If the batteries of the remote sensor are low, the following indicator will be displayed on the main unit, next to the outdoor temperature display [A10]. Please replace the remote sensor's batteries. The indicator will also be displayed on the remote sensor's screen [C4]. When the main unit's LCD display becomes dim, it indicates that the batteries are low and need to be changed.

5
English
Copyright © Lexibook 2008
SETTINGS
Please make sure the main unit has NOT been turned on.
SETTING THE REMOTE SENSOR
- Unscrew the battery cover located at the back of the sensor unit and insert 2xAAA batteries to begin the settings.
-
CH 123 will be displayed [C1]. Select a channel (1, 2 or 3) using the [D2] switch. The channel function allows the receiver to identify each remote sensor. The main unit can receive up to 3 different remote channels. The preferred channel number (1, 2 or 3) for each individual remote sensor can be assigned. However, channel 1 is used for collecting data from outdoors and activating the weather forecast symbols. If you only have one remote sensor, please set it at channel 1 and place it outdoors.
-
Select whether the sensor will display the temperature in Celsius or Fahrenheit degrees by pressing [D1].
-
Press the TX button [D3] to synchronize the sensor with your new settings. The icon will appear at [C2].
- Insert 2 x AA batteries at the back of the main unit.
Note: the SM1800 comes with one main unit and one remote sensor. If you wish to buy additional sensors please refer to the section ACCESSORIES at the end of this manual. SM1802 comes with 2 sensors, SM1803 comes with 3 sensors.
SYNCHRONIZATION
Automatic Learn Function
- The Learn function executes automatically and runs for approximately 2 minutes when the batteries are first installed in the receiver.
- Within these 2 minutes, the main unit picks up the temperature & humidity signals from the remote sensor and displays the readings. If you only have one remote sensor, the main unit will be automatically synchronized with the channel set on the remote sensor.

FIXING THE REMOTE SENSOR AND MAIN UNIT
Remote sensor
The remote sensor can be placed upright on a smooth surface or wall-mounted. To ensure a good transmission, the remote sensor should not be installed on or near a large metal surface. Before choosing the location of the remote sensor, test that the receiver can receive the signals. It is also recommended that the remote sensor is placed as close as possible to the main unit to eliminate any interference. The remote sensor can also be wall-mounted. To do so, locate the wall-mounting hole at the back of the sensor (upper part) and fix it on a hook or nail.
English
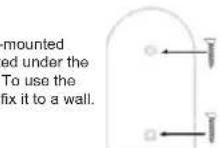
Main unit
The main unit can be fixed on the rotating/pivoting base or on the wall-mounted base (both included). To use the base, fix the main unit's socket (located under the unit) into the base's jack. Place the base on a smooth, stable surface. To use the wall-mounted base, insert a screw in each wall-mounting hole (2) and fix it to a wall. Then, fix the main unit's socket into the wall-mounted base's jack.
BACK LIGHT:
To use the back light, press [A15], located below the main unit LCD display. The back light stays on for 5 seconds.
Copyright © Lexilbook 2008

CLOCK AND ALARM SETTINGS
Manual Time and Date Setting:
- The setting sequence is displayed in the order:
Hours Minutes Seconds Year Month/Day sequence Month Day Time Zone Day-of-week language.
-
Press and hold [B4] to enter the manual Clock/Calendar setting mode.
-
Time and date: Press the "+" [B6] or "-" [B7] buttons to adjust the settings and press [B4] to confirm each setting.
-
The month and day sequence gives you the option to select whether the month or the day is displayed first.
Time Zone: The time zone should be set to 0.
Day of the week: It can be displayed in different 8 languages: for English, select EN; German (GE), French (FR), Spanish (SP), Italian (IT), Dutch (NE), Danish (DA), and Russian (RU).
Notes:
- You will automatically exit the time setting mode after 5 seconds of inactivity.
-DST" appears on the LCD if the Daylight Saving Time mode has been activated.
12/24 Hour Display mode:
Outside the manual time setting mode, press the [B6] key to select the 12 or 24 hours mode.
Alarm Clock Function:
- The alarm clock sequence is as follows:
Time Date Alarm Time - Outside the manual time setting mode, press [B4] twice to scroll to the alarm.
- Press and hold [B4] to set the alarm.
- Use the [B6] and [B7] buttons to adjust the hour then press [B4].
- Use the [B6] and [B7] buttons to adjust the minutes then press [B4].
- Press the [B1] button to turn the alarm ON and OFF. When the alarm is activated, its icon (f) will be displayed at [A13].
- When the alarm rings, you can press the backlit button [A15] to activate the snooze alarm. The alarm will ring again 5 minutes later. In the meantime, the alarm icon will blink. If you want to stop the alarm, press any button. The alarm will ring again the next day at the same time. If you wish to deactivate the alarm completely, you must turn it off (see step 6).
English
Copyright © Lexibook 2008
WEATHER FORECAST AND DISPLAY
Animated Weather Forecast Symbols
This weather station is capable of detecting barometric pressure changes, and based on the data collected, predicting the weather for the next 8 to 12 hours. There are 5 different weather forecast symbols [A1].
| Sunny | Sunny intervals | Cloudy | Rainy | Heavy Rain (Storm Risk) |
After inserting new batteries or pressing and holding the [B7] key, the weather forecast icon will flash [A1]. Enter the current weather using the [B6] and [B7] keys to choose among the weather forecast symbols available.
REMARKS:
After having completed the settings of your weather station, please discard the readings of the weather forecast for the next 12-24 hours. This will allow sufficient time for the Weather Station to operate at a constant altitude and therefore result in a more accurate forecast.
The remote sensor set on Channel 1 is used to help displaying the weather forecast icons (as well as the trend indicator). Please place it outdoors.
Absolute accuracy cannot be guaranteed regarding weather forecasting.
The weather forecasting feature is estimated to have an accuracy level of about 75% due to the varying areas the Weather Station has been designed to be used in.
Pressure trend
The trend pointer displayed at [A2] indicates the trend of the barometric pressure.

Indicates that the barometric pressure trend is increasing.
Indicates that the barometric pressure trend is steady.
Indicates the barometric pressure trend is decreasing.
Copyright © Lexibook 2008


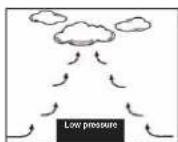
Why study barometric pressure?

Generally, bad weather is associated with low barometric pressure and fine weather with high pressure. A low pressure area is surrounded by air of higher pressure. As the higher pressure air cannot move in the low pressure area, it will move upwards, causing condensation of water in the air and producing clouds. The opposite is true for high pressure: in a high pressure area, air of lower pressure will move downwards, warming up the air and evaporating the water in the air.
TEMPERATURE DISPLAY AND ALARM
°C or °F Temperature display:
You can select to display the indoor [A5] and outdoor [A9] temperature in Celsius (°C) or Fahrenheit (°F) by pressing the [B7] key.
Temperature Alert Function:
- Press and hold the [B3] button to set the outdoor temperature alert function.
- Use the [B6] and [B7] keys to select which temperature alert you wish to set: indoor temperature alert or outdoor temperature alert (channel 1, 2 or 3).
- Press [B3] to confirm.
- Use the [B6] and [B7] keys to set the upper limit of the temperature alarm' " and press [B3] to confirm.
- Use the [B6] and [B7] keys to set the lower limit " of the temperature alarm and press [B3] to confirm.
- For example, you can set the temperature alarm between 0^ and 35^ . Every time the remote sensor registers an outdoor temperature lower than 1^ or higher than 34^ , the temperature alarm will ring and [A9] will blink. It will ring for a few seconds, stop, and ring a few seconds later until it is turned off.
This weather station records everyday the maximum/minimum indoor /outdoor temperature and indoor humidity level. The readings are automatically cleared daily at 00:00.
- Press [B5] once to see the maximum indoor temperature [A5], outdoor temperature [A9] and indoor humidity [A4]. "MAX" is shown at [A3] and [A6].
- Press [B5] twice to see the minimum indoor [A5] and outdoor temperature [A9]. "MIN" is shown at [A3] and [A6].
- Press and hold [B5] to clear the recorded temperature and humidity readings.
MOON PHASES & TIDES
Moon phases
Throughout the 28 days of the lunar month, the aspect of the moon changes. Indeed, the moon, being spherical, is always half lightened up by the sun. As the moon rotates around the Earth, the appearance of its lightened side changes continuously. This phenomenon creates moon phases. The moon phase [A14] on your MeteoClock® is automatically updated according to the year / month / day.
1: New Moon 2: Waxing Crescent 3: First Quarter 4: Waxing Gibbous

5: Full Moon 6: Waning Gibbous 7: Last Quarter 8: Waning Crescent
Tides
Every 12 hours approximately, the oceans on each side of the planet rise slightly then fall back. This movement is called tides. It is the result of the gravitational pull of the moon and the sun and the rotations of the earth, moon and sun. Your weather station displays the tide status [A14] as follows: H: High Tide M: Medium Tide L: Low Tide
Copyright © Lexibook 2008


FURTHER INSTRUCTIONS FOR MULTI-SENSOR USE
If you have one or two additional sensors, you can place them in a different location in your house; in a bedroom, for example. Your main unit can collect the temperature and humidity data of up to three remote sensors.
Set up:
To set up a new sensor, follow the instructions given on page 5. Make sure you set every sensor to a different channel.
Temperature and humidity and display :
You can view the humidity and temperature readings of your different remote sensors by pressing the [B2] key. The sequence is as follows:

The sign ^ [A8] means that the unit will display your available channels consecutively. Press and hold [B2] to remove a channel manually. It will automatically search and register new channel again if a new channel is received. If no temperature is displayed on an existing channel ( ^ C - C - C ) is displayed on the LCD), press and hold [B2] to cancel that channel and receive the channel again. Then, press [D3] on the corresponding sensor unit to transmit the signal to the main unit manually.
ACCESSIONS
Additional sensors:
Measure temperature and hygrometry in other places!
-
Upstairs
-
In the baby's bedroom
In the basement
-
In the wine cellar
-
In another room
To order, phone the Lexibook office located in your country or browse www.lexibook.com
TROUBLESHOOTING
Problem:
- The temperature measurements of the remote sensor and receiver do not match.
- Temperature reading of outdoor remote sensor seems too high.
- Receiver is no longer receiving remote sensor signals or display.
Solution:
- Wait for about 1-2 minute to ensure the remote sensor and receiver are in phase. Otherwise, re-synchronize receiver by holding [D3] for 3 seconds until a beep is heard.
- Ensure the remote sensor is out of direct sunlight, and away from sources of heat.
- Repeat the learning procedures.
-Temperature may be below -30^ - Batteries in remote sensor may need changing
- Move remote sensor closer to the receiver.
- Make sure remote sensor is away from sources of electrical disturbance.
English
SPECIFICATIONS
Weather Station Receiver SM1800
Size: 213× 118× 140mm
Battery Type: 2 X 1.5V AA batteries
Operation Temp: 0C+50C
Temp. Range: 0C- +50C Measurement Accuracy: +1C
Measuring range
Indoor temperature: 0^ +50^
Indoor Humidity: 20% - 95%
Outdoor temperature: -50°C +70°C
Resolution: 0.1^
Copyright © Lexibook 2008
Thermo sensor unit ASM30
Size: 140 × 44 × 30 ~mm
Battery Type: 2 X 1.5V AAA batteries
Temp. Range: -20C +50C
Transmission Frequency: 433
Transmission Range: 30 meter (Open area)
13
MAINTENANCE
In order to clean the unit, use only a soft cloth moistened with water; do not use any detergent product. Do not dismantle or drop the unit. Remove the batteries if the unit is not going to be used for an extended period of time.
WARRANTY
NOTE: Please keep this instruction manual, it contains important information. This product is covered by our two-year warranty.
To make use of the warranty or the after-sales service, please contact your retailer and supply proof of purchase. Our warranty covers material or installation-related defects attributable to the manufacturer, with the exception of wear caused by failure to respect the instructions for use or any unauthorised work on the equipment (such as dismantling, exposure to heat or damp, etc.).
Lexibook UK Ltd.
Unit 10 Petersfield Industrial Estate,
Bedford Road, Petersfield,
Hampshire, GU32 3QA
United Kingdom
Helpline: 0808 1003015.
www.lexibook.com
Environmental Protection
Unwanted electrical appliances can be recycled and should not be discarded along with regular household waste! Please actively support the conservation of resources and help protect the environment by returning this appliance to a collection centre (if available).

Note: Please keep this instruction manual, it contains important information.
14
Copyright © Lexilbook 2008
LEXIBOOK
DECLARATION OF CONFORMITY
We. Lexibook® S.A.
2. avenue de Scandinavie
91953 Courtaboeuf Cedex, France
hereby declare under our full and sole responsibility, that the product:
Name: MeleoClock Evolution
Reference/type:SM1800
Make: Lexibook®
to which this declaration refers, complies with the essential requirements and any other provisions stated in Directive R&TE (1999/5/EC) for all that applies to:
SECURITY:EN60950-1/A11:2004
RADIOFREQUENCY: EN 300220-1 (V1.3.1 2000-09), EN300220-3 (V1.1.1 2000-09)
CEM (Electromagnetic compatibility): EN 301489-1 (V1.4.1 2002-08), EN301489-3 (V1.4.1 2002-08)
Additional information:
Certified laboratory being consulted: TIMCO
Technical report available from:
Lexibok, 2 avenue de Scandinavie, 91953 Courtaboeuf Cedex dated the 29th of March 2006 is
suitable for use within the European Union member states.

Copyright © Lexibook 2008
Julian Chung QA Manager


15
MeteoClock®“Elegance”
Copyright © Lexilbook 2008
FONCTIONS DETAILLEES
L'unité principale SM1800
Copyright © Lexilbook 2008
Copyright © Lexibook 2008
Copyright © Lexilbook 2008
Français
4
Copyright © Lexibook 2008
5
POUR COMMENCER
ECRAN RETRO-ECLAIRE:
Copyright © Lexibook 2008
RéGLAGE DE L'HORLOGE ET ALARME
Copyright © Lexilbook 2008
Copyright © Lexilbook 2008
Copyright © Lexilbook 2008
Français
10
Copyright © Lexibook 2008
Les Marées
Copyright © Lexibook 2008
SPECIFICATIONS
Station Météo SM1800
Dimensions: 213 × 118 × 140 ~mm
Alimentation: 2 X 1.5V AA batteries
Copyright © Lexibook 2008
LEXIBOOK
DECLARATION DE CONFORMITE
Nous, Lexibook® S.A.
Copyright © Lexibook 2008
MeteoClock® "Elegance" Manual de uso - SM1800 + ASM30
INTRODUCCION
Copyright © Lexilbook 2008
CHARACTERISTICAS PRINCIPALES
Copyright © Lexilbook 2008
Copyright © Lexibook 2008

Copyright © Lexilbook 2008
Espanol
Copyright © Lexilbook 2008
AJUSTES
Copyright © Lexilbook 2008
6
FJACION DEL SENSOR REMOTO Y DE LA UNIDAD PRINCIPAL
Sensor remoto
Copyright © Lexibook 2008
AJUSTE DE ALARMA Y RELOJ
Copyright © Lexilbook 2008
Espanol
8
Copyright © Lexibook 2008
Copyright © Lexilbook 2008
Espanol
10
- Por exemple, podeponer la alerta de temperatura entre 0^ y 35^ . Cada vez que el sensor remoto registre una temperatura exterior menor que 14^ o mayor que 34^ , sonara la alarmade temperaturey [A9] parpadoar. Sonara duranteanosocossegundos,LUgo se detendra, yylvania a sonarunosocossegundos despues hasteque la apague.
FUNCION DE REGISTRO DE MAXIMA/MINIMA
Copyright © Lexibook 2008

Mareas
Copyright © Lexilbook 2008
ESPECIFICACIONES
Copyright © Lexilbook 2008
A
GARANTIA
Copyright © Lexilbook 2008
LEXIBOOK
Copyright © Lexlbook 2008

Copyright © Lexilbook 2008
Espanol
Emuitascharacteristicsextra:
-
Icones animados - Suporte para a parede
-
Base articulada e rotativa - Ecrä LCD com luz de fundo azul
semnoid
Copyright © Lexilbook 2008
1
CHARACTERISTICAS PRINCIPAIS
Copyright © Lexlbook 2008
2
sennnnn
INICIAR
Copyright © Lexibook 2008
B. Botoes de funciona da unidade principal
B1- Alarm on/off: liga e desigla o alarme/despertador 1 ou 2.
B2-Channel:alternaentreocanal1.2e3
B3 - Alert: acerca o alerca da temperatura. B4 - Mode/Set: insira e acerce as horas, data e desportador.
BS - Min/Max: insira os regislos da temperatura minima /maxima no exterior e interior, mais a humididade minima/maxima no interior.
Copyright © Lexilbook 2008

4
Copyright © Lexilbook 2008
#
CONFIGURAÇÖES/ACERTOS
CONFIGURAR O SENSOR REMOTO
Copyright © Lexilbook 2008
Portugues
#
FIXAR O SENSOR REMOTO E A UNIDADE PRINCIPAL
Sensor remoto
Copyright © Lexibook 2008
ACERTO DO RELOGIO E ALARME/DESPERTADOR
Acerto da Hora e Data:
Copyright © Lexilbook 2008
Copyright © Lexibook 2008
Copyright © Lexibook 2008
Marés
Copyright © Lexilbook 2008
CHARACTERISTICAS TECNICAS
Receptor Meteorologico SM1800
Tamanho: 213 × 118 × 40 ~mm
Tipede Pilhas:2X1.5VAA
Temperatura de Funcionamento: 0^ + 50^
Limits da Temperatura: 0^ + 50^
Copyright © Lexibook 2008
LEXIBOOK
Copyright © Lexilbook 2008
Julian Chung
Copyright © Lexilbook 2008
OUE||B|
Copyright © Lexilbook 2008
Sensore termlco
Copyright © Lexibook 2008
Copyright © Lexilbook 2008
Italiano
4
tlll
Copyright © Lexibook 2008
IMPOSTAZIONI
Copyright © Lexilbook 2008
2
FISSAGGIO DEL SENSORE REMOTO E DELL'UNITA PRINCIPALE
Sensore remot
Copyright © Lexibook 2008
品

Copyright © Lexibook 2008
Italiano
8
Copyright © Lexibook 2008
Copyright © Lexilbook 2008
10
Copyright © Lexilbook 2008
Maree
Copyright © Lexilbook 2008


ACCESSORI
Sensori aggiuntivi:
Copyright © Lexilbook 2008
SPECIFICHE TECNICHE
Copyright © Lexibook 2008
LEXIBOOK
Copyright © Lexibook 2008
Julian Chung
Responsabile Qualita

Italiano
MeteorClock "Elegance
Copyright © Lexibook 2008
1
HAUPTFUNKTIONEN
Copyright © Lexilbook 2008

Copyright © Lexibook 2008
EINSTELLUNGEN
Copyright © Lexilbook 2008
Deutsch
6
Copyright © Lexibook 2008
Copyright © Lexilbook 2008

Copyright © Lexibook 2008
Drucktrend
Copyright © Lexilbook 2008
Deutsch
10
Copyright © Lexibook 2008
Gezeiten
Copyright © Lexibook 2008
TECHNISCHE DATEN
Copyright © Lexilbook 2008
Deutsch
14
GARANTIE
Copyright © Lexibook 2008
LEXIBOOK
Copyright © Lexilbook 2008
Julian Chung
Copyright © Lexibook 2008
FUNZIONI PRINCIPALI
Copyright © Lexilbook 2008

Copyright © Lexibook 2008
INSTELLINGEN
Copyright © Lexilbook 2008
Nederlands
6
DE AFSTANDSSensor EN HET HOOFDTOESTEL BEVESTIGEN Afstandssensor
Copyright © Lexibook 2008
KLOK- EN ALARMINSTELLINGEN
Copyright © Lexilbook 2008


Copyright © Lexibook 2008
Luchtdruktendens
Copyright © Lexilbook 2008

Copyright © Lexibook 2008
Getijden
Copyright © Lexibook 2008
TECHNISCHE GEGEVENS
Weerstation Ontvanger SM1800
Afmetingen: 213 × 118 × 140 ~mm
Batterijtype:2X1,5VAAbatterijen
Werkingstemp:0C-+50C
Copyright © Lexilbook 2008

GARANTIE
Copyright © Lexibook 2008
LEXIBOOK
CONFORMITEITSVERKLARING
Wij, Lexilbook® S.A.
Copyright © Lexilbook 2008
Copyright © Lexilbook 2008
Ean
KYPIA XAPAKTHPIIKA
Kupia o6vSm1800
Δiapkeqημeρολoγio μexpi to etoc 2069.
_n = 1^ Avorotantaa emiaoyns eupdavianr ngs wapac 12wnp/24wnp npnp
Euavian Bpuokpaac a ku ypaata tou eawtepkxuupou.
Kivouμενα σύβλα πρόγνωσκ καρού.
EeTAta Tnpoepocke Ka npapakouBei Tn 越 E K p a I kntynypaiaatnoepi3 anouakpuevouc aoBntnpce meoew TEyoxoaylrc AF 433MHz (TePiajauvctet Avcs auipuotaoBnOtnpacsEeKpokaa
2eikntns taons ts θepuokpaosla.
KarayapnATNUVJNNTGEXATNG/MEYIATNS eowTepKns/EwTepKnsBepokpaoiaKa uypaoias.
Hepes nE8oadac e duatotnTa Emloyns piaa ato 8 ywos
AduatotnTt emoyns avaptnanct oav toixo n tomBETnTnTrwae Bao.
Φaoeis ealvns kai taliippoias
duvatoTcEIAOyCnF
Toppooboaia:2ptatapie tsouAA
AiothnpacBepkopaia
Copyright © Lexilbook 2008
2
Eey
N2 NA 3EKINHETE
A.Hoovn LCD tks kupias movadas
A1 - Kivoupeva oupbaT poyvwns kaipou
A2 - Aekns taans nies
A3 -Mvun eouwepikns yE/leX. 0epuokpaoia KAI UYPaia
A4 -Eouερικηνypασία
A5 -EoupiKnBepkoia
A6 -MvHnEgWtepiknsy./Exx. Eepuokpaoias
A7 -Kavai atoapkuouevou aothe npa #CH) kai taan ts eutepiknc cepokpaoic
A8 -Evaaaknti npoBoa knavaiou k avoCnTngs anpatos
A9 -EeWtepikn0epkoP
A10-△Eikntx qanhns pntapias
A11-Aeoupyiaaapp
A12-PpOBoHn Wpc
A13-Eikoviioa an/evpyoimou evou aapu
A14-△EikTeCΦaεωvπaIippoiaKaiσeHyrnG
A15-OtioBio 山 40wTioo
Copyright © Lexibook 2008
B. Pniktpa aeitoupyias ts Kupiaoovadac
3
B1-AI/epeyoToinaAapu:Ia va aI/ epeyoToinaTe Ta aApu 1 n2
B3-EiOtoin:ya opiaTe Tn tiPi BepoKpaTic yia EoiToin.
B4-Mode/Set (Aeioupyia/Puboi):via va eieABETe 0Tn Aetoupyia kai va pubiote Tnv wpa, Tnv npeopnuia kai to Sutuvntpi.
BS-Min/Max (MeV/EAoX): yia va kotayupiaeTe nI eY/ExAeEeUepiK Kc eouepikn eepkoopaia, Ka Etnionc Tn eY/EAoX.eauepikn Uypaia.
B. (ouvex.) Niow mAnktpa kupacovadas
- Bpiakovtai oTo navw mepoc ts kupiaosovaas
B6-Koumi (12/24):viaa puoilaeTe to Eutvntnai kai Tnv EIOtoiOn,viwaetniEeTe nI eivpOAnTnCwac 0e 12wnp/24wn npn. Patnne KaKpatneTo pannveo viya puoiieTe TaynpaJe taXtepe Puo.
B7-Koumu (C/F) / KApoc: yia va puthetaierte to Eutvntnpi kai tvn eiootlan, yia va etieeete epaivion eowertepinkc thepukpaiaac oC n of. nantote kai kpatmtote to tarnuevo ia va puthetaierte ta npia me tautepepo puho.
*Bpiokovtai oio triou npoc ts Kupiaoc novadac
C-Aioaontriopa-OoovLCD
E
4
Copyright © Lexilbook 2008
C1-Apiθμoε καναλιού
C2-EiokovioIaeroupyiaac autoatac Eekadno
C3-EgWepiknEepuokpata
C4-△Eikntnsxamnngmptapia
D.ПANKRAЯлгουра tou aiaaTnna
D1-Koumi oC/oF: yia va emalefete Eepavion Theepkoapacac cE. Cn F
D2-DiakottinEtiAoiNcKavaiIo:Yia vaTnapaxuipTeToV a0aIgntpaO tKaVa1,2 n3.
D3-KoujmtxTIA(trao)va vao uayovploate tov amoakpuoyeo aiothtnpa me vecpuoiieCcoAf n kaivaiou.
** Biokovtai 10i Wiow p6oou aoiotnpa, moe 0 tiaepiaipuatapiu
TPOΦOΔOεIA
AA
To Meotoclock aoc lantoupyei 2 u 2atapie cA yia tvn Kupia movada ka 2u atapiec AAA yia 10v amoqaquapevo aotnnpnae (De vTrepiAajBavetan kaiqa).
TOnroEnernon mntapapiw
- Kupia mvadao: Avoite me to doxuao oag in thopou tou diaepipauoc muaapuou mpuikotai ro taipupeos n kupiaovadao.Balte eo2 murtapieAa oupuva e npv evekuvuoeyn nokkotna.Kaiote raTto diaepipua maatapiw.
2.AnoakpuoEvoc aoBnnpa: AvoieE eva Katoaibi th npu ouaepapaoatmuapovou BpOkekta 0to Tn npoc pou atopaukpauevou aoBnnpa. Batoe ooo 2Tnupatac AAA oupuva me tvnvEvoknuovnolikotna.Kaiote nai to diqepua mpatappov kai apoe Tn bia
Kupia pavada
Atoaokpuauoovoc aoTinpancs
ENDEIEH XAMHAHE MITATAPIAE: Av oI mpatiec Tou atoakauouvou aioa npeivae, 0e i eavapaii t Eevdiyntn kupia novoda, dma otnv eetepkbi Bepokpaia [A10]. Oa pTeir va avtikataotne Tmuatapies Tou atoakpuouvou aoia nptia. H evdiy eavapaiietei tionns onov 0ovnn Tou atoakpuouvou aoia nptia [C4]. H eaoanm ts evtaon ts obovnc LCD ts kupia novadac evi Evdiynt on oI mpatiec eviat nepeves Kpi Teir va avtikataaabou.
5
Copyright © Lexilbook 2008
PYOMIZEI
Copyright © Lexilbook 2008
EAAyika
6
TONIOETHEH TOY ANOMAKPYEMENOY AIEHTHPA KAI THE KYPIA MONADAA
AToaKapuOevoaioBntnpa
O atouapuagevoc aoBnnpac umopei va tottoBteNge i opia, ravw AE iaEi emipveia nva apvatBne 1ov toxio. Iva va Eaaoaalote kAan eTADAo, o atouapuauevoc aoBnnpac dev Bt peTeva var totoBteNge naVn Kovta o neyAan metaalikn entpavieia. PIV diaEeE TE nBean tou aotauapuauevou aoBnnpac,dojuaote v an odelta taunata. Unvatatai entian o atouapuauevoc aoBnnpac va totoBte TNT KUPA movaaba, wote va atoepuyovtaoi aoroeBnntote TAPeBbAoBnnpac umopei va etianc va avaptneoi stov toxio. StepeWATE n aKpafi, amTnv Eidik nptra y avapntan otov toxio Tou BiPeketai ate pEOC oU TOBnnpa (ravw tumju).

Kupiaovada
H Kupia mvoDg tme i v aTepeWei TAVV nTV TEPIrpePoeVn/
tpepeovn Bao nTo atriyua vi avapton nTo ToxIO (TEPAUABVOTAI KA ta duo).Ia va xpoaioutonote n Baon, otepeowntnv uTOboXnTNS KUPIA mvoDAG (Tu pbiKetai kato an To uOkeun) Tavw am TaBao.
TOTOeHTOTe n Bao nTuW eAia Ka TOAEBn EITpDAVE.Iva va XPOAIoutonote n Bao avaptoncs OTOv ToXIO,BaATE ia BIDAe KaeTETTA (2) KAI otepeWTe nEv ev Axio. Meta, otepeWote nv UTOBOXnTNS KUPIA mvoDAg oTo aTVPAAvi v avaptonn oTo ToXIO.

ONIEIOE QOTIEMO:
Via xpaniatoaetote v ontioqoiu, taoTae to [A15], m oipkctai katu oTTOvObVn LCD TIC KUAPs oovdoa, O otioiofoiouoic evoiaoxio 5 de UeotopdETTA.
Copyright © Lexilbook 2008

PYOMIIEIPOAOTIOYKAIAAAPM
Pouon npa Kai nepounviac ME To xepi:
1.H oipapwovtoxelwvpeynovotola yivetnpuon eivan n
Ope AETTtA AETePpAETTg ETOs ZepaMjvaHepac Mjvac Hepa Zwn
ωpac → Γλωσα Hμερaτης εβδομαδας.
2. Patrjote KAI kpatnate patmveo To [B4] vaa eiaAteTe stn leuayla pueipianou Tou poaioyiou /nepeaoiyou me xepi
3. Opa kai njuepoynuia: NaTne Tae kaoujnaia " + " [B6] n " " [B7] ia va kavete puoiieci, kai meta to [B4] ia va embetaiooet e kade puoiian.
A. Katoipioic nTc eipac mnu - npepac oac emtpei ve emiee teo a to duo 8a epkpuu Ttpuo.
5. Zwyn npac: H Cwn npa 0a Tpnei va eivai oTo O
6. Hépà TIC Eδδoáoc; MTPOE vEAupavicetai 8 yAωoec;viTIV Avyik, eIAEETEN, Γeμaikn(GE), ΓαλiKn(FR), IOTAVIKn(SP), IαλiKn(II), OλaVδiKn(NE), ΔaVikn(DA) KAI Puaikn(RU).
Snejuew: Oa byeIte autoiota ato Tn aeitoupiia pubiian5 Tns wpa tio 5 deutepeAetta aobapevica.
-HevdEgN“DST"(epivnwp)epavicietaiotnyoovnLCDavexeevpyomoinBnepivnpa.
Copyright © Lexlbook 2008


- Oav xurana to alapu, mtopeite va natnate to koumu tou oiaoiou qwniou [A15] vla ve evpyoanotote to etovaanntno ta u aapu (snooo). To aapu 8x utnnnei taiae ato 5 eTTa. Av thee va otatnatoe to aapu, nataote onioobnnotoe koumi. To aapu 8x utnnnei Taiv ny eyn npepa, tv IDa upa. Av thee va atvepyoanotene TEleicw to apu, pTETIva to diakopue (Seite 9ua 6).
IPOFNQSH KAIOY KAI NAPOYZIAZH
Kivoueva oμβoλ προνωng kaipou
AUTc o iEeapokoyikoc stabuO ptopei va ivxveueoi aaiayec TcBapoeipkng tiecn kai, baei To boEvouTuouaIevi, va TpoBaeuToov Kaipo yia Tc Etopeveg 8 eoc 12 wpc. YtApXouV 5 diaepopotauuubolaoTpoyvauaq kaipou [A1].
Copyright © Lexilbook 2008
Tao msiang
O deiktns ts taon tsou epapavicietai oA [A2] delxve tnv taon ts Bapopeptkns trions

bn taon tsBapouepikng trioan auéavetai.

Otn Taon nns BapouetpiKng mncs elvai Otaepn
Tati va eEtoe kaveic n papopetpiKn TIEON;
Fevika, o kakoc kaipoc exei oxen me Tn xaunl Bapouotpi kian kai o kaoos kaipoc me Tny uanl mia trexpoy me yauan lneon peiabaiatme aepa uunlotepc ncec Kaohc o aepac me Tny uanlote pion dev utopev ia knvei meaa atny trexpoy me Tny xaunl nian kvatai npoc ta na Wpokaluvac uypoitnoan tou aepa, kai etoi dnouyovutra ouvveqa. To avtiveu oubaivee me Tny uunl nian cme iia trexpoy me unan lnean o aepac ts xaunlotepc ncec kivteir npoc ta katw, depaivovtas vto apa, kai etoi ekatiketai to vepo toun utapexia mea otov aepa.
EMΦANIHTH ΕEPMOKPAIAZ KAI EIDONIOIH
Euapavion mG eepuokpaoiae CnF
MTOEPEVE VA EITIETE EQUADVIA TNG eUOTEPIKH [A5] KAI EQUOTEPIKH [A9] EQUOPKAIOAC 8a BAOUGKAEIAO (°C) HAPAEVIAT (°F), TATWIGTA TO NAIKTIO [B7].
Aeitoupyia EIOOToinoNs Bepokpaia:
- PlanteTKe KAnPteHote Tarnmu To Koumu [B3] Yia va paubmuTe Tn Aetoupyia EIsToInonJy ia tvny Egeptepik Bepuokpaia.
- Xpnoiioiota oia Tnkiopa [Kai] BAI (7) ia va iMaEeTe oiooepbepkaocia yia to ioia OIEAEIOIOIeOIA: ia tvN owetepik biopkpaia n tyvL owetepik biopkpaia (kavda 1, 2 n).
- Natao to [B3] yia tneaiow
- XpnoiOIOIeTae TnAikpRb [K6] bai vio opoe to avotepo oio * Bepuokpaiaq ia iEoiOAnr, kai pntoTe to [B3] yei EtnBeaJoiin.
- Xpnaioiortae ta nktpa [B6] ka [B7] ia va opiaetee to xqunloepn oio " Bepuokpaiaic yia eioiopoi, kai nartoe to [B3] ia emtbetaiow.
Copyright © Lexilbook 2008
EAAyika
10
- Fia TAPASEymu, TAPATE va opaete TM BepuKpaia yia EIOTOnan mteauo 0C kai 35°C. Kafe opaT Oou aotnKpuAevoc niaHtnap KATpapae iia EeWteptk HepuKpaia xauJntepn an 1°C n uApAotpn an 34°C, XnE iEIOATAOAn Tc BepuKpaia to [A9] avaoBoBnye. Hxey ia epeika deetpoAETTA, Oatapadai, Koi tera ani Aya deetpoAETTA cavaxtunai, Mxpi va ateepyoToonEl.
AEIOTYPIA KATAFPAOHMEIETHE/EAAXIETHE OEPMOKPAIAE
Autos o meuoloayokos atoog katoyapapeia kaiupeiva to mtedeo ts yviatntx/Exaxihtns eouwepikgsotepipkns thepokpaia kai ts eowtepiks uypaiaCi. O tnc diaypovtaia autopata kaqnepeipv ot 00:00.
- PAnrnte To TnAekpo [B5] Ia opa yia va dite n t neiTne eoutepkn Bepuokpcaia [A5], nTv 2Eouetepik Bepuokpaio [A9] kai Tnv eouetepki uypoia [A4]. Ekpavietan n Evseien MAX oA [A3] kai [A6]
- Pamiotre To koumi [B5] duo opece yi deire ny Eaiyakn eunewtepkn thepokpaia [A5] kai eEwstepeki npokpaia [A9].Euapovicet an EvSeiN MIN"Oa [A3] kai [A6].
- Manitope Kki pataotane taniueo To [B3] via va diaypaote Tc katiaypaeve Tnc eoutekn 6epkpaacic Kauiypaacic
DAEIEZEAHNHEKAIIIAIPPOIAZ
Φαειςηςσελγνης
2e 0a oia tna uau 28 nueuouu ou aeivnauo uyn, na ou nuc nce anaein Aapuyan, eni eon n aeynv eaipapki, quicetai ravva to mao tsunua atto tv no. KaBcE depiopepetaa ywup aotn Tn, npuovianng swnpuane uana aalaeouxena Auto to apovvevo noiayoue auu rou ovuaocpeaeis cne anyv. H pao nts anync [A14] 0rteMeoclock cac enyupovetai autupaata uuppuva me to etoc, tv nuya kai nvypea.
1:NeAeAnv 2:Neapoc mviokos 3: npwro tepato 4: Tmuon 3/4

5:NaovéAnvoc 6:Xaon 3/4 7:Tεeutaio Tepro 8:Γnpaio Mnyiokos

Copyright © Lexilbook 2008
PaiippoieC
Iepitou kke 12 wpc, n atoun twn ukeawv oukeaupou tnaivn avebaivee laappka kai meia npipeir. Aunri nkvon oovzeraanippoia. Eiva anotaleo nnc nccnbpntoc ncs oalnyk taou naou. Kaowu kau nneipatopwuv nns ng, nce aolnu nca kau naiou. O peteupoayokos atabuc ag eapaviciy nky katataan nts pllpoeac [A14], wc eth
IPOZOETE OAHHIE TIA TH XPHSH NOAQN AIEOHTHPON
Av Evet evav n duo paoBtoua aaiBntepc, uptopite va tou tonototetate e diapopoetkeicheic e mea oto otti aoc, nX. teuvovmaio. H kupia movda oca utpoei va oulaee i 8e0eva tns Bepuopaacai kai ts ypaia cexpi atpoaopauevou caiTnpoc
TtoToEtnon:
Fia va totoTbIeTeEv Avo EOaTHnPa, AOaIOuTHc Tc OyNIE Tcu DIOVATO tOn eALIBa 5. FOVPoTiVA vopaoxupHaeToV kAbE aioTHnpa E daipopetiko KAVAI.
Eepavion nCg EepokpaiaKai nS uypaia
Mtopeire va deite ts tiques uypaiaas kai nts thepokpaiaacwov diaopopikuv aotapkpuevuv aiothnpwov ac, natwrtas to ntkpo [B2]. H eipd evai n efns:

H evdiEi [A8] onaivei on n ouakeun th aepaviaei ta diaeaijka kavaiia oac diadoxik.
Pnntae kai kpatne tane mtevo to [B2] vai aapaipeete eva kaviai. (Mn autouatog troto.) H
aukeunai uautoi a bi avanrtae i Ka Bk Karaypauiye veo kaviai, av yivei liuou. AV dev E,
paviieai n eepokpaiaoe eva unapxov kaviai (eupaviieai n eevidein -- -otny oevon LCD),
Tnptae kai kpatne tane mtevo to [B2] vai aakupoote ekeivo to kaviai kai va yivei rai an jnuin
kavalaiou. Meta, tnatre to [D3] am ouakeun to auivatoiou aoiqtnpna ia vai metadobci to nia
atyn kupaiaova dae en autopato npto.
Copyright © Lexilbook 2008


EAPTMATA
PpOa8e1oaoTnppeC:
MetipnoTe n Bepuokpaoia kai nvypaia oe aaaa np!
-2Tov TAVOPOPO
-1uV08wpuiaoupwpou
-210U10y810
-2TO KEApkiKpaaiW
-2e aAoo eva 8oanio
Ig nagayyia. inAeuynoiE oyaqia nC Lexibook on yuogocn 10kOe8iein 8uBuyon
To Web: www.lexibook.com
ANTIMETΩΠIISH NPOBAHMATQN
xuuyy
Ppαβλημα:
- OI eptnaeic nC thepokpaiaac tou aonjaekpuevouiaahtpa kai tou dEKIN SEV taipaoivou
- Oi tnc ts 0epokpaac taou aotkauegeov aoahtnpaou elar toroetnevo cewoiaocuv noku wnaEc.
- Odeltantc dev aouaive ma anuata atoTov aouapuaevo aioBnnpa n devaugvciie
Aucn:
- Nepijevete nepitou 1-2 keiia yia va eivai ayoupo o o anmuakpuveov aiaatnpac kai o ekntnc evai ouxxpovioevo Au vtoe aujbaivekavte rauyxpoviou toekni, kpatuvira narnjevo to CHN ia 3 SeutepeoAetae jexpivakouatei eva nxntiko onja.
- Apovioite wote aotouakpuevoc aoBnTnpoc va mye kETBai otov nai ka via piaKetai paKpia ato eTicheepotntac.
- EtavaalabeTic diaikaocieekaonns. Hepuapcaia umoipai viva kawto -30C. OI parracpcou aot amakpuayou aiothnma npoipe va xpiacovia avikiaotaao.
-Φeipovtoaiajauojuevoo08nTnpioKovoi 06tovdkt.
Φρονιτε τωτε σατηλαμκρυμεος αἰδηπηρας να βρίακελα μακρία πάθεις έλεκτιρίκε διατρακής
13
Copyright © Lexibook 2008
TEXNIKA XAPAKTHPIETIKA
Aektns MeTeWpOaoyiKou Σαθμou SM1800
Meyeog:213x118x140x
Tpoosooia: 2 mparapie8 1.5V AA
EepuXnoupyiC:OC+50C
Eupoc ;0C - + 50C
Akpiβεια μετρησς:+-1C
Eupoc Tpnoeewv
Eωτερικήθερμοκρασία: 0°C ~ +50°C
Eowepikuypda:20%~95%
EeTepkiHepokpaia: -50°C ~ +70°C
Yπoδiaipéαεικλiμακας:0.1°C
Copyright © Lexilbook 2008
LEXIBOOK
△HAQESH SYMMOPΦΩEHE
OkiTuWBI UToyPapovTe, LexibookS.A.
Copyright © Lexilbook 2008
Julian Chung
YntuBuvocPiotikou EAeyxou

SM1800IM0108

16