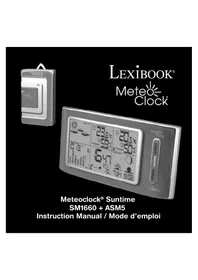
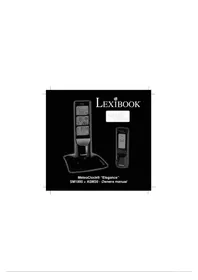
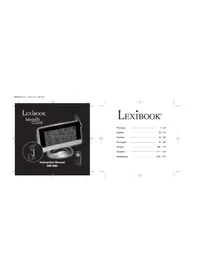
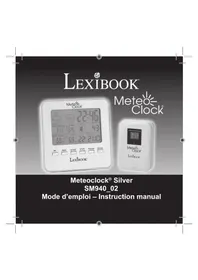
Serenity RL960 - Weather Station LEXIBOOK - Free user manual and instructions
Find the device manual for free Serenity RL960 LEXIBOOK in PDF.

| Product Type | Weather station with radio alarm clock |
| Brand | Lexibook |
| Model | Serenity RL960 |
| Dimensions (approx.) | 200 x 120 x 80 mm |
| Weight (approx.) | 500 g |
| Main power supply | Mains adapter 230 V~50 Hz, output 6 V DC 500 mA, center positive |
| Backup batteries | 2 LR6/AA batteries (not included) |
| Main functions | Radio alarm clock, 3 alarm modes (polyphonic melodies, radio, progressive wake-up), sleep mode, DCF radio-controlled clock, temperature and humidity display, progressive lighting, 8 melodies, 12 preset radio stations, 3 wake-up themes (ocean, countryside, spiritual), adjustable snooze (5 to 12 min), 12/24 h display, calendar |
| Radio receiver | FM, 12 memory stations |
| Display | Digital, temperature in °C or °F, humidity, radio frequency, date, day of the week |
| Backlight | Permanent or temporary (5 s), adjustable |
| Care and cleaning | Clean with a soft, dry cloth. Do not use water or liquid products. |
| Safety | Use only the supplied adapter. Do not expose to moisture or heat sources. Disconnect during storms. |
| Spare parts and repairability | Backup batteries replaceable by user. No other spare parts available. Repair by professional only. |
| General information | 43-page manual available in multiple languages. 2-year warranty. Manufacturer: Lexibook. |
Frequently Asked Questions - Serenity RL960 LEXIBOOK
User questions about Serenity RL960 LEXIBOOK
0 question about this device. Answer the ones you know or ask your own.
Ask a new question about this device
Download the instructions for your Weather Station in PDF format for free! Find your manual Serenity RL960 - LEXIBOOK and take your electronic device back in hand. On this page are published all the documents necessary for the use of your device. Serenity RL960 by LEXIBOOK.
USER MANUAL Serenity RL960 LEXIBOOK
m = 311
√
m = 311


m = 311


Congratulations on your purchase of the Lexibook Serenity Clock. Serenity makes you fall asleep and wake up gently in a melody of lights and sounds. Ocean sounds, temperature and humidity display, light shows... all conditions are into place to guarantee a refreshing and deep sleep every night. This radio alarm clock offers innovative functions that can be tailored to your preferences:
Keep this manual handy as you discover the functions this product has to offer. It contains useful step-by-step instructions, as well as technical specifications and important warnings.
Product Overview
See (Fig. A)
1.Up arrow key
- Press to wrap around the alarm setting as follows:
Polyphonic alarm > radio alarm > awakening mode > off. - In radio mode, press to toggle next radio preset station
- Hold to enter set duration mode.
2. OK key
- In clock mode, press to show the alarm time.
- Press to confirm settings
- Press and hold to enter alarm set mode.
3. Down arrow key
- Press to select the alarm tone.
- In radio mode, press to toggle previous radio preset.
4. Plus (+) key
- Press to increase a setting.
-
In radio mode, press to scan the radio frequency up.
-
Press and hold to enter clock setting mode.
5.12/24key
- Press to switch between clock and radio mode.
- Press to toggle between 12 and 24 hour display in clock setting mode.
6. Minus (-) key
-
Press to decrease a setting.
-
(In radio mode) press to scan the radio frequency down.
- Press and hold to enter time-zone and language setting
mode - Press to toggle between the following display modes:
Temperature in Celsius > Temperature in Fahrenheit
Humidity display.
7. S key
- Press to switch the slumber mode on and off.
- Press to turn the RCC function on or off while in clock
time setting mode.
See (Fig.B)
8.Light key
- Press once to activate the snooze function.
- Press once to switch backlight on for 5 seconds.
- Hold for 2 seconds to switch the backlight on permanently. Press once again to switch the backlight off.
- Press twice briefly (within one second) to switch the lightshow on and off.
See (Fig. C)
9. Volume Wheel
Scroll the volume wheel to increase or decrease the sound volume.
10.Antenna

16-1721/07/203617:54:28
See(Fig.D)
- EU GMT+1/UK GMT switch
Select which radio controlled time signal you want to receive.
Switch between DCF-77 from Germany or MSF from England.
12. External speaker
Plug in earphones or an external speaker.
13. Reset hole
Insert a thin blunt instrument to restore all the default settings.
14. Backup battery compartment
Insert 2 x AA batteries (optional).
15.6V AC/DC Power Adapter Socket
LCD Overview
See (Fig. 1).
- Calendar Radio Preset Station.
Day of the week, month, date Preset station: 1-12
1.00元/股 - Shooze on Icon. 3. T:111111111111111111111111111
- Title HAMW, 12-24-H0F, AM/PM, 4. Code controlled electronic
4.Radio controlled clock icon 5.Music home - Ntio 1
- Courtyard theme
Getung started
Fig.1
-
Open the battery compartment located at the back the clock. Make sure the RCC switch is set to the UK GMT position.
-
You can install 2 x AA batteries in the battery compartment located at the back of the clock. These backup batteries will keep the clock powered on in the event of a power failure.
-
Plug the clocks AC230V-50Hz adaptor into an electrical power outlet. Plug the AC adaptor jack into the player's DC IN 6V-500mA with positive centre -jack
Warnings:
Should you notice any abnormality in the AC adaptor, discover it from the electrical socket and player immediately. Always use the supplied AC adaptor that is designed specifically for the clock only. Using any other AC power adaptor may cause the unit to malfunction and increase the risk of fire or injury. If the unit malfunctions or receives an electrostatic shock, use a blunt object (the tip of a paper clip for example) to press the Reset key located inside the battery compartment.
16

Radio Controlled Clock
Serenity® Clock is designed to automatically synchronize its calendar clock once it is brought within the reception range of the UK atomic clock MSF signal, for GMT O (UK, Ireland, Portugal)
- Make sure the correct time zone is selected as described under Selecting the time zone and clock display language' on page 18. 2. The clock automatically displays the PCC signal after it is presented up to the北京时间 number of hours in a
Fig. 4. Once data is being recorded the signal at a point in time t is plotted as a function of the signal amplitude A(t) . The data representation generally takes several minutes, depending on the strength of the radio signal. Previous settings will be overwritten.
- When the reception is complete, the radio clock symbol will stop blinking and remain solid. The clock automatically scans the time signal at 02:00 everyday to maintain accurate timing.
Notes.
- If the reception was successful the Radio Tower symbol and the 3 rings are displayed. If the reception was not successful, but the
previous scan obtained a complete set of data then the Radio Tower symbol and the 3 rings are shown as well. If there is no reception for 3 successive days then the RCC icon will be turned off.
The clock will start to scan the RCC signal after every day at 2.00 am, after reset or reconnection to power (if used) without back up batteries) and when the line-zone is set.
For an optimal reception, place the clock away from metal objects and electrical appliances (i.e. television, computer, monitor, etc.) to minimize interference. - Set the RCC switch to the sender that is closer to your position or which provides a better reception.
Make sure you select the time-zone of the country of which you want to display the time.
Setting the clock manually
- To enter the clock setting mode, press and hold for 2 seconds while in clock mode.
- The hour is blinking. Press + or - to set the hour. Confirm with OK
- The minutes are blinking. Press + or - to set the minutes. Confirm with OK
- The day is blinding Press + or - to set the day Confirm with OK
- The month is blinking. Press + or - to set the month. Confirm with OK
- The year is blinking. Press + or - to set the year. Press OK to confirm all your clock settings and return to clock mode.
17
16-1721/07/2006 17:54:28

Additional settings in clock setting mode
- Press to toggle between 12 and 24 hour display
- Press to logics between RCC so and off.
Selecting the time-zone and clock display language
- In clock mode, press and hold for 2 seconds to enter line-zone and language setting mode.
-
The currently selected language is blinking. Press + or - to select one of the 6 following languages:
French (FRA), English(ENG), Spanish(ESP), Portuguese(POR), Italian(ITA), German(DEU) -
Press OK to confirm and return to clock mode. The clock will automatically start to scan the for the RCC signal
Note: the time zone is automatically updated when you choose a language.
Alarm modes
Discovering the 3 alarm modes
Serenity® Clock includes 3 alarm modes. Press to toggle between the 3 types of alarm display:
Polyphonic Ringtones Alarm Iio Alarm Awaking Mode
Setting the alarm time
- Press and hold OK for 2 seconds. The display shows the current alarm time, and the hour is blinking.
- Press + and - to set the hour and confirm with OK
- The minutes are blinding. Press + and - to set the minutes and confirm with OK
Setting the duration for the snooze
Press and hold for 2 seconds while in clock mode. Press OK 4 times
The anooze lon 7 1 1
(DUR 05-12). Press + and to set the minutes and confirm with OK
18
18-1921/07/2006 17:54:23


Setting the duration for the snooze
Press any key except (Snooze) to stop the alarm. It will start again the next day at the same time.
OR
Press to repeat (snooze) the alarm. The snooz icon flashes to stop the alarm while the snooze is activated.
press and hold any button except for 2 seconds. The snoozie icon will disappear once the alarm is stopped.
Setting the Polyphonic Ringtones Alarm
-
Select a ringtone
In clock display mode, press until is displayed to activate the polyphonic ringlones alarm mode. Press to
togbe between the 8 ringtones avallable (CHM1 to CHM8). The last ringlon displayed will be selected. Pres and hold to review the alarm tone. -
Set the alarm time
- When the alarm rings:
The polyphonic melody will start at the selected alarm time in low volume and will increase within approximately 60 seconds to
Setting the Radio Alarm
- Select a preset radio station
In clock display mode, press until displayed to turn the radio alarm on. Press to toggle between the 12
prest radio stations available (PRE01 to PRE12). The last preset station displayed will be selected. Press and hold to preview the preset station.
Note: you can select your own preset stations. To do so, refer to the radio section on page 22. - Set the alarm time
- When the alarm rings
If the alarm is not stopped, it will automatically stop after an hour.
19

Setting the Awakening Alarm Mode
The Serenity®Clock features an Innovative Awakening Wake. Wake up gentle with the sounds of nature, soothing music and relaxing relaxation. Wake up in a natural way. Wake up in a natural way. Wake up in a natural way. Wake up in a natural way. Wake up in a natural way. Wake up in a natural way. Wake up in a natural way. Wake up in a natural way. Wake up in a natural way. Wake up in a natural way. Wake up in a natural way. Wake up in a natural way. Wake up in a natural way. Wake up in a natural way. Wake up in a natural way.
There are 3 user-selectable awakening themes:
untrbside:sounds of streams, birds, bells, sheep ...
Age:virtual music...
Ocean: sounds of waves, dolphins, seagulls, boats
At the beginning of the awakening sequence the sound will be in low volume and the light dim. During the wake up period the volume will gradually increase and more sounds will be added until the maximum level is reached at the set wake up time. Also, the light intensity is increasing over time to simulate the raising sound and tell the sleeping body that the night is over and a new day is awakening. To enjoy the awakening experience to the most, set the awakening period and volume to your preference.
- Select an awakening theme
In clock display mode, press until is displayed to activate the awakening alarm mode. Press to toggle
between the 3 themes available (Ocean = , Countryside = , New Age = ). The currently displayed ringtone will
be selected. Press and hold to preview the alarm tone.
-
Set the alarm time (end time)
Note that the alarm time is actually the time at which you want the alarm or awakening period to stop. By selecting the duration of the awakening period in the next step, you will set the alarm starting time. -
Set the duration of the awakening (start time)
Press and hold for 2 seconds while in clock mode. Press OK once is flashing and DUR 15 is displayed on the top part of the screen. The duration of the awakening period can be set to 15, 30 or 45 minutes. Press + or - to set the time of the awakening period, and confirm with OK TOP ON is displayed on top of the screen. Select whether you want to activate (TOP ON) or deactivate (TOP OFF) the light show during the awakening period. Press + or - to toggle between TOP ON and TOP OFF, and confirm with OK. Press OK three times to confirm your settings and return to clock display mode.
20
Slumber Mode
When the alarm rings
A is fashing and the awakening sequence begins. Press any key except to end the awakening period. It will start again the next day at the same time. If the alarm is not stopped, it will automatically end at the line set
OR
Press to repeat (snooze) the alarm (the whole awakening sequence will be repeated).
The slumber mode has been developed with our busy and hectic lifestyle in mind. It calms the mind and prepares the body for a good night sleep. The same themes as for awakening mode can be selected, and the slumber duration as well as the lightshow on or off can be set. The sequence will start on maximum volume. Slowly the volume will decrease and fewer and fewer sounds are played. The light intensity will gradually be reduced to give the impression of a peaceful sunset. As the light is fading and the sounds fade the user is falling into a healthy sleep. If an alarm is set for the next day, the volume should not be set too low as otherwise the sounds might not be heard and the user will oversleep.
- Enter the slumber theme set mode
Press and hold for 2 seconds while in clock mode. The currently selected slumber theme is displayed and a preview is playing. Press or to toggle between the 3 themes available (Ocean = Countyside = NewAge =). Confirm with to return to clock display mode. - Set the duration of the slumber mode
Press and hold for 2 seconds while in clock mode. Press OK twice. This is flashing and DUR is displayed on the top part of the screen. The duration of the slumber period can be set to 15, 30 or 45 minutes. Press + or - to set the time of the slumber period, and confirm with OK. TOP ON is displayed on top of the screen. Select whether you want to activate (TOP ON) or deactivate (TOP OFF) the light show during the slumber period. Press + or - to toggle between TOP ON and TOP OFF, and confirm with OK. Press OK once more to confirm your settings and return to clock display mode. - Turn the slumber mode on
When you are ready to go to sleep, press to launch the slumber mode while in clock mode. Press once more if you wish to turn it off.
21
This function indicates whether the temperature and humidity conditions in your bedroom are favourable to an ideal and refreshing sleep. This is illustrated with a comfort icon. The Serenity® Clock features a built-in thermometer and hygrometer. It displays the current temperature in Celsius or Fahrenheit and the humidity in percentage.
Press to toggle between 3 displays:
Temperature in Celsius Humidity in percentage Temperature in Fahrenheit


The comfort icon indicates the current conditions in your bedroom:
Excellent Temperature 20°C to 22°C (68.0°F to 71.6°F) AND Humidity 45% to 55%

Conditions Good
Temperature 18/19 ^ C or 23/24 ^ C (64.4/66.2F to 73.4/75.2F) AND Humidity 35% to 44% or 56% to 65%

Conditions
Acceptable
No Icon
Conditions Not NEITHER
Acceptable Temperature 18 °C to 24 °C (64.4 °F to 75.2 °F) OR Humidity 35% to 65%
Radio Mode
Press to toggle between clock mode and radio mode
Press or to scan the radio frequencies up or down. Press once to scan in 0.1 increments. Press and hold to auto-scan to the next radio station.
Press or to loggle between the 12 preset stations.
22
Setting a preset radio station
- To enter the Set Radio Preset Mode press and hold OK for 2 seconds while in radio mode.
-
Select the preset you want to set (PREF1 In PREF12) with
Theorem 1.2. The following theorem holds for all n -times k -dimensional subspaces of ^n -
Then, pmod 4
4.Once the desired station is assigned to the selected preset number, use or to select the next preset number
you want to be - Continue until all the preset numbers you want to adjust are set. Press OK to save the changes and return to radio mod
Setting a preset radio station
In radio mode press to switch the sleeping mode on or off. The selected radio station will play for the duration selected in set duration mode of the slumber mode until it switches off automatically.
Note: please keep in mind that if you set the volume too low in the radio sleeping mode, you may not hear your alarm the next morning.
Safety and Care
Safety precautions
Keep the product away from heat sources, such as radiators, sloves, heaters, and other heat-generating products.
Do not use the product in or close to water or in high moisture locations (the bathroom for example).
- This product may be susceptible to power surges . It should be unplugged duringlong time . Only uses the tire of power source supplied in this installation proposal
Care precautions
To clean this unit, only use a soft cloth moistened with water. Do not use any delongel product or chemicals. This may cause permanent damage that is not covered by the warranty.
- Do not demand of drop the unit. Do not try to repair the product yourself.
- Remove the batteries if the unit is not going to be used for an extended period of time.
23
Warranty
NOTE: please keep this instruction manual, it contains important information.
This product is covered by our two-year warranty.
To make use of the warranty or the after-sales service, please contact your retailer and supply proof of purchase. Our warranty covers material or installation-related defects attributable to the manufacturer, with the exception of wear caused by failure to respect the instructions for use or any unauthorised work on the equipment (such as dismantling, exposure to heat or damp, etc.).
Customer Service
LEXIBOOK UK Ltd
Unit 10 Petersfield Industrial Estate
Bedford Road, Petersfield
Hampshire, GU32 3QA,
United Kingdom
Freephone helpline: 0808 100 3015
http://www.lexibook.com
Environmental Protection
Unwanted electrical appliances can be recycled and should not be discarded along with regular household waste! Please actively support the conservation of resources and help protect the environment by returning this appliance to a collection centre (if available).


Introduccion
m = 311 ;
(Ver fig.E)
42-4321/07/200617:54:38


LEXIBOOK Electronica Lda
Quinta dos Lojos
Praceta Jose Domingos dos Santos, 6B-8A
2835-343 Lavradio-Barreiro
Portugal
Apoio Tecnico: 212 039 600
http://www.lexibook.com

Proteção Ambiental
50-5121/07/2006 17:54:40


Gortd Cnding Tcemn 18 19C 77 24C 5N Vcdtcbed 35% t 41% of 55% t 55%

Conflues
Company
Geen Niet sanvaardbare NOCH, Tpmnrs 18oC to 24oC NOCH Vorsbtinged 35% to 65%
Conditions
75