AG301EU - Deep fryer NINJA - Free user manual and instructions
Find the device manual for free AG301EU NINJA in PDF.
| Product Type | Air Fryer / Multifunction Grill |
| Brand | Ninja |
| Model | AG301EU |
| Power Supply | 220-240 V~, 50-60 Hz, 1760 W |
| Pot Capacity | Approx. 5.5 L (estimated) |
| Main Functions | Grill, Air Fry, Roast, Bake, Dehydrate |
| Temperature Settings | Variable per function: from low to max for Grill, specific ranges for Air Fry, Roast, Bake, Dehydrate |
| Timer | Up to 30 min (Grill), up to 1 h (Air Fry), up to 4 h (Roast/Bake), up to 12 h (Dehydrate) |
| Coating Material | Stainless steel on outer surface |
| Included Accessories | Removable cooking pot, grill plate, baking tray, splatter guard, cleaning brush |
| Cleaning and Maintenance | Plate, tray, pot, guard and brush are dishwasher safe; main unit cleaned with a damp cloth |
| Safety | Automatic standby, overheat protection, lockable lid, hot surface indicator |
| Weight | Approx. 6.5 kg (estimated) |
| Dimensions (L x W x H) | Approx. 38 x 30 x 25 cm (estimated) |
| Warranty | 2 years (subject to registration) |
Frequently Asked Questions - AG301EU NINJA
User questions about AG301EU NINJA
0 question about this device. Answer the ones you know or ask your own.
Ask a new question about this device
Download the instructions for your Deep fryer in PDF format for free! Find your manual AG301EU - NINJA and take your electronic device back in hand. On this page are published all the documents necessary for the use of your device. AG301EU by NINJA.
USER MANUAL AG301EU NINJA
GRILLSTYRINGSTEKNOLOGI
Med vore technologi kan du styre grilipiadens temperatur for nogejtig bileredinng semr for at undgag ng kekket.
Standard temperature vises. Brug op-og nepalne for TEM (ill at loestro temperature).
BEMARK:For all konvertere opskifler til almince igov skdu reducere temperaturen med 10^ Kontroler maden olte, sa du undgär aten far for megej.
3 Brug op-og ncdpiene for TID til at indstilbitermingndien med 15 minuitters-intervaler til 4 timera.
Tryk pAK START/STOP-Knapen for at begynde forvarming. Displayet vil vse PRF, og stufusbjaelken vil begynde.Det kane oo t tre minutter at forvarme apparateit, at after den valige temperatur.
BEM/ERK: Selvom viktigt anbefaler at ufcr forvarming for at opn a dot bocdo resultat, kan du vage at springe processen over yod at trykko pa ROAST-knappen Igen. Medeisen Add Food (Tillam) mad) vI blinko plasylact. Aen lagot oglag ingrediensere gnilkuroyen. Nar laget er luxict. vil blocrconingen bogynde, og tmeren vi starte neatalingen.
5 När forvammingen er faerdig, vil apparater bioce og meedelelsen Add Food (Tillfaj mad) vil blinke pa displayet.
6 AnjLaget, oglaginergenserne i gryden,Narlaget er Lukket, vill Uberbedingen begynde,og timeren vil starte ndeillingen.
for purchasing the Ninja Grill & Air Fryer

REGISTER YOUR PURCHASE
pinjakitchen.eu
plan QR code using mobile device
RECORD THIS INFORMATION
Model Number:
Serial Number:
Date of Purchase:
(Keep receipt)
Store of Purchase:
TECHNICAL SPECIFICATIONS
Voltage: 220-240V-50-60Hz
Watts: 1760W
TIP: You can find the model and serial numbers on the QR code label located on the back of the unit by the power cord.
CONTENTS
Important Safeguards. 35
Parts 37
Getting to Know Your Grill 38
Function Buttons 38
Operating Buttons 38
Before First Use 38
Using Your Grill 39
Splatter Guard 39
Cooking Functions 10
Grill 10
Air Fry 41
Roast 42
Dehydrata 44
Cleaning Your Grill. 44
Troubleshooting Guide. 45
Product Registration. 47
IMPORTANT SAFEGUARDS
HOUSEHOLD USE ONLY·READ ALL INSTRUCTIONS BEFORE USE
Read all Instructions before using your Ninja Grill.
When using electrical appliances, basic safety precautions should always be followed, including the following:
AWARNING
1 Remove and discard the protective cover fitted on the power plug of this appliance.
2 This appliance can be used by persons with reduced physical, sensory or mental capabilities or lack of experience and knowledge if they have been given supervision or instruction concerning use of the appliance in a safe way and understand the hazards involved.
3 Keep the appliance and its cord out of reach of children. DO NOT allow the appliance to be used by children. Close supervision is necessary when used near children.
4 This apolance is for household use only. DO NOT use this appliance for anything other than its intended use. DO NOT use in moving vehicles or boats. DO NOT use outdoors. Misuse may cause injury.
5 Ensure the surface is level, clean and dry. DO NOT place the appliance near the edge of a worktop during operation.
6ALWAYS ensure the appliance is properly assembled before use
7 When using this appliance, provide at least 15.25 cm (6 inches) of space above and on all sides for air circulation.
8DONOT use an extension cord. A short power-supply cord is used to reduce the risk of children grabbing the cord or becoming entangled and to reduce the risk of people tripping over a longer cord.
9 To protect against electrical shock DO NOT immerse cord, plugs, or main unit housing in water or other liquid.
10 DONOT use the appliance if there is damage to the power cord or plug. Regularly inspect the appliance and power cord. If the appliance malfunctions or has been damaged in any way, immediately stop use and call Customer Service.
11 NEVERUSE socket below worktop surface.
12 NEVER connect this appliance to an external timer switch or separate remote-control system.
13 DONOTplace appliance and let card hang over edges of tables, counters or touch hot surfaces including on or near a hot gas or electric burner, or in a heated oven.
Only use recommended accessories included with this appliance or authorized by SharkNinja. The use of accessories or attachments not recommended by SharkNinja may cause a risk of fire or injury.
15 Before placing any accessory into the cooker, ensure they are clean and dry.
16 DONOT use the appliance without the removable cooking pot and splatter guard installed.
17 ALWAYS ensure lid is fully closed before operating.
18 DO NOT move the appliance when in use.
19 DONOT cover the air intake vent or air socket, vent while unit is operating. Doing so will prevent even cooking and may damage the unit or cause it to overheat.
20 DONOT touch hot surfaces. Appliance surfaces are not during and after operation. To prevent burns or personal injury, ALWAYS use protective hot pads or insulated oven gloves and use available handles and knobs.
21 DONOT touch accessories during or immediately after cooking. The grill plate and basket becomes extremely hot during the cooking process. Avoid physical contact while removing the accessory from the appliance. To prevent burns or personal injury ALWAYS use care when interfacing with product. Recommend use of long handed utensil and protective hot pads or insulated oven gloves.
22 DONOT use this appliance for deep-frying.
23 To prevent possible illness, ALWAYS use a thermometer to check that your food is cooked to the recommended temperatures.
24 Should a grease fire occur or the unit emits black smoke, unplug immediately. Wait for smoking to stop before removing any cooking accessories.
25 Please refer to the Cleaning & Maintenance section for regular maintenance of the appliance.
26 To disconnect, turn any control to "off", then unplug from socket when not in use and before cleaning. Allow to cool before cleaning, disassembly, putting in or taking off parts and for storage.
27 DO NOT clean with metal scouring pads. Pieces can break off the pad and touch electrical parts, creating a risk of electric shock.
28. Cleaning and user maintenance shall not be made by children.
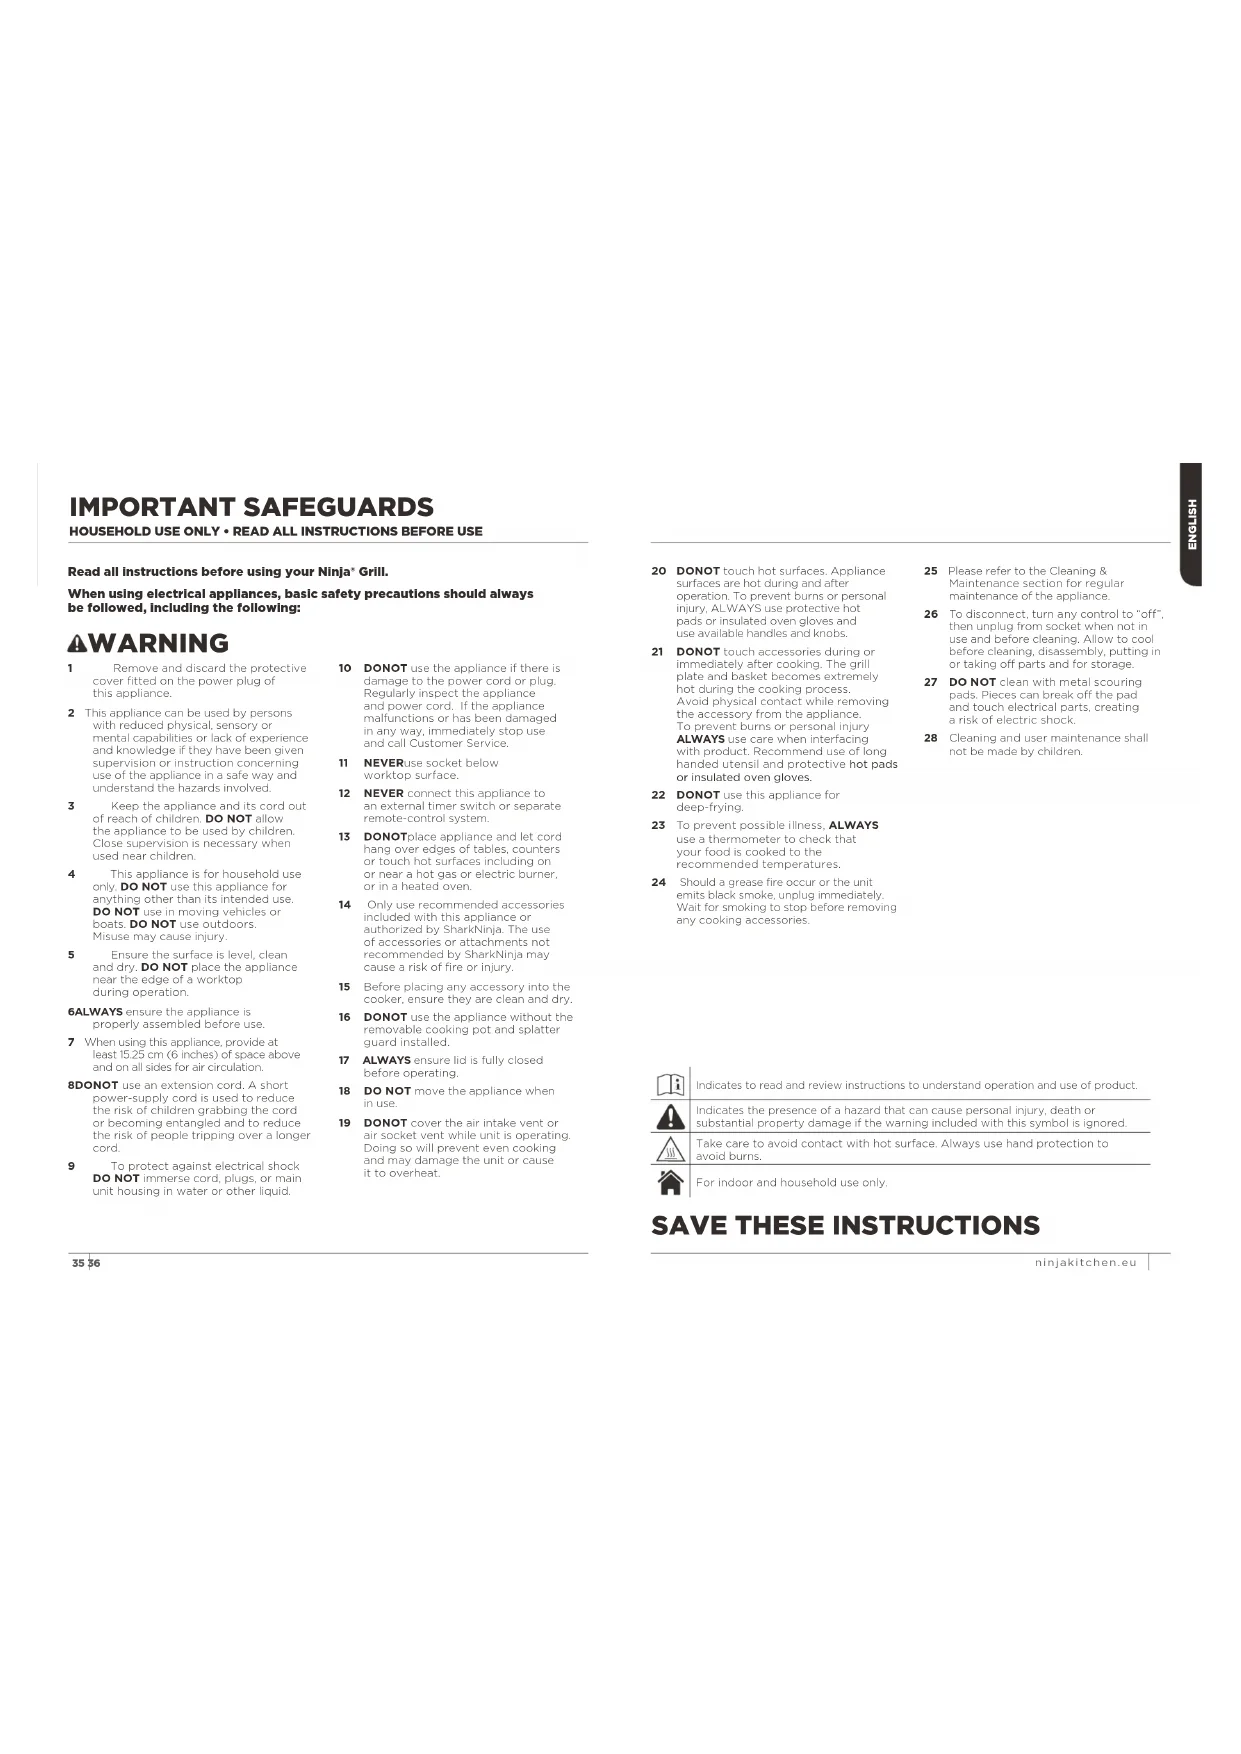
indicates to read and review instructions to understand operation and use of product.
Indicates the presence of a hazard that can cause personal injury, death or substantial property damage if the warning included with this symbol is ignored.
Take care to avoid contact with hot surface. Always use hand protection to avoid burns.
For indoor and household use only.
SAVE THESE INSTRUCTIONS
PARTS
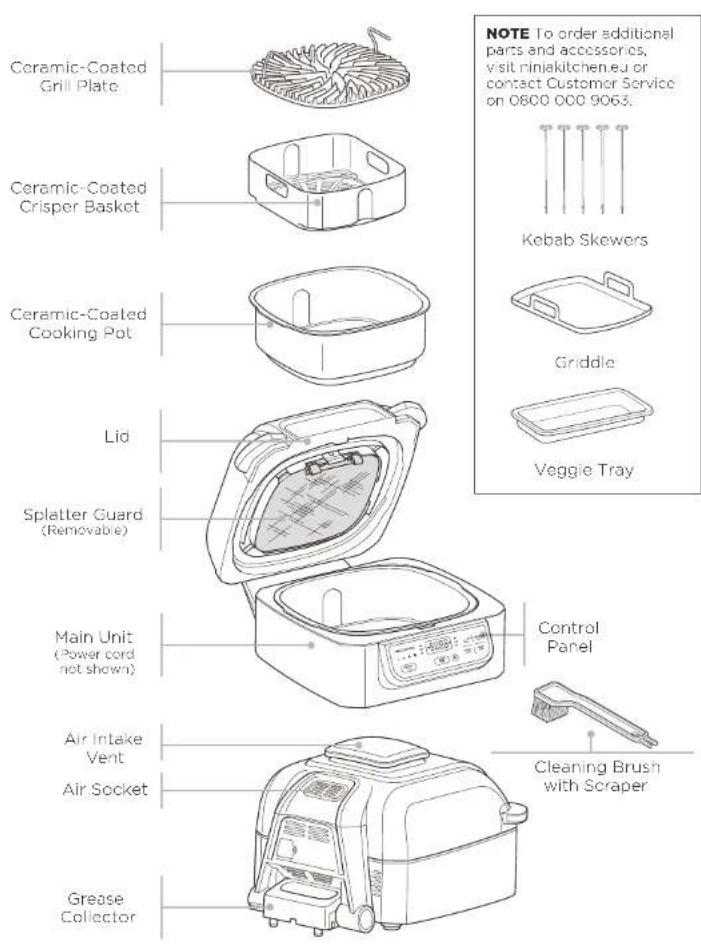
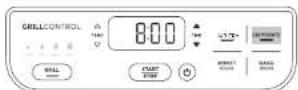
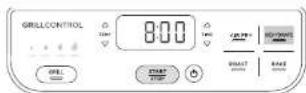
GETTING TO KNOW YOUR GRILL
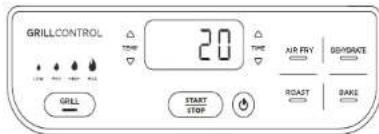
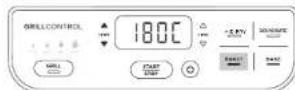
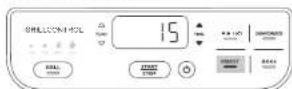
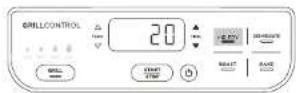
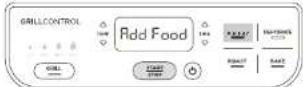
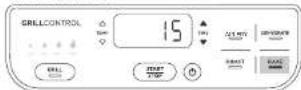
The control panel display shows time in an HHMM format. The display to the left reads 20 minutes.
FUNCTION BUTTONS
GRILL Sizzle and sear foods, with chargrilled lines and all round even cooking.
AIR FRY For crispiness and crunch with little to no oil.
ROAST Tenderise meals, roast vegetables, and more.
BAKE use to bake cakes, treats, desserts and more.
DEHYDRATE Dehydrate meats, fruits and vegetables for healthy homemade snacks.
OPERATING BUTTONS
POWER button Once the unit is plugged in, press the power button to turn on the unit. Pressing it during cooking stops the current cooking function and turns off the unit.
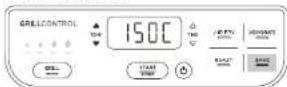
TEMP arrows Use the up end down TEMP arrows to adjust the cooking temperature in any function. When using the Grill function, toggle the GRILL button or use the up and down arrows to adjust cooking temperature.
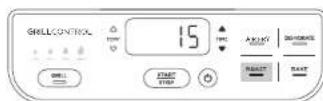
TIME arrows Use the up and down TIME arrows to adjust the cook time in any function.
NOTE: To adjust temperature or time during cooking, press the up and down arrows. The unit will then resume at those settings.
START/STOP button After selecting temperature and time, press the START/STOP button to begin cooking.
STANDBY MODE
The unit will power off if cooking is not in process and there has been no interaction with the control panel for 10 minutes.
USING YOUR GRILL
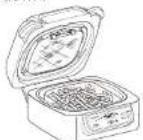
SPLATTER GUARD
Located on the underside of the lid, the splatter guard keeps the heating element clean and prevents smoking. The splatter guard is removable for cleaning, but we recommend keeping it in place when cooking.
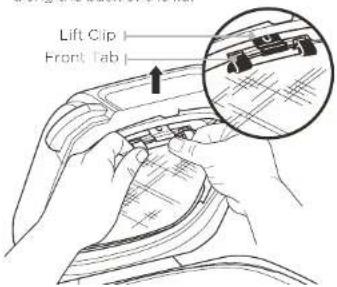
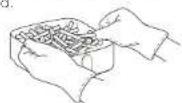
Removing the splatter guard
Remove the splatter guard for cleaning after every use. First allow the splatter guard to cool completely, then remove it by using your thumb to release the front clip by pushing the front clip upward and using your other hand to pull one of the tabs toward you. This will release the splatter guard, allowing you to pull it out of the slot along the back of the lid.
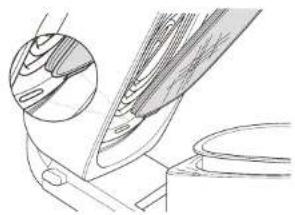
Installing the splatter guard
To install, gently push the splatter guard into the back of the lid. Insert the back lab on guard with the slot on the back of the lid. Then push the salatier guard upward until it clicks into the clip on the front of the lid.
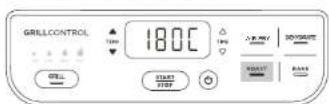
GRILLCONTROL TECHNOLOGY
Our technology allows you to control the temperature of the grill plate for precise cooking and keep smoke out of the kitchen.
When using the Grill function, you will need to select the grill plate temperature setting. Below are recommended temperature levels for common ingredients.
| LOW | MEDIUM | HIGH | MAX |
| • Lacton • Sausages • Shredded peppers when using thick barbecue saues • Calzone | • FrozenMeats • Marmelade coated meat | • Steaks • Chicken • Burgers • Hot dogs | • Veggies • Frail • Picaes • Fresh/ Fresh Seafood • Ketuins |
NOTE: The unit could create smoke during the cooking process. For less smoke, we recommend using vegetable oil, coconut, avocado or grapeseed instead of olive oil.
NOTE: The unit may produce smoke when cooking meats on a hotier setting than what is recommended. For more cooking charts, refer to your inspiration Guide or visit minjkitchen.eu.
Batch grilling
When grilling more than two consecutive batches of food, it is recommended that you empty the fat/oil from the removable cooking pot. This will help prevent grease from burning and causing smoke.
We also recommend allowing the grill plate to heat back up for at least 3-5 minutes between batches to ensure consistent grill marks and cooking.
Switching to Grill after using another function
If the unit is already warm from using a different function, and the grill plate is at room temperature when you place it in the unit, "Add Food" may appear on the screen immediately. We recommend allowing the grill grate to heat up for at least 6 minutes before placing ingredients on it. As the unit continues to run and the grill grate heats up, "Add Food" will remain on the screen until you open the lid and place ingredients on the plate.
COOKING FUNCTIONS
Ensure the unit is plugged in before turning it on. Press the power button.
Grill
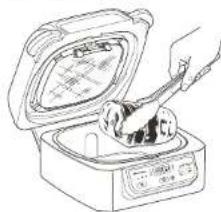
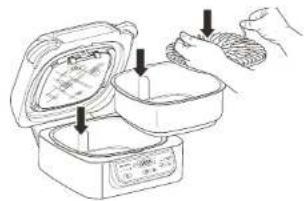
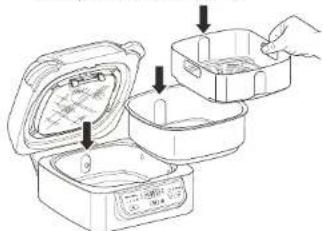
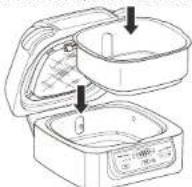
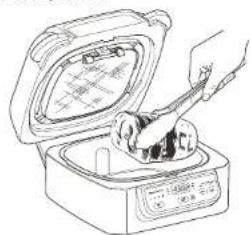
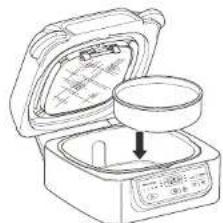
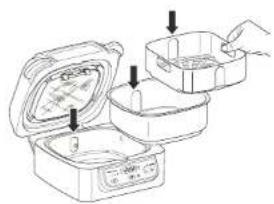
1 Place the cooking pot in the unit with the indent on the pot aligned with the rear bump on the main unit. Then place the grill plate in the pot with the handles facing up. Ensure the splatter guard is in place and close the lid.
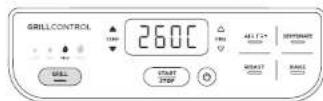
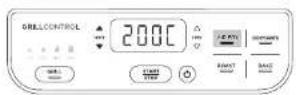
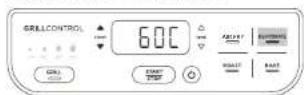
Press the GRILL button. The default temperature level will illuminate on the left side of the control panel and the corresponding air temperature will appear on the display screen. Press the Grill button or the up and down TEMP arrows to adjust the temperature setting.
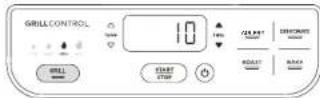
Press the up and down TIME arrows to set the cooking time in one-minute increments, up to 30 minutes.
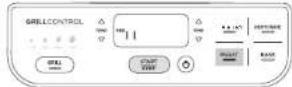
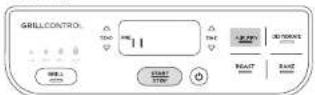
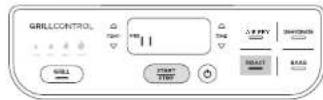
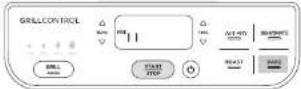
Press the START/STOP button to begin preheating. PRE will appear on the display screen and the progress bar will begin. It can take about 8 minutes to preheat, depending on the selected temperature setting.

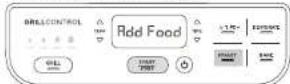
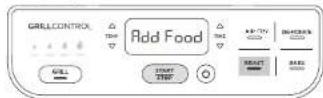
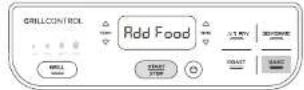
5 When preheating is complete, the unit will loop and Add Food will flash across on the display screen
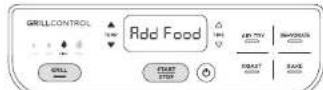
6 Open the lid and place ingredients on the grill plate. Once the lid is closed, cooking will begin and the timer will start counting down.
NOTE: During cooking, you can open the lid to check on or flip your food. The timer will pause when the lid is opened and then automatically resume after it is closed.
When cook time is complete, the unit will keep and END will appear on the display screen. Keep the lid open after removing your food so the unit will cool down more quickly. The stainless steel wrap on the exterior of the unit will be not after cooking. If you need to cook your food longer, simply press the TIME up arrow to add more time, then press the START/STOP button.
NOTE: If batch cooking, empty the oil from the removable cooking pot after every 2 batches. This will help prevent grease from burning and causing smoke.
USING YOUR GRILL - CONT.
Air Fry
1 Place cooking pot in the unit with the indent on the pot aligned with the bump on the main unit. Place the crisper basket in the pot, then close the lid.
2 Press the Air Fry button. The default temperature setting will display. Use the up and down TEMP arrows to adjust the temperature.
3 Use the up and down TIME arrows to set the cook time in 1-minute increments up to 1 hour.
4 Press the START/STOP button to begin preheating. PRE will appear on the display screencand the progress bar will begin. It can take up to 3 minutes to preheat, depending on the selected temperature setting.
NOTE: While preheating is strongly recommended for best results, you can skip it by pressing the Air Fry button again. Add Food will flash across the screen. Open the lid and place ingredients in the crispener basket. Once the lid is closed cooking will begin and the timer will start counting down. Skip to step 7 for further instructions.
5 When preheating is complete, the unit will deep and Add Food will flash across on the display screen.
6 Open the lid and place ingredients in the crisper basket. Once the lid is closed, cooking will begin and the timer will start counting down.
For best results, we recommend shaking ingredients frequently. When you open the lid, the unit will pause. Use silicone tipped tongs when tossing your food or oven gloves to shake the basket. When done, replace the basket and close the lid. Cooking will automatically resume after lid is closed.
When cook time is complete, the unit will beep and END will appear on the display screen. Keep the lid open after removing your food so the unit will cool down more quickly. The stainless steel wrap on the exterior of the unit will be not after cooking. If you need to cook your food longer, simply press the TIME up arrow to add more time, then press the START/STOP button.
Roast
1 Place cooking pot in the unit with the indent on the pot aligned with the pump on the main unit, then close the lid.
Press the ROAST button. The default temperature setting will display. Use the up and down EMP arrows to adjust the temperature.
NOTE: To convert conventional oven recipes, reduce the temperature by 10^ . Check food frequently to avoid overcooking.
Use the up and down TIME arrows to set the cook time, in 15-minute increments, up to 4 hours.
4 Press the START/STOP button to begin preheating. PRE will appear on the display screencand the progress bar will begin. It can take up to 3 minutes to preheat, depending on the selected temperature setting.
NOTE: While preheating is strongly recommended for best results, you can skip it by pressing the ROAST button again. Add Food will flash across the screen. Open the lid and place ingredients in the crisper basket. Once the lid is closed cooking will begin and the timer will start counting down.
5 When preheating is complete, the unit will be and Add Food will flash across on the display screen.
6 Open the lid and place ingredients in the pot. Once the lid is closed, cooking will begin and the timer will start. Counting down.
NOTE: During cooking, you can open the lid to check on your food. The timer will pause when the lid is opened and then automatically resume after it is closed.
When cook time is complete, the unit will be open and END will appear on the display screen. Keep the door open after removing your food so the unit will cool down more quickly. The stainless steel wrap on the exterior of the unit will be hot after cooking. If you need to cook your food longer, simply press the TIME up arrow to add more time, then press the START/STOP button.
USING YOUR GRILL - CONT.
Bake
1 Place cooking pot in the unit so the indent on the pot aligned with the bump on the main unit, then close the lid.

Press the BAKE button. The default temperature setting will display. Use the up and down TEMP arrows to adjust the temperature.
NOTE: To convert conventional oven recipes, reduce the temperature by 10^ . Check food frequently to avoid overcooking.
3 Use the up and down TIME arrows to set the cook time, in 15-minute increments, up to 4 hours.
- Press the START/STOP button to begin prehealing. PRE will appear on the display screen and the progress bar will begin. It can take up 5 minutes to preheat, depending on the selected temperature setting.
NOTE: While preheating is strongly recommended for best results, you can skip it by pressing the BAKE button again. Add Food will flash across the screen. Open the lid and paste ingredients in the crisp basket. Once the lid is closed cooking will begin and the timer will start counting down.
5 When preheating is complete, the unit will beep and Add Food will flash across on the display screen.
6 Open the lid and add ingredients to the pot or set your bake pan directly in the bottom of the pot and close the lid to start cooking. Once the lid is closed, cooking will begin and the timer will start counting down.
NOTE: During cooking, you can open the lid to check on your food. The timer will pause when the lid is opened and then automatically resume after it is closed.
When cook time is complete, the unit will be open and END will appear on the display screen. Keep the lid open after removing your food so the unit will cool down more quickly. The stainless steel wrap on the exterior of the unit will be hot after cooking. If you need to cook your food longer, simply press the TIME up arrow to add more time, then press the START/STOP button.
Dehydrate
- Place cooking pot in the unit with the indent on the pot aligno with the bump on the main unit, then add a single layer of ingredients to the bottom of the pot. Place the crisper basket in the pot and add a layer of ingredients to the bottom of the basket. Close the lid.
2PresstheDEHYDRATE button. The default temperature setting will display. Use the up and down TEMP arrows to set your desired temperature.
3 Use the up and down TIME arrows to set the dehydration time, in 15-minute increments, up to 12 hours.
4 Press the START/STOP button to begin The unit does not need to preheat.
NOTE: During dehydration, you can open the lid to check on your food. The timer will pause when the lid is opened and then automatically resume after it is closed.
5 When dehydration time is complete, the unit will beep and END will appear on the display screen. Remove your food and close the lid.
CLEANING YOUR GRILL
The unit should be cleaned thoroughly after every use. Always let the appliance cool before cleaning.
- Unplug the unit from the wall socket before cleaning. Keep the lid open after removing your food so the unit will cool down more quickly.
To clean the main unit and control panel, wipe them with a damp cloth. - The cooking pot, grill plate, crisper basket, spatter gun, cleaning brush and any other additional Ninja grill accessories are dishwasher safe.
NOTE: NEVER use abrasive tools or cleaners. NEVER immerse the main unit in water or any other liquid.
If hand-washing, use the cleaning brush to help wash the parts. Use the opposite end of the cleaning brush as a scraper to assist with releasing baked-on foods. Air-dry or towel-dry all parts after hand-washing.
- If food residue or grease are stuck on the grill plate, spatter guard, or any other removable part, place them in a sink or stack them in the pot and fill with warm, soapy water and allow to soak for a couple hours or overnight. After soaking, use the cleaning brush to clean each part.
Over time, the splatter guard front tabs and frame may accumulate grease. Soaking the splatter guard overnight will help soften the baked-on grease. After soaking, use the cleaning brush to remove the grease from the stainless steel frame and front tabs.
TROUBLESHOOTING GUIDE
- Add Food" appears on the control panel display.
The unit has completed its Grill preheating and it is now time to add your ingredients. - "Shut Lid" appears on the control panel display.
The lid is open and needs to be closed for the selected function to start. - "Add Pot" appears on the control panel display.
The pot is not installed in the unit. - "E" appears on the control panel display. The unit is not functioning properly. Please contact Customer Service at 0800 000 9063.
- Why do blinking lights appear after I press the START/STOP button? This is a progress bar indicating how far a long you are in the preheating cycle.
Why does the preheat progress bar not start from the beginning? When the unit is warm from previously being used, it will not require the full preheating time.
- Should I add my ingredients before or after preheating?
- Let the unit preheat before adding ingredients.
- Why is my unit emitting smoke?
When using the Grill function, always select the recommended temperature setting. Recommended settings can be found in the Quick Start Guide/ Inspiration Guide. Make sure the spallier guard is installed.
How do I pause the unitl so I can check my food?
When the lid is opened during a cooking function, the unit will automatically pause.
My food is burned. Do not add food until prehealing is complete. For best results, check progress throughout cooking and remove food when desired level of brownness has been achieved. Remove food immediately after the cook time is complete to avoid overcooking.
My food didn't cook when Alr Frying. For consistent browning, make sure ingredients are arranged in an oven layer on the bottom of the crisper basket with no overlapping. Snake loose ingredients during cooking for consistent crissiness.
- Why is my food blowing around when Air Fryng?
Occasionally, the fan will blow lightweight foods around. To prevent this, secure loose food (like the top slice of bread or a sandwich) with cocktail sticks.
Can I Air Fry fresh battered ingredients? Yes, but use the proper baking technique. It is important to coat foods first with flour, then with egg and then with bread crumbs. Be sure to press the bread crumbs onto the food so they stick in place. Loose baking may be blown off by the unit's powerful fan.
- The control panel display is no longer illuminated.
The unit is off. Press the power button to turn it back on.
Can I cancel or override preheating? Preheating is highly recommended for best results, skip preheating by selecting the function again after you press the START/STOP button. However, you cannot override preheating when using the Grill function.
How can I deep clean the splatter guard The splatter guard should be cleaned after each use and is dishwasher safe. Over time, the splatter guard front labs and frame may accumulate grease buildup. Soaking the splatter guard overnight will help soften the baked-on grease. After soaking, use the cleaning brush to remove the grease from the stainless steel frame and front tabs
PRODUCT REGISTRATION
TWO (2) YEAR LIMITED GUARANTEE
When you buy a product in Germany as a consumer, you get the benefit of legal rights relating to the quality of the product (your "statutory rights"). You can enforce these statutory rights against your retailer. However, at Njna we are so confident about the quality of our products (the "Products") that we give you an additional manufacturer's guarantee of up to two years. This guarantee only applies to the Product if it is bought in now and unused condition. These terms and conditions relate to our guarantees only – your statutory rights as a buyer are unaffected. Please note that the 2 year guarantee is available in all EU countries and in the UK if it stops being an EU country during the guarantee term.
The conditions below describe the prerequisites and scope of our guarantees which are issued by SharkNinja Germany GmbH, Kurt-Baum-Platz 9, 63450 Hanau (Germany) ("us", "our" or "we"). They do not affect your statutory rights or the obligations of your retailer and your contract with them. The same applies if you have purchased the product directly from Ninja.
Ninja Guarantees
A household kitchen appliance constitutes a sizeable investment. Your new machine needs to work properly for as long as possible. The guarantee it comes with is an important consideration - and reflects how much confidence the manufacturer has in its product and manufacturing quality.
Our customer service helpline (0800 000 9063) is open from 9:00am to 6:00pm Monday - Friday. It's free to call, and you'll be put straight through to a Ninja representative. You'll also find online support at www.rinjekitchen.eu.
How do I register my guarantee?
You can register your guarantee online within 28 days of purchase. To save time, you'll need the following information about your machine:
Model no.
Serial Number (only if available)
- Date of purchase of the Product (receipt or delivery note)
To register online, please visit www.ninjakitchen.eu
IMPORTANT
The guarantee covers your Product for 2 years starting on the date of purchase.
Please keep the receipt at all times. Should you need to use your guarantee we will need the receipt to verify the information supplied to us is correct. The inability to produce a valid receipt will invalidate your guarantee.
What are the benefits of registering my guarantee?
When you register your guarantee, you can choose to receive our newsletter containing tips, advice and competitions. Hear the latest news about new Njing technology and launches. If you register your guarantee online, you'll get instant confirmation that we've received your details.
For details of our privacy policy please visit www.njakitchen.eu
How long are our Products guaranteed for?
Our confidence in our design and quality control means that your Product is guaranteed for a total of two years.
What is covered by the guarantee?
Repair or replacement (at Ninja's discretion) of your Product, including all parts and labour in case of any defect in design, materials and workmanship (including transport and shipping costs). Our guarantee is in addition to your legal rights as a consumer.
What is not covered by the guarantee?
Normal wear and tear.
- Accidental damage, faults caused by negligent use or care, misuse, neglect, careless, operation or handling of the kitchen appliance which is not in accordance with the Ninja® Instruction Manual supplied with your machine.
- Use of the kitchen appliance for anything other than normal domestic household purposes.
- Use of parts not assembled or installed in accordance with the operating instructions.
- Use of parts and accessories which are not Ninja® Genuine Components.
- Faulty installation (except where installed by Ninja®).
- Repairs or alterations carried out by parties other than Ninja or its agents, Repairs or alterations carried out by parties other than Ninja or its agents, unless you can show that the repairs or alterations carried out by others are not related to the defect for which you exercise the guarantee.
What happens when my guarantee runs out?
Ninja does not design products to last for a limited time. We do appreciate that there may be a desire for our customers to want to repair their kitchen appliance after the guarantee has elapsed. In this case please contact our free phone customer service help line and ask about our guarantee program, on 0800 000 9063.
Where can I buy genuine Ninja spares and accessories?
Ninja spares and accessories are developed by the same engineers who developed your Ninja kitchen appliance. You'll find a full range of Ninja spares, replacement parts and accessories for all Ninja machines at www.ninjaikitchen.eu.
Please remember that using non-Niña spares may invalidate your manufacturer's guarantee. However, your statutory rights are unaffected.
GRACIAS
Dehydrate (Deshydrater). 76
BAKE (CUIRE AU FOUR) Curo dos gataux, palisseries, desserts, etc.
Griglate consecutive
Denhydrate (Torking) 124
Illustrations may differ from actual product. We are constantly striving to improve our products; therefore the specifications contained herein are subject to change without notice.
NINJA is a registered trademark of SharkNinja Operating LLC.
PRINTED IN CHINA