
SUWL700 - Wall mount SONY - Free user manual and instructions
Find the device manual for free SUWL700 SONY in PDF.
| Product Type | Wall Mount |
| Brand | Sony |
| Model | SUWL700 |
| Dimensions (a x b x c x d) | 445 x 406 x 320 x 364 mm |
| Weight | 4 kg |
| Power Supply | None (passive mount) |
| Main Functions | Wall installation, angle adjustment (0°, 5°, 10°, 15°, 20°) |
| Screen Compatibility | KDL-52EX1, KDL-46EX1, KDL-40EX1, KDL-40ZX1, KLV-40ZX1M |
| Care and Cleaning | Avoid liquids, clean with a soft cloth |
| Safety | Installation by a certified professional, wall supporting at least 4x the weight of the screen, screws of at least 8 mm diameter |
| Spare Parts and Repairability | Screws provided (BVST4x8, PSW M6x16, PSW M5x8), hex key, paper template. Wall mounting screws not provided |
| General Information | Sony wall mount for 40 to 52 inch LCD screens. Check screen weight in its manual |
Frequently Asked Questions - SUWL700 SONY
User questions about SUWL700 SONY
0 question about this device. Answer the ones you know or ask your own.
Ask a new question about this device
Download the instructions for your Wall mount in PDF format for free! Find your manual SUWL700 - SONY and take your electronic device back in hand. On this page are published all the documents necessary for the use of your device. SUWL700 by SONY.
USER MANUAL SUWL700 SONY
Thank you for purchasing this product.
To Customers
Sufficient expertise is required for installing this product. Be sure to subcontract the installation to Sony dealers or licensed contractors and pay special attention to safety during the installation. Sony is not liable for any damages or injury caused by mishandling or improper installation, or installing any other than the specified product. Your Statutory Rights (if any) are not affected.
WARNING
If the safety precautions are not observed or the product is used incorrectly, it may result in serious injury or fire.
This instruction manual shows the correct handling of the product and important precautions necessary to prevent accidents. Be sure to read this manual thoroughly and use the product correctly. Keep this manual available for future reference.
To Sony dealers
Sufficient expertise is required for installing this product. Be sure to read this instruction manual thoroughly to do the installation work safely. Sony is not liable for any damages or injury caused by mishandling or improper installation. Please give this manual to the customer after installation.
On Safety
Products by Sony are designed with safety in mind. If the products are used incorrectly, however, it may result in a serious injury through fire, electric shock, the product toppling over, or the product dropping. Be sure to observe the precautions for safety to prevent such accidents.
CAUTION
Specified products
The following products are subject to change without notice, may be out of stock, or discontinued.
Also, certain models are sold in some regions.
| LCD Digital Color TV | KDL-52EX1KDL-46EX1KDL-40EX1KDL-40ZX1 |
| LCD Display KLV-40ZX1M | |
This Wall-Mount Bracket is designed for use with the products specified above. For other Displays, refer to their operating instructions to verify that the Wall-Mount Bracket can be used.
To Customers
WARNING
If the following precautions are not observed, serious injury or death through fire, electric shock, the product toppling over, or the product dropping can result.
Be sure to subcontract the installation to licensed contractors and keep small children away during the installation.
If the Wall-Mount Bracket or the Display is not installed correctly, the following accidents may occur. Be sure licensed contractors carry out installation.
- The Display may fall and cause a serious injury such as a bruise or a fracture.
- If the wall on which the Wall-Mount Bracket is installed is unstable, uneven, or not perpendicular to the floor, the unit may fall and cause injury or property damage. The wall should be capable of supporting a weight of at least four times the Display weight. (Refer to your Display's instructions for its weight.)
- If the installation of the Wall-Mount Bracket on the wall is not sufficiently sturdy, the unit may fall and cause injury or property damage.
Be sure to subcontract moving or dismounting of the Display to licensed contractors.
If persons other than licensed contractors transport or dismount the Display, it may fall and cause injury or property damage. Be sure that two or more persons carry or dismount the Display.
Do not spill liquid of any kind on the Display.
If you allow the Display to get wet, this may result in a fire or an electric shock.
Do not remove screws, etc., after mounting the Display.
If you do so, the Display may fall and cause injury or property damage.
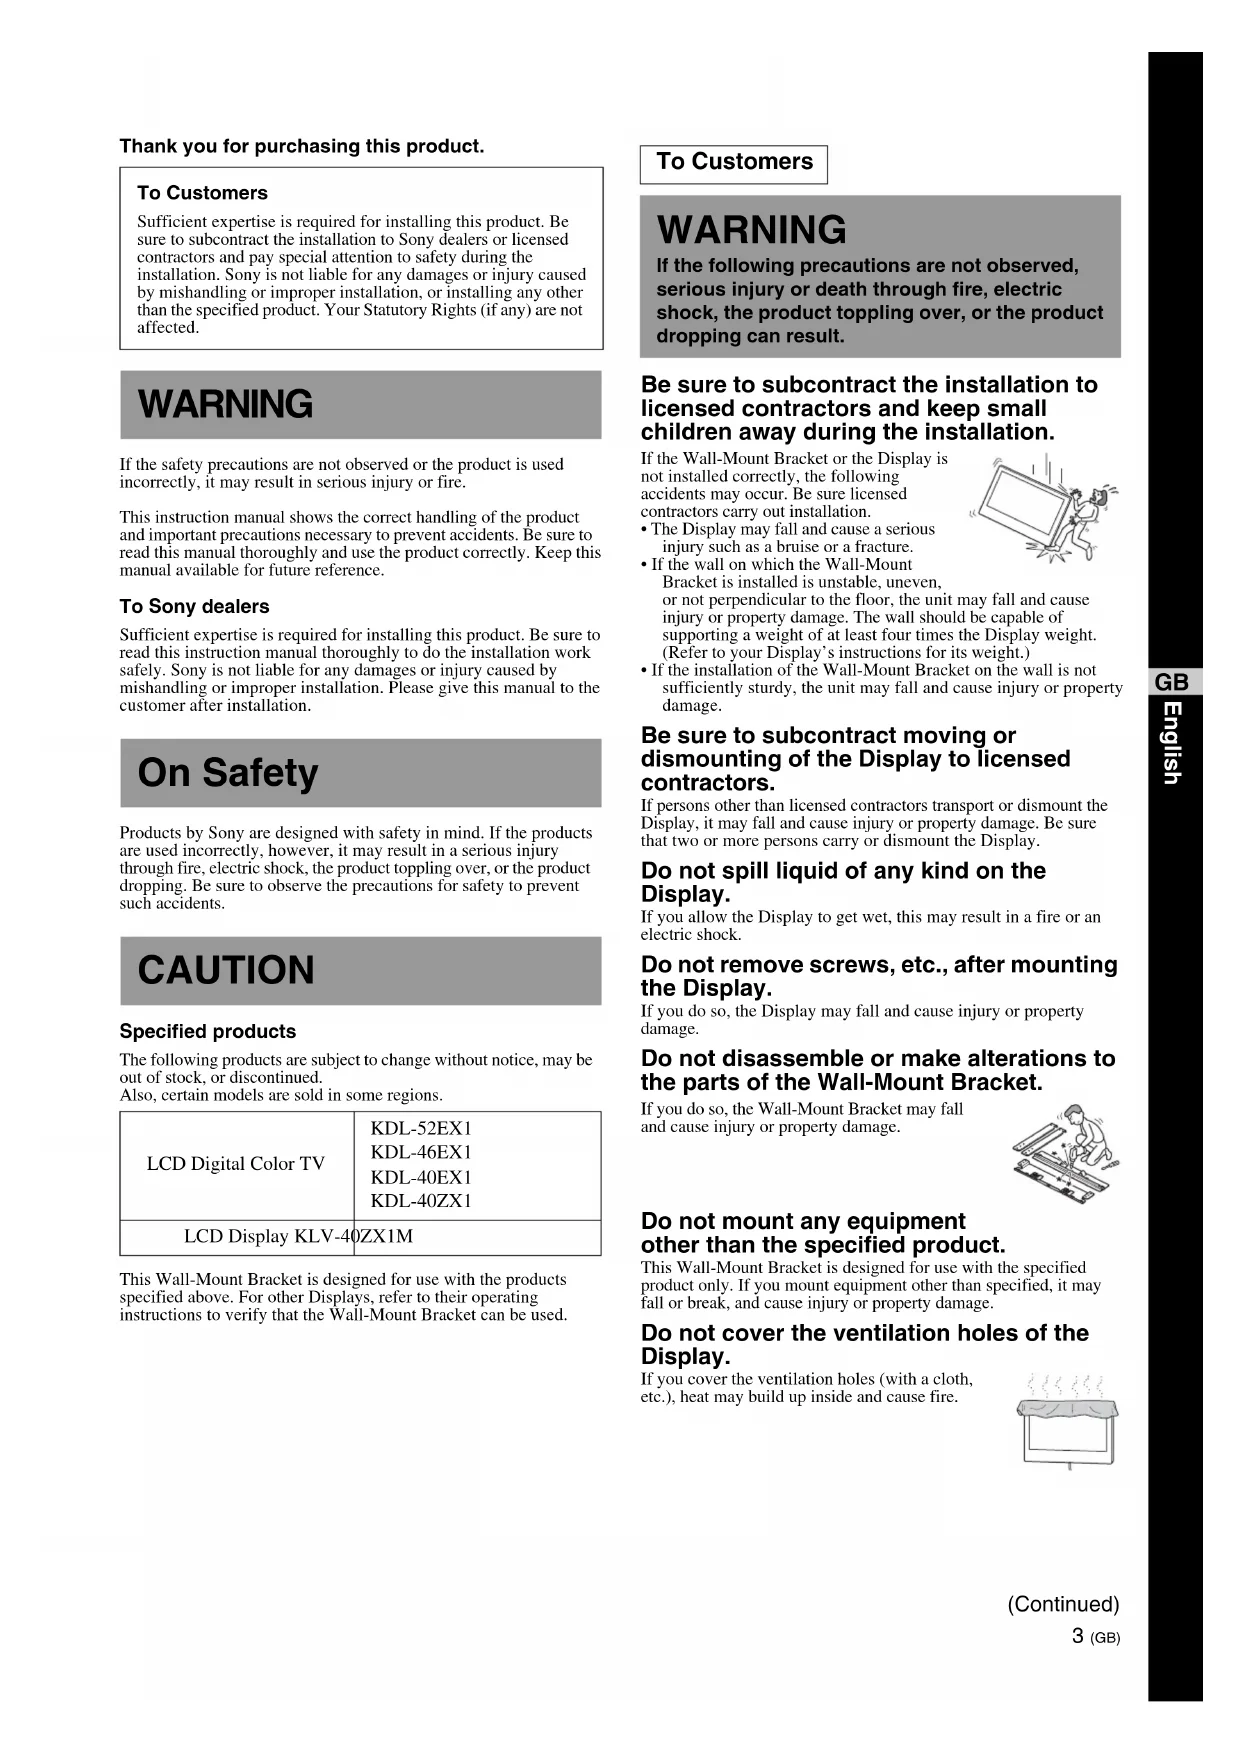
Do not disassemble or make alterations to the parts of the Wall-Mount Bracket.
If you do so, the Wall-Mount Bracket may fall and cause injury or property damage.
Do not mount any equipment other than the specified product.
This Wall-Mount Bracket is designed for use with the specified product only. If you mount equipment other than specified, it may fall or break, and cause injury or property damage.
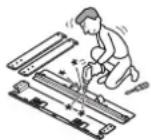
Do not cover the ventilation holes of the Display.
If you cover the ventilation holes (with a cloth, etc.), heat may build up inside and cause fire.
(Continued)
Do not apply any load other than the Display on the Wall-Mount Bracket.
If you do so, the Display may fall and cause injury or property damage.
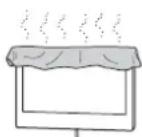
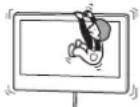
Do not lean on or hang from the Display.
Do not lean on or hang from the Display as it may fall on you and cause serious injury.
Do not expose the Display to rain or moisture.
It may cause a fire or an electric shock.
Never place the Display in hot, humid or excessively dusty places, or in a place where the Display is subjected to mechanical vibrations.
If you do so, it may cause a fire or an electric shock.
Keep flammable objects or open flames (e.g., candles) away from the Display.
To prevent a fire, keep flammable objects or open flames (e.g., candles) away from the Display.
CAUTION
If the following precautions are not observed, injury or property damage may occur.
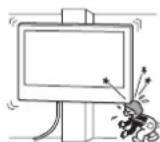
Do not install the Wall-Mount Bracket on wall surfaces where the corners or the sides of the Display protrude away from the wall surface.
Do not install the Wall-Mount Bracket on wall surfaces such as a pillar, where the corners or the sides of the Display protrude away from the wall surface. If a person or object happens to hit the protruded corner or side of the Display, it may cause injury or property damage.
Do not handle the product with excessive force during cleaning or maintenance.
Do not apply excessive force on the topside of the Display. If you do so, the Display may fall and cause injury or property damage.
Do not install the Display over or under an air-conditioner.
If the Display is exposed to water leaks or air current from an air-conditioner for a long time, it may cause a fire, an electric shock or a malfunction of the Display.
Precautions
- If you use the Display installed on the Wall-Mount Bracket for a long time, the wall behind or above the Display may become discolored or the wallpaper may come unstuck, depending on the material of the wall.
- If the Wall-Mount Bracket is removed after installing it on the wall, the screw holes are left.
Installing the Wall-Mount Bracket
To Sony Dealers
WARNING
To Customers
Sufficient expertise is required for installing this product. Be sure to subcontract the installation to Sony dealers or licensed contractors and pay special attention to safety during the installation.
To Sony Dealers
The following instructions are for Sony dealers only. Be sure to read safety precautions described above and pay special attention to safety during the installation, maintenance and checking of this product.
Be sure to install the Wall-Mount Bracket securely to the wall following the instructions in this instruction manual.
If any of the screws are loose or fall out, the Wall-Mount Bracket may fall and cause injury or property damage. Be sure to use the appropriate screws for the material of the wall and install the unit securely using four or more screws of 8 mm (11/32 inches) diameter (or equivalent).
Be sure to use the supplied screws and attachment parts properly following the instructions given in this instruction manual. If you use substitute items, the Display may fall and cause bodily injury to someone or damage to the Display.
Be sure to assemble the bracket properly following the instructed procedure explained in this instruction manual.
If any of the screws are loose or fall out, the Display may fall and cause bodily injury to someone or damage to the Display.
Be sure to tighten the screws securely in the designated position.
If you fail to do so, the Display may fall and cause bodily injury to someone or damage to the Display.
Be careful not to subject the Display to shock during installation.
If the Display is exposed to shock, it may fall or break apart. This may cause injury.
Be sure to install the Display on a wall that is both perpendicular and flat.
If you fail to do so, the Display may fall and cause injury.
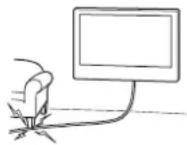
After proper installation of the Display, secure the cables properly.
If people or objects get tangled with cables, this may result in injury or damage to the Display.
Do not allow the AC power cord or the connecting cable to be pinched.
If the AC power cord or the connecting cable is pinched between the unit and the wall or is bent or twisted by force, the internal conductors may become exposed and cause a short circuit or an electrical break. This may cause a fire or an electric shock.
Be careful not to hurt your hands or fingers during the installation.
Be careful not to hurt your hands or fingers when installing the Wall-Mount Bracket or the Display.
The screws needed to secure the Wall-Mount Bracket to the wall are not supplied.
Use the appropriate screws for the wall material and structure when mounting the Wall-Mount Bracket.
Preparation
Installation procedure differs depending on your Display. Follow the instructions in this manual referring to the assembly sheet.
Before assembling
- Have the Display's operating instructions at hand before installation.
- Refer to the assembly sheet when there is a appended to the procedure.
- Arrow direction in the assembly sheet indicates the front face of the Display.
- Be sure to have a Phillips screwdriver that fits the screws prior to the assembly.

Specifications
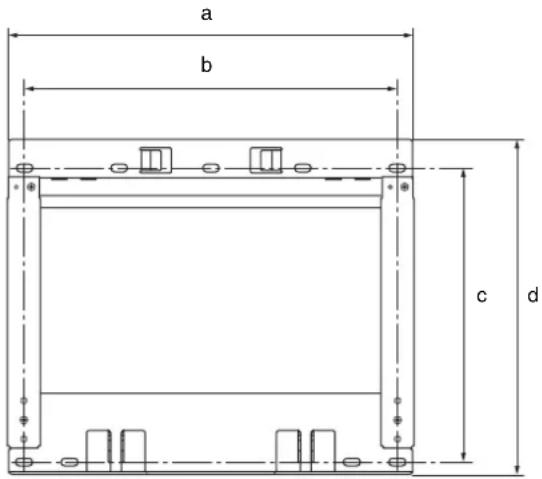
| Dimensions: mm (inches) | a | 445 (17 5/8) |
| b 406 (16) | ||
| c | 320 (12 5/8) | |
| d | 364 (14 3/8) | |
| Weight: 4 kg (9 lb) | 142 oz) | |
Design and specifications are subject to change without notice.
Installation
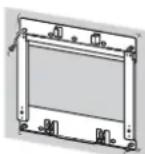
1 Check the parts
1 Verify that all parts are included.
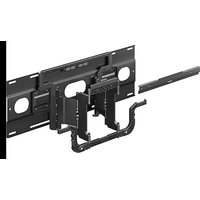
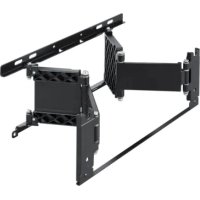
A Base Bracket (top) | B Base Bracket (bottom)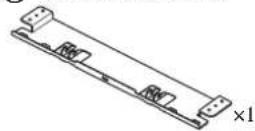 |
C Joint Bracket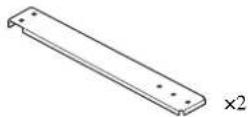 | D Mounting Bracket R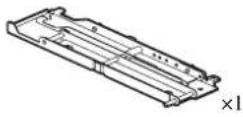 |
E Mounting Bracket L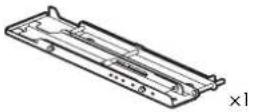 | F Lock Bracket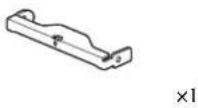 |
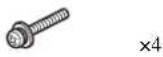
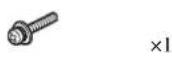
G Hexagon wrench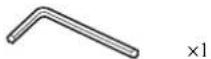 | H Screw (+BVST4 × 8)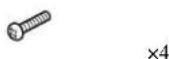 |
  |   |
  | (   |
Prepare four or more screws of 8 mm ( ^11/32 inches) diameter or equivalent (not supplied). Select screws suitable for the material of the wall.
2 Decide on the installation location
1 Decide on the installation location.
Refer to the installation dimensions table on page i (end of this manual).
Allow for suitable clearance between the Display and the ceiling and protruding parts of the wall as shown below.
Unit: mm (inches)
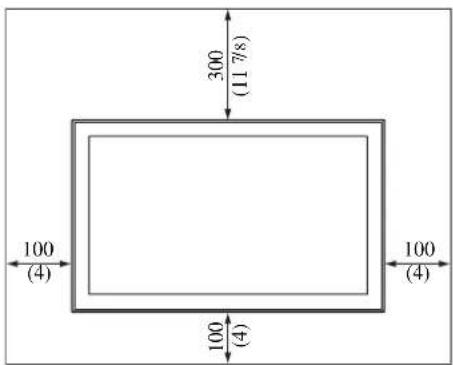
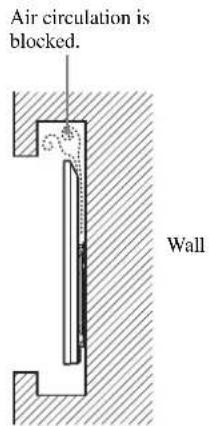
Never install the Display as shown below:

- If you intend to route the cables in the wall, make a hole in the wall to insert the cables before beginning the installation.
To prevent pinching the cables, prepare a hole in the wall somewhere outside the perimeter of the Base Bracket.
2 Decide the positions of the screws for installing the Base Bracket ⒶB.
Refer to the specifications on page 5.
WARNING
The wall that the Display will be mounted on should be able to support a weight of at least four times that of the Display (Refer to your Display's operating instructions for its weight.).
Determine the strength of the wall the Display will be mounted on. Reinforce the wall sufficiently, if necessary.
3 Install the Base Bracket on the wall
When using an electric screwdriver, set the torque setting to approximately 1.5 N·m {15 kgf·cm}.
1 Attach the Joint Bracket Ⓒ to the Base Bracket ⒶB securely.
Use four screws Ⓗ (+BVST4 × 8).
2 Secure the assembled Base Bracket to the wall.
Use four or more screws of 8 mm (11/32 inches) diameter or equivalent (not supplied).
4
- Be sure to align the assembled Base Bracket so that it is level.
4 Prepare for the installation of the Display
1 Make sure that the Table-Top Stand is removed (if necessary).
If the Display has the Table-Top Stand attached, it should be removed before carrying out the procedure below. Refer to the operating instructions supplied with your Display.
4
- When removing the Table-Top Stand from the Display, lay the display face down on a stable work surface that is larger than the Display.
- To prevent damaging the surface of the LCD display, make sure to place a soft cloth on the work surface.
- When lifting or moving the Display, keep a soft cloth underneath to prevent damage.
- The number and position of the screws on the rear of the Display differs, depending on the model of Display; be sure to read the operating instructions of your Display.
CAUTION
- If pressure or shock is applied to the surface of the Display, the LCD display may break or become damaged.
- Lay the display face down on a stable and level surface with the Table-Top Stand hanging over the edge of the surface. Having the display face and the base of the Table-Top Stand on the same level surface will create an unstable working condition and can damage the Display.
- When detaching the Table-Top Stand from the Display, hold the Table-Top Stand securely with both hands.
2 Place the Spacers (for KDL-40ZX1/KLV-40ZX1M only).
① Remove the four screws from the rear of the Display.
② Place the Spacers (supplied with your Display) on the screw holes of the previous procedure.
Refer to the operating instructions supplied with your Display.
3 Attach the Mounting Bracket ⑭ to the rear of the Display temporarily.
Temporarily tighten the top of the Mounting Bracket ① using two screws ① (+PSW M6 × 16).
4 Attach the Lock Bracket Ⓕ to the bottom of the Mounting Bracket Ⓓ.
① Temporarily move the bottom of the Mounting Bracket ⑭ outwards.
40
- If the bottom of the Mounting Bracket does not move, loosen the screws (return to step 3).
② Insert the pins of the Mounting Bracket ① through the holes of the Lock Bracket ⑤. Return the Mounting Bracket ⑥ to their original position to attach the Lock Bracket ⑦.
5 Confirm the Sony optional Speaker System connection (for KDL-40ZX1/KLV-40ZX1M only).
When connecting the Speaker System to the Display, connections should be made before the following wall mounting procedure. Refer to the instruction manual supplied with your Speaker System and Display beforehand.
6 Secure the Mounting Bracket Ⓓ to the rear of the Display.
When using an electric screwdriver, set the torque setting to approximately 2 N·m {20 kgf·cm}.
① Tighten the bottom of the Mounting Bracket ⑭ using two screws ① (+PSW M6 × 16).
② Be sure that all screws are securely tightened with equal torque to the rear of the Display.
7
Adjust the angle of the Mounting Bracket ⒹE. Use the supplied hexagon wrench Ⓖ.
When installing the Display parallel to the wall (0 degrees), adjustment of the Mounting Bracket angle (procedures ① and ② below) is not necessary.
① Remove the two angle adjusting screws from the Mounting Bracket D⑧.
② Secure the screws to the corresponding holes for the desired angle (“■,” “5,” “10,” “15” or “20”).
420
- For BRAVIA Wireless Link DMX-WL1 users, only the “■,” “5,” “10,” “15” or “20” degree settings are available.
- Be sure that both the left and right sides are set to the same angle, and secure the screws to the corresponding angle holes (two screws for each side, left and right).
- Make sure that the two arms of the Mounting Bracket are screwed in securely.
CAUTION
Be careful not to pinch your fingers when adjusting the angle of the Mounting Bracket.
Note on the adjustment angles
- When installing Display models other than those specified on page 3 (depending on the model's size and dimensions, etc.), the adjustment angles listed ("0," "■," "5," "10," "15," "20") for the arms may be limited.
- For the available adjustment angles of the arms when installing Display models other than those specified on page 3, refer to the operating instructions.
5
Install the Display on the wall
1
Connect the AC power cord and the connecting cable(s) to the Display.
Refer to the operating instructions supplied with your Display.
A
- You cannot connect the cables to the Display after it is wall-mounted.
- Subcontract the cable routing in the wall to a licensed contractor.
- Bundle the connecting cables to prevent stepping on them before wall mounting.
2
Prepare the paper template Ⓛ.
①Refer to the installation dimensions table on page i (end of this manual).
②Check the width dimension of your Display in column Ⓐ, and divide that number by 2 to determine how far from the center point to mark the outer limits of the Display on the paper template Ⓛ.
③ Align the center line of the paper template Ⓛ to the center of the Base Bracket Ⓐ and tape it to the wall. Be sure to arrange the paper template Ⓛ parallel to the Base Bracket Ⓐ.
3
Install the Display onto the Base Bracket Ⓐ. Hold the Display securely with both hands, and gently align it on the Base Bracket Ⓐ referring to the paper template Ⓛ.
- Pull the bottom of the Display forward slightly to make sure that it is securely attached to the Base Bracket. If there is any movement, it is not fixed correctly, and the procedure should be performed again.
WARNING
Be sure that two or more persons hold the Display when carrying it. Carrying a 40 inch Display requires two or more persons. If the Display is larger than 40 inches, three or more persons are required.
4
Firmly secure the Base Bracket Ⓑ and the Lock Bracket Ⓕ.
Use screw Ⓙ (+PSW M5 × 8).
_2
- If you push the Display upward when inserting the screw, the Display could fall. Be sure to hold down the Display during the installation.
- Insert the screw at the marked position of the Lock Bracket.
- If you cannot insert the screw, Mounting Bracket angle adjustment may be wrong. Reconfirm the angle adjustment of the Mounting Bracket (see step 4-7).
6
Confirm the completion of the installation
1
Check the following points.
- The Mounting Bracket ①② are firmly latched in the Base Bracket ③④ .
- The cord and the cable are not twisted or pinched.
- The screw Ⓙ that secures the Base Bracket Ⓑ and the Lock Bracket Ⓕ are securely tightened.
WARNING
Do not adjust the angle of the Mounting Bracket when the Display is installed on the wall and be sure to install completely. It may cause the product to fall and result in injury or product damage. Also, improper placement of the AC power cord, etc., may cause fire or electric shock through a short circuit. Be sure to confirm the completion of the installation for safety.
Other information
When removing the Display, reverse the previous installation procedure.
* Point central de l'écran/Punto central de la pantalla/Bildschirmmittelpunkt/Middelpunt van het scherm/Punto centrale dello schermo/Skärmens mittpunkt/Punkt środkowy ekranu
Unit: mm (inches) ^*1
| Model Name*2 | Display dimensions*3 | Screen center dimension*4 | Length for each mounting angle*5 | ||||||
| Angle (0°)*6 | Angle (20°)*7 | ||||||||
| A B C D E F G H | |||||||||
| KDL-52EX1 | 1312 (51 3/4) | 806 (31 3/4) | 11 (7/16) 417 (16 1/2) | 74 (3) | 396 (15 5/8) | 765 (30 1/8) | 484 (19 1/8) | ||
| KDL-46EX1 | 1156 (45 5/8) | 709 (28) | 38 (1 1/2) 395 (15 5/8) | 70 (2 7/8) 366 (14 1/2) | 674 (26 5/8) | 462 (18 1/4) | |||
| KDL-40EX1 | 1024 (40 3/8) | 635 (25) 75 (3) | 395 (15 5/8) | 70 (2 7/8) | 341 (13 1/2) | 604 (23 7/8) | 462 (18 1/4) | ||
| KDL-40ZX1/KLV-40ZX1M | 986 (38 7/8) | 599 (23 5/8)679 (26 3/4)*8 | 74 (3) | 373 (14 3/4)454 (17 7/8)*8 | 48 (1 15/16) | 315 (12 1/2) | 563 (22 1/4)639 (25 1/4)*8 | 433 (17 1/8)509 (20 1/8)*8 | |
Some models may not be available in certain regions. Figures in the above table may differ slightly depending on the installation./
The wall that the Display will be installed on should be capable of supporting a weight of at least four times that of the Display. Refer to your Display's instructions for its weight./

- Thank you for purchasing this product.
- To Customers
- WARNING
- To Sony dealers
- On Safety
- CAUTION
- Specified products
- Be sure to subcontract the installation to licensed contractors and keep small children away during the installation.
- Be sure to subcontract moving or dismounting of the Display to licensed contractors.
- Do not spill liquid of any kind on the Display.
- Do not remove screws, etc., after mounting the Display.
- Do not disassemble or make alterations to the parts of the Wall-Mount Bracket.
- Do not mount any equipment other than the specified product.
- Do not cover the ventilation holes of the Display.
- Do not apply any load other than the Display on the Wall-Mount Bracket.
- Do not lean on or hang from the Display.
- Do not expose the Display to rain or moisture.
- Never place the Display in hot, humid or excessively dusty places, or in a place where the Display is subjected to mechanical vibrations.
- Keep flammable objects or open flames (e.g., candles) away from the Display.
- Do not install the Wall-Mount Bracket on wall surfaces where the corners or the sides of the Display protrude away from the wall surface.
- Do not handle the product with excessive force during cleaning or maintenance.
- Do not install the Display over or under an air-conditioner.
- Precautions
- Installing the Wall-Mount Bracket
- Be sure to install the Wall-Mount Bracket securely to the wall following the instructions in this instruction manual.
- Be sure to use the supplied screws and attachment parts properly following the instructions given in this instruction manual. If you use substitute items, the Display may fall and cause bodily injury to someone or damage to the Display.
- Be sure to assemble the bracket properly following the instructed procedure explained in this instruction manual.
- Be sure to tighten the screws securely in the designated position.
- Be careful not to subject the Display to shock during installation.
- Be sure to install the Display on a wall that is both perpendicular and flat.
- After proper installation of the Display, secure the cables properly.
- Do not allow the AC power cord or the connecting cable to be pinched.
- Be careful not to hurt your hands or fingers during the installation.
- The screws needed to secure the Wall-Mount Bracket to the wall are not supplied.
- Preparation
- Before assembling
- Specifications
- Installation
- Check the parts
- Verify that all parts are included.
- Decide on the installation location
- Decide on the installation location.
- Decide the positions of the screws for installing the Base Bracket ⒶB.
- Install the Base Bracket on the wall
- Attach the Joint Bracket Ⓒ to the Base Bracket ⒶB securely.
- Secure the assembled Base Bracket to the wall.
- Prepare for the installation of the Display
- Make sure that the Table-Top Stand is removed (if necessary).
- Place the Spacers (for KDL-40ZX1/KLV-40ZX1M only).
- Attach the Mounting Bracket ⑭ to the rear of the Display temporarily.
- Attach the Lock Bracket Ⓕ to the bottom of the Mounting Bracket Ⓓ.
- Confirm the Sony optional Speaker System connection (for KDL-40ZX1/KLV-40ZX1M only).
- Secure the Mounting Bracket Ⓓ to the rear of the Display.
- 7
- Note on the adjustment angles
- 5
- Install the Display on the wall
- 1
- Connect the AC power cord and the connecting cable(s) to the Display.
- 2
- Prepare the paper template Ⓛ.
- 3
- 4
- Firmly secure the Base Bracket Ⓑ and the Lock Bracket Ⓕ.
- 6
- Confirm the completion of the installation
- Check the following points.
- Other information
Brand : SONY
Model : SUWL700
Category : Wall mount