SUP42T2 - TV Stand SONY - Free user manual and instructions
Find the device manual for free SUP42T2 SONY in PDF.
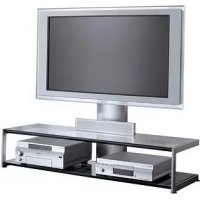
| Product Type | TV stand (TV cabinet) for flat screen |
| Brand | Sony |
| Model | SUP42T2 (SU-P42T2) |
| Dimensions (mm) | A: 500, B: 295, C: 392, D: 340, E: 310, F: 461, G: 141, H: 602 |
| Weight | 16.0 kg |
| Material | Steel (estimated) - manual not specified |
| Color | Black (estimated) |
| Load capacity | Designed for TVs of the series (KDE-P42MRX1, etc.) - max weight not specified |
| Compatible with | KDE-P42MRX1, KDE-P50MRX1, KDE-P61MRX1, KE-P42MRX1, KE-P50MRX1, KE-P61MRX1, KDL-L42MRX1, KLV-L42MRX1 |
| Installation | By a professional (Sony dealer), must be done by two people |
| Safety - wall anchoring | Mandatory: use a rope/chain and an anchoring support to prevent tipping |
| Maintenance | Soft dry cloth; stubborn stains: cloth slightly dampened with diluted detergent, then wipe with a dry cloth |
| Prohibited cleaning products | Thinner, gasoline or other chemical products |
| Supplied parts | Main console, stand, countersunk screws (10), fixing screws (2), cable tie |
| Required tools | Phillips screwdriver (recommended torque 2.45 N·m if electric) |
| Repairability | Spare parts available from Sony; have any repairs carried out by a professional |
| Warranty | Not specified in the manual - refer to Sony conditions |
Frequently Asked Questions - SUP42T2 SONY
User questions about SUP42T2 SONY
0 question about this device. Answer the ones you know or ask your own.
Ask a new question about this device
Download the instructions for your TV Stand in PDF format for free! Find your manual SUP42T2 - SONY and take your electronic device back in hand. On this page are published all the documents necessary for the use of your device. SUP42T2 by SONY.
USER MANUAL SUP42T2 SONY
For Customers and Sony Dealers in Europe
Tabletop Stand
Instructions GB
Mode d'emploi FR
Instrucciones ES
Instruções PT
Vejledning DK
Instruksjoner NO
Bruksanvisning SE
Käyttöohje FI
Instructies NL
Gebrauchsanweisung DE
Istruzioni IT
Οδηγίες GR
Инструкции RU
SU-P42T2/SU-P50T2
Thank you for purchasing this product.
To Customers
Sufficient expertise is required for installing this product. Be sure to subcontract the installation to Sony dealers or contractors and pay special attention to safety during the installation. Sony is not liable for any damages or injury caused by mishandling or improper installation. Your Statutory Rights (if any) are not affected.
WARNING
If the safety precautions are not observed or the product is used incorrectly, it may result in serious injury or fire.
This instruction manual shows the correct handling of the product and important precautions necessary to prevent accidents. Be sure to read this manual thoroughly and use the product correctly. Keep this manual available for future reference.
For Sony dealers
Sufficient expertise is required for installing this product. Be sure to read this instruction manual thoroughly to do the installation work safely. Sony is not liable for any damages or injury caused by mishandling or improper installation. Your Statutory Rights (if any) are not affected. Please give this manual to the customer after installation.
On Safety
Products by Sony are designed with safety in mind.
If the products are used incorrectly, however, it may result in a serious injury through fire, electric shock, the product toppling over, or the product dropping. Be sure to observe the precautions for safety to prevent such accidents.
CAUTION
This Tabletop Stand is intended for use only with the following products. Use with other apparatus is capable of resulting in instability causing possible injury.
Specified product (As of March 2004)
| Tabletop Stand SU-P42T2 SU-P50T2 | ||
| Flat Panel Colour Television KDE-P42MRX1 KDE-P50MRX1 KDE-P61MRX1(Display Model) (PDM-4210) (PDM-5010) (PDM-6110)KE-P42MRX1 KE-P50MRX1 KE-P61MRX1(PDM-4210) (PDM-5010) (PDM-6110) | ||
| LCD Colour Television KDL-L42MRX1 —(Display Model) (LDM-4210) | —KLV-L42MRX1(LDM-4210) | |
For Customers
WARNING
If the following precautions are not observed, serious injury or death through fire, electric shock, the product toppling over, or the product dropping can result.
Be sure to subcontract the installation to Sony dealers.
If persons other than Sony dealers do the installation work, this may result in serious injury, as the Display Unit is very heavy.
Be sure to take measures to prevent the stand from toppling over.
If you fail to do so, the Tabletop Stand may topple over during an earthquake and cause injury or property damage. Draw a rope, chain, etc. through the holes of the Security Attachments located on the upper part of the main bracket and fix the other ends of the rope, chain, etc. to the wall, pillar, etc. to anchor the Tabletop Stand and prevent it from toppling over.
Be sure to install the Tabletop Stand on a solid and flat surface.
Do not install the Tabletop Stand so that it leans in one direction. If you do so, the Tabletop Stand may topple over or the Display Unit may fall. This may cause injury or property damage.
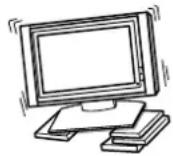
Be sure to install the Tabletop Stand on a stable surface.
If you install the Tabletop Stand on an unstable surface, it may lose its balance and topple over or fall off. This may cause injury or property damage.
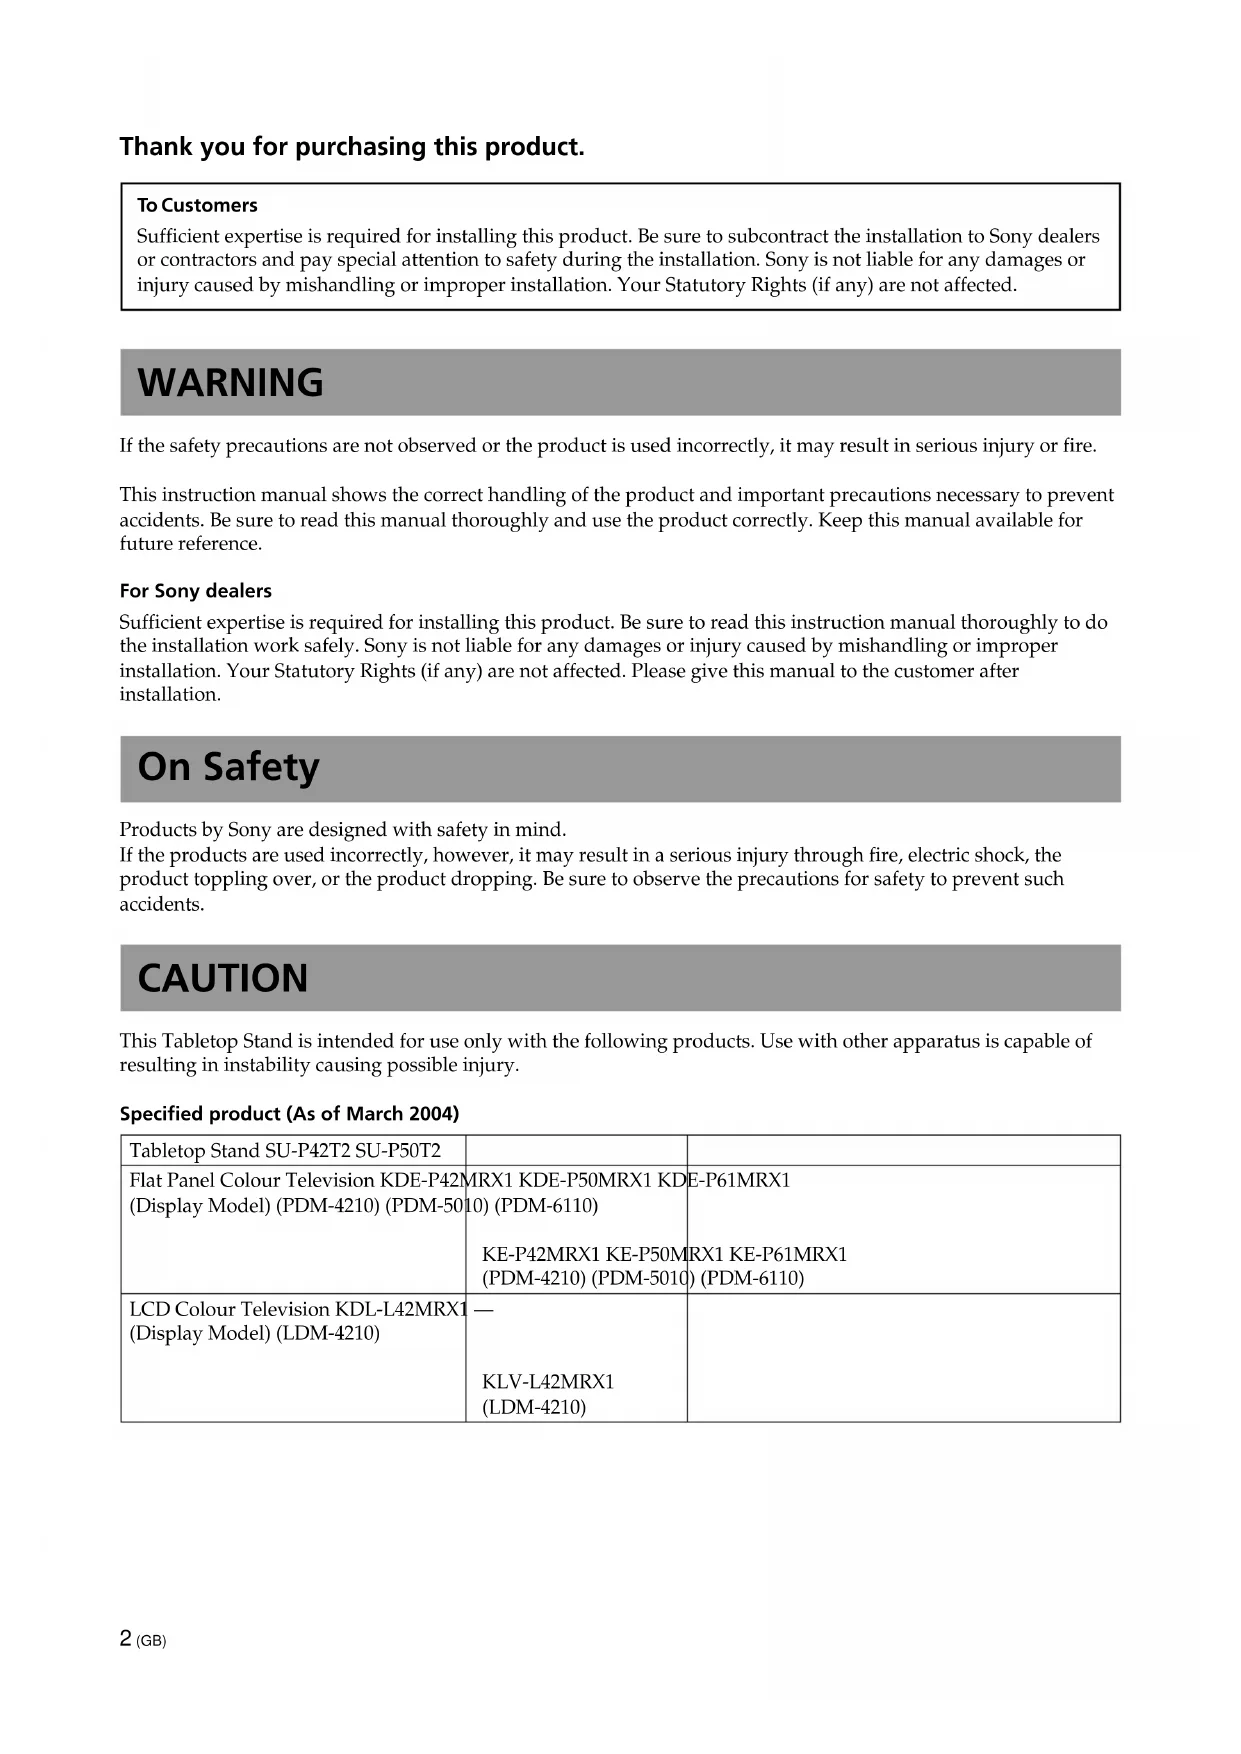
Do not lean on or hang from the Display Unit with the Display Unit installed on the Tabletop Stand.
The Tabletop Stand may topple over, or the Display Unit may fall and cause serious injury or death.

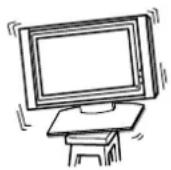
Do not cover the ventilation hole of the Display Unit.
If you cover the ventilation hole (with a cloth, etc.), heat may build up inside and cause fire.
natural_image
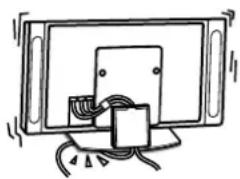
Simple line drawing of a computer monitor with a canopy and a blank screen (no text or symbols)Do not allow the mains lead or the Display Interface Cable to be pinched.
- Do not allow the mains lead or the Display Interface Cable to be pinched when you install the Display Unit on the Tabletop Stand. If the mains lead or the Display Interface Cable is damaged, this may result in a fire or an electric shock.
- Do not step on the mains lead or the Display Interface Cable when you carry the Tabletop Stand. The mains lead or the Display Interface Cable may be damaged, and this may result in a fire or an electric shock.
natural_image
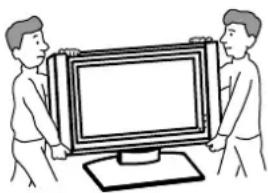
Simple line drawing of a mounted device with cables and a component (no text or symbols)Be sure to carry the stand in the manner shown in this manual.
If the Tabletop Stand is carried incorrectly, it may topple over and cause injury.
Do not stumble over the mains lead or the Display Interface Cable.
If you stumble over the mains lead or the Display Interface Cable, the Tabletop Stand may topple over and cause injury.
Do not carry the Tabletop Stand with Display Unit installed on it.
Be sure to remove the Display Unit before attempting to carry the Tabletop Stand. If you fail to do so, the Display Unit may fall and cause bodily injury.
natural_image
Illustration of two people holding a large computer monitor (no text or symbols visible)CAUTION
If the following precautions are not observed, injury or property damage may occur.
Do not install any equipment other than the specified product.
This stand is designed for use with the specified product only. If you install equipment other than specified, it may fall and cause injury or property damage.
Be sure to use the securing screws.
If the securing screws are not used, the Display Unit may fall and cause injury.
Notes on installation
- When assembling, lay the packing materials on the floor to avoid damage to the floor.
- Install the stand on a solid and flat surface. Do not allow the stand to be installed at an angle or incline. To avoid this, observe the following precautions.
- If you install the stand on a soft surface such as a mat or a carpet, lay a board over the designated location beforehand.
- Do not install the stand in a place subject to direct sunlight or near a heater.
- Do not install the stand in a hot or humid place, or outdoors.
Note on use
To keep the stand clean, occasionally wipe the stand with a dry soft cloth. Stubborn stains may be removed with a cloth slightly dampened with diluted detergent. Then wipe the area with a dry soft cloth. Do not use chemicals, such as thinner or benzine, as they damage the finish of the stand.
Assemble the Tabletop Stand
For Sony Dealers
To Sony Dealers
The following instructions are for Sony Dealers only. Be sure to read safety precautions described above thoroughly and pay special attention to safety during the installation, maintenance, checking and repair of this product.
Be sure that two or more persons do the installation work.
Be sure that two or more persons install the Display Unit on the Tabletop Stand. If one person does the installation work alone, this may result in an accident or an injury.
Be sure to assemble the Tabletop Stand securely following the instructions in this manual.
If any of the screws are loose or fall out, the Tabletop Stand may lean and topple over, or the Display Unit may fall. This may cause injury or property damage.

Be careful not to hurt your hands or fingers when assembling the Tabletop Stand.
Be careful not to hurt your hands or fingers when assembling the Tabletop Stand or when installing the Display Unit.
Be sure to install the Display Unit securely, following the proper procedure.
Be sure to tighten the screws firmly.
If the Display Unit is not installed securely, it may fall and cause injury.
Check the parts
| Name Quantity Name Quantity | |||
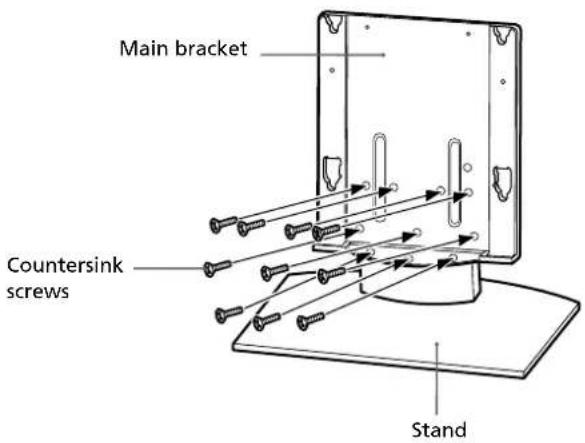
Main bracket Countersink screw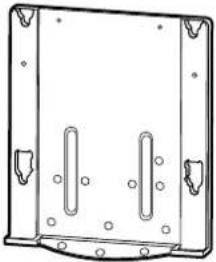 | 1 |  | 10 |
Securing screw | |||
Stand 2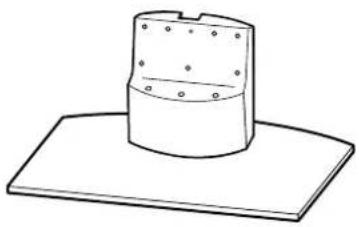 | 1 Cable clamper |  | 1 |
Prepare a Phillips screwdriver beforehand.
Install the main bracket
Align the main bracket over the screw holes on the stand. Then fasten the main bracket to the stand using 10 countersink screws.
Be sure that two or more persons hold the parts during this procedure.
Tighten the 10 countersink screws once again after screwing them temporarily.
Note
Be sure to hold the stand firmly and keep it stable.
Caution
When using an electric screwdriver, set the torque setting to about 2.45N·m.
Do not use an impact driver. If you use an impact driver or an electric screwdriver with the torque setting out of the specified range, screws may be excessively tightened, which may damage the screws or product. The stand may fall and serious injury may result.
Install the Display Unit
WARNING
Be sure to complete the installation before connecting the mains lead to the wall socket. If you allow the mains lead to be pinched under or between pieces of equipment, this may result in a short circuit or an electric shock. If you stumble over the mains lead or the Display Unit, the stand may topple over and cause injury.
1
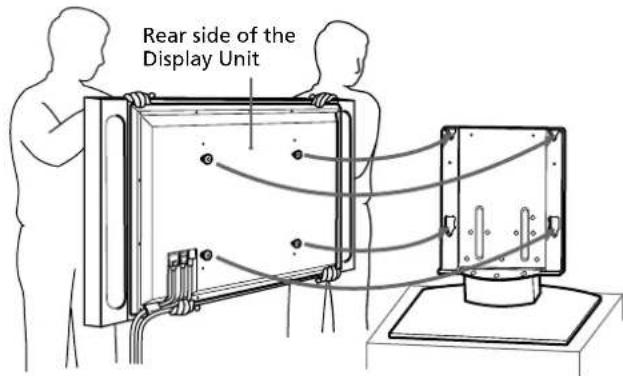
Install the Display Unit on the Tabletop Stand.
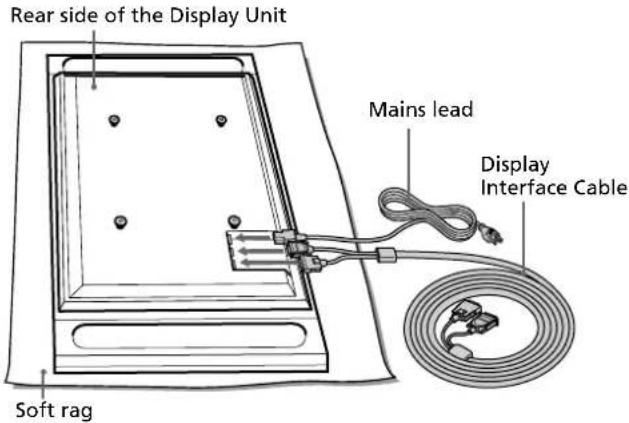
①Connect the mains lead and the Display Interface Cable to the Display Unit.

See the instruction manual of the Sony Flat Panel Colour Television or LCD Color Television for more details on connecting the mains lead and the Display Interface Cable.
Notes
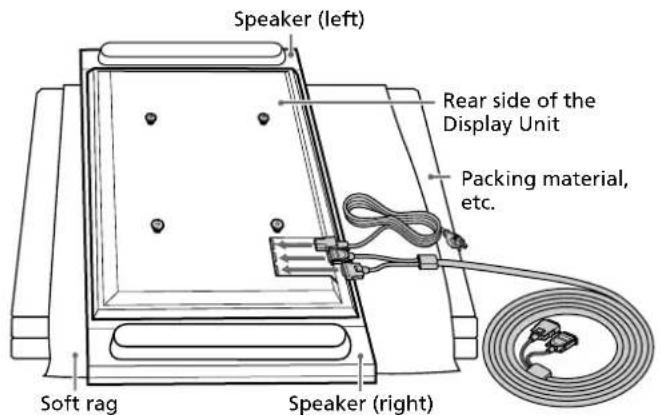
- If the weight of the Display Unit is placed on the speakers, deformation or a loose connection of the speakers may result. To avoid this, observe the following. (KDE-P61MRX1, KE-P61MRX1, KDL-L42MRX1, KLV-L42MRX1 only)
- Do not hold the speakers when carrying the Display Unit.
- When connecting cables to the Display Unit, place packing material, etc. on the floor and lay the Display Unit face down on it so that the speakers on either side of the Display Unit are clear of the packing material, etc.
- Be sure to place the Display Unit stably.
- Use soft cloth to protect the screen of the Display Unit from damage or dirt.
KDE-P42MRX1/KE-P42MRX1/KDE-P50MRX1/KE-P50MRX1
KDE-P61MRX1/KE-P61MRX1

KDL-L42MRX1/KLV-L42MRX1
Illustrations without model names that appear from now on are based on the Flat Panel colour television KDE-P42MRX1, KE-P42MRX1.
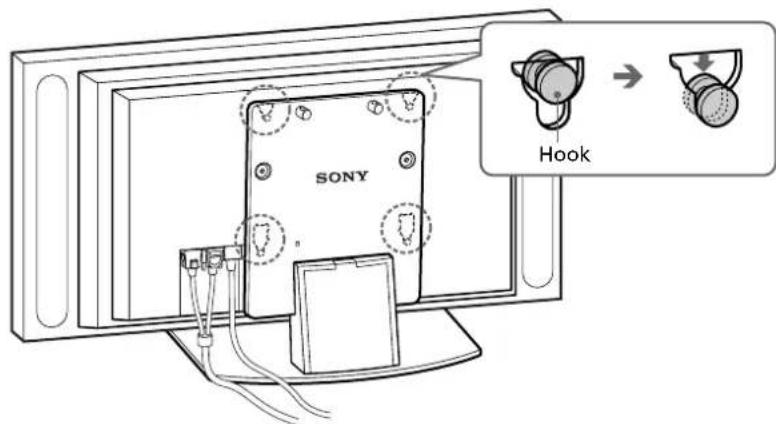
② Be sure that two or more persons hold the right and left edges of the top and the under sides of the Display Unit while fitting the hooks on the rear of the Display Unit into the holes on the fixtures of the stand. Then confirm that the hooks on the rear of the Display Unit are completely inserted into the four holes of the fixtures.
Note
Do not stumble over the mains lead or the Display Interface Cable.
③Slide the Display Unit straight downward until it snaps on.
Notes
- Slide the Display Unit completely down to the bottom. Confirm that the Display Unit is installed on the stand horizontally.
- Be sure to keep the Tabletop Stand stable while installing the Display Unit.
2
Attach the Display Unit to the stand with the two securing screws.

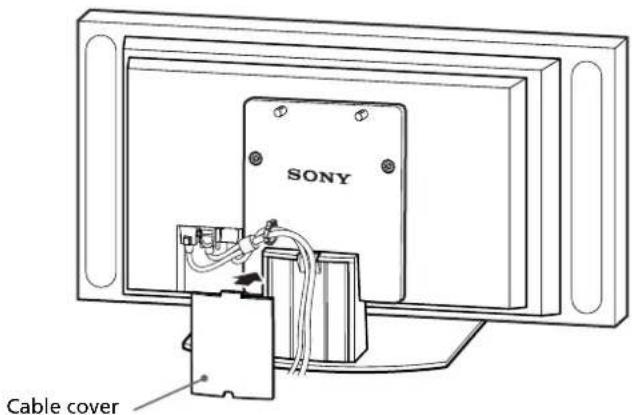
Route the mains lead and the Display Interface Cable through the stand.
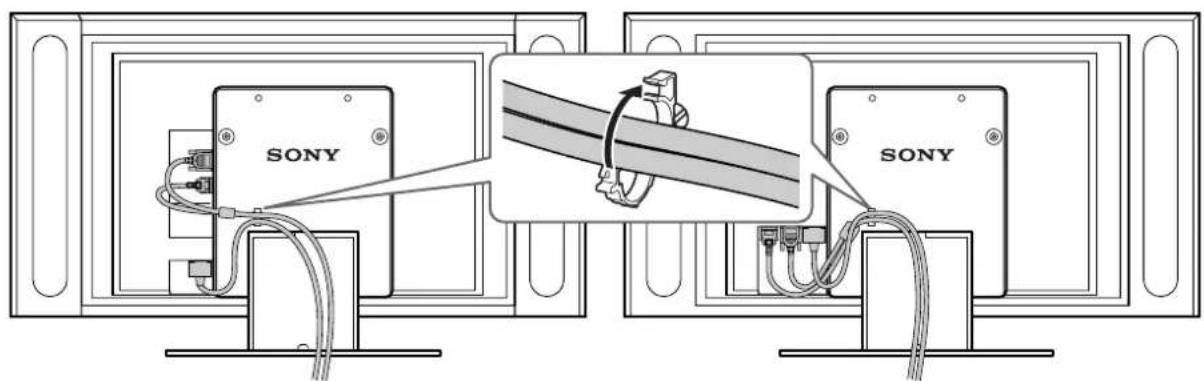
① Attach the cable clamper to the main bracket.
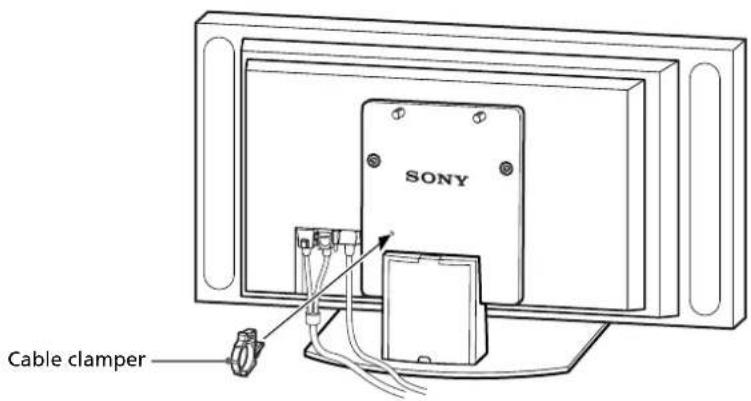
② Draw the mains lead and the Display Interface Cable through the cable clamper and fix them.
KDL-L42MRX1/ KLV-L42MRX1
③ Remove the cable cover from the stand and route the mains lead and the Display Interface Cable inside the stand.

④Reattach the cable cover to the stand.
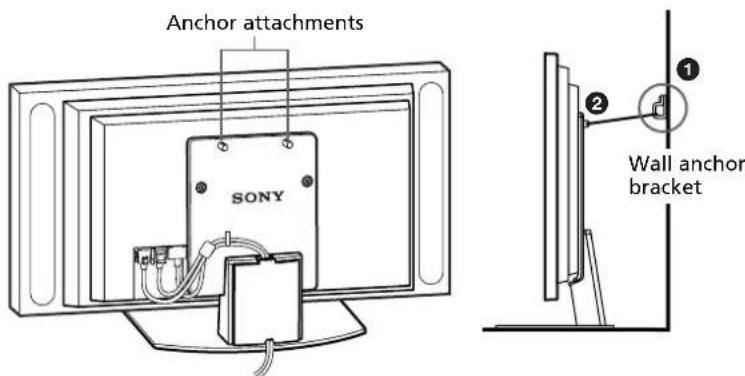
Safety measures to prevent toppling over
WARNING
Be sure to take measures to prevent the stand from toppling over. If you fail to do so, the Tabletop Stand may topple over during an earthquake and cause injury or property damage. Anchor the Tabletop Stand to a wall, pillar, etc. to prevent it from toppling over.
Prepare a commercially available rope or chain and wall anchor bracket beforehand.
①Secure the wall anchor bracket to a solid wall or pillar.
② Pass the rope or chain through both holes of the anchor attachments and then tighten the other end of the rope or chain to the wall anchor bracket.
Specifications
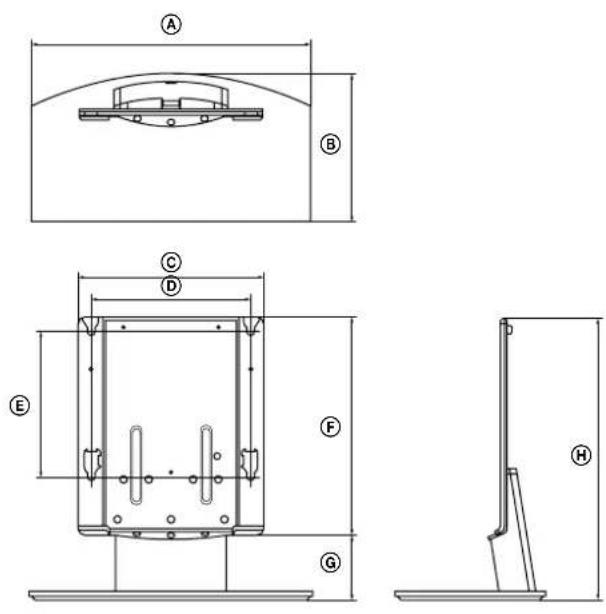
| SU-P42T2 SU-P50T2 | |||
| Dimensions: A 500 (19(mm/inches) B 295 (11 | ^11/_16 60 | 0 (23 ^5/_8 ) | |
| ^5/_8 321 | (12 ^5/_8 ) | ||
| C 392 (15 | ^7/_16 ) | ||
| D 340 (13 | ^3/_8 ) | ||
| E 310 (12 | ^7/_32 ) | ||
| F 461 (18 | ^5/_32 ) | ||
| G 41 (5 | ^9/_16 ) | ||
| H 602 (23 | ^11/_16 ) | ||
| Weight: (kg/lb) | 16.0 (35 lb 4 oz) | 19.0 (41 lb 14 oz) | |
Design and specifications are subject to change without notice.
natural_image
Simple line drawing of a computer monitor with a canopy and steam rising (no text or symbols)natural_image
Simple line drawing of a mounted device with cables and a component (no text or symbols)natural_image
Two people holding a large rectangular monitor (no text or symbols visible)ATTENTION
natural_image
Simple line drawing of a computer monitor with a canopy and steam rising (no text or symbols)natural_image
Simple line drawing of a mounted TV or audio device with cables and a small component (no text or symbols)natural_image
Illustration of two people holding a large computer monitor (no text or symbols visible)PRECAUCIÓN
natural_image
Simple line drawing of a computer monitor with a roof and side legs, no text or symbols present.natural_image
Simple line drawing of a mounted device with cables and a small component (no text or symbols)natural_image
Illustration of two people holding a large rectangular monitor (no text or symbols visible)ATENÇÃO
natural_image
Simple line drawing of a computer monitor with a canopy and steam rising (no text or symbols)natural_image
Simple line drawing of a mounted device with cables and a small component (no text or symbols)natural_image
Illustration of two people holding a large rectangular monitor (no text or symbols visible)FORSIGTIG!
Sørg for, at mindst to personer holder delene under denne procedure.
natural_image
Simple line drawing of a computer monitor with a canopy and steam rising (no text or symbols)natural_image
Simple line drawing of a mounted device with cables and a cable (no text or symbols)natural_image
Illustration of two people holding a large rectangular monitor (no text or symbols visible)FORSIKTIG
natural_image
Simple line drawing of a computer monitor with a roof and side legs, emitting steam (no text or symbols)natural_image
Simple line drawing of a mounted device with cables and a small component (no text or symbols)natural_image
Illustration of two people holding a large computer monitor (no text or symbols visible)WARNING!
natural_image
Simple line drawing of a computer monitor with a roof and side legs, emitting steam (no text or symbols)natural_image
Simple line drawing of a mounted device with cables and a box, no text or symbols presentnatural_image
Illustration of two people holding a large flat-screen computer monitor (no text or symbols visible)VAROITUS
natural_image
Simple line drawing of a computer monitor with a canopy and steam rising (no text or symbols)natural_image
Simple line drawing of a mounted device with cables and a component (no text or symbols)natural_image
Illustration of two people holding a large computer monitor (no text or symbols visible)LET OP
2
natural_image
Simple line drawing of a computer monitor with a canopy and steam rising (no text or symbols)natural_image
Simple line drawing of a mounted device with cables and a small component (no text or symbols)natural_image
Illustration of two people holding a large computer monitor (no text or symbols visible)VORSICHT
natural_image
Simple line drawing of a computer monitor with a roof and side legs, emitting steam (no text or symbols)natural_image
Simple line drawing of a mounted device with cables and a component (no text or symbols)natural_image
Illustration of two people holding a large rectangular monitor (no text or symbols visible)AVVERTIMENTO
natural_image
Simple line drawing of a computer monitor with a canopy and heat pipes above it (no text or symbols)natural_image
Simple line drawing of a mounted device with cables and a component (no text or symbols)natural_image
Illustration of two people holding a large rectangular monitor (no text or symbols visible)ΠΡΟΣΟΧΗ
natural_image
Simple line drawing of a computer monitor with a roof and side legs, emitting steam (no text or symbols)natural_image
Simple line drawing of a mounted device with cables and a component, no text or symbols presentnatural_image
Illustration of two people holding a large computer monitor (no text or symbols visible)ВНИМАНИЕ
Printed on 100% recycled paper using VOC (Volatile Organic Compound)-free vegetable oil based ink.