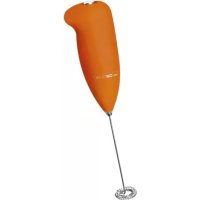
BM 3472 - Milk frother CLATRONIC - Free user manual and instructions
Find the device manual for free BM 3472 CLATRONIC in PDF.

User questions about BM 3472 CLATRONIC
0 question about this device. Answer the ones you know or ask your own.
Ask a new question about this device
Download the instructions for your Milk frother in PDF format for free! Find your manual BM 3472 - CLATRONIC and take your electronic device back in hand. On this page are published all the documents necessary for the use of your device. BM 3472 by CLATRONIC.
USER MANUAL BM 3472 CLATRONIC
Thank you for choosing our product. We hope you will enjoy using the appliance.
Symbols in these Instructions for Use
Important information for your safety is specially marked. It is essential to comply with these instructions in order to avoid accidents and prevent damage to the machine:

WARNING:
This warns you of dangers to your health and indicates possible injury risk.

CAUTION:
This refers to possible hazards to the machine or other objects.

OTE: This highlights tips and information.
General Safety Instructions
Read the operating instructions carefully before putting the appliance into operation and keep the instructions including the warranty, the receipt and, if possible, the box with the internal packing. If you give this device to other people, please also pass on the operating instructions.
- The appliance is designed exclusively for private use and for the envisaged purpose. This appliance is not fit for commercial use.
Do not use it outdoors. Keep it away from sources of heat, direct sunlight, humidity (never dip it into any liquid) and sharp edges. Do not use the appliance with wet hands. If the appliance is humid or wet, unplug it immediately.
- When cleaning or putting it away, switch off the appliance and always pull out the plug from the socket (pull the plug itself, not the lead) if the appliance is not being used and remove the attached accessories.
- Do not operate the machine without supervision. If you leave the room you should always turn the device off. Remove the plug from the socket.
- The device and the mains lead have to be checked regularly for signs of damage. If damage is found the device must not be used.
- Do not try to repair the appliance on your own. Always contact an authorized technician. To avoid the exposure to danger, always have faulty cable be replaced only by the manufacturer, by our customer service or by qualified person and with a cable of the same type.
- Use only original spare parts.
- In order to ensure your children's safety, please keep all packaging (plastic bags, boxes, polystyrene etc.) out of their reach.

WARNING!
Don't let small children play with foils for danger of suffocation!
- Pay careful attention to the following "Special Safety Instructions".
Special safety information for this unit

WARNING:
- Only use the appliance together with the supplied mixing jug.
- Whilst mixing, never put your hands or any other objects into the mixing jug!

WARNING: Risk of burning!
Do not pour any liquids that are hotter than 60^ into the mixing jug!

CAUTION:
Do not process any solid foods or dry products. Chopped food can only be processed when liquids are added.
- Place the appliance on a secure and flat surface. Set it up so that it cannot fall.
- The appliance is equipped with a safety switch. It prevents the appliance from being operated without the mixing jug being attached. Do not try to bypass this switch!
- Do not use the mixer without any ingredients to mix!
- Only interrupt the mixing sequence with the function switch. Do not use the safety switch!
- Always disconnect the appliance from the supply if it is left unattended and before assembling, disassembling or cleaning.
- Do not carry or lift the appliance during operation, but turn it off first and then disconnect the mains plug. Always carry the appliance with both hands!
- This appliance shall not be used by children.
- Keep the appliance and its cord out of reach of children.
- This appliance can be used by persons with reduced physical, sensory or mental capabilities or lack of experience and knowledge if they have been given supervision or instruction concerning use of the appliance in a safe way and understand the hazards involved.
- Gshidreot play with the appliance.
- Always clean the appliance as described below under "Cleaning".
Intended use
This appliance is used to prepare the following:
- fruit drinks
- milk shakes
cocktails (and similar drinks) as well as - milk foam and
- cream
The appliance is only to be used as described in the user manual. Do not use the appliance for any commercial purposes.
Any other use is considered as not intended and may lead to damage of property or even to personal injury.
The manufacturer assumes no liability for damage which may occur through incorrect use.
Supplied parts
1 Appliance base
1 Mixing jug
Unpacking the appliance
- Remove the packaging of the appliance.
- Remove all packaging material such as plastic film, filler material, cable ties and box packaging.
- Check that all the parts are in the box.
NOTE:
There may still be dust or production residues on the appliance. We recommend that you clean the appliance as described under "Cleaning".
Description of parts
1 Safety switch
2 Mixing rod
3 Mixing jug holder
4 Function switch
5 Mains adapter
6 Mixing jug with scale
7 Motor housing
Instructions
Location
A skid-proof, even surface is suitable as installation location.
Electrical connection
- Ensure that your mains power corresponds with the specifications of the appliance. The specifications are printed on the type label.
- Connect the mains cable to correctly installed and earthed socket.
Switch functions / Button functions
Off
On with a low speed setting
II On with a high speed setting
You can let go of the switch during operation.

CAUTION: Operating for a short period
Do not run the appliance constantly for longer than 3 minutes. Before using the appliance again, allow it to cool for approx. 3 minutes.
Capacity
Use the scale on the mixing jug.
- Fill the mixing jug to 450ml (max.), if you want to mix using the low speed setting (I).
- Fill the mixing jug to 400ml (max.), if you want to mix using the high speed setting (II).
- Do not overfill!
NOTE:
- Foam needs plenty of space. Reduce the capacity if the liquids which you are using generate a lot of foam.
- In the case of whipped cream, our recommendation is: 250 ml (max.).
Frothing milk
iNOTE:
- For best results, use milk with a 3.5% fat content.
-
Milk with 1.5% fat content and soy milk or lactose-free milk does not froth as well.
-
In order to foam milk, use the high speed setting (II).
Operation
- If necessary, chop up the material to be mixed into small pieces beforehand.
- Put the ingredients to be mixed, together with the liquid, into the mixing jug. Pay attention to the capacity!
- Make sure that the function switch is set to "".
- Connect the mains adapter to a properly installed earthed socket.
- Hold the appliance base securely with one hand. Insert the mixing jug from below, by pushing it upwards between the safety switch and the mixing container holder.
- Using the function switch, select a speed setting. Switch the appliance on using the function switch.
- Hold the appliance securely during the mixing sequence.
- After the mixing sequence, switch the appliance off using the function switch.
- In order to remove the mixing jug, hold the appliance base securely with one hand. With the mixing jug, press the safety switch upwards and at the same time, remove the mixing jug from the holder.
- If you want to end the operation, disconnect the mains plug.
Adding ingredients (to be mixed)

CAUTION:
Do not add ingredients to be mixed whilst the appliance is running!
- In order to add ingredients to be mixed, switch the appliance off using the function switch.
- Remove the mixing jug (as described above).
- Add the ingredients to be mixed.
- Continue operating the appliance.
Stopping operation
- Switch the appliance off using the function switch.
- Disconnect the mains adapter from the plug socket.
- Remove the mixing jug.

IMPORTANT NOTE:
Never keep juice from citrus fruit and/or food which contains acid, in metal containers.
Cleaning
Pre-cleaning
- Fill the mixing jug with 450ml (max.) warm water.
- Operate the appliance for approx. 10 seconds (as described above).
- Following this, pour the water out.
Thorough cleaning
WARNING:
Always pull the power supply plug before cleaning.
- Never immerse the base in water for cleaning. It could result in an electric shock or fire.
CAUTION:
- Do not use a wire brush or other abrasive items.
- Never use sharp or scouring cleaning materials.
- The mixing jug is not dishwasher safe.
Mixing jug
- In order to clean thoroughly, remove the mixing jug.
- Clean the mixing jug straight away after each use in a bowl of hot soapy water.
- Dry the mixing jug straight away.
Mixing rod
CAUTION:
The mixing rod cannot be removed.
- Wipe the mixing rod with a damp cloth.
- Then dry off with a dry cloth.
Appliance base
- In order to clean the outside of the appliance, use a moderately damp cloth (as necessary).
- Then polish the surface with a dry cloth.
Storage
- Clean the device as described and allow to dry completely.
- We recommend that you keep the appliance in the original packaging if the appliance will be not used for long periods.
- Always keep the appliance out of the reach of children in a dry, well ventilated place.
Troubleshooting
| Malfunction | Possible Cause | Remedy |
| The appliance does not work/the motor does not turn | Is the mixing jug fitted properly between the safety switch and the holder? | Check whether the mixing jug is correctly inserted. |
| Is the appliance switched on?Is the mains socket defective? | Try a different socket | |
| The milk doesnot foam | Is there enough milk in the mixing jug? | There should be between 150 and 250 ml of milk in the mixing jug. |
| Have you used the right kind of milk? | Use milk with a 3.5% fat content. |
Technical Data
Model: BM3472
Power supply: 230 V~, 50 Hz
Power consumption: 65 W
Protection class: II
Short-term duty: 3 minutes
Capacity: 450 ml (max.)
Net weight: approx. 1.07 kg
The right to make technical and design modifications in the course of continuous product development remains reserved.
This device complies with all current CE directives, such as electromagnetic compatibility and low voltage directive and is manufactured according to the latest safety regulations.
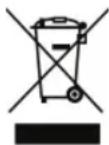
Disposal
Meaning of the "Wheelie Bin" Symbol
Take care of our environment, do not dispose of electrical appliances via the household waste.
Dispose of obsolete or defective electrical appliances via municipal collection points.
Please help to avoid potential environmental and health impacts through improper waste disposal.
You contribute to recycling and other forms of utilization of old electric and electronic appliances.
Your municipality provides you with information about collecting points.
Instrukcja obslugi
CTC Clatronic Sp. z o.o
CtpnXeHbIa3miuYBaHHa

YBAGA.
CtpnkeHdIa3mUyBaHHHe 3Himaetbcra.
- PpOtpIb CtpnKeHbIa 3MiUyBaHnB OJorOTo raHipKOIO.
-NotIMBnpttbCyXHOraHhipKOIO.
Ochoba npnilaNy
- Ⅲo6 noHCTHTn npHaad 33OBHI, BnKOpNCTOByTe BOrky ranHicpKy (3a notpe6n).
- Notim npoTpiB noBepxHIO cyXO IO raHupkoIO.
36epiraHH
-Почистппсстрий,як описно Нхчe,дайтейюу OXJOHOHTN.
- PekomeHdoBaHO 36epirATn npncptiB opurihbHi ynaKOBU, kIIO BIN HE BIKOPNCOTOBaBATmETbcr TpNBanJyac.
36epiraTe npictpi no3a Mexamn docXHocti diTey cyxomy,do6pe npoBITpOBAHOMy micui.
YcyHeHH HeCnpaBHOcte
Yka3bIbaeT Ha BO3MOxHHyO ONaCHOCTb IINI3JeINr INpyRnx OKpyKaIOuNX PpeDMeTOB.

PUMEAHNJaetcoBteiHnHcOpMaunio.
06uye yka3aHnno TeXnke 6e3OnacHOCTN
Ipeed Haayanom 3KcNpyataun npnbopa BHmateJIbHO npOHTaTae npnnaeMyIO HCTpykuHIO NO 3KcNpyataunu COxpaHNTe ee B HadeXHom MeCTe, BMeCTe C rapaHTnHBIM TaHOHOM, KACCobbIM YekOM N, NO BO3MOXHOCTN, KAPTOHHo Kopo6kOc yNAKOBOHbIM MaTePnAnOM. Ecn daTe KOMy-No6o Noonlb3OBaTbCpnp60pOM, O8a3aTeJIbHO daTe BnpuDauy daHHyo IHCTpykuHIO NO 3KcNpyataun.
-ПользуITEcBпиборOMToIbKOчaCTHbIMОбразOMИно HA3HaueHEnIO.Ipr6OpHeпрдHa3HaueHENДЯКOMМерчe- CKOTONIOJIb3OBAHIN.
He noIb3yItec np6opom noI OTkpblIM He6OM. Ipe doxpaHnTe np6op OT kApbl, npMbx COJIHeuHbIX Lyuei, BnaXHOCTN (Hn B KOem Cnyuae He nOpykaTe erO B Ody) N yapob 06 ocptbe yrIbI. He npKacaiTeCk np6Op- py BnaXHbIMn pykam. Ecn np6op yBnaXHNcR nIN HA-MOK, TyT JKe BbIHbTe BNIKy n3 po3eTKI.
- Pocne 3KcNpyataun, MOtTaKe npHaDnExHNOCTe, uNCTKe nIIN pONOMKe np6Opa Bcerda BbIHMaTe BUNKy n3 po3ETKN (TAnHTe 3a BNky, a He 3a Ka6enb).
He octabnIe BKNIOUeHHbIe 3NekTpOnpn6OpbI 6e3 npCmOTpa. BbIXoJN 3 NOMEuHnB CcERda BbIKIOuaTe npN-6Op.BbIHbTe uTEKepe n3 po3eKn. - Pnp6op n Ka6eBcTeBOro nTuTHnHeo6xOIMO peryIpaH0 o6cneDObaTb Ha HAIuYne cNeOb NOBpeXdEHn. PpO6hApUxKeHHN NOBpeXdEHn NOb3ObaTbca Pnp6Opom 3aPpeSaeTcR.
HnB KOem clyuae He peMoHTnpyIte np6op caMOCTOaTeIbHO, a ObaaainTecb TaKOM clyuae 3a NOMoUbIO K CneuaJIncTy, IMeIoUeMy COOTBeTCTByUOuN IOnyck. IV3 COo6paKeHHn 6e3oNaChOCTN, 3aMeHa CeTeBOrO UHpya Ha paBHO3HaHbI dONyCKaETCra TOIbKO Yepe3 3aBOIN3ROTOBNTeJIb, Hauy cepBNCHy MoCTepCKHy INI NCOOTBEcTByIOUeR O KaIINuINpOBaHHOrO CneuaJIncTa. - IcnoJb3yIe ToJbKO opuHnHaJIbHbIe 3aIuaCTN.
V3 coo6paKeHn 6e0nacHOCTn DnA TeTe He octaBIAIy Te IexKaTb ynaKOBky (PiactNKOBbIe MeuK, KapTOH, neHO-nnact n T.D.) 6e3 npncmOTpa.

PENDEYNPEXDEHNEI
He no3B0JnTe DeTm nIpaTb c NOIN3TNNEHOBOI nIeHKO. OnachocTB ydyub!
- PtoxanyIcTa, co6JIIOaIte HIXeCENeIyOuIe "CneUnaIbHbIe yka3aHnno texHnke 6e3oNaChOCTn".
Oco6bIe yka3aHnI NO TexHnke 6e30nacHocTn ДЯДaHHoro yCTpOiCtBa

PPEdynpeXeHne:
- Историяе заюпов толъков Вмосте симпелов Кубшином.
BoBpeMa CmeuBaHnHe OnyckaTc Baun pyKn n IIObIe npy- rne ppeMTeB B CmecnteJbHbI KybUnH!

Danhbl np6op nCnoB3yTcI nIpyroTOBneHn:
- ppykTOBbIX HANITKOB
MOnOuHbIX KOKTeIneIe
KOKTeJJIeN (aHaHAnOHnHbIx HAnITKOB)
MOJOUHOI NENBI
B36nTbIX CJINBOK
YcTPOIcTBo MOxHO NcONb3OBaTb TOnbKO TaK, KaK OINCAHO B DaHHOM pyKOBoCDBe NcB3OBaTeJn. He NcONb3yIte erO B KaKnx-Ni6o KOMMepuecknx ueJX.
Iio6oe npyroe nCnoB3OBaHne cHTaeTcN CnOJIb3OBaHN- em He no Ha3NaueHnIO mOKeT pINBEcT K IOpYe IMUeCTBa INI daJke K TpaBMe.
ПОНЗВОДИТЕН He HeCET OTBETCTBEHHOCHT 3a BO3MOXHbIyUseP6, KOTOpBIM MOKET 6bITb ПичINHeB pe3yJIbTaTe HENpaBnIbHOrO IcNoIb3OBAHnY yCTpOInCTBa.
KomnneKT
1 Kopnyc npnbopa
1 CmecnteHbI KBYUN
PacnaKOBka yctpoNCTBa
- YdaJIte ynaKOBky cTpoCTBa.
- YdaJInte BCE ynaKoBOUHbIe MaTePnAbI, TaKHe KaK NOnN3-TInNeHOBa IInEHa, MaTePnAn HAnONHITeR, Ka6eNbHbIe CTJKKN KOpO6Kn.
- Y6eIHTecb, yTO B Kopo6Ke eCTb BCE KOMIOHeHTbl.

ПИМЕЧАНО:
Ha yctpoiCTBe BCE eue MOyT OCTaBaTbCRA MeKne YaCTnBcI n nbInb, OCTaBUnCeNOCNE npOn3BOCDtBEHHOro pOcecca. PeKOMeHdyETc NOuHCTNb yCTpoiCTBO,KAK ONICaHO B pa3-ndeJe "YncTkA".
Oncahne kOMnoHeHToB
1 PpeoXpaHnTeHbI BbIKIOuHaTeIb
2 CmecnteIbHbI CTepKeHb
3ДерхаTeIb CMecuTeIbHOrO KyBUnHa
4 ΦyHKUHOHaNbHbI nepeKluOaTeNb
5 CeTeBOn aAnTep
6 CmecnteIbHbI KyBUnH C mepHOI ShkaIToI
7 Kopnyc DnurataTeJIa
HCTpykun
PacnoJoxeHne
IyCTaHOBKn yCTpoiCTBa HyxHa yCToHnBa, poBHa noBepXHOCTb.
IopknHouyen
- Y6eIITecb, yTO napameTpbl 3JIeKTPoNTaHnH COOTBETCTByIO T CneUΦnKauyn ycTpoiCTBa. CneUΦnKaua Ha neyataHa Ha 3TNKeTke.
- Bctabte wTeceJIb uHypa 3JekTpOnuTaHnB nCnpaBHyIO n 3a3eMneHHyO p03eTKy.
I P N M E U A H N I:
-Дяниушero pe3yNbTaTaNcNoIb3yIte MONOKO JNHPHOCTbIO 3,5%.
- MoNOKO 1,5% xHnPHoCTn mONJOKo n3 con nn moJOKo 6e3 NaKTo3bI BCHeHnBaIOTc He OueHb XopoAo.
-Дя BCHeHbAHnMoJIOKa NcIOnb3yItepeXIM BbICOKOckopoCTN (II).
Pa6ota
- Пи HeobxOIMOCTN 3apaHee MeJIko I3MeIbYHTE npoDyKT, NOJIeKaUIN CMEUBAHNO.
2.ПОJOXHTe CMeUHBAeMbIe INHRpeJNeHTbI BMeCTe C XNIDKOCTbIO B CMEcNTeJIbHbI KYBUnH.CobIIOJaTe peKOMeHnyeMbIe OsbemblnpOyKTOB! - Поберьт,чTo Функционьнй поеклочаюь установпен Ha O.
- BkIIOHTe CeTeBoi aIaNTep B COOTBeTCTByUOuI OPO3ETky C 3a3emJIeHnEM.
- IpoHyo ydepKnBaIte KOpNc npnbopa OndoHou pyKoBCTabBe CmecTeNbHi KyBUnH CHN3y BBepx, npOTJIKNyB erO MeXdy npeOxpaHHTeNbHbIM BbIKJIOuHaTeJeM N depKaTeJeM CmecTeNbHO RyBUnHa.
- IcnoIb3y4 yHKnIOHaJIbHbI nepeKNIoYaTeIb, Bbl6epNTe peXIM ckOPOCTn IN BKIIOnHTe npBOp.
7.BoBpemI npoecca CmeunBaHnI npouHo ydepKuBaIe npi6op. - Io OKOHaHm CMeWbAHn BbIKIOHTe pIbOp c NOMOJIbIO FyHKUHOHaJIbHOrO NepeKIOUcATEJIA.
9.ДЯOTCOeIMHeHnIcMEcITbHOKyBUnHa npOuHo ydepxBaIte npi6op odHoi pyKoN,nepeBeJa npedoxpaHITeBbHbBbIKNoHTeB BepxHee nONoKeHne,ODHOBpeMeHHO BbIHbTe CMEcITbHbN KyBUnH N3 DepeKaTeJIa. - EcHn HxKHO 3aBepuNTb pa6Otu C np6Opom, OTKIOHTe ceTeByo BUNKy.
DobabHeHnE HnRpeJeHnTOB DJIa CMeuBaHn

BHIMAHNE:
He do6abIyTe INHpeJeNHTbI DnI CMeUINBaHnB O BpeMa pa6oTbI np6opa!
1.Дяdo6abHnHnHrpeJeHToBДЯ CMeuBaHnBbIKIyoTe np6op c nOmoBIO cyHKUHOHaJIbHOro nepeKlnOaTeJra.
2. BbHbTe CmecnteBHyk KyBUnH (Kak OnncaHO BbiJe).
3.Добавытейнгеленьдя Смшваня.
4. BHOBB BKNIOHTe np6op dny npoDOJIkeHn CMeuBaHn.
PpekpaueHne pa6oTbI
- BbIKIIOHTe npi6op c nOmoIbIO cyHKUHOHaJIbHOro nepeKIIHOaTeJI.
- OTKIIOHTe cTeBcOaIaTep ot ITeNcEbHOb po3ETKl.
- BbHbTe CmecnteHbIkyBUnH.

BAXHOE PIPIMEYAHNE:
HnKoIa He xpaHnte cok n3 uTpycoBbIX cpyKTOB n/nn npOdykTBi, coepkaune KNCNOTY, B metaIIuueCKNX KOHTeHepax.
UcTka
Прееварытеловая чстka
- 3aONHnTe CmecnteNbHbI KByBUN H TeNIOB BOO (MaKcMym 450 M).
- BkIIOHTe np6op n daTe emy npa6oTaTb TteHne OK. 10 cek. (kak OINCAHO Bblue).
- 3aTeM BbIeNte BOy.
TtateJIbHaYnCTka

IPEyIpyKxHHeH:
-Передческов Всета оТоeINHЯITEшурэнТpoNITAHIA.
He onyckaIte ochoBaHne B Body Ira ouHCTKn. B npoTnBHom cIyuae 3TO MoKet npuBeCTN K ydApy 3JeKtpoTOKOM INI NOxapy.

BHIMAHNE:
He nCnoJb3yIte npBOONOHyIO ueKyu nn KaKe-JIN60DpyrIe abpa3nBhIe BeuecCTBa.
He nCnoJb3yIteKaKne-Jin6o KnCIOThbIe NIn a6pa3HBHbIe MOUuIe CpeDCTBa.
CmecnteIbHbI KYBUNH He npirodeH IJIaMbITbB NOCydomoeyHO MaHNHe.
CmecnteBbHk KyBunH
- TIIAteJIbHOOCHTKNOTCOeHNHTe CMEcNTeJIbHbI KByBUnH OT KOpnyCa MKNCEpa.
Cpa3y Je nocJe KaJDoI NcIOJIb3OBAHnB BbIMoTe CMe-CNTeJIbHbI KByBUnH B MNCKe C TeIIOI MbJIbHOB BOIOI.
Cpa3y JHe Hacxyo BbItpTe CMeCtTeBbHbI KByuINH.
CmecnteBhBcTepKeHb

BHIMAHNE:
CmecnteHbH CTepKeHb He CHImaetcra.
- BbItpuTe cMeCnTeNbHbI cTepeXeHb BlaJxHO TkaHbIO.
- 3aTeM BbCyUHTE erO cyXoN TkaHbIO.
Kopnyc npnbopa
-ДЯ OЧNTК BHeUHe NOBePxHocTn npN6Opa NcNoJIb3yTe, npN Heo6XODMOCtN, yMepeHHO BnaXHyTO TkaHb.
- 3aTeM BbITpNTe NOBepxHOCt bCyXoT KtaHbIO.
XpaHene
-ПочиТпустpoИСТВОВCOOTBETCTBUNC OПИСАнEM,ИдайтЕ EMу ПОПНOCТьЮ ВьICOXHHTb.
- PekomeHnyetc xpaHntb yctpoNCTBO ero opnHaJbHOy ynaKOBKe, ecn OHO He nCNoIb3yETc dIInTeJIbHOe BpeM.
Bcerda xpaHNTe yCTPOBCTBO B cyXOM, XopoOIO BEHTINIPyEMOM MecTe, HeIOCTyHOM IJRA DETeI.
YcTpaHHe HEnCnpaBHOCTe
jol jssall allie gblll
bi 1
blllg jll jll
clal jao elec, g ojolpaiau Jsc y
同学 S_n + 1 = 12( n^2 + 1)
.3julfo 12111 1
a_1 = 2,a_n + 1 = _n2 + _n3 + ·s + _1n
4
ai = 12 i - i i + _i
Ailuaa aabba biaill 1j zwaal
AeJyJaaBaeB
j_L = 21 d = 13
ailll aalaae aea aaii jglll jgll jall
(5)
Ail jilab aab: bawll gai
#
Lolai 45 jil g jsi go LS jellll
aaii i 1111
A
yJlso Jlaa Jlaa Jlaa Jlaa Jlaa Jlaa
4.2
a
a
1511 1211 (a) 450 a
(1). a.e. a 令 a 为 a^2 + 1 ,则 | a - 1| = | a + 1|
14 400
(II) a is a + b and c is c + d ,respectively.
4k + 1 ≤ x_0 < 4
jll jll lglalil
jolll jolll oolal y aolal y gill cll sall 1
ai = bi = 1( i = 1,2, )
.0x1e 2
.3
jie jie jie 4
!jLJI 2
jll jll lalil
a
J 1
J 1
8 8
1
aiaaii jbiall 15jg aiai i yj
jll jbb
"1iill" 2j jll jll
1j
jul c1io 1
21 ÷ 21
3
ai a ai 分母最小值为 k .
5
6
7
L
jglsl
1
alal. jall clalal gao yjssll jilg jn 1
.
2
jill 155g/114all 155g
Jzil
aieiaeaiee aee
ailll aalll 1
i 1
a
Jusu Jusu, jusu
- a3 = 2 a5 = 4
1
yla 1
aSall
Jlll lal jao
aill (alldll)
J 1
piaaie 1. piaiial lgl aol gaiie jaiai i
( x - 1) ( y - 1) = 0
al jao paa gill jai jai gai jai alalalalal
aaiiie aiee iie eae
a 1
2015年/4月2日星期二
j_L : j is x < 1
1
gaiy
jglal j1.1
sall slosgssll 1bill jia bll al ggsj j
aillg 1
.3
i
3