MS 3812 - Milk frother CLATRONIC - Free user manual and instructions
Find the device manual for free MS 3812 CLATRONIC in PDF.

User questions about MS 3812 CLATRONIC
0 question about this device. Answer the ones you know or ask your own.
Ask a new question about this device
Download the instructions for your Milk frother in PDF format for free! Find your manual MS 3812 - CLATRONIC and take your electronic device back in hand. On this page are published all the documents necessary for the use of your device. MS 3812 by CLATRONIC.
USER MANUAL MS 3812 CLATRONIC
natural_image
Black and silver CTRONC water heater with digital display, no visible text or symbols on the device itself.CE
Bedienungsanleitung
Overview of the Components ...... Page 3
Instruction Manual......Page 8
Technical Data......Page 10
WICHTIG:
1 × Rühr-Ring (●)
2× EDS-Ring ( )
Be sure to read the separately enclosed safety instructions first.
Instruction Manual
Thank you for choosing our product. We hope you will enjoy using the appliance.
Read the instruction manual and the separately enclosed safety instructions very carefully before using this appliance. Keep these documents, including the warranty certificate, receipt and, if possible, the box with the inner packaging in a safe place. If you pass the appliance on to a third party, always include all the relevant documents.
Symbols in this Instruction Manual
Important information for your safety is specially marked. It is essential to comply with these instructions in order to avoid accidents and prevent damage to the appliance:

WARNING:
This warns you of dangers to your health and indicates possible injury risks.

CAUTION:
This refers to possible hazards to the appliance or other objects.
Unpacking the Appliance
- Remove the appliance from its packaging.
- Remove all packaging material, such as foils, filling material, cable ties and cardboard packaging.
- Check the scope of delivery for completeness.
- If the contents of the packaging are incomplete or if damage can be detected, do not operate the appliance. Return it to the dealer immediately.
- There may still be dust or production residues on the appliance. We recommend that you clean the appliance as described under "Cleaning".
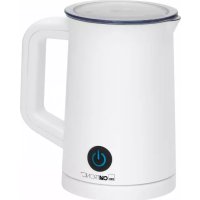
Overview of the Components / Scope of Delivery
1 Jug
2 Lid
3 Handle
4 "Latte macchiato" function
5 "Hot chocolate" function
6 Multifunction rotary switch with function indicator
7 "Cocoa/iced coffee" function
8 "Cappuccino" function
9 Base
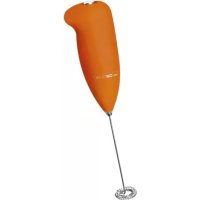
Without Illustration
1 × Stirring ring (●)
2 × Stainless steel ring (●)
Warnings for the Use of the Appliance

WARNING:
Only use the appliance with the corresponding base.

WARNING: Risk of Burns!
- When you remove the jug after heating, the heating plate on the base and the bottom of the jug are still hot!
- Even after use, the surface of the heating element still has residual heat.
Notes for Use
Location
A non-slip, level surface is suitable as a location.
Electrical Connection
- Check that the mains voltage you want to use matches that of the appliance. You will find the relevant information on the rating plate on the base.
- Connect the mains cable to a correctly installed earthed socket. A signal tone sounds and all function indicators flash.
Functions of the Rotary Switch
| Latte Macchiato Hot stirring/foaming | |
| Hot chocolate Hot stirring | |
| Cold Cold stirring/foaming | |
| Cappuccino Hot stirring/foaming |
Jug
If you remove the jug during operation, several signals will sound. If you place the jug back on the base during this time, the selected function will continue.
- If you place the jug on the base after the signal tones, the appliance switches to stand-by.
Fitting / Changing the Insert
- Place the insert in the shaft at the bottom of the jug.
- Press the stainless steel ring onto the stirring ring with light pressure. This snaps into place. It is used to froth the milk.
• To remove the insert, pull it upwards.
Filling Quantity
| MIN 100 | ml | Minimum quantity for foaming and stirring |
| MAX | 250 ml | Maximum quantity for foaming |
| MAX | 350 ml | Maximum quantity for stirring |
Milk Frothing

CAUTION:
Observe the MAX♦ filling mark, otherwise the milk will froth over.
- To achieve optimum results, use milk with a fat content of 3.5% and a filling quantity of 250~ml .
- A fat content of 1.5 %, soya milk or lactose-free milk will result in less foaming.
Warming Drinking Chocolate / Hot Chocolate

CAUTION:
- Only add the cocoa powder or chocolate after the milk.
- Cut the chocolate into small pieces beforehand. Do not add too much chocolate.
- Observe the MAX ● filling mark, otherwise the jug will overflow.
- The smaller the chocolate pieces, the better the result.
- Use the stirring ring insert for the drinking chocolate. The chocolate becomes frothier with the stainless steel ring.
Application Table
Use the following table as a guide:
| Application – Desired result | InsertFunction | |
| Hot foamed milk Stainless steel ring | ||
| Hot frothed milk Stirring ring | ||
| Warm foamed milk Stainless steel ring | ||
| Warm frothed milk Stirring ring | ||
| Cold foamed milk Stainless steel ring | ||
| Cold frothed milk | Stirring ring | |
| Hot chocolate | Stirring ring |
The results may vary depending on the milk and temperature.
Operation
- Insert the mains plug into the socket.
- Place the desired insert in the jug.
- Pour the desired milk into the jug.
- Pay attention to the fill level markings.
- Lock the jug with the lid and place it on the base.
- Turn the rotary control to the desired function and press it to start.
- If no input is made within 3 seconds, the appliance switches back to standby mode.
- The function indicator lights up continuously during operation.
-
When the function is finished, 10 signals sound.
-
The following options are available to end operation:
• Automatic switch-off
- Press the rotary control
- Remove the jug
Cleaning

WARNING:
• Always pull the mains plug out of the socket before cleaning.
- Allow the appliance to cool down.
- Never immerse the base in water for cleaning. This could lead to an electric shock or fire.

CAUTION:
- Do not use a wire brush or other abrasive objects.
- Do not use harsh or abrasive cleaning agents.
Base
Clean the outside of the base with a dry cloth, without using any additives.
Jug, lid
For easy cleaning, you can clean the jug and lid in the dishwasher.
- First pull the used insert upwards out of the jug.
Inserts, seals
• Always clean these parts immediately after use.
- Only wash the parts by hand with a soft cloth and a mild dishwashing detergent.
- Heavier soiling can be removed with a nylon brush.
- Rinse with clean water and dry the parts.
Storage
- Clean the appliance as described. Allow the accessories to dry completely.
- We recommend storing the appliance in its original packaging if you do not intend to use it for a longer period of time.
- Always store the appliance out of the reach of children in a well-ventilated and dry place.
Troubleshooting
| ProblemPossible Cause Remedy | ||
| The appliance has no function. | The appliance has no power supply. | Check the power socket with another appliance. |
| Insert the mains plug correctly. | ||
| Check the house fuse. | ||
| The appliance is defective. Contact our service or a specialist. | ||
| The milk does not foam. | The stainless steel ring is not fitted correctly. | Check that the stainless steel ring is seated correctly. |
| The attachment is blocked. | ||
| There is not enough milk in the jug. There should be between 100 and 200 ml of milk in the jug. | ||
Technical Data
Model: MS 3812
Power supply: 220–240 V\~, 50–60 Hz
Power consumption: 500 W
Protection class:....I
Net weight: .... approx. 1 kg
The right to make technical and design modifications in the course of continuous product development remains reserved.
This appliance has been tested according to all applicable, current CE directives and built according to the latest safety regulations.
Disposal
Meaning of the "Dustbin" Symbol
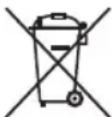
Protect our environment: do not dispose of electrical equipment in the domestic waste.
Please return any electrical equipment that you will no longer use to the collection points provided for their disposal.
This helps avoid the potential effects of incorrect disposal on the environment and human health.
This will contribute to the recycling and other forms of re-utilisation of electrical and electronic equipment.
Information concerning where the equipment can be disposed of can be obtained from your local authority. Your dealer and contractual partner is also obliged to take back the old appliance free of charge.
BELANGRIJK:
CTC Clatronic Sp. z o.o
Ul. Brzeska 1
45-960 Opole