
TCLD 50 - Rangefinder EINHELL - Free user manual and instructions
Find the device manual for free TCLD 50 EINHELL in PDF.

| Product type | Laser distance meter |
| Brand | Einhell |
| Model | TCLD 50 |
| Power supply | 2 AAA batteries (not included) |
| Maximum range | 50 m |
| Accuracy | ± 2 mm |
| Laser class | 2 (635 nm, power < 1 mW) |
| Measurement units | m, ft, in, pi |
| Measurement functions | Single distance, continuous (min/max), area, volume, two areas side by side, indirect (Pythagorean 2 points), indirect (Pythagorean 3 points), stakeout |
| Addition/Subtraction | Yes |
| Memory | Last 20 measurements |
| Reference point | Front edge, back edge, folding stop |
| Display | LCD screen |
| Automatic shutdown | Yes, after inactivity |
| Cleaning | Damp cloth with a little soap; avoid solvents |
| Safety | Do not look into the laser beam; do not point at people or animals |
| Included accessories | Carrying case, instruction manual |
| Storage temperature | 5 to 30 °C, dry and dark place |
| Warranty | 24 months (household use) |
| Spare parts | Available via customer service; indicate type, reference, and identification number |
Frequently Asked Questions - TCLD 50 EINHELL
User questions about TCLD 50 EINHELL
0 question about this device. Answer the ones you know or ask your own.
Ask a new question about this device
Download the instructions for your Rangefinder in PDF format for free! Find your manual TCLD 50 - EINHELL and take your electronic device back in hand. On this page are published all the documents necessary for the use of your device. TCLD 50 by EINHELL.
USER MANUAL TCLD 50 EINHELL
GB Original operating instructions Laser distance meter
natural_image
Diagram of a mobile phone with a sensor and antenna, showing no text or symbols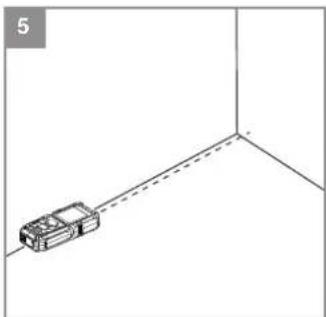
natural_image
Simple line drawing of a car on a road inside a corner, with no text or symbols present.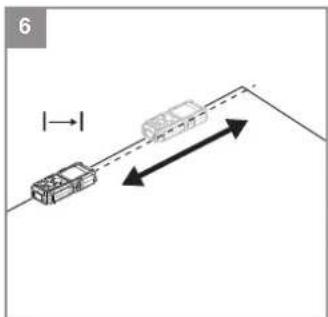
natural_image
Diagram showing two vehicles on a road with directional arrows indicating movement (no text or symbols)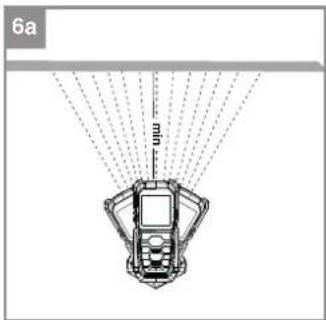
-3-

-4-
D
Inhaltsverzeichnis
Leistung Laser: ....../< 1 mW
- Safety regulations
- Layout and items supplied
- Proper use
- Technical data
- Before using the equipment
- Operation
- Cleaning, maintenance and ordering of spare parts
-
Disposal and recycling
-
Storage
-16-


Danger! - Read the operating instructions to reduce the risk of injury
-17-
GB
Danger!
When using the equipment, a few safety precautions must be observed to avoid injuries and damage. Please read the complete operating instructions and safety regulations with due care. Keep this manual in a safe place, so that the information is available at all times. If you give the equipment to any other person, hand over these operating instructions and safety regulations as well. We cannot accept any liability for damage or accidents which arise due to a failure to follow these instructions and the safety instructions.
1. Safety regulations
The corresponding safety information can be found in the enclosed booklet.
Danger!
Read all safety regulations and instructions.
Any errors made in following the safety regulations and instructions may result in an electric shock, fi re and/or serious injury.
Keep all safety regulations and instructions in a safe place for future use.
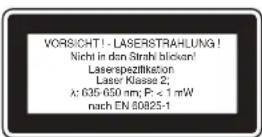
Special information about the laser

Caution: Laser radiation
Do not look into the beam
Laser class 2
• Never look directly into the laser path.
- Never direct the laser beam at reflecting surfaces or persons or animals. Even a low output laser beam can inflict injury on the eye.
- Caution: It is vital to follow the work procedures described in these instructions. Using the equipment in any other way may result in hazardous exposure to laser radiation.
• Never open the laser module.
- It is prohibited to carry out any modifications to the laser to increase its power.
- The manufacturer cannot accept any liability for damage due to non-observance of the safety information.
Safety information on the batteries
Use of the batteries
- Inserting the batteries when the laser is switched on can cause accidents.
- If the equipment is not used correctly, the batteries may leak. Avoid contact with the battery fluid. If you come into contact with battery fluid, clean the affected body part with running water. If you get battery fluid in your eyes, seek immediate medical assistance.
• Escaped battery fluid can cause skin irritation and acid burns.
• Never expose the batteries to excess heat such as sunshine, fire or similar. - Never recharge batteries that are not suitable for recharging. There is a risk of explosion!
- Keep batteries away from children, do not short circuit batteries or disassemble.
- Seek a doctor's advice immediately if a battery is swallowed.
- If necessary, clean the contacts on the battery and equipment before inserting the batteries.
- Ensure that you insert the batteries the right way round.
- Remove flat batteries immediately from the equipment. There is an increased risk of leakage.
• Always change all batteries in one go. - Insert only batteries of the same type, do not use different types of batteries or used and new batteries together.
• Make sure that the equipment is switched off after use. - Remove the batteries if the equipment is not used over a longer period.
2. Layout and items supplied
2.1 Layout (Fig. 1)
- Sensor
- Laser
- Display
- Keypad
- Swing-out stop
- Battery compartment cover
GB
2.2 Items supplied
Please check that the article is complete as specified in the scope of delivery. If parts are missing, please contact our service center or the sales outlet where you made your purchase at the latest within 5 working days after purchasing the product and upon presentation of a valid bill of purchase. Also, refer to the warranty table in the service information at the end of the operating instructions.
- Open the packaging and take out the equipment with care.
- Remove the packaging material and any packaging and/or transportation braces (if available).
• Check to see if all items are supplied. - Inspect the equipment and accessories for transport damage.
- If possible, please keep the packaging until the end of the guarantee period.
Danger!
The equipment and packaging material are not toys. Do not let children play with plastic bags, foils or small parts. There is a danger of swallowing or suffocating!
• Laser distance meter
Bag
• Original operating instructions
3. Proper use
The laser is designed for measuring distances, areas and volumes.
The equipment is to be used only for its prescribed purpose. Any other use is deemed to be a case of misuse. The user / operator and not the manufacturer will be liable for any damage or injuries of any kind caused as a result of this.
Please note that our equipment has not been designed for use in commercial, trade or industrial applications. Our warranty will be voided if the machine is used in commercial, trade or industrial businesses or for equivalent purposes.
4. Technical data
Range: 0.05 - 50 m
Accuracy: +/- 2 mm
Power supply: 2 x 1.5V; type AAA (LR03
Laser class: 2
Wavelength of laser: 635 nm
Laser output: ....../< 1 mW
5. Before using the equipment
Inserting/changing batteries (Fig. 2)
• Switch off the equipment.
- Remove the battery compartment cover (6) by pressing in the fastener (a) and flipping up the battery compartment cover.
- Insert the batteries (b), ensuring that you fit them the right way round.
- Fit the battery compartment cover back on, making sure that the fastener snaps into place.
6. Operation
Important!
The measuring distance and measuring accuracy can be affected by ambient conditions such as sunlight or poor reflection and this can have an adverse effect on the measurement result.
6.1 Description of the function buttons
(Fig. 3)
A ON/Measuring button
B Measurement options button
C OFF/Delete button
D Addition
E Subtraction
F Selection of the reference point for distance measurement / Selection of the measuring unit
6.2 Switching the laser on/off
- To switch the laser on, press the ON/Measuring button (A) and keep it pressed for a short time.
• To switch off the laser, press the OFF button (C) and keep it pressed for about 1 second.
GB
6.3 Setting the unit of measurement (Fig. 3 Item 4 F)
The default unit of measurement is the metric meter (m). But you can also select from three other unit settings. To do so, press the F button and keep it pressed until the unit changes. Keep repeating until the unit you require is displayed.
6.4 Setting the reference point (Fig. 3 - 4)
Measurements can be performed from three different reference points on the equipment. To do so, press the F button briefly and select the reference point you require.
• Front edge reference point (see Fig. 4a)
• Rear edge reference point (see Fig. 4a)
• Swing-out stop reference point (see Fig. 4b)
6.5 Using the measurement functions
Note:
The laser beam switches off automatically after completion of each measurement. Press the ON/Measuring button.
6.5.1 Function: "Measure single distance"
"No symbol" (Fig. 5)
Procedure:
• Press button A once and keep it pressed for a short time: Switch on the equipment
- Button F if necessary: Select the reference point on the equipment
• Press button A once: Switch on the laser
- Align the laser
- Press button A once: Measure
→ The result is displayed at the bottom in m
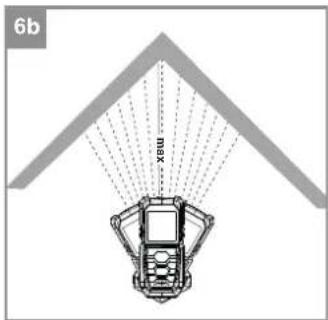
6.5.2 Function: "Measure continuous distance (min/max)"
"Symbol|→|” (Fig. 6)
Procedure:
- Press button A once and keep it pressed for a short time: Switch on the equipment
- Button F if necessary: Select the reference
point on the equipment
• Press button A once: Switch on the laser
- Align the laser
- Press button A for 2 seconds: Continuous measurement
→ Min: The lowest measurement result is displayed (Fig. 6a)
→ Max: The highest measurement result is displayed (Fig. 6b)
The current measurement result is displayed right at the bottom in real time
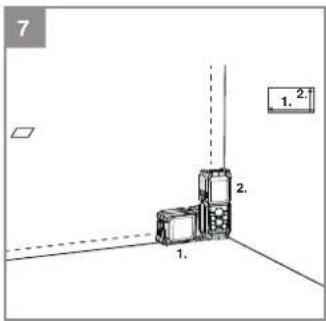
6.5.3 Function: "Measure areas"
"Symbol □" (Fig. 7)
Procedure:
- Press button A once and keep it pressed for a short time: Switch on the equipment
• Press button B once: Select function - Button F if necessary: Select the reference
point on the equipment
• Press button A once: Switch on the laser - Align the laser
• Press button A once: Measure the area length
• Press button A once: Switch on the laser - Align the laser
• Press button A once: Measure the area width
→ The result is displayed at the bottom in m²
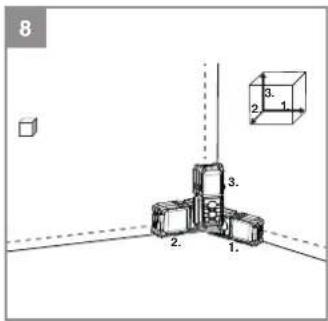
6.5.4 Function: "Measure volumes"
"Symbol (Fig. 8)
Procedure:
- Press button A once and keep it pressed for a short time: Switch on the equipment
• Press button B twice: Select function - Button F if necessary: Select the reference point on the equipment
• Press button A once: Switch on the laser - Align the laser
- Press button A once: Measure the room length
• Press button A once: Switch on the laser - Align the laser
• Press button A once: Measure the room width
• Press button A once: Switch on the laser - Align the laser
- Press button A once: Measure the room height
→ The result is displayed at the bottom in m³
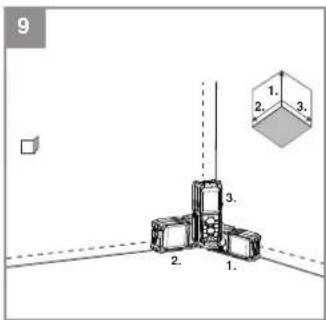
6.5.5 Function: "Measure two adjacent areas"
"Symbol (Fig. 9)
Procedure:
- Press button A once and keep it pressed for a short time: Switch on the equipment
• Press button B three times: Select function
- Button F if necessary: Select the reference point on the equipment
GB
• Press button A once: Switch on the laser
- Align the laser
• Press button A once: Measure the area width
• Press button A once: Switch on the laser
- Align the laser
- Press button A once: Measure the first area length
- Press button A once: Switch on the laser
- Align the laser
- Press button A once: Measure the second area length
→ The result is displayed at the bottom in m²
6.5.6 Function: "Indirect distance measurement"
"Symbol (Fig. 10)
2 reference points (using the Pythagoras rule) Procedure:
- Press button B four times: Select function
- Button F if necessary: Select the reference point on the equipment
Caution!
The hypotenuse (1.) is measured first, then the adjacent side (2.), which must be at right-angles to the required distance (opposite side). The set reference point on the equipment and the measuring position must be the same when both points are set!
• Press button A once: Switch on the laser
- Align the laser
- Button A once: Set the first point (hypotenuse) of the distance to be calculated
• Press button A once: Switch on the laser
- Align the laser
- Button A once: Set the second point (adjacent side) of the distance to be calculated → The result is displayed at the bottom in m
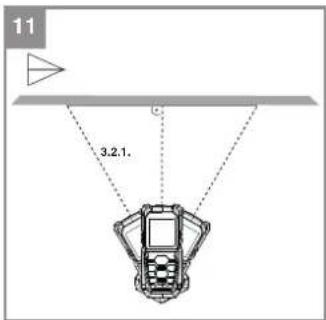
6.5.7 Function: "Indirect distance measurement
3 reference points (using the Pythagoras rule)"

' (Fig. 11)
Procedure:
- Press button A once and keep it pressed for a short time: Switch on the equipment
- Press button B five times: Area mode
- Press button B five times. Area measurement function
- Button F if necessary: Select the reference point on the equipment
Caution!
The hypotenuse (1.) is measured first, then the adjacent side (2.), which must be at right-angles to the required distance (opposite side).
The set reference point on the equipment and the measuring position must be the same when both points are set!
- Press button A once: Switch on the laser
- Align the laser
- Button A twice: Set the first point (hypotenuse 1) of the distance to be calculated
• Press button A once: Switch on the laser - Align the laser
- Button A once: Set the second point (adjacent side) of the distance to be calculated
- Press button A once: Switch on the laser
- Align the laser
- Button A once: Set the third point (hypotenuse 2) of the distance to be calculated → The result is displayed at the bottom in m
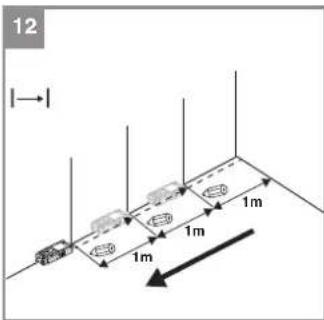
6.5.8 Function: "Staking out function (min. 10 cm = 0.1m)"
"Symbol |→|" (Fig. 12)
Procedure:
- Press button A once and keep it pressed for a short time: Switch on the equipment
• Press button B six times: Select function - Button F if necessary: Select the reference point on the equipment
- Button D (+): Select digit
- Button E (-): Select size
• Press button A once: Measurement - Move the equipment towards the back from the reference point
→ Rapid beeping signals that the required spacing has been reached
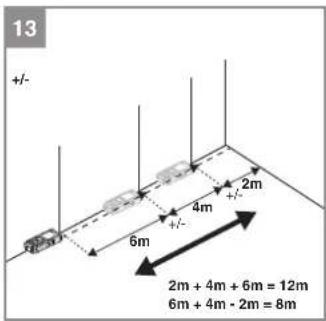
6.5.9 Function: "Add/subtract results"
"Symbol +/-" (Fig. 13)
Procedure:
- Press button A once and keep it pressed for a short time: Switch on the equipment
- Button F: Select required function (distance, area, volume)
• Measure results (as described above)
• Press button D (+) once: Add the new mea-
surement
• Press button E (-) once: Subtract the new
GB
measurement
→ The result is displayed at the bottom in m
6.6 Deleting values (Fig. 3 / Item 4)
To delete any wrongly measured values again, press button C briefly. You can then perform the measurement again.
6.7 Memory (Fig. 3 / Item 4 D, E, C)
The last 20 measured values are automatically saved in the memory. To enter the memory, press button D (+) or E (-). You can also use these buttons to search the memory. To delete the saved values, press button C.
7. Cleaning, maintenance and ordering of spare parts
Danger!
Always pull out the mains power plug before starting any cleaning work.
7.1 Cleaning
- Keep all safety devices, air vents and the motor housing free of dirt and dust as far as possible. Wipe the equipment with a clean cloth or blow it with compressed air at low pressure.
• We recommend that you clean the device immediately each time you have finished using it. - Clean the equipment regularly with a moist cloth and some soft soap. Do not use cleaning agents or solvents; these could attack the plastic parts of the equipment. Ensure that no water can seep into the device. The ingress of water into an electric tool increases the risk of an electric shock.
7.2 Maintenance
There are no parts inside the equipment which require additional maintenance.
7.3 Ordering spare parts and accessories
Please provide the following information when ordering spare parts:
- Type of unit
• Article number of the unit
• ID number of the unit - Spare part number of the required spare part For our latest prices and information please go to www.isc-gmbh.info

Tip! For good results we recommend high-quality accessories from kwb ! www.kwb.eu welcome@kwb.eu
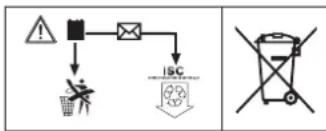
8. Disposal and recycling
The equipment is supplied in packaging to prevent it from being damaged in transit. The raw materials in this packaging can be reused or recycled. The equipment and its accessories are made of various types of material, such as metal and plastic. Never place defective equipment in your household refuse. The equipment should be taken to a suitable collection center for proper disposal. If you do not know the whereabouts of such a collection point, you should ask in your local council offi ces.
Disposing of batteries:
Batteries contain materials that are potentially harmful to the environment. Never place batteries in your household refuse, in fire or in water. Batteries should be collected, recycled or disposed of by environment-friendly means. Send your old batteries to iSC GmbH, Eschenstrasse 6 in D-94405 Landau. You can then be sure that the equipment will be correctly disposed of by the manufacturer.
flowchart
graph TD
    A["Warning"] --> B["Trash Bin"]
    B --> C["ISC"]
    C --> D["Recyclable Waste"]
-22-
GB
9. Storage
Store the equipment and accessories in a dark and dry place at above freezing temperature. The ideal storage temperature is between 5 and 30 °C. Store the electric tool in its original packaging.
-23-
GB
For EU countries only
Never place any electric power tools in your household refuse.
To comply with European Directive 2012/19/EC concerning old electric and electronic equipment and its implementation in national laws, old electric power tools have to be separated from other waste and disposed of in an environment-friendly fashion, e.g. by taking to a recycling depot.
Recycling alternative to the return request:
As an alternative to returning the equipment to the manufacturer, the owner of the electrical equipment must make sure that the equipment is properly disposed of if he no longer wants to keep the equipment. The old equipment can be returned to a suitable collection point that will dispose of the equipment in accordance with the national recycling and waste disposal regulations. This does not apply to any accessories or aids without electrical components supplied with the old equipment.
The reprinting or reproduction by any other means, in whole or in part, of documentation and papers accompanying products is permitted only with the express consent of the iSC GmbH.
Subject to technical changes
-24-
GB
Warranty certifi cate
Dear Customer,
All of our products undergo strict quality checks to ensure that they reach you in perfect condition. In the unlikely event that your device develops a fault, please contact our service department at the address shown on this guarantee card. You can also contact us by telephone using the service number shown.
Please note the following terms under which guarantee claims can be made:
-
These guarantee terms apply to consumers only, i.e. natural persons intending to use this product neither for their commercial activities nor for any other self-employed activities. These warranty terms regulate additional warranty services, which the manufacturer mentioned below promises to buyers of its new products in addition to their statutory rights of guarantee. Your statutory guarantee claims are not affected by this guarantee. Our guarantee is free of charge to you.
-
The warranty services cover only defects due to material or manufacturing faults on a product which you have bought from the manufacturer mentioned below and are limited to either the rectification of said defects on the product or the replacement of the product, whichever we prefer.
Please note that our devices are not designed for use in commercial, trade or professional applications. A guarantee contract will not be created if the device has been used by commercial, trade or industrial business or has been exposed to similar stresses during the guarantee period.
- The following are not covered by our guarantee:
- Damage to the device caused by a failure to follow the assembly instructions or due to incorrect installation, a failure to follow the operating instructions (for example connecting it to an incorrect mains voltage or current type) or a failure to follow the maintenance and safety instructions or by exposing the device to abnormal environmental conditions or by lack of care and maintenance.
- Damage to the device caused by abuse or incorrect use (for example overloading the device or the use or unapproved tools or accessories), ingress of foreign bodies into the device (such as sand, stones or dust, transport damage), the use of force or damage caused by external forces (for example by dropping it).
- Damage to the device or parts of the device caused by normal or natural wear or tear or by normal use of the device.
-
The guarantee is valid for a period of 24 months starting from the purchase date of the device. Guarantee claims should be submitted before the end of the guarantee period within two weeks of the defect being noticed. No guarantee claims will be accepted after the end of the guarantee period. The original guarantee period remains applicable to the device even if repairs are carried out or parts are replaced. In such cases, the work performed or parts fitted will not result in an extension of the guarantee period, and no new guarantee will become active for the work performed or parts fitted. This also applies if an on-site service is used.
-
To make a claim under the guarantee, please register the defective device at: www.Einhell-Service.com. Please keep your bill of purchase or other proof of purchase for the new device. Devices that are returned without proof of purchase or without a rating plate shall not be covered by the guarantee, because appropriate identification will not be possible. If the defect is covered by our guarantee, then the item in question will either be repaired immediately and returned to you or we will send you a new replacement.
Of course, we are also happy offer a chargeable repair service for any defects which are not covered by the scope of this guarantee or for units which are no longer covered. To take advantage of this service, please send the device to our service address.
Also refer to the restrictions of this warranty concerning wear parts, consumables and missing parts as set out in the service information in these operating instructions.
-25-
F
Sommaire
flowchart
graph TD
    A["Warning"] --> B["Signal"]
    B --> C["ISC"]
    C --> D["Recycling"]
    D --> E["Recycling with Waste Discharge"]
-33-
9. Stockage
flowchart
graph TD
    A["Warning"] --> B["Trash Bin"]
    B --> C["ISC"]
    C --> D["Recycle with Waste Discharge"]
-43-
9. Conservazione
9. Opbevaring
9. Skladování
A Inschakel/Meet-toets
B Toets meetopties
flowchart
graph TD
    A["Warning"] --> B["Trash Bin"]
    B --> C["ISC"]
    C --> D["Recyclable Waste"]
9. Skladiščenje
H
9. Tárolás
flowchart
graph TD
    A["Warning"] --> B["Trash Bin"]
    B --> C["ISC"]
    C --> D["Recycle/Discharge"]
9. Φύλαξη
GB Declaration of conformity: We declare conformity in accordance with the EU directive and standards for action.
in standardised case makes (individual) colliele.
SILO (Z.AVA O.SKI ADNOSTI aktivis slatično slsušinost samerica EU
In standardi za Izdaiek
Subject to change without notice
Archive-File/Record: NAPR012903
Documents registrar: Christoph Egginger
-143-

-144-

-145-