
Trout VS0812B - Vacuum packaging machines WILFA - Free user manual and instructions
Find the device manual for free Trout VS0812B WILFA in PDF.

| Brand | Wilfa |
| Model | Trout VS0812B |
| Product Type | Vacuum Sealer |
| Dimensions (approx.) | 40 × 15 × 8 cm |
| Weight (approx.) | 1.5 kg |
| Power Supply | 220-240 V ~ 50/60 Hz |
| Power (estimated) | 120 W |
| Main Functions | Automatic vacuum and sealing (Vac/Seal), sealing only (Seal), canister aspiration (Canister) |
| Seam Width | 3 mm |
| Materials | Plastic body, rubber seal, metal sealing bar |
| Included Accessories | Tube for vacuum canisters, compatibility with Wilfa bags and rolls |
| Cooling Interval | 40 seconds between cycles |
| Maintenance and Cleaning | Wipe the exterior with a damp cloth; do not immerse; clean the chamber with a paper towel |
| Safety | Automatic shut-off at end of cycle; lid lock; do not use with an extension cord |
| Spare Parts and Reparability | Parts available on wilfa.com; repair by a qualified technician |
| Warranty | 5 years (domestic use) |
| General Information | Domestic use only; do not use outdoors; follow safety instructions |
Frequently Asked Questions - Trout VS0812B WILFA
User questions about Trout VS0812B WILFA
0 question about this device. Answer the ones you know or ask your own.
Ask a new question about this device
Download the instructions for your Vacuum packaging machines in PDF format for free! Find your manual Trout VS0812B - WILFA and take your electronic device back in hand. On this page are published all the documents necessary for the use of your device. Trout VS0812B by WILFA.
USER MANUAL Trout VS0812B WILFA
IPEEDNcNoJIb3OBAHnEM IPOQTNTE BCE INHCTPyKlUN
EN
NO
SE
DK
FI
DE
NL
PL
FR
IT
ES
RU
EN
INSTRUCTION MANUAL·TROUT
CONTENTS
4 IMPORTANT SAFETY INSTRUCTIONS
6 IMPORTANT
7 PRODUCT OVERVIEW
8 OPERATING INSTRUCTION
10 CARE AND CLEANING
10 HELPFUL HINTS
11 TROUBLESHOOTING
12 STORAGE GUIDE
14 GUARANTEE
15 PRODUCT SPECIFICATIONS
15 SUPPORT AND SPARE PARTS
15 RECYCLABILITY
EN
IMPORTANT SAFETY INSTRUCTIONS
- Read this manual thoroughly before using and save it for future reference.
- Please check if the local power supply voltage matches the voltage indicated on this appliance before use.
- Do not operate the appliance with a damaged power cord or plug. Do not operate the appliance if there's any malfunctions or damage on the product.
- If the supply cord is damaged, it must be replaced by the manufacturer, its service agent or similarly qualified persons in order to avoid a hazard.
- To disconnect the power, unplug the power cord plug from the electrical outlet. Do not disconnect by pulling on the power cord.
- Do not use an extension cord with the appliance.
- When the appliance is not in use or need to be cleaned, please unplug power cord plug from the power outlet first.
- Do not use the appliance on wet or hot surfaces or near a power source.
-
Do not immerse any part of the appliance, power cord or plug in water or other liquid.
-
Useonlyaccessoriesorattachmentsrecommended by the manufacture.
- Use the appliance only for its intended use. Don't use the product outside the work area.
- This appliance can be used by children aged from 8 years and above and persons with reduced physical, sensory or mental capabilities or lack of experience and knowledge if they have been given supervision or instruction concerning use of the appliance in a safe way and understand the hazards involved.
Children shall not play with the appliance. - Cleaning and user maintenance shall not be made by children without supervision.
- Keep the appliance and its cord out of reach of children less than 8 years.
- This product is intended for indoor, nonindustrial non-commercial, household use only.
- Do not use the item outdoors or for any other purpose.
EN
IMPORTANT
Vacuum packing is not the same as preservation and cannot prevent food from ageing.
- It will, however, delay the process. Vacuum packing is not a substitute for cooling or freezing. Refrigerated goods shall still be kept in the refrigerator or in the freezer after vacuum packing.
- To avoid possible illness, do not reuse bags, always use new bags.
- Intervals for 40 seconds is recommended every time after seal.
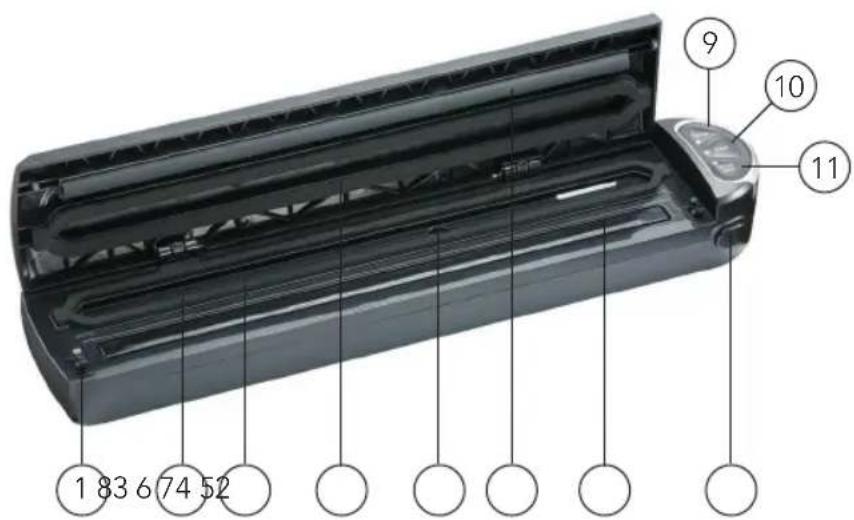
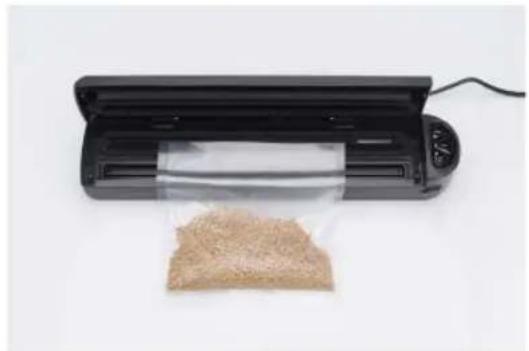
PRODUCT OVERVIEW
1. Locking hook
Press the cover down until it clicks to lock the bag into place.
2. Vacuum chamber
The bag must be placed within the vacuum chamber for vacuuming.
3. Lower gasket
Sealing element - element that seals the vacuum bags / rolls.
4. Upper gasket
Sealing element - element that seals the vacuum bags / rolls.
5. Vacuum nozzle
When pumping external vacuum canister, wine stopper or other accessories, insert the hose into the nozzle. Do not block the nozzle when use.
6. Rubber lip
Make seal flat.
7. Sealing Bar
3mm width sealing bar make good seal.
8. Air-release button
After vacuum, press the release button.
9. "Canister" button
Press this button, the appliance begins to vacuum package from the canister until the process is completed.
10. "Seal" button
Press this button to seal bag (intervals for 40 seconds are recommended each time)
11. "Vac/Seal/Stop" button
Press this button to vacuum and seal bag (intervals for 40 seconds is recommended each time) Press this button again, then the machine will stop working immediately.
EN
OPERATINGINSTRUCTION
- When sealing bags, put the bags to designated area (ensure that one end of the bag is within this area, but cannot pass the gasket, also can not be into the vacuum chamber), lightly press the lid, and then just press the "Seal" button.
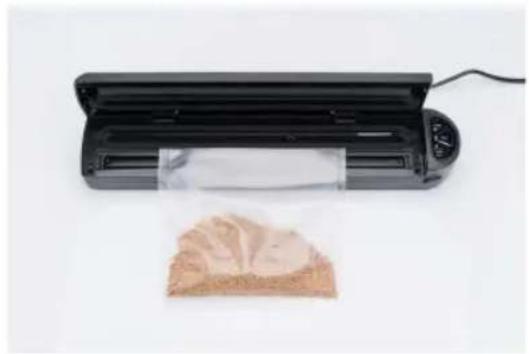
- Put the opening side of the bags into the vacuum chamber, please be sure not cover the air suction hole.
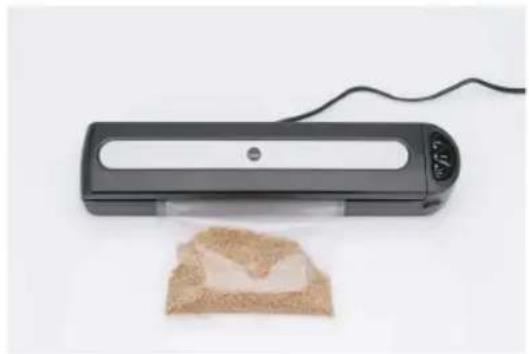
- Lightly press down the lid with both hands, and then press the Vac/Seal button, then vacuum and seal will be done automatically.
- After vacuum, press the release button on the right, and open the lid, then take out the sealed bag with food inside.
SEAL VACUUM BAGS AND ROLLSS
- Plug the appliance in.
- Insert the opening of the bag into the vacuum chamber as the above pictures.
- Close the lid and lightly press down the lid.
- Press the "Seal" button and LED lights up, when the Led light disappears, the sealing is done.
- Press release button on the right to open the appliance, then take out the sealed bag.
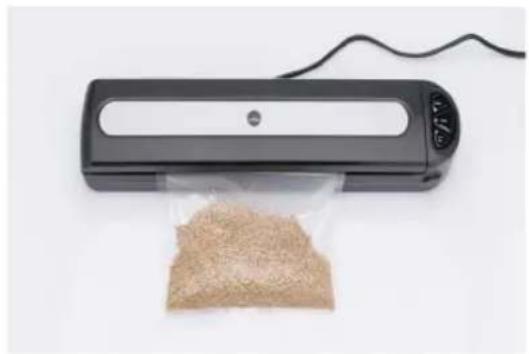
PRESERVATION WITH VACUUM BAG
- Plug the appliance in.
- Put the items that you want to preserve inside the bag.
- Clean and straighten the opening of the bag, make sure there are no wrinkles on the opening.
- Insert the opening of the bag into the vacuum chamber as the above pictures.
- Close the lid, lightly press down the lid.
- Press the "Vacuum/Seal" button and the LED lights up, then the bag will be automatically vacuumed and sealed. When the LED light on "Seal" disappears, the process is completed.
- Press the release buttons on the right, then take out the sealed items.
PRESERVATION WITH VACUUM CANISTERS
- Put the items inside the canister and cover it with lid, insert one end of the hose into the Vacuum nozzle on the appliance, then insert the other end into the hole on the top of the canister lid.
- Press "Canister" button, and it begins to vacuum the air from the canister and create tight seal. You can press the "Stop" button to stop working any time. When the vacuuming process is completed, the appliance will automatically stop.
- Unplug one end of the hose from the canister first, then unplug the other end from the appliance.
- When the stored items expire or need to be removed from the canister, please press down the button in the center of the canister lid to deflate air, then you can open the canister in a few seconds.
Note: End user need to buy the canister on their own and follow related requirement. Our sealer only provides this feature.
EN
TIPS ON USING CANISTER
- Please remove the lid before you put the canister in microwave oven.
- Place the canister in refrigerator for better preservation.
TIPS ON VACUUM SEALING
Please pay attention to the following points before using:
- Make sure to leave at least 2.5cm (1 inch) space between objects and edge.
- Wipe the edge of the jar, container or bottle to make sure it is clean and dry.
- Put the lid on the canister or container or insert the wine stopper into the bottle.
- Turn the knob to vacuum the canister/ container with a large knob on the lid, when the process is completed, turn the knob off, then remove the hose.
CARE AND CLEANING
Always unplug the unit before cleaning.
- Don't immerse the appliance in water on other liquid for cleaning.
- Do not use abrasive cleaners to clean, because it might scratch the surface of the appliance.
- Wipe the outside of the appliance with a damp cloth or sponge with mild soap if necessary.
- To clean the vacuum chamber, wipe away any food or liquid with a tissue paper.
- Dry thoroughly before using again.
HELPFUL HINTS
- Do not overload the bags, leave enough length at the opening of the bag so that it can be placed in the vacuum chamber easily.
- Ensure that the opening of the bag is not wet. A wet bag may be difficult to melt and seal tightly.
- Vacuum seal cannot completely replace the refrigeration and freeze, Perishable foods still need to be refrigerated or frozen.
- Make the opening of plastic bags clean and flat, no foreign objects or folds allowed, otherwise it will cause difficulty or leakage during seal.
-
To prevent wrinkles in a seal when vacuum sealing bulky items, gently stretch bag flat while inserting into the vacuum chamber and hold it until the pump begins to work.
-
When you are vacuum sealing items with sharp edges (dry spaghetti, silverware etc.), protect the bag from punctures by wrapping item in soft cushioning material, such as tissue paper, you may need a canister or container instead of a bag.
- When using accessories, remember to leave 2.5cm (1-inch) of space at the top of the canister or container.
- Pre-freeze fruits and blanch vegetables before vacuum sealing for the best results.
- Intervals for 40 seconds after seal or vacuum is recommended.
If you are unsure whether your bag was sealed properly, just reseal the bag.
TROUBLESHOOTING
NOTHING HAPPENS WHEN YOU TRY TO VACUUM PACKAGE
- Check if the power cord is tightly plugged into electrical outlet.
- Check if the power cord is damaged.
- Check if the electrical outlet is working by plugging in another appliance.
- Make sure the latches are in the locked position.
- Make sure the bag is placed correctly inside vacuum chamber.
- Allow the appliance to cool for 40 seconds before using it again.
Note: To prevent overheating of the appliance, allow the appliance to cool for 40 seconds before using it again and keep the cover open.
AIR IS STILL IN THE BAG AFTER VACUUM
- Make sure the opening of the bag is placed entirely inside vacuum chamber.
- Examine the bag if it leaks. Seal bag with air, then immerse it in water and apply pressure, bubbles indicate a leak, use a new bag if bubbles appear.
- A wrinkle in the bag along the seal may cause leakage and allow air to reenter, just cut bag and reseal.
- Do not attempt to make your own side seams since the bags are manufactured with special side seams, which are sealed all the way to the outer edge. Making your own side seams may cause leakage and allow air to re-enter.
EN
STORAGE GUIDE
In the fridge (5 + / - 3^) No vacuum Vacuum
| Red meat 3-4 days 8-9 days |
| White meat 2-3 days 6-8 days |
| Fish 1-3 days 4-5 days |
| Cooked Meat 3-5 days 10-15 days |
| Soft cheese 5-7 days 20 days |
| Hard cheese 1-5 days 60 days |
| Fruits 5-7 days 14-20 days |
| Vegetables 1-3 days 7-10 days |
| Pasta/rice leftover 2-3 days 6-8 days |
| Cream desserts 2-3 days 8 days |
Room temperature (25 + / - 2^) No vacuum Vacuum
| Fresh bread 1-2 days 8-10 days | ||
| Biscuits 4-6 months | 12 months | |
| Uncooked pasta/rice | 5-6 months | 12 months |
| Flour | 4-6 months | 12 months |
| Dry fruits | 3-4 months | 12 months |
| Ground coffee | 2-3 months | 12 months |
| Loose tea | 5-6 months | 12 months |
| Milk tea | 1-2 months | 12 months |
| In the freezer (-18 +/-2°C) | No vacuum Vacuum | |
| Meat | 4-6 months | 15-20 months |
| Fish 3-4 months | 15-20 months | |
| Vegetables 3-4 months | 8-24 months | |

EN

GUARANTEE
Wilfa issues a 5 year guarantee on this product from the day of purchase is done. The guarantee covers production failure or defects that arise during the guarantee period. Your purchase receipt works as proof towards retailer if claiming your guarantee.
The guarantee is valid only for products that are bought and used in private households. The guarantee is not valid if the product is used commercially. The guarantee is not valid if the product is misused, used by negligence, if not following instructions given by Wilfa, if modified or if unauthorized reparation is done. The guarantee is also not valid for normal wear of the product, misuse, lack of maintenance, use of wrong electrical voltage or:
Overloading of product
- Parts which are normally worn down
- Parts you can expect being replaced regularly (e.g. filter, battery etc.)
PRODUCT SPECIFICATIONS
220V~240V~50Hz, 100 W
Operating time: 10 minutes
EN
SUPPORT AND SPARE PARTS
For support please visit us at wilfa.com, and see our customer service/support page. Here you will find frequently asked questions, spare parts, tips and tricks and all our contact information.
RECYCLABILITY

This marking indicates that this product should not be disposed with other household wastes throughout the EU. To prevent possible harm to the environment or human health from uncontrolled waste disposal, recycle it responsibly to promote the sustainable reuse of material resources. To return your used device, please use the return and
collection systems or contact the retailer where the product was purchased.
They can take this product for environmentally safe recycling free of charge.
NO
NO
INNHOLD
18 VIKTIG SIKKERHETSVEILEDNING
19 VIKTIG
21 PRODUKTOVERSIKT
22 BRUKSANVISNING
24 VEDLIKEHOLD OG RENGJØRING
24 NYTTIGETIPS
25 FEILSØKING
26 OPPBEVARINGSVEILEDNING
28 GARANTI
29 PRODUKTSPESIFIKASJONER
29 SUPPORT OG RESERVEDELER
29 GJENVINNING
VIKTIG SIKKERHETSVEILEDNING
VEDLIKEHOLD OG RENGJØRING
- Trekk alltid ut stopselet for rengjoring.
- Ikke dypp produit i vann ell er annen vaeske for a rengjore det.
- Ikke bruk slipende rengjøringsmidler, da de kan lage riper i overflaten på produitet.
- Tørk om质地 evändig av Produktet på utsiden med en fuktig klut eller svamp med mild sAPE.
- Tørk vekk eventuell mat ell erer væske i vakuumkammeret med et stykke tørkerull.
- Tørk noye for neste gangs bruk.
NYTTIGETIPS
- Unngå Å overfylle posene, la det vare igjen sä mye plass ved apningen at posen er enkel a plassere i vakuumkammeret.
Pass på at apningen på posen ikke er vår. En vår pose kan[vare vanskelig á smelte og forsegle tett. - Vakuumforsegling er ingen fullgod erstatning for kjoling og friesing. Lett bedervelige matvarer ma fortsett legges i kjoleskap eller fryser.
- Sørg for at øpningen på plastposene er rene og flate. Inneholder de fremmedlegemer eller har bredter, kan det forårsake lekkasje under forsegling.
-
For Å unngå krøller nár du forsegler større articler, strekker du posen forsiktig ut nár du legger den inn i vakuumkammeret og holder den flat til pumpen begynner Å arbeide.
-
Ved vakuumforseling av artikler med skarpe kanter (tør spagetti, solv'toy osv.), kan du beskytte posene mot punktering ved ø pakke artikkelen inn i et mykt og dampende materiale, for eksempel kjokkennull. Eventuelt kan det hende at du ma bruke en boks eller annen beholder i stedet for en pose.
- Ved bruk av tilbehør må du huske à la det være igjen 2,5 cm plass øverst i boksen eller beholderen.
- Best mulig resultat oppnár du ved Å fryse frukt og forvelle grønnsaker før de vakuumpakkes.
- Et intervall på 40 sekunder mellom hvver forsegling eller vakuumering anbefales.
- Er du usikker på om posen er ordentlig forseglet, kan du bare forsegle den på nytt.
NO
FEILSØKING
DET SKJER INGENTING NAR DU FORSOKER A VAKUUMPAKKE
- Kontroller om stöpselet er satt ordentlich inn i stikkontakten.
- Kontroller om strømledningen er skadet.
- Kontroller om stikkontakten fungerer ved Å koble til et annet elektrisk apparat.
- Kontroller at lasemenismene stared Ist stilling.
- Kontroller at posen er plassert riktig i vakuumkammeret.
- La produitet avkjole i 40 sekunder for du prover pa nytt.
9. "Canister"-painike
11. "Vac/Seal/Stop"-painike
CARACTERISTIQUES DU PRODUIT
220V 240V 50Hz,100W