PH850M - Drill Meister Craft - Free user manual and instructions
Find the device manual for free PH850M Meister Craft in PDF.

| Product type | Hammer drill |
| Brand | Meister Craft |
| Model | PH850M |
| Power supply | 230-240 V ~, 50 Hz |
| Rated power input | 850 W |
| No-load speed | 800 min⁻¹ |
| Impact rate (no load) | 3900 min⁻¹ |
| Max drilling diameter (concrete/stone/granite) | 26 mm |
| Weight | 4.7 kg |
| Cable length | 200 cm |
| Chuck system | SDS+ |
| Additional handle | Yes, adjustable |
| Depth stop | Yes, adjustable |
| Dust collection nozzle | Yes |
| Double insulation | Yes |
| Intended use | Domestic |
| Vibration (drilling concrete, handle) | 19.257 m/s² (K=1.5) |
| Vibration (chiseling, additional handle) | 11.326 m/s² (K=1.5) |
| Conformity | CE, safety control mark |
| Maintenance | Clean with a damp cloth, do not use solvents |
| Included accessories | Hammer drill, depth stop, additional handle, chuck key, dust collection nozzle, instruction manual, warranty certificate |
| Warranty | Warranty certificate included |
Frequently Asked Questions - PH850M Meister Craft
User questions about PH850M Meister Craft
0 question about this device. Answer the ones you know or ask your own.
Ask a new question about this device
Download the instructions for your Drill in PDF format for free! Find your manual PH850M - Meister Craft and take your electronic device back in hand. On this page are published all the documents necessary for the use of your device. PH850M by Meister Craft.
USER MANUAL PH850M Meister Craft
Enclenchement/Coupure
Operating instructions & safety hints

To prevent injury, always read the operating instructions before use and pass them on to any future owners of the tool. Keep with the tool.
Contents
| Page | Page | ||
| 1 - Scope of delivery | 29 | 7 - Installation and setting | 33 |
| 2 - Technical information | 29 | 8 - Operation | 34 |
| 3 - Components | 30 | 9 - Mode of operation | 34 |
| 4 - Correct use | 30 | 10 - Maintenance and environmental protection | 35 |
| 5 - General safety instructions | 30 | ||
| 6 - Safety instructions relating specifically to the equipment | 32 | 11 - Service instructions | 35 |
1 - Scope of delivery
1 Rotary Hammer
1 Depth stop
1 Additional handle
1 Flange key
- 1 Dust collection cap
- Operating Instructions
- Guarantee
2 - Technical information
Technical data
| Power supply | 230-240 V~/50 Hz |
| Rated power requirement | 850 W |
| Idle speed | n0= 800 min-1 |
| Impact rate (without load) | 3900 min-1 |
| Max. drill diameter - for concrete/stone/granite | 26 mm |
| Weight | 4,7 kg |
| Mains cable | 200 cm |
Noise emission/vibration
| LpA: 92,6 dB(A), LWA: 103,6 dB(A), K: 3 dB(A) | |
| Hand/arm vibrations aw: | |
| DRILL in cement: | |
| - handle | 19,257 m/s2, |
| - additional handle | 15,241 m/s2, |
| K: 1,5 m/s2; | |
| CHISEL: | |
| - handle | 14,718 m/s2, |
| - additional handle | 11,326 m/s2, |
| K: 1,5 m/s2. | |
Noise/vibration information
Measured values determined in accordance with EN 60745.
- The specified vibration emission value was measured in accordance with a normed test procedure and can be used in order to compare one power tool with another.
Technical changes reserved.
The specified vibration emission value can also be used for an introductory evaluation of the exposure.
- The vibration emission value may fluctuate from the specified value during actual use of the power tool. These fluctuations will depend on the way in which the power tool is used.
- All parts of the operating cycle must be taken into account for this purpose (for example, also including times in which the power tool is switched off and times in which it is switched on, but is running without load). In order to prevent the risks caused by vibrations,
- Wear gloves when using;
- Limit working times and shorten the actual operating time. Safety measures must be taken in order to protect the operator. As a result, the evaluation of the influence must be made whilst taking account of the actual conditions of use. (All parts of the operating cycle must be taken into account for this purpose. This also includes times in which the power tool is switched off and times in which it is switched on, but is running without load.)
CAUTION! A certain amount of noise is unavoidable when using this device. Ensure you carry out noise-intensive work during permitted times. Maintain the quiet periods and limit your work to the absolute minimum.
CAUTION! The effects of noise may cause damage to your hearing. Only ever work with suitable ear defenders. Anybody else in the vicinity should thus also wear ear defenders.
3 - Components
1 Selection knob for drilling/chasing
2 Gear oil filler opening
3 On/Off switch
4 On/Off switch for hammer action
5 Additional handle
6 Depth stop
7 Drill chuck
7a Holding sleeve
8 Flange wrench
9 Dust collection cap
4 - Correct use
This rotary hammer is suitable for drilling and hammer-drilling concrete, stone, masonry and light chiselling work around the house. Use only suitable accessories (note manufacturer's instructions). All other applications are expressly excluded. Drill chuck suitable for tools according to the SDS+ system.
The machine is intended only for use in the household.
5 - General safety instructions for handling power tools
WARNING! Read all safety warnings and all instructions.
Failure to follow the warnings and instructions may result in electric shock, fire and/or serious injury.
Save all warnings and instructions for future reference.
The term "power tool" in the warnings refers to your mains operated (corded) power tool or battery-operated (cordless) power tool.
Work area
- Keep work area clean and well lit. Cluttered and dark areas invite accidents.
- Do not operate power tools in explosive atmospheres, such as in the presence of flammable liquids, gases or dust. Power tools create sparks which may ignite the dust or fumes.
- Keep children and bystanders away while operating a power tool. Distractions can cause you to lose control.
Electrical Safety
- Power tool plugs must match the outlet. Never modify the plug in any way. Do not use any adapter plugs with earthed (grounded) power tools. Unmodified plugs and matching outlets will reduce risk of electric shock.
- Avoid body contact with earthed or grounded surfaces, such as pipes, radiators, ranges and refrigerators. There is an increased risk of electric shock if your body is earthed or grounded.
- Do not expose power tools to rain or wet conditions. Water entering a power tool will increase the risk of electric shock.
-
Do not abuse the cord. Never use the cord for carrying, pulling or unplugging the power tool. Keep cord away from heat, oil, sharp edges or moving parts. Damaged or entangled cords increase the risk of electric shock.
-
When operating a power tool outdoors, use an extension cord suitable for outdoor use. Use of a cord suitable for outdoor use reduces the risk of electric shock.
Personal safety
- Stay alert, watch what you are doing and use common sense when operating a power tool. Do not use a power tool while you are tired or under the influence of drugs, alcohol or medication. A moment of inattention while operating power tools may result in serious personal injury.
- Use personal protective equipment. Always wear eye protection. Protective equipment such as dust masks, non-skid safety shoes, hard hat, or hearing protection used for appropriate conditions will reduce personal injuries.
- Prevent unintentional starting. Ensure the switch is in the off-position before connecting to power source and/or battery pack, picking up or carrying the tool. Carrying power tools with your finger on the switch or energising power tools that have the switch on invites accidents.
- Remove any adjusting key or wrench before turning the power tool on. A wrench or a key left attached to a rotating part of the power tool may result in personal injury.
- Do not overreach. Keep proper footing and balance at all times. This enables better control of the power tool in unexpected situations.
- Dress properly. Do not wear loose clothing or jewellery. Keep your hair, clothing and gloves away from
moving parts. Loose clothes, jewellery or long hair can be caught in moving parts.
- Keep handles dry, clean and free from oil and grease. Slippery handles do not allow for safe handling and control of the tool in unexpected situations.
- If devices are provided for the connection of dust extraction and collection facilities, ensure these are connected and properly used. Use of these devices can reduce dust related hazards.
Power tool use and care
- Do not force the power tool. Use the correct power tool for your application. The correct power tool will do the job better and safer at the rate for which it was designed.
- Do not use the power tool if the switch does not turn it on and off. Any power tool that cannot be controlled with the switch is dangerous and must be repaired.
- Disconnect the plug from the power source before making any adjustments, changing accessories, or storing power tools. Such preventive safety measures reduce the risk of starting the power tool accidentally.
- Store idle power tools out of the reach of children and do not allow persons unfamiliar with the power tool or these instructions to operate the power tool. Power tools are dangerous in the hands of untrained users.
- Maintain power tools. Check for misalignment or binding of moving parts, breakage of parts and any
other condition that may affect the power tool's operation. If damaged, have the power tool repaired before use. Many accidents are caused by poorly maintained power tools.
- Keep cutting tools sharp and clean. Properly maintained cutting tools with sharp cutting edges are less likely to bind and are easier to control.
- Use the power tool, accessories and tool bits etc. in accordance with these instructions, taking into account the working conditions and the work to be performed. Use of the power tool for operations different from those intended could result in a hazardous situation.
Service
- Have your power tool serviced by a qualified repair person using only identical replacement parts. This will ensure that the safety of the power tool is maintained.
6 - Safety instructions relating specifically to the equipment

- Wear suitable ear protectors.
- Use the machine for its intended purposes only.
- When the machine is in operation, grasp it with both hands and take a firm stance.
- Hold the device by the insulated handle surfaces when carrying out tasks during which it is possible that
the tool will come across hidden power cables or its own cable.
Contact with a power-carrying cable may also put metal parts of the device under power and cause an electric shock.

- Wear a dust protection mask when using the device.
- Power sockets for use out of doors must be fitted with residual-current safety switches.
- Never remove chippings or debris when the machine is running.
- Before drilling in a wall, ensure that there are no electricity wires, water or gas pipes under the surface.
- Secure small workpieces to ensure that they are not entrained by the drill.
- Remove the power plug before working on the machine, during all intervals in work, and when the machine is not in use.
Always keep the power cable well away from the drilling zone. - Turn switch to OFF before plugging into power supply.
Always use the machine with the additional grip. - Do not allow persons under 16 years of age to use the machine.
-
Observe general safety instructions for handling power tools!
-
To avoid hazards, damaged power leads must be replaced by the manufacturer or his customer service representative.

Do not dispose of with the household waste!

Important! Observe the operating instructions!

Wear goggles.

Wear a dust protection mask.

Wear ear defenders.

The housing is double insulated

Voluntary "geprüfte Sicherheit" seal of quality (tested safety)

CE mark (conformity with European safety standards)

Mounting in accordance with the SDS+ system
7 - Installation and setting
Inserting bit

WARNING! Pull out mains plug.

Hold drill so that chuck (7) points upwards. Lightly grease bit shank, insert into chuck and turn until it
engages. Slide retaining bush (7a) down as far as the stop - the bit will slip into the locating shaft. Release the retaining bush, which must return to its initial position.
Removing bit
Slide back retaining sleeve (7a) and remove the bit.
Adjusting additional handle (5) (Fig. 2)
Twist handle anticlockwise and set it to a suitable side working position by turning it about the drilling axis. Twist handle clockwise to lock.
Fitting and setting depth stop (6)
Release additional handle. Insert the straight portion of the depth stop into the hole and, using the inserted drill bit as a guide, set to the desired drilling depth. Lock handle.
Using the dust collection cap (9)
When carrying out work above your head, fit the dust collection cap (9) to the drill in accordance with Figure 4.
8 - Operation
Switching On and Off
The power supply voltage must comply with the data on the power tool rating plate.
- Start: Press On-Off switch (3).
- Stop: Release On-Off switch (3).
Switching from hammer drilling, chiselling and drilling
Select the suitable switch combination using the hammer switch (4) and selection switch (1) in accordance with Figures 1a and 3.
To operate the selection switch (1) proceed as follows:
- Unlock the switch
- Make the appropriate setting
Make the setting with the machine at a standstill.
9 - Mode of operation (Fig. 1a, Fig. 3)
A: Spot-drilling without hammer action, e.g. rendering, gas concrete
B: Hammer-drilling concrete, stone and masonry
C: Chiselling without rotary action in masonry or to detach slabs.
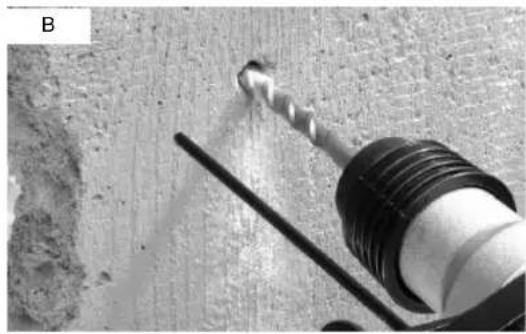

WARNING! Never operate the power tool with rotary action when the chisel is inserted!
A pneumatic hammer mechanism generates the required impact for
hammer-drilling stone. This electro - pneumatic principle produces a highly elastic impact effect and a recoilless operation. Unlike on the percussion drill, the drilling performance does not depend upon the pressure applied.
WARNING! A higher pressure will therefore not increase drilling performance!
Note
With a suitable adapter (not included in the delivery) a key-type drill chuck for working with conventional drill bits can be attached to the power tool. Follow the manufacturer's instructions for using accessories.
10 - Maintenance and environmental protection

WARNING! Pull out mains plug.
Clean the machine housing with a damp cloth only - do not use solvents! Then dry well. Always ensure that the ventilation slots of the machine are kept clean. Make sure that the gears have sufficient lubrication. After an operating time of approximately 5 hours, unscrew the gear lubrication filling opening (2) with the flange wrench (8) and get a specialist to check whether sufficient lubrication is available.
CAUTION! Electrical and battery operated units that no longer work should not be disposed of in the household waste! They are
to be collected separately, in accordance with the 2012/19/EU directive for the disposal of electrical and electronic waste, and

sent for proper and environmentally-friendly recycling.
Please discard power tools no longer usable at a local collection point. Collection and disposal of packaging materials separately by types complying with local rules and regulations. For details, please contact your municipal authority concerned.
11 - Service instructions
- Store the machine, operating instructions and where necessary the accessories in the original packaging. In this way you will always have all the information and parts ready to hand.
- Meister devices are to a large extent maintenancefree, a damp cloth being sufficient to clean the casing. Do not drop electrical machines in water. Please note additional hints given in the operating instructions.
- Meister devices are subject to stringent quality control. If however a functional fault should occur, send the device to our servicing address. The repairs will be carried out in a short time.
- A brief description of the defect speeds up the faulttracing and repair time. If within the guarantee period, please enclose the guarantee document and the proof of purchase.
- In so far as a repair under guarantee is not concerned, we will charge the repair costs to your account.
Pleases NOTE! Opening of the device invalidates the guarantee claim.
IMPORTANT! We point out expressly that in accordance with the Product Liability Act we do not take responsibility for any damage caused by our appliances, in so much that said damage is caused by improper repair, or original parts or parts released by us not being used when parts are changed, or repairs not being conducted by Meister Werkzeuge GmbH, Customer Service or an authorised specialist! The
same applies analogously to the accessories used.
- Pack the device well or use the original packaging in order to avoid transit damage.
Even after the expiry of the guarantee period, we would like to help you and carry out any repairs at a favourable price.

EC-Declaration of Conformity
EG-Verklaring van overeenstemming
The following product ...
... is herewith declared to conform with the following guidelines: