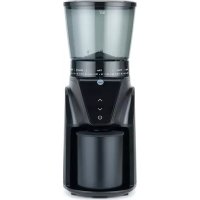
Creek SVS1200S - Other kitchen appliances WILFA - Free user manual and instructions
Find the device manual for free Creek SVS1200S WILFA in PDF.
| Technical specifications | Power: 1200 W, Capacity: 1.5 L, Material: Stainless steel, Dimensions: 30 x 20 x 25 cm |
|---|---|
| Usage | Multifunction device for sous vide cooking, ideal for preparing meats, vegetables, and fish. |
| Maintenance and repair | Easy to clean with a damp cloth, do not immerse in water, regularly check the sealing gaskets. |
| Safety | Built-in safety system to prevent overheating, do not use without water in the reservoir. |
| General information | Warranty: 2 years, Included accessories: cooking stand, user manual. |
Frequently Asked Questions - Creek SVS1200S WILFA
User questions about Creek SVS1200S WILFA
0 question about this device. Answer the ones you know or ask your own.
Ask a new question about this device
Download the instructions for your Other kitchen appliances in PDF format for free! Find your manual Creek SVS1200S - WILFA and take your electronic device back in hand. On this page are published all the documents necessary for the use of your device. Creek SVS1200S by WILFA.
USER MANUAL Creek SVS1200S WILFA
IPEEDNcNoJIb3OBAHnEM IPOQTNTE BCE INHCTPyKlUN
EN
NO
SE
DK
FI
DE
NL
PL
FR
IT
ES
RU
EN
INSTRUCTION MANUAL·SOUS VIDE
CONTENTS
4 IMPORTANT SAFETY INSTRUCTIONS
7 INTRODUCTION
7 PRODUCT OVERVIEW
8 SETUP
9 OPERATION
9 CLEANING
9 DESCALING
10 TROUBLESHOOTING
11 SPECIFICATIONS
12 GUARANTEE
13 PRODUCT SPECIFICATIONS
13 SUPPORT AND SPARE PARTS
13 RECYCLABILITY
EN
IMPORTANT SAFETY INSTRUCTIONS
- Please read this manual carefully before operation and save it for future reference.
- Do not fill water over the MAX mark of the pump housing.
- Unplug the immersion heater before removing it from the liquid
- If the sous vide stick falls into the water, immediately unplug it from the AC power outlet, then allow it to fully dry before reuse.
- Unplug the sous vide stick from the power source when not in use. Never unplug the unit by pulling the power cord. Always pull the plug.
- After unplugging, the heating element will remain hot and should not be touched or placed on combustible surfaces.
- Do not touch the device or the power cord with wet hands.
- Before plugging the unit into a power outlet, ensure that the outlet provides the same type and level of power required by the device.
-
Do not use power extension cords. Always plug the sous vide stick directly into a nearby, grounded AC power outlet.
-
This device uses a grounded power cord and requires a ground connection for safe operation. Ensure that the power source has a proper ground connection. Do not modify the plug or use a "cheater" plug to bypass the ground connection.
- The appliance is not intended to be operated by means of an external timer or a separate remote-control system.
- If the supply cord is damaged, it must be replaced by the manufacturer, its service agent or similarly qualified persons in order to avoid a hazard.
- This sous vide stick has no user serviceable parts. Do not attempt to open, service, or modify this device.
- The cooking container, appliance and the food bags all get hot during use. Allow them to fully cool before emptying the water.
- Do not expose this sous vide stick to excessively high temperatures. Do not place it in, on, or near heat sources, such as a stove or leave it in direct sunlight.
- This appliance can be used by persons with reduced physical, sensory or mental capabilities or lack of experience and knowledge if they have been given supervision or instruction concerning
EN
use of the appliance in a safe way and understand the hazards involved.
Children shall not play with the appliance.
- Cleaning and user maintenance shall not be made by children.
- Use only sous vide sealed zip bags or sous vide vacuum bags when cooking. Do not use plastic wrap.
- The sous vide stick requires a 11cm deep pot or container with a minimum capacity of 10 liters.
- The product shall only be used in metal pots, metal container or hard plastic container. If plastic container is used it must be suitable for temperatures up to 95 degrees Celsius.

INTRODUCTION
This sous vide stick heat and circulates water to cook/heat food contained in plastic zip or vacuum bags. Sous vide stick is a slow cooking method, which ensures that the food is cooked evenly and that it retains its natural moisture. The sous-vide method prevents overcooking the exterior surface of the food and produces food that is particularly fresh and tasty.
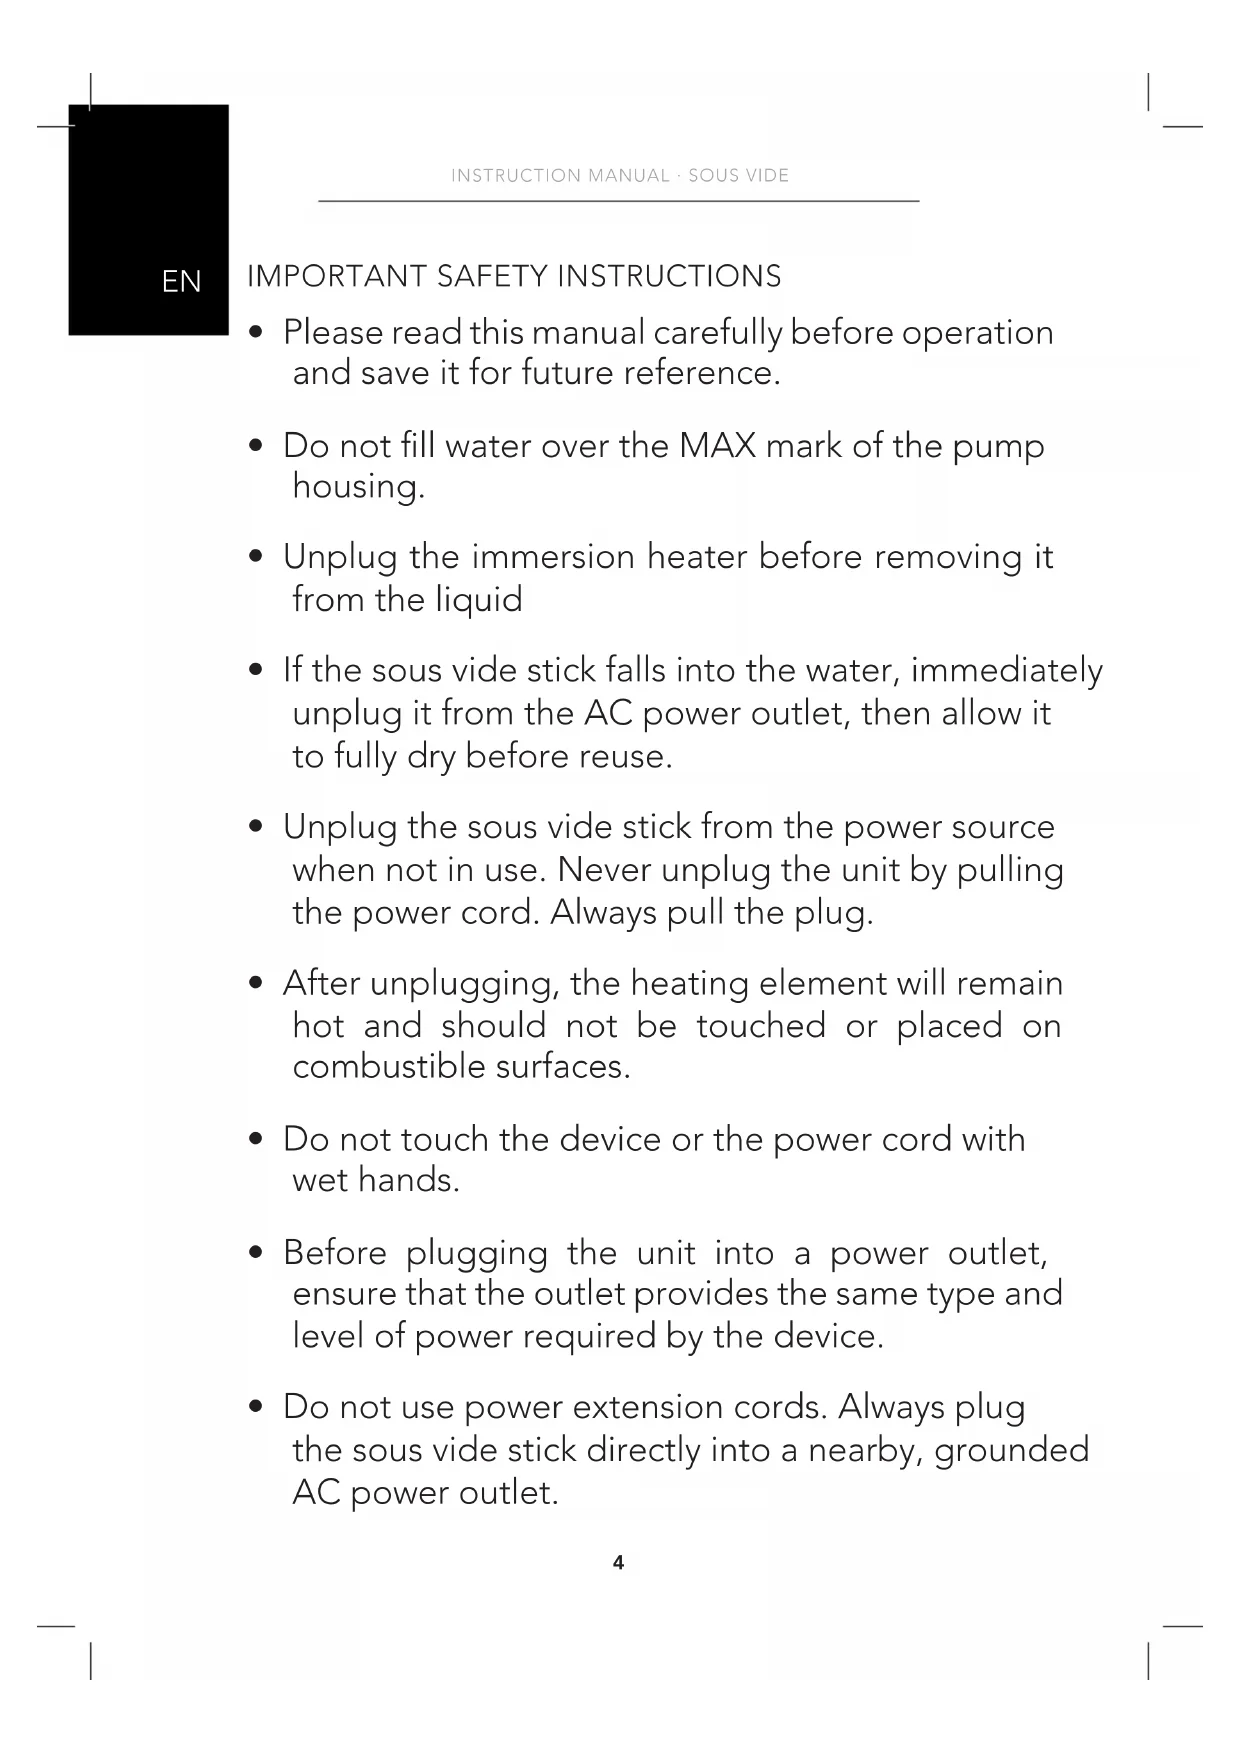
PRODUCT OVERVIEW
- Temp setting
- Start/stop
- Time setting
- Increase button
- Decrease button
- Adjustable ring clip
- Pump housing
EN
SETUP
CHANGING TEMPERATURE UNITS
Press and hold the start/stop button for about 3 seconds to switch between Fahrenheit and Celsius temperature units.
SETTING THE TIMER
- Press the timer button on the control panel, then press the increase button (+) to set the hours.
- Press the timer button to save the hours value, then press the increase button (+) or decrease button (-) to set the minutes.
- Press the start/stop button to save the minutes value. The timer button will blink for about 3 seconds, indicating that your timer is properly set. Once the temperature reaches the target temperature, the timer will start the countdown.
SETTING THE FLOW DIRECTION
The sous vide stick can circulate water in a clockwise or counterclockwise direction. Additionally, it can be set to direct the output of the pump into the side of the container, to protect delicate foods, such as eggs or salmon, or to prevent the water jet from being blocked by food.
- Twist the pump housing clockwise to unlock it from the main unit.
- Position the openings in the side of the pump housing, as desired. Insert the retaining tabs into the slots, then turn the cap counterclockwise to lock it in place.
CALIBRATING THE TEMPERATURE
The temperature sensor on the sous vide stick is extremely accurate and is calibrated at the factory. However, if you want the readings on the sous vide stick to match that of your thermometer, perform the following steps to re-calibrate the sous vide stick.
- Determine the difference between the temperature reading on the sous vide stick and the temperature reading on your thermometer. You can change the sous vide stick's reading by up to ± 9.9^ .
- Press and hold the temp button for about 5 seconds. The display will show 0.0^ .
- Press increase button or decrease button to add or subtract up to 9.9^
- Press the temp button to save the set value.
OPERATION
- Ensure that the sous vide stick is unplugged from the power source.
- Install the adjustable ring clip on the side of your pot or container, then clamp it firmly in place.
- Insert the sous vide stick into the adjustable ring clip.
- Fill the pot with water to some level between the MIN and MAX lines on the side of the pump housing.
- Place the pot/container near an AC power outlet. Ensure that it is not on a stove or other heat source.
- Plug the sous vide stick into the nearby AC power outlet.
- Press the temp button on the control panel, then press increase button or decrease button to set to target temperature.
- Press the start/stop button to begin cooking.
- When cooking is complete, press the start/stop button to stop the sous vide stick.
CLEANING
- Turn the pump housing clockwise to unlock it from the main unit, then remove it.
- Clean the pump housing in soapy water in the sink.
- Cleaning the metal parts, use dish soap and a soft toothbrush, then rinse under running water. Ensure that only the metal parts are exposed to water. Be careful with the propeller. Do not expose the upper part of the sous vide stick to water.
- Allow all parts to fully dry before reassembly.
DESCALING
Depending on how hard the water is, we recommend descending the sous vide stick regularly. Descale the sous vide with the same regularity and with the same method as used for other products that need descending, like electric water kettles. Use a commercially available descending agent intended for kitchen products. See the manufacturer's instructions for the exact procedure.
TROUBLESHOOTING
Problem Solutions
| The sous vide stick is emitting a whistling noise. | This is caused by the motor, propeller, and cooling fan, and is normal. |
| The sous vide stick is emitting a grinding noise. | The pump housing is loose. Turn off the sous vide stick, wait until it cools down, then secure the pump housing in place. |
| The sous vide stick is emitting a hissing noise. | Check that the water level is between the MIN and MAX marks. Refill the pot if necessary. |
| The sous vide stick is making a bubbling and/or swishing noise. | Check that the water level is between the MIN and MAX marks. Refill the pot if necessary. |
| The sous vide stick damages fish fillets or cracks eggs. | Re-position the pump housing to direct the water jet into the side of the pot, away from the food. |
| The lights on the sous vide stick control panel or main body flicker during operation. | This is normal. |
SPECIFICATIONS
Minimum Temperature +20^
Maximum Temperature +95^ C
Temperature Stability ±1%
Minimum Water Depth 11 cm
Minimum Bath Size 10 liters
Maximum Bath Size 30 liters
Pump Volume 8.5 liters/minute

GUARANTEE
Wilfa issues a 5 year guarantee on this product from the day of purchase is done. The guarantee covers production failure or defects that arise during the guarantee period. Your purchase receipt works as proof towards retailer if claiming your guarantee.
The guarantee is valid only for products that are bought and used in private households. The guarantee is not valid if the product is used commercially. The guarantee is not valid if the product is misused, used by negligence, if not following instructions given by Wilfa, if modified or if unauthorized reparation is done. The guarantee is also not valid for normal wear of the product, misuse, lack of maintenance, use of wrong electrical voltage or:
Overloading of product
- Parts which are normally worn down
- Parts you can expect being replaced regularly (e.g. filter, battery etc.)
PRODUCT SPECIFICATIONS
220V~240V~50Hz, 1200 W
SUPPORT AND SPARE PARTS
For support please visit us at wilfa.com, and see our customer service/support page. Here you will find frequently asked questions, spare parts, tips and tricks and all our contact information.
RECYCLABILITY
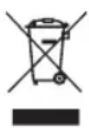
This marking indicates that this product should not be disposed with other household wastes throughout the EU. To prevent possible harm to the environment or human health from uncontrolled waste disposal, recycle it responsibly to promote the sustainable reuse of material resources. To return your used device, please use the return and
collection systems or contact the retailer where the product was purchased.
They can take this product for environmentally safe recycling free of charge.
NO
NO
INNHOLD
16 VIKTIG SIKKERHETSVEILEDNING
19 INTRODUKSJON
19 PRODUKTOVERSIKT
20 OPPSETT
21 BRUK
21 RENGJØRING
21 AVKALKING
22 PROBLEMSNING
23 SPESIFIKASJONER
24 GARANTI
25 PRODUKTSPESIFIKASJONER
25 SUPPORT OG RESERVEDELER
25 GJENVINNING
VIKTIG SIKKERHETSVEILEDNING
- Les donne bruksanvisningen nøye För du tar apparatet i bruk, og ta varé på det til senere bruk.
- Ikke fyll vann over MAX-merket på pumpehuset.
- Trekk stopselet til produitet ut for du fjerner den fra væsken
- Hvis produitetfallerivannet,ma du trekkestopslet ut med det samme og la den ligge og tørke for den brukes igjen.
- Trekk stopslet til produitet ut av kontakten när den/DD er i bruk. Trekk aldri ut stopselet etter strømledningen. Trekk alltid ut delve stopselet.
- Når du har trukket støpselet ut av kontakten, vil varmeelementet fortsette med Å[vare varmt og på ikke berøres eller plasseres på brennbart materiaile.
- Ikke kom bortig encheten aller strømledningen med våte hender.
För du setter stoppslet i kontakten, mA du sjekke om strømnettet er kompatibelt medprodukter. - Du pågressive bruke skjøteledninger. Støpslet til produitet på settes direkte i kontakten.
NO
CARACTERISTIQUES DU PRODUIT
220V 240V 50Hz,1200W
TePMoCTa6nIbHOCTb ±1%
MnHmMaJIbHaIy6HnHa BOdBi 11cm
MHHMaJIbHbI OObem EMcKoCTn 10 nHTPOB
MaKcImaJIbHbI OObem EMKoCTn 30 nHTPOB
O6bemHa nOdaHacoca 8,5 n/MnH

「APAHTЯ
Kompana Wifpa npedocabnre 5-letno rapaHTno Ha daHoe n3deJne co dny noyn. rapaHTra pacnpocpnaerTc H kcnnyatauOHbIe Heoctatkn nn dekebl, BO3nkaioune B teueHne rapaHTnHoro nepnoda. Kbntanua O nokyne raBnE Tc DOka3aTeNbCTBOM pni npedbReHn rapaHTnHbIX npeteh3n npodaBcy.
TapaHTnI DeiCTByET TOIbKO B OTHOWeHn I3DeJI, KUJIeHHbIX N IcNoJIb3YeMbIX B YacTHbIX XO3aIcTBax. KomMepueckoe nCNOJb3OBaHne n3DeJIra aHHyIpyet rapaHTIO. TapaHTnI HeJeCTBNTbHa B Cnyae He npabunbHoro nII H6peXHO rncOJIb3OBaHn n3DeJI, HecO6JIIOHeHn IHCTpyKcuN KOMNaHn Wilfa, BHeceHn I3MeHn B KOHCTpyKcuN nII BBINOJIHeHn HecOrlaocBaHoro peMOHTa. TapaHTnI TakKe He pacnpoctpaHareTc Ha HopMaIbHbI n3HOC n3DeJI, He npabUNbHOe nCNOJb3OBaHne, HeIOCTaTOUHOe 06cIyXuBaHne, nCNOJb3OBaHne npn HeIOxOJaem 3JIeKTPnuCeCKom HanpJxHn, a TaKKe Ha:
- neperpy3ky u3dennr
- N3HaUNBaEmbIe DeTaJIi
Ha Tpe6yUoIe peRyIaRPhOu 3aMeHbI DeTaII (HaPp., pNJIbTp, 3JIeMeHTbI nITaHnI I.
TEXHnueCKNE XAPAKTEPNCIKN 3dJIINJ
220B'240B'50Γ