
ES4029 - Razor PANASONIC - Free user manual and instructions
Find the device manual for free ES4029 PANASONIC in PDF.

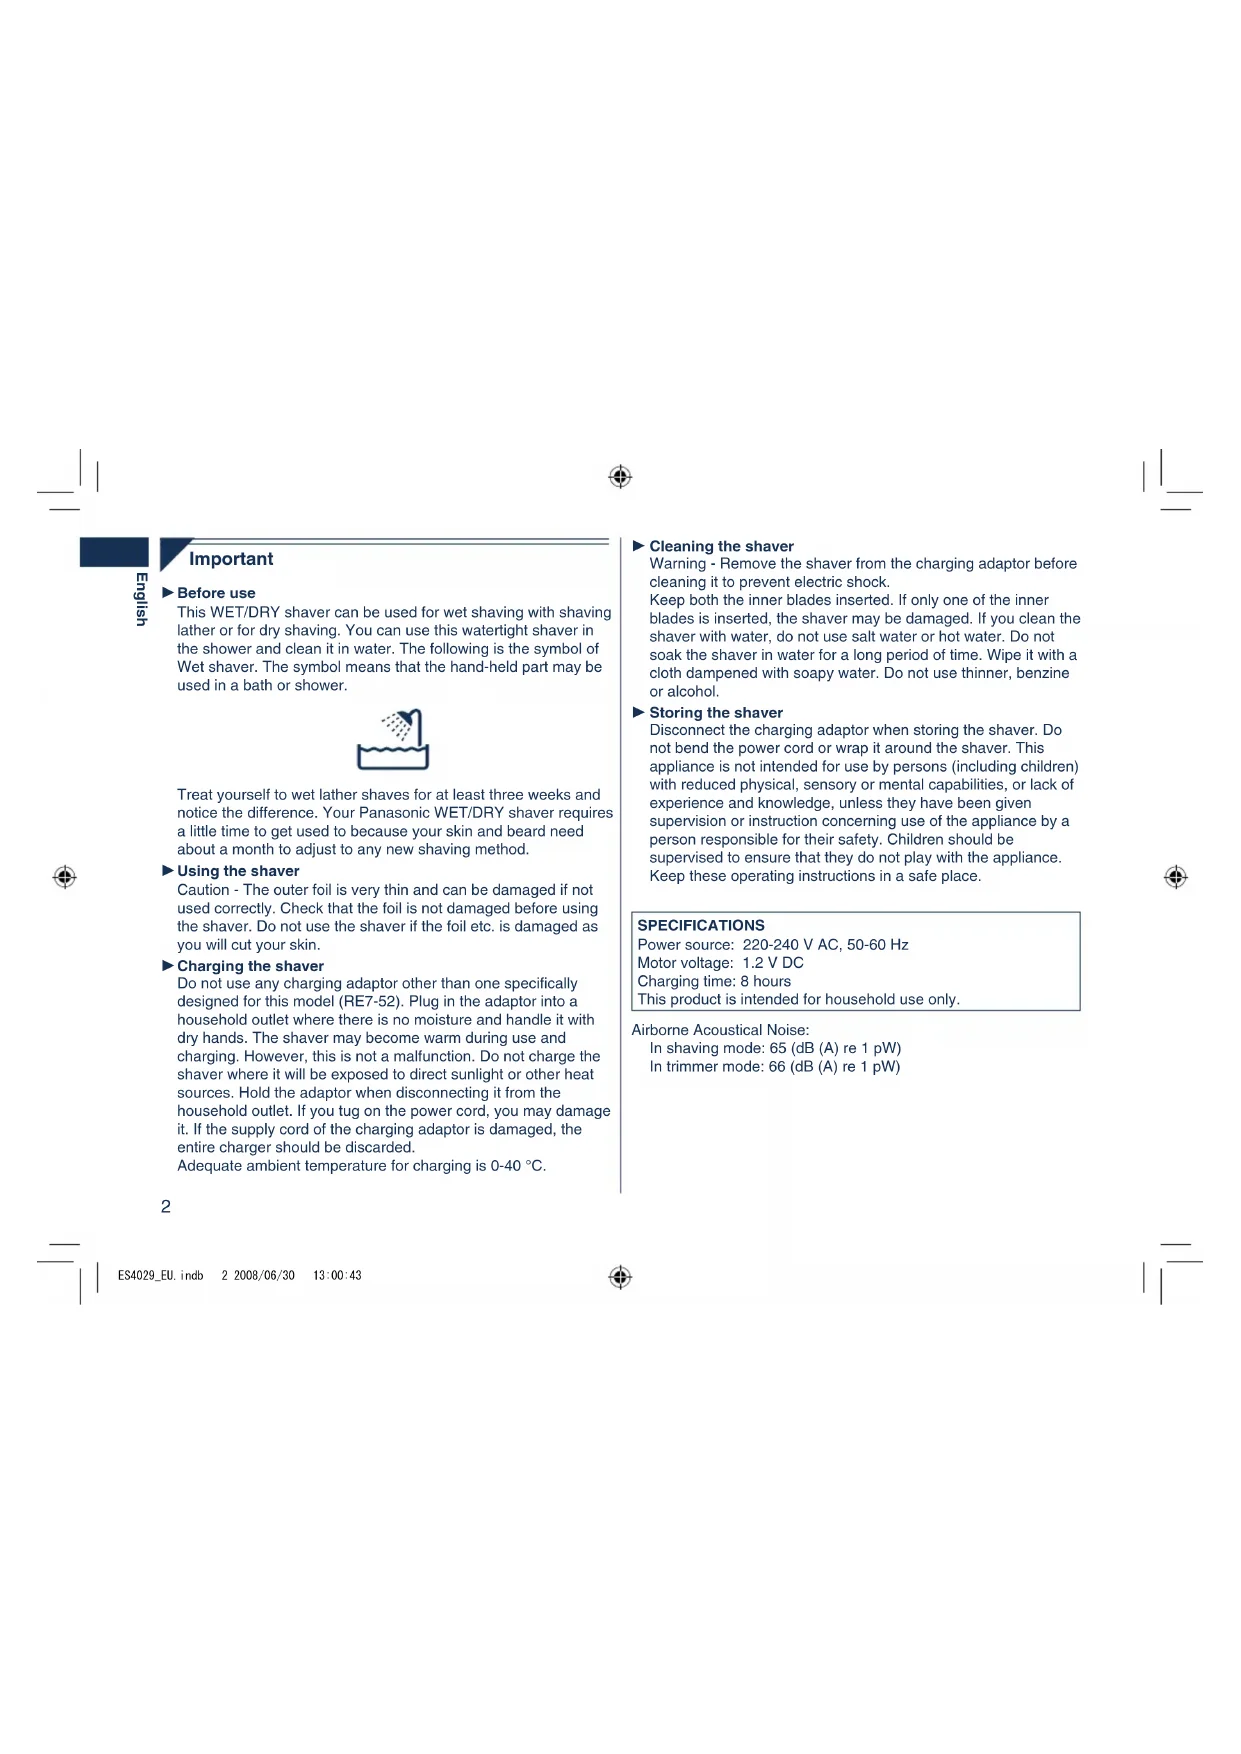


| Product type | Electric shaver |
| Brand | Panasonic |
| Model | ES4029 |
| Power supply | 220-240 V AC, 50-60 Hz |
| Motor voltage | 1.2 V DC |
| Charging time | 8 hours |
| Runtime | Approximately 7 shaves of 3 minutes |
| Battery type | Nickel-metal hydride (Ni-MH) rechargeable, built-in |
| Usage | Dry or wet (with shaving gel), waterproof for shower use |
| Main functions | Dry/wet shaving, built-in sideburn trimmer |
| Charge indicator | Red light during charging |
| Cleaning | With water (regular soap), cleaning brush included |
| Maintenance | Replace outer foil annually, inner blades every 2 years |
| Spare parts | System outer foil, inner blades, charging adapter (RE7-52) |
| Safety | Automatic shut-off not specified; switch lock button |
| Noise level | In shaver mode: 65 dB(A); in trimmer mode: 66 dB(A) |
| Included accessories | Charging adapter (RE7-52), travel pouch, cleaning brush |
| Intended use | Household use only |
| Charging temperature | 0-40 °C |
Frequently Asked Questions - ES4029 PANASONIC
User questions about ES4029 PANASONIC
0 question about this device. Answer the ones you know or ask your own.
Ask a new question about this device
Download the instructions for your Razor in PDF format for free! Find your manual ES4029 - PANASONIC and take your electronic device back in hand. On this page are published all the documents necessary for the use of your device. ES4029 by PANASONIC.
USER MANUAL ES4029 PANASONIC
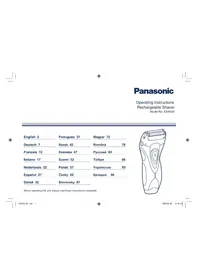
Operating Instructions
Rechargeable Shaver
Model No. ES4029
English 2 Portuguese 37 Magyar 72
Deutsch 7 Norsk 42 Romana 78
Français 12 Svenska 47 Pycckn 83
Italiano 17 Suomi 52 Türkce 88
Before operating this unit, please read these instructions completely.
Important
Before use
This WET/DRY shaver can be used for wet shaving with shaving lather or for dry shaving. You can use this watertight shaver in the shower and clean it in water. The following is the symbol of Wet shaver. The symbol means that the hand-held part may be used in a bath or shower.

Treat yourself to wet lather shaves for at least three weeks and notice the difference. Your Panasonic WET/DRY shaver requires a little time to get used to because your skin and beard need about a month to adjust to any new shaving method.
Using the shaver
Caution - The outer foil is very thin and can be damaged if not used correctly. Check that the foil is not damaged before using the shaver. Do not use the shaver if the foil etc. is damaged as you will cut your skin.
Charging the shaver
Do not use any charging adaptor other than one specifically designed for this model (RE7-52). Plug the adaptor into a household outlet where there is no moisture and handle it with dry hands. The shaver may become warm during use and charging. However, this is not a malfunction. Do not charge the shaver where it will be exposed to direct sunlight or other heat sources. Hold the adaptor when disconnecting it from the household outlet. If you tug on the power cord, you may damage it. If the supply cord of the charging adaptor is damaged, the entire charger should be discarded.
Adequate ambient temperature for charging is 0 - 40°C
▸ Cleaning the shaver
Warning - Remove the shaver from the charging adaptor before cleaning it to prevent electric shock.
Keep both inner blades inserted. If only one of the inner blades is inserted, the shaver may be damaged. If you clean the shaver with water, do not use salt water or hot water. Do not soak the shaver in water for a long period of time. Wipe it with a cloth dampened with soapy water. Do not use thinner, benzine, or alcohol.
Storing the shaver
Disconnect the charging adaptor when storing the shaver. Do not bend the power cord or wrap it around the shaver. This appliance is not intended for use by persons (including children) with reduced physical, sensory, or mental capabilities, or lack of experience and knowledge, unless they have been given supervision or instruction concerning use of the appliance by a person responsible for their safety. Children should be supervised to ensure that they do not play with the appliance. Keep these operating instructions in a safe place.
SPECIFICATIONS
Power source: 220-240 V AC, 50-60 Hz
Motor voltage: 1.2 V DC
Charging time: 8 hours
This product is intended for household use only.
Airborne Acoustical Noise:
In shaving mode: 65 (dB (A) re 1 pW)
In trimmer mode: 66 (dB A) re 1 pW
Parts identification
A B
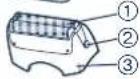
D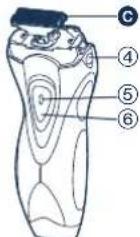
A Protective cap
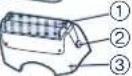
Outer foil section ① System outer foil ② System outer foil release buttons ③ Foil frame C Inner blades ● Main body ④ Foil frame release buttons
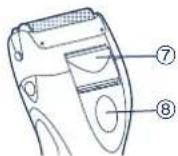

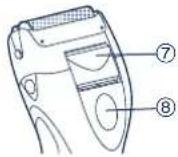
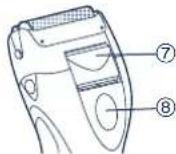
⑤ Switch lock button ⑥ OFF/ON switch ⑦ Trimmer ⑧ Trimmer handle
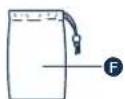
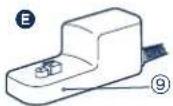
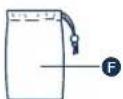
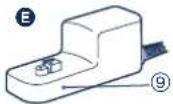
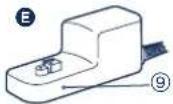
Charging adaptor (RE7-52) Charge indicator lamp Travel pouch 6 Cleaning brush
charge
Charging
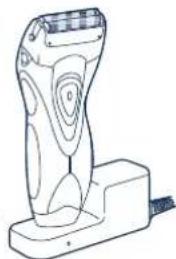
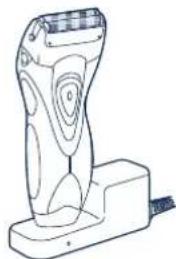
Perform the following steps to charge the shaver if it seems to lose the speed. You can fully charge the shaver in 8 hours. - A full charge will supply enough power for approx. 7 shaves of 3 minutes each.

Turn off the shaver and insert it in the charging adaptor as illustrated.

Plug in the adaptor into a household outlet.
- The charge indicator lamp glows red and stays on until the shaver is removed from the charging adaptor.


Using the shaver
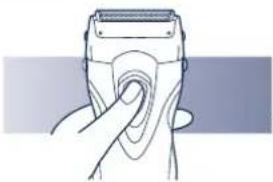

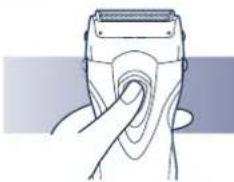
1 Depress the switch lock button and slide the OFF/ON switch upwards.
2 Hold the shaver as illustrated above and shave.
- Start out shaving by applying gentle pressure to your face. Stretch your skin with your free hand and move the shaver back and forth in the direction of your beard. You may gently increase the amount of pressure as your skin becomes accustomed to this shaver. Applying excessive pressure does not provide a closer shave.
Using the trimmer
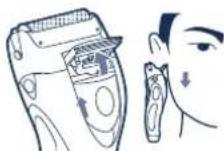
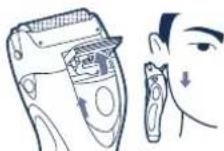
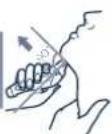
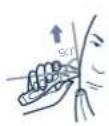
Slide the trimmer handle up. Place at a right angle to your skin and move downwards to trim your sideburns.
Cle
Cleaning
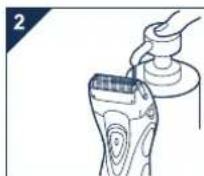
- Remove the shaver from the charging adaptor.
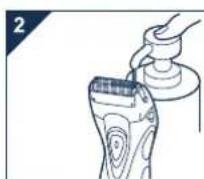
- Apply some hand soap to the outer foil.
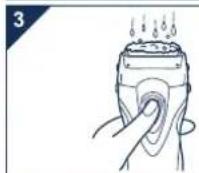
- Turn the shaver on and then pour some water over the outer foil.
- Turn the shaver off after 10-20 seconds.
- Remove the outer foil section and clean it with running water.
- Wipe off any drops of water with a dry cloth.
- Remove the protective cap to allow it to dry completely.
Replacing the system outer foil and the inner blades
System outer foil once every year
Inner blade once every two years
Replacing the system outer foil
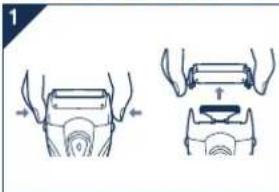
- Press the system outer foil release buttons and lift the system outer foil upwards as illustrated.
- Insert the system outer foil by pushing it downwards until it clicks.
Replacing the inner blades
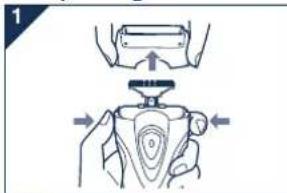
- Press the foil frame release buttons and lift the outer foil section upwards as illustrated.
- Remove the inner blades one at a time as illustrated.
- Do not touch the edges (metal parts) of the inner blades to prevent injury to your hand.
- Insert the inner blades one at a time until they click as illustrated.
Cleaning with the brush
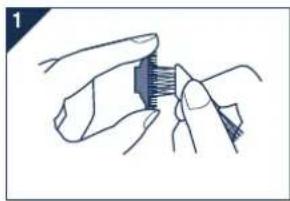
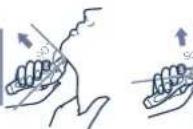
- Clean the inner blades using the short brush by moving it in direction.
Clean the system outer foil, the shaver body and the trimmer using the long brush - Do not use the short brush to clean the outer foils.
Removing the built-in rechargeable battery
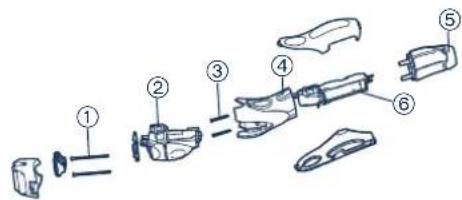
Remove the built-in rechargeable battery before disposing of the shaver. Please make sure that the battery is disposed of at an officially designated location if there is one. Do not dismantle or replace the battery so that you can use the shaver again. This could cause fire or an electric shock. Replace it at an authorized service center.
- Remove the shaver from the charging adaptor when removing the battery.
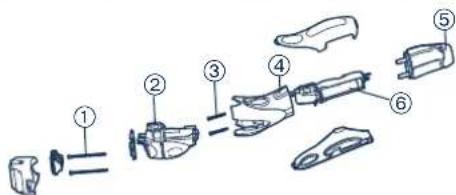
- Perform steps ① to ⑥ and lift the battery, and then remove it.
For environmental protection and recycling of materials
This shaver contains a Nickel-Metal Hydride battery. Please make sure that the battery is disposed of at an officially assigned location, if there is one in your country.
Information for Users on Collection and Disposal of Old Equipment and used Batteries
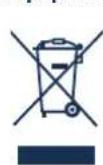
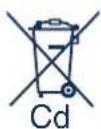
These symbols on the products, packaging, and/or accompanying documents mean that used electrical and electronic products and batteries should not be mixed with general household waste.
For proper treatment, recovery and recycling of old products and used batteries, please take them to applicable collection points, in accordance with your national legislation and the Directives 2002/96/EC and 2006/66/EC.
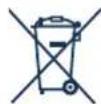
By disposing of these products and batteries correctly, you will help to save valuable resources and prevent any potential negative effects on human health and the environment which could otherwise arise from inappropriate waste handling.
For more information about collection and recycling of old products and batteries, please contact your local municipality, your waste disposal service or the point of sale where you purchased the items.
Penalties may be applicable for incorrect disposal of this waste, in accordance with national legislation.
For business users in the European Union
If you wish to discard electrical and electronic equipment, please contact your dealer or supplier for further information.
[Information on Disposal in other Countries outside the European Union]
These symbols are only valid in the European Union. If you wish to discard these items, please contact your local authorities or dealer and ask for the correct method of disposal.
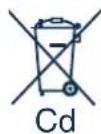
Note for the battery symbol (bottom two symbol examples):
This symbol might be used in combination with a chemical symbol. In this case it complies with the requirement set by the Directive for the chemical involved.
Important
under barbing: 65 (dB (A) re 1 pW)
under trimming: 66 (dB (A) re 1 pW)
Identification of parts
A B
D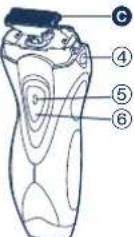
A Protective cap B Outer casing section ① System's outer casing ② Release buttons for system's outer casing ③ Casing frame Inner blades Main body ④ Release buttons for

casing frame
(5) Contact lock button OFF/ON switch (7) Trimmer ⑧ Trimmer handle
Under trimming: 66 (dB (A) re 1 pW)
Replacing the inner blades
Tank priming pump
Reposition the priming pump. Rotate the priming pump at the correct angle until the cover opens, so that the tank can be drained.
Cleaning
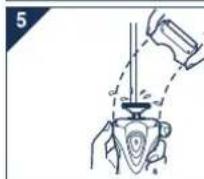

1. Remove the priming pump from the tank or from the charging point. 2. Activate the pump. 3. Immerse the priming pump, then rinse the cloth in water from the outside of the tank. 4. After 10-20 seconds, turn off the priming pump. 5. Remove the outer cover of the tank and rinse it under running water. 6. Wipe it thoroughly and dry it with a dry cloth. 7. Remove the protective cover and wait until it is completely dry.
Maintenance of external tanks and internal parts
External tank system once a year
Internal parts once a year
Maintenance of the external tank system.
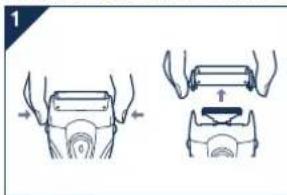
- Press the button and remove the cover as shown in the picture. 2. Insert the external tank system, pressing it down until you hear a click.
Replacement of internal parts
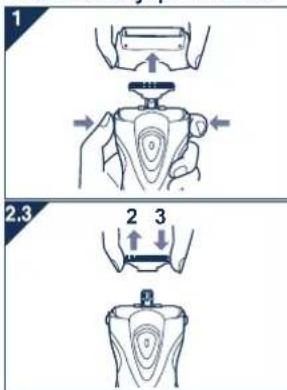
- Press the button to remove the tank and pull out the external tank of the cover as shown in the picture.
- Insert the internal parts according to the picture to avoid damage, do not touch the edges (metal parts) of the internal parts. 3. Insert the internal parts until you hear a click as shown in the picture.
Exchied
8
Cleaning with the help of a ladder
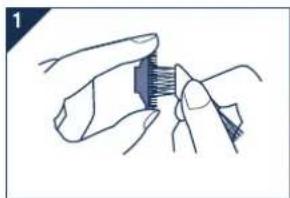
- Clean the internal thread with a short brush, moving it and the nodes. Clean the system of external leaks, the housing, the electric drill and the drill with a short brush.
- Do not use a short brush for cleaning external leaks.
Removing the built-in battery
Remove the built-in battery before disposing of the electric drill. Please be careful to dispose of the battery in specially designated places for this purpose, as they are hazardous. Do not disassemble or dispose of the battery in a fire. This could lead to injury or electric shock. Dispose of the battery only at an authorized service center.
- Before removing the battery, disconnect the electric drill from the charger. Follow steps ① to ⑥, remove the battery, and then dispose of it.
Environmental protection information and material recycling
This electric drill is equipped with a nickel-metal hydride battery.
Please be careful to dispose of the battery in specially designated places for this purpose, as they are hazardous.
The warranty period for this product is 7 years from the date of manufacture, provided that the product is used in strict accordance with the instructions for use and technical standards applicable to this product.
The date of manufacture is indicated on the product.
Panasonic Electric Works Wanbao (Guangzhou) Co.,Ltd.
Wanbao Base Shiguang Road, Panyu District, Guangdong, 511495 CHINA
Panasonic Electric Works Wanbao (Guangzhou) Co.,Ltd.
Baanbao Bem3 ⅢryaHr Poan, PAnHO DnctpiKr, ryaHkoY, ryaHrdnHr, 511495, KNTA
Panasonic Information Center
MxHapOdiD3BInKnTaD3BInKn 3 KneBa:+380-44-490-38-98
Be3KoTuBHi 3D3iHKn 3i CtaioHapHX TepeohIB Mekx YkpaHH
8-800-309-8-800
InΦopMaiaI ΜΟθ yTnIaII B KpaiHax, Aki He BXoJrB Cbponec6kN Co03
Dahi CmB0n DiiChi TINbKN HA TepuTOpI CBpOenCbKOro CoHO3y. PIn noTppeyiTuNiau DAnHX enEMeHIB 3BepHtbcra DO MucEBORe KepiBHNUTBa a6o Dnnpa 0do
MaHbI3aIbI aKnapaT
KoIaHny aIbIHda
OcbblNFALI KYPFAK yctapa kbpbyhy6birn naananaBbIn bInran KbpbyHa HEmece Kpyrak KbpbyHa MymkiHik 6peji. Byn cy eTneTINH yCTapaHbIyUta konDahya XKeHe KbpbyHbN 6onraH coc yEme haaBn ta3aayra bonad. TeMeHe Kepcertinre Benri blnran KbpbyHy bInipede. Byn 6enri Konmeh YcTaBtBn 6enirh 6bInayda HEmece DyTu konDahya BOnaTbHbH 6Inipei.

KemHe yu anTa bInan KbIpHydb naDanaHbn aBpMaBbNtBk KePiH3. CzdiH PanacOnHK BnFAL/ KYPFAK YcTapaRa YypeHyre KiUke He yaBt Tana eTeDi, ce6eBi ciDIn Tepi3 6en CaKabHb3 KbIpyHbN Hkaa aDiciHe yPeHyIe IaMAmE hip ayakBT KepeK KbNadbi.
YctapaHbI KOnJaHy
AnbHn ana eckpty - Cbtpkbl kannakkae te KyaKxhe de Dpybc KondaanbaHan XaJdana 63bIyby MyMKIH. KaNakka 63bIyFaH XaJdanaYctapana NaiDanaanhaBafan Kxh Bonap, oTKeHi on ctiHep TepiHdi Kecin Ketyi MyMKH.
YcTapaHbI3aprTay
Ke3 KeIReH 3aprTay aanTepiH naIaIaNb6arH xen, apHaIbOcbl yIrrE K06aIahraH MOnEnLi (RE7-52) K0nDaHbHb3. AanTepdi TpMbCTBk TOK jenicihe KOKKaHda bInrAnbIK XOKtBkTbI eCkepe OtbIPbHb3 XeHe de aanTepdY cTaFAH Ke3De KOnbHb3 KpyRak 6onra HxN. YcTapaHb KOnDAH xHe 3aprTay Ke3InDE ON Kb3ybl MyMKIN. CorAH Kapamactah 6yn KaFdA 6byBlc De en cecTeImMeDl. Tikeen KYN Cayneci Hemece Baca Da XkyBn Ke3Depie JxHkErnppe YcTabapHa 3aprTaMaHb3. YcTabapHa ToK jeniciH axBipAtKH Ke3De, aanTepdi KOnDa YcTan TyprAh xen. CbIM jeniciH TapTnAb3, ce661 on 6byBnBy MyMKIN. 3aprTay aanTepinH cbM JeNici 6byBlnfAH
emeeey
KaIdma3apTay KpybIYbcH KOndaHbCTah WbIrapHan XeH. 3apTayra apHaHrAnH den opTaHa KaIbIM 0-40 C.
Before cleaning, disconnect the appliance from the power supply. Then remove the dirt from the filter. If the filter is heavily soiled, it can be washed with water. After cleaning, let the filter dry completely before reinstalling. Do not use aggressive cleaning agents. Rinse the filter under running water. Do not use gasoline, benzene, or other flammable liquids.
Cleaning the filter
During cleaning, be careful not to damage the filter. Do not use the appliance without the filter in place. Replace the filter if it is damaged.
TECHNICAL SPECIFICATIONS
Voltage: 220-240 V AC (alternating current), 50-60 Hz
Motor power: 1.2 W DC (direct current)
Charging time: 8 hours
The manufacturer reserves the right to make changes without prior notice.
Noise level:
Sound power level: 65 dB(A) re 1 pW
Sound pressure level: 66 dB(A) re 1 pW
Accessories
A B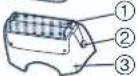
D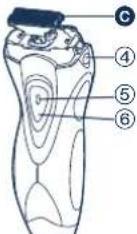
A KopraHbI KajnaKaJha
CbipTkkaKaKaMa6eIiM
① CbipTkkaKnaKaJxKyNeci ② CbtpkKaKnKauaanapdbanyra apHaanraH TMenI afbTkltbWtaptb ③ Kaiknakwa kopa6bi
1wki kyy3dep
0 YcTapa Kopa6bl
④ KaKaKaHaKopa6bHanyFa apHaHaHaTHTMEnI AfBtKbIHTap ⑤ AaBbpyin-KockBbWbTbH


Ky6blImaIbIbIfBH aybiCTbipyfa apHaHFAH TYME
⑥ AByIPbIIN-KOCKblIu TyMepepi
⑦ Tericteyiui ⑧ TericteyiW tyKacbi
3apay aanterpi (RE7-52) ⑨ Zapdany DeHrein KepceTeIN 1
YctapaHbI cKaTayFa apHaJIraH KaNTaTa Ta3anay 电Kacbi
#
3apraTay
YcTapaHbH XblnDAMblfTeMeHeDeEHNXaFda,Onb3apraTay yWIn MblHaKaamdApblOpblHaBbI. YcTapaHbI TOnblk Typde 3apraTayra 8 caFat kaxet. TOnb3apraTanrH Kpybnf3 MHyTTaH WAMAmH 7 pet Kblpbyra MyMkiHk6epedi.
YcTapaHb cHdpin, OHb CypTe KepCetInrReHdE 3apJdTay aanTepHe caBbIbI3. 2 AanTepdi 3neKtp xyneci po3eTKacbHa KocbIbI3. Ycapa 3apayay aadantepineH anbH6aHaHwa, 3apdany DeHrein H KpcetetIH KbIbI IaM KaHaDbI.



The device is designed for operation in the temperature range from minus 40 to plus 50 degrees Celsius.

During operation, the device must be protected from direct sunlight and precipitation.
The device must be installed on a flat surface. The device must be placed at a distance of at least 50 cm from walls and other objects. After installation, the device must be secured. The device must be connected to the power supply.

Wanbao Base Shiguang Road, Panyu District, Guangzhou, Guangdong, 511495 CHINA
No.1 EN, GE, FR, IT, DU, SP, DA, PT, NW, SW, FI, PL, CZ, SK, HU, RO, RU, TK, UA, KAZ (Europe)
Printed in China


- IMPORTANT
- BEFORE USE
- USING THE SHAVER
- CHARGING THE SHAVER
- ▸ CLEANING THE SHAVER
- STORING THE SHAVER
- SPECIFICATIONS
- PARTS IDENTIFICATION
- CHARGE
- CHARGING
- USING THE TRIMMER
- CLE
- CLEANING
- REPLACING THE SYSTEM OUTER FOIL AND THE INNER BLADES
- REPLACING THE SYSTEM OUTER FOIL
- REPLACING THE INNER BLADES
- CLEANING WITH THE BRUSH
- REMOVING THE BUILT-IN RECHARGEABLE BATTERY
- FOR ENVIRONMENTAL PROTECTION AND RECYCLING OF MATERIALS
- INFORMATION FOR USERS ON COLLECTION AND DISPOSAL OF OLD EQUIPMENT AND USED BATTERIES
- FOR BUSINESS USERS IN THE EUROPEAN UNION
- [INFORMATION ON DISPOSAL IN OTHER COUNTRIES OUTSIDE THE EUROPEAN UNION]
- NOTE FOR THE BATTERY SYMBOL (BOTTOM TWO SYMBOL EXAMPLES)
- IDENTIFICATION OF PARTS
- TANK PRIMING PUMP
- MAINTENANCE OF EXTERNAL TANKS AND INTERNAL PARTS
- MAINTENANCE OF THE EXTERNAL TANK SYSTEM
- REPLACEMENT OF INTERNAL PARTS
- CLEANING WITH THE HELP OF A LADDER
- REMOVING THE BUILT-IN BATTERY
- MAHBI3AIBI AKNAPAT
- KOIAHNY AIBIHDA
- YCTAPAHBI KONJAHY
- YCTAPAHBI3APRTAY
- CLEANING THE FILTER
- TECHNICAL SPECIFICATIONS
- ACCESSORIES
- A KOPRAHBI KAJNAKAJHA
- APRATAY
Brand : PANASONIC
Model : ES4029
Category : Razor