
KM 3890 - Food Processor SEVERIN - Free user manual and instructions
Find the device manual for free KM 3890 SEVERIN in PDF.
| Product type | Food processor |
| Brand | SEVERIN |
| Model | KM 3890 |
| Power supply | 220-240 V, 50/60 Hz |
| Blender bowl capacity | 1.5 L (max), 1 L max for frothy liquids |
| Speeds | 6 speeds + pulse function |
| Functions | Kneading, mixing, whisking, blending |
| Included accessories | Kneading hook (2 sizes), whisk, bowl, blender bowl with lid, pouring/protective lid |
| Bowl material | Stainless steel |
| Blender bowl material | Resistant glass |
| Safety | Tilt head release button, motor stop required before handling |
| Cleaning | Motor unit with damp cloth; accessories washable in warm soapy water; whisk and hooks dishwasher safe |
| Warranty | 2 years |
| Control type | Rotary speed control |
| Usage | Maximum operation intervals of 3 minutes, then cooling |
Frequently Asked Questions - KM 3890 SEVERIN
User questions about KM 3890 SEVERIN
0 question about this device. Answer the ones you know or ask your own.
Ask a new question about this device
Download the instructions for your Food Processor in PDF format for free! Find your manual KM 3890 - SEVERIN and take your electronic device back in hand. On this page are published all the documents necessary for the use of your device. KM 3890 by SEVERIN.
USER MANUAL KM 3890 SEVERIN
natural_image
Black and white photo of a modern kitchen mixer with a blender and bowl (no visible text or symbols)GB Instructions for use Food Processor 10
DE
Küchenmaschine
Before using the appliance, please read the following instructions carefully and keep this manual for future reference. The appliance must only be used by persons familiar with these instructions.
Connection to the mains supply
Make sure that the supply voltage corresponds with the voltage marked on the rating label. This product complies with all binding CE labelling directives.
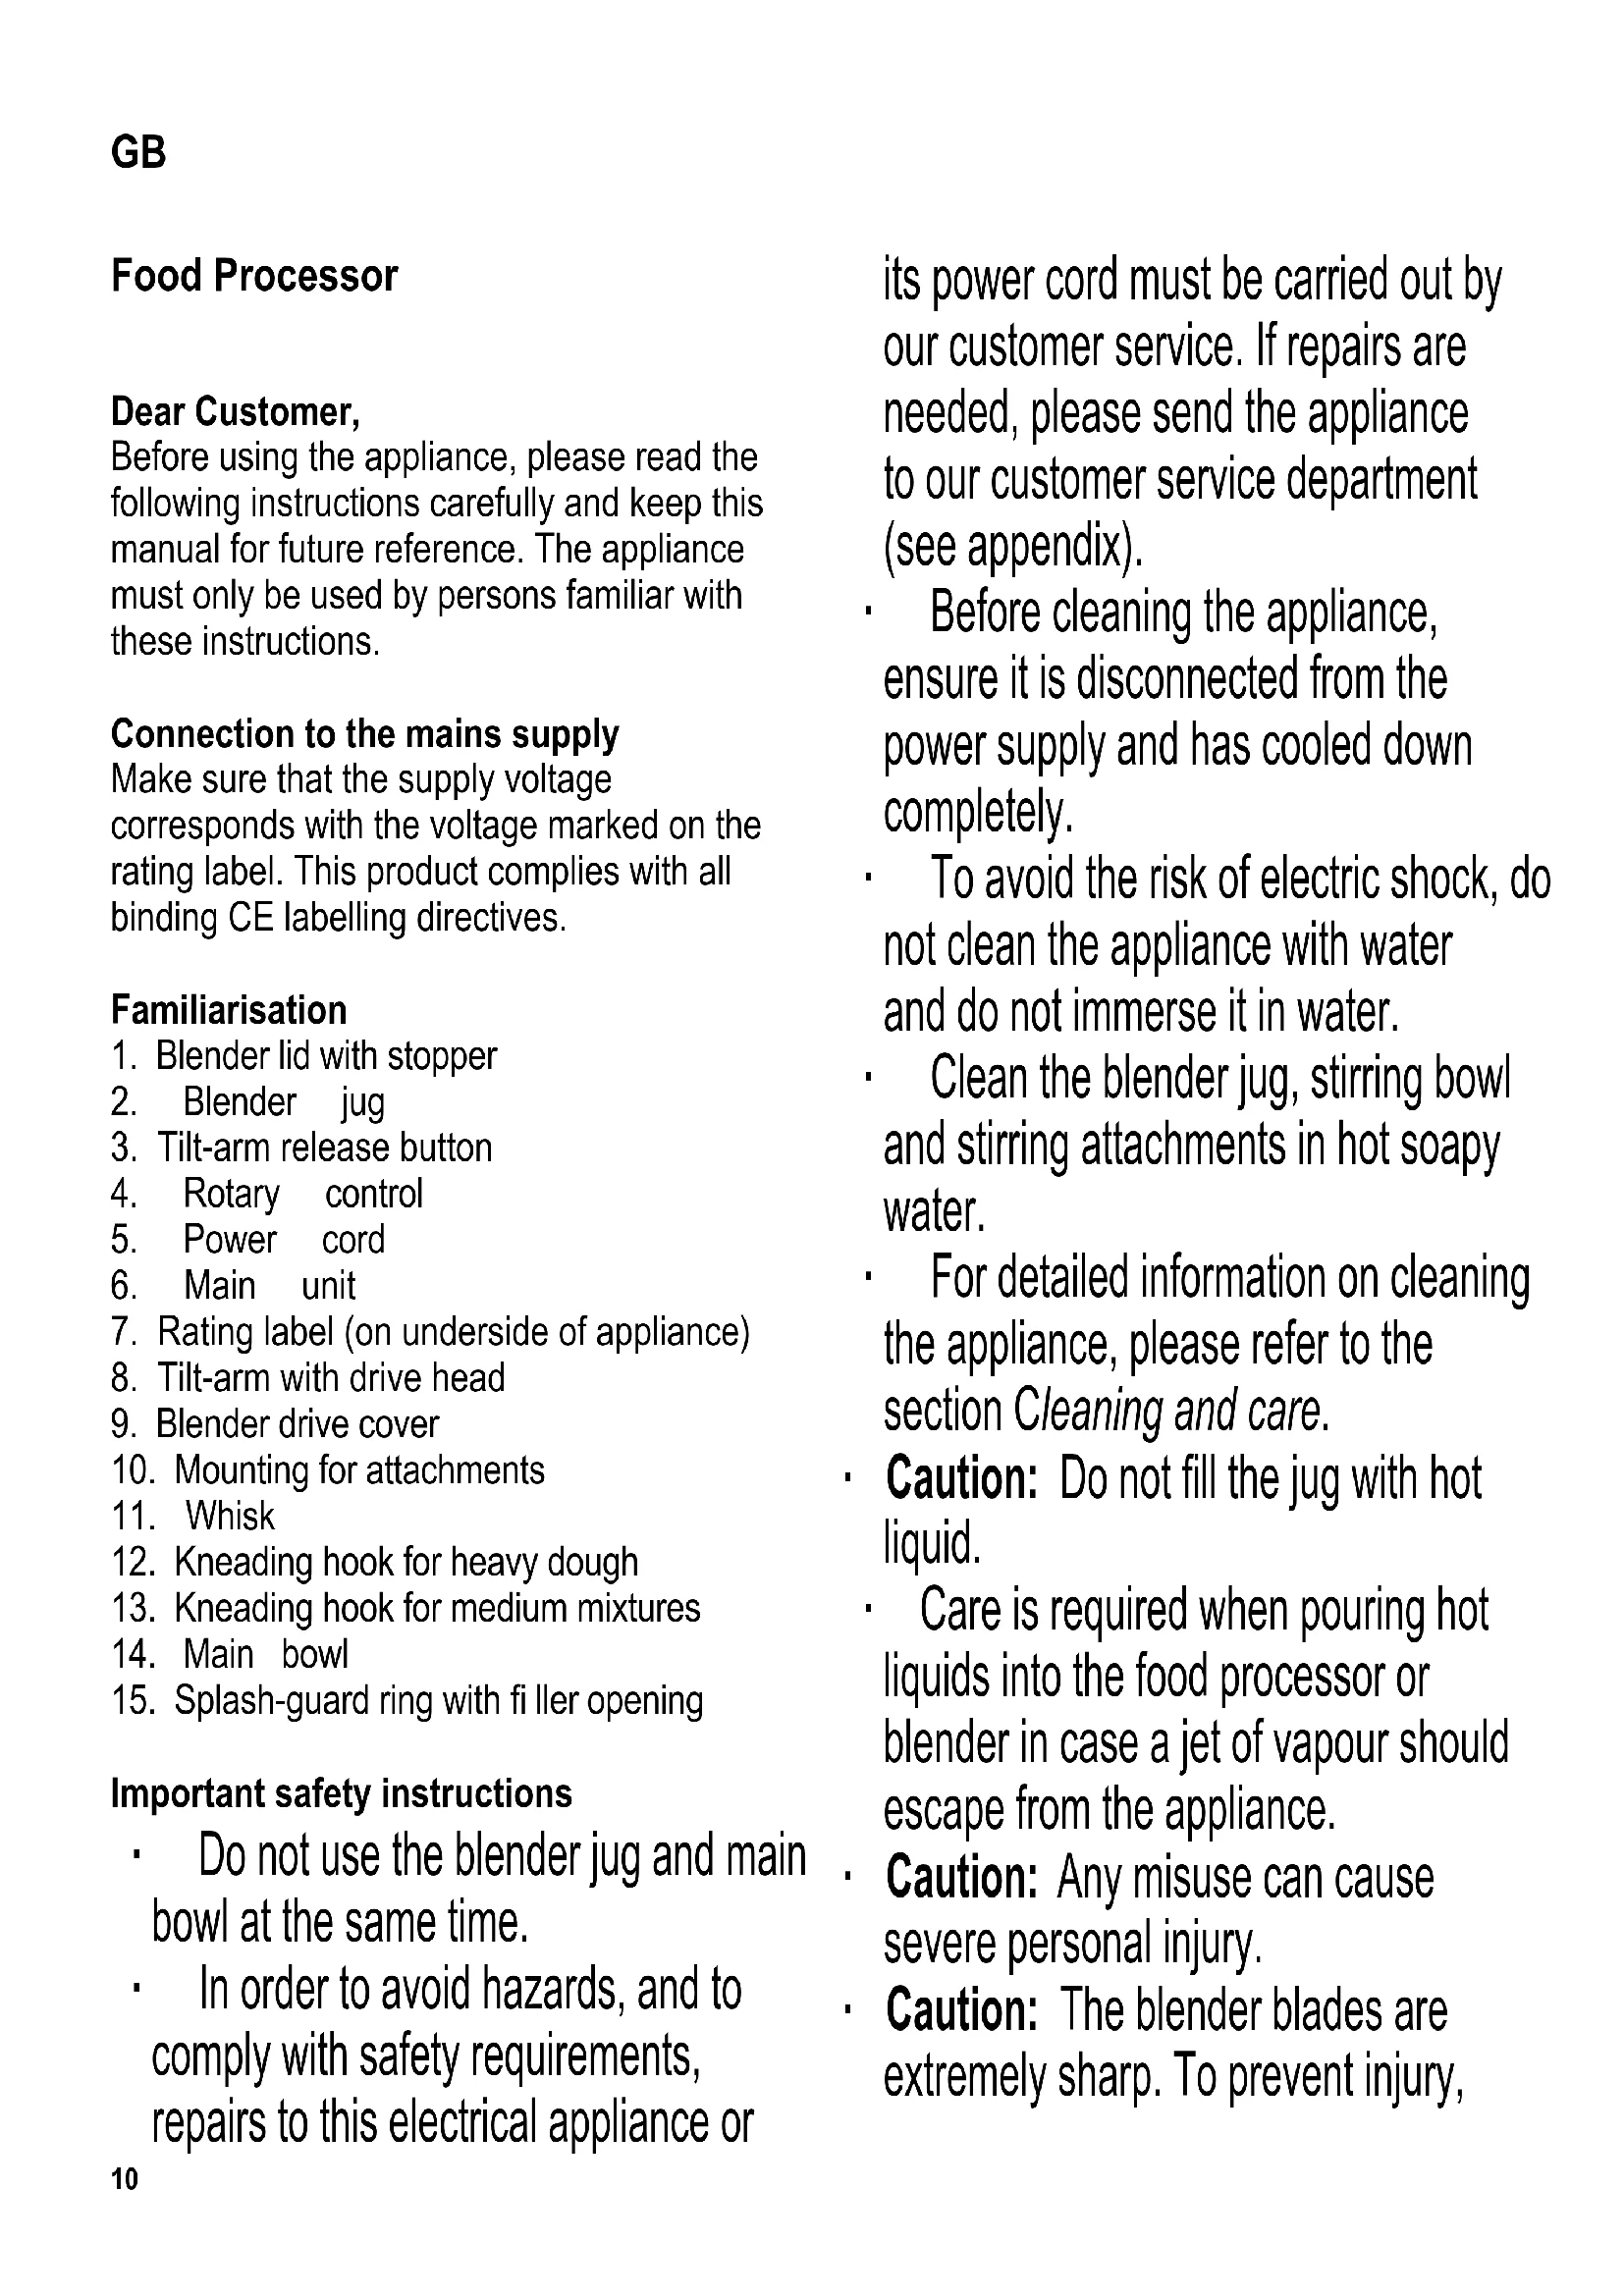
Familiarisation
- Blender lid with stopper
- Blender jug
- Tilt-arm release button
- Rotary control
- Power cord
- Main unit
- Rating label (on underside of appliance)
- Tilt-arm with drive head
- Blender drive cover
- Mounting for attachments
- Whisk
- Kneading hook for heavy dough
- Kneading hook for medium mixtures
- Main bowl
- Splash-guard ring with fi ller opening
Important safety instructions
- Do not use the blender jug and main bowl at the same time.
• In order to avoid hazards, and to comply with safety requirements, repairs to this electrical appliance or
its power cord must be carried out by our customer service. If repairs are needed, please send the appliance to our customer service department (see appendix).
- Before cleaning the appliance, ensure it is disconnected from the power supply and has cooled down completely.
• To avoid the risk of electric shock, do not clean the appliance with water and do not immerse it in water. - Clean the blender jug, stirring bowl and stirring attachments in hot soapy water.
- For detailed information on cleaning the appliance, please refer to the section Cleaning and care.
- Caution: Do not fill the jug with hot liquid.
- Care is required when pouring hot liquids into the food processor or blender in case a jet of vapour should escape from the appliance.
- Caution: Any misuse can cause severe personal injury.
- Caution: The blender blades are extremely sharp. To prevent injury,
take special care when cleaning or emptying the jug.
- Always remove the plug from the wall socket
- when there is no supervision,
- after each cycle of use,
- in case of any malfunction,
- before cleaning, assembling or disassembling the appliance,
-
before changing any attachment.
-
When removing the plug from the wall socket, never pull on the power cord; always grip the plug itself.
- This appliance is intended for domestic or similar applications, such as
- by staff members in shops, offi ces and other similar working environments,
- in agricultural working environments,
- by customers in hotels, motels etc. and similar establishments,
- in bed-and breakfast type environments.
- The appliance may only be used by persons with reduced physical, sensory or mental capabilities, or
lacking experience and knowledge, if they have been given supervision or instruction concerning the use of the appliance and fully understand all dangers and safety precautions involved.
- Children must not be permitted to operate the appliance. The appliance and its power cord must be kept well away from children.
• Children must not be permitted to play with the appliance.
- Caution: Keep any packaging materials well away from children – these materials are a potential source of danger, e.g. of suffocation.
- Every time the appliance is used, the main body including the power cord as well as any attachment fitted should be checked thoroughly for any defects. Should the appliance, for instance, have been dropped onto a hard surface, or if excessive force has been used to pull the power cord, it must no longer be used: even invisible damage may have adverse effects on the operational safety of the appliance.
- Do not allow the appliance or its power cord to touch hot surfaces or to come into contact with any heat sources.
- Do not let the power cord hang free.
- Do not touch any moving parts during operation, and do not insert any implements (e.g. dough spatulas or cooking spoons) into the blender jug unless the motor has come to a complete
standstill.
- No responsibility will be accepted if damage results from improper use, or if these instructions are not complied with.
Short-time operation
The appliance has been designed for short-term operation only, ie it should not be operated continuously for more than 3 minutes. Switch off the appliance afterwards and allow the motor to cool down before switching it on again.
Before using for the first time
Before the appliance is used for the first time, all attachments and accessory parts must be cleaned as described in the section Cleaning and care.
Rotary control
The appliance is equipped with a continuously adjustable rotary-type control switch.
The following speed settings may be selected:
P short-term high speed (pulse)
0 appliance off
1 very low speed
2-3 low speed
4-5 medium speed
6 high speed
Using the main bowl
Caution: When the main bowl is used, the blender jug must not be fitted, and its cover must be in place, as the build-up of heat will otherwise cause damage to the appliance.
Planetary action
The attachments (whisk, kneading hooks etc.) are fitted off-centre, causing them to rotate round their own axis as well as round the main drive axis. This action ensures thorough mixing of the ingredients from the side of the bowl towards the centre.
Appropriate speed settings
- Always start with a low speed setting, especially when processing liquid or creamy ingredients, or any mixture containing fl our.
- Settings 1 to 3 are suitable for slow blending, mixing, stirring in of ingredients and processing liquid ingredients as well as making dough.
- Setting 4 is suitable for making cake or pastry dough.
- Settings 5 and 6 are suitable for beating with the whisk.
Whisk
The whisk is suitable for light blending of liquid mixtures such as sauces, egg-white and cream.
The whisk can be used with the settings 1-6.
Kneading hook
for medium mixtures

This hook is useful for medium mixtures such as thick batter-mix and mashed potatoes, using the speed settings 1-4.
for heavy dough

This hook is suitable for processing heavy dough using the speed settings 1-3.
Operation
- Before fitting, changing, removing or cleaning any attachments, ensure that
the appliance has been switched off and disconnected from the mains.
- Caution: After switching off, always wait until the motor has come to a complete standstill. Do not touch any moving parts.
- Press the release button (PUSH) to release the drive head. Tilt the head upwards until it is heard locking safely into place.
- Fit the main bowl and lock it by turning it clockwise.
- Place the splash-guard ring onto the bowl with the filler opening to the left.
- When fitting the attachments, ensure that the pin on the mounting fi ts safely into the corresponding recess in the attachment.
- Push the attachment all the way up, then lock it by turning it anti-clockwise (about 90^ ).
- Caution: If an attachment should touch the splash-guard ring when being fitted, lower the tilt-arm again and switch the unit briefly on; this will bring the drive head in a centred position inside the bowl.
- Put the ingredients into the bowl.
- Press the release button. Tilt the head downwards until it is heard locking into place.
- Insert the plug into a wall outlet.
- Slowly turn the rotary control to the required speed setting.
- The filler opening in the splash-guard ring allows you to add further ingredients during the stirring or kneading process.
- Switch the appliance off and remove the plug from the wall outlet after use,
- Press the release button (PUSH) to release the drive head. Tilt the head upwards until it is heard locking safely into place.
- Caution: Check the position of the attachments before tilting up the drive head: if they are not in a centred position, briefly switch the unit on again to centre the drive head inside the bowl.
- Push the attachment upwards all the way, then unlock it by turning it clockwise (about 90°) and remove it from its mounting.
- Remove the splash-guard ring.
- Unlock the bowl by turning it anticlockwise and remove it.
Using the blender
Caution: When using the blender attachment, both the main bowl and splash-guard ring must be fitted. Do not reach into the stirring bowl with your hands or fingers
Appropriate speed levels
- Settings 1 to 4 are suitable for slow blending and stirring.
- Settings 5-6 are suitable for chopping, mixing and pureeing.
Blender operation
- Fit the blender jug in such a way that the arrow mark on the jug is properly aligned with the open-lock symbol (Lock the jug by turning it clockwise, so that the arrow mark on the jug is aligned with the closed-lock symbol (
- Put the liquid ingredients into the blender jug, which has a maximum capacity of around 1,500 ml. To prevent possible spillage when processing foamable or thin liquids such as milk, do not fill the jug over the 1,000 ml mark.
- Place the lid on the jug so that the pouring
spout is completely covered.
- To add ingredients during operation, the small stopper in the jug lid may be removed during operation. Turn the stopper anti-clockwise and lift it up.
Caution: Do not insert any implements into the jug while the blender is switched on. - Connect the unit to the mains and use the rotary control to select the required speed setting, or the Pulse function for short-term operation.
- Caution: Do not operate the blender when the jug is empty. Do not fill it with dry items only, such as almonds or other nuts.
- Switch off the blender and remove the plug from the wall socket after use. Wait until the motor has come to a complete standstill before removing the jug.
Cleaning and care
- Before cleaning the appliance, ensure it is disconnected from the power supply and has cooled down completely.
- To avoid the risk of electric shock, do not clean the appliance with water and do not immerse it in water.
- Do not use abrasives or harsh cleaning solutions for cleaning.
- The housing may be wiped with a damp, lint-free cloth.
- The jug lid, splash-guard ring, main bowl, whisk and kneading hooks may be cleaned using hot water and a mild detergent.
- The whisk and kneading hooks are dishwasher-safe.
- No other items should be put in a dishwasher.
• To clean the jug immediately after use,
put about 1,000 ml of warm water with a little mild detergent into the jug and let the appliance run briefly, as described in the section Blender operation. Rinse the jug, lid and stopper lid in clean water afterwards and dry thoroughly.
Disposal

Devices marked with this symbol must be disposed of separately from your household waste, as they contain valuable materials
which can be recycled. Proper disposal protects the environment and human health. Your local authority or retailer can provide information on the matter.
Guarantee
This product is guaranteed against defects in materials and workmanship for a period of two years from the date of purchase. Under this guarantee the manufacturer undertakes to repair or replace any parts found to be defective, providing the product is returned to one of our authorised service centres. This guarantee is only valid if the appliance has been used in accordance with the instructions, and provided that it has not been modified, repaired or interfered with by any unauthorised person, or damaged through misuse.
This guarantee naturally does not cover wear and tear, nor breakables such as glass and ceramic items, bulbs etc. This guarantee does not affect your statutory rights, nor any legal rights you may have as a consumer under applicable national legislation governing the purchase of goods. If the product fails to operate and needs to be returned, pack it carefully, enclosing your name and address and the reason for
return. If within the guarantee period, please also provide the guarantee card and proof of purchase.
FR
Robot de Cuisine
Chère cliente, Cher client,
Sunnex Century Catering Equipment
(Shenzhen) Ltd.
2/F., Block A, Dong He Industrial Building
Yue He Street, Sha Shen Road, Sha Tou Jiao
Shenzhen
Tel.: +86 755 25551458 or 25550852
Fax: +86 755 25357468 or 25357498
eMail: sales@severinchina.com
Web: http://www.severinchina.com
Czech Republic
BVZ Commerce s.r.o.
Parkerova c.p. 618
CZ 25067 Klecany
Tel.: +420 233 55 94 74
Fax: +420 233 55 94 74
Danmark
F&H of Scandinavia A/S
Gl. Skivevej 70
DK-8800 Viborg
Tel.: +45 8928 1300
Fax: +45 8928 1301
F-67210 OBERNAI CEDEX
Tel.: +33 3 88 47 62 08
Fax: +33 3 88 47 62 09
eMail: severin.france@severin.fr
Web: http://www.severin.fr
Greece
BERSON
C. Sarafi dis Bros. S.A.
Agamemnonos 47
176 75 Kallithea, Athens
Tel.: 0030-210 9478700
Philippos Business Center
Service Post of Thermi
570 01 Thessaloniki, Greece
Tel.: 0030-2310954020
Hong Kong
Pacifi c Coff ee Company
7/F Hollywood Centre, 233 Hollywood Road,
Sheung Wan, Hong Kong
Tel.: +852 2805 1627
Fax: + 852 2850 4015
eMail: espresso@pacifi ccoff ee.com
India
Zansaar
1210, 2nd Floor
Fawar Manor, 100ft Road
Indiranagar, Bangalore 560 038
Tel.: +91 80 49170000
eMail: customersupport@zansaar.com
Web: http://www.zansaar.com
Iran
IRAN-SEVERIN KISH CO. LTD.
No. 668, 7th. Floor
Bahar Tower
Ave. South Bahar
TEHRAN - IRAN
Tel.: 009821 - 77616767
Fax: 009821-77616534
Info@iranseverin.com
www.iranseverin.com
Iraq
AI JOUD Home Appliances Manufacturing
Co. Ltd
PIC: Eng. Ahmad Al-Sharabi
Al Joud Building Karadat Kharej
Baghdad - Iraq
Tel.: +964 782 270 2727
+964 770 003 5533
+964 771 231 7850
Ireland
Bluestone Sales & Distribution Ltd
26 Oaktree Business Park
Trim Co Meath Ireland
Tel.: +353 46 94 83100
Fax: +353 46 94 83663
Web: www.bluestone.ie
Italia
via Dino Col 52r-54r-56r,
I - 16149 Genova
Green Number: 800224155
Tel.: 010/6 45 11 02 - 01041 86 09
Fax: 010/6 42 50 09
e-mail: videoelettronica@panet.it
Jordan
J.L.C.
P.O. Box 910330
Mecca Street, Jaber Complex Building No. 193
Amman 11191 Jordan
Tel: +962 6 593 9365
Korea
Jung Shin Electronics co., Ltd.
501, Megaventuretower 77-9,
Moonrae-Dong 3ga, Yongdeungpo-Gu
Seoul, Korea
Tel: +82-22-637 3245\~7
Fax: +82-22-637 3244
Service Hotline: 080-001-0190
Kuwait
Mohammed Abdulrahman Al Bahar
Al Bahar Building P.O. Box 148
Safat 13002 Kuwait
Tel: +965 4810855
Latvia
SERVO Ltd.
Mr. Janis Pivovarenoks
Tel: +371 7279892
Lebanon
Khoury Home
7th Floor, Cité Dora 3 Building, Dora
P.O.Box 70611
Antelias, Lebanon
Tel: +961 1 244200
Fax:+966 1 253535
eMail: info@khouryhome.com
Internet: www.khouryhome.com
Luxembourg
Ser-Tec
GHALA 112, P.O. Box 996
Muscat Sultanate of Oman
Tel.: +968 24593025
Fax.: +968 24593490
Philippines
COLOMBO MERCHANT PHILIPPINES, INC.
Mezzanine 1, South Center Tower
2206 Venture Street, Madrigal Business Park
Alabang, Muntinlupa City
Tel.: 809 34 41
eMail: severinconsumercare@colombophils.com.ph
Polska
SERV- SERWIS SP. Z 0.0.
UL. WSCHODNIA 4
46-070 CHMIELOWICE K/OPOLA
Tel: +48 77 453 86 42
Fax: +48 77 453 86 42
Serbia and Montenegro
tel: +381-21-524-638
tel: +381-21-553-594
fax: +381-21-522-096
Singapore
Beste (S) Pte. Ltd.
Tagore Building
6 Tagore Drive, #03-04
Singapore 787623
Tel.: +65 6455 0005
Fax: +65 6455 4010
eMail: info@beste.com.sg
Slovenia
SEVTIS d.o.o.
Smartinska 130
1000 Ljubljana
Tel: 00386 1 542 1927
Fax: 00386 1 542 1926
Slowak Republic
PREMT,s.r.o.
Skladová 1
917 01 Trnava
Tel: +421 33 55 45 007
Fax: +421 33 55 45 007
eMail: premt@premt.sk
South Africa
AL.CD. Ashley (Pty) Ltd
ABSA on Grove
Grove Avenue
Claremont, Cape Town 7708
Tel.: +27 21 674 0294
Fax: +27 21 674 0295
eMail: greg@alcdashley.co.za
Web: www.alcdashley.co.za
Svenska
Rakspecialisten HS
Möllevångsgatan 34
214 20 Malmö
Tel.: +46 40 12 07 70
Fax: +46 40 6 11 03 35
eMail: info@rakspecialisten.se
Switzerland
VB Handels Sàrl GmbH
Postfach 306
1040 Echallens
Tel: 021 881 60 45
Fax: 021 881 60 46
mail: severin@helt.ch
Syria
Joud Industries Domestic Appliances Co.
P.O. Box 199 or 219
Motorway entrance
Lattakia - Syria
Tel.: +963 41 416 590
+963 41 416 591
Fax: +963 41 444 622
Thailand
Verasu Ltd. part.
83/7 Wireless Rd., Lumpini,
Patumwan, Bangkok 10330
Tel.: +662 254 81 008
eMail: askverasu@verasu.com
United Arab Emirates
Juma al Majid Est
P.O. Box 156
Dubai U.A.E.
Tel.: 04 266 5210
Fax: 04 262 3431
eMail: shahid.saleem@al-majid.com
Web: www.al-majid.com
United Kingdom
Homespares Centres Limited
Firwood Industrial Estate
Thicketford Road
Bolton, BL2 3TR
Tel.: +44 1204 558160
Fax: +44 1204 558161
eMail: offi ce@hscl.info
Web: www.hscl.info
Vietnam
Brand Partner
W.22, D. Binh Thanh
180/38 Nguyen Huu Canh Street
Ho Chi Minh City. Vietnam
Tel.: +84 862 899 648
Fax: +84 862 899 649
eMail: info@brandpartner.vn
Stand: 08.2014

- DE
- Küchenmaschine
- Connection to the mains supply
- Familiarisation
- Important safety instructions
- Short-time operation
- Before using for the first time
- Rotary control
- Using the main bowl
- Planetary action
- Appropriate speed settings
- Whisk
- Kneading hook
- for heavy dough
- Operation
- Using the blender
- Appropriate speed levels
- Blender operation
- Cleaning and care
- Disposal
- Guarantee
- FR
- Robot de Cuisine
- Chère cliente, Cher client,
- Czech Republic
- Danmark
- Greece
- Hong Kong
- India
- 1210, 2nd Floor
- Iran
- Iraq
- Ireland
- Italia
- Jordan
- Korea
- Kuwait
- Latvia
- Lebanon
- Luxembourg
- Philippines
- Polska
- Singapore
- Slovenia
- Slowak Republic
- South Africa
- Svenska
- Switzerland
- Syria
- Thailand
- United Arab Emirates
- United Kingdom
- Vietnam
Brand : SEVERIN
Model : KM 3890
Category : Food Processor