
Bravia KD65XG8196 - Television SONY - Free user manual and instructions
Find the device manual for free Bravia KD65XG8196 SONY in PDF.
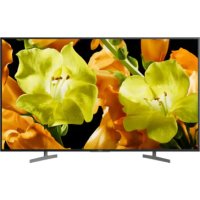



| Product Type | LED 4K Television |
| Brand | Sony |
| Model | Bravia KD65XG8196 |
| Screen Size | 65 inches (165 cm) |
| Resolution | 4K Ultra HD (3840 x 2160) |
| Display Dimensions (W x H) | 1463 x 845 mm |
| Weight (without stand) | Approximately 21 kg |
| Power Supply | 220-240 V AC, 50/60 Hz |
| Power Consumption (estimated) | 185 W |
| Key Features | Smart TV Android TV, HDR10, HLG, Dolby Vision, Built-in Wi-Fi, Bluetooth |
| Connectivity | 4x HDMI, 2x USB, Ethernet, Optical output, Headphone jack |
| Audio | Built-in speakers, Dolby Audio |
| Compatible Wall Mount | Sony SU-WL450 (standard and slim mount) |
| Distance from Wall (standard mount) | 142 mm |
| Distance from Wall (slim mount) | 100 mm |
| Wall Mounting Screws | 4 screws of 8 mm diameter (not included) |
| Maintenance and Cleaning | Clean with a soft, dry cloth; do not use chemical products |
| Safety | Professional installation recommended; do not shake or lean on the TV |
| Spare Parts | Table stand included; wall mounting screws not provided |
| Repairability | Sony after-sales service available |
Frequently Asked Questions - Bravia KD65XG8196 SONY
User questions about Bravia KD65XG8196 SONY
0 question about this device. Answer the ones you know or ask your own.
Ask a new question about this device
Download the instructions for your Television in PDF format for free! Find your manual Bravia KD65XG8196 - SONY and take your electronic device back in hand. On this page are published all the documents necessary for the use of your device. Bravia KD65XG8196 by SONY.
USER MANUAL Bravia KD65XG8196 SONY
- In the actual model names, the "□□" indicates numbers and/or characters specific to each model.
To Customers
For product protection and safety reasons, Sony strongly recommends that installation of your TV be performed by Sony dealers or licensed contractors. Do not attempt to install it yourself.
To Sony Dealers and Contractors
Provide full attention to safety during the installation, periodic maintenance and examination of this product.
Sufficient expertise is required for installing this product, especially to determine the strength of the wall for withstanding the TV's weight. Be sure to entrust the attachment of this product to the wall to Sony dealers or licensed contractors and pay adequate attention to safety during the installation. Sony is not liable for any damage or injury caused by mishandling or improper installation.
For safety and proper installation, follow the Wall-mount Bracket Operation Instructions, TV Setup Guide, and the directions in this manual.
On Safety
Thank you for purchasing this product.
To Customers
Sufficient expertise is required for installing this product. Be sure to subcontract the installation to Sony dealers or licensed contractors and pay special attention to safety during the installation. Sony is not liable for any damages or injury caused by mishandling or improper installation, or installing any other than the specified product. Your Statutory Rights (if any) are not affected.
To Sony dealers
Sufficient expertise is required for installing this product. Be sure to read this instruction manual thoroughly to do the installation work safely. Sony is not liable for any damages or injury caused by mishandling or improper installation. Please give this manual to the customer after installation.
This instruction manual shows the correct handling of the product and important precautions necessary to prevent accidents. Be sure to read this manual thoroughly and use the product correctly. Keep this manual available for future reference.
Products by Sony are designed with safety in mind. If the products are used incorrectly, however, it may result in a serious injury through fire, electric shock, the product toppling over, or the product dropping. Be sure to observe the precautions for safety to prevent such accidents.
CAUTION
Specified products
This Wall-Mount Bracket is designed for use with the specified products TVs. For TVs, refer to their Reference Guide to verify that the Wall-Mount Bracket can be used.
To Customers
WARNING
If the following precautions are not observed, serious injury or death through fire, electric shock, or the product dropping can result.
Be sure to subcontract the installation to licensed contractors and keep small children away during the installation.
If the Wall-Mount Bracket or the TV is not installed correctly, the following accidents may occur. Be sure licensed contractors carry out installation.
The TV may fall and cause a serious injury such as a bruise or a fracture. - If the wall on which the Wall-Mount Bracket is installed is unstable, uneven, or not perpendicular to the floor, the unit may fall and cause injury or property damage. The wall should be capable of supporting a weight of at least four times the TV weight. (Refer to your TV's Reference Guide for its weight.) - If the installation of the Wall-Mount Bracket on the wall is not sufficiently sturdy, the unit may fall and cause injury or property damage.
Be sure to subcontract moving or dismounting of the TV to licensed contractors.
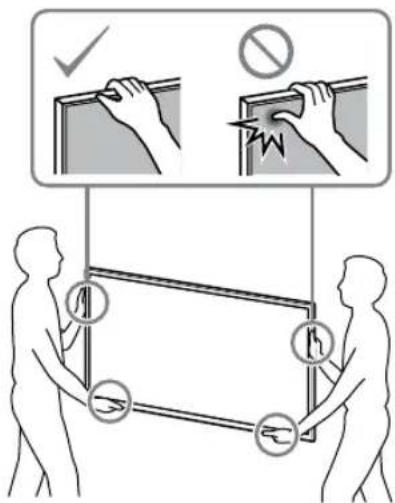
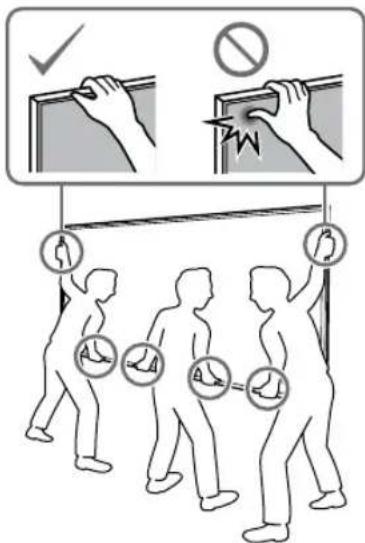
If persons other than licensed contractors transport or dismount the TV, it may fall and cause injury or property damage. Be sure that two or more persons (three or more persons for 75 inches and above TV set) carry or dismount the TV.
Do not remove screws, etc., after mounting the TV.
If you do so, the TV may fall and cause injury or property damage.
Do not make alterations to the parts of the Wall-Mount Bracket.
If you do so, the Wall-Mount Bracket may fall and cause injury or property damage.
Do not mount any equipment other than the specified product.
This Wall-Mount Bracket is designed for use with the specified product only. If you mount equipment other than specified, it may fall or break, and cause injury or property damage.
Do not apply any load other than the TV on the Wall-Mount Bracket. Do not shake the TV left/right, up/down.
If you do so, the TV may fall and cause injury or property damage.
Do not lean on or hang from the TV.
Do not lean on or hang from the TV as it may fall on you and cause serious injury.
CAUTION
If the following precautions are not observed, injury or property damage may occur.
Do not handle the product with excessive force during cleaning or maintenance.
Do not apply excessive force on the topside of the TV. If you do so, the TV may fall and cause injury or property damage.
Precautions
- If you use the TV installed on the Wall-Mount Bracket for a long time, the wall behind or above the TV may become discolored or the wallpaper may come unstuck, depending on the material of the wall.
- If the Wall-Mount Bracket is removed after installing it on the wall, the screw holes are left.
- Do not use the Wall-Mount Bracket in a place where it is subjected to mechanical vibrations.
Installing the Wall-Mount Bracket
To Sony Dealers
WARNING
The following instructions are for Sony dealers only. Be sure to read the safety precautions described above and pay special attention to safety during the installation, maintenance, and checking of this product.
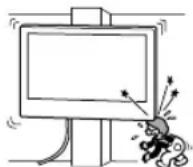
Do not install the Wall-Mount Bracket on wall surfaces where the corners or sides of the TV protrude away from the wall surface.
Do not install the Wall-Mount Bracket on wall surfaces such as a pillar, where the corners or sides of the TV protrude away from the wall surface. If a person or object happens to hit the protruded corner or side of the TV, it may cause injury or property damage.
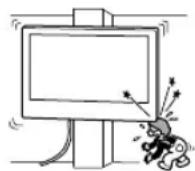
Do not install the TV over or under an air conditioner.
If the TV is exposed to water leaks or air current from an air conditioner for a long time, it may cause a fire, an electric shock, or a malfunction of the TV.
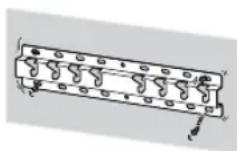
Be sure to install the Wall-Mount Bracket securely to the wall following the instructions in this instruction manual.
If any of the screws are loose or fall out, the Wall-Mount Bracket may fall and cause injury or property damage. Be sure to use the appropriate screws for the material of the wall and install the unit securely using four or more screws of 8 mm diameter (or equivalent).
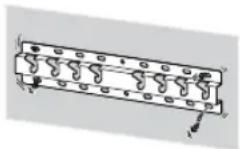
Be sure to use the supplied screws and attachment parts properly following the instructions given in this instruction manual. If you use substitute items, the TV may fall and cause bodily injury to someone or damage to the TV.
Be sure to assemble the bracket properly following the instructed procedure explained in this instruction manual.
If any of the screws are loose or fall out, the TV may fall and cause bodily injury to someone or damage to the TV.
Be sure to tighten the screws securely in the designated position.
If you fail to do so, the TV may fall and cause bodily injury to someone or damage to the TV.
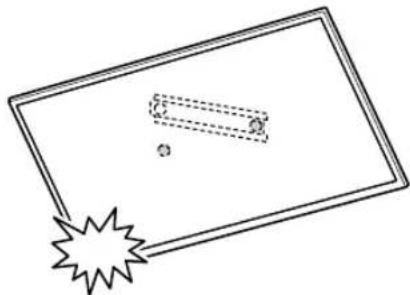
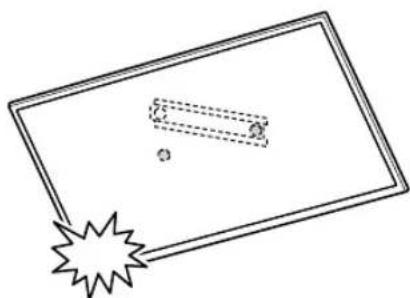
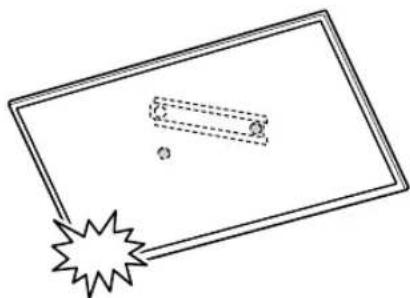
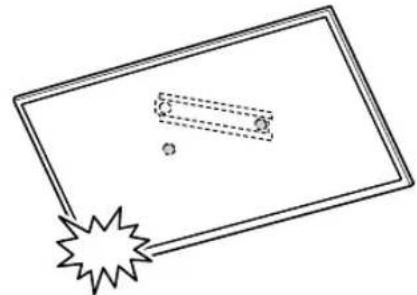
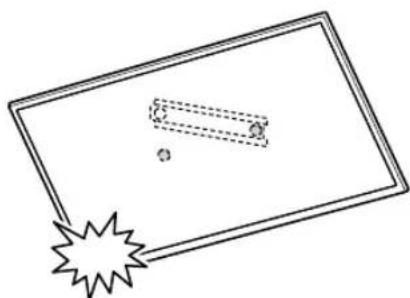
Be careful not to subject the TV to shock during installation.
If the TV is exposed to shock, it may fall or break apart. This may cause injury.
Be sure to install the TV on a wall that is both perpendicular and flat.
If you fail to do so, the TV may fall and cause injury.
After proper installation of the TV, secure the cables properly.
If people or objects get tangled with cables, this may result in injury or damage to the TV.
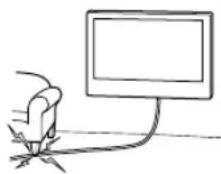
Do not allow the mains lead or the connecting cable to be pinched.
If the mains lead or the connecting cable is pinched between the unit and the wall or is bent or twisted by force, the internal conductors may become exposed and cause a short circuit or an electrical break. This may cause a fire or an electric shock.
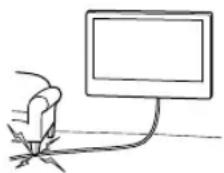
The screws needed to secure the Wall-Mount Bracket to the wall are not supplied.
Use the appropriate screws for the wall material and structure when mounting the Wall-Mount Bracket.
Table of Contents
Preparing for installation. 5
Checking the parts. 5
Deciding on the installation location 6
Installing the Base on the wall 8
Preparing for the installation of the TV. 9
KD-75XG80□□ 9
KD-65XG81□□/65XG80□□ 10
KD-55XG81□□/55XG80□□ 11
KD-49XG81□/49XG80□/43XG81□/43XG80□
Installing the TV on the wall 14
KD-75XG80□□ 14
KD-65XG81□□ / 65XG80□□ / 55XG81□□ / 55XG80□□ / 49XG81□□ / 49XG80□□ / 43XG81□□ / 43XG80□□
Confirming the completion of the
installation 19
Other information. 19
Specifications 19
Installing the TV onto the wall
Installation procedure differs, depending on your TV.
Use the Wall-Mount Bracket SU-WL450 to install the TV to the wall.
Note
- If the Table-Top Stand is attached to the TV, detach the Table-Top Stand beforehand. See the Setup Guide and follow in reverse order the steps to detach the Table-Top Stand.
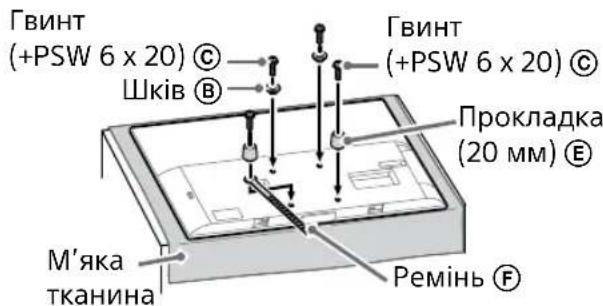
- Place the TV with its screen facing down on a level and stable surface covered with a thick and soft cloth, when securing the Attachment parts for Wall-Mount Bracket or when removing the Table-Top Stand from the TV to prevent damaging the surface of the LCD display.
- Be sure to store the removed screws in a safe place, keeping them away from children.
Preparing for installation
- Have the TV's Reference Guide and Setup Guide at hand before installation.
- Be sure to have a Phillips screwdriver that fits the screws prior to the assembly.
- Confirm the installing position of your TV.
- Prepare four or more screws of 8 mm diameter and one screw of 5 mm or equivalent (not supplied). Select screws suitable for the material of the wall.
Checking the parts
Supplied with SU-WL450
- Verify that all the parts are included.
| A Base (20) (1) B Pulley (2) | |
| ◎ PSW 6x20 (4)◎ PSW 4x20 with Bush (2) | |
| ◎ Spacer (20) (2)◎ Belt (1) | |
| ◎ Bush (20) (M4) (2)◎ PSW 4x20 (2) | |
| ① Base Adaptor (2)① | PSW 4x10 (8) |
| ◎ Spacer (60) (2)◎ PSW 6x50 (2) | |
| ◎ Bush (M4) (2)◎ PSW 4x50 (2) | |
Deciding on the installation location
1 Decide on the installation location.
Make sure that the wall has enough space for the TV and is capable of supporting a weight of at least four times that of the TV.
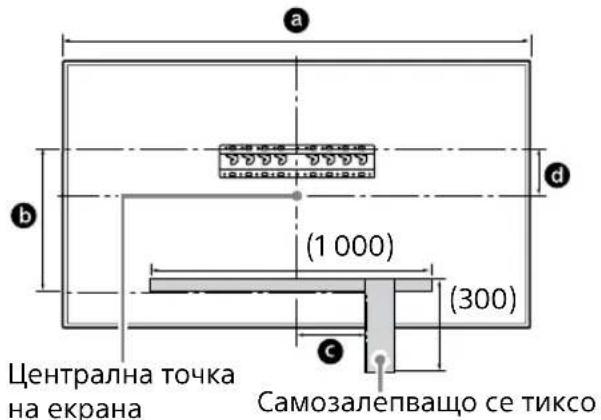
Refer to the following table on installing the TV to the wall. Refer to your TV's Reference Guide for the TV's weight.
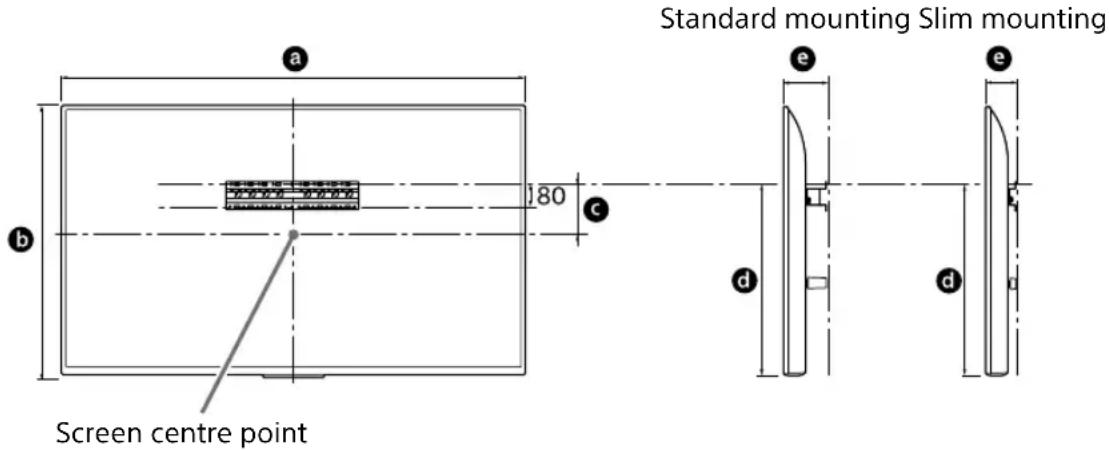
Unit: mm
| Model Name | Display dimensions | Screen centre dimension | Length for mounting | |||
| a | b | c | d | e | ||
| Standard mounting | Slim mounting | |||||
| KD-75XG80□□ | 1,686 | 970 | 202 | 690 | 142 | 100 |
| KD-65XG81□□ | 1,463 | 845 | 173 | 597 | 142 | 100 |
| KD-65XG80□□ | 1,463 | 845 | 173 | 597 | 142 | 100 |
| KD-55XG81□□ | 1,241 | 721 | 95 | 460 | 141 | 100 |
| KD-55XG80□□ | 1,241 | 721 | 95 | 460 | 141 | 100 |
| KD-49XG81□□ | 1,101 | 645 | -15* | 314 | 119 | 78 |
| KD-49XG80□□ | 1,101 | 645 | -15* | 314 | 119 | 78 |
| KD-43XG81□□ | 970 | 570 | 23 | 315 | 119 | 77 |
| KD-43XG80□□ | 970 | 570 | 23 | 315 | 119 | 77 |
- Bracket positioning is below the screen centre point.
Note
- Figures in the table may differ slightly depending on the installation.
- When your TV is installed on the wall, the upper side of the TV slightly leans forward.
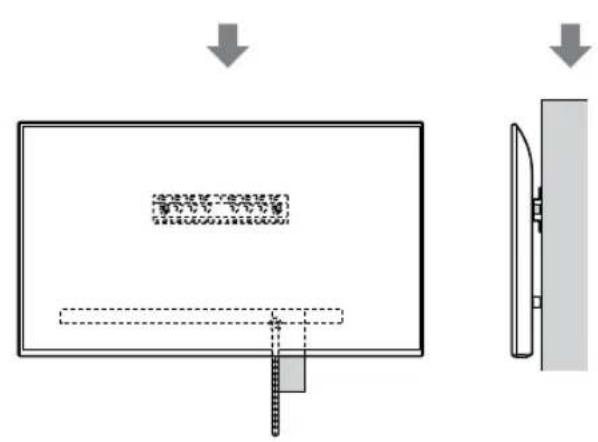
Allow for suitable clearance between the TV and the ceiling and protruding parts of the wall as shown below.
Unit: mm
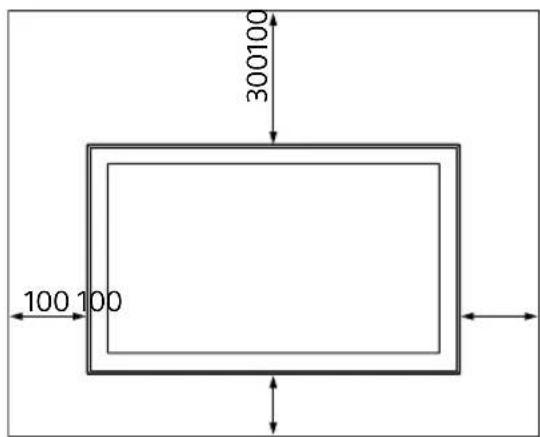
To ensure proper ventilation and prevent the collection of dirt or dust:
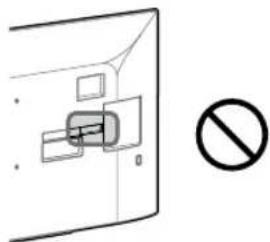
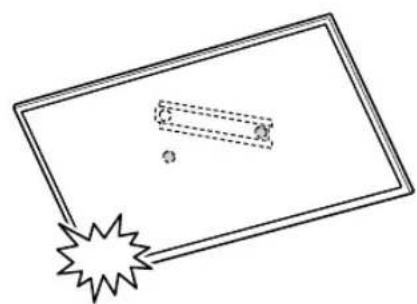
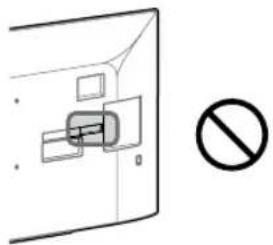
Do not lay the TV set flat, install upside down, backwards, or sideways. - Do not place the TV set on a shelf, rug, bed or in a closet. - Do not cover the TV set with a cloth, such as curtains, or items such as newspapers, etc. - Do not install the TV set as shown below.
Air circulation is blocked.
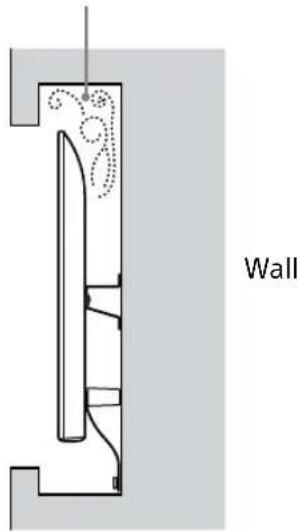
Note
- If you intend to route the cables in the wall, make a hole in the wall to insert the cables before beginning the installation.
To prevent pinching the cables, prepare a hole in the wall somewhere outside the perimeter of the Base (20) A,Base Adaptor 1 and Spacer (20) E, Spacer (60) K.
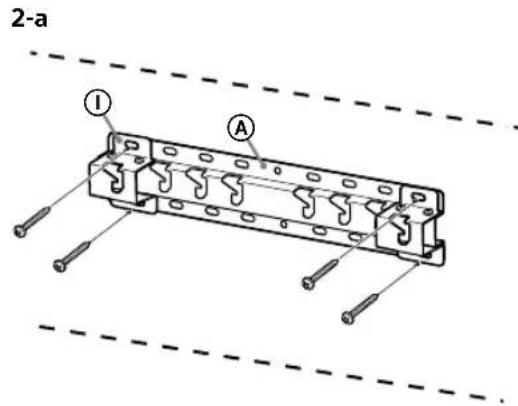
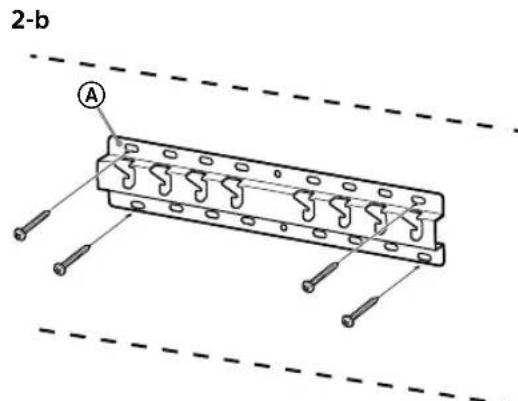
2 Select Wall mounting style. It is selectable as shown below.
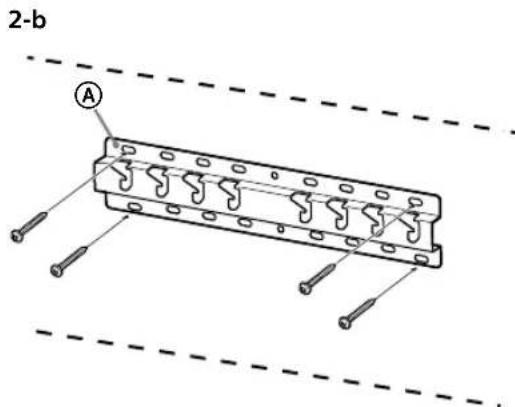
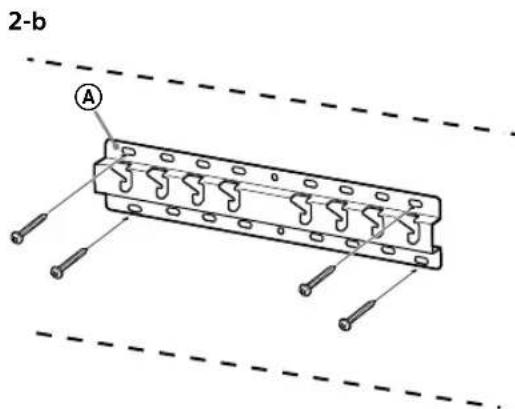
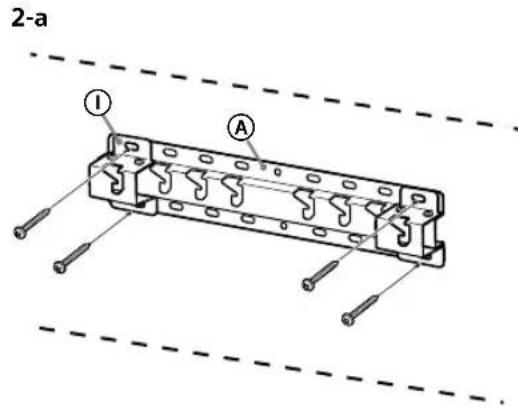
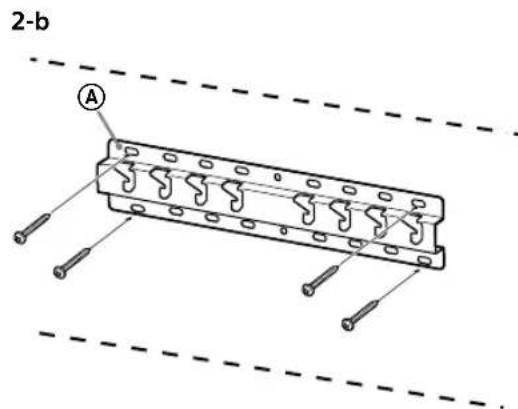
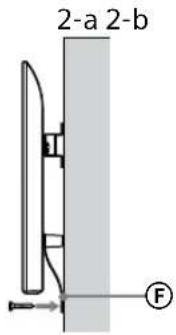
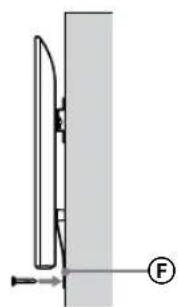
2-a Standard mount 2-b Slim mount
Refer to the table of step 1.
WARNING
- When 2-b is selected, rear terminal access is limited.
2-a 2-b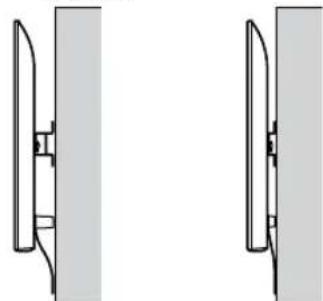
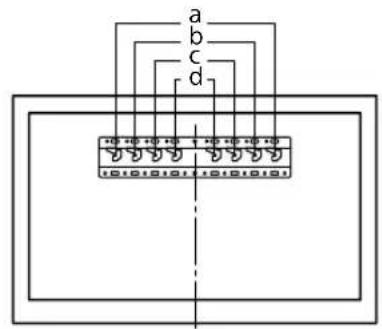
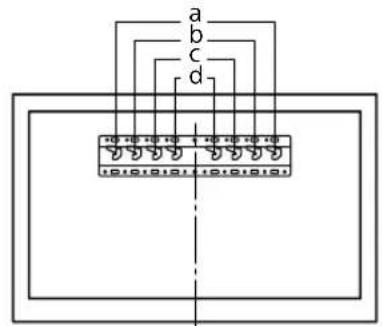
Refer to the below table about the Base Adaptor fitting location. In case of selecting 2-b, then skip this step.
| Model Name Hook location | |
| KD-75XG80□□ | |
| KD-65XG81□□ | b |
| KD-65XG80□□ | |
| KD-55XG81□□ | |
| KD-55XG80□□ | |
| KD-49XG81□□ | c |
| KD-49XG80□□ | |
| KD-43XG81□□ | d |
| KD-43XG80□□ | |
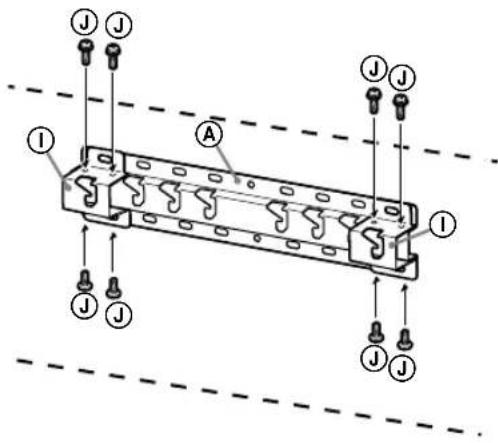
Fit Base Adaptor ① by using Screw (PSW 4x10) ⑧ to Base (20) ④ when selecting 2-a.
Decide the positions of the screws for installing the Base (20) A.
Refer to the specifications on page 19. When selecting 2-a, please use the hole positions of Base Adaptor ①.
WARNING
The wall that the TV will be mounted on should be able to support a weight of at least four times that of the TV (Refer to your TV's Reference Guide for its weight.). - Determine the strength of the wall the TV will be mounted on. Reinforce the wall sufficiently, if necessary.
Installing the Base on the wall
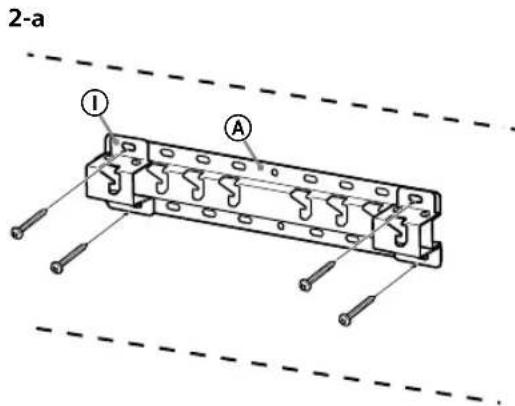
- Use four or more screws of 8 mm diameter or equivalent (not supplied).
- Fit four screws to the holes of Base Adaptor ① with Base (20) A (2-a only). Install the Base (20) A on the wall horizontally.
Preparing for the installation of the TV
Refer to the Setup Guide for stand installation.
KD-75XG80□□
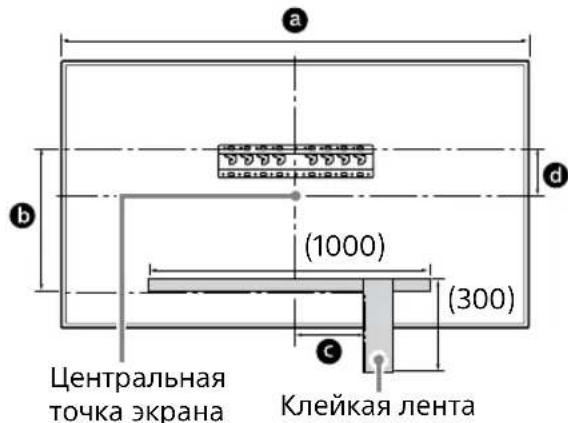
1 Mark the installation location on the wall.
- Use masking tape, etc. (not supplied) to mark the location of the TV near the Base or Base Adaptor. Refer to the following table.
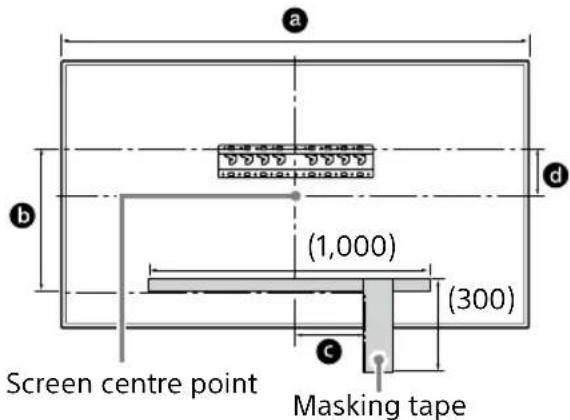
Unit: mm
| Model Name | Length for marking | Screen centre dimension | ||
| a | b | c | d | |
KD-75XG80□□ 1,686 564 150 202
2 Attach the Attachment parts for Wall-Mount Bracket. Check the Attachment parts by referring to "Supplied with SU-WL450" in "Checking the parts" on page 5.
Note
- Firmly secure the Attachment parts using screws.
- When using an electric screwdriver, set the torque setting to approximately 1.5 N·m {15 kgf·cm}.
- Be sure to store the used or unused parts in a safe place for future use. Retain this manual for future reference.
Standard mounting (2-a)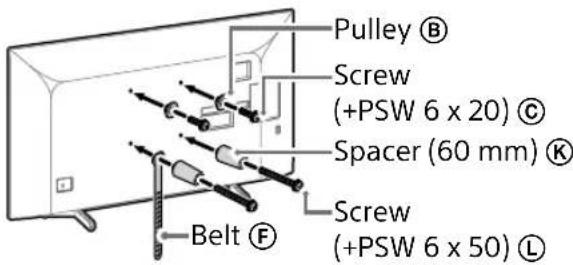
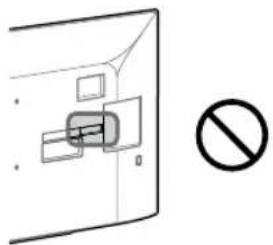
Slim mounting (2-b)
Note
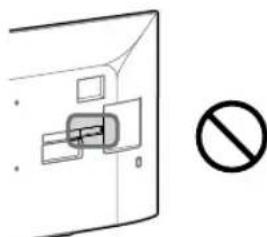
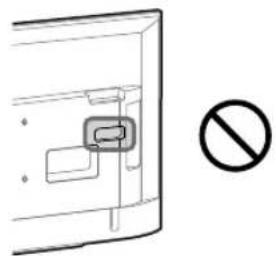
- You cannot use some of the terminals on the rear of the TV when using this mounting style.
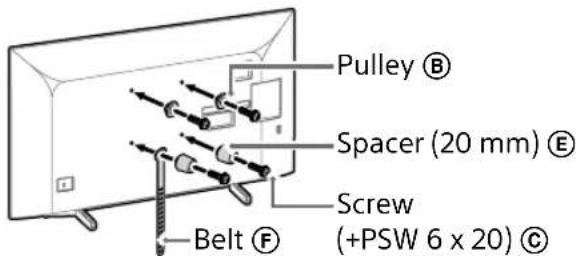
3 Connect the necessary cable(s) to the TV.
Make sure to connect the cables before installing the TV on the wall. You will be unable to connect the cables when the TV is installed.
Refer to the Reference Guide supplied with your TV.
Note
- Subcontract the cable routing in the wall to a licensed contractor.
- Bundle the connecting cables to prevent stepping on them before wall mounting.
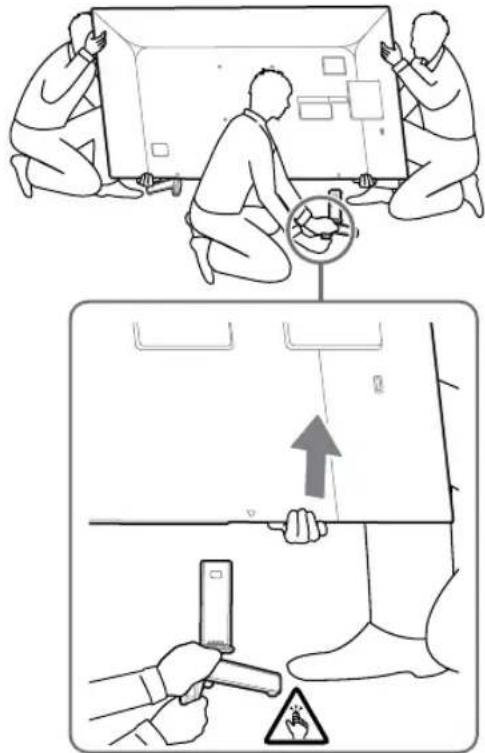
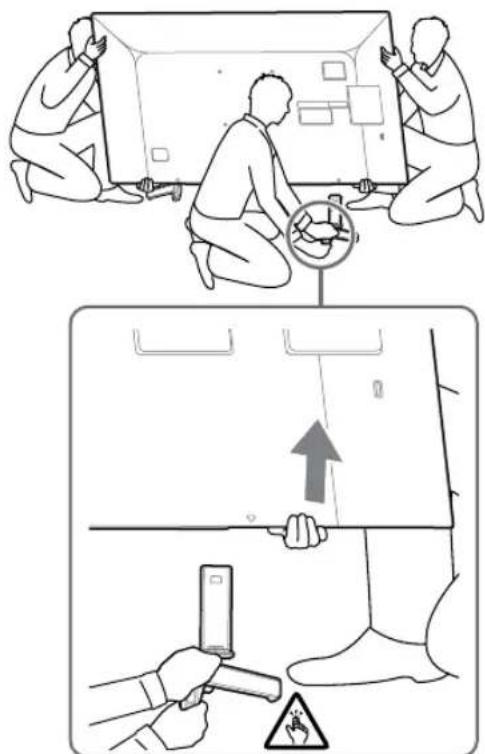
4 Detach the Table-Top Stand from the TV.
- Remove one side of the Table-Top Stand at a time. Firmly hold the Table-Top Stand securely with both hands while the other people lift up the TV.
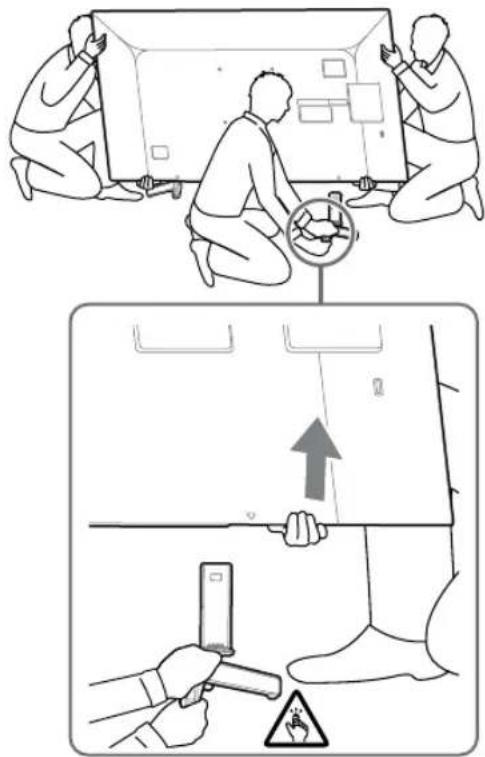
- Repeat the previous step and remove the other side of the Table-Top Stand.
Note
- Three or more people are required to detach the Table-Top Stand.
- Be careful not to use excessive force while detaching the Table-Top Stand from the TV as it may cause the TV set to fall resulting in personal injury or physical damage to the TV. Take care when handling the Table-Top Stand to prevent damage to the TV.
- Be careful when lifting the TV as the Table-Top Stand is detached, the Table-Top Stand may topple over and cause personal injury. Take care when removing the Table-Top Stand from the TV to prevent it from falling over and damaging the surface that the TV is sitting on.
KD-65XG81□□/65XG80□□
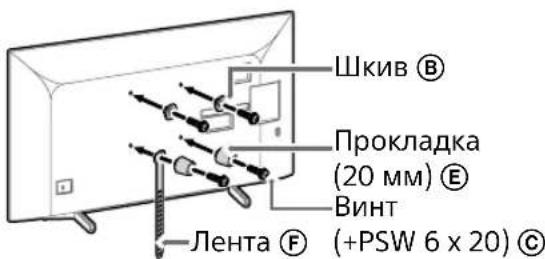
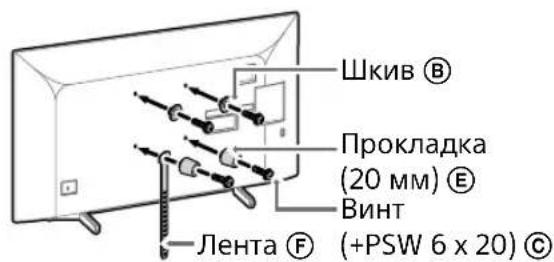
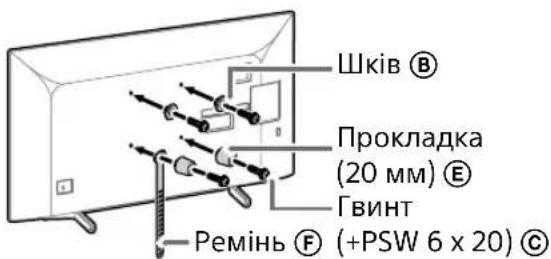
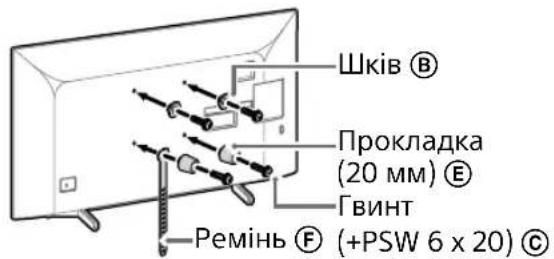
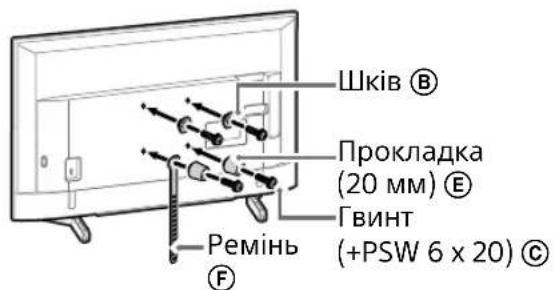
1 Attach the Attachment parts for Wall-Mount Bracket. Check the Attachment parts by referring to "Supplied with SU-WL450" in "Checking the parts" on page 5.
Note
- Firmly secure the Attachment parts using screws.
- When using an electric screwdriver, set the torque setting to approximately 1.5 N·m {15 kgf·cm}.
- Be sure to store the used or unused parts in a safe place for future use. Retain this manual for future reference.
Standard mounting (2-a)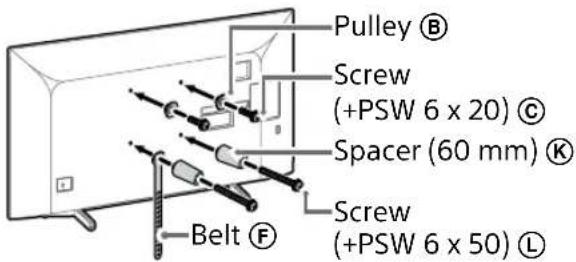
Slim mounting (2-b)
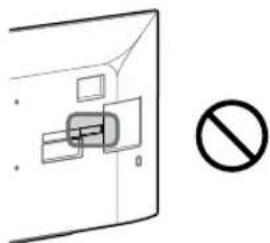
Note
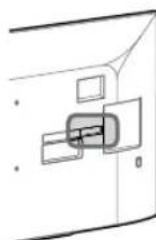
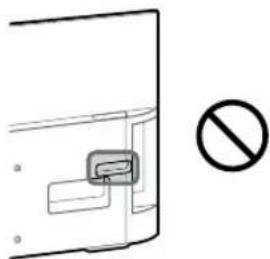
- You cannot use some of the terminals on the rear of the TV when using this mounting style.
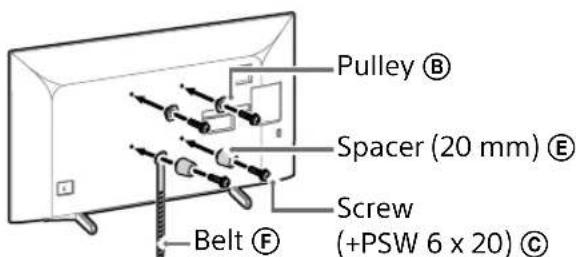
2 Connect the necessary cable(s) to the TV.
Make sure to connect the cables before installing the TV on the wall. You will be unable to connect the cables when the TV is installed.
Refer to the Reference Guide supplied with your TV.
Note
- Subcontract the cable routing in the wall to a licensed contractor.
- Bundle the connecting cables to prevent stepping on them before wall mounting.
3 Detach the Table-Top Stand from the TV.
- Remove one side of the Table-Top Stand at a time. Firmly hold the Table-Top Stand securely with both hands while the other people lift up the TV.
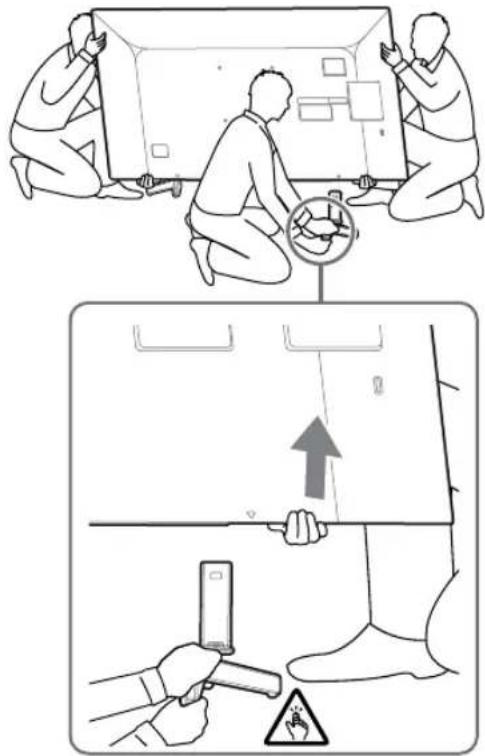
- Repeat the previous step and remove the other side of the Table-Top Stand.
Note
- Three or more people are required to detach the Table-Top Stand.
- Be careful not to use excessive force while detaching the Table-Top Stand from the TV as it may cause the TV set to fall resulting in personal injury or physical damage to the TV. Take care when handling the Table-Top Stand to prevent damage to the TV.
- Be careful when lifting the TV as the Table-Top Stand is detached, the Table-Top Stand may topple over and cause personal injury. Take care when removing the Table-Top Stand from the TV to prevent it from falling over and damaging the surface that the TV is sitting on.
KD-55XG81□□/
55XG80□□
1 Attach the Attachment parts for Wall-Mount Bracket. Check the Attachment parts by referring to "Supplied with SU-WL450" in "Checking the parts" on page 5.
Note
- Firmly secure the Attachment parts using screws.
- When using an electric screwdriver, set the torque setting to approximately 1.5 N·m {15 kgf·cm}.
- Be sure to store the used or unused parts in a safe place for future use. Retain this manual for future reference.
Standard mounting (2-a)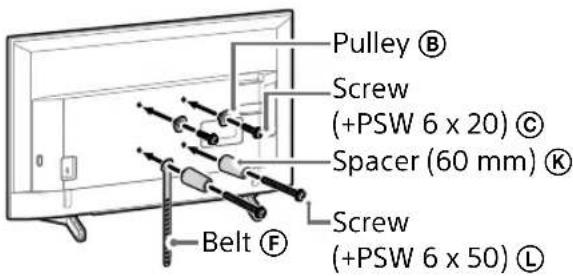
Slim mounting (2-b)
Note
- You cannot use some of the terminals on the rear of the TV when using this mounting style.
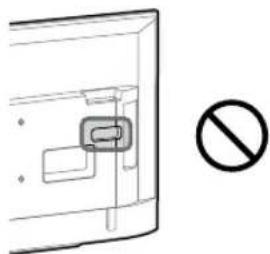
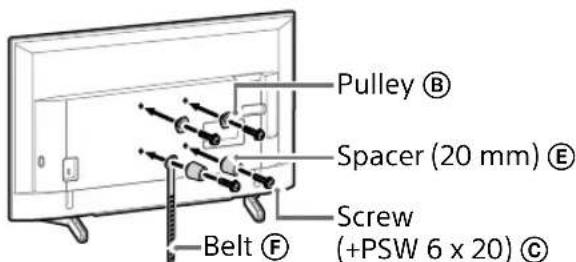
2 Connect the necessary cable(s) to the TV.
Make sure to connect the cables before installing the TV on the wall. You will be unable to connect the cables when the TV is installed. Refer to the Reference Guide supplied with your TV.
Note
- Subcontract the cable routing in the wall to a licensed contractor.
- Bundle the connecting cables to prevent stepping on them before wall mounting.
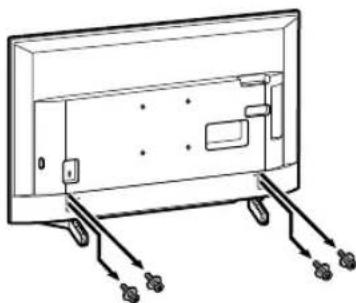
3 Detach the Table-Top Stand from the TV.
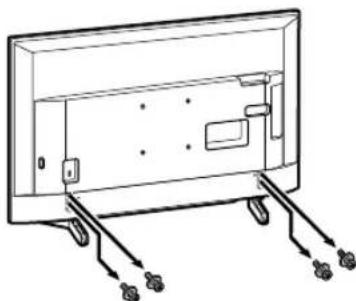
Note
- Be careful when lifting the TV as the Table-Top Stand is detached, the Table-Top Stand may topple over and cause personal injury. Take care when removing the Table-Top Stand from the TV to prevent it from falling over and damaging the surface that the TV is sitting on.
KD-49XG81□□/
49XG80□□ / 43XG81□□ /
43XG80□□
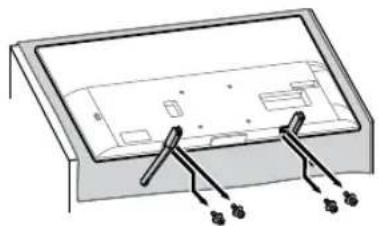
1 Detach the Table-Top Stand from the TV.
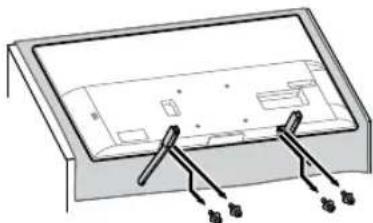
Note
- Make sure to place the TV on a soft cloth to prevent damaging the display's surface.
- When installing the Wall-Mount Bracket, do not use the screws removed from the Table-Top Stand.
- Be sure to store the removed Table-Top Stand and its screws in a safe place, keeping them away from children. You will need them if you want to use the TV on a table in the future. The Table-Top Stand cannot be purchased separately.
WARNING
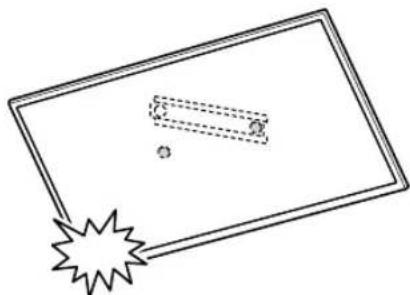
- Be sure the TV is in the vertical position before switching it on. The TV set must not be powered on with the LCD panel face down to avoid uneven picture uniformity. If pressure or shock is applied to the surface of the TV, the TV may break or become damaged.
- Lay the TV face down on a stable and level surface with the Table-Top Stand hanging over the edge of the surface. Having the TV face and the base of the Table-Top Stand on the same level surface will create an unstable working condition and can damage the TV.
- When detaching the Table-Top Stand from the TV, hold the Table-Top Stand securely with both hands.
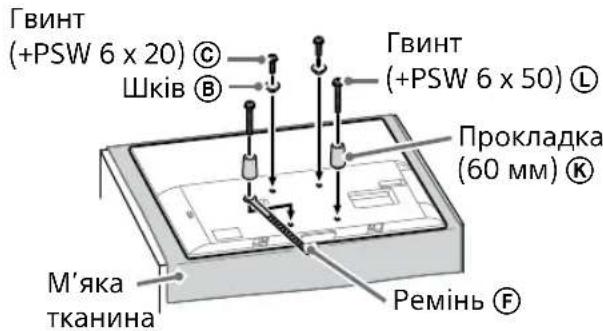
2 Attach the Attachment parts for Wall-Mount Bracket. Check the Attachment parts by referring to "Supplied with SU-WL450" in "Checking the parts" on page 5.
Note
- Firmly secure the Attachment parts using screws.
- When using an electric screwdriver, set the torque setting to approximately 1.5 N·m {15 kgf·cm}.
- Be sure to store the used or unused parts in a safe place for future use. Retain this manual for future reference.
Standard mounting (2-a)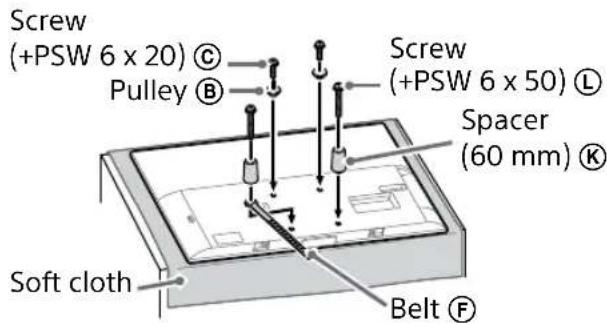
Slim mounting (2-b)
Note
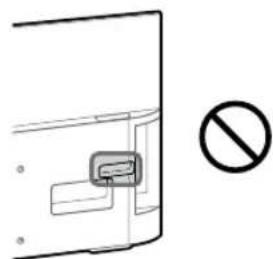
- You cannot use some of the terminals on the rear of the TV when using this mounting style.
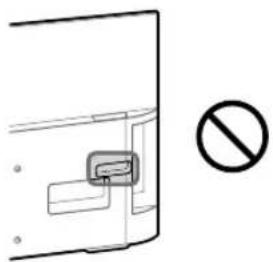
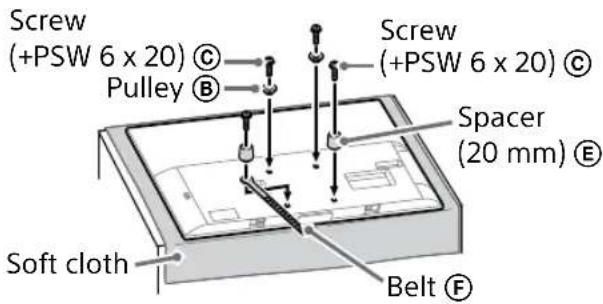
3 Connect the necessary cable(s) to the TV.
Make sure to connect the cables before installing the TV on the wall. You will be unable to connect the cables when the TV is installed.
Refer to the Reference Guide supplied with your TV.
Note
- Subcontract the cable routing in the wall to a licensed contractor.
- Bundle the connecting cables to prevent stepping on them before wall mounting.
Installing the TV on the wall
KD-75XG80□□
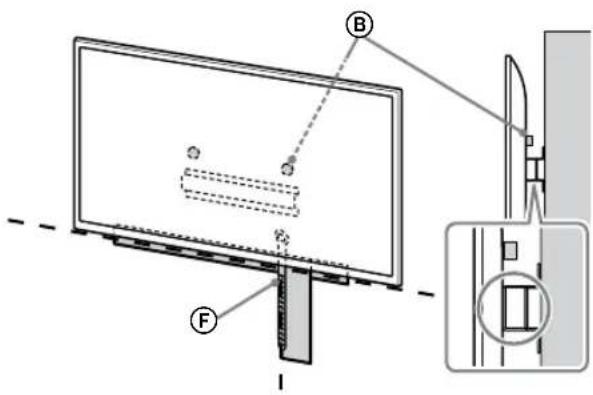
1 Lift the TV.
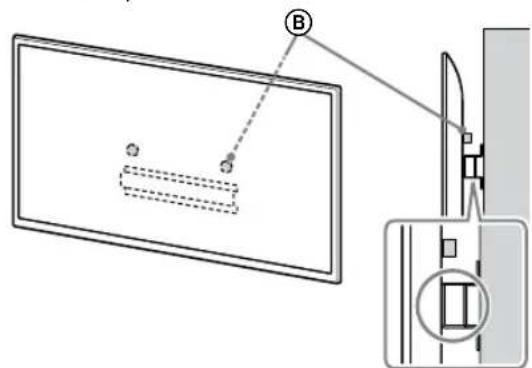
- For the location of the Pulleys (B) to the hang on the Base or Base Adaptor, refer to the table of step 3 in "Deciding on the installation location" on page 7.
- Make sure that the rear of the TV touches the Base or Base Adaptor when holding the TV.
Note
- Hold the TV securely with both hands and make sure the Belt (F) and the bottom of the TV align with the masking tape.
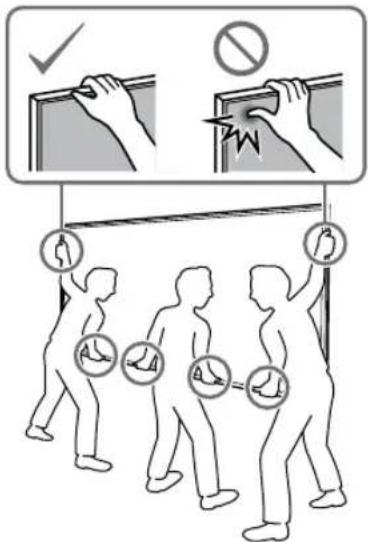
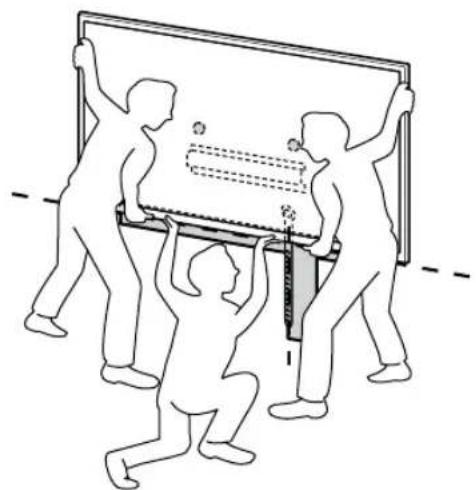
- Carry the TV with three people and the person who is in front of the TV leads the others to adjust the position.
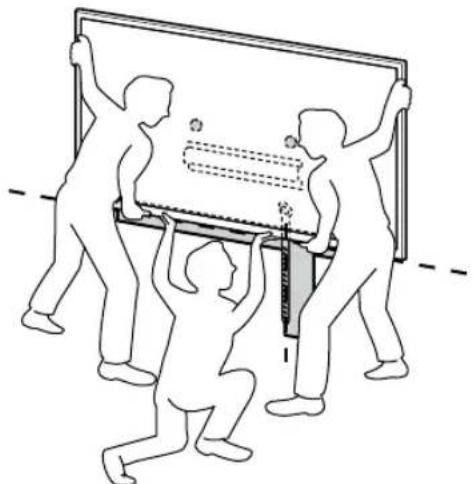
Take great care when installing the TV to the wall especially for the person who is supporting the TV from below, the television set may fall, causing serious bodily injury or even death.
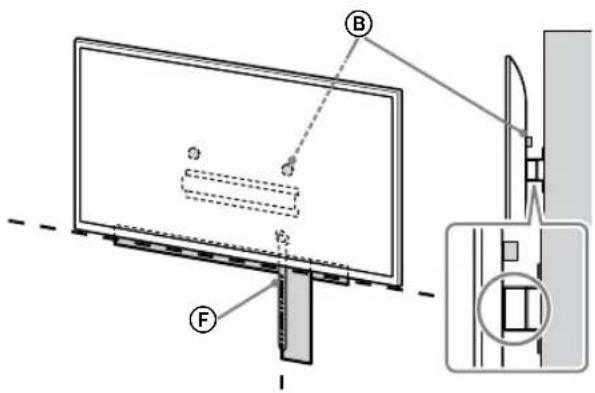
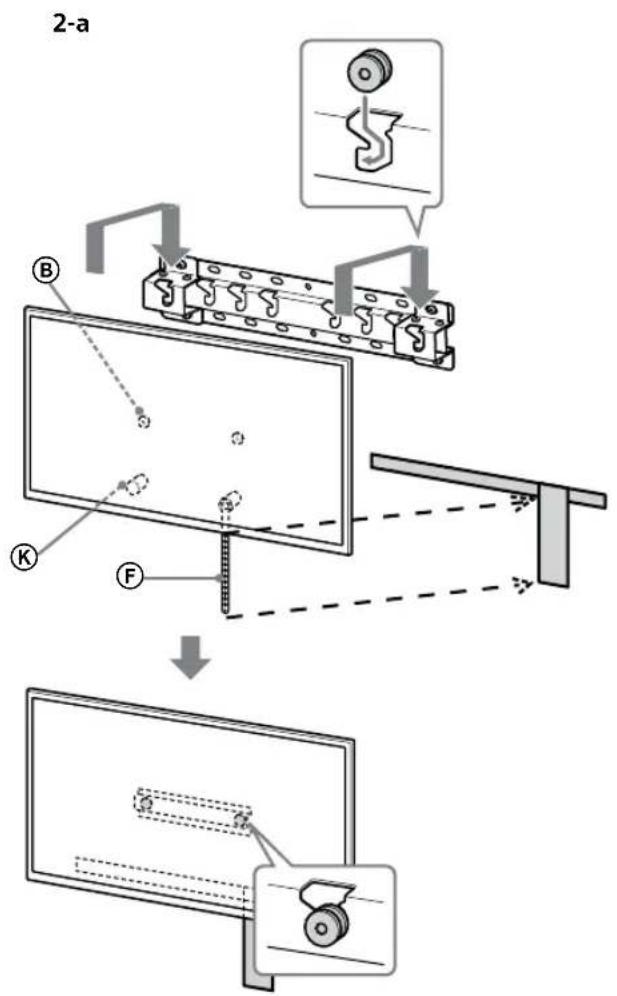
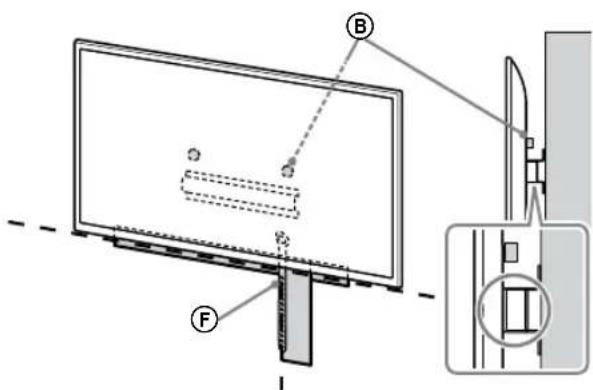
2 Install the TV onto the Base or Base Adaptor.
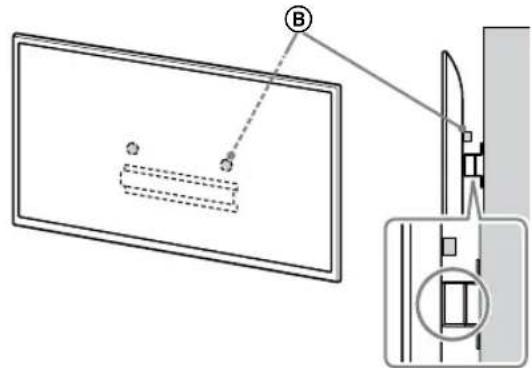
- Gently slide down the TV and hang the Pulleys (8) attached to the rear of the TV to the Base or Base Adaptor, making sure to confirm the shape of the holes. After installing the TV on the wall, confirm the Pulleys (8) are firmly latched into the Base or Base Adaptor.
- Release both hands slowly to ensure that the TV does not fall.
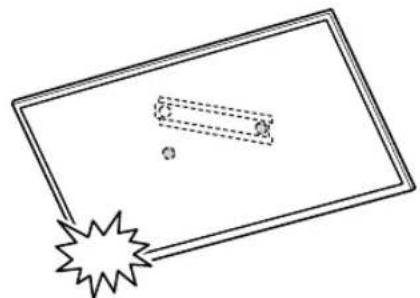
After installing the TV on the wall, remove the masking tape, etc. from the wall.
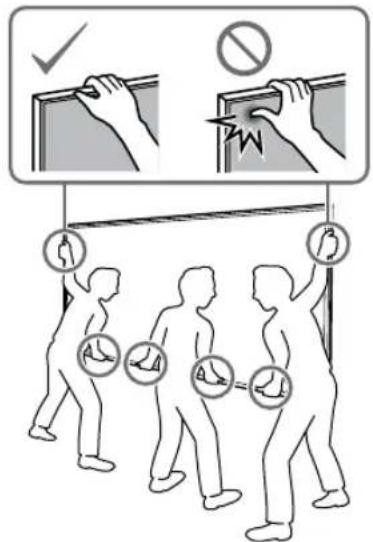
WARNING
- Be sure that two or more persons (three or more persons for 75 inches and above TV set) hold the TV when carrying it.
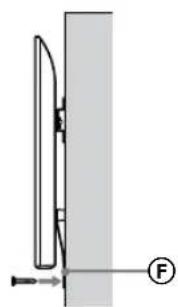
3 Preventing the bottom of the TV from shifting.
Take up the slack of Belt F and attach it to the wall tightly.
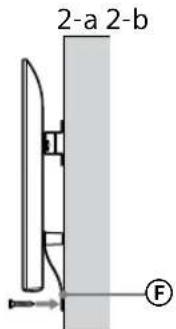
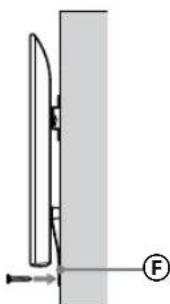
- Use a 5 mm diameter screw or equivalent (not supplied).
Note
Try to pull the bottom of the TV towards yourself slightly, to make sure that it does not move forward. If there is any movement, it is not fixed correctly, and the Belt (F) should be secured firmly again.
KD-65XG81□□/ 65XG80□□ / 55XG81□□ / 55XG80□□ / 49XG81□□ / 49XG80□□ / 43XG81□□ / 43XG80□□
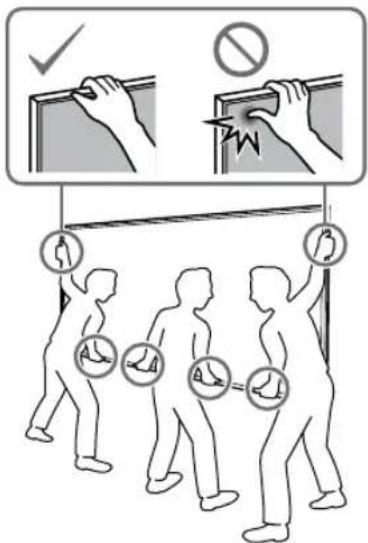
1 Lift the TV.
- For the location of the Pulleys to hang on the Base or Base Adaptor, refer to the table of step 3 in "Deciding on the installation location" on page 7. Make sure that the rear of the TV touches the Base or Base Adaptor when holding the TV.
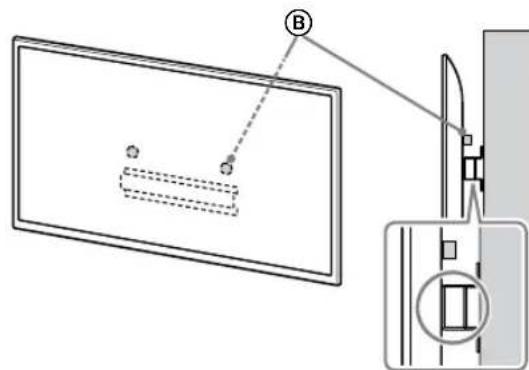
Note
- Hold the TV securely with both hands.
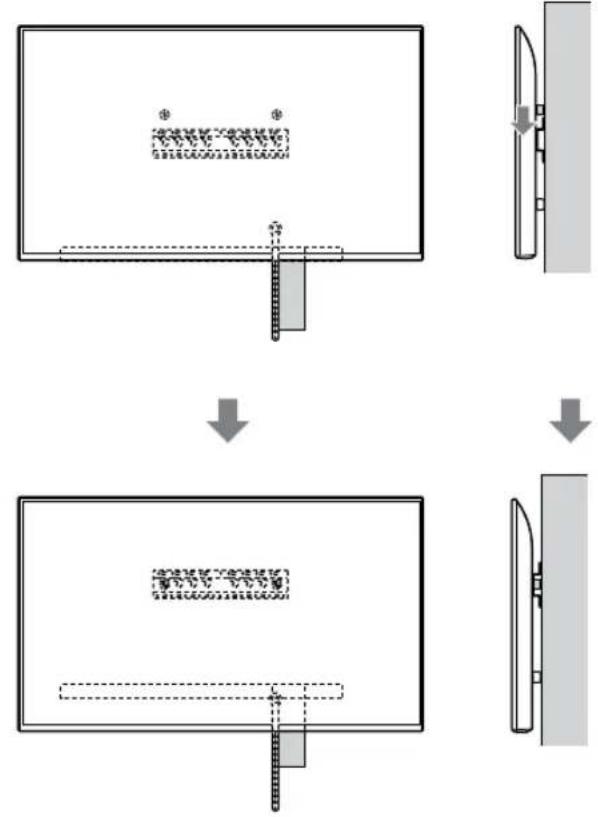
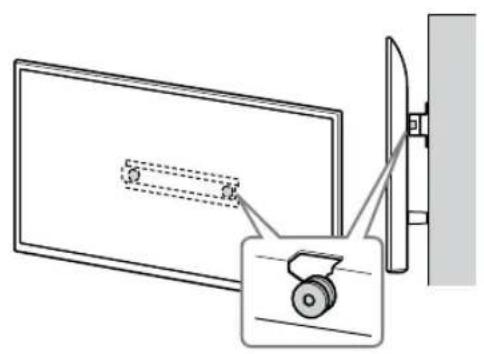
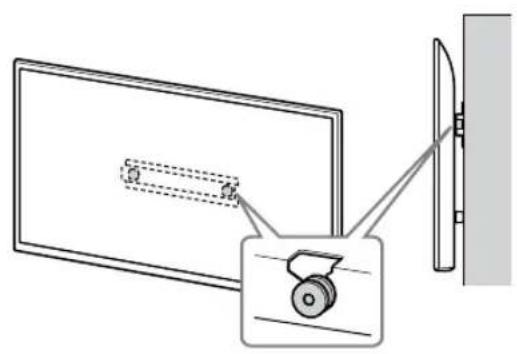
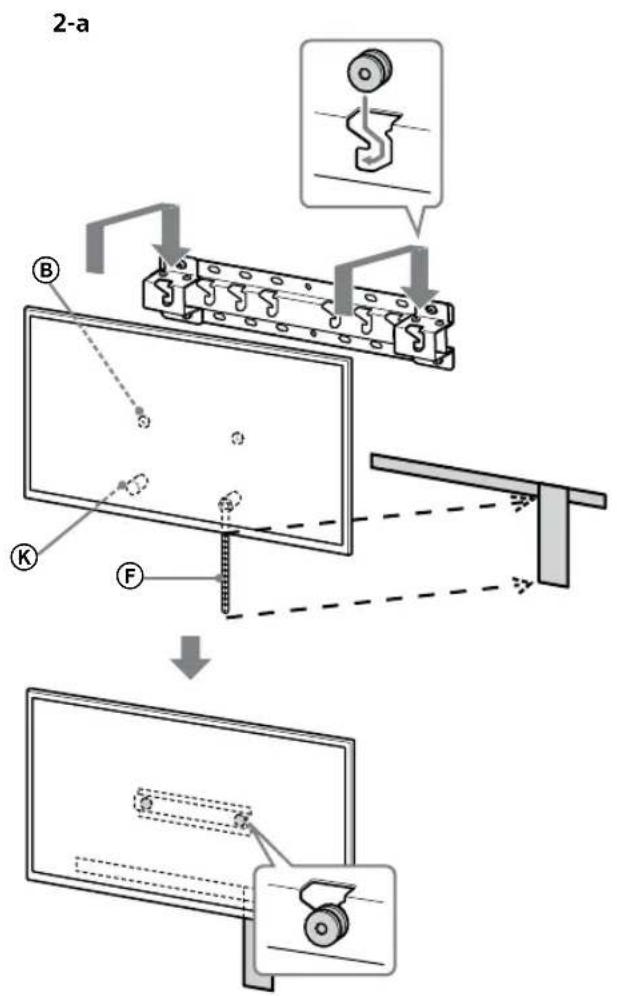
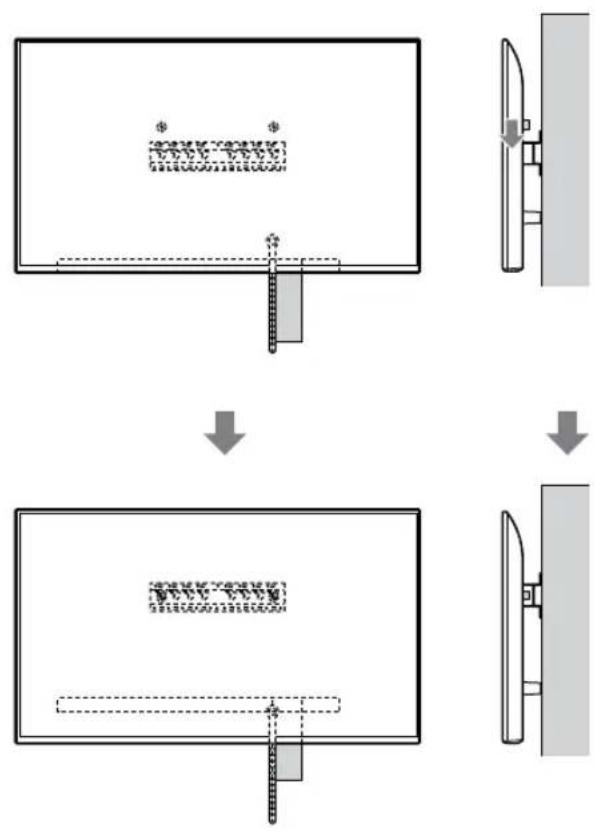
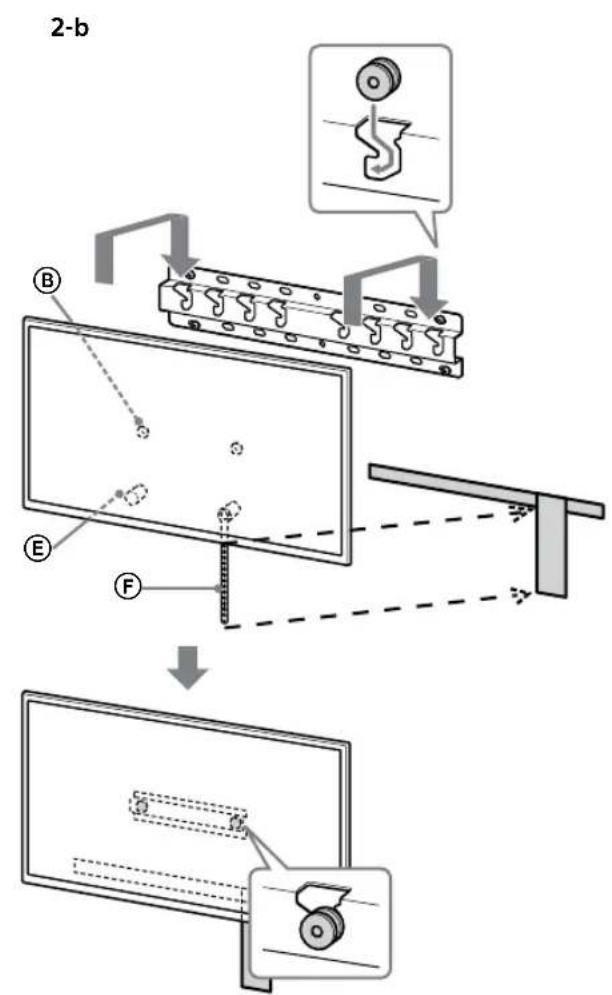
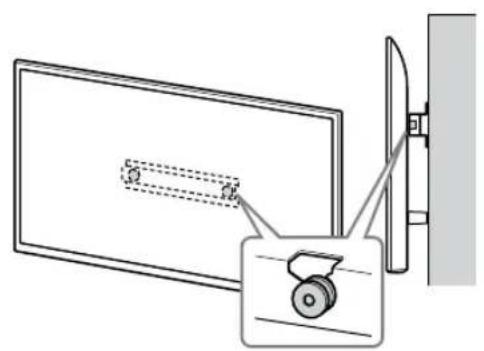
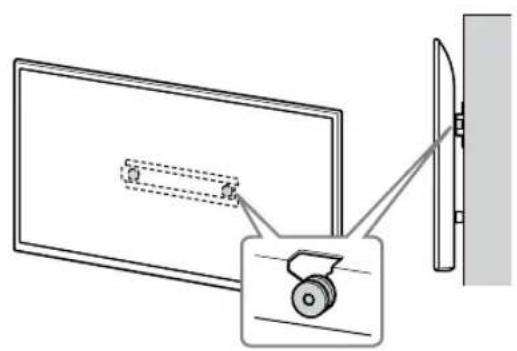
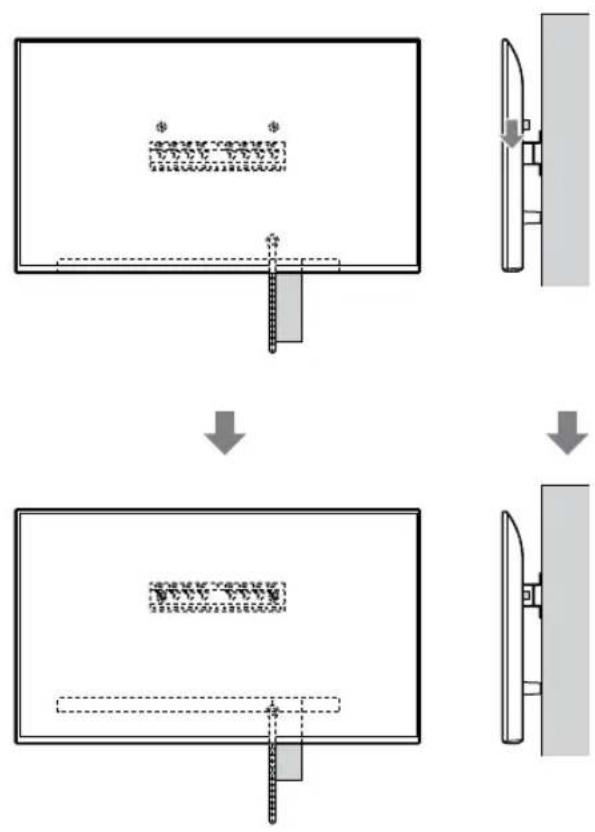
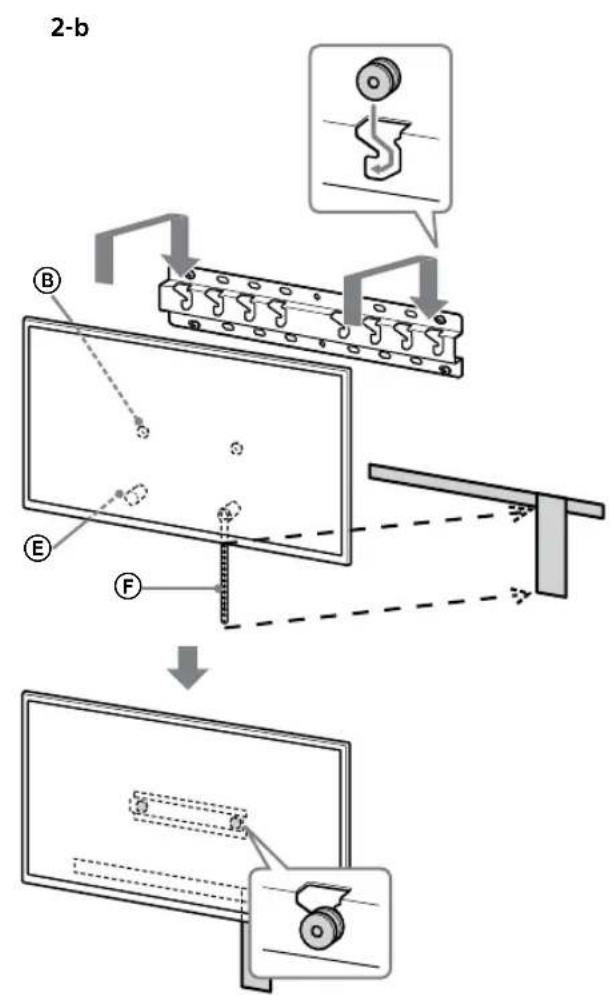
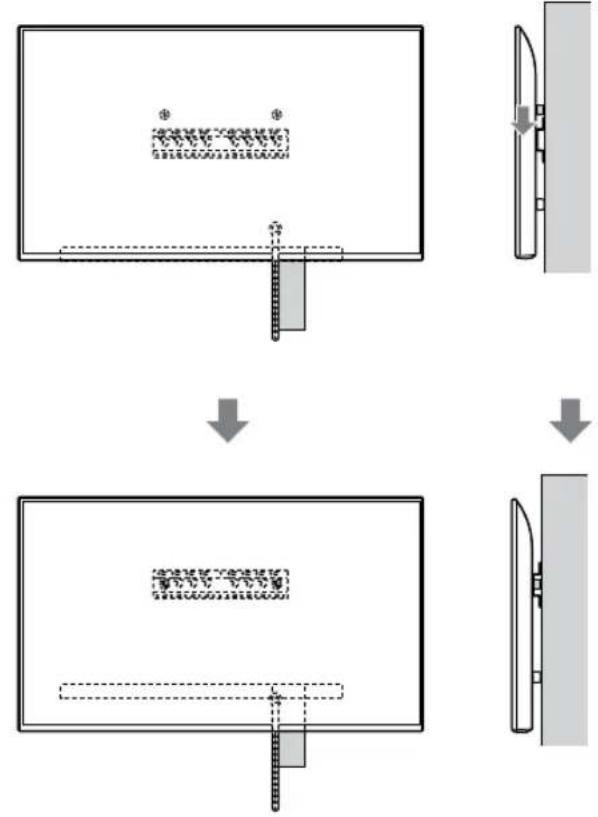
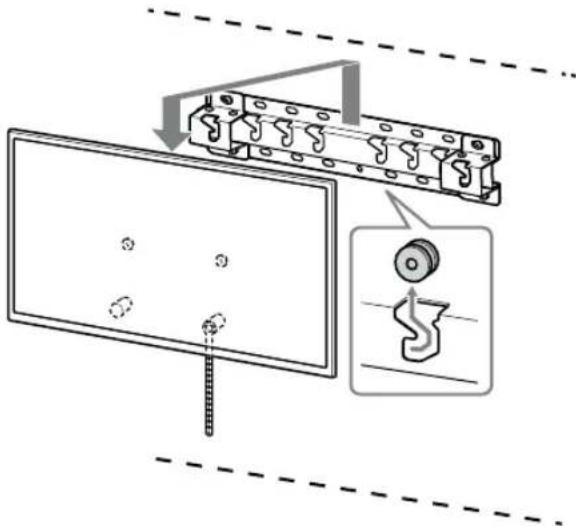
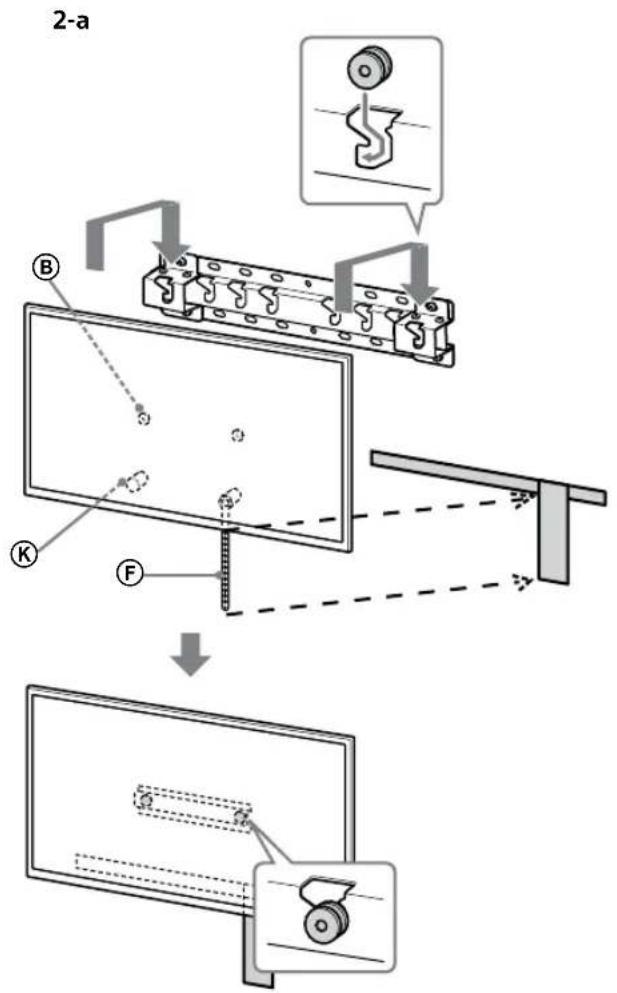
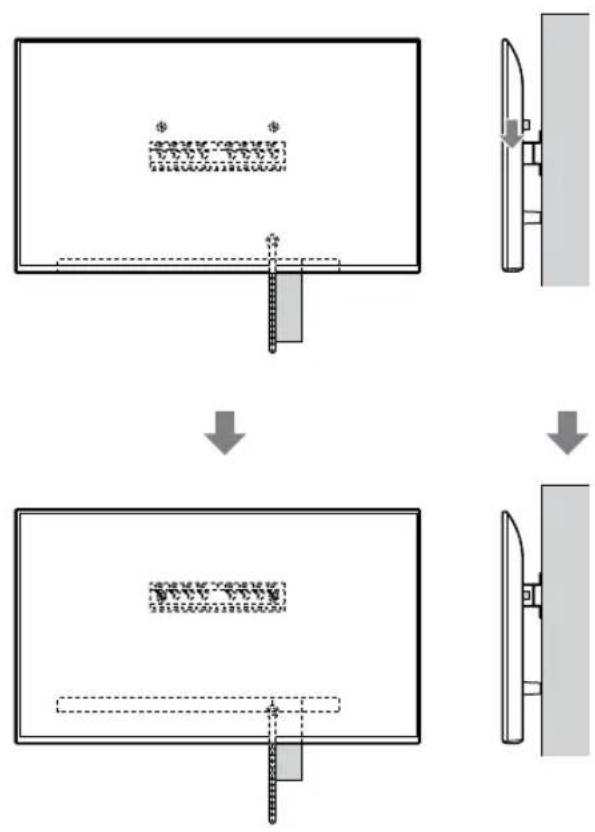
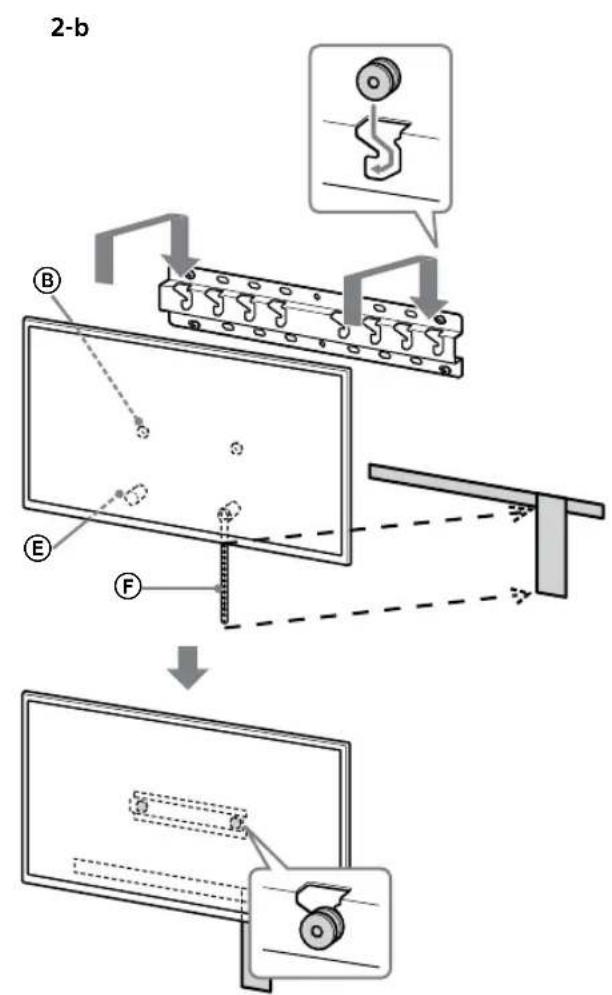
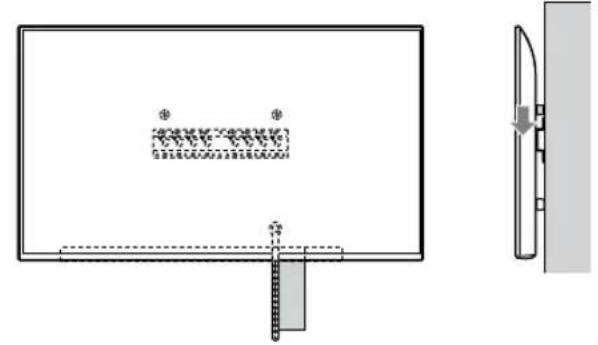
2 Install the TV onto the Base or Base Adaptor.
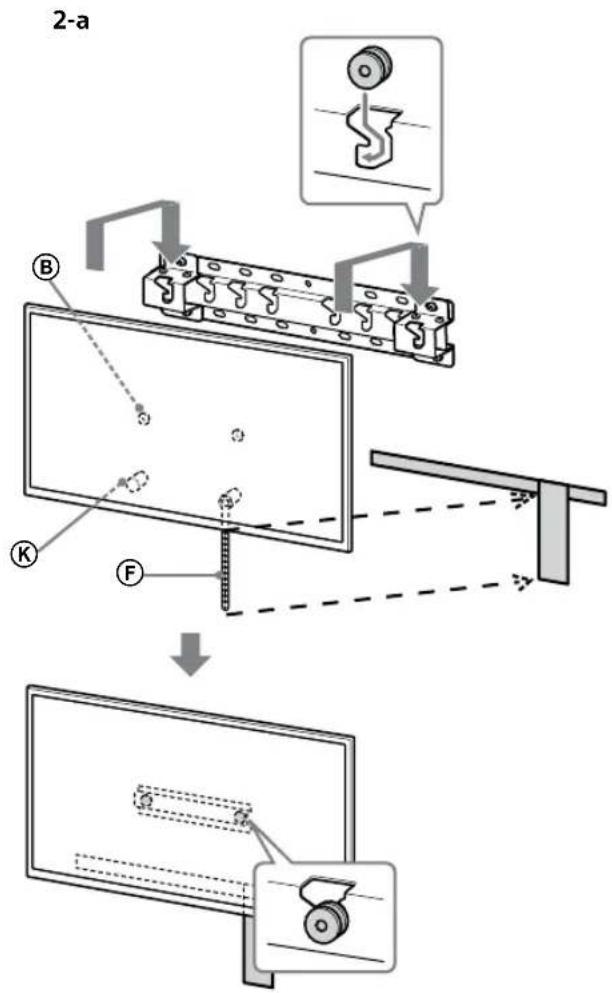
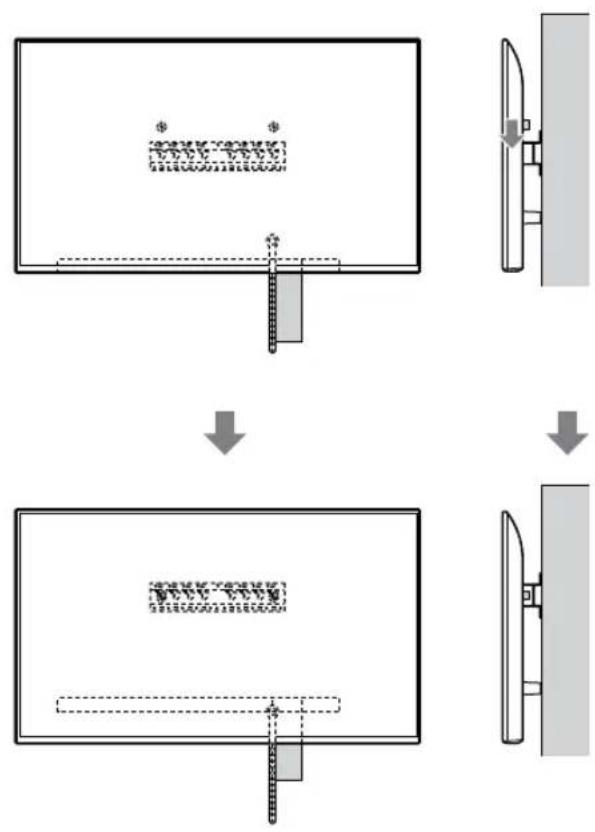
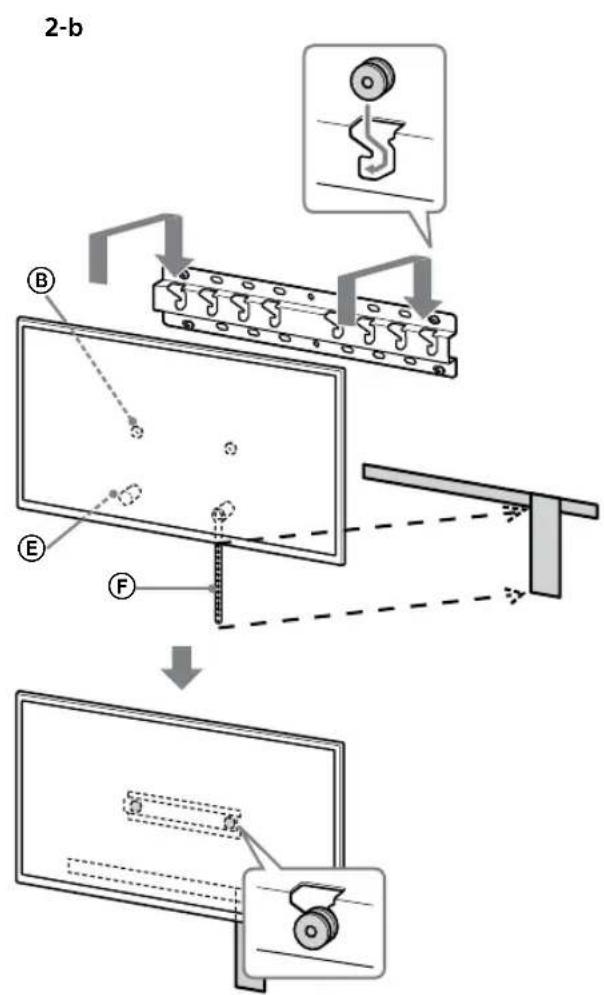
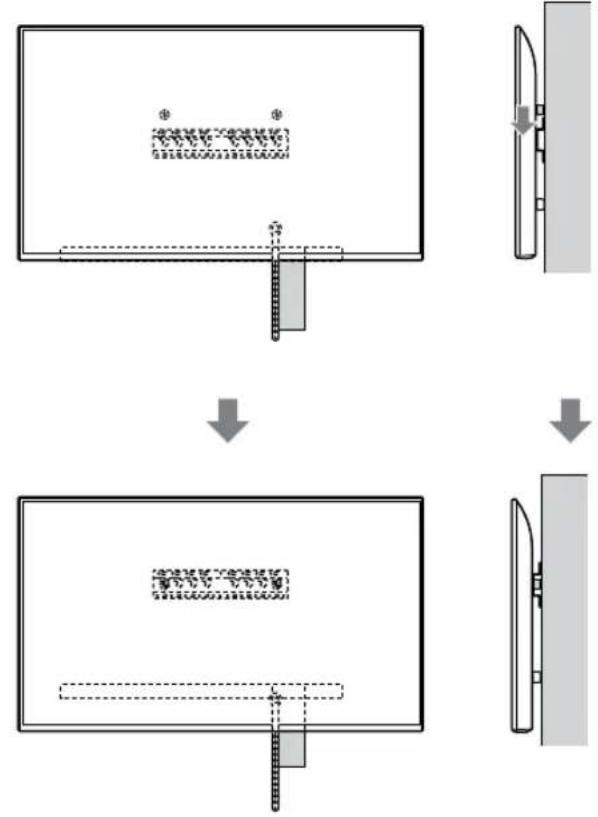
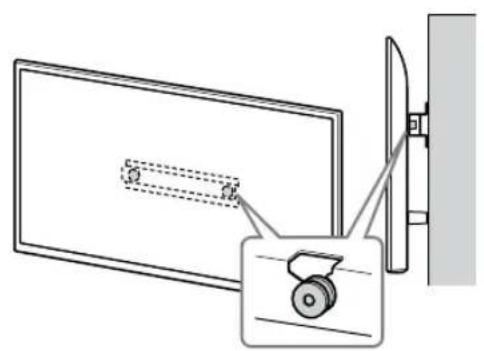
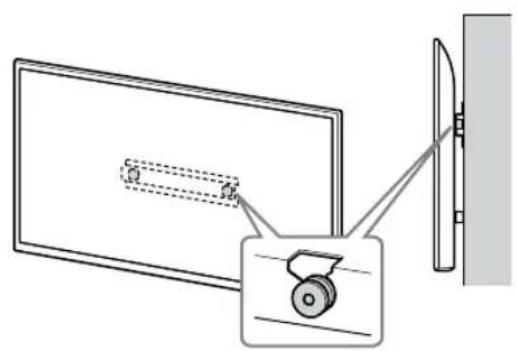
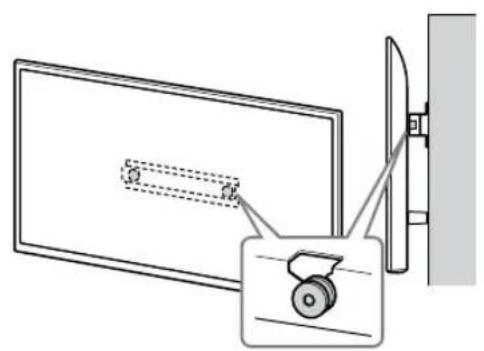
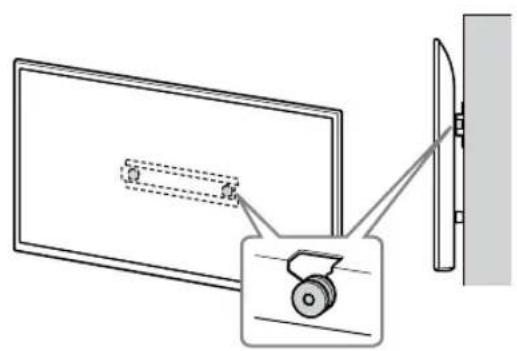
Gently slide down the TV and hang the Pulleys (⑧) attached to the rear of the TV to the Base or Base Adaptor, making sure to confirm the shape of the holes. After installing the TV on the wall, confirm the Pulleys (B) are firmly latched into the Base or Base Adaptor. - Release both hands slowly to ensure that the TV does not fall.
2-a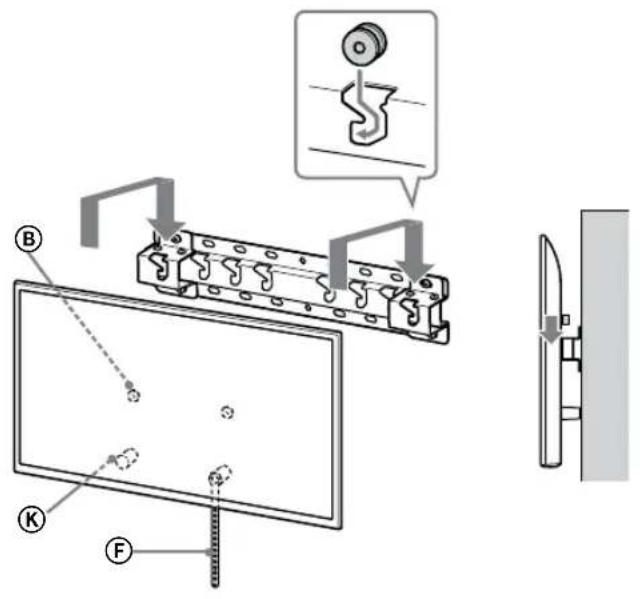
2-b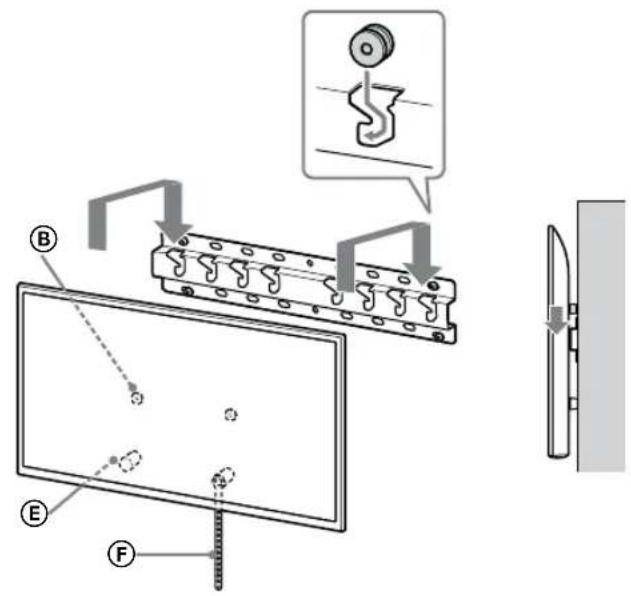
↓
↓
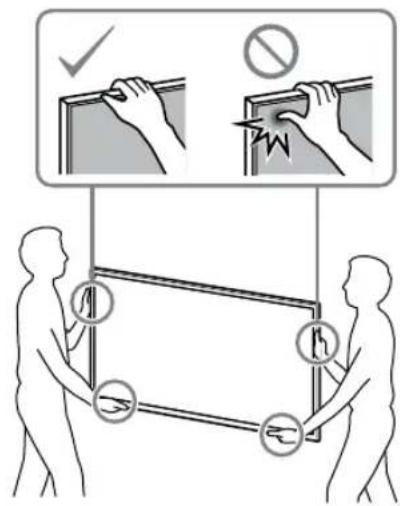
WARNING
- Be sure that two or more persons (three or more persons for 75 inches and above TV set) hold the TV when carrying it.
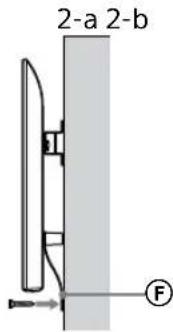
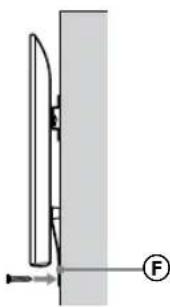
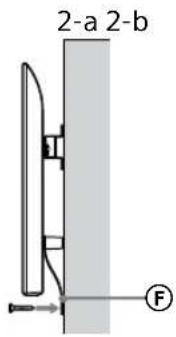
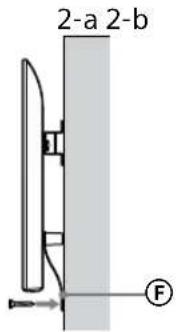
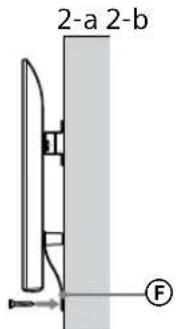
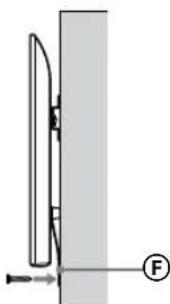
3 Preventing the bottom of the TV from shifting.
Take up the slack of Belt F and attach it to the wall tightly.
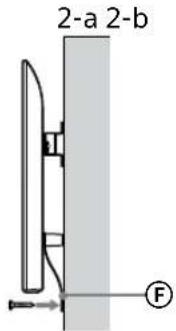
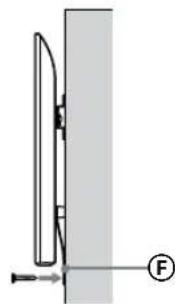
- Use a 5mm diameter screw or equivalent (not supplied).
Note
Try to pull the bottom of the TV towards yourself slightly, to make sure that it does not move forward. If there is any movement, it is not fixed correctly, and the Belt should be secured firmly again.
Confirming the completion of the installation
Check the following points.
- The Pulleys (B) are firmly hung onto the Base or Base Adaptor.
- The cord and the cable are not twisted or pinched.
- The Belt F is tight with no slack.
WARNING
- Improper placement of the mains lead, etc. may cause fire or electric shock through a short circuit. Be sure to confirm the completion of the installation for safety.
Other information
When removing the TV, reverse the previous installation procedure.
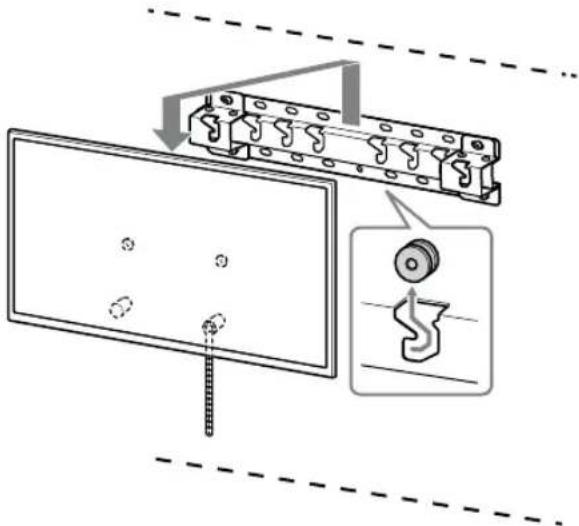
WARNING
- Be sure that two or more persons (three or more persons for 75 inches and above TV set) hold the TV when removing it.
Specifications
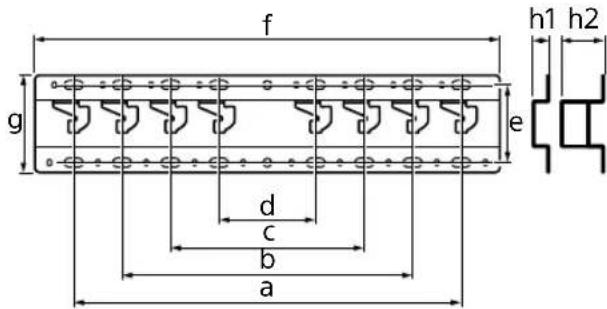
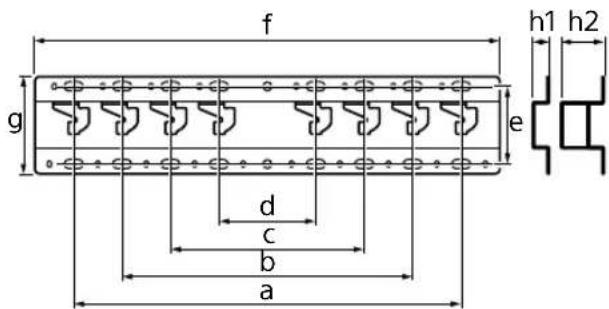
Dimensions: (Approx.) [mm]
a: 400
b: 300
c: 200
d: 100
e: 80
f: 480
g: 100
h1: 20 (case 2-b)
h2: 60 (case 2-a)
Weight (base only): (Approx.) [kg]
0.8
Design and specifications are subject to change without notice.
55XG80□□*/49XG81□□*/49XG80□□*/43XG81□□*/
43XG80□□*
Dimensions: (approx.) [mm]
a: 400
b: 300
c: 200
d: 100
e: 80
f: 480
g: 100
h1: 20 (case 2-b)
h2: 60 (case 2-a)
Weight (base only): (approx.) [kg] 0.8
55XG80□□*/49XG81□□*/49XG80□□*/43XG81□□*/
43XG80□□*
55XG80□□*/49XG81□□*/49XG80□□*/43XG81□□*/
43XG80□□*
55XG80□□*/49XG81□□*/49XG80□□*/43XG81□□*/
43XG80□□*
55XG80□□*/49XG81□□*/49XG80□□*/43XG81□□*/
43XG80□□*
In current model names, "□□" indicates digits and/or characters specific to each model.
To customers
55XG80□□*/49XG81□□*/49XG80□□*/43XG81□□*/
43XG80□□*
55XG80□□*/49XG81□□*/49XG80□□*/43XG81□□*/
43XG80□□*
Dimensions: (Approx.) [mm]
a: 400
b: 300
c: 200
d: 100
e:80
f:480
g:100
h1:20 (case 2-b)
h2:60 (case 2-a)
Weight (base only): (Approx.) [kg]
0.8
55XG80□□*/49XG81□□*/49XG80□□*/43XG81□□*/
43XG80□□*
* The □□ in the model names indicate numbers and/or symbols for each model.
To customers
Preparation for installation. 5
Checking parts 5
Finding a location 6
Preparation for installation
1 Find the TV's location.
55XG80□□*/49XG81□□*/49XG80□□*/43XG81□□*/
43XG80□□*
55XG80□□*/49XG81□□*/49XG80□□*/43XG81□□*/
43XG80□□*
* The actual model name of the TVs, the "□" indicates the digits/characters of the specific model.
For customers
For reasons of product protection and safety, Sony recommends that the installation of your TV be carried out by Sony representatives or qualified technicians. Do not attempt to install it yourself.
For Sony representatives and technicians
Preparation for installation
Keep the instruction manual and the TV installation manual from the installation nearby. - Before installation, make sure you have a Philips screwdriver that fits the screws. - Verify the position of the TV stand. - Prepare three or more screws of 8 mm diameter and one screw of 5 mm diameter (if applicable). Choose screws suitable for the wall material.
Checking the accessories
55XG80□□*/49XG81□□*/49XG80□□*/43XG81□□*/
43XG80□□*
55XG80□□*/49XG81□□*/49XG80□□*/43XG81□□*/
43XG80□□*
55XG80□□*/49XG81□□*/49XG80□□*/43XG81□□*/
43XG80□□*
Dimensions: (approx.) [mm]
a:400
b:300
c:200
d:100
e:80
f:480
q:100
h1:20 (case 2-b)
h2:60 (case 2-a)
Do not insert screws or other mounting items into the TV.
If done incorrectly, the TV may fall and cause injury or damage to property.
Place the wall mount bracket on the wall.
If you do not follow the instructions, the wall mount bracket may fall and cause injury or property damage.
Do not mount any other equipment other than the specified product.
This wall mount bracket is designed for use only with the specified product. If you mount equipment different from the specified one, it may fall and cause injury or property damage.
Do not place the wall mount bracket on any other product except the TV. Do not place the TV on top of or below the bracket.
If you do not follow the instructions, the TV may fall and cause injury or property damage.
Do not lean on or sit on the TV.
Do not push or pull the TV; it may fall and cause serious injury.
WARNING
If the safety precautions are not followed, injury or property damage may occur.
Do not handle the product with wet hands during cleaning or maintenance.
Do not apply excessive force to the top of the TV. If you do, the TV may fall and cause injury or property damage.
Safety Precautions
If you use the TV for a long time, mounted on the wall mount bracket, the wall may weaken or the bracket may detach, depending on the wall material. - If the wall mount bracket is pulled off the wall after mounting, screw holes will remain. Do not reuse the wall mount bracket in a location where it may be subjected to mechanical vibration.
Wall Mount Bracket Installation
Read the instructions on Sony.
ACCESSORIES
Read these instructions for yourself before installing the product. Follow the safety precautions described below. Pay special attention to safety during installation, maintenance, and operation of the product.
Do not install the wall-mount bracket on a wall surface where the TV screen protrudes from the wall surface.
Do not install the wall-mount bracket on a wall surface, such as a pillar, where the TV screen protrudes from the wall surface. If the TV falls or is dropped, it may cause injury or damage to property.
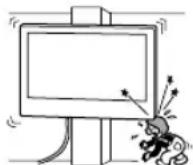
Do not install the TV under or near an air conditioner.
If the TV is exposed to cold or hot air from an air conditioner for a long time, it may cause fire, electric shock, or malfunction of the TV.
Install the wall-mount bracket securely to the wall by following the instructions in this manual.
If any of the screws become loose or fall out, the wall-mount bracket may fall and cause injury or damage to property. Use screws suitable for the wall material and install the structure securely by using four or more screws with a diameter of 8 mm (or equivalent).
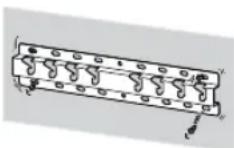
Do not allow the power cord or connecting cables to be pinched.
If the power cord or connecting cable is pinched between the wall structure or if it is pulled or stressed with force, the internal wires may be damaged and cause a short circuit or electric shock. This may cause a fire or electric shock.
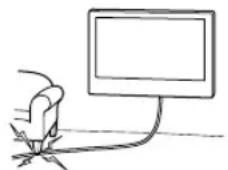
The screws required for securing the wall-mount bracket to the wall are not included in the package.
Use screws suitable for the wall material and structure when installing the wall-mount bracket.
Contents
Preparation for installation. 5
Checking on part 5
Determining the mounting location 6
Mounting the wall base 8
Preparing for TV mounting...9
KD-75XG80□□ 9
KD-65XG81□□/65XG80□□. 10
KD-55XG81□□/55XG80□□ 11
KD-49XG81□/49XG80□/43XG81□/43XG80□
Mounting the TV on the wall.14
KD-75XG80□□ 14
KD-65XG81□□ / 65XG80□□ / 55XG81□□ / 55XG80□□ / 49XG81□□ / 49XG80□□ / 43XG81□□ / 43XG80□□
Checking the connection of the
Mounting 19
Other information 19
Specifications.. 19
Mounting the TV on the Wall
The mounting procedure differs depending on the TV.
4 Determine the positions of the screws for mounting the base (20) A.
See the specifications on page 19.
When you select 2-a, use the specific positions of the holes for the adapter on the base ①.
WARNING
The wall on which you are going to mount the TV must be able to support at least four times the weight of the TV (see the TV's reference guide regarding its weight).
- Determine the direction of the wall on which the TV will be mounted. If necessary, strengthen the wall sufficiently.
Mounting the base on the wall
- Use four or more screws with a diameter of 8 mm or equivalent (not supplied). Tighten the four screws into the holes of the adapter on the base ① with the base (20) A (only 2-a).
- Mount the base (20) A horizontally on the wall.

Preparation for mounting the TV
When mounting, follow the setup guide.
KD-75XG80□□
1 Determine the location for mounting on the wall.
- Install the TV stand (not supplied with the kit) to prevent the TV from tipping over, near the base of the stand. See the following table.
Unit: mm
2 Mount the TV onto the table-top stand.
Carefully lift the TV and insert the brackets B, securing them to the designated side of the TV, onto the base of the stand, while checking the hole format. After mounting the TV, check that the brackets B are securely fastened to the base of the stand. Also tighten the two screws to ensure the TV is stable.
After mounting the TV to the wall, remove the self-adhesive tape from the wall.
WARNING
- Ensure that two or more people (two or more people for TVs with screen size 75 inches or larger) hold the TV when carrying it.
Remove the protective film from the TV.
- Pull out the detached part of the stand and secure it firmly to the wall.
- Use a screw with a diameter of 5 mm or equivalent (not supplied with the kit).
Prevention
- Gently pull the TV towards you to ensure it is not loose. If it moves, it is not secured properly and the stand must be re-secured.
KD-65XG81□□/ 65XG80□□ / 55XG81□□ / 55XG80□□ / 49XG81□□ / 49XG80□□ / 43XG81□□ / 43XG80□□
1 Lift the TV.
3. Mount the bracket ⑧ onto the base of the adapter for the base. See the table in the section "Determining the Mounting Location" on page 7. Make sure that the correct side of the TV is facing the base of the adapter for the base when you hold the TV.
Note
Keep the TV upright.
2. Mount the TV onto the base plate of the adapter for the base.
Carefully place the TV on a flat surface and insert the bracket ⑧, securing it to the correct side of the TV, onto the base of the adapter for the base, checking the alignment of the holes. After mounting the TV, check that the bracket ⑧ is securely attached to the base of the adapter. Also, tighten both screws to ensure the TV is stable.
2-a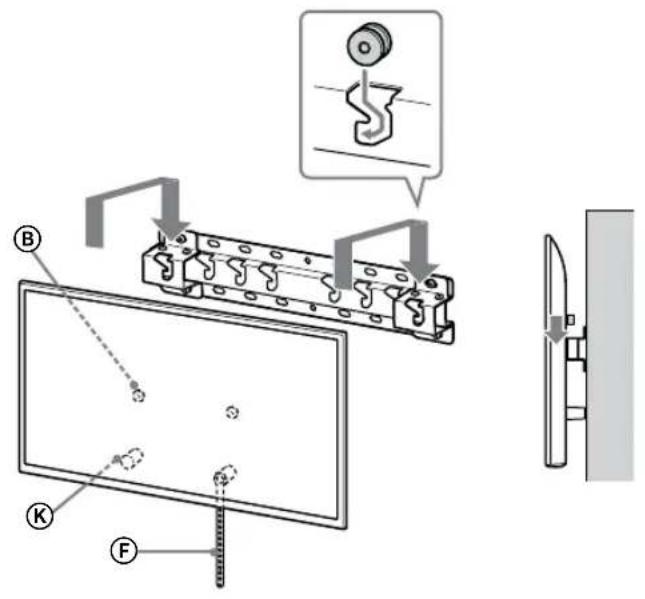
2-b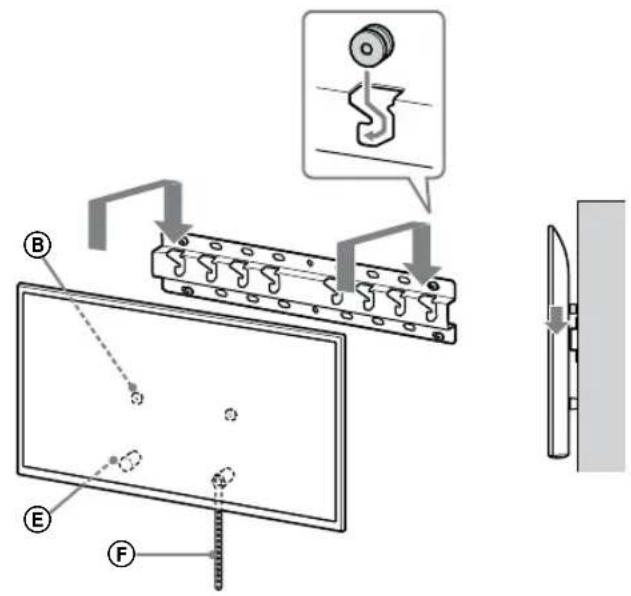
↓
↓
BG
PACKING
- Make sure that the TV is held by at least two people (or three or more for TVs 75 inches and larger) when carrying it.
3. Adjustment
Adjusting the lower part of the TV.
- Remove the loosened part of the collar and slide it toward the wall.
- I3noJ3BaIte BnHT c DnaMeTp5 mm nn EKBuBaIeHTeH (He e BKIOueH B KOMNKeTa).
3a6eJexKa
-OnntaTe IeKo Da n3dbpnte KbM c6e cn dOnHaTa HCT Ha TeBn3opa, 3a Da CE yBepuTE, He He CE IpeMeCTBa HAnpei. Ako Ce DnKn, Toi He e 3akpenen npabunHO N KOanH F Tpr6Ba OTHOBO da ce 3akpen 3dpabo.
Поберка на
PondepkInBaemble MoeI:
KD-75XG80□□*/65XG81□□*/65XG80□□*/55XG81□□*/
55XG80□□*/49XG81□□*/49XG80□□*/43XG81□□*/
43XG80□□*
* B ΦaKTnuecknx Ha3BaHnax MoJeN "□□" 6o3Haayet uΦpyi N/Inn CmBOJbl, XapakTepeHbIe nIg KOHKpeTHoN MoJeN.
DaHHb KpOHHTeH nI HaCTeHHORO KpenJIeHN IpeH3aHauH cIy OTJeBbIX MoIeNe TcEBu3OpOB. Cm. CnpabOchoe pyKOBOCTBO K TeEbn3OpAM nI npOBepKn BO3MOXHOCTN IcONJb3OBAHn KpOHHTeHa dI HACTeHHoYCTaHOBKn.
Для nokунATEnei
PNEUINPEKDEHNE
HecobJIOeHne npBBeHbIX HnKe Mep npeoCTopOxHOCTn MOKeT CTaTb pNCHNO CMEPTNI NOLyueHnE cep3HbIX TpaBM BCNeCDTBNE nopaeHnE 3JeKTPnueCKm TOKOM, BO3rOpAHn, ONPOKNbBaHn INI naDeHn N3DeJIIN.
063aTeIbHo 06paTntecb K JIuceH3nPoBaHHOMy IOpRAnky,a TaKxHe He DOnyckaIte TORO,QTObbl DeTN HaxoJInCb B6Jln3m MeCTa YCTaHOBKn N3dEJIy.
HenpaBnBnaYcTaHObKa KPOHtTeHa DnA HacteHHOyCTaHOBKn IIN TeJIeBN3Opa MOKeT CTAb npuHHo nepeHCNEHHbIX HnKe HeCAcTHbIX CNYaeB. DnA BbIOJIneHHa YcTaHOBKn O83aTeNbHO OBpaNTecb K NlueEHNpOBaHHbIM NoDpAChkAm.
The wall mount bracket must be installed on a wall that can support the weight of the TV. If the wall on which the wall mount bracket is installed is not sturdy, uneven, or not vertical, the product may fall and cause serious injury or damage to property. The wall must support at least four times the weight of the TV. (To find out the weight of the TV, see the reference manual.) If the wall mount bracket is installed on a wall that is not sturdy enough, the product may fall and cause injury or damage to property.
Precautions for children
Do not allow children to play with the TV. Keep small parts out of the reach of children so that they cannot accidentally swallow them.
After installing the TV, do not remove the screws, etc.
Otherwise, the TV may fall and cause injury or damage to property.
Do not disassemble or modify the parts of the wall mount bracket.
Otherwise, the wall mount bracket may fall and cause injury or damage to property.
Do not install any equipment other than the specified one on the bracket.
This wall mount bracket is intended for use only with the specified products. If you attach equipment that is not intended for this installation to the wall mount bracket, it may fall or be damaged, and may also cause injury or damage to property.
To avoid overloading the wall mount bracket, do not place anything other than the TV on it. Do not move the TV left/right or up/down.
Otherwise, the TV may fall and cause injury or damage to property.
Do not lean on the TV or hold onto it.
Do not lean on the TV or hold onto it, as it may fall and cause serious injury.
WARNING
If the following precautions are not observed, there is a risk of injury or damage to property.
Necessary. Do not apply excessive force.
Do not overload the top of the TV. Otherwise, the TV may fall and become a cause of injury or property damage.
Precautions
If the TV is installed on a wall mount and used for a long period of time, the wall behind or beside it may become discolored or the wallpaper may peel. After removing the wall mount, holes will remain in the wall. Do not use the wall mount in places with mechanical vibrations.
Do not install the wall mount on walls where the edges of the TV will protrude beyond the edges of the wall.
Do not install the wall mount on surfaces such as columns where the edges of the TV will protrude beyond the edges of the surface. Hitting the protruding edges of the TV may cause injury or property damage.
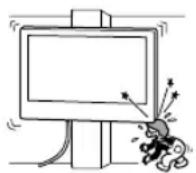
Do not place the TV on top of a stand or on the floor.
If the TV is exposed to condensation or airflow from an air conditioner for a long period of time, it may cause a fire, electric shock, or malfunction of the TV.
Be sure to securely attach the wall mount to the wall, following the instructions in this manual.
If any of the screws are loose or missing, the wall mount may fall and become a cause of injury or property damage. When performing installation, be sure to use screws that match the wall material, securely install the device, and use no less than four 8 mm screws (or equivalent).
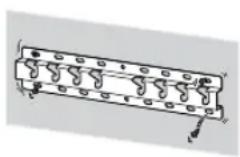
Be sure to use the screws and parts included in the package for mounting and strictly follow the instructions in this installation manual. If other mounting materials were used during installation, the TV may fall and be damaged or become a cause of injury.
Be sure to perform the assembly of the bracket, exactly following the instructions in this installation manual.
If any of the screws are loose or missing, the TV may fall and be damaged or become a cause of injury.
Securely tighten the screws in the designated mounting holes.
Otherwise, the TV may fall and be damaged or become a cause of injury.
Make sure that during installation the TV is not exposed to impacts.
An impact can cause the TV to fall and be damaged. This can lead to injury.
Install the TV on a wall only if it is vertical and positioned at a right angle to the floor.
Otherwise, the TV may fall and cause injury.
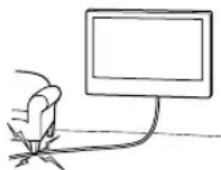
After installing the TV, ensure that the cables are laid out safely.
Cables that pose a tripping hazard can lead to serious injury or damage to the TV.
Do not allow the power cord and connecting cables to become tangled.
If the power cord or connecting cables are pinched between the device and the wall, or are sharply bent or twisted, the insulation of the internal wires may be damaged, which can cause a short circuit or break. This can lead to fire or electric shock.
Screws for attaching the wall-mount bracket to the wall are not included in the delivery.
When mounting the bracket for wall installation, use screws that match the material and structure of the wall.
The product should be stored in its cardboard packaging in a cool, dry, clean, and well-ventilated room, away from direct sunlight. Storage temperature: from -20°C to +60°C. Storage humidity: <80%.
Contents
Preparation for installation. 6
Checking the delivery contents 6
Determining the installation location 7
Wall-mounting the TV 9
Preparing for TV installation...10
KD-75XG80□□ 10
KD-65XG81□□/65XG80□□ 11
KD-55XG81□□/55XG80□□ 12
KD-49XG81□/49XG80□/43XG81□/43XG80□
Installing the TV on the wall. 15
KD-75XG80□□ 15
KD-65XG81□□ / 65XG80□□ / 55XG81□□ / 55XG80□□ / 49XG81□□ / 49XG80□□ / 43XG81□□ / 43XG80□□
Use the SU-WL450 wall-mount bracket for wall-mounting the TV.
Note
- If the table-top stand is attached to the TV, first remove the table-top stand. Perform the steps for attaching the table-top stand described in the Setup Guide in reverse order.
Place the TV on a stable horizontal surface covered with a soft cloth, with the screen facing down, and attach the wall-mount bracket parts. When removing the table-top stand from the TV, do so to avoid damaging the LCD screen of the TV.
Keep the removed screws in a safe place out of the reach of children.
- Determine the strength of the wall on which the TV will be installed. If necessary, reinforce the wall.
Wall mounting base installation
- Use four or more screws with a diameter of 8 mm or similar (not included in the delivery package).
Insert four screws into the holes of the base adapter ①, and attach it to the base (20) (only 2-a).
- Install the base (20) horizontally on the wall.
1 Mark the installation location on the wall.
- Use adhesive tape or similar (not included in the delivery package) to mark the location of the TV next to the base or base adapter. See the following table.
Measurement units: mm
Compact installation (2-b)
Note
- With this installation, some connectors on the back of the TV will be inaccessible.
3 Connect the necessary cables to the TV.
Before installing the TV on the wall, be sure to connect the cables.
After installing the TV, connecting the cables will be impossible.
See the user manual supplied with the TV.
Note
Drill holes in the wall according to the specified procedure. Secure the device to the wall with the mounting screws, and connect the cables so that you do not accidentally step on them.
4 Disconnect the table-top stand from the TV.
- Remove the table-top stand from the TV. Hold the table-top stand firmly with both hands while others lift the TV.
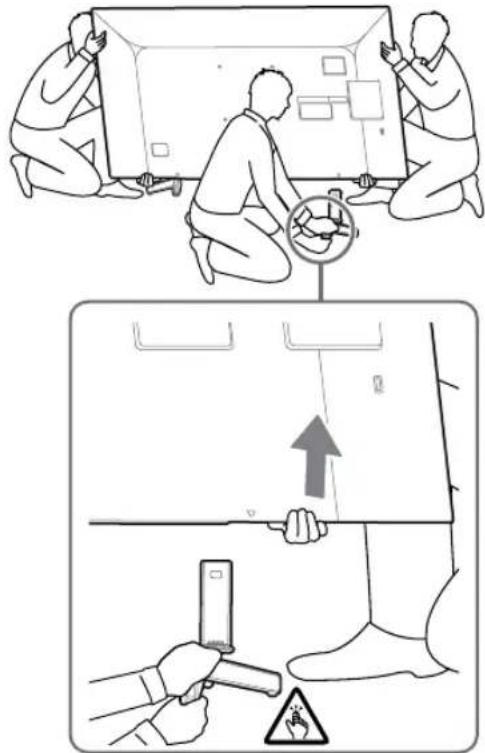
- Repeat the procedure and remove the other side of the table-top stand.
Note
To disconnect the table-top stand, two or more people are required. Be careful not to use excessive force when disconnecting the table-top stand from the TV, as this may cause the TV to fall and result in injury or damage to the TV. Be careful when handling the table-top stand to prevent damage to the TV. Be careful when lifting the TV, as the table-top stand may detach and cause injury. Be careful when disconnecting the table-top stand from the TV to avoid tipping over the device or damaging the surface on which the TV is placed.
KD-65XG81□□/65XG80□□
1 Attach the wall-mount brackets and the wall-mount base. Verify the brackets according to the section "Attaching the Wall-Mount Base" in the "Checking the Accessories" section on page 6.
Note
Tighten the brackets securely with screws. When using an electric screwdriver, set the torque to approximately 1.5 N·m {15 kgf·cm}. Store used or unused parts in a safe place for future use. Keep this instruction manual for future reference.
Standard mounting (2-a)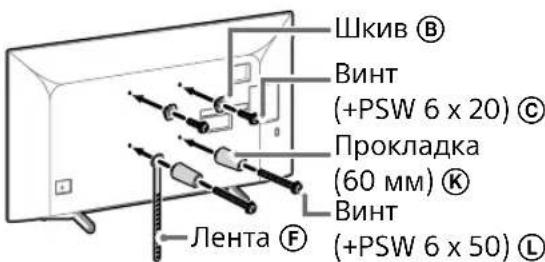
Compact installation (2-b)
Note
- With this installation, some connectors on the rear of the TV will be inaccessible.

2 Connect the necessary cables to the TV.
When installing the TV on the wall, be sure to connect the cables.
After installing the TV, connecting the cables will become impossible.
See the Reference Guide supplied with the TV.
Note
-For routing cables through the wall, use a certified conduit. -Before mounting the device on the wall, connect the cables to avoid accidental damage to them.
Detach the table-top stand from the TV.
- Remove one side of the table-top stand alternately. Firmly hold the table-top stand with both hands while others lift the TV.
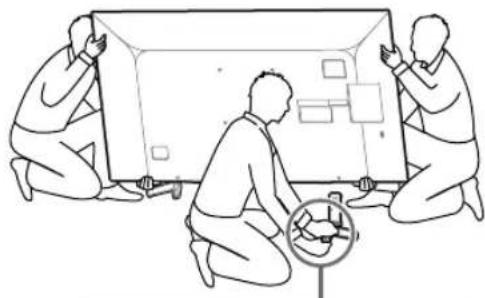
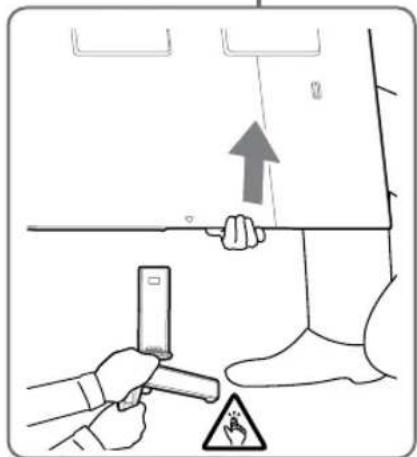
- Repeat the specified action and remove the other side of the table-top stand.
Note
-Detaching the table-top stand requires three or more people. -Be careful not to use excessive force when detaching the table-top stand from the TV, as this may cause the TV to fall and result in injury or damage to the TV. -Be careful when handling the table-top stand to prevent damage to the TV. -Be careful when lifting the TV, as the table-top stand may detach and fall, which could cause injury. -Be careful when detaching the table-top stand from the TV to avoid tipping over the device and damaging the surface on which the TV is placed.
KD-55XG81□□/55XG80□□
1 Attach the mounting parts and brackets for wall-mount installation. Perform the check of the mounting parts according to the section "Attaching the SU-WL450" in the "Checking the accessories" on page 6.
Note
-Securely attach the mounting parts with screws. -For the electric screwdriver, set the tightening torque to approximately 1.5 N·m {15 kgf·cm}. Store used and unused parts in a safe place for future use. Keep this instruction manual for future reference.
Standard mounting (2-a)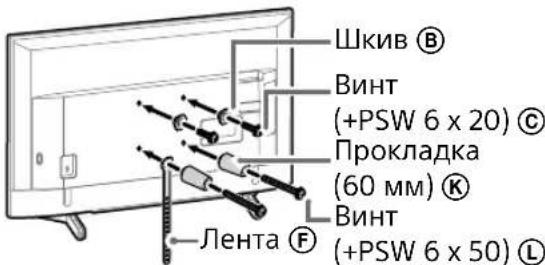
Wall-mount installation (2-b)
Note
- With this type of TV installation, some connectors on the back of the TV will be inaccessible.
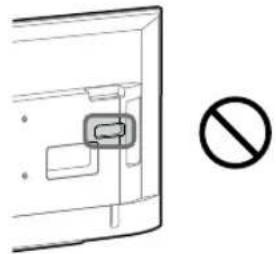
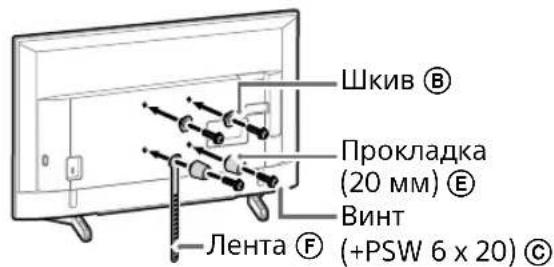
2 Connect the necessary cables to the TV.
Before installing the TV on the wall, be sure to connect the cables.
After installing the TV, connecting the cables will be impossible.
See the instruction manual supplied with the TV.
Note
- To route cables along the wall, use a cable guide. - Before fixing the TV to the wall, connect the cables so that you do not step on them.
3 Detach the table-top stand from the TV.
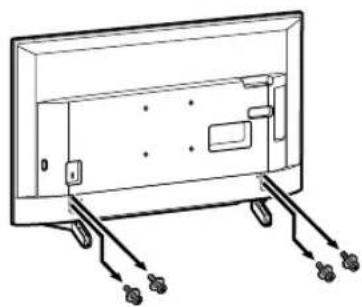
Note
- Be careful when lifting the TV, as the table-top stand may detach and fall, which could cause injury.
- Be careful when detaching the table-top stand from the TV to avoid tipping over the device and damaging the surface on which the TV is placed.
KD-49XG81□□/ 49XG80□□ / 43XG81□□ / 43XG80□□
1 Detach the table-top stand from the TV.
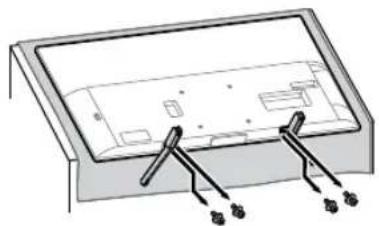
PpmeaHne
Place the TV on a soft cloth to avoid damage. -When installing the table-top stand, do not use screws removed from the table-top stand. Store the removed table-top stand and its screws in a safe place out of reach of children. You will need them if you want to install the TV on a table in the future. The table-top stand is not sold separately.
CAUTION!
-Before switching on, make sure the TV is in a vertical position. It is forbidden to switch on the TV if it is placed with the screen facing down to avoid unevenness of the image. Applying pressure to the TV with mechanical force may lead to breakage or damage to the TV. -Place the TV with the screen facing down on a stable, flat surface so that the table-top stand extends beyond the edge of the surface. Positioning the TV screen and the table-top stand on the same level may lead to unstable working conditions and damage the TV. -When disconnecting the table-top stand from the TV, hold the table-top stand with both hands.
2Attach the mounting brackets of the wall-mount. Perform a check of the mounting brackets according to the item "Supplied accessories SU-WL450" in the section "Checking the accessories" on page 6.
Note
Tighten the mounting brackets with the help of a screwdriver -When using an electric screwdriver, set the tightening torque to approximately 1.5 N·m {15 kgf·cm}. Store the used or unused parts in a safe place so that they can be used in the future. Keep this instruction manual for future reference.
Standard mounting (2-a)
Screw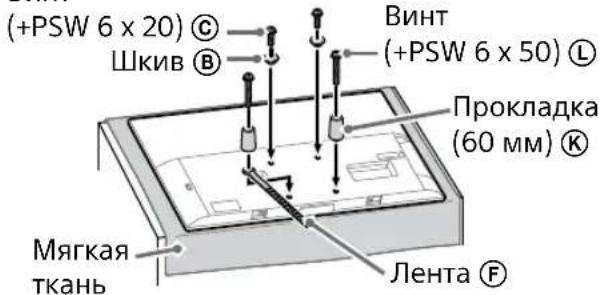
Compact mounting (2-b)
Note
-With this mounting, some connectors on the rear panel of the TV will be inaccessible.
Screw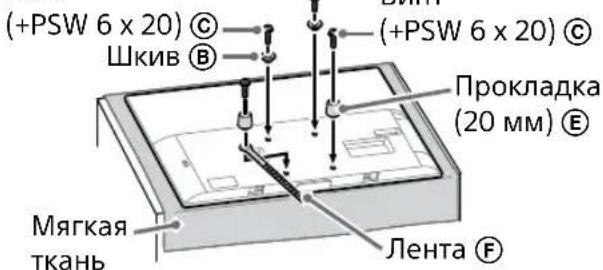
3Connect the necessary cables to the TV.
Before installing the TV on the wall, be sure to connect the cables. After installing the TV, connecting the cables will be impossible. See the reference manual supplied with the TV.
Note
- For mounting on a wall, follow the procedure in the order specified. - Before attaching the device to the wall, connect the cables to avoid accidentally stepping on them.
Mounting the TV on a wall
KD-75XG80□□
1 Prepare the TV.
The positions of the screws for attaching the base or base adapter are shown in Table 3 in the section "Determining the mounting position" on page 8. - Make sure the rear panel of the TV is in contact with the base or base adapter while holding the TV.
Note
- Hold the TV with both hands and make sure the bottom of the TV is level and aligned with the tape.
- Moving the TV should be done by three people: the person in the middle of the TV should guide the others to place the TV in the proper position.
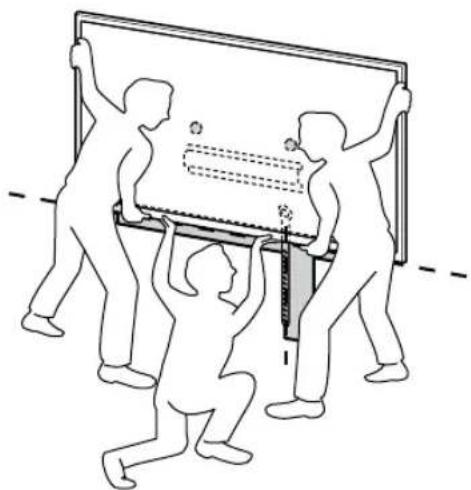
- When installing the TV on a wall, be careful not to let the TV fall, as it may cause serious injury or even death.
2 Install the TV on the base or base adapter.
- Carefully lower the TV and hook the hooks (8) installed on the rear panel of the monitor onto the base or base adapter, following the shape of the holes.
- After installing the TV on the wall, make sure that the hooks ⑧ are securely fixed in the base or base adapter.
- Slowly remove both hands and make sure the TV is securely installed.
- After installing the TV on the wall, remove the adhesive tape, etc. from the wall.
- This TV weighs 25 kg or more (for TVs with a 75-inch screen or larger, it weighs even more) when carried.
To prevent the lower part of the TV from shifting.
- Remove the adhesive tape E and securely attach it to the wall.
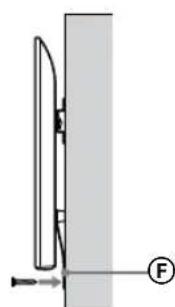
- Use a screw with a diameter of 5 mm or its equivalent (not supplied).
Note
Gently pull the lower part of the TV toward you to ensure it does not move forward. If there is any play, the TV is not securely fastened; strap F should be tightened.
KD-65XG81□□/ 65XG80□□ / 55XG81□□ / 55XG80□□ / 49XG81□□ / 49XG80□□ / 43XG81□□ / 43XG80□□
1. Lift the TV.
The positions of the hooks for attaching to the base or adapter base are shown in Table 3 in the section "Determining the installation location" on page 8. - Ensure that the rear of the TV is in contact with the base or adapter base when holding the TV.
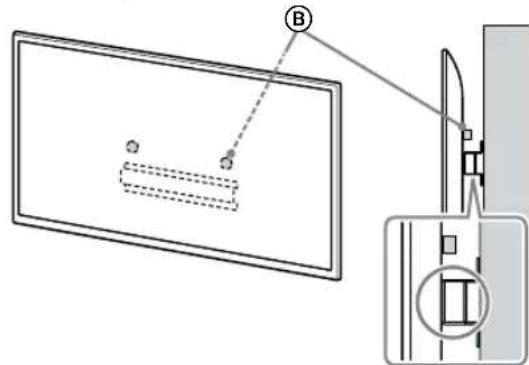
Note
- Hold the TV with both hands.
2. Place the TV on the base or adapter base.
- Carefully lower the TV and align the hooks installed on the rear of the monitor with the base or adapter base, following the shape of the holes.
- After installing the TV on the wall, ensure that the hooks are securely fixed to the base or adapter base.
- Hold the TV with both hands and make sure it is securely installed.
2-a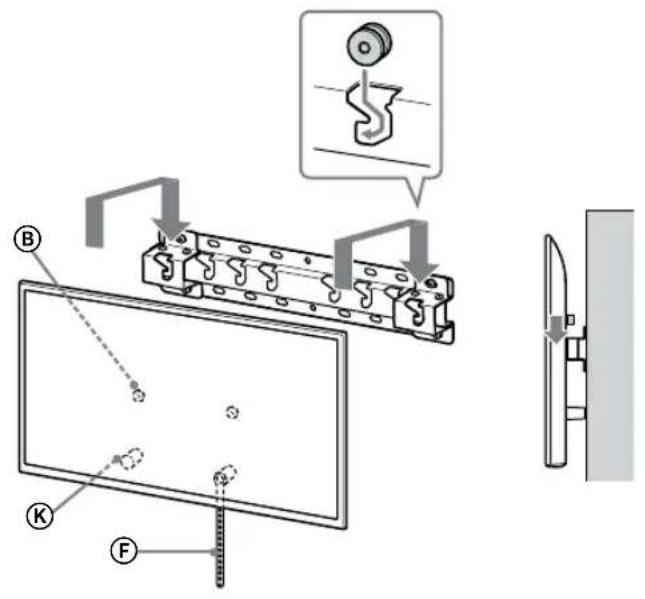
2-b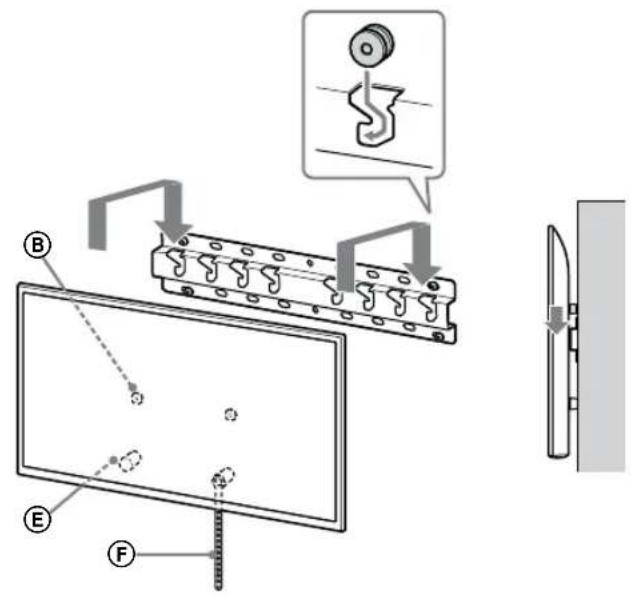
↓
↓
WARNING
- Make sure that the TV is held by two or more people (three or more people for TVs with a screen size of 75 inches or more) when moving it.
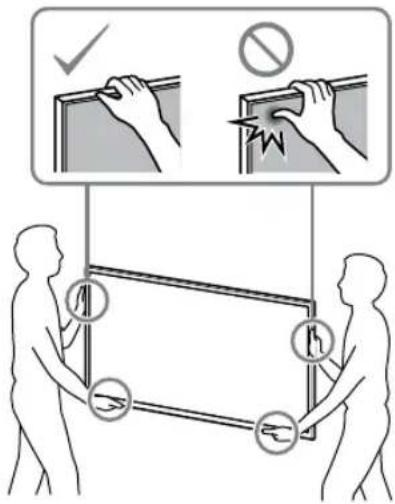
3 Prevent the lower part of the TV from shifting.
- Remove the adhesive tape F and securely attach it to the wall.
- Use screws with a diameter of 5 mm or equivalent (not supplied).
Note
Gently pull the lower part of the TV toward you to make sure it does not move forward. If there is any movement, the TV is not secured properly, and tape F should be attached securely.
- The hooks ⑧ are securely attached to the base or base adapter.
- The cord and cable are not twisted or pinched.
- Tape F is securely attached without slack.
- Improper cable installation, etc., can lead to fire or electric shock due to short circuits. To ensure safety, make sure all installation steps are completed.
Initial Information
To install the TV, perform the procedure described above in reverse order.
Make sure that the monitor is held by two people (or three people for TVs with a 75-inch diagonal or larger) when removing it.
Technical Specifications
Dimensions: (approx.) [mm]
a: 400
b: 300
c: 200
d: 100
e: 80
f: 480
g: 100
h1:20 (BapnaHT2-b)
h2:60 (BapnaHT2-a)
Base (only base): (approx.) [Kr] 0.8
Design and specifications are subject to change without prior notice.
Information for installation using the wall-mount bracket for Sony (SU-WL450)
Supported models: KD-75XG80□□*/65XG81□□*/65XG80□□*/55XG81□□*/ 55XG80□□*/49XG81□□*/49XG80□□*/43XG81□□*/ 43XG80□□*
* The “□□” corresponds to individual digits and/or symbols that appear in the model numbers of specific models.
For your safety and protection, Sony strongly recommends that installation of your TV be performed by Sony dealers or licensed contractors. Do not attempt to install it yourself.
Sony dealers and contractors will pay maximum attention to safety during installation, periodic maintenance, and product checks.
For installation of this product, especially for determining the strength of the wall that must support the weight of the TV, sufficient experience is required. Entrust the installation work only to Sony dealers or licensed contractors and pay adequate attention to safety during installation. Sony will not be held liable for any damages or injuries caused by improper installation or handling.
For safe and correct installation of the wall-mount bracket, follow the instructions in the wall-mount bracket installation manual, the TV setup guide, and the operating instructions.
Safety information
Thank you for purchasing this product.
Installation precautions
For installation of this product, sufficient knowledge and skills are required. Be sure to entrust the installation to Sony dealers or licensed contractors and pay special attention to safety during installation. Sony will not be held liable for any damages or injuries caused by improper handling or improper installation, or installation by any other installer other than those specified. This does not affect your statutory rights (if any).
Damage to the product by Sony
INSTALLATION It is necessary to have sufficient knowledge and skills. It is mandatory to carefully read this manual to safely perform the work and installation. Sony is not responsible for damage or injuries that occur due to improper handling or poor installation. After installation, read this manual again and keep it.
This manual describes the correct handling of the product and also provides important safety measures to prevent accidents. It is mandatory to carefully read this manual and use the product safely. Keep this manual for future reference.
During the development of SONY products, safety is the first priority. However, improper handling of the product can lead to serious injuries, electric shock, or fire. To prevent such incidents, it is mandatory to follow the safety rules.
The date of manufacture is indicated on the product and packaging with a barcode in the following format: YYYY/MM, where YYYY is the year and MM is the month of manufacture.
Manufacturer: Sony Corporation, 2-10-1 Osaki Shinagawa-ku Tokyo, 141-8610 Japan. Made in China.
WARNING
Product name
This wall-mount bracket is intended for use only with televisions specified for this product. Information about the possibility of using the bracket for wall mounting is provided in the manuals of the corresponding TV models.
Installation instructions
WARNINGS
If you do not follow the warnings below, serious injuries or death may occur due to fire, electric shock, or product falling.
It is mandatory to entrust installation to licensed contractors and ensure that children are not present during installation.
If the wall-mount bracket or TV is installed incorrectly, the following accidents may occur. Installation must be performed by licensed contractors.
The TV may fall and cause serious injuries such as bruises or fractures. If the wall on which the bracket for wall mounting is installed is unstable, uneven, or not perpendicular, the bracket may fall and cause injury or damage to property. The wall must be able to support the weight exceeding the weight of the TV. (The weight of the TV can be found in the manual.) If the bracket for wall mounting is installed on a wall that is not strong enough, the bracket may fall and cause injury or damage to property.
He Do3B0nIe Te DITM 3aJa3uTn H aTeNebi3op. TpmaTae Mani Detani n03a doctynom dTein, 06 dtn ix BnnaKOBo He npokobTHyn.
O6OB'3K0BO dopyuItb nepemiueneHHa6o demoHTyBaHHa TeIeBi3opa NiipraHnKaMn, kIMaIOb LiueH3IO.
Kuio nepemiueHHa 60 deMOHTyBaHH TeneB1Opa BnKOHyBaTMyTb IHU Oc6H, OKPIM iipraHNIKB, KIA MAtb IiueHIO, TeneB1OPO MOKe BNACTN Ta CTAn PnPHNOHO TPaMbYBaHH AooNoKoDKeHH MaHa. PepeHeceHH ADO deMOHTax TeBE3Opa NOBHHI 3IiChHOBat UOHMe HHE DBOI JIOE (UOHaMHeHtpe, kuo diAoHJIb TeneB1Opa Ckndae75DIOIMAB60JbSe).
He BnKpyuYTe rBnHTn, Too, nCJMa MOHTyBaHHa TeIeBi3opa.
Kkuo 3pObTu Nce, TeneBizop MoKe BnactTa 3aBdaTc Cepno3Hx TpaBM YN npu3BeCTNo NOIkwokxHnMaHa.
He 3miHouTe deTaJI KPOHHTeHa dJa HAcTIHHOro KpinJeHHra.
Kkto 3pObTuN Ce, KPOHTeH DnA HCTIHHORo KpIIeHNr MOxE Bnactn Ta3aBdATCep03Hnx TpaBM Yn Pn3BcETn Do NOKoJXeHN MaHa.
He BCTaHOBJIouTe HiaKnx iHmIx npncTpoIB, Kpim 3a3NaueHoro Bnpo6y.
Ley KPOHHTN DIA HACTIHORO KPIINENH Pn3HaueHO DIA BUKOPCTAHN IINIE 3 3aHaueHIM BNPoBOM.Y BUNADKY BCTAHOBENHH IHINX PnCtPoB, KpIM 3aHaueHES BOHN MOKytBnactu N 3naMaTNA Ta 3aDaTn CepO3Hnx TpaBM Y Pn3BeCTNO NO WKOJKeHH MaHa.
He 3actocobyTe do KpoHwTeHa dJa HactiHHoro KpinJIeHHI INwi HabaHTaXeHHN, OKpIM TeJIeBi3opa. He po3xITyIte TeJIeBi3Op yIbO/BnpaBO qN Bropy/ BHn3.
Kkuo 3pObTu Nc, TeNeB1Op MoKe BNaCTu Ta 3aBdTu CepNo3Hux TpaBM YN PnN3BeCTNu NOIOWKOJKeHHMaHa.
He cnpuaTecna TeleBizop i He yinJaTec3a Hboro.
He cnnpaTecHa TeJIeB3Op I He cINnIteTec 3a HbOro, OCKInbKn BiH MoKe Bnactn Ha Bac Ta 3aBdAn CepNo3HNx TpaBM.
PONEPEIXEHH
Failure to follow these safety precautions could result in serious injury or damage to property.
When cleaning or servicing the product, do not apply excessive force to it.
Do not apply excessive force to the top of the TV. If this happens, the TV may fall and cause serious injury or lead to property damage.
Safety precautions
If the TV is installed using the wall-mount bracket, it will be used for a long time. Depending on the material of the wall, the wall surface behind the TV or the wall itself may become unable to support the weight, or the screws may come loose.
For wall-mount bracket installation, after the TV has been mounted on the wall, do not use the wall-mount bracket in places where there are vibrations or impacts.
Installing the wall-mount bracket
For Sony customers
WARNING
The instructions below are intended for Sony customers. Please read the safety precautions below carefully and pay special attention to safety during installation, servicing, and inspection of the product.
Do not install the wall-mount bracket in places where the edges of the TV protrude beyond the wall surface.
Do not install the wall-mount bracket on surfaces that are not flat, because in such places the edges of the product protrude beyond the wall surface. If a person or object accidentally hits the protruding side of the TV, it may cause injury or lead to property damage.
Do not install the TV on a ceiling or with a condenser.
If the TV is exposed to dripping or splashing water for a long time, or to a stream from a condenser, it may cause malfunction, electric shock, or improper operation of the TV.
Install the wall-mount bracket securely to the wall according to the instructions in this manual.
Tighten the bolts to securely attach the TV to the wall, preventing it from falling or causing injury. Use bolts appropriate for the wall material. To ensure secure installation, use dynamic bolts with a diameter of 8 mm (or equivalent).
Use the bolts from the parts kit supplied with the TV, following the instructions in this manual. Using other bolts may cause the TV to fall and result in injury or damage.
Tighten the bolts securely, following the procedure described in this manual.
If the bolts are not tightened properly or fall out, the TV may fall and cause injury or damage.
Tighten the bolts firmly in the specified position.
If not done, the TV may fall or tip over and cause injury.
When moving the TV, hold the bottom of the TV.
During movement, the TV may fall or break. This can cause injury.
Install the TV on a perpendicular wall with a flat surface.
If not done, the TV may fall and cause serious injury.
After mounting the TV, secure the cables with a proper clamp.
If the cables are loose or tangled, this may cause damage to the TV or injury.
Make sure that the power cord or connecting cable is not pinched.
If the power cord or connecting cable is pinched between the product and the wall or is bent or twisted, the internal conductors may be exposed, causing a short circuit or electric leakage. This may cause electric shock or injury.
The bolts used to secure the TV to the wall are not included in the supply kit.
The wall-mount bracket must be installed in accordance with the wall structure and material into which it is mounted.
Keep the product in its cardboard box, in a dark, dry, clean place with good ventilation, away from areas where acids and glues are stored. Storage temperature: from -20°C to +60°C. Storage humidity: <80%
Contents
Preparation for installation 5
Checking the parts 5
Identifying the installation location 6
Installing the TV on the wall 8
Preparing for TV installation .... 9
KD-75XG80□□ 9
KD-65XG81□□/65XG80□□ 10
KD-55XG81□□/55XG80□□ 11
KD-49XG81□/49XG80□/43XG81□/43XG80□
Installing the TV on the wall 14
KD-75XG80□□ 14
KD-65XG81□□ / 65XG80□□ / 55XG81□□ / 55XG80□□ / 49XG81□□ / 49XG80□□ / 43XG81□□ / 43XG80□□
Completion
Installation 19
Other information 19
Technical specifications 19
Mounting the TV on a wall
The installation procedure depends on the TV model.
To mount the TV on a wall, use the bracket for wall mounting SU-WL450.
Attachment
- If a wall mount is attached to the TV, remove it. Follow the manual and perform the steps in reverse order to detach the wall mount.
- To avoid damaging the bracket's mounting elements during installation of the wall mount, place the TV screen down on a flat surface covered with a thick, soft cloth. Keep the screws in a safe place, out of reach of children.
Preparation
Installation
- Before installation, carefully read the manual and the guide for setting up the TV. Before assembling, make sure you have the appropriate screwdriver for the screws.
- Check the position for installing the TV. Use four straight screws with a diameter of 8 mm and one screw with a diameter of 5 mm or equivalent (not included in the package). Choose the screws according to the material of the wall.
Check the details
- The remote control and batteries are included in the delivery package.
| AБаза(20)(1)ВШК | В(2) |
| CГВИNTPSW6x20(4) | DГВИNTPSW4x20i3Втулков(2) |
| EПрокадka(20)(2) | FРемиь(1) |
| GВтулka(20)(M4)(2) | HГВИNTPSW4x20(2) |
| IПерекдддддддддддддддддддддддддддддддддддддддддддддддддддддддддддддддддддддддддддддддддддддддддддддддддддд徳6a3n(2) | JГВИNTPSW4x10(8) |
| KПрокадka(60)(2) | LГВИNTPSW6x50(2) |
| MВтулka(M4)(2)N | ΓВИNTPSW4x50(2) |
Installation location
1 Installation location.
Before installation, make sure the surface is large enough and can support the weight, which is about 4 times the weight of the TV.
The necessary screws for mounting the TV on the wall can be found in the table below. The weight of the TV can be found in the TV's manual.
Standard mounting screws
Center of the screen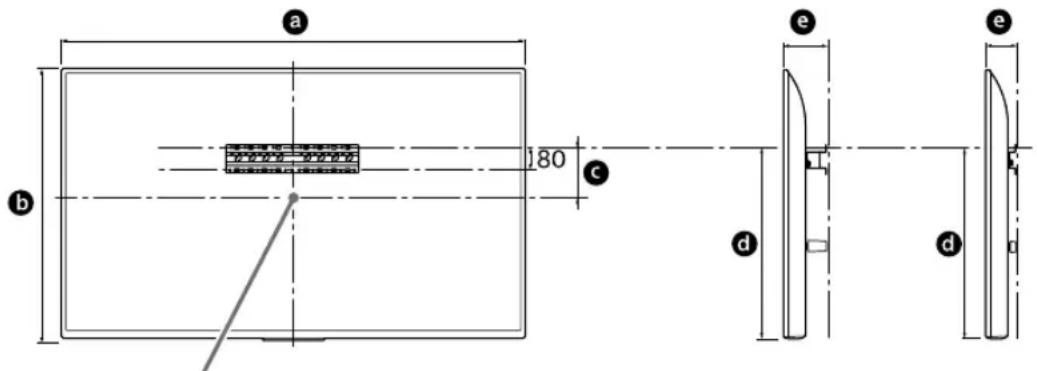
Ventilation holes
Do not place the TV horizontally, do not install it with the bottom side up, upside down, or on its side. Do not place the TV on a floor, carpet, bedding, or furniture. Do not cover the TV with fabric (curtains) or other materials that block ventilation.
Do not install the TV as shown below.
Damage to the screen.
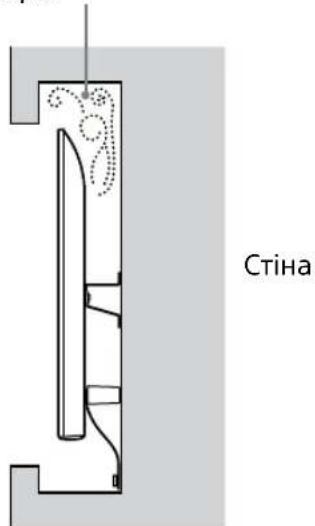
Note
To route the cables through the wall, make a hole in the wall to insert the cables before starting the installation.
To allow for cable routing, make a hole in the wall beyond the perimeter of the base (20) A, the base connector (20) B, and the grommet (20) E, grommet (60) K.
2 Ways to Install the Stand. Choose the installation method for your TV according to the wall type, as shown below.
2-a Standard Mounting
2-b Slim Mounting
See Table 1.
CAUTION
- If you choose 2-b, access to the ports on the rear panel will be limited.
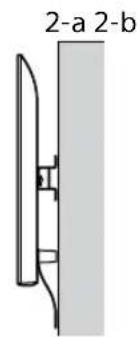
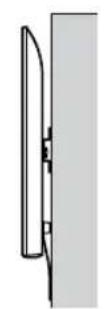
The installation method for the stand is determined by the table below. If you chose 2-b, skip this step.
| Назва м odeлі | Розташуваннrayakiv |
| KD-75XG80□□ KD-65XG81□□ KD-65XG80□□ | b |
| KD-55XG81□□ KD-55XG80□□ KD-49XG81□□ KD-49XG80□□ | c |
| KD-43XG81□□ KD-43XG80□□ | d |
Determine the wall thickness where the TV will be installed. If necessary, change the wall anchors to suitable ones.
Installing the Stand
Use four screws with a diameter of 8 mm or equivalent (not included in the package). Tighten the four screws into the holes on the back of the base ① with the base (20) (only for 2-a). Install the base (20) horizontally on the wall.
Slim Mounting (2-b)
Note
- If you use this type of mounting, you cannot use the separate holes on the rear panel of the TV.
Connect the necessary cables to the TV.
Connect the cables before mounting the TV on the wall. After mounting the TV, it will be impossible to connect the cables. Connect them to the TV.
The cable must be laid by a licensed electrician. - Route the cables so that you do not step on them before mounting them on the wall.
4 Remove the wall mount bracket of the TV.
Remove one side of the wall mount bracket at a time. Hold the wall mount bracket firmly with your hands, while another person lifts the TV.
- Repeat the previous step and remove the other side of the wall mount bracket.
-Three people are needed to remove the wall mount bracket of the TV. Be careful when using force, as removing the wall mount bracket from the TV may cause the TV to fall and result in injury or damage to the TV. -Carefully handle the wall mount bracket to avoid damaging the TV. -Lift the TV carefully, as the removed wall mount bracket may tip over and cause injury. -Be careful when removing the wall mount bracket from the TV. If the bracket falls, it may damage the surface on which the TV is placed.
KD-65XG81□□/65XG80□□
1 Attach the mounting brackets for wall mounting. Check the presence of all mounting brackets, using the list "Supplied accessories" in the "Checking the parts" section on page 5.
Attach the mounting brackets with screws. -For the upper screws, tighten them to a torque of approximately 1.5 N·m {15 kgf·cm}. -Be sure to keep used or unused components in a safe place for future use. Keep this manual for future use.
Standard mounting (2-a)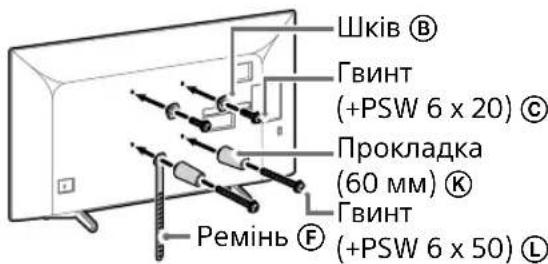
Thin mounting (2-b)
- When using this type of mounting, you cannot use the separate holes on the rear panel of the TV.
Connect the TV to the power outlet as required.
Before connecting the cable, make sure the TV is unplugged from the power outlet. After installing the TV, it will be necessary to plug in the cable. See the TV's user manual.
Note
The cable at the wall must be laid by a licensed electrician. - Route the cables so that you do not step on them before mounting them on the wall.
Disconnect the TV from the power outlet.
Remove one side of the wall mount at a time. Hold the wall mount firmly with both hands while another person lifts the TV.
- Repeat the previous step and remove the other side of the wall mount.
Note
- Three people are needed to remove the wall mount from the TV.
- Be careful when using force to remove the wall mount from the TV, as this may cause damage to the TV and lead to injury or damage to the TV. - Carefully lift the TV with the wall mount to avoid damaging the TV. - Lift the TV carefully, as the removed wall mount may tip over and cause injury. - Be careful when removing the wall mount from the TV. If the mount falls, it may damage the surface on which the TV is placed.
KD-55XG81□□/55XG80□□
1 Attach the wall-mount brackets to the wall-mount plate. Check the tightness of all wall-mount brackets using the list "Supplied accessories - WL450" in the "Checking the Parts" section on page 5.
Note
Tighten the wall-mount brackets with a screwdriver. - For electric screwdrivers, set the torque to approximately 1.5 N·m {15 kgf·cm}. - Be sure to keep the used or unused components in a safe place for future use. Keep these instructions for future use.
Standard mounting (2-a)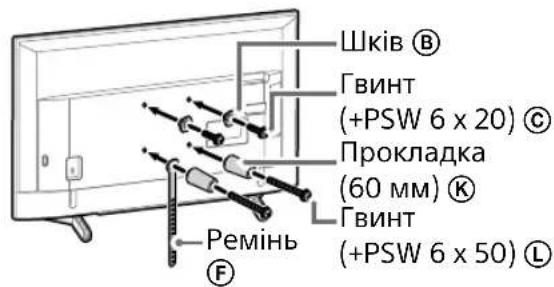
To the wall mount (2-b)
Note
When using this type of mount, you cannot use the separate screws for the rear panels of the TV.
Connect the TV cable.
Before connecting the cable, reposition the TV on the wall. After installing the TV, it will be impossible to connect the cable. See the TV connection section.
Note
The cable in the wall must be laid by a licensed contractor. - Route the cables, do not step on them, and do not mount them on the wall.
Remove the stand from the TV.
Note
- Lift the TV carefully, as the stand is heavy and may tip over and cause injury. - Be careful when removing the stand from the TV. If the stand falls, it may damage the surface or the TV.
KD-49XG81□□ / 49XG80□□ / 43XG81□□ / 43XG80□□
1 Remove the stand from the TV.
Note
- To avoid damaging the screen, place the TV on a soft cloth on the surface where you will place it. Do not use the screws from the stand when installing the wall mount. Keep the stand and screws in a safe place for future use. They will be needed if you want to install the TV on a table. The stand is not sold separately.
WARNING
Place the TV vertically. To prevent distortion of the image, do not press the TV, place the panel downwards. A blow or impact on the TV surface may break or damage the panel. Place the TV with the screen downwards on a flat, soft surface so that the stand can be attached through the surface. If the TV surface and the stand surface are not on the same level, the working conditions will be unstable, and the TV may be damaged. When lifting the TV, hold the stand with both hands.
2 Attach the stand's mounting brackets for wall mounting. Check the presence of all mounting brackets, using the list "Supplied with SU-WL450" in the "Checking the Parts" section on page 5.
Note
Attach the mounting brackets with screws. - For tightening torque, set approximately 1.5 N·m {15 kgf·cm}. - Be sure to keep unused or used components in a safe place for future use. Keep these instructions for future use.
Standard mounting (2-a)
Thin mounting (2-b)
Note
- When using this type of mounting, you cannot use the separate holes on the back panel of the TV.
Connect the TV to the necessary cables.
Check the cable connection before moving the TV to the stand. If the TV is moved, it will be difficult to connect the cables. See the TV manual.
Note
The cables in the stand must be routed through the licensed path. - Organize the cables, do not step on them, before mounting them on the stand.
Installing the TV on the stand
KD-75XG80□□
1 Lift the TV.
- Place the TV on the base or pedestal for the base, see table 1 of the section "Determining the installation location" on page 7.
- Hold the TV, make sure the back of the TV touches the base or pedestal for the base.
Note
Hold the TV with both hands. The back and bottom parts of the TV must not be pressed against the mounting strip. - The TV must be held by three people. The person who is on the back of the TV must give instructions to the others to properly place the TV.
Be careful when installing the TV on the wall. Be especially careful to the person holding the TV from below. The weight of the TV can lead to serious injuries and even death.
2 Install the TV on the base or pedestal for the base.
- Carefully lower the TV and insert the brackets ⑧, attached to the back of the TV, onto the base or pedestal for the base (they must match the dimensions of the holes). - After installing the TV on the wall, make sure that the brackets (B) are securely fixed in the base or pedestal for the base.
- Carefully release the TV with both hands, making sure it does not fall.
- After installing the TV on the wall, remove the mounting strip (protective material) from the wall.
WARNING
When lifting the TV, at least two people should hold it (at least three people if the diagonal of the TV is 75 inches or more).
Be careful not to damage the bottom part of the TV.
Check the wall part of the bracket F and securely attach it to the wall.
Use screws with a diameter of 5 mm or equivalent (not included in the delivery package).
Note
To avoid the TV falling on you, make sure it is not wobbling forward. If the TV wobbles, close the stand incorrectly and it is necessary to re-tighten the belt.
KD-65XG81□□/ 65XG80□□ / 55XG81□□ / 55XG80□□ / 49XG81□□ / 49XG80□□ / 43XG81□□ / 43XG80□□
1. Lift the TV.
- Align the hooks ⑧ with the holes on the base or the base adapter, see the table for the installation step in the section "Determining the installation location" on page 7.
- Hold the TV, make sure the hooks on the TV are engaged with the base or the base adapter.
Stand
- Hold the TV with both hands.
2. Place the TV on the base or the base adapter.
- Carefully lower the TV and insert the hooks ⑧, attached to the back of the TV, into the base or the base adapter (they must match the size of the holes).
- After installing the TV on the wall, make sure that the hooks ⑧ are securely locked in the base or the base adapter.
- Slowly release the TV with both hands to ensure it does not fall.
2-a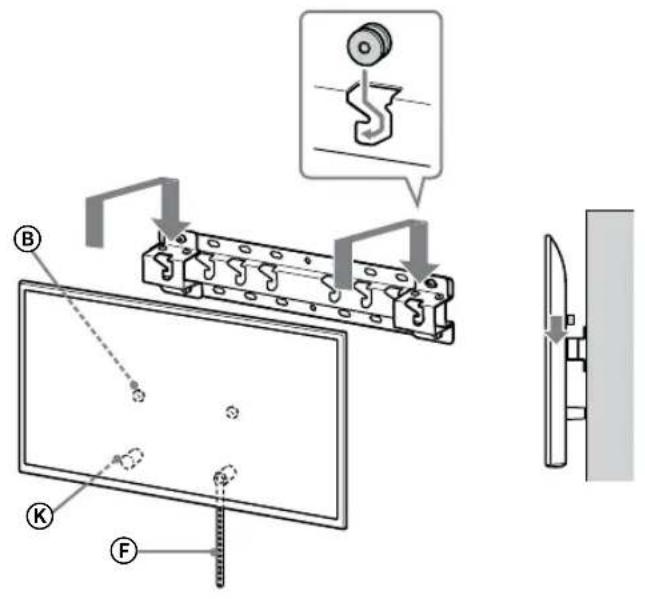
2-b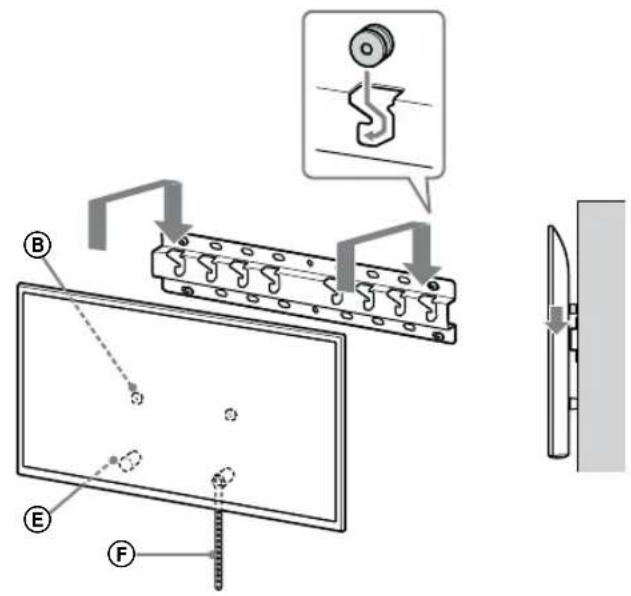
↓
↓
UA
WARNING
Before installing the TV, keep the original packaging (or the original packaging of the stand, if the TV is used with a stand).
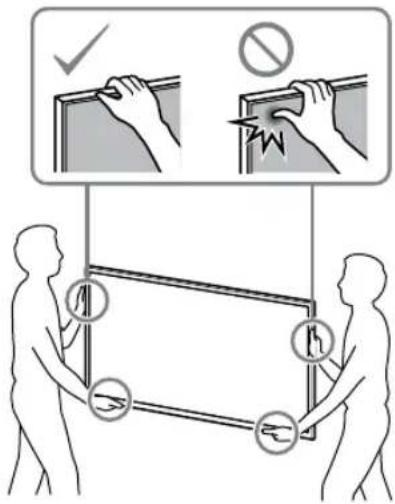
To replace the stand
Lower part of the TV.
Pick up the lower part of the TV and carefully cover it with a cloth.
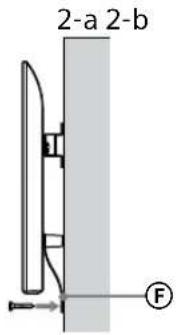
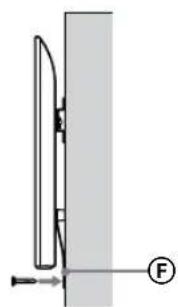
Use a screwdriver with a 5 mm diameter or equivalent (not included in the delivery set).
Note
Try to gently lift the lower part of the TV towards you, make sure it does not move forward. If the TV moves, close it correctly and repeat the installation.
Check after installation
Check the specified points.
- The plug is inserted into the base or into the adapter for the base.
- The cord and cable are not crossed or pinched.
- The screws are securely tightened without slipping.
WARNING
- The appliance must be connected to the mains supply through a suitable isolating device that can disconnect all poles from the supply, having a contact separation of at least 3 mm. For safety, always check all parts after installation.
Other information
55XG80□□*/49XG81□□*/49XG80□□*/43XG81□□*/
43XG80□□*
- In the model names above, "□□" denotes numbers and/or marks that are specific to each model.
For customers
Thin installation (2-b)
Mark.
Thin installation (2-b)
Mark.
Thin installation (2-b)
Mark.
Thin installation (2-b)
Mark.
Mass (only base): (approx.) [kg]
0.8
55XG80□□*/49XG81□□*/49XG80□□*/43XG81□□*/
43XG80□□*
- In the model names, "□□" indicates numbers and/or letters that are unique to each model.
For customers
For product protection and safety reasons, Sony strongly recommends that TV installation be performed by Sony dealers or licensed contractors. Do not attempt to install it yourself.
h1:20 (2-b variants)
h2:60 (2-a variants)
Weight (base): (approx.) [kg]
0.8
Design and specifications are subject to change without notice.
55XG80□□*/49XG81□□*/49XG80□□*/43XG81□□*/
43XG80□□*
55XG80□□*/49XG81□□*/49XG80□□*/43XG81□□*/
43XG80□□*
55XG80□□*/49XG81□□*/49XG80□□*/43XG81□□*/
43XG80□□*
- In actual model names, "□□" indicates digits and/or letters specific to each model.
For users
For product protection and safety reasons, Sony strongly recommends that installation of your TV be performed by Sony dealers or authorized contractors. Do not attempt to install it yourself.
For Sony dealers and contractors
Pay full attention to safety during installation, periodic maintenance, and testing of this product.
Installing this product, especially determining the wall strength to support the TV's weight, requires appropriate expertise. Ensure that mounting this product on the wall is entrusted to Sony dealers or authorized contractors, and that due attention is paid to safety during installation. Sony is not liable for any damage or injury caused by improper handling or installation.
For safety and proper installation, follow the Wall-Mount Bracket Installation Instructions, the TV Installation Guide, and the instructions in this manual.
About safety
Sony dnilnepepi ywiH
ECKEPTY
Keneci Hcykaynap Tek Sony dinyepnepine aphanfah. Kofapbda 6epinreH andbin any wapanapabih OKbin ubifbHb3 xhe ocbi KpyblfbHbOpHaTy, oaf H KyTIM Xacay, OHb Tkepey Ke3iHde aca Ha3ap aydpabHb3.
Ka6biprara 6ekity KpoHwTeHiH
TeIeIaIapdbIH
6ypblTapbl He KanTaIbI Ka6bIpra 6eTIHeH WbIFbIn TypaTbIH OpbIHApFa opHaTnAbI3.
Ka6biprafa 6eKity KPOHtTeHHIN TepeiAapdbin 6bypIITapbl He KaTANbl Ka6bipra 6eTIHeH 6bIbI IN Tpyatbl 6aHan cekindi OPbIHapra OPhATNaHb.4Am Hemece 6acka 3aT TepeiAapdbin 6bIFIn TyfAH 6bypIbHa He KaTANbHa COKca, ON Xkapatanyhmece MyNk 3akBmDahbl MYMKH.
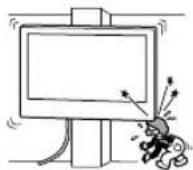
TeJeIaPbIH caIKbIHdaTkbIHTbIH ycTiHe He acTbHa opHaTaHbI3.
TeEniapra caKbIH DAkTbIaTH y3ak yaKbI BoI cy tamblapbI aKa He cAnkbH aya cOKca, ON eptke, ToK coryfa HEmece TeEniapabH Dpybc XyMbic IcTeMeYiHe ekenyMYMKH.
Ka6biprara 6ekity kpoHHTeHHOcbI
naydaanhy HcayIbIbHa cyneHe OTbIPbIMMbIKTan 6ekiriH3.
BypaHdaapabih6piXoFAnbIn He Tycin Kanran Bonca, Ka6bpfara 6eKity KPOHtEHH Kynan, Xkapakta Hemece MyNtIKTH 3AkMbDAhyBa ekenyi Mymkn. Ka6bpraHbMATEpnaIbHa cain bypaHdaapabn naIaHaNbHb3 XeHe DnAmetpi 8 MM (Hemece YkCac) 60NaTbH TeP He OaH da Keon 6ypaHdaapabn naIaHa OTbIPn KypaIbMbKtan 6eKITHi3.
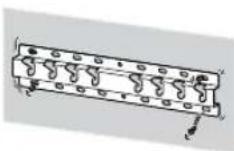
BepinreH 6ypaHdaIap meh 6ekity 6eIweKTePin OcbI HyckayIbIKTaftbl HyckaynapFa cyneHe OTbIPbIN dypbc naidaHaHbIHb13. KocankbI 3JeMeHTTepdi naJaHaHcaHb13, TeJeHdAp Kynan, 6ipeyre Dehe XapaKaTbIH canybl Hemce TeJeHdApbl 3aKbIMDaYbIMymkiH.
HcyaynbkTa 6epiReh npoceDypanapra cyneHe OTbIPbIN KPOHwTeHdi DypbICTa
KypactbipbiHbl3.
By turning the handle counterclockwise, the tension can be released or the tensioner can be closed.
These indicators should be secured with screws in the indicated positions.
If this is not the case, the tension can be released or the tensioner can be closed.
During installation, do not remove the tensioners.
If the tensioners are removed, they may be lost or damaged. This is dangerous.
The tensioners must be installed perpendicular to the wall and floor.
If this is not the case, the tensioners may be lost or damaged.
After the tensioners are correctly installed, secure the cables correctly.
If doors or other objects are placed on the cable, it may be necessary to close the tensioners.
The alternating current or the cable must be disconnected.
If the alternating current or the cable is cut between the wall and the floor, and if it is damaged or broken, the circuit breakers may close, causing a short circuit or an electric shock. This may cause a fire or electric shock.
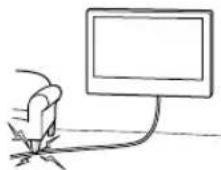
Screws for securing to the wall are not provided.
When securing to the wall, do not damage the wall material with the screws.
Contents
Installation instructions 5
Wall mounting instructions 5
Preparing for wall mounting 6
Wall mounting procedure 8
TV installation procedure 9 KD-75XG80□□ 9 KD-65XG81□□ / 65XG80□□ 10 KD-55XG81□□ / 55XG80□□ 11 KD-49XG81□□ / 49XG80□□ / 43XG81□□ / 43XG80□□ 12
Wall mounting procedure 14 KD-75XG80□□ 14 KD-65XG81□/65XG80□/55XG81□/ 55XG80□/49XG81□/49XG80□/ 43XG81□/43XG80□
If the installation instructions are lost 19 Other equipment 19
Technical specifications 19
TV wall mounting
The procedure for installing the TV on the wall is described below. To mount the TV on the wall, you will need the SU-WL450 wall-mount bracket.
Instructions
Be sure to follow the instructions carefully. If you do not, the TV may fall and cause injury. Do not install the TV on a wall that is not strong enough to support it. If you are unsure about the strength of the wall, consult a professional. - Keep the screws out of reach of children to prevent accidental swallowing.
Preparing for installation
Before installation, remove the TV from the stand and remove the stand. Use a Phillips screwdriver to remove the screws. Do not remove the screws that are not specified. - Use screws with a diameter of 8 mm or less. Do not use screws that are longer than the specified length. Do not overtighten the screws.
Removing the stand
Supplied with the SU-WL450
- Remove the protective film from the display.
| A Heri3 (20) (1) B Terepiik (2) | |
| ◎ PSW 6x20 (4)◎ TbIFbIH PSW 4x20 (2) | |
| E ApaIbIK (20) (2) E | Belenik (1) |
| ◎ TbIFbIH (20) (M4) (2) | H PSW 4x20 (2) |
| ① Heri3ri aandaTep (2) | J PSW 4x10 (8) |
| K ApaIbIK (60) (2) L | PSW 6x50 (2) |
| M TbIFbIH (M4) (2) N | PSW 4x50 (2) |
Standard installation
1 Standard installation.
There is a protective film on the display and the display must be cleaned before installation.
See the instructions for installing the protective film. See the instructions for cleaning the display.
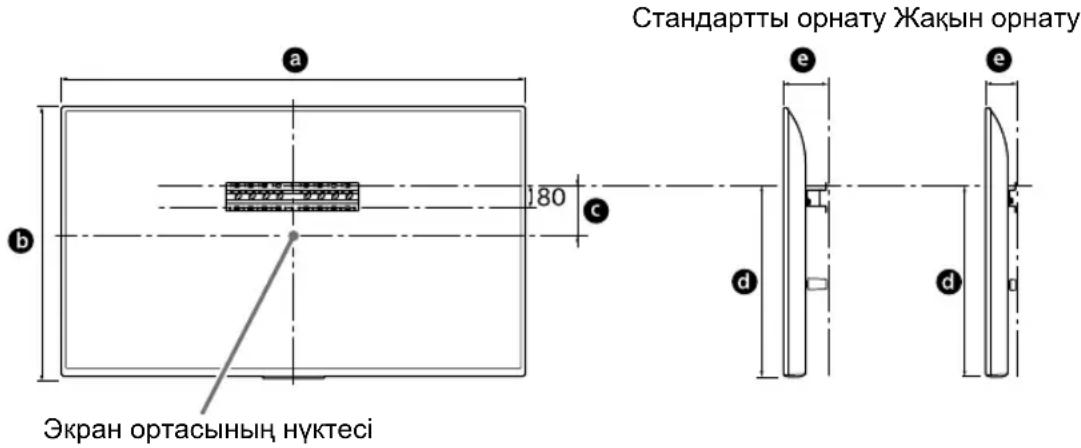
Tools: MM
| Yilri hemipi | Зкран салемерi | Зкран ортасьин салемi | Орнату узbingыflu | ||
| a | b | c | d | ||
| Стацарты орнату | Жасын орнату | ||||
| KD-75XG80□□ | 1686 970 202 690 142 100 | ||||
| KD-65XG81□□ | 1463 845 173 597 142 100 | ||||
| KD-65XG80□□ | 1463 845 173 597 142 100 | ||||
| KD-55XG81□□ | 1241 721 95 460 141 100 | ||||
| KD-55XG80□□ | 1241 721 95 460 141 100 | ||||
| KD-49XG81□□ | 1101 645 -15* 314 119 78 | ||||
| KD-49XG80□□ | 1101 645 -15* 314 119 78 | ||||
| KD-43XG81□□ | 970 570 23 315 119 77 | ||||
| KD-43XG80□□ | 970 570 23 315 119 77 | ||||
*The protective film is not included in the delivery.
Cleaning
- It is possible to install the protective film without any tools. When installing, the protective film must be applied without any bubbles.
Clean the display and the protective film with a soft cloth before installation.
Tools: MM
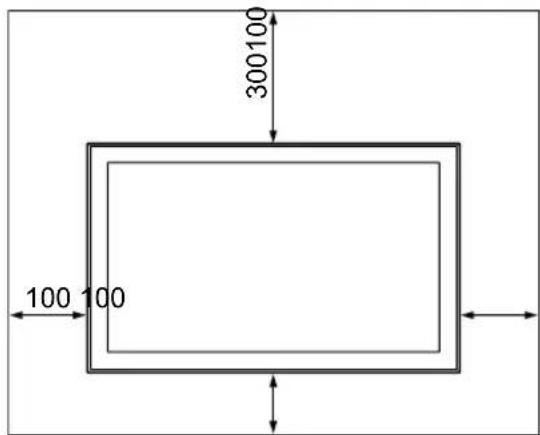
To avoid fingerprints and dust:
- Do not install the display in a dusty or dirty place. Do not touch the display with bare hands.
- Do not install the display near a heater or other heat sources. Install the display in a well-ventilated place.
The display is now ready for use.
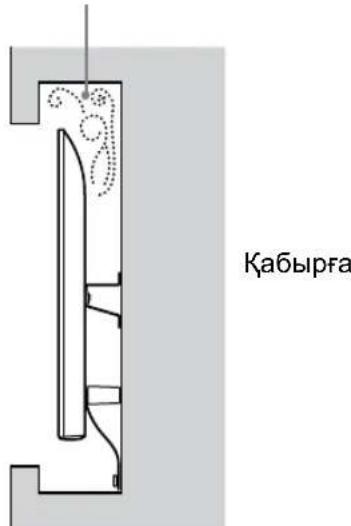
Hyckay
Cables must be laid without tension, the cable ends must be sealed.
Cables are laid on the basis of (20) A, base (20) E, branch (60) K to the perimeter of the laid cable.
2 Select the laying method. The cable ends must be sealed with a cable end cap.
2-a Standard layout 2-b Layout
1- Remove the protective cover.
NOTE
-2- When laying, the cable ends must be sealed.
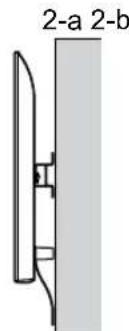
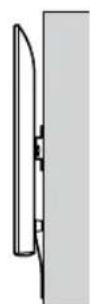
3 See the table below for the bending radius of the base cable. When laying, follow this procedure.
| Y NFLI HEMIPİ LIMEK OPHBİ | |
| KD-75XG80□□ | |
| KD-65XG81□□ | b |
| KD-65XG80□□ | |
| KD-55XG81□□ | |
| KD-55XG80□□ | |
| KD-49XG81□□ | c |
| KD-49XG80□□ | |
| KD-43XG81□□ | d |
| KD-43XG80□□ | |
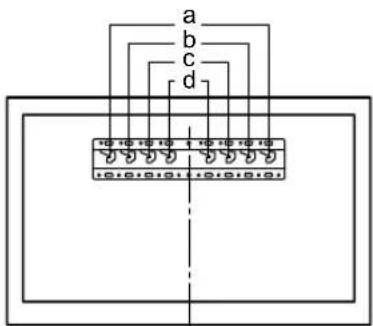
Cable ① Base (PSW 4x10) ② When laying with brackets, secure to the base (20) A.
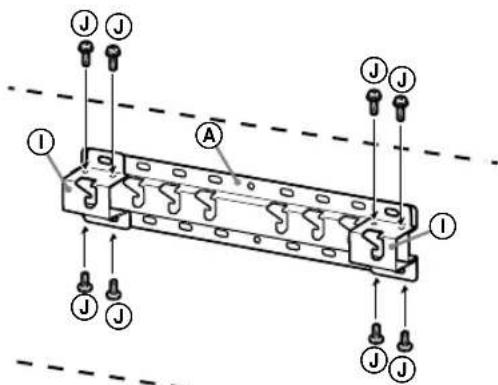
4 For the base (20) @ layout, install the brackets.
See the signal diagrams on page 19. When laying, connect the cable ① to the base.
NOTE
The cable must be laid with a bend radius greater than the minimum bending radius (see the cable specifications for the minimum bending radius).
The cable must be laid with a bend radius greater than the minimum bending radius. If necessary, secure the cable with a clamp.
Cable fixing brackets
- Diameter 8 mm. Do not overtighten the screws. Attach the cable fixing brackets (20) to the base using the screws (not supplied). ① Attach the base fixing brackets (20) to the base (see figure 2-a). The screws (20) should be inserted into the cable fixing brackets.
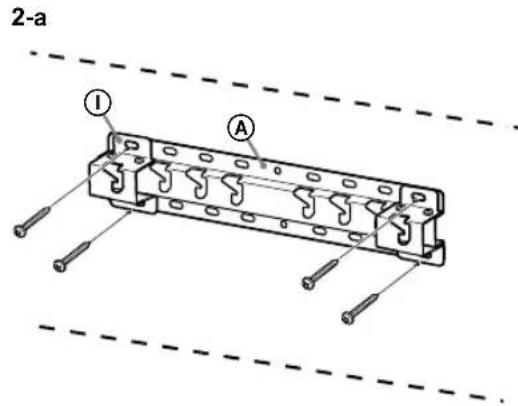
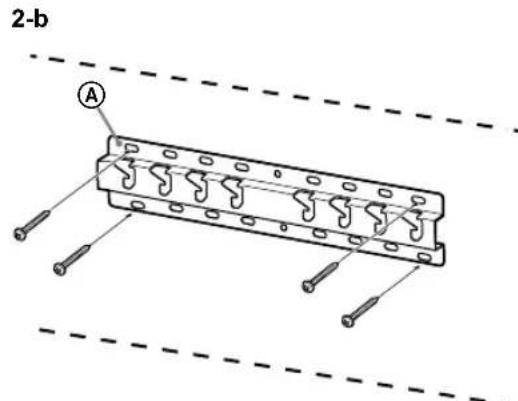
Removing the cable fixing brackets
Do not remove the screws.
KD-75XG80□□
1 Remove the cable fixing brackets.
To remove the brackets from the base or the base adapters, use a flathead screwdriver, i.e., (insert together) as shown. Be careful not to damage the brackets.
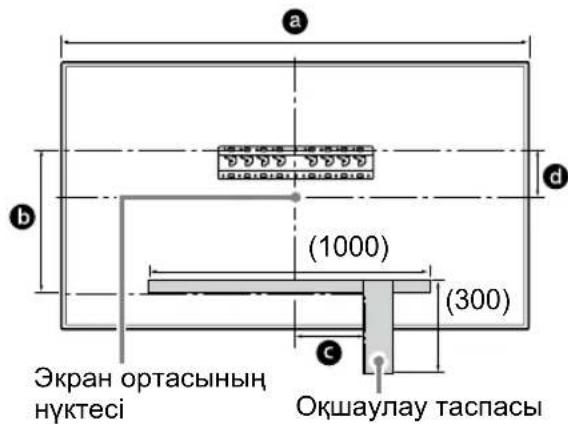
Unit: mm
| Ynlri hemipi | Белriney узblычы | Зкран ортысын的企业 |
| a b c d | ||
| KD-75XG80□□ | 1686 564 150 202 |
2 To attach the cable fixing brackets, use the screws provided. See "Attaching the cable fixing brackets" in the "SU-WL450" section for the installation procedure.
Note
- Tighten the screws firmly. When attaching the wall-mount bracket, place it at a distance of 15 cm.
- If the wall-mount bracket is not attached properly, the TV may fall and cause injury. Be careful to avoid this.
Standard mounting (2-a)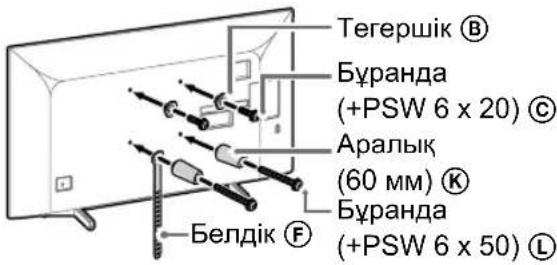
Inclined mounting (2-b)
Note
- By the way, the antenna cable is connected to the antenna input terminal.
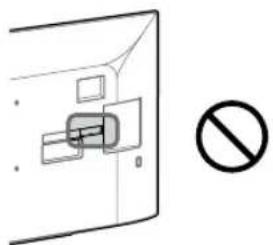
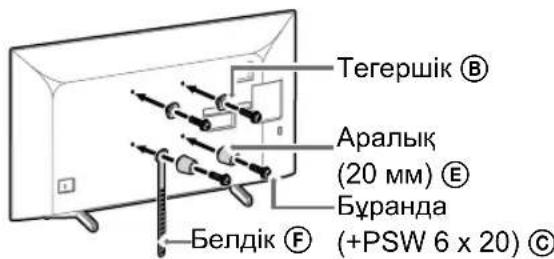
Connect the cable(s) to the TV.
The TV is designed to be used with the cables connected. After installing the TV, it may not be possible to connect the cables. Connect the cables before installing the TV.
Instruction
Before connecting the cable, check the connector type. Before connecting, for easy installation, connect the cables loosely.
4 Insert the upper part of the TV from the top.
- Place the upper part of the stand on a flat surface. Place the stand's upper part on a flat surface, then attach the TV.
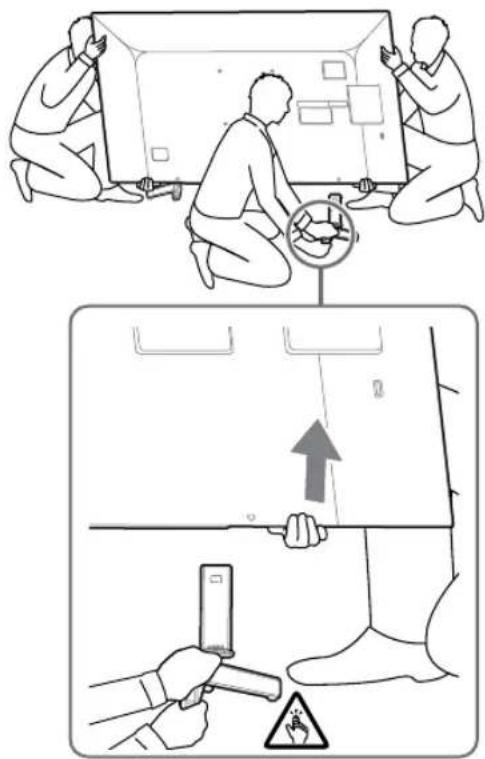
Then attach the TV to the stand's upper part.
Instruction
The upper part of the stand is not a single piece. When installing the TV, do not apply force to the upper part of the stand, as it may damage the TV or cause injury. To secure the TV, use the upper part of the stand. Do not hold the TV by the upper part of the stand, as it may fall and cause injury. - When installing the TV, hold the upper part of the stand and the TV firmly, and do not apply excessive force to the stand.
KD-65XG81□□/65XG80□□
1 Before installing, read the safety instructions and the installation instructions. See the "SU-WL450" section in the "Safety Instructions" for wall-mount installation.
Instruction
- Install the TV using the specified brackets. Tighten the screws to a torque of 1.5 N·m {15 kgf·cm}. - Do not use the screws if they are damaged or missing. Keep the screws for future use.
Standard installation (2-a)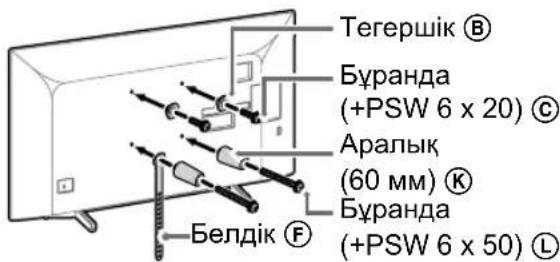
Cable clamp (2-b)
Instruction
- When installing the cable clamp, make sure the contacts are not damaged.
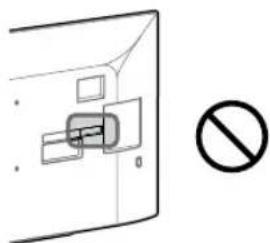
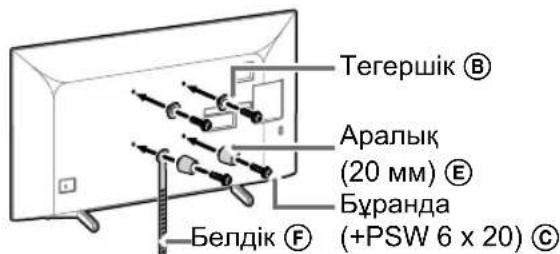
2 Connect the cables to the terminals.
Before connecting the cables, check the cable connections. After connecting the cables, they should not be loose. See the instruction manual supplied with the cables.
Instruction
Connect the cables to the terminal block with the specified tightening torque. When mounting the cable clamp, do not pinch the cables.
3 Remove the top cover.
- Remove the screw on one side of the top cover. Then remove the screws on the other side of the top cover.
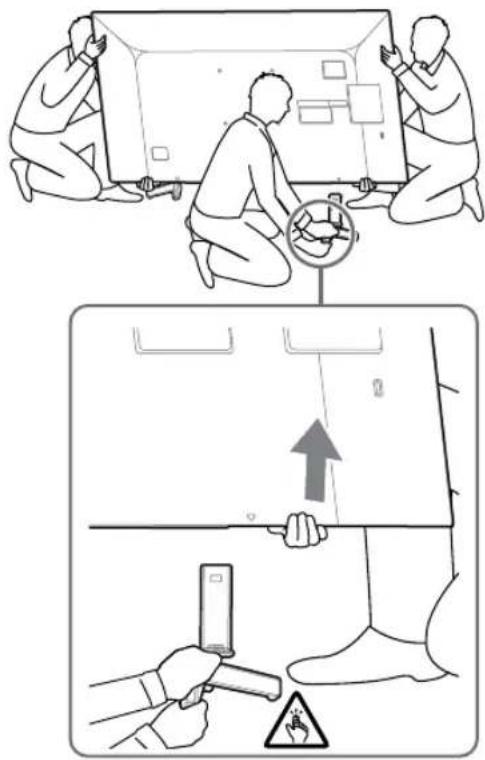
Remove the screws on the other side of the top cover.
Instruction
- To remove the top cover, remove all screws. When removing the top cover, be careful not to damage the cables. You may need to disconnect the cables and re-connect them after removing the cover.
When removing the top cover, be careful not to damage the cables. If the cables are in the way, disconnect them and re-connect them after removing the cover.
KD-55XG81□□/55XG80□□
1 To mount the cable clamp, use the screws provided. See the section "Removing the screws" on page 5 for the SU-WL450 bracket installation.
HycKay
- Bekity6eIeKTePiH 6ypaHdaIap apkblbMbIKTan 6eKiTiH3. 3NeKtp6bpybIbTbnaIaIHaHfA,aiHaIy 1111111111111111111111111111111111
- NaIaHaHbIHaH HeMeCe naIaHaHbIMMaFah 6eKTepe anDarbl KonDaHbc yWIn Kayinc3 opBHa KaTaNFaHbIH TeKcepiH3. Byn HcaynbIKtbi 6onaKaTa Kapay yWIn cKaTaHbI3.
CTaHdApTTbI opHaTy (2-a)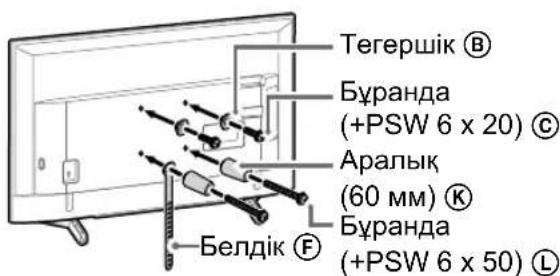
XaKbH opHaTy (2-b)
Hycay
- By npHaty cTnIH naIaHaHaHaTe TeNeIaapDbH apTKbI XaFbIHdaFBI KOHTTaKTap Kei6ipeyIH naIaHaHa aImaCbl3.
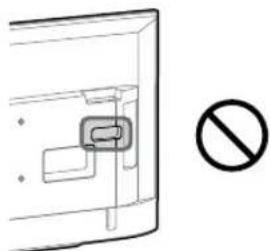
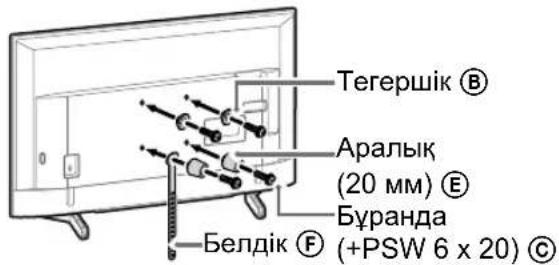
2 KaKeTTi KaBeIbI (KaBeIbIePdi) TeJeIuapra Kajray.
TepeiIapbl Ka6bipfara opHaTnac 6ypbH Ka6eJIbDEpIH KaIraHraHBIn TEKcepH3. TepeiIapbl OPHaTKaHHan KeiH Ka6eJIbDEpDI KaIray MymkiH 6oJMaIbI. TepeiIapMeH 6epinEiH AnbIKtAmalbIK Hcay 6enimin KapaHbI3.
Hyckay
Ka6bipara ka6eIb Jxypri3ydi IuueH3nrcbl 6ap Meepirepre 6epi13. Ka6biprafMoHTaxdayaIbHda,6acbinKetneyyuiH, KaIfactbpyu Ka6enbdepi Kocblh3.
3 TД-дан YcteTуfblpblH aKbIpaTbIHbI3.
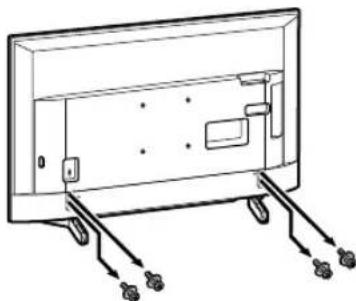
Hyckay
TeIeIaapblketepeHneabai6oJIbHb3,eiTKeHi yCTeTIyfbipAlxkbpaTbIN,kapamcb13bIKKa yMbpayMiMkiH. TeJeIaIaH YcTEn TybIbIH any Ke3IHe KynaTbI anyaH XeHE TeJeIaIap OpaTHbINFaH 6eTke 3aKbIM KeTIpyeH CaTbIK WapanapBIn KOJIra aJIbHI3.
KD-49XG81□□ / 49XG80□□ / 43XG81□□ / 43XG80□□
1 Do not use the device without the user manual.
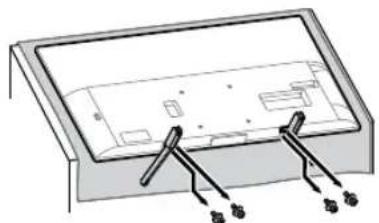
Instruction
Before using the device, read the user manual carefully and keep it in a safe place. If the device is used improperly, the user manual may be damaged. Keep the user manual and its accessories out of reach of children. If you give the device to someone else, give them the manual as well. The user manual should not be thrown away.
CAUTION
To cut the device's power supply and disconnect it from the mains, unplug it. To avoid electric shock, do not touch the device with wet hands. If the device is not working properly, it may cause fire or electric shock. If the device has a user manual, keep it in a safe place. If the device is not working properly, it may cause fire or electric shock. When unplugging the device, hold the plug, not the cord.
2 For proper installation, follow the instructions in the installation manual. See the "Installation" section in the "SU-WL450" bracket manual for wall-mounting instructions.
Instruction
Install the device using the brackets. To avoid electric shock, do not install near water. For details, see 15
- If the device is not installed properly, it may fall and cause injury. Keep the device away from children.
Standard installation (2-a)
Bracket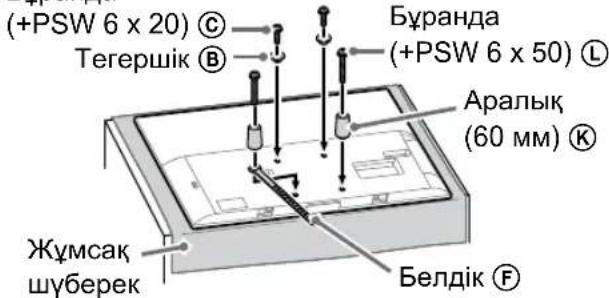
Correct installation (2-b)
Instruction
-When installing the device, do not touch the antenna or any other parts.
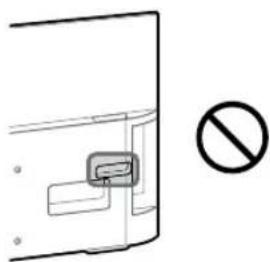
Bracket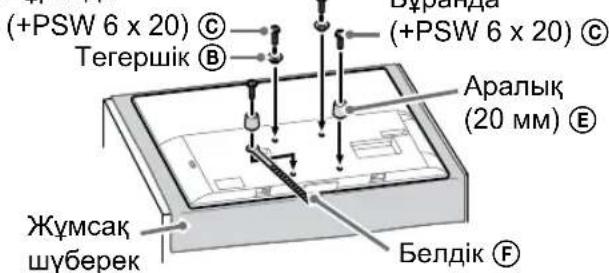
3. Connect the cables (cable cords) to the terminals.
Before connecting the cables, check the text of the cables and the terminals. After connecting, the cables may be disconnected. Before connecting, check the polarity marks.
Note
If the cable has a connector, connect it to the corresponding terminal. When mounting the cable, do not pull it forcibly.
Connecting the speakers
KD-75XG80□□
1. Remove the speaker covers.
Refer to step 3 in "Identifying the mounting position" on page 7-6 for the mounting holes on the base or base stand. When installing the speakers, be careful not to pinch your fingers between the speakers and the base or base stand.
Note
When installing the speakers with two people, be careful not to drop the speakers or hit them against the floor. When connecting the speaker cables, be careful not to pinch them between the speakers and the floor.
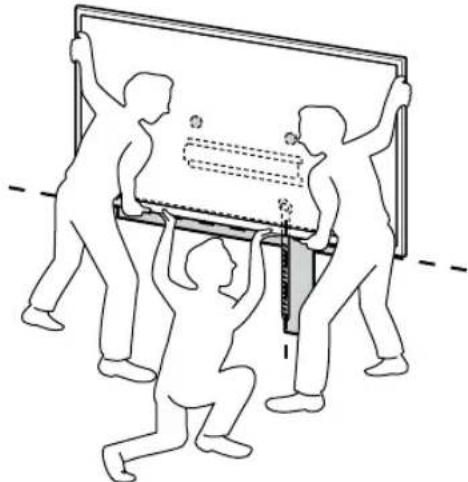
Before connecting the speakers to the TV, make sure the TV is stable (e.g., speakers are installed on a flat surface) to prevent the speakers from falling, which could cause injury or damage.
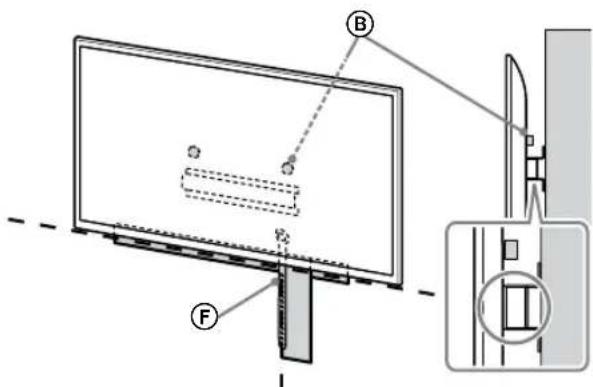
2. Attach the speakers to the base or base stand.
Align the speakers with the mounting holes on the base or base stand, insert the screws, and tighten them. After attaching the speakers to the TV, check that the screws are securely tightened. To avoid damaging the speakers, do not overtighten the screws.
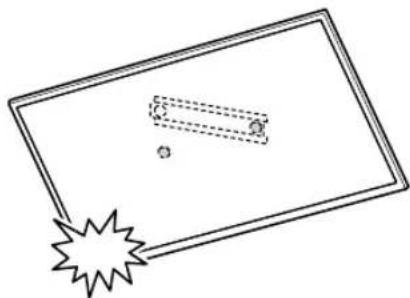
After connecting the speakers to the TV, connect the speaker cables to the TV.
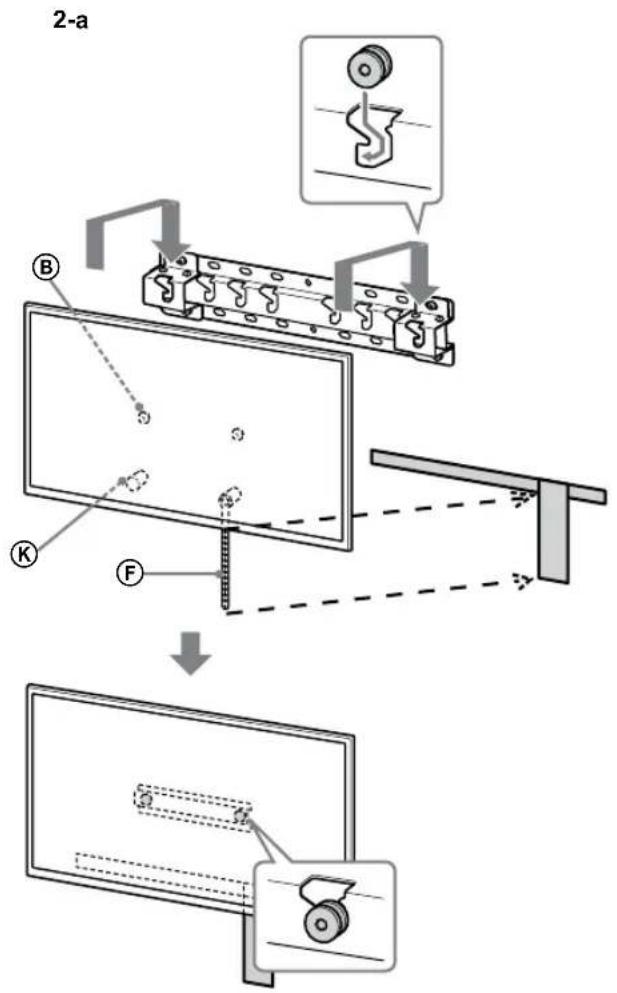
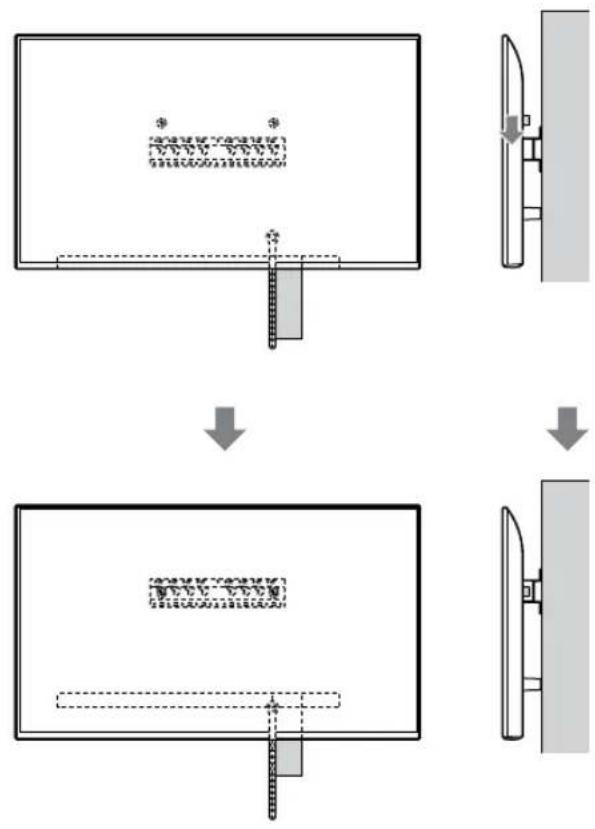
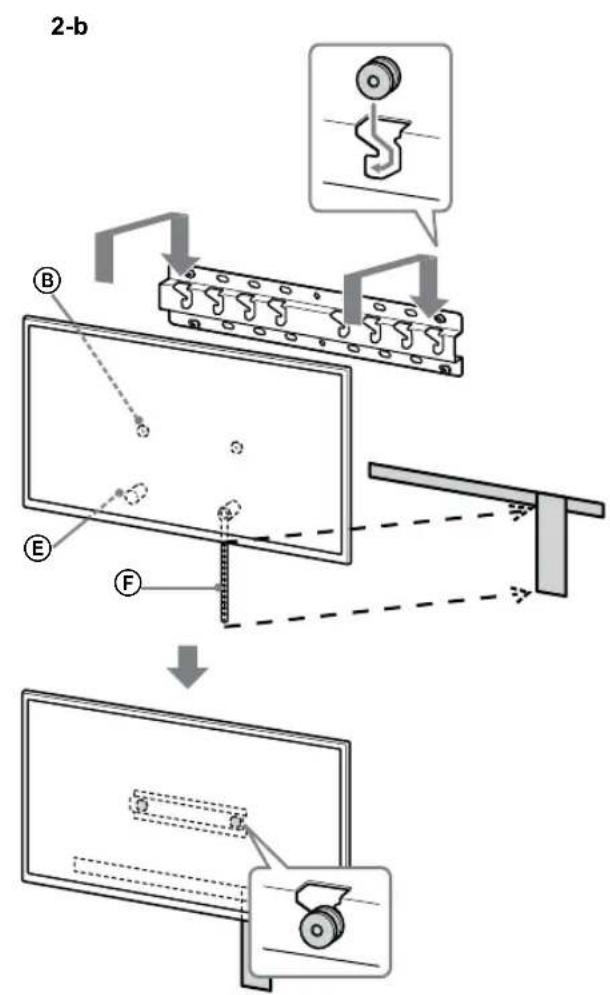
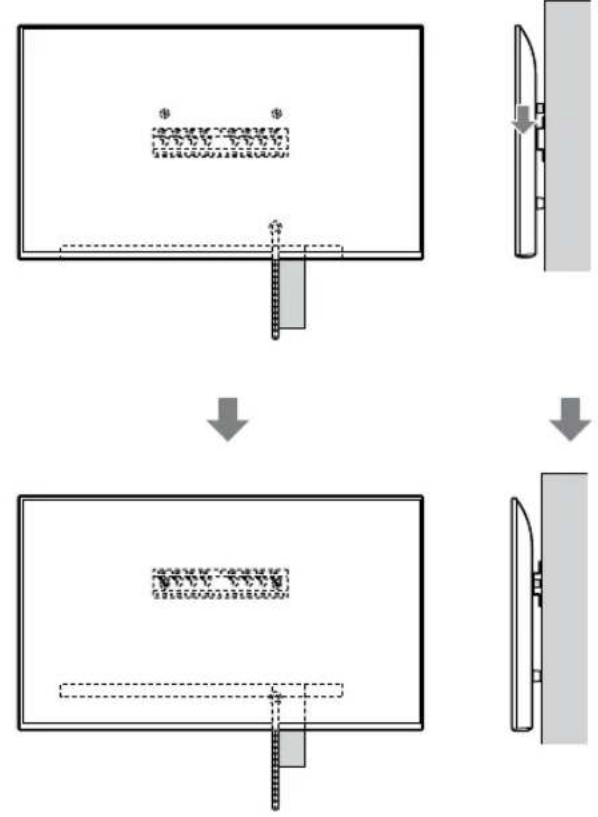
CAUTION
Install the TV using the supplied table-top stand or wall-mount bracket (sold separately).
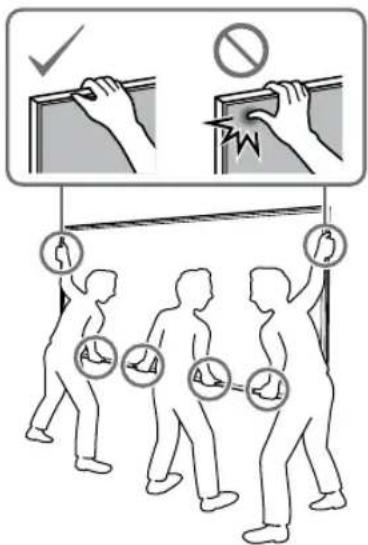
Do not install the TV on a surface that is not level or stable.
- Be careful not to pinch your fingers when installing the stand or wall-mount bracket.
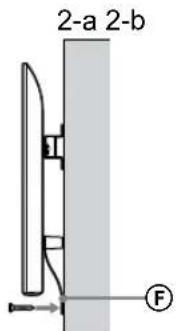
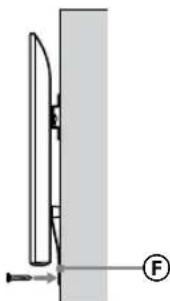
- If the diameter is 5 mm or more, use a screwdriver (not included).
Note
When installing the TV, refer to the instructions for the stand or wall-mount bracket. If you have any questions, contact the dealer or installer.
KD-65XG81□□/ 65XG80□□ / 55XG81□□ / 55XG80□□ / 49XG81□□ / 49XG80□□ / 43XG81□□ / 43XG80□□
1 Remove the TV from the box.
For details on installing the stand or wall-mount bracket, refer to the 3rd step in "Identifying the mounting holes" on page 7. When installing the TV, make sure the stand or wall-mount bracket is securely attached.
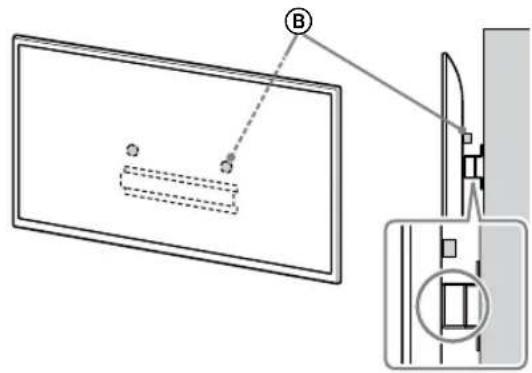
Note
- Do not place the TV on a soft surface.
2 Attach the stand or wall-mount bracket to the TV.
Lay the TV face down on a soft cloth, then attach the stand or wall-mount bracket to the TV using the screws provided. After attaching the bracket, make sure it is securely fastened. To avoid damaging the TV, use two hands when lifting it.
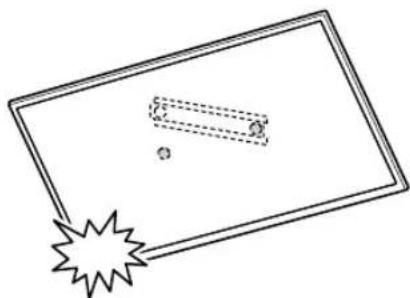
2-a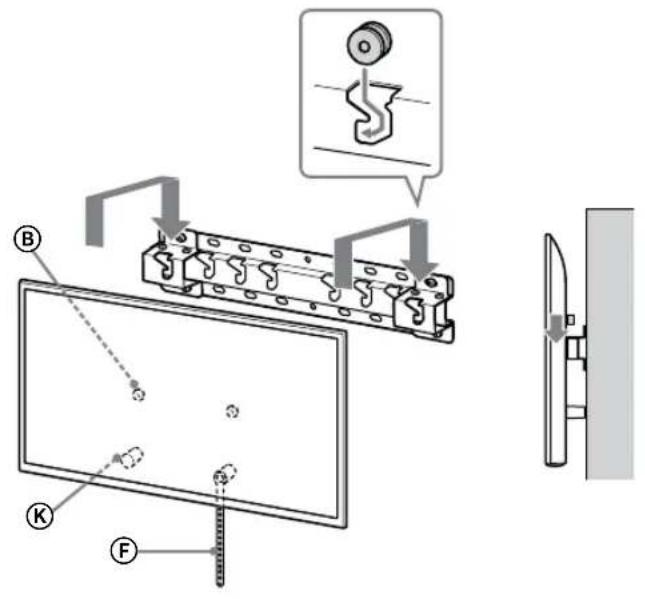
2-b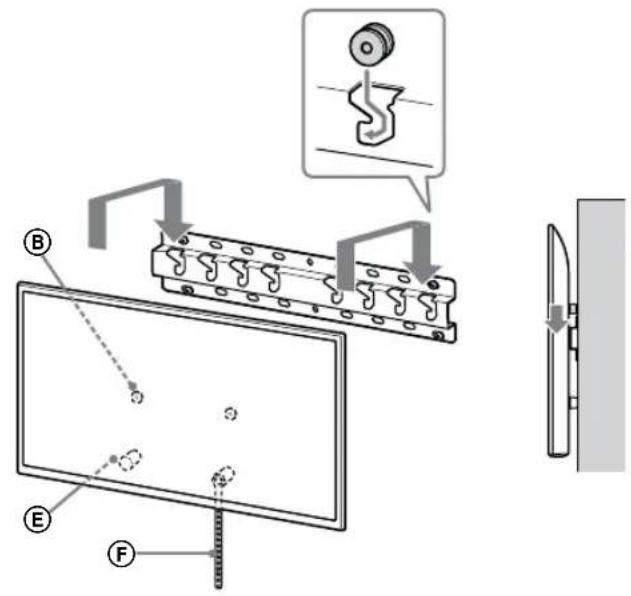
WARNING: The text is not in English. It appears to be in Kazakh (Cyrillic). Translation: 'Television antennas must be installed at a distance of at least 75 cm from the antenna and at least 75 cm from the television antenna cable.'
3. Do not bend the television antenna cable.
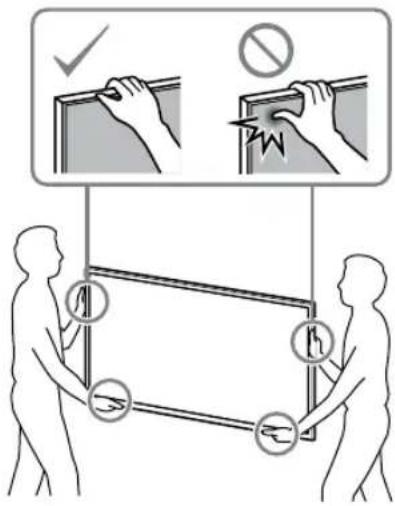
Take the plug (F) and insert it firmly into the socket.
- - Diameter 5 mm or less, or use a suitable adapter (not provided).
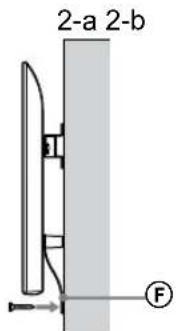
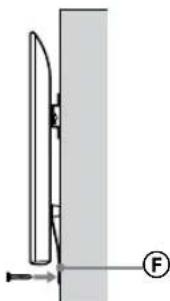
Start
To connect the television antenna cable, insert the antenna plug into the antenna socket. If it is loose, tighten the screw.
Installation of the antenna
Check the connections.
Make sure the antenna is properly connected. - The cable and plug are not damaged. - The plug (F) is firmly inserted.
WARNING
Do not place the antenna near metal objects or in a place where it may be exposed to rain or moisture. Do not install the antenna near power lines or other electrical equipment.
Other equipment
Battery compartment
This manual is intended for the repair of kerosene heaters.
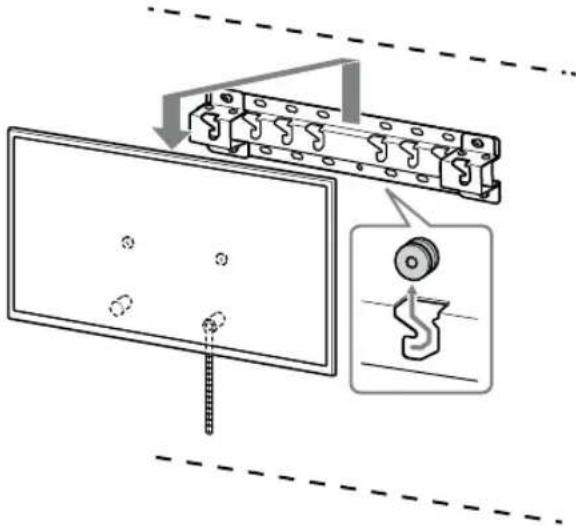
EXPERTS
The following devices are installed in the heater (75 W lamp, fan, and other devices listed in the table).
Technical specifications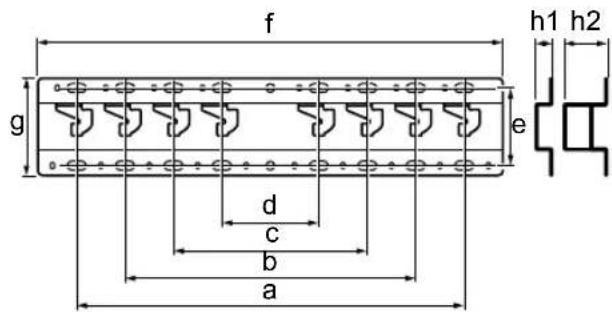
Dimensions: (approximately) [mm]
a:400
b:300
c:200
d:100
e:80
f:480
g:100
h1:20 (2nd type)
h2:60 (2nd type)
Weight (without fuel): (approximately) [kg] 0.8
Installation information for use of Sony wall-mount bracket (SU-WL450)
Supported models:
KD-75XG80□□*/65XG81□□*/65XG80□□*/55XG81□□*/
55XG80□□*/49XG81□□*/49XG80□□*/43XG81□□*/
43XG80□□*
- In the actual model names, “☐☐” indicates digits and/or letters specific to each model.
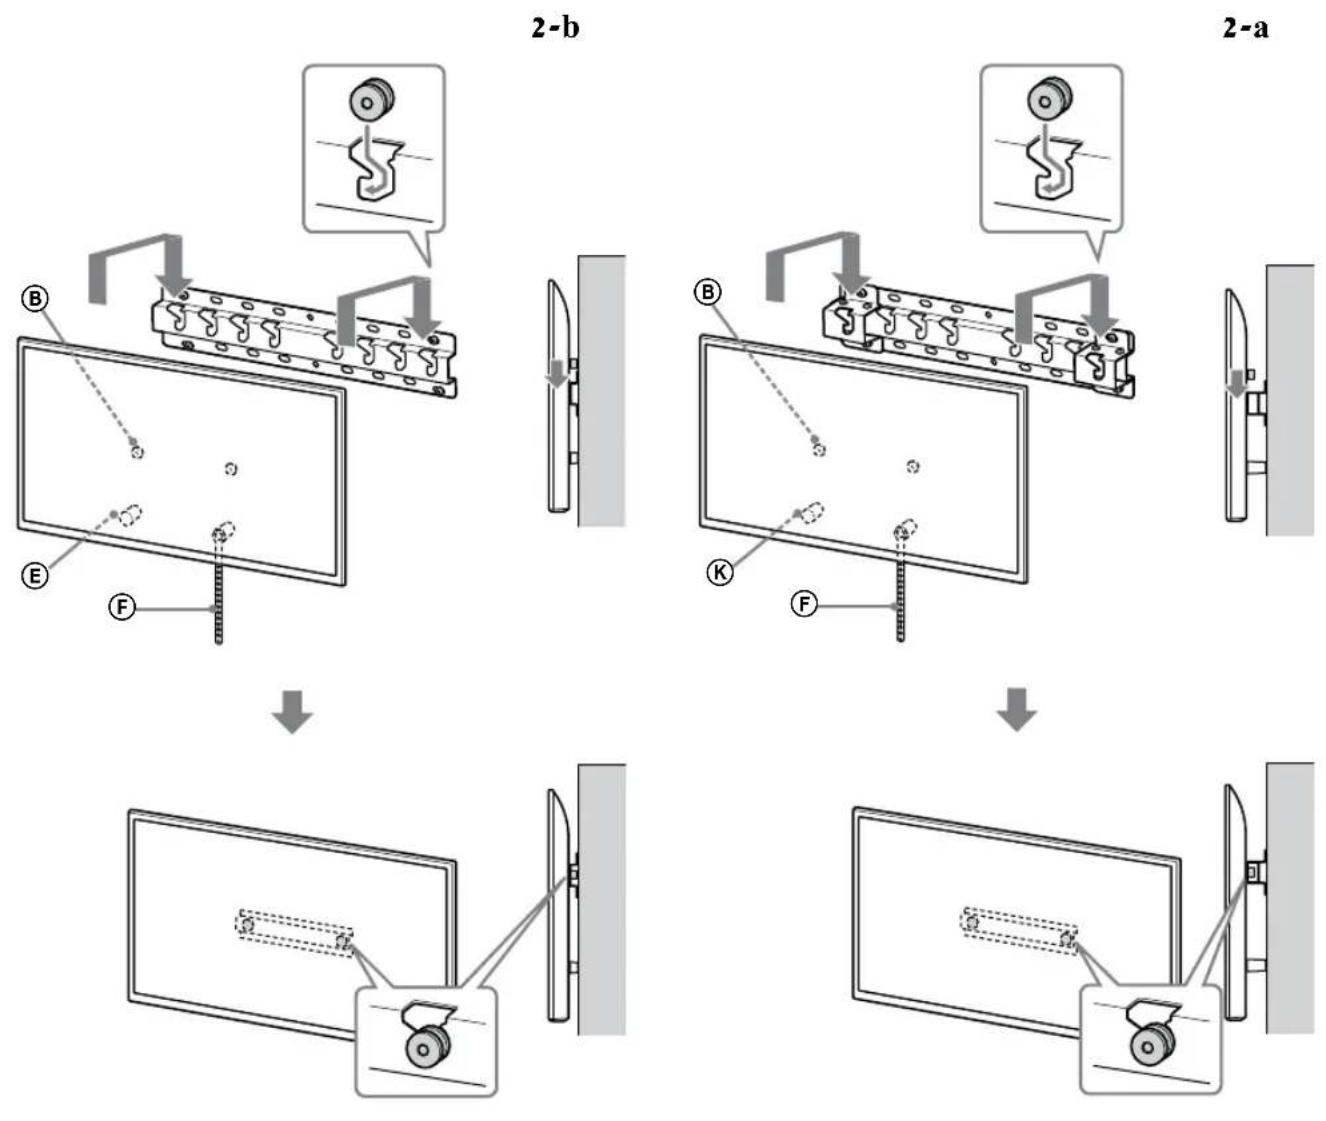
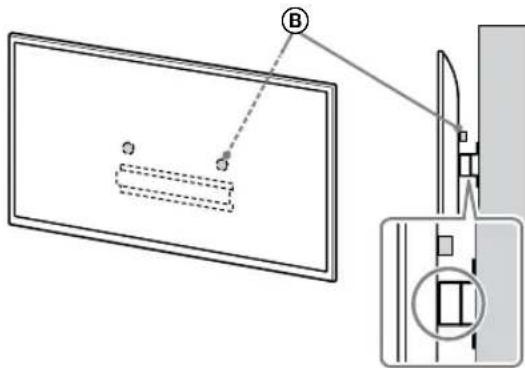
1.
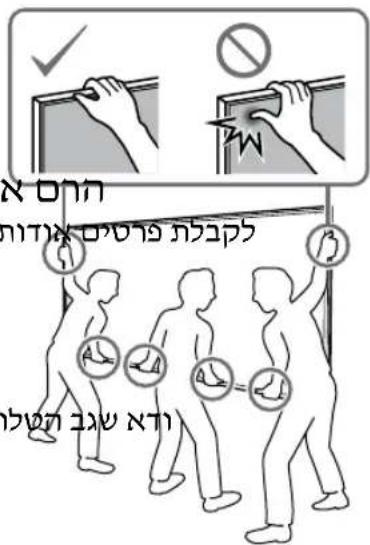
.
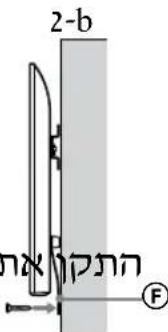
Therefore, (P1D1N') = 7^2
.
.
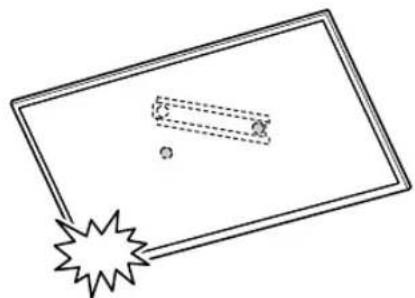
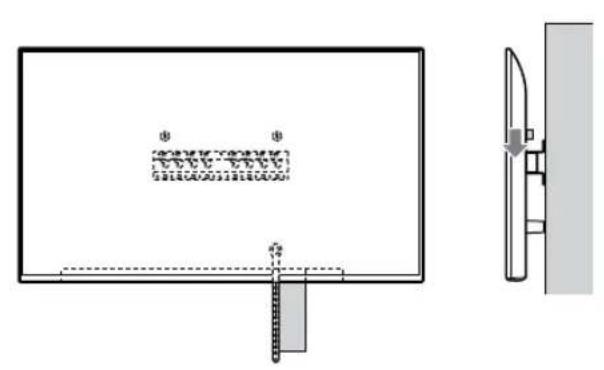
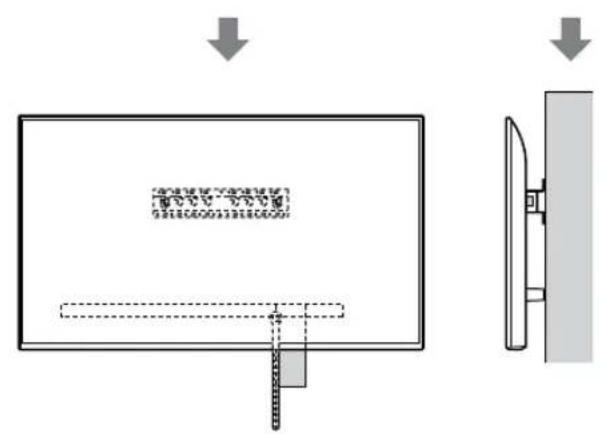
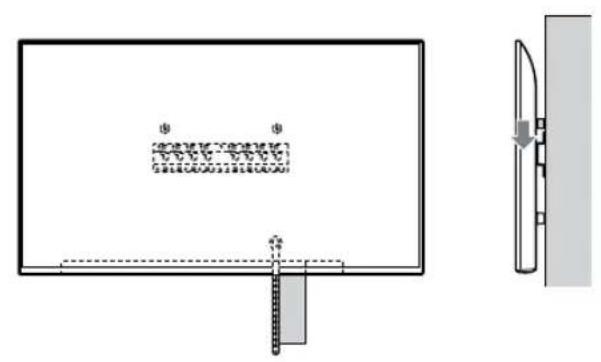
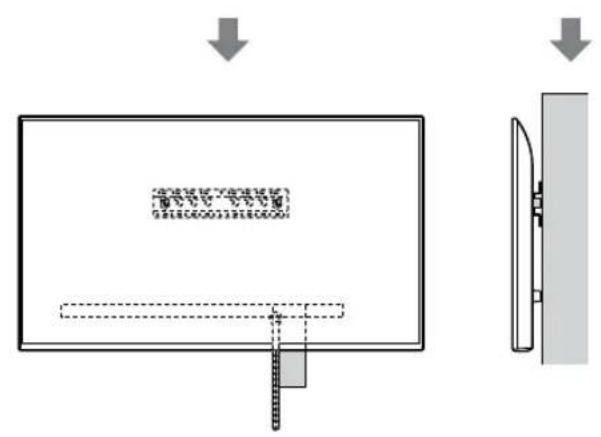
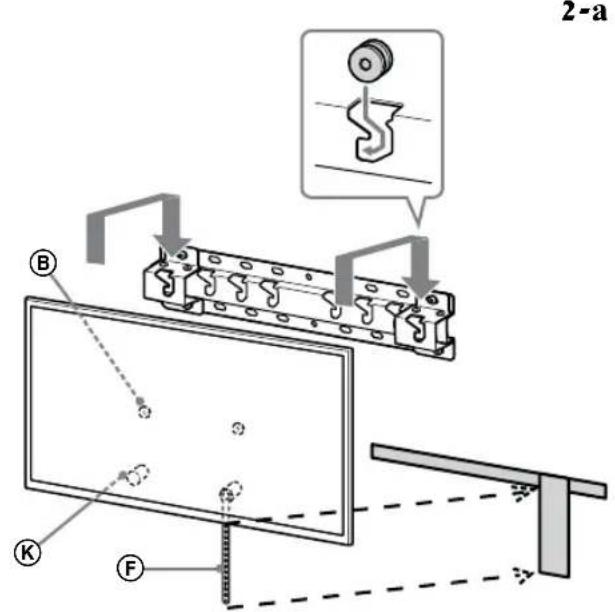
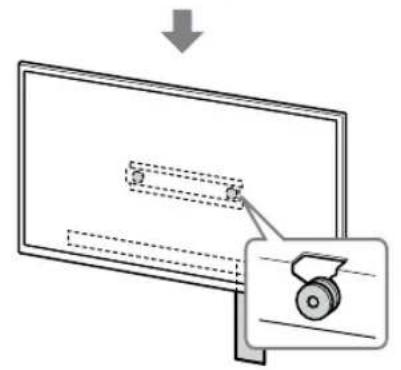
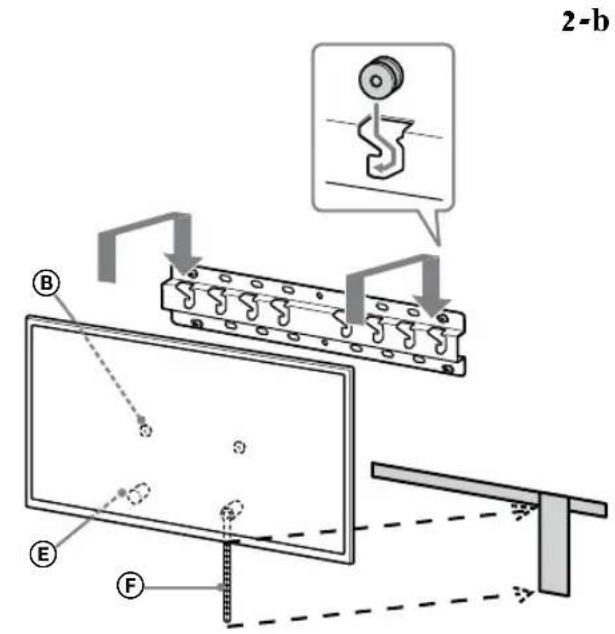
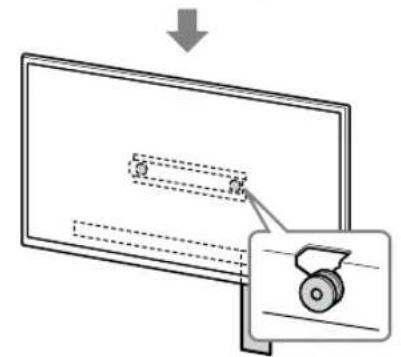
KD-75XG80□□
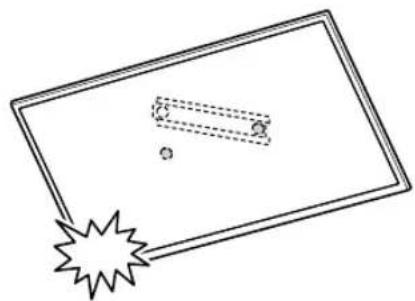
1.
B
#
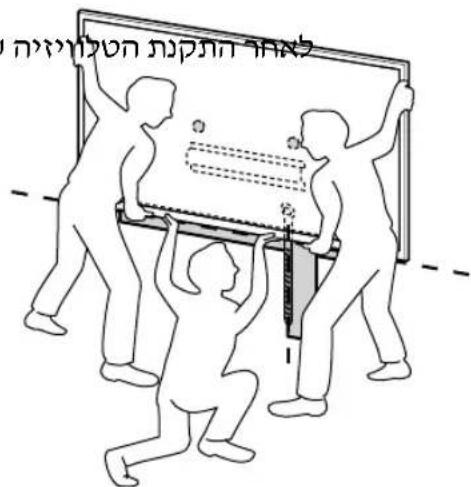
n 1
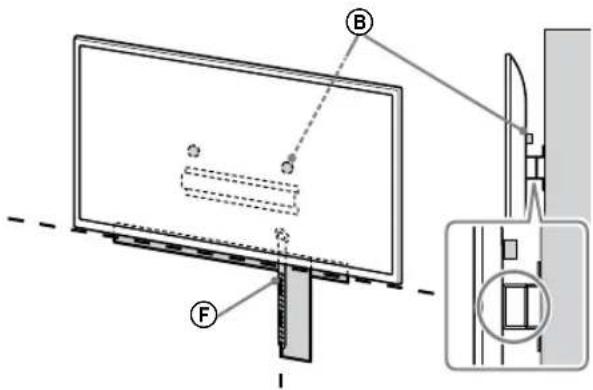
(2-a) n7n7n7 (2-b) nynn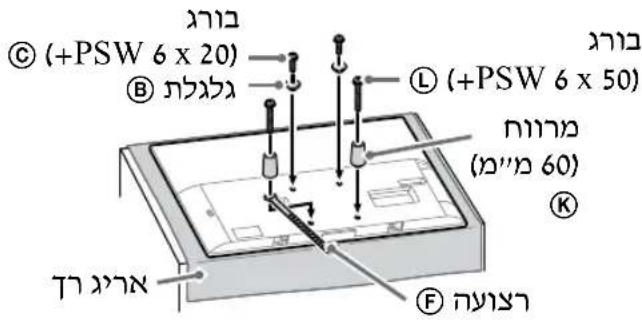
n nn nnnn nn nn
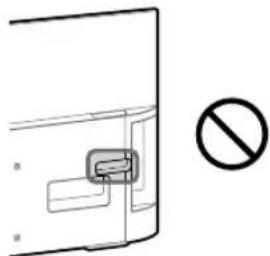
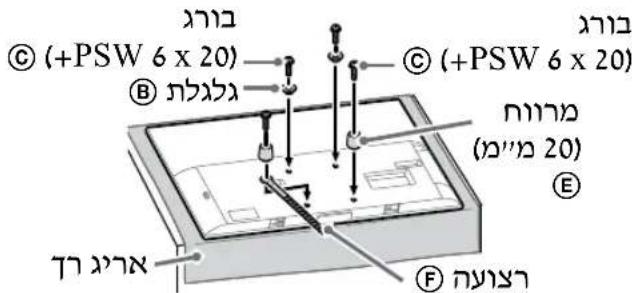
3
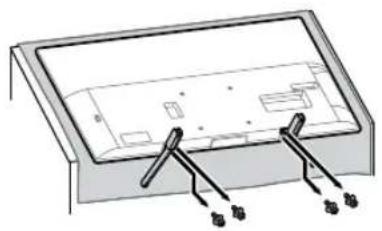
| b | KD-75XG80□□KD-65XG81□□KD-65XG80□□ |
| c | KD-55XG81□□KD-55XG80□□KD-49XG81□□KD-49XG80□□ |
| d | KD-43XG81□□KD-43XG80□□ |
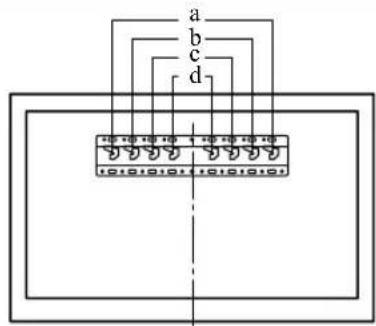
2 1
n:n IN PON 5V - by in Tn, -NNnNn , ∴ m : x = 1 或 3x + 4y + 1 = 0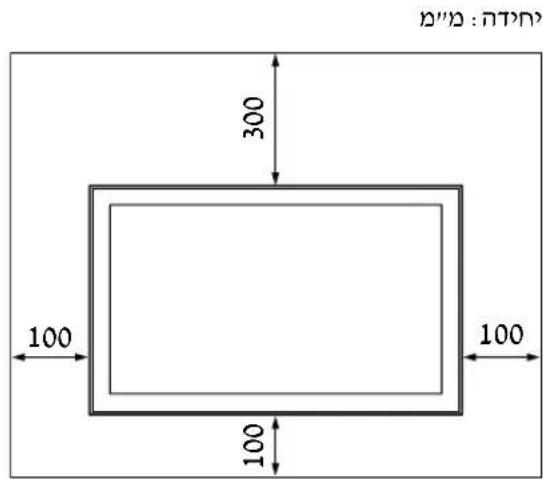
3 npovv nnv noo
N N 1000
n nn n
nnpnn nnnnn nn noan noan np
yinnnnn nn, nnnn nn nn
(20) nnnn ① v nn, (20) v nn
(60) nnnn
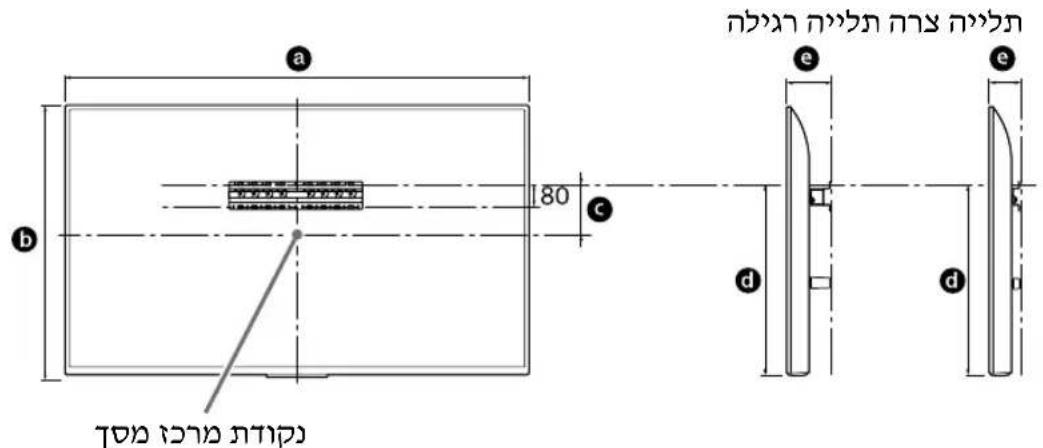
| e | d | C | b | a | a | |
| n | n | |||||
| n | n | |||||
| 1,6869702K2DP05A2C80□□ | ||||||
| 1,4638451K3DP25A2C80□□ | ||||||
| 1,4638451K3DP25A2C80□□ | ||||||
| 1,2417219K4D055N0B1□□ | ||||||
| 1,2417219K4D055N0B1□□ | ||||||
| 1,101645-15f3144X781□□ | ||||||
| 1,101645-15f3144X780□□ | ||||||
| 97057023K15143XG81□□ | ||||||
| 97057023K15143XG80□□ | ||||||
- KD-75XG80□□
- KD-65XG81□/65XG80□ 11.KD-55XG81□/55XG80□
N 5 10 N
SU-WL450 17
- KG-75XG80□
(1) (20) ④(2) ⑤
KD-65XG81□/65XG80□/55XG81□/55XG80□/49XG81□/49XG80□/43XG81□/ 16. 43XG80□□ 19. 19. 7N 19

PSW 4x20 (2)

(4)PSW6x20

E(1) yin
(2) (20) nnnn

(2)PSW4x20 H

(2) (M4) (20) ⑥

①(8) PSW 4x10 J
n nn nnnnnnnnn
nnuu nn nnuu npnnn nu npnn Su-WL450 npnnn wwn npn by
- TAYLOR JN


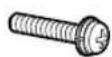
(2) (60) nnnn K (2) PSW

K(2)PSW 6x5p,nnbnwnnynn nn nnnn nee nee nee nee nee nee nee nee nee nee nee nee nee nee nee nee nee nee nee nee nee nee nee nee nee nee nee nee nee nee nee nee nee nee nee nee nee nee nee nee nee nee nee nee nee nee nee nee nee nee neee
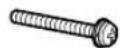
(2) (M4) mnn (2) PSW 4x50 N
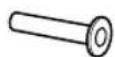
n nn nnnn 197n nn nn nn nn nn nn nn nn nn nn nn nn nn nn nn nn nn nn nn nn nn nn nn nn nn nn nn nn nn nn nn nn nn nn nn nn nn nn nn nn nn nn nn nn nn nn nn nn nn nn nn nn nn nn nn nn nn nn nn nn nn nn nn nn nn nn nn nn nn nn nn nn nn nn nn nn nn nn nn nn nn nn nn nn nn nn nn nn nn nn nn nn nn nn nn nn nn nn nn nn
1000000000000000000000000000000000000000000
yannnnn79p7 7yinn nn yipn
yabnyn,ynyn nON
NNyN7Ow.
in nnnn nn nnnn nn nnnn
NNPnnpn TINNp bynnn.
ybnbynnbn,ynynnON .nybn
5vnnn nnN 107 p7n, n77n
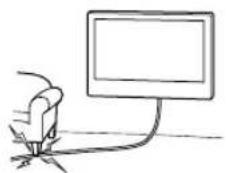
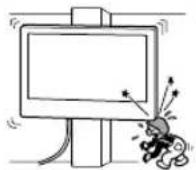
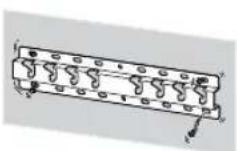
This is a test, not the real thing. This is a test.
Test
Sony
Test
Test
55XG80□□*/49XG81□□*/49XG80□□*/43XG81□□*/
43XG80□□*
Sony
- TO CUSTOMERS
- TO SONY DEALERS AND CONTRACTORS
- ON SAFETY
- TO SONY DEALERS
- CAUTION
- SPECIFIED PRODUCTS
- WARNING
- BE SURE TO SUBCONTRACT THE INSTALLATION TO LICENSED CONTRACTORS AND KEEP SMALL CHILDREN AWAY DURING THE INSTALLATION
- BE SURE TO SUBCONTRACT MOVING OR DISMOUNTING OF THE TV TO LICENSED CONTRACTORS
- DO NOT REMOVE SCREWS, ETC., AFTER MOUNTING THE TV
- DO NOT MAKE ALTERATIONS TO THE PARTS OF THE WALL-MOUNT BRACKET
- DO NOT MOUNT ANY EQUIPMENT OTHER THAN THE SPECIFIED PRODUCT
- DO NOT LEAN ON OR HANG FROM THE TV
- DO NOT HANDLE THE PRODUCT WITH EXCESSIVE FORCE DURING CLEANING OR MAINTENANCE
- PRECAUTIONS
- INSTALLING THE WALL-MOUNT BRACKET
- DO NOT INSTALL THE TV OVER OR UNDER AN AIR CONDITIONER
- BE SURE TO INSTALL THE WALL-MOUNT BRACKET SECURELY TO THE WALL FOLLOWING THE INSTRUCTIONS IN THIS INSTRUCTION MANUAL
- BE SURE TO ASSEMBLE THE BRACKET PROPERLY FOLLOWING THE INSTRUCTED PROCEDURE EXPLAINED IN THIS INSTRUCTION MANUAL
- BE SURE TO TIGHTEN THE SCREWS SECURELY IN THE DESIGNATED POSITION
- BE CAREFUL NOT TO SUBJECT THE TV TO SHOCK DURING INSTALLATION
- BE SURE TO INSTALL THE TV ON A WALL THAT IS BOTH PERPENDICULAR AND FLAT
- AFTER PROPER INSTALLATION OF THE TV, SECURE THE CABLES PROPERLY
- DO NOT ALLOW THE MAINS LEAD OR THE CONNECTING CABLE TO BE PINCHED
- THE SCREWS NEEDED TO SECURE THE WALL-MOUNT BRACKET TO THE WALL ARE NOT SUPPLIED
- TABLE OF CONTENTS
- INSTALLING THE TV ONTO THE WALL
- NOTE
- PREPARING FOR INSTALLATION
- CHECKING THE PARTS
- SUPPLIED WITH SU-WL
- DECIDING ON THE INSTALLATION LOCATION
- DECIDE ON THE INSTALLATION LOCATION
- INSTALLING THE BASE ON THE WALL
- PREPARING FOR THE INSTALLATION OF THE TV
- KD-75XG
- SLIM MOUNTING (2-B)
- DETACH THE TABLE-TOP STAND FROM THE TV
- KD-65XG81□□/65XG
- CONNECT THE NECESSARY CABLE(S) TO THE TV
- KD-55XG
- XG
- ATTACH THE ATTACHMENT PARTS FOR WALL-MOUNT BRACKET. CHECK THE ATTACHMENT PARTS BY REFERRING TO "SUPPLIED WITH SU-WL450" IN "CHECKING THE PARTS" ON PAGE
- INSTALLING THE TV ON THE WALL
- LIFT THE TV
- INSTALL THE TV ONTO THE BASE OR BASE ADAPTOR
- PREVENTING THE BOTTOM OF THE TV FROM SHIFTING
- CONFIRMING THE COMPLETION OF THE INSTALLATION
- OTHER INFORMATION
- SPECIFICATIONS
- DIMENSIONS: (APPROX.) [MM]
- WEIGHT (BASE ONLY): (APPROX.) [KG]
- PREPARATION FOR INSTALLATION
- FIND THE TV'S LOCATION
- FOR CUSTOMERS
- CHECKING THE ACCESSORIES
- DO NOT INSERT SCREWS OR OTHER MOUNTING ITEMS INTO THE TV
- PLACE THE WALL MOUNT BRACKET ON THE WALL
- DO NOT MOUNT ANY OTHER EQUIPMENT OTHER THAN THE SPECIFIED PRODUCT
- DO NOT PLACE THE WALL MOUNT BRACKET ON ANY OTHER PRODUCT EXCEPT THE TV. DO NOT PLACE THE TV ON TOP OF OR BELOW THE BRACKET
- DO NOT LEAN ON OR SIT ON THE TV
- DO NOT HANDLE THE PRODUCT WITH WET HANDS DURING CLEANING OR MAINTENANCE
- SAFETY PRECAUTIONS
- WALL MOUNT BRACKET INSTALLATION
- ACCESSORIES
- DO NOT INSTALL THE WALL-MOUNT BRACKET ON A WALL SURFACE WHERE THE TV SCREEN PROTRUDES FROM THE WALL SURFACE
- DO NOT INSTALL THE TV UNDER OR NEAR AN AIR CONDITIONER
- INSTALL THE WALL-MOUNT BRACKET SECURELY TO THE WALL BY FOLLOWING THE INSTRUCTIONS IN THIS MANUAL
- DO NOT ALLOW THE POWER CORD OR CONNECTING CABLES TO BE PINCHED
- THE SCREWS REQUIRED FOR SECURING THE WALL-MOUNT BRACKET TO THE WALL ARE NOT INCLUDED IN THE PACKAGE
- CONTENTS
- MOUNTING THE TV ON THE WALL
- DETERMINE THE POSITIONS OF THE SCREWS FOR MOUNTING THE BASE (20) A
- MOUNTING THE BASE ON THE WALL
- PREPARATION FOR MOUNTING THE TV
- DETERMINE THE LOCATION FOR MOUNTING ON THE WALL
- MOUNT THE TV ONTO THE TABLE-TOP STAND
- REMOVE THE PROTECTIVE FILM FROM THE TV
- PREVENTION
- MOUNT THE TV ONTO THE BASE PLATE OF THE ADAPTER FOR THE BASE
- PACKING
- ADJUSTMENT
- A6EJEXKA
- ПОБЕРКА НА
- PONDEPKINBAEMBLE MOEI
- ДЛЯ NOKУНATENEI
- PNEUINPEKDEHNE
- ATEIBHO 06PATNTECB K JIUCEH3NPOBAHHOMY IOPRANKY,A TAKXHE HE DONYCKAITE TORO,QTOBBL DETN HAXOJINCB B6JLN3M MECTA YCTAHOBKN N3DEJIY
- PRECAUTIONS FOR CHILDREN
- AFTER INSTALLING THE TV, DO NOT REMOVE THE SCREWS, ETC
- DO NOT DISASSEMBLE OR MODIFY THE PARTS OF THE WALL MOUNT BRACKET
- DO NOT INSTALL ANY EQUIPMENT OTHER THAN THE SPECIFIED ONE ON THE BRACKET
- TO AVOID OVERLOADING THE WALL MOUNT BRACKET, DO NOT PLACE ANYTHING OTHER THAN THE TV ON IT. DO NOT MOVE THE TV LEFT/RIGHT OR UP/DOWN
- DO NOT LEAN ON THE TV OR HOLD ONTO IT
- WALL MOUNTING BASE INSTALLATION
- MARK THE INSTALLATION LOCATION ON THE WALL
- COMPACT INSTALLATION (2-B)
- CONNECT THE NECESSARY CABLES TO THE TV
- DISCONNECT THE TABLE-TOP STAND FROM THE TV
- KD-55XG81□□/55XG
- ATTACH THE MOUNTING PARTS AND BRACKETS FOR WALL-MOUNT INSTALLATION. PERFORM THE CHECK OF THE MOUNTING PARTS ACCORDING TO THE SECTION "ATTACHING THE SU-WL450" IN THE "CHECKING THE ACCESSORIES" ON PAGE
- WALL-MOUNT INSTALLATION (2-B)
- PPMEAHNE
- ATTACH THE MOUNTING BRACKETS OF THE WALL-MOUNT. PERFORM A CHECK OF THE MOUNTING BRACKETS ACCORDING TO THE ITEM "SUPPLIED ACCESSORIES SU-WL450" IN THE SECTION "CHECKING THE ACCESSORIES" ON PAGE
- STANDARD MOUNTING (2-A)
- COMPACT MOUNTING (2-B)
- MOUNTING THE TV ON A WALL
- PREPARE THE TV
- INSTALL THE TV ON THE BASE OR BASE ADAPTER
- TO PREVENT THE LOWER PART OF THE TV FROM SHIFTING
- PLACE THE TV ON THE BASE OR ADAPTER BASE
- PREVENT THE LOWER PART OF THE TV FROM SHIFTING
- INITIAL INFORMATION
- TECHNICAL SPECIFICATIONS
- INFORMATION FOR INSTALLATION USING THE WALL-MOUNT BRACKET FOR SONY (SU-WL450)
- SAFETY INFORMATION
- INSTALLATION PRECAUTIONS
- DAMAGE TO THE PRODUCT BY SONY
- PRODUCT NAME
- INSTALLATION INSTRUCTIONS
- WARNINGS
- IT IS MANDATORY TO ENTRUST INSTALLATION TO LICENSED CONTRACTORS AND ENSURE THAT CHILDREN ARE NOT PRESENT DURING INSTALLATION
- O6OB'3K0BO DOPYUITB NEPEMIUENEHHA6O DEMOHTYBAHHA TEIEBI3OPA NIIPRAHNKAMN, KIMAIOB LIUEH3IO
- HE BNKPYUYTE RBNHTN, TOO, NCJMA MOHTYBAHHA TEIEBI3OPA
- HE 3MIHOUTE DETAJI KPOHHTEHA DJA HACTIHHORO KPINJEHHRA
- HE BCTAHOBJIOUTE HIAKNX IHMIX NPNCTPOIB, KPIM 3A3NAUEHORO BNPO6Y
- HE 3ACTOCOBYTE DO KPOHWTEHA DJA HACTIHHORO KPINJIEHHI INWI HABAHTAXEHHN, OKPIM TEJIEBI3OPA. HE PO3XITYITE TEJIEBI3OP YIBO/BNPABO QN BROPY/ BHN
- HE CNPUATECNA TELEBIZOP I HE YINJATEC3A HBORO
- PONEPEIXEHH
- WHEN CLEANING OR SERVICING THE PRODUCT, DO NOT APPLY EXCESSIVE FORCE TO IT
- FOR SONY CUSTOMERS
- DO NOT INSTALL THE WALL-MOUNT BRACKET IN PLACES WHERE THE EDGES OF THE TV PROTRUDE BEYOND THE WALL SURFACE
- DO NOT INSTALL THE TV ON A CEILING OR WITH A CONDENSER
- INSTALL THE WALL-MOUNT BRACKET SECURELY TO THE WALL ACCORDING TO THE INSTRUCTIONS IN THIS MANUAL
- TIGHTEN THE BOLTS SECURELY, FOLLOWING THE PROCEDURE DESCRIBED IN THIS MANUAL
- TIGHTEN THE BOLTS FIRMLY IN THE SPECIFIED POSITION
- WHEN MOVING THE TV, HOLD THE BOTTOM OF THE TV
- INSTALL THE TV ON A PERPENDICULAR WALL WITH A FLAT SURFACE
- AFTER MOUNTING THE TV, SECURE THE CABLES WITH A PROPER CLAMP
- MAKE SURE THAT THE POWER CORD OR CONNECTING CABLE IS NOT PINCHED
- THE BOLTS USED TO SECURE THE TV TO THE WALL ARE NOT INCLUDED IN THE SUPPLY KIT
- ATTACHMENT
- PREPARATION
- INSTALLATION
- CHECK THE DETAILS
- INSTALLATION LOCATION
- INSTALLING THE STAND
- REMOVE THE WALL MOUNT BRACKET OF THE TV
- THIN MOUNTING (2-B)
- CONNECT THE TV TO THE POWER OUTLET AS REQUIRED
- DISCONNECT THE TV FROM THE POWER OUTLET
- ATTACH THE WALL-MOUNT BRACKETS TO THE WALL-MOUNT PLATE. CHECK THE TIGHTNESS OF ALL WALL-MOUNT BRACKETS USING THE LIST "SUPPLIED ACCESSORIES - WL450" IN THE "CHECKING THE PARTS" SECTION ON PAGE
- TO THE WALL MOUNT (2-B)
- CONNECT THE TV CABLE
- REMOVE THE STAND FROM THE TV
- ATTACH THE STAND'S MOUNTING BRACKETS FOR WALL MOUNTING. CHECK THE PRESENCE OF ALL MOUNTING BRACKETS, USING THE LIST "SUPPLIED WITH SU-WL450" IN THE "CHECKING THE PARTS" SECTION ON PAGE
- CONNECT THE TV TO THE NECESSARY CABLES
- INSTALLING THE TV ON THE STAND
- INSTALL THE TV ON THE BASE OR PEDESTAL FOR THE BASE
- BE CAREFUL NOT TO DAMAGE THE BOTTOM PART OF THE TV
- STAND
- PLACE THE TV ON THE BASE OR THE BASE ADAPTER
- TO REPLACE THE STAND
- CHECK AFTER INSTALLATION
- THIN INSTALLATION (2-B)
- MARK
- MASS (ONLY BASE): (APPROX.) [KG]
- WEIGHT (BASE): (APPROX.) [KG]
- FOR USERS
- FOR SONY DEALERS AND CONTRACTORS
- ABOUT SAFETY
- SONY DNILNEPEPI YWIH
- ECKEPTY
- KA6BIPRARA 6EKITY KPOHWTEHIH
- TEIEIAIAPDBIH
- YPBLTAPBL HE KANTAIBI KA6BIPRA 6ETIHEH WBIFBIN TYPATBIH OPBIHAPFA OPHATNABI
- TEJEIAPBIH CAIKBIHDATKBIHTBIH YCTIHE HE ACTBHA OPHATAHBI
- KA6BIPRARA 6EKITY KPOHHTEHHOCBI
- NAYDAANHY HCAYIBIBHA CYNEHE OTBIPBIMMBIKTAN 6EKIRIH
- HCYAYNBKTA 6EPIREH NPOCEDYPANAPRA CYNEHE OTBIPBIN KPOHWTEHDI DYPBICTA
- KYPACTBIPBIHBL
- THESE INDICATORS SHOULD BE SECURED WITH SCREWS IN THE INDICATED POSITIONS
- DURING INSTALLATION, DO NOT REMOVE THE TENSIONERS
- THE TENSIONERS MUST BE INSTALLED PERPENDICULAR TO THE WALL AND FLOOR
- AFTER THE TENSIONERS ARE CORRECTLY INSTALLED, SECURE THE CABLES CORRECTLY
- THE ALTERNATING CURRENT OR THE CABLE MUST BE DISCONNECTED
- SCREWS FOR SECURING TO THE WALL ARE NOT PROVIDED
- TV WALL MOUNTING
- INSTRUCTIONS
- REMOVING THE STAND
- SUPPLIED WITH THE SU-WL
- STANDARD INSTALLATION
- CLEANING
- HYCKAY
- CABLE FIXING BRACKETS
- REMOVING THE CABLE FIXING BRACKETS
- REMOVE THE CABLE FIXING BRACKETS
- TO ATTACH THE CABLE FIXING BRACKETS, USE THE SCREWS PROVIDED. SEE "ATTACHING THE CABLE FIXING BRACKETS" IN THE "SU-WL450" SECTION FOR THE INSTALLATION PROCEDURE
- INCLINED MOUNTING (2-B)
- CONNECT THE CABLE(S) TO THE TV
- INSTRUCTION
- INSERT THE UPPER PART OF THE TV FROM THE TOP
- CABLE CLAMP (2-B)
- CONNECT THE CABLES TO THE TERMINALS
- REMOVE THE TOP COVER
- TO MOUNT THE CABLE CLAMP, USE THE SCREWS PROVIDED. SEE THE SECTION "REMOVING THE SCREWS" ON PAGE 5 FOR THE SU-WL450 BRACKET INSTALLATION
- XAKBH OPHATY (2-B)
- HYCAY
- KAKETTI KABEIBI (KABEIBIEPDI) TEJEIUAPRA KAJRAY
- TД-ДАН YCTETУFBLPBLH AKBIPATBIHBI
- KD-49XG81□□ / 49XG80□□ / 43XG81□□ / 43XG
- DO NOT USE THE DEVICE WITHOUT THE USER MANUAL
- FOR PROPER INSTALLATION, FOLLOW THE INSTRUCTIONS IN THE INSTALLATION MANUAL. SEE THE "INSTALLATION" SECTION IN THE "SU-WL450" BRACKET MANUAL FOR WALL-MOUNTING INSTRUCTIONS
- STANDARD INSTALLATION (2-A)
- CORRECT INSTALLATION (2-B)
- CONNECT THE CABLES (CABLE CORDS) TO THE TERMINALS
- CONNECTING THE SPEAKERS
- REMOVE THE SPEAKER COVERS
- ATTACH THE SPEAKERS TO THE BASE OR BASE STAND
- DO NOT INSTALL THE TV ON A SURFACE THAT IS NOT LEVEL OR STABLE
- REMOVE THE TV FROM THE BOX
- ATTACH THE STAND OR WALL-MOUNT BRACKET TO THE TV
- WARNING: THE TEXT IS NOT IN ENGLISH. IT APPEARS TO BE IN KAZAKH (CYRILLIC). TRANSLATION: 'TELEVISION ANTENNAS MUST BE INSTALLED AT A DISTANCE OF AT LEAST 75 CM FROM THE ANTENNA AND AT LEAST 75 CM FROM THE TELEVISION ANTENNA CABLE
- TAKE THE PLUG (F) AND INSERT IT FIRMLY INTO THE SOCKET
- TO CONNECT THE TELEVISION ANTENNA CABLE, INSERT THE ANTENNA PLUG INTO THE ANTENNA SOCKET. IF IT IS LOOSE, TIGHTEN THE SCREW
- CHECK THE CONNECTIONS
- DO NOT PLACE THE ANTENNA NEAR METAL OBJECTS OR IN A PLACE WHERE IT MAY BE EXPOSED TO RAIN OR MOISTURE. DO NOT INSTALL THE ANTENNA NEAR POWER LINES OR OTHER ELECTRICAL EQUIPMENT
- BATTERY COMPARTMENT
- EXPERTS
- INSTALLATION INFORMATION FOR USE OF SONY WALL-MOUNT BRACKET (SU-WL450)
- SU-WL
- N NN NNNNNNNNN
- N NN NNNN 197N NN NN NN NN NN NN NN NN NN NN NN NN NN NN NN NN NN NN NN NN NN NN NN NN NN NN NN NN NN NN NN NN NN NN NN NN NN NN NN NN NN NN NN NN NN NN NN NN NN NN NN NN NN NN NN NN NN NN NN NN NN NN NN NN NN NN NN NN NN NN NN NN NN NN NN NN NN NN NN NN NN NN NN NN NN NN NN NN NN NN NN NN NN NN NN NN NN NN NN NN
- YANNNNN79P7 7YINN NN YIPN
- NNYN7OW
- NNPNNPN TINNP BYNNN
- VNNN NNN 107 P7N, N77N
- TEST
- SONY
Brand : SONY
Model : Bravia KD65XG8196
Category : Television