17017 - Compressor Erba - Free user manual and instructions
Find the device manual for free 17017 Erba in PDF.
User questions about 17017 Erba
0 question about this device. Answer the ones you know or ask your own.
Ask a new question about this device
Download the instructions for your Compressor in PDF format for free! Find your manual 17017 - Erba and take your electronic device back in hand. On this page are published all the documents necessary for the use of your device. 17017 by Erba.
USER MANUAL 17017 Erba
natural_image
Blue industrial air compressor with black top and yellow label (no visible text or symbols on body)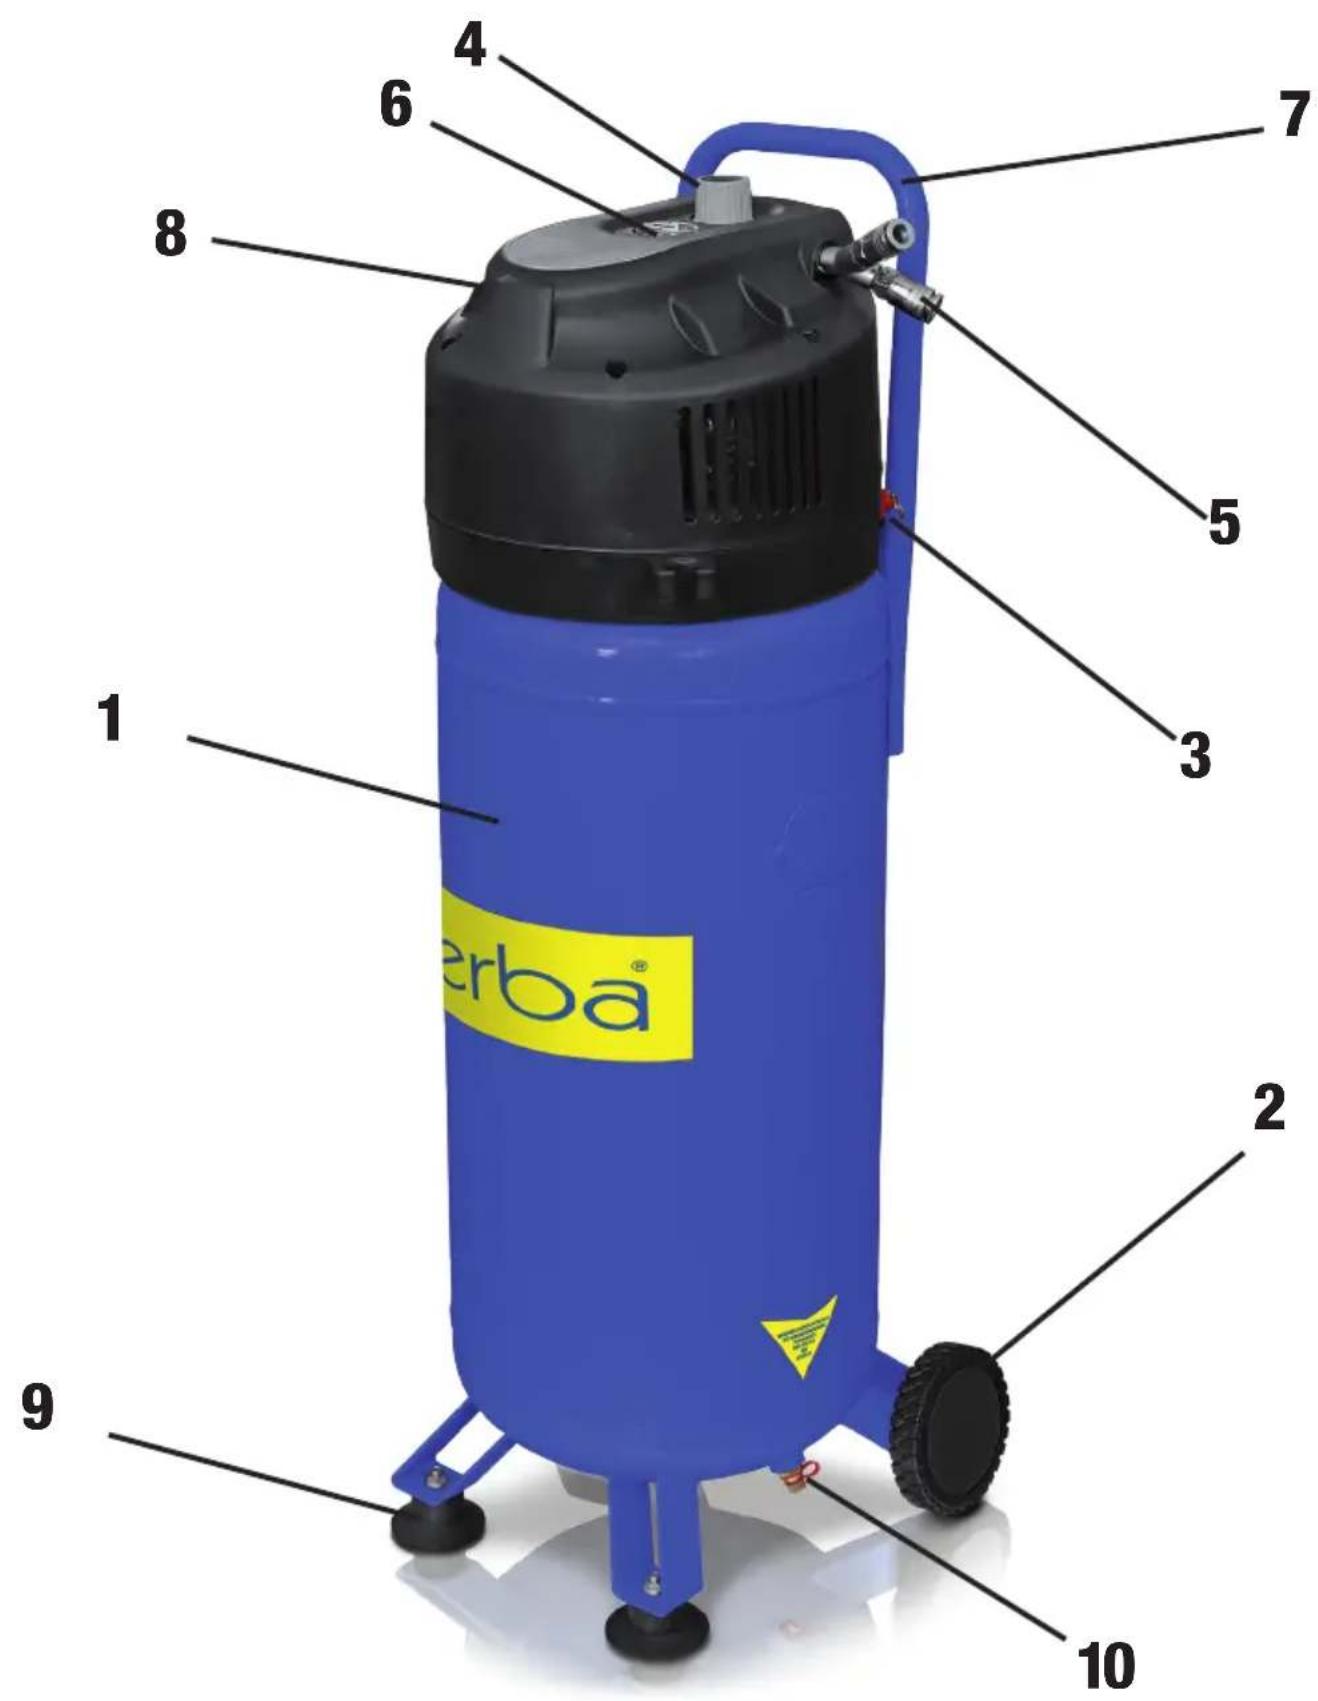
natural_image
Close-up of hands assembling a mechanical component with a metallic screw and nut (no text or symbols visible)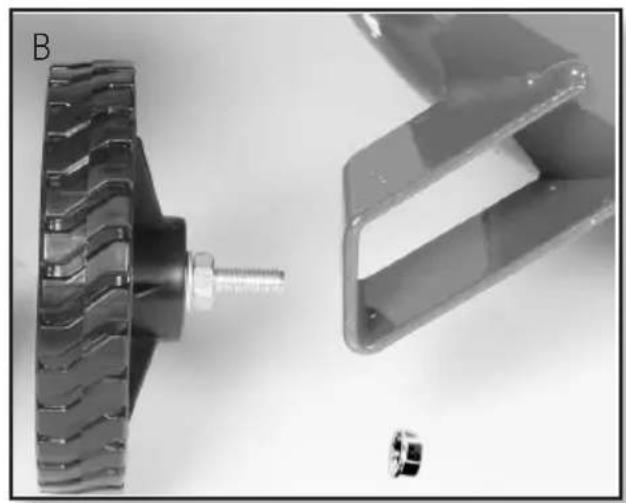
natural_image
Two mechanical components: a gear with threaded shaft and a bracket with flanged end (no visible text or symbols)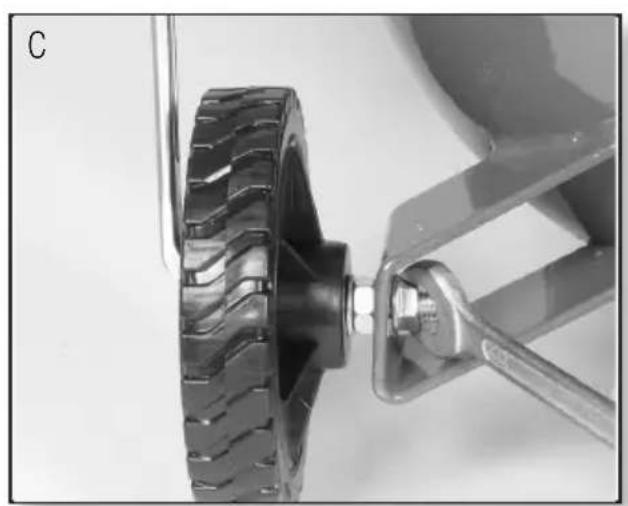
natural_image
Close-up of a mechanical component with visible tire and lever assembly (no text or symbols)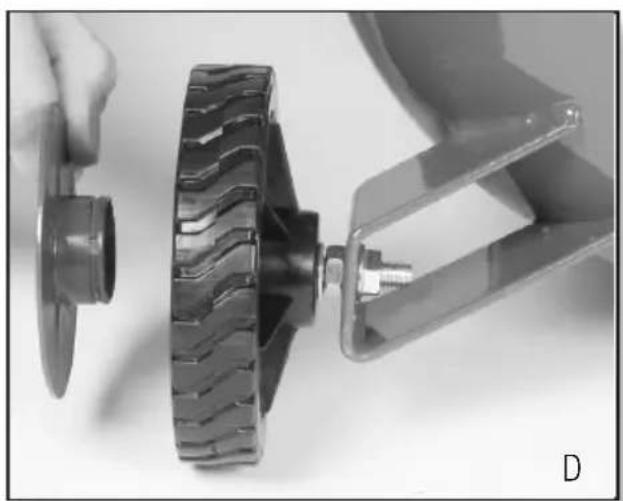
natural_image
Close-up of a mechanical assembly showing a tire and clamping mechanism (no visible text or symbols)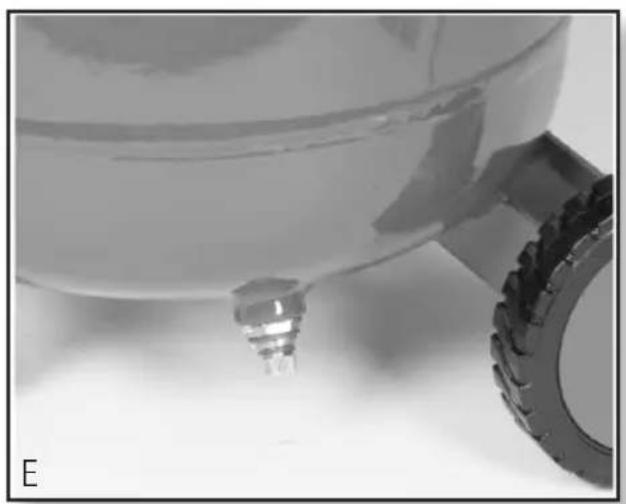
natural_image
Close-up of a mechanical component with a small metallic fitting and a large tire, no visible text or symbols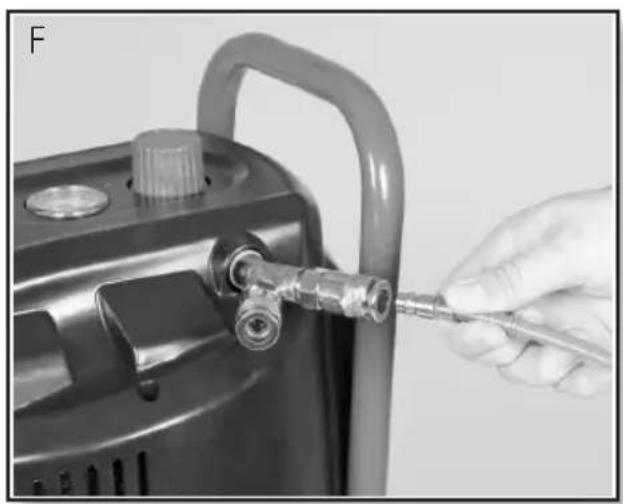
natural_image
Close-up of a hand using a tool to adjust or install a fuel valve into a gas cylinder (no text or symbols visible)* Technical changes reserved
For and on behalf of ERBA GmbH (authorized signature)
Dominik Schilling
- Safety instructions 14
- Product description 16
- Designated use 16
- Restrictions of use 16
- Technical data 16
- Noise emission values 16
- Important information for initial operation 17
- Operation instructions 17
- Service and replacement parts 19
- Warranty 19
- Disposal 19
- Legal information 19
- Declaration of conformity 20
1. SAFETY INSTRUCTIONS
Read this material before using this product. Failure to do so can result in serious injury. KEEP THIS MANUAL. When giving this machine to third parties, always include this manual. We do not accept any liabilities for accidents or damages that result from misuse. Removal/Alteration of any safety devices or of the machine in general will result in the loss of warranty. The buyer assumes all risk and liability arising out of his or her repairs/alterations to the original product or replacement parts thereto, or arising out of his or her installation of replacement parts thereto.
■ Always keep your work area well lit, clean and free of obstacles.
■ Do not use the product in the vicinity of ignition sources.
- Keep children away from your work area.
- Avoid contact with grounded surfaces (eg. pipes, radiators, etc.) to avoid the risk of electric shock.
■ Do not use the product in moist or wet areas.
■ Never carry the product on its electric cord. Do not pull the cord to unplug the product. Check the cord for any damage on a regular basis.
■ When using the product outdoors, always use suitable outdoor-extension cords/outlets.
■ Always use proper personal protection equipment (eye-protection, gloves, etc.).
■ Make sure the product is turned off when plugging in the cable.
- Do not wear loose clothing, jewellery or any other accessory that might get caught in the machine. If you have long hair, wear a hair-net.
■ Always disconnect the powercord when doing maintenance work, cleaning or changing the mixer.
■ Never leave the product unattended when children are present.
- Check the product for any sign of damage each time before you use it.
■ Do not attempt to repair the product when it is damaged! Repair work must only be done by authorized, qualified service technicians.
The compressor has a starting power of 2ps/1500W and therefore It is necessary to use a 16A time delay fuse. Try to avoid extension cords whenever possible and use air hose extensions instead.
■ The free release of air from the tank can be dangerous and should only be done by authorized personell.
■ When unused, the compressor should be stored in a dry, locked room out of reach for children.
- Keep the compressor clean.
■ When removing the air couplings keep a firm grip to avoid the air hose snapping back.
Safety instructions for color spraying
■ Do not use paint or solvents with an ignition point below 55°C. Do not heat up paint or solvents!
■ When working with harmful substances always use personal protective equipment. Read the instructions on safety measures provided by the producer of said substances.
- When working with atomized paint it is forbidden to smoke, use open fire or other ignition sources. Atomized paint is highly flammable.
■ Do not consume food or drinks in the work area. Paint fumes are toxic.
■ The work area (room) must be larger than 30m^2 and well ventilated.
- Don't spray upwind.
■ Always follow federal laws and regulations concerning the use and disposal of hazardous substances.
■ Do not use mineral spirits, butyl alcohol or methylene chloride in combination with PVC air hoses (reduced lifespan).
Safety instructions for working with compressed air and dust guns
■ Compressor and pipes reach high temperatures during operation. Do not touch!
■ Make sure the air consumed by the compressor is void of any hazardous substances to avoid fire or explosions.
■ Always use personal protective equipment (safety goggles) when working with dust guns.
■ Never aim dust guns directly at people. Do not use a dust gun to clean yourself or other people.
Safety instructions for operating pressure equipment
■ Whoever operates pressure equipment must keep the appliances in good condition, supervised and immediately carry out all necessary steps to repair and maintain the equipment in accordance with the latest safety standards.
■ Pressure equipment must not be operated when damaged.
■ Pressure tanks must be inspected on a regular basis for any damage or rust. Contact a service technician if you find any damage.
2. PRODUCT DESCRIPTION
- Pressure tank
- Wheel
- Safety valve
- Pressure regulator
- Working pressure valve
- Gauge
- Handle
- On/off switch
- Stand
- Drain valve
3. DESIGNATED USE
The compressor is used to generate compressed air to operate air powered tools. Any other use is prohibited. The buyer accepts all liabilities, legal and otherwise, for any damage or injury resulting from improper use of the product (i.e. any other use than the above stated designated use).
4. RESTRICTIONS
Please note, that this product is not designed for commercial or industrial use. We accept no liability or warranty claims should the product be used in industrial and/or commercial operations.
5. TECHNICAL DATA
| Rated power: | 230 V ~ 50 Hz |
| Engine power: | 2 PS/1500 W, S3 25% |
| Engine rpm: | 4000 rpm |
| Working pressure: | max. 10 bar |
| Tank volume: | 50 l |
| Air consumption: | 220 l/min. |
| Sound power level LwA: | 97 dB (A) ± 3 dB |
| Sound pressure level LpA: | 83 dB (A) ± 3 dB |
| IP Class: | IP 20 |
| Weight: | 23,5 kg |
6. NOISE EMISSION VALUES
See technical data.
7. IMPORTANT INFORMATION FOR INITIAL OPERATION
■ Check the product for transport any damage. Notify the carrier if you find any transport damage.
■ Position the compressor as close to the working area as possible to avoid long air hoses and extension cords.
■ Intake air must be dry and clean.
■ After filling the air tank the compressor engine must cool down for 2-5 minutes to avoid overheating.
Mounting the wheels (2)
The enclosed wheels have to be mounted according to images B, C and D.
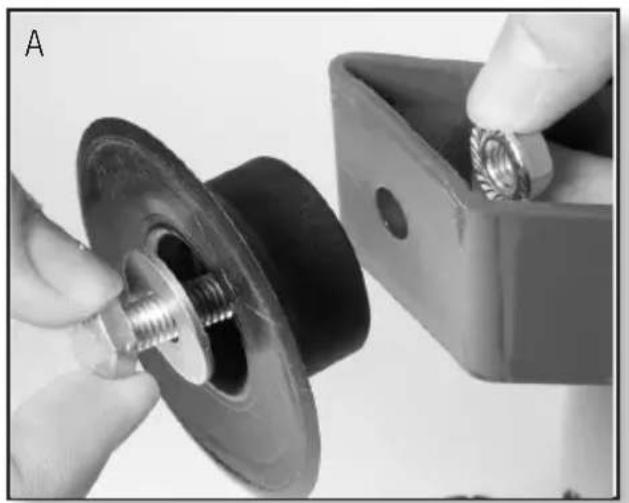
Mounting the stand (9)
The enclosed rubber stands have to be mounted according to image A.
8. OPERATION INSTRUCTIONS
Quick coupling (5)
Connect:
Put the plug of your hose directly into the coupling until you hear a clicking sound.
Disconnect:
Pull back the sleeve of the quick coupling and pull out the plug.
Adjusting the pressure
Use the pressure regulator (4) to adjust the pressure on the gauge (6). This will regulate the pressure coming out of the working pressure valve (5).
Troubleshooting:
Compressor engine does not work
Cause: No power present.
Solution: Check cables, plugs, fuses and outlets.
Cause: Power level too low.
Solution: Avoid using long extension cords. If you have to use extension cords, make sure they are sufficiently thick (at least 2.5 mm ^2 ).
Cause: Ambient temperature too low.
Solution: Do not operate below 5 °C.
Cause: Engine overheating.
Solution: Let the engine cool down. Do not operate above 40^ C ambient temperature.
Compressor engine working, but no pressure
Cause: Seals leaky.
Solution: Check seals and let a certified technician replace them.
Cause: Drain valve leaky.
Solution: Tighten the screw by hand. Check the seal on the valve and replace it if necessary.
Compressor engine working, gauge display pressure, tools not operating
Cause: Hose connections leaky.
Solution: Check hoses and tools and replace if necessary.
Cause: Working pressure valve leaky.
Solution: Check valve and replace if necessary.
Cause: Pressure regulator set too low.
Solution: Increase pressure with the pressure regulator or use the tank pressure valve.
9. SERVICE AND REPLACEMENT PARTS
Condensed water
Condensed water can be drained using the drain valve (10) on the bottom of the tank (image E). The condensed water inside the tank contains oil and has to be disposed of accordingly.
Safety valve
The safety valve is set to the max. allowed tank pressure. It is forbidden to alter this valve in any way. To ensure a perfect operation of the valve it has to be moved every now and then. Pull the ring until you hear the air venting from the valve. Then let go of the ring.
10. WARRANTY
Legal warranty regulations apply.
11. DISPOSAL
Our products are packed in order to prevent damage during transport. Packing materials are valuable resources and therefore can and should be recycled. The product itself consists of various materials (metals, oils, plastic, etc.) and should be disposed with care and in accordance with your federal and local disposal regulations.
12. LEGAL INFORMATION
All rights reserved. This manual is copyrighted. Reproduction in and form (digital, print, etc.) is strictly prohibited without the written permission of ERBA GmbH.
DECLARATION OF CONFORMITY
Models: 17017 Air Compressor 50 I oilfree
ERBA GmbH, Talpagasse 6, 1230 Wien, hereby states, that the mentioned model meet the following CE/RoHS quality standards, approvals and relevant safety requirements:
Machinery Directive: 2006/42/EC
EMC Directive: 2014/30/EC
Outdoor Directive: 2000/14/EC + 2005/88/EC
ROHS: 2002/95/EC
- EN 60204-1:2006+A1
- EN 1012-1:2010
- AfPS GS 2014:01
- EN 55014-1:2006+A1+A2
- EN 55014-2:2015
- EN 61000-3-2:2014
- EN 61000-3-3:2013
Wien, 01.09. 2017
For and on behalf of ERBA GmbH (authorized signature)
Dominik Schilling
Technical coordinator
ERBA GmbH, Talpagasse 6, 1230 Wien, Austria
Table des matières
Recherche
DÉCLARATION DE CONFORMITÉ
Directive CEM: 2014/30/CE
ROHS: 2002/95/EC
- EN 60204-1:2006+A1
- EN 1012-1:2010
- AfPS GS 2014:01
- EN 55014-1:2006+A1+A2
- EN 55014-2:2015
- EN 61000-3-2:2014
- EN 61000-3-3:2013
Wien, 01.09. 2017