
WA24ODU - Air conditioner WHIRLPOOL - Free user manual and instructions
Find the device manual for free WA24ODU WHIRLPOOL in PDF.
| Device type | Air Conditioner |
| Brand | Whirlpool |
| Model | WA24ODU |
| Cooling Capacity (BTU) | 24,000 (estimate) |
| Heating Capacity (BTU) | 24,000 (for models with heat pump) |
| Refrigerant | R410A, GWP 2088 |
| Operating Modes | Cooling, Heating, Dehumidification, Ventilation |
| Special Functions | Jet, Sleep (4 modes), Timer, Power Save, Super Silent, Round U, DIM |
| Remote Control | Yes, with AAA batteries (2×1.5V) |
| Display | Control panel with temperature, operation, timer, filter maintenance indicators |
| Fan Speed | Auto, Fast, Medium, Slow |
| Air Flow Direction | Vertical (remote) and horizontal (manual) |
| Filter Maintenance | Clean every 200 hours of use |
| Power Supply | 230 V / 50 Hz (estimate), dedicated circuit |
| Protection | 30 mA differential circuit breaker, mandatory grounding |
| Max Pipe Length | 20 m (for 24K model) |
| Max Elevation Difference | 10 m |
| Installation | By qualified technician, min height 2.5 m for indoor unit |
| Refrigerant Gas Weight | 2.2 kg (for 24K) |
| CO2 Equivalent | 4,594 tons |
| Warranty | Consult the provided warranty booklet |
| After-Sales Service | Contact an authorized Whirlpool center |
Frequently Asked Questions - WA24ODU WHIRLPOOL
User questions about WA24ODU WHIRLPOOL
0 question about this device. Answer the ones you know or ask your own.
Ask a new question about this device
Download the instructions for your Air conditioner in PDF format for free! Find your manual WA24ODU - WHIRLPOOL and take your electronic device back in hand. On this page are published all the documents necessary for the use of your device. WA24ODU by WHIRLPOOL.
USER MANUAL WA24ODU WHIRLPOOL
Instructions for use
Mode d'emploi
Gebruiksaanwijzing
Please ready all instructions carefully before using this product. When using this appliances, should always follow this instruction to reduce the risk of fire, electric shock, and injury to person.
Please keep this manual. If you deliver the appliance to other users, do handover this manual together.
These instructions shall also be available on website: www.whirlpool.eu.
SAFETY PRECAUTIONS
- The Installation and service/repair must be performed by a qualified technician, in compliance with the producer's instructions and following local safety norms. Do not repair or replace any parts of the appliance unless it is specifically written in the user instructions.
- Do not pull the power supply cord to remove it from the socket. Do not twist or press the power supply cord, and make sure it is not broken.
- Do not touch the power plug, circuit breaker and emergency button when your hands are wet.
- Do not insert your fingers or foreign substances into the air inlet/outlet of indoor&outdoor unit.
- Never block the air inlet or outlet of indoor and outdoor unit.
- Physically or mentally disabled people, children and people without any experience with the product are only allowed to use
the appliance if they have had specific training on how to operate the appliance by a person responsible for their security and well-being. The appliance is not intended for use by disabled without supervision.
- Children should be supervised to ensure that they do not play with the appliance (including remote control).
- This appliance can be used by children aged from 8 years and above and persons with reduced physical, sensory or mental capabilities or lack of experience and knowledge if they have been given supervision or instruction concerning use of the appliance in a safe way and understand the hazards involved. Children shall not play with the appliance.
Cleaning and user maintenance shall not be made by children without supervision.
AIR CONDITIONER PRECAUTIONS
Please strictly follow the below instructions:
- Long and direct exposure to cool air might be harmful to health. It is advisable to set the louvers in order to avoid direct cool air and deflect it within the room.
- Upon malfunctioning first turn the appliance off by pressing the ON/OFF button on the remote control, then disconnect it from power supply.
- Always turn off the air conditioner by remote control first. Do not use the power supply circuit breaker or pull off the plug to turn it off.
-
Do not switch the appliance on and off too often as this can damage the appliance.
-
Do not place any objects on the outdoor unit.
- Disconnect the air conditioner from the power supply if it is to be left unused for a long period of time or during a thunder/lightning storm.
- This product contains Fluorinated Greenhouse Gases covered by the Kyoto Protocol, the refrigerant gas being in a hermetically sealed system. (R410a, GWP 2088)
| Model 20K 24K 36K | |||
| Gas weight (kg) 1.4 | 2.2 | 2.6 | |
| CO2 equivalent (Ton) | 2.923 | 4.594 | 5.429 |
SAFEGUARDING THE ENVIRONMENT
- This appliance has been made of recyclable or re-usable material. Scrapping must be carried out in compliance with local waste disposal regulations. Before scrapping it, make sure to cut off the mains cord so that the appliance cannot be re-used.
- For more detailed information on handling and recycling of this product, contact your local authorities who deal with the separate collection of rubbish or the shop where you bought the appliance.
SCRAPPING OF PACKAGING
The packaging can be 100% recycled as confirmed by the recycling symbol. The various parts of the packaging must not be dispersed in the environment, but must be scrapped in line with local authority regulations.
SCRAPPING OF APPLIANCE
- This appliance is marked according to the European Directive 2002/96/EC, Waste Electrical and Electronic Equipment (WEEE).
-
By ensuring that this product is disposed of correctly, you will help to prevent potentially negative consequences for the environment and for human health.
-
The symbol on the product or on the documents accompanying the product indicates that this appliance should not be treated as household waste, but must be given to the appropriate local gathering place where electric and electronic appliances are stored and recycled.
PRODUCT DESCRIPTION

Indoor unit
I. Air Intake
2. Front Panel
3. Display panel
4. Air Outlet
5. Electrical box
6. Emergency control button
7. Vertical Adjustment Louver
8. Horizontal Adjustment Louver
9. Air Filter
10. Remote Control
II. On-off Switch
Images in the user instructions are based on external views of standard models, shape and design vary according to the model.
Outdoor unit
- Air Intake
- Pipes and Power Connection Cord
- Drain Hose
Note: Condensate water drains at COOLING or DRY operation.
- Air Outlet
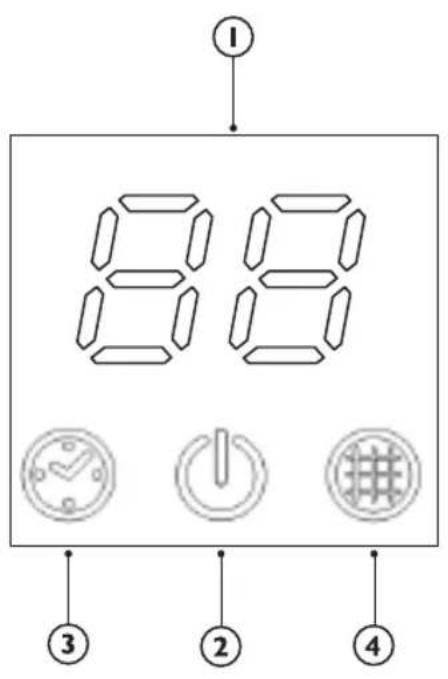
CONTROL PANEL DISPLAY INDICATORS DESCRIPTION
Temperature indicator (I)
Displays set temperature.
It shows "FC" as a reminder to clean the filter.
Running indicator (2)
It lights up during operation.
It flashes during outside unit defrosting.
Timer indicator (3)
It lights up during the set time.
It goes off when timer operation ends.
Filter monitor indicator (4)
It flashes when the filter needs to be cleaned.
Filter monitor indicator flashes after 720 hours of usage as reminder to clean the filter.
After filter cleaning, press the filter reset button located on the indoor unit behind the front panel in order to interrupt the flashing of the filter monitor indicator.

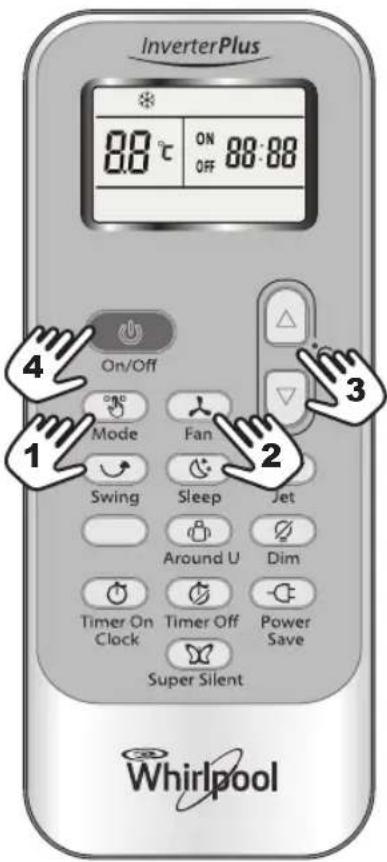
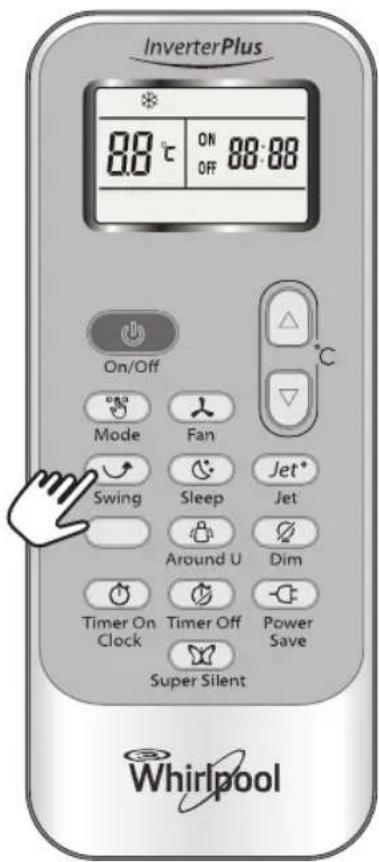
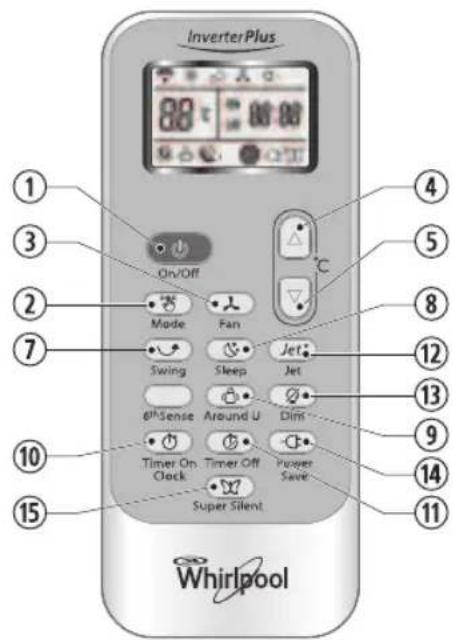
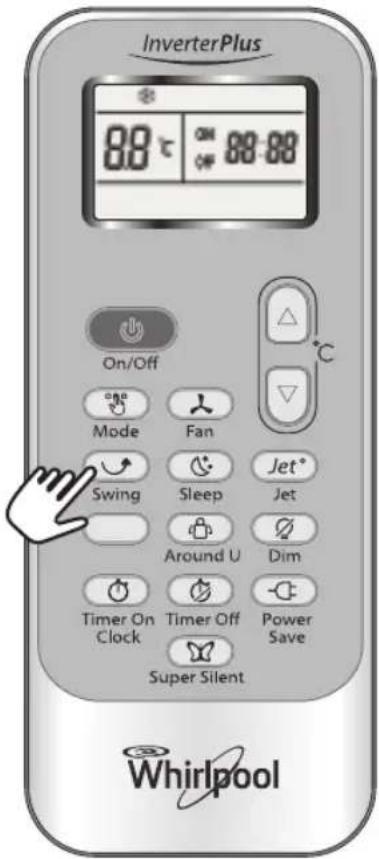
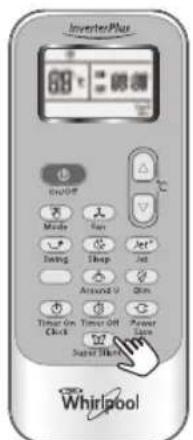
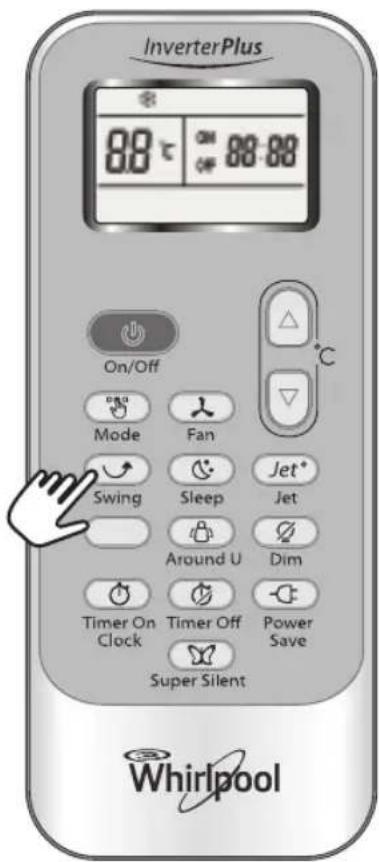
REMOTE CONTROL FUNCTIONS AND INDICATORS
1. ON/OFF BUTTON
Starts and/or Stops the appliance by pressing this button.
2. MODE BUTTON
Used to select the operation mode.
3. FAN BUTTON
Used to select fan speed in sequence auto, high, medium or low.
4-5. TEMPERATURE BUTTON
Used to select the room temperature. Used to set time in timer mode and real time clock.
7. SWING BUTTON
Stops or starts vertical adjustment louver swinging and sets the desired up/down airflow direction.
8. SLEEP BUTTON
Sets or cancels Sleep Mode operation.
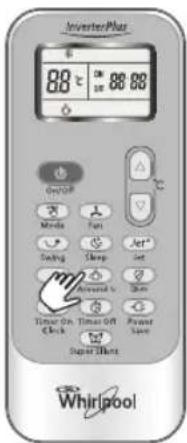
9. AROUND U BUTTON
When you press this button, the remote control transmits signal of the actual room temperature around itself to the indoor unit every 10 minutes. Therefore please keep the remote control in a location where it can transmit the signal to the indoor unit properly. Press once to set and press again to cancel.
10. TIMER ON/CLOCK BUTTON
Used to set the current time. Used to set or cancel the timer on operation.
II TIMER OFF BUTTON
Used to set or cancel the timer off operation.
12.JET BUTTON
Used to start or stop the fast cooling.

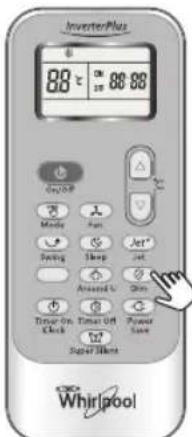
13. DIM BUTTON
Used to turn on or turn off display light on indoor unit.
14. POWER SAVE BUTTON
Used to start or stop the power save operation.
15. SUPER SILENT BUTTON
Used to start or stop the super silent operation. This function is available only on certain models. Models without this function don't have the button on the remote control.
INDICATOR SYMBOLS ON RC DISPLAY

Cooling indicator

Dry indicator

Fan only indicator

Heating indicator

Auto fan speed

High fan speed

Medium fan speed

Low fan speed

Super silent indicator

6th Sense indicator

Sleep I indicator (number of indicators depend on model)

Sleep 2 indicator (number of indicators depend on model)

Sleep 3 indicator (number of indicators depend on model)

Sleep 4 indicator (number of indicators depend on model)

Around U indicator

Jet indicator

Signal transmission

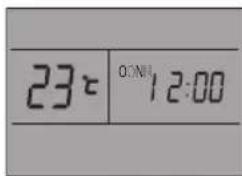
BB:BB Display set timer
Display current time

Display set temperature

Power save indicator
STORAGE AND TIPS FOR USING THE REMOTE CONTROL
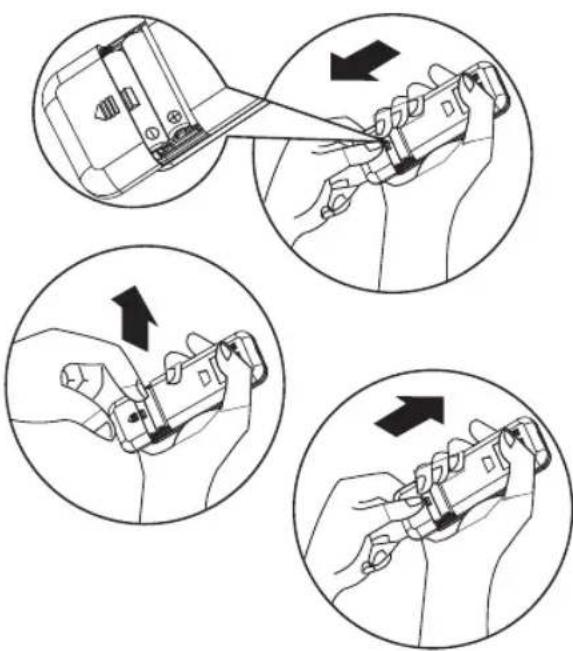
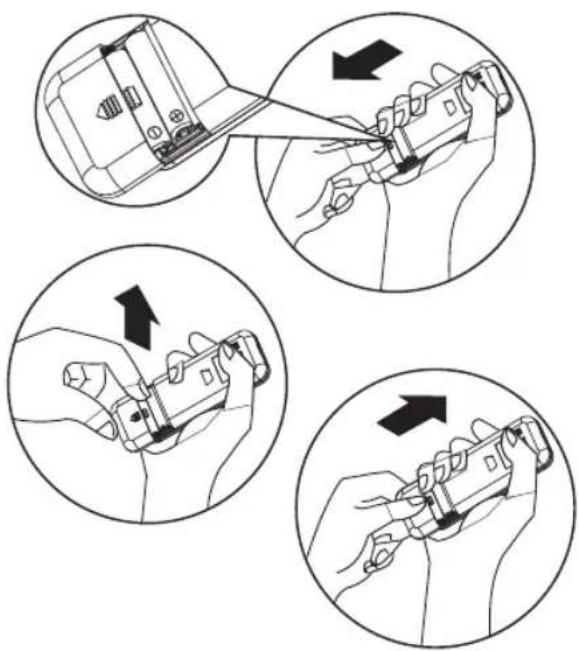
How to insert the batteries
I. Insert a pin and gently press down on the battery cover and push in the direction of the arrow to remove, as shown.
2. Insert 2 AAA batteries (1.5V) into the compartment.
Ensure that "+" and "-" polarity is correctly positioned.
- Close the battery cover on the remote control.
How to remove the batteries
Remove the battery cover in the direction of the arrow.
Press the positive pole of the battery softly with your fingers, then draw the batteries out of the compartment. All this should be done by adults, children are forbidden to remove the batteries from the remote control in order to avoid danger of swallow.
Disposal of the batteries
Please discard the batteries as sorted municipal waste at the accessible collection point.
Precautions
- When replacing the batteries, do not use new batteries with old batteries, or different types of batteries as this may cause the remote control to malfunction.
- If you do not expect to use the remote control for some time, take the batteries out to prevent leakage of battery acid in the remote control.
- Operate the remote control within effective range. Keep the remote control at least 1 meter from any TV set or HI-Fl equipment.
- If the remote control does not work normally, take the batteries out and reinstall after 30 seconds. If it still does not work install new batteries.
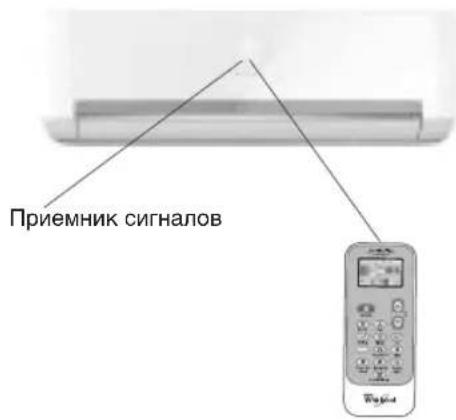
To operate the appliance by remote control, point the remote control at the receiving device on the indoor unit, to ensure receiving sensibility.
To send a message from remote control, the symbol will flash for 1 second. On receipt of the message, the appliance will emit a beep.
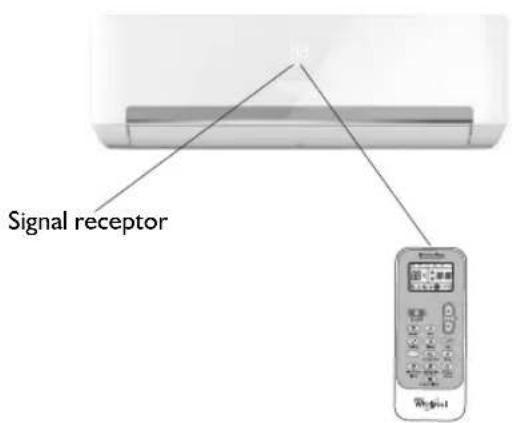
The remote control will operate the air conditioner at a distance of up to 7m.
Each time the batteries are replaced in the remote control, the remote control is pre-set at Heat Pump mode.
OPERATING MODE DESCRIPTION
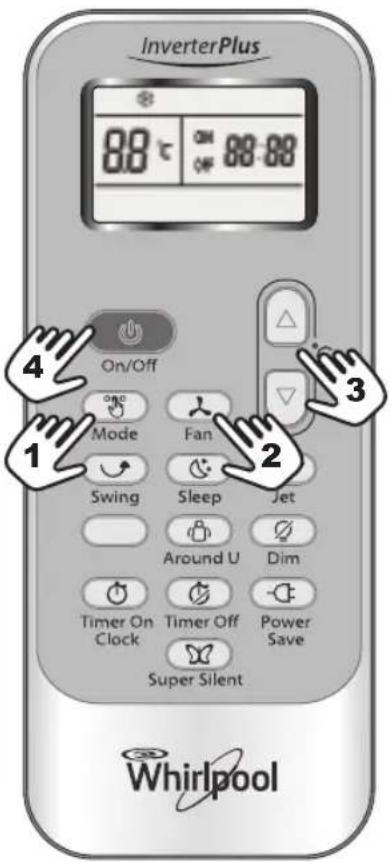
Operation Modes:
I. Selecting mode
Each time MODE button is pressed, the operation mode is changed in sequence:
COOLING DRY FAN ONLY HEATING
Heating mode is not available for cooling only air conditioners.
2. FAN mode
Each time the "FAN" button is pressed, the fan speed is changed in sequence:
Auto High Medium Low
At "FAN ONLY" mode, only "High", "Medium" and "Low" are available.
At "DRY" mode, Fan speed is set at "Auto" automatically, "FAN" button is ineffective in this case.
3. Setting temperature

Press once to raise temperature setting by I raise ^ C

Press once to lower temperature setting by I lower ^ C
| Range of available set temperature | |
| *HEATING, COOLING | 18°C~32°C |
| DRY +/-7°C | |
| FAN ONLY unable to set | |
*Note: Heating mode is NOT available for cooling only models.
4. Turning on
Press button, when the appliance receives the signal, the RUNNING indicator of the indoor unit lights up.
During mode changes wait a few seconds and repeat the operation if the unit does not respond at once.
When selection the heating operation, air flow will start after 2-5 minutes.
AIRFLOW DIRECTION CONTROL
5. Airflow direction control
Vertical airflow is automatically adjusted to a certain angle in accordance with the operation mode after turning on the unit.
The direction of airflow can be also adjusted to your own requirement by pressing the "SWING" button of the remote control.
| Operation mode Direction of airflow |
| COOLING, DRY horizontal |
| *HEATING, FAN ONLY downward |
*Heating mode is only available for heat pump models.
Vertical airflow control (using the remote control)
Use the remote control to set the flow angles.
Swinging airflow
Pressing "SWING" button once, the vertical adjustment louver will swing up and down automatically.
Desired direction airflow
Pressing the "SWING" button again when the louvers swing to a suitable angle as desired.
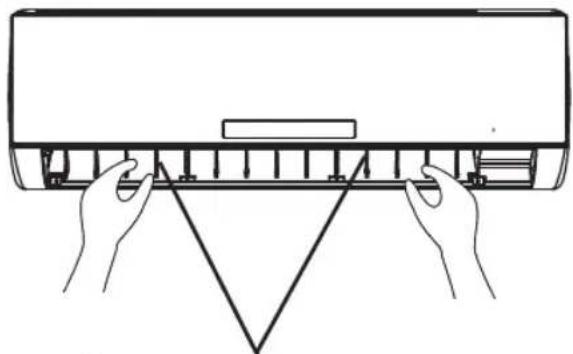
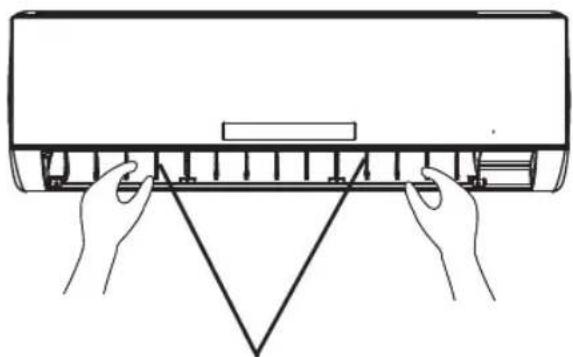
Horizontal airflow control (with hands)
Turn the control rods of the horizontal adjustment louvers to change horizontal air flow as shown.
Note: The shape of the unit may look different from that of the air conditioner you have selected.
A - Do not turn the vertical adjustment louvers manually, otherwise malfunction may occur. If that happens, turn off the unit first and cut off the power supply, then restore power supply again.
B - It is better not to let the vertical adjustment louver tilt downward for a long time at COOLING or DRY mode to prevent condensed water from dripping.

MODE AND FUNCTION DESCRIPTIONS
Clock function
You can adjust the real time by pressing TIMER
ON/CLOCK button, then using and
buttons to get the correct time, press this button again, the real time is set.

SLEEP mode
SLEEP mode can be set in COOLING,
HEATING or DRY operation mode.
This function gives you a more comfortable environment for sleep.
The appliance will stop operation automatically after operating for 8 hours.
Fan speed is automatically set at low speed.
Each time SLEEP button is pressed, the operation mode is changed in sequence:
SLEEP I SLEEP 2 SLEEP 3 SLEEP 4 NORMAL
个
SLEEP for Adults (mode I)
Set temperature will rise by 2^ at most if the appliance operates in cooling mode for 2 hours constantly, then keeps steady.
Set temperature will decrease by 2^ at most if the appliance operates in heating mode for 2 hours constantly, then keeps steady.
SLEEP for Elderly (mode 2):
Set temperature will rise by 2^ if the appliance operates in cooling mode for 2 hours constantly, decrease by 1^ after 6 hours, then decrease by 1^ after 7 hours.
Set temperature will decrease by 2^ if the appliance operates in heating mode for 2 hours constantly, rise by 1^ after 6 hours, then rise by 1^ after 7 hours.
SLEEP for Youngsters/Teenagers (mode 3):
Set temperature will rise by 1^ if the appliance operates in cooling mode for 1 hour, rise by 2^ after 2 hours, then decrease by 2^ after 6 hours, decrease by 1^ after 7 hours.
Set temperature will decrease by 2^ if the appliance operates in heating mode for 1 hour, decrease by 2^ after 2 hours, then rise by 2^ after 6 hours, rise by 2^ after 7 hours.
SLEEP for Children (mode 4):
Set temperature will keep steady.

Note: Heating is NOT available for cooling only air conditioner.
JET mode
- JET mode is used to start or stop fast cooling or Heating.
Fast cooling operates at high fan speed, changing the set temperature automatically to 18^ .
Fast heating operates at auto fan speed, changing the set temperature automatically to 32^
- In JET mode, you can set airflow direction or timer. If you want to quit from JET mode, press any - JET, MODE, FAN, ON/OFF or TEMPERATURE SETTING button, the display will return to the original mode.
Note:
- SLEEP and 6th Sense buttons are not available in JET mode.
- The appliance will continue working in JET mode if you don't quit from it by pressing any of the buttons mentioned.

Timer function
It is convenient to set the timer on by pressing the TIMER ON/CLOCK button to achieve a comfortable room temperature at the time you get home.
You can also set timer off by pressing the TIMER OFF button to enjoy a good sleep at night.
How to set TIMER ON
TIMER ON/CLOCK button can be used to set the timer programming as wished in order to switch on the appliance at your desired time.
i) Press TIMER ON/CLOCK button for 3 seconds, when "ON 12:00" flashes on the LCD, then you can press the or buttons to select your desired time for appliance on.
Press the or button once to increase or decrease the time setting by 1 minute.
Press the or button for 5 seconds to increase or decrease the time setting by 10 minutes.
Press the or button for a longer time to increase or decrease the time by 1 hour.
Note: If you don't see the time in 10 seconds after you press TIMER ON/CLOCK button, the remote control will exit the TIMER ON mode automatically.
ii) When your desired time displayed on LCD, press the TIMER ON/CLOCK button and confirm it.
A "beep" can be heard.
"ON" stops flashing.
The TIMER indicator on the indoor unit lights up.
iii) After the time set displayed for 5 seconds the clock will be displayed on the LCD of the remote control instead of set timer.
How to cancel TIMER ON
Press the TIMER ON/CLOCK button again, a "beep" can be heard and the indicator disappears, the TIMER ON mode has been canceled.
Note: It is similar to set the TIMER OFF, you can make the appliance switch off automatically at your desired time.

Increase

Decrease

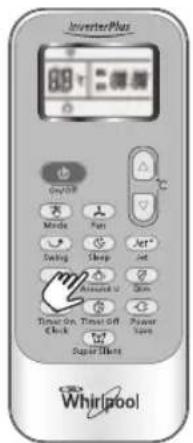
Around U function
When you press this button, will display, remote control transmits the actual room temperature around it to the indoor unit, and the appliance will operate according to this temperature to let you feel more comfortable. Please keep the remote control in a location where it can transmit the signal to the indoor unit properly. Press once to set and press again to cancel.
DIM function
Press this button to turn on or turn off display light on indoor unit control panel.
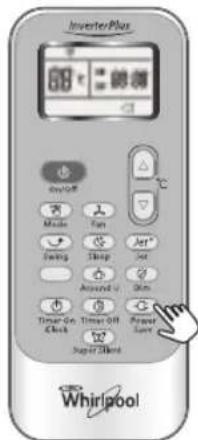
POWER SAVE function
POWER SAVE mode can be available in COOLING,HEATING,DRY and FAN ONLY operation mode.
When pressing this button, will display on remote control.
POWER SAVE function under COOLING, HEATING and DRY mode, the appliance will set the temperature at 25^ with low fan speed. POWER SAVE function under FAN ONLY mode the appliance will set at low fan speed.
Change mode or press the power save button again to cancel this function.
Note: Fan speed and temperature can not be adjusted under this mode.
SUPER SILENT function
Press button to let the unit operate at low noise level to get a quiet and comfortable room environment. Will display on remote control.
Note: Super silent function will be off when pressing MODE button, or pressing SUPER SILENT button again.
This function may not be available on some models.


EMERGENCY OPERATION
Under emergency situation or when remote control is missing, you can control the unit by pressing the on/off switch located on the indoor unit.
- Turn on the appliance: when the unit is off, press this button, it will start up and operate in 6th SENSE mode.
- Turn off the appliance: when the unit is on, press this button, the unit will stop working.
PROTECTION
Operating condition
The protective device maybe trip and stop the appliance in the cases listed below.
| Heating | Outdoor air temperature is over 24°C |
| Outdoor air temperature is below -10°C | |
| Room temperature is over 27°C | |
| Cooling | Outdoor air temperature is over *43°C |
| Room temperature is below 21°C | |
| Dehumidifying | Room temperature is below 18°C |
*For Tropical (T3) Climate condition models, the temperature point is 52^ instead of 43^ . If the air conditioner runs in COOLING or DRY mode with door or window opened for a long time when relative humidity is above 80% , dew may drip down from the outlet.
Noise pollution
Install the appliance at a place that can bear its weight in order to operate more quietly
- Install the outdoor unit at a place where the air discharged and the operation noise would not disturb your neighbours.
- Do not place any obstacles in front of the air outlet of the outdoor unit lest it increases the noise level.
Features of protection device
Wait at least 3 minutes before restarting the unit after operation stops or changing mode during operation. After connecting to power supply and turning on the appliance immediately, a delay of 20 seconds may occur before it starts to operate. If all operation has stopped, press ON/OFF button again to restart. Timer should be set again if it has been cancelled.

Features of COOLING mode
Anti-freezing
When the temperature of the indoor heat exchanger drops to 0^ or below, compressor will stop working to protect the appliance.
Features of HEATING mode
Preheating
In order to prevent cool air blowing, 2-5 minutes are necessary to preheat the indoor unit at HEATING operation start. The indoor fan will not work during preheating.
Defrosting
In HEATING operation the appliance will defrost (de-ice) automatically to raise efficiency. This procedure usually lasts 6-10 minutes. During defrosting, fan stops running and running indicator flashes. After defrosting is completed, it returns to HEATING mode automatically.
Mode interfere
For the reason that all the indoor units use one outdoor unit, outdoor unit can only run with same mode (cooling or heating), so when the mode you set is different from the mode that the outdoor is running with, mode interfere occurs. Following shows the mode interfere scene.
cooling dry heating fan
cooling v v x v
dryvxxv
heatingx×v×
fanv v x v
x: mode interfere - v: normal
Outdoor unit always run with the mode of first indoor unit that turned on. When the setting mode of following indoor unit is interfered with it, 3 beeps would be heard, and the indoor unit interfered with the normal running units would turn off automatically.
MAINTENANCE
Clean front panel of Indoor Unit
- Disconnect from the power supply
Turn off the appliance first before disconnecting from power supply.
- Remove the front panel
Open the front panel as shown by the arrow (Fig. A).
Pull the slots at the side of the front panel with force to take out the front panel (Fig. B).
- Clean the front panel
Wipe it with a soft and dry cloth. Use lukewarm water (below 40^ ) to clean if the appliance is very dirty. After cleaning let it dry.
- Refit and close the front panel
Refit and close the front panel by pushing it downward.
Note:
- Do not use substances such as gasoline or polishing powder to clean the appliance.
- Do not sprinkle water onto the indoor unit. Dangerous! Electric shock!
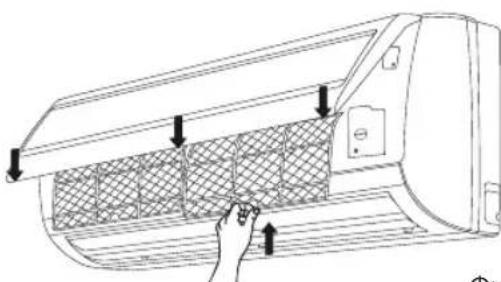
Clean Air filter
It is necessary to clean the air filter after using it for about 200 hours. Clean the air filter every two weeks if the air conditioner operates in an extremely dusty environment.
- Disconnect from the power supply
Turn off the appliance first before disconnecting from power supply.
-
Take out air filter (Fig. C).
-
Open the front panel.
- Press the handle of the filter gently.
-
Slide out the filter.
-
Cleaning the air filter (Fig. D)
If the filter is very dirty, clean it with a solution of lukewarm water and neutral detergent.
After cleaning let it dry.
- Refit the filter, press the filter reset button (Fig.E) at right side by using a cylinder pin and close the front panel.
Note:
- To avoid injury, do not touch the fins of indoor unit with your fingers after removing the filter.
- Do not attempt to clean the inside of the air conditioner by yourself.
- Do not clean the filter in washing machine.
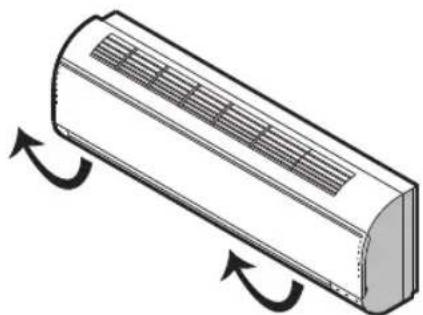
Fig. A
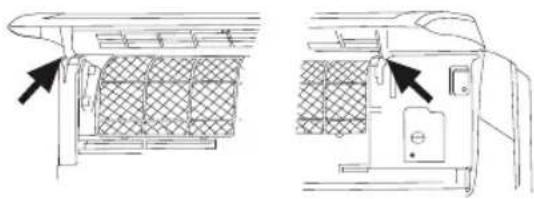
Fig. B
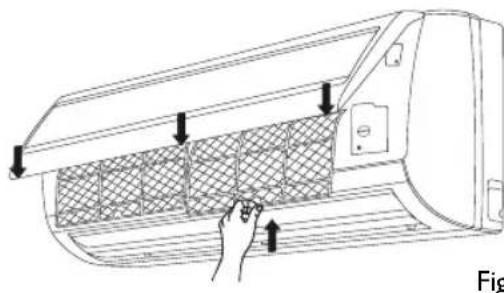
Fig. C

Fig. D
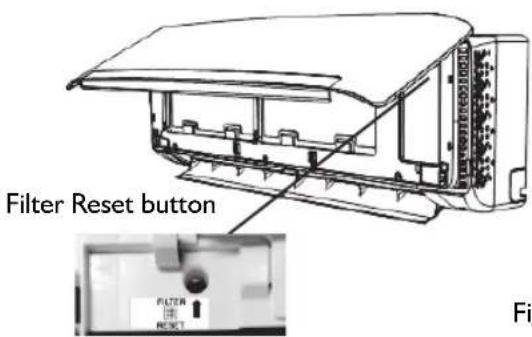
Fig. E
TROUBLESHOOTING
Operation problems are often due to minor causes, please check and refer to the following chart before contacting the service. This may save time and unnecessary expenses.
| Trouble Analysis | |
| Does not run | ·Is the protection device or fuse blown? ·Please wait for 3 minutes and start again, protection device may be preventing unit to work. ·Are the remote control batteries low? ·Is the plug not properly plugged? |
| No cooling or heating air | ·Is the air filter dirty? ·Are the intakes and outlets of the air conditioner blocked? ·Is the temperature set properly? ·Are doors or windows open? |
| Ineffective control | ·Has there been a strong interference (from excessive static electricity discharge, power supply voltage abnormality)? Note that operation will be abnormal, in this case unplug from the power supply and re-plug after 2-3 seconds. |
| Does not operate immediately | ·3 minute delay will occur when changing mode during operation. |
| Peculiar smell | ·This smell may come from another source such as furniture, cigarette etc, which is sucked in the unit and blown out with the air. |
| A sound of running water | ·Normal behaviour caused by the flow of refrigerant in the air conditioner. ·Defrosting sound in heating mode. |
| Cracking sound | ·The sound may be generated by the expansion or contraction of the front panel due to temperature changes. |
| Mist sprays from the outlet | ·Mist is present in the room with low temperature? Normal behaviour due to cool air discharged from indoor unit during COOLING or DRY operation mode. |
| Running indicator flashes but indoor fan stops. | ·The unit is shifting from heating mode to defrost. The indicator will light off and return to heating mode. |
Note: If the problems still have, turn off the appliance and disconnect from power supply, then contact the nearest Whirlpool Authorized Service Center. Do not attempt to move, repair, disassemble, or modify the appliance by yourself.
INSTALLATION SERVICE
Before installation
I. Please read this manual carefully before installation.
2. The appliance must be installed according to national wiring rules and according to this manual by qualified technicians.
3. Any change of installation position must be handled by professionals;
4. Check the product to verify that it has not been damaged before installation.
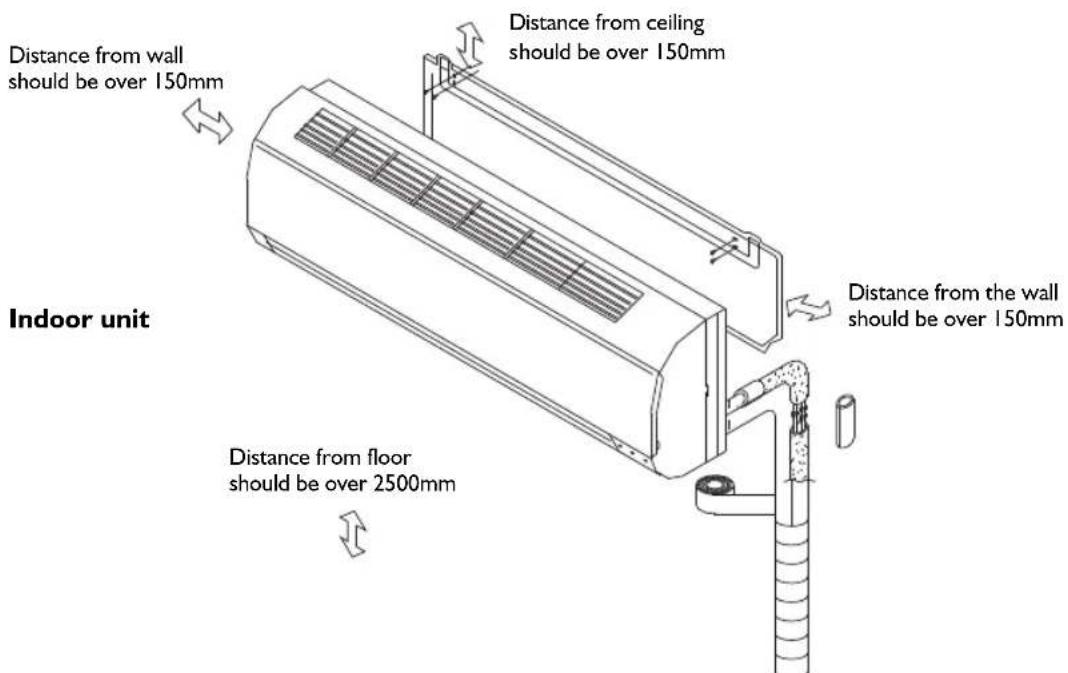
- Mount with the lowest moving parts of indoor unit at least 2.5m above floor or grade Level.
- After installing, the consumer must operate the appliance correctly according to this manual, keep a suitable storage for maintenance and move of it in the future.
SAFETY PRECAUTION
I. The power supply must be of rated voltage with special circuitry for the appliance. The normal operating range of voltage is 90% 110% of rated voltage. The diameter of the power cord must comply with requirements.
2. The user power supply shall have a reliable grounding terminal. It is prohibited to connect the grounding wire to the following items:
I) Water Supply Pipe
2) Gas Pipe
3) Sewage Pipe
4) Other positions that are considered unsafe.
- Ensure safe grounding and a grounding wire connected with the special grounding system of the building, installed by professionals. The appliance must be fitted with electrical leakage protection switch and an auxiliary circuit breaker with sufficient capacity. The circuit breaker must also have a magnetic and a thermal tripping function to ensure protection in case of short-circuit and overload.
| Type Model | Required Capacity of air break switch | |
| Split Inverter | 20K 30A | |
| 24K 30A | ||
| 36K 40A | ||
SAFETY PRECAUTION
- Make sure that the power supply cord is long enough to allow the right connection. Do not use any extension cord for power supply.
- If the supply cord is damaged, it must be replaced by the manufacturer or its service agent or a similarly qualified person in order to avoid a hazard;
- An all-pole disconnection switch having a contact separation of at least 3mm in all poles should be connected in fixed wiring.
- Risk of electric shock can cause injury or death: Disconnect all electric power supplies before servicing.
-
The connection of power cord and the cable connection between indoor unit and outdoor unit shall be in accordance with the wiring diagram attached on the appliance.
-
Once installation is completed, the electric components must not be accessible to the users.
- Use two or more people to move and install the appliance to avoid excessive weight hazard.
II. After unpacking the air conditioner, keep all packaging materials well out of the reach of must also have a magnetic and a thermal children. - According to the character of refrigerant the pressure of the tube is very high, so be sure to careful when you install and repair the appliance.
- A residual current device(RCD) having rated residual operation current not exceeding 30mA shall be incorporated in fixed wiring according to national law.
INSTALLATION INSTRUCTIONS
Installation diagram
Outdoor unit

NOTE: The figure above is only a simple presentation of the unit, it may not match the external appearance of the product you purchased. Installation must be performed in accordance with the national wiring standards by authorized service people only.
Select the best location
Location for Installing Indoor Unit
- Where there is no obstacle near the air outlet and air can be easily blown to every corner of room.
- Where piping and wall hole can be easily arranged.
- Observe the required distance from ceiling and wall according to the installation diagram.
- Where the air filter can easily be removed.
- Keep the unit and remote control lm or more from television, radio etc.
- To prevent the effects of a fluorescent lamp, keep the unit as far as possible from it.
- Do not put anything near the air inlet that could obstruct it.
- In a place that can bear the weight and will not increase operating noise and vibrations.
- The indoor unit is not suitable to be installed in areas used for laundry.

Location for Installing Outdoor Unit
- Install in a convenient and well-ventilated place.
- Avoid installing it where flammable gas could leak.
- Observe the required distance from the wall according to the installation diagram.
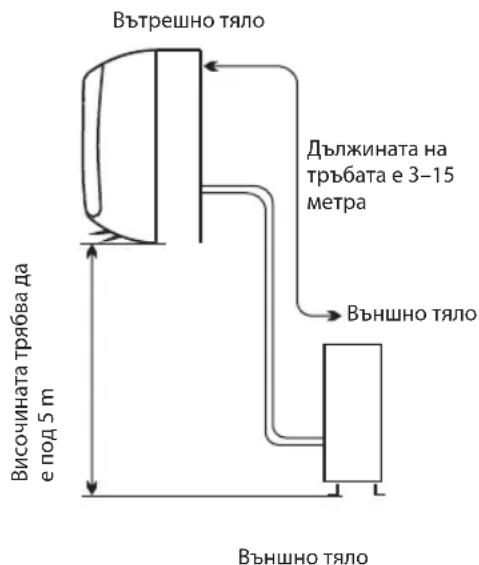
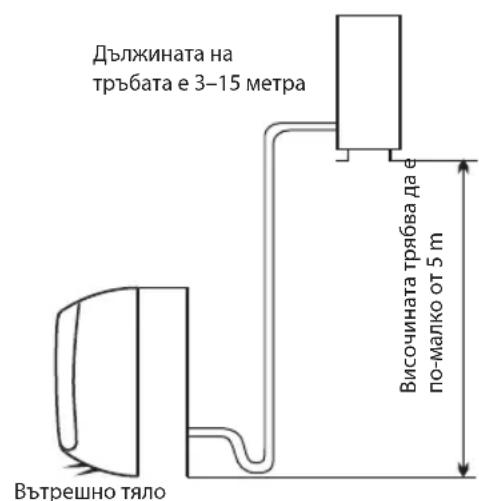
- The distance between Indoor and outdoor unit should be 5 meters and can go up to maximum 15 meters with additional refrigerant charge.
- Do not install the outdoor unit in a dirty or greasy place, near a vulcanization gas exit.
- Avoid installing it at the roadside where it could be soiled with muddy water.
- A fixed base where operating noise will not increase.
- Where the air outlet is not obstructed.
- The installation position shall be able to withstand the weight and vibration of the outdoor unit and ensure safe installation;
- Where drained water does not become any problem.
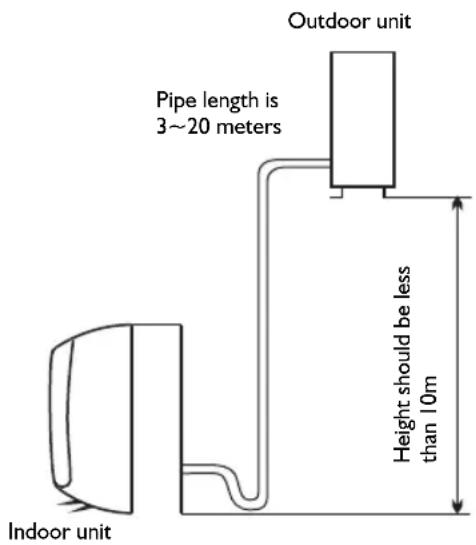
| Model Standard tubing Length (m) | Limit of Each Indoor Unit Tubing Length (m) | Limit of Total Tubing Lenght (m) | Limit of Elevation Difference H (m) | Extra refrigerant charge (g/m) |
| FM20ODU WA2 | 5+5 20 40 | 10 | 15 (When total piping length is over 15m) | |
| FM24ODU WA2 | 5+5+5 20 | 60 10 | 15 (When total piping length is over 20m) | |
| FM36ODU WA2 | 5+5+5+5 25 | 60 10 | 15 (When total piping length is over 20m) |
INDOOR UNIT INSTALLATION
I. Installing the Mounting Plate
- Select a location to install the mounting plate according to the indoor unit location and piping direction.
- Adjust the mounting plate horizontally with a gradient or plumb line.
- Drill holes 32mm in deep on the wall to fix the plate.
- Insert the plastic plugs in the hole, then fix the mounting plate with tapping screws.
- Check that the mounting plate is well fixed. Then drill a hole for piping.

NOTE: The shape of your mounting plate may be different from the one above, but installation method is similar.
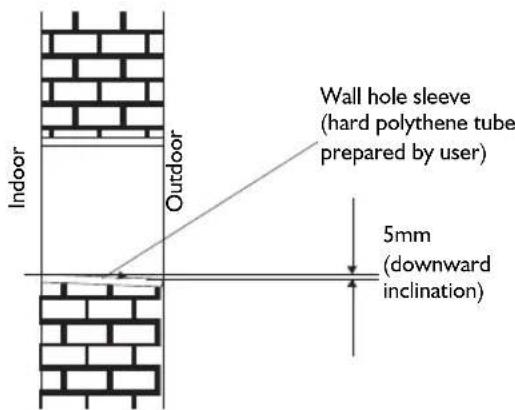
2. Drill a Hole for Piping
- Decide the position of the hole for piping according to the location of mounting plate.
- Drill a hole on the wall. The hole should slightly be inclined downward toward outside.
- Install a sleeve through the wall hole to keep the wall tidy and clean.
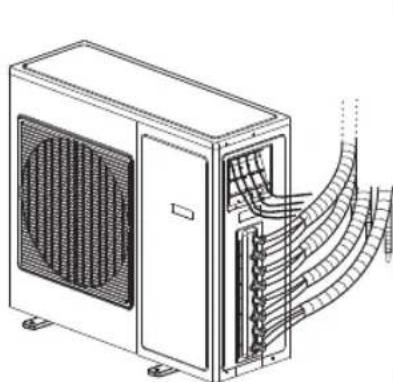
3. Indoor Unit Piping Installation
-
Fit the piping (liquid and gas pipe) and cables through the wall hole from outside or fit them from inside after completing indoor piping and cables connections so as to connect to outdoor unit.
-
Decide whether saw off the plastic part in accordance with the piping direction (as shown below).

NOTE:
When fixing the pipe along directions 1, 2 or 4, saw the corresponding plastic part off the indoor unit base.
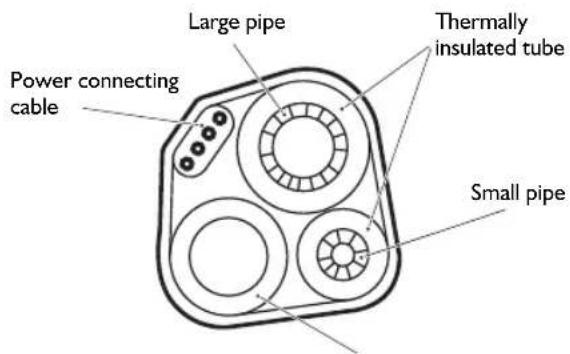
- After connecting the piping as required, install the drain hose. Then connect the power connecting cable. After connecting, wrap the piping, cable and drain hose together with thermal insulating materials.
NOTE: Do not connect to power supply during installation.
IMPORTANT:
Piping Joints Thermal Insulation:
Wrap the piping joints with thermal insulating materials and then wrap with a vinyl tape.

Thermal insulation

Wrappered with vinyl type
Thermal Insulation piping:
a. Place the drain hose under the piping.
b. Insulation material: polythene foam over 6mm in thickness.
NOTE: Drain hose is prepared by user.
- Drain hose should point downward for easy drain flow. Do not twist the drain pipe, leave it sticking out or waving around, do not immerse the end in water. If an extension drain hose is connected to the drain pipe, make sure to be thermally insulated when passing it through the indoor unit.
- When the piping is directed to the right, piping, power cable and drain hose should be thermally insulated and fixed at the rear of the unit.
Drain hose (prepared by user)
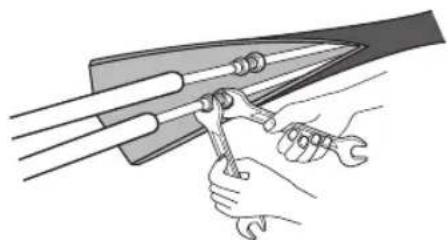
Piping Connection:
a. Connect indoor unit pipes with two wrenches. Pay special attention to the torque allowed as shown below to prevent the pipes, connectors and flare nuts from being deformed and damaged.
b. At first fingers-tighten them, then use the wrenches.

| Pipe size Torque Nut width Min. thickness | |||
| Liquid Side (1/4 inch) 1.5~2kg.m | 17mm 0.5mm | ||
| Gas Side (3/8 inch) 3.1~3.5kg.m | 22mm 0.7mm | ||
| Gas Side (1/2 inch) 5.0~5.5kg.m | 24mm 0.8mm | ||
| Gas Side (5/8 inch) 6.0~6.5kg.m | 27mm 0.8mm | ||
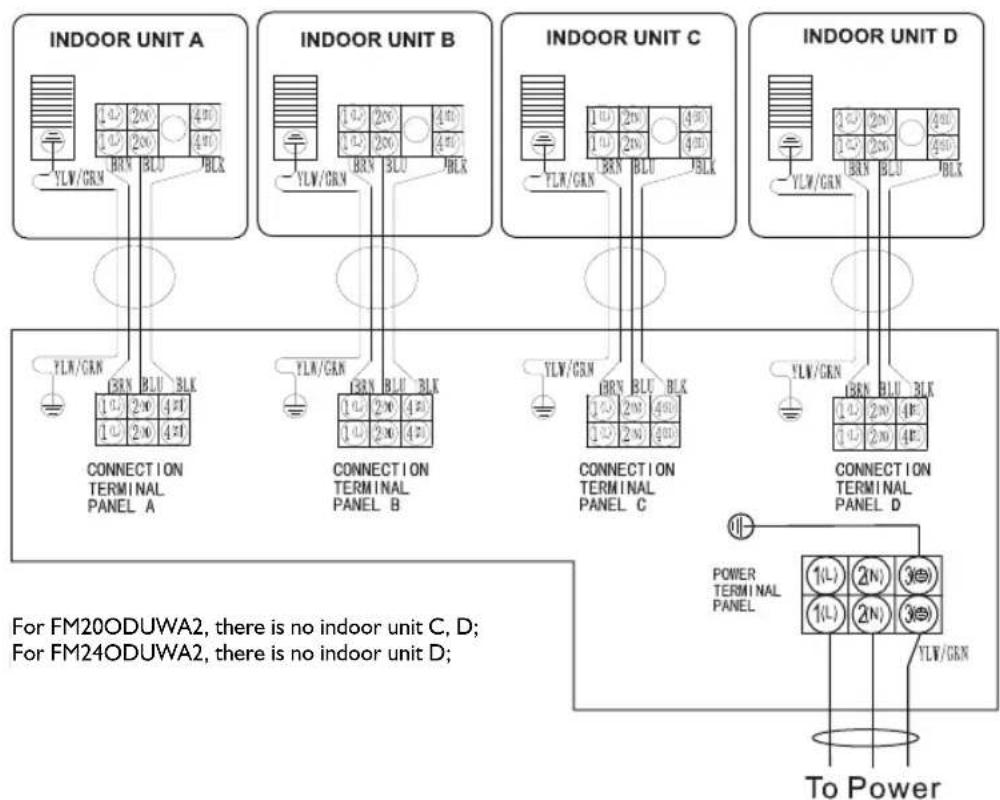
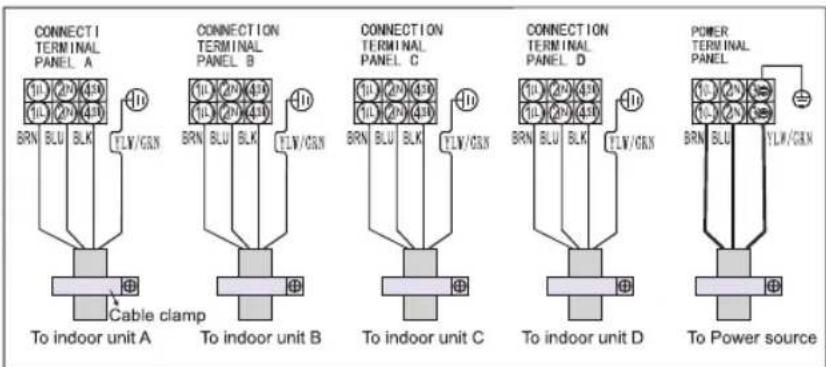
4. Connecting the Cable
- Indoor Unit
1) Open the front panel, remove the covering plate by loosening the screw.
2) Connect the power connecting cord to the indoor unit by connecting the wires to the terminals on the control board individually as follows.
3) Secure the power connecting cord on the control board with cable clamp.
4) Refit the covering plate and tighten the screw.
Covering plate

NOTE: (depending on the model) It is necessary to remove the cabinet to perform connections with the indoor unit terminal.

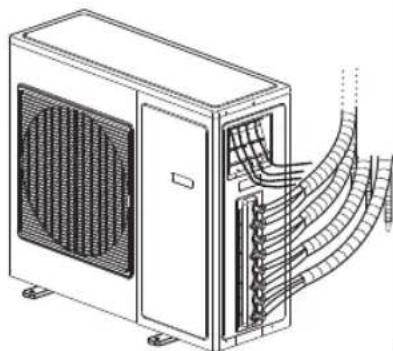
- Outdoor Unit
1) Remove the access door from the unit by loosening the screw. Unscrew the cable clamp, connect the wires to the terminals on the control board individually in accordance with the indoor unit connection.
2) Secure the power connecting cord on the control board with cable clamp.
3) Refit the access door in the original position and tighten the screw.
NOTE: (depending on the model) It is necessary to remove the cabinet to perform connections with the indoor unit terminal.

For FM20ODUWA2, there is no indoor unit C, D; For FM24ODUWA2, there is no indoor unit D;
CAUTION:
I. Make sure that the colour of wires and the terminal number of the outdoor unit are the same as those of the indoor unit.
2. Use an individual power circuit specifically for the air conditioner. As for the wiring method, refer to the circuit diagram on the appliance.
3. Check that the cable specification conforms to the table as follows. And the minimum cross sectional area of the cable should comply with Design 245 IEC 57.
4. Check the wires and make sure that they are all tightly fastened after cable connection. The cable should be tightly fastened by cable clamp.
5. Be sure to install an earth leakage circuit breaker in a wet or moist area.
Cable Specifications
| Model Power | cord (outdoor) Power | connecting cable Main powersupply (Note) | |
| FM20ODUWA2 H05RN-F,3G 2.5mm² | H07RN-F, 4G 0.75mm² | To outdoor | |
| FM24ODUWA2 H05RN-F,3G 4.0mm² | H07RN-F, 4G 0.75mm² | To outdoor | |
| FM36ODUWA2 H05RN-F,3G 4.0mm² | H07RN-F, 4G 0.75mm² | To outdoor | |
OUTDOOR UNIT INSTALLATION
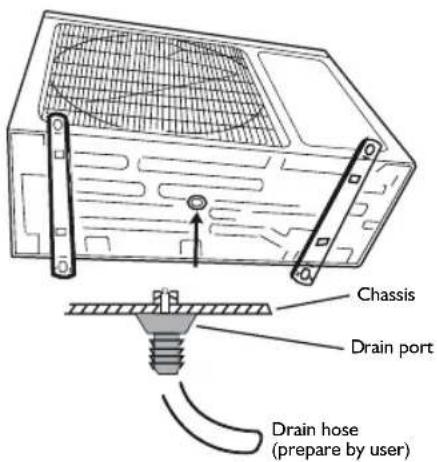
I. Install Drain Port and Drain Hose
The condensate drains from the outdoor unit when the unit operates in heating mode. In order not to disturb your neighbours and protect the environment, install a drain port and a drain hose to direct the condensate water. Just install the drain port on the chassis of the outdoor unit, then connect a drain hose to the port as shown in the figure on the right.
2. Install and Fix Outdoor Unit
Fix with bolts and nuts tightly on a flat and strong floor. If installed on the wall or roof, make sure to fix the supporter well to prevent it from shaking due to serious vibration or strong wind.
3. Outdoor Unit Piping Connection
- Remove the valve caps from the 2-way and 3-way valve.
-
Connect the pipes to the 2-way and 3-way valves separately according to the required torque.
-
Outdoor Unit Cable Connection (see previous page)
AIR PURGING
Air containing moisture remaining in the refrigeration cycle may cause a malfunction on the compressor. After connecting the indoor and outdoor units, evacuate air and moisture from refrigerant cycle using a vacuum pump, as shown below.
Note: Because the system pressure is high and also to protect the environment, be sure not to discharge the refrigerant to the air directly.
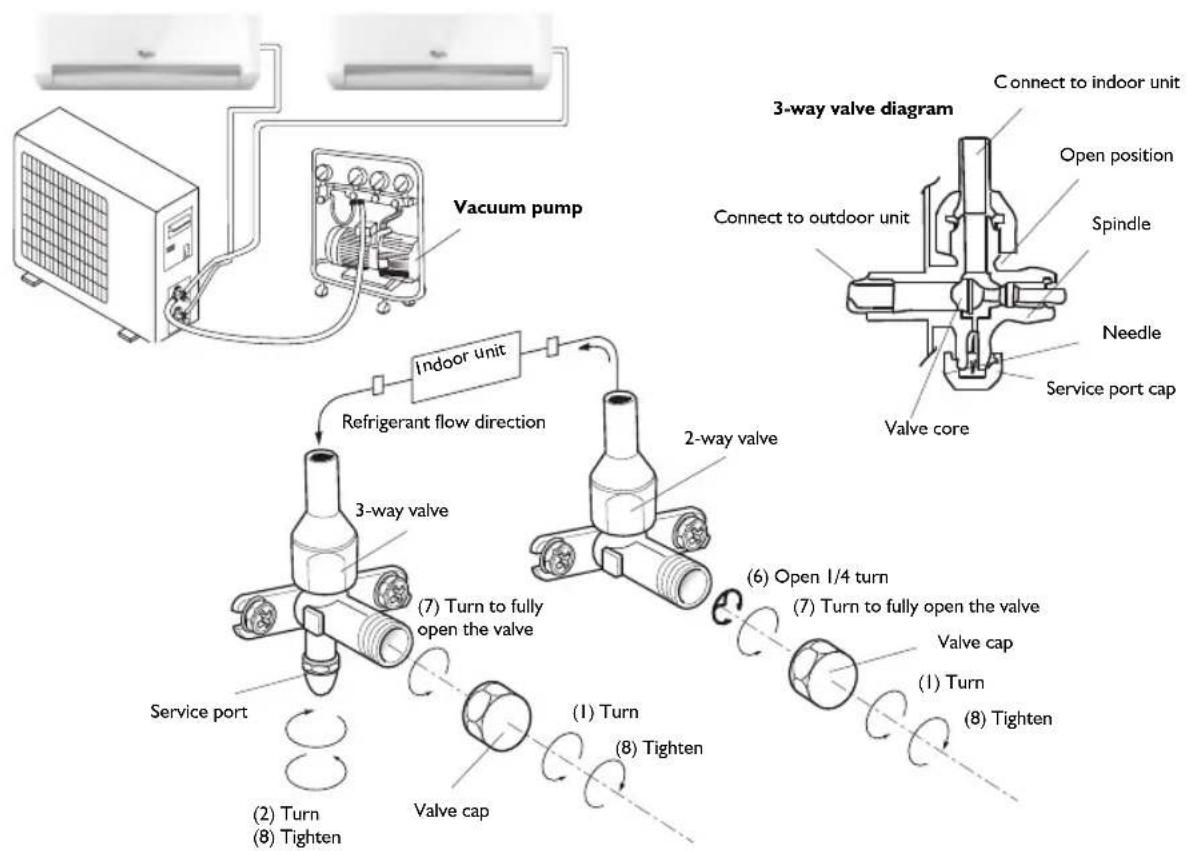
How to Purge Air Tubes:
I. Unscrew and remove caps from 2 and 3-way valves.
2. Unscrew and remove cap from service valve.
3. Connect vacuum pump flexible hose to the service valve.
4. Start vacuum pump for 10-15 minutes until it reaches an absolute vacuum of 10mmHg
5. With vacuum pump still running close the low pressure knob on vacuum pump manifold. Then stop vacuum pump.
6. Open 2-way valve 1/4 turn, then close it after 10 seconds. Check tightness of all joints using liquid soap or an electronic leak detector.
7. Turn 2 and 3-way valves stem. Disconnect vacuum pump flexible hose.
8. Replace and tighten all valve caps.
AFTER SALES SERVICE
Before contacting the Customer Care Centre:
- Try to solve the problem yourself based on the descriptions given in the "Troubleshooting".
- Turn the appliance off and restart it to see if the fault persists.
If after carrying out the above checks, the fault persists, contact the Customer Care Centre.
Please give:
- a short description of the fault;
the exact model of the air conditioner; - the service number (this is the number found below the word Service on service sticker which is located on the side or on the bottom of the indoor unit).
The service number can also be found in the warranty booklet;
- your full address;
- your telephone number.
If repair work has to be carried out, contact the Customer Care Centre (Use of original spare parts and a proper repair is guaranteed).
You will need to present the original invoice.
Failure to comply with these instructions could compromise the safety and quality of your product.
SERVICE
0000 000 00000

AVANT D'UTILISER L'APPAREIL
7. TOUCHE SWING (Oscillation)
VOORZORGSGMAATREGELEN
VOOR DE VEILIGHEID
AFVALVERWERKING VAN HET APPARAAT
INSTALLATIE BINNENUNIT
3. BOTAO FAN (VENTOINHA)
Como colocar as pilhas
- Limpar o paine frontal
8. KOYMNI SLEEP (YTNNOs)
Puθμiει ἀκυρωνει Tov tpòπo λειούργiac ὄνου.
9. KOYMNI AROUND U
Xpnooieiaytnpuonnynakupwn Tnclambdaoc Around U (Upwoou).
10. KOYMNI TIMER ON (Xpovodiaokotnc Evepyonoinoc)
Xpoumoiotaia yua puohion nakupwn tnc
lambdaoupyicxpoovodiakontn evepyooinoc.
11 KOYMNI TIMER OFF (Xpovodiaokonnc anevpyooinoc)
XpnoiOnoiEitai yia puOuion n akupwn tnc
lambdaocxovodiaokoTn aneVepyooinoc.
12. KOYMNI JET (TAXEIA Y H / O E P M A N H
Xpnoiopoieitai yia tyn Ekkivnon n tn diakonn Tnc npnyopnc uEnc n epuavanc.
13. KOYMNI DIM (ΦΩTI ΣMΩ)
Xpnooioieiay evpyooinn n anevpyooinn tou OTNV eowtepkn movada.
14. KOYMNI POWER SAVE (EEOIKONOMHENEPTEIA)
Xpnoionoieita yia tnv ekkivnon n tn diakonn tnc eoikovounoc evepyiaac.
15. KOYMNI SUPER SILENT (E3AIPETIKA AGOPYBH AEITOYPTIA)
Xpoaonoiieita iaytnv evpyooinn n tni diakonn tnc eiaepetik aopupnc leitoupyiac.
ΣYMBOLA ENΔEIEΕΩN ΣTHN OΘONH THΛEXEΙΡΙΣΤΗΡΙΟΥ
EvdeiEgAeitoupyiacpsiucn
EvdeiEeAeoupyiac apypaovanc
Evdsn aeitoupyiac mvo avmuotnpa
EvdeIEn aeitoupyiac Eepaavanc
4-5. TLACITKO TEPLOTA
POPIS PROVOZNÍCH REŽIMÜ
Provozní režímy:
1. Volba režimu
Pri kazdem stisknuti tlacitka MODE se provozni rezim meni v poradi:
CHLAZENI ODVLHCOVANI
JEN VETRANI TOPENI
Rezim topeni neni k dispozici u modelu urcenych pouze k chlazeni.
2. Rezim FAN (ventilator)
Kazdym stisknutim tlačitka „FAN“ (Ventilator) se zmeni otáčky ventilatóru v tomto poradi:
POPIS REŽIMÜ A FUNKCI
Funkce HODINY
Skutechny cas nastavite stisknutim tlacitka hodin TIMER ON/CLOCK, pak pouzijte tlacitka a k zadani presneho casu a opet stisknete tlacitko CLOCK.
SPÁNKOVÍ režim
4-5. TLACIDLO TEPLOTY
Použiva sa na volby teploty v miestnosti.
Použiva sa na nastavenie šasu v režime
casomeru a na nastavenie presného šasu.
7. TLACIDLO SWING (NATOGENIE)
SLEEP 1→SLEEP 2→SLEEP 3→SLEEP 4→NORMAL

SLEEP preDSPelych (rezim 1)
8.SLEEP (EJSZAKAI) GOMB
MEPbI INPEIOCTOPOXKHOCTN
- UCTaHOBka n TexHnueCKoe 6cnyKnBaHne/peMOHT DOJXHbI BblIOJIbTbcraTexHnueCKIM CneuJIACrOM B COOTBeTCTBmC HNCTpyKUmaMn IPOUN3BOJNTeJIa N DeICTByIOUImM MeCTHbIMN HopMaMn NO 6e3OJaCHOCTn 3anpeuaetcra peMOHTnpOBaTb nnn 3aMeHraTb DeTaJI npIbopa, 3a NCKLIoueHnem cnyaeb, KOHKpeTHO OROBOpEHbIX B INHCTpyKUINo EKCIIyatauIN.
3anpeuetaeTcraHHTb 3a ceTeBOI shHypr Jnra TOrO, yTO6bl BbvHTb BNlKy n3 po3eTKn. 3anpeuaeTcra CKpyuNBaTb Nn npJxImaTb ceTeBOI shHyp, a TaKxe Heo6xOIMo npOBepaTb erO ueIOCTHOCTb.
3anpeaetcKaCaTbCn BnIKn, aBTOMaTa 3auntbl N KHOKN abapnHOrO OCTaHOBa BnaXhbIM npykamn.
3anpeaetcBCTabTb naIbUpyK nnHOpOHNbIpeMeTBI BO BXODHOE/BbIXoHoe OTBepCTne dJI B03dyxa BHyTpEHnro n HapxKHO6loka.
3anpeuetae6IoknpoBaBxOJHOE/BbIXoHoeOTBepCTneДЯBO3dYxa BHyTpeHHeRo n HapyKHO6Ioka. - IIOIc OgrpaHnueHHbIMN 03MBO3MOXHOCTaMNI JyUeBHO6OJIbHbIe IIOI,JeTNI JIOI,He IMeIoUne ONbTa
NcNoB3OBaHnna 3neKtpponpno6opa, MOryT Nolb3OBaTbcra IM TOnbKO NocIe TOrO, KaK OHN pOoJIIN CneuNaIbHoe obUyeHne NO NcNoB3OBaHnIO 3neKtpponpno6opa NOD pyKOBOdCTBOM INuCA, OTBeTCTBeHHoro 3a INx 6e3OnaChOCTb IN 3DopOBbe. Pnp6Op He NpeHa3NaueH dJa 3KcnJyaTaCuIN IIOdbMn C ORpaHnueHHbIMN BO3MOxHOCTaMn INn DeTbMn 6e3 PnpCMOTpa.
Heo6xOJIMO CJeIITb 3a DeTbMn, yTo6bl OHN He IrgpAIN C npnbOpom (B TOM YncIe C NylbTom dNCTaHcIOHOHOrO ynpabJeHna).
Даньпрбор может
Использоватбаядъми CTapшe 8
Лети Людми CO CHINKEHHbIMN
ФиЗИчЕСКИМ, СЕнСОЧБIMN Или
УМСТВЕНьIMN CNOСОБHOCТЯМN, He
ОБlaДАЮШМN ДОCTАTOЧВIM
ОпытOM Или He 3HaKOMbIMN C
ИЗДЕПЕМ, TOьКО ПОД писмOTPOM
ПИЦA, OTВETCTBEHNOFO 3a INX
6e3ОпаСHOCTь, Или пи уСLOВИN,
ЧTO OHI ПОПШИ NHCТРУКТЖ ПО
ПраВИлам 6e3ОпаС"HО
эКСПNYATAцIN ЭЛЕКТРОПРИБОРАИ
ПОНИМAIOT CBЯЗАHHbie CЭТIM
ОпаСHOCTи. He pa3peшaite DeTЯМ
ИграТь сэлЕКТРОПРИБОРМ.
He дOnуSCаиTe DeTeй К чИстke И
УхODY 3a пиборom 6e3 писмOTpa.
MEPbI INPEIOCTOPOXHOCTN INPNIOBPAUHIN C KOHNIOHEPOM
Ctporo co6louaTe mHcTpyKu, npBedeHHbIe Hxke:
-Пюджпьhoeи
HENOCpeICTBHeHHOE BO3deIcTBNe
XOLOHOrO BO3dYxa MoKeT 6bITb
BpeHNo IЯ 3IopOBb.Bo
N36ExKaHne BO3dIeIcTBnI npAmoro
XOLOHOrO BO3dYxa peKOMeHdyETc
yCTaHOBt b JkaJIIO3N, YTO6bl
N3MeHNTb HApPaBJIeHne BO3dYxa B
IpeDeJax NOMEseHnI.
- Пи HeICnpaBHOCTn Chauana BblIOUHTe np6Op nyTe m HaxKaTna KhoNKn "ON/OFF" ("BKl./BblKl."), a 3aTeM OTcoEduHnte erO ot 3JIeKTpNUeCKoI CETn.
Bcerda cnaa BbIKIOuayTe KOHdNcNOHeP C NOMOsbIy NylbTa DnCTaHcNOHHOrO ynpaBLeHn. 3anpeaetcra nCNoJIb3OBaTb aBTOMaT 3aunTbI CeTN NIN BbldeprNBaTb BNkY dJa BbIKUoyHn np6opa.
- He BkIouaIte n He BbIKIOUaIte
Pn60p CnHKOM qacto, TaK KaK 3TO MoKeT PnBecTu K erO NOBpeKdEHNIO.
He knaIte npedMeTbHa HapxHbI 6nok.
OTKJIIOUHTe KOHNUCHOHep OT NCTOUYKa NITaHnA,ecIN OH He 6ydtNcNoB3OBaTbCBA TeueHne npoJOnjXntbHOro nepnoDa BpeMeHn,a TaKKe BO BpeM rPo3bl.
-Данhoeи3делпсооржнг
фторсооржашие napнковbie
ra3bl,Ha KOTOpbie paCnpoCTpaHЯETc
deiCTbIe KnOTcKOro npOTOKOna,ra3-
xlaadareHT hXODNTcBHyTpN
repMeTnUHOrO KOHTypa.
(R410a,GWP2088)
ABTomatnuecka CKOpocb BeHTnIATopa

BbICOKa CKOPOCTb BEHTNIArTOpa

CpeHnAckopocbBentnIaTopa

Hn3kakckopocbBbENTJITopa

Cmbon ouenb tixo paobotbl

CmBON "CoH 1" (KoNueCTBO CmBONOB 3aBnCt OT MoJeIN)

CmBONJ“CoN 2"(KoJIueCTBO CmBONOB 3aBnCIT OT MoJeIN)

CmBON "COH 3" (KoNueCTBO CmBONOB 3aBnCtOT MoeJI)

88:88 OTo6paKeHHe yCTaHOBJIeHHOro TaIMepe
OTo6paXeHne TeKyuIeroBvpeMeHH

OTo6paXeHne 3aDaHHoTempeaTpyb

CmBbON pexkma Power save (3heproc6epekehen)
COBETbI IO XPAHEHnIO N IcNoJIb3OBAHnIO NyJIbTA DInCTAHzNOHHOуNpABJIeHnIA
Kak BCTaBnTb 6aTapei
- Bctabte wTnDfN cIeRka HaIaBNTe Ha KpbIkwky OTcKa N CdbHbTe ee B HAnpaBJeHm, 06o3HaueHHOM CTpeJKOHa Kopnyce, KaK noka3aHO Ha pucyHke.
- YcTaHOBnTe B OTCeK DBe 6aTapeu Tnna AAA (1,5 B). Pn yCTaHOBKe cO6JIoDaIte o603HaueHHyIO nonpHocTb.
- 3aKpOte KpbIuKy OTceKa 3nEmeHTOB NITaHnnybTa Dv.
Kak BbIHMaTb 6aTapen
CdbnHbTe KpbIuKy OTdeJeHHaTapeB HappaBHeHN CTpeKN.
Cnerka npnxMnte naIbcaMn noNoxKTeNbHbI nOIOc 6aTapei, 3aTeM n3BNeKeNTe 6aTapeu n3 OTJeHn. 3aMeHy 3neMeHToB nITaHn DOJXHbI BbINHATb B3POCJIbe, DeTAM 3anpeuaeTCr n3BLeKaTa 6aTapeu n3 nyIbTa DY BO n36ExaHne nporNaTbIBaHn.
YtJn3aun6atapen
Ytunn3npyTe 6aTapeN KaC copTnpyeMbIe 6bTOBBe OTXoDbI B DOCTynbIX TOpKax C6opa Mycopa.
Mepbl npedoctoPOXHOCTN
- Pnp 3aeme He baape HnCnoB3yTe HOBbIe 6baape BmecTe CO CTapbIMn, a TaKke He nCNoB3yTe 6baapeMn pa3InuHbIX TINOB:3TO MOKeT PnIBeCTN K NOBpeXKeHIO NpJIbTa DnCTaHcNOHHOrO YnpabJeHnA.
- Ecni npednonaraetc dnteBhnepepbB B nCnObl3OBaHm NylbTa DY, peKomeHdyETc H3Bnuey h3 Hero 6atapen, YTObI npedOTbpaNTb BO3MOxHyIO yTeky 3NeKTpOInTa n NOBpeXdHeHne NylbTa.
- YnpabJIeHHe yCTpoIcTBOM npn NOMOu nYnbTa DYdoJXHO OcyueCTBnTbCn B npeJeIax erOp aDnyCa deIcTBnH. He pacnoJaarTe nyblT DHa paCCToAHm MeHee 1 M OT TeJIeBu3NoHHbIX npneMHNKOB uN HI-Fl annapaTypbl.
- Pnp c6oax B pa6ote nybta dy u3BneKeNTe 6aTapeHn Ha 30 cekyH, a 3aTEM BHOBb yCTaHOBnTE ux. Ecn pa6OTOCNOC6HOCTb nybTa He BOCCTaHOBnAcB, 3aMeHnTe 6aTapeH.
- PnpnncnoB3OBAHnnybTa DY HanpaBnIte ero Ha npneMHOe OKoUKO Ha BHyTpEHem 6JIOKe KOHNIOHEPA, YTObI OBeCNEuTb KaueCTBO npneMa KOMaHd.
- Pnppeaue KOMaHbI c npbTa YHa erO dncnlee 6ydt MrgaTb CmBOB bceehne 1 cekyhbl. Pnp noJyehnn CnHaJa-KOMaHbIO T npbTa DY KOHNIOHe 6ydt N3daBaTb 3ByKOBoCnHaI.
-Пульт ДУ obeceneиBaet ynpablenHeKOHdHIOHepOM Ha pacCToHHn Do 7 M.
Kaxdbpa npu yctahOBKe B nybT DY HOBOro KOMnEkTa 6atapey npbT nepexOHT B pexIM Heat Pump (tennoBoH hacoc).
Опиcaне PEXКIMOB PABOTbl YCTPOIcTBA
Pexnmbi pa60tbl:
1. Bb6op pexuma
PnKaKdom HaxkTm KhONK MODE
NOCJIeIOBAteJIbHO N3MeHHeTcR
pexim pa6oTbI:
OXJIAKDEHNE OCYUHEHNE
OBOPEB TOJIbKO BEHTNIJATOP
Функин Oбогрев OТСУТСВЕТ BMOДЕЛХ KOHДИЦИОЧЕРа,pa6OtaIOUxTOJbKOHa OXJIAXDEHIE.
2. Pekim FAN
KaKdbi pa3 npn haxaTnn KhoNkn "FAN"
("BEHTNJATOP")CKOpocTb BeHTNJRTopa
13MEHRETCA B CLEDyIOUe NOCNEOBOATEJIbHOCTN:
→ABTO→BbICOKa
CpeHnHnHn3KaH
Bpekme "FAN ONLY" ("TOJIbKO BEHTINJATOP") DOCTynbl TOIbKO CneDyUOue 3NaueHn:
"BbICOKa", "CpeHnra" n "Hn3Ka".
Bpekme "DRY"(OCUWEHNE)"ckopoctb BEHTnIATopa aBTOMaTneCKn yCTaHaBnBaeTcBApeKIM "Auto"(ABTO), npn 3ToM KONKa FAN"(BEHTNIATOP") cTaHOBNTcHeAKTNBHOJ.
3.YctaHObKa TEMnepaTpypbI

Haxmnte OndHokpTaHO, YTO6bI NOHaTb
Temnepaotypy Ha 1°C

Haxmnte ODHOKpTHO,HTO6bICHN3NTb
TemnepatypHa 1°C
Bb60p HxHoro HnpaBHeHn BO3dyuHoro nToKa
HaKmte KhONky SWING eue pa3, kOrJa XaIIO36ydyT HxOoNTbCn IOd HxHbIM yrJOM.
PerynnpoBaHne HnpaBneHn B03dyuHoro nToKa no rOpn3OHTaNN (BpyHy)
IIN3MeHHeHrOpu3OHTaHbHOrO NToKa IepemecTne ynpabJIOUe CTePxHn KaJIo3n rOpu3OHTaHbHO npynpOBKn, KaK 3TO NOKa3aHo Ha pncyHke.
PpmeaHne: FOpMa 6Joka MoKet OTnUaTbCn OT Toi, KOTopyu IMeet BbIbpaHHb Bam KOHdUHOHeP.
A-HeIb3a perynipOBaTb BpyHnyo JkaIO3n BePTKaNbHOr perynipOBKn, TaK KaK 3TO MoKET npNBecTN K HApUeHNIO HopMaJIbHOr paOToB. EcIN 3TO cnyuNIOcb, BblIOuHTe np6Op, OTKIOUHTe NOdaY 3JeKTPoNTaHnA, a 3aTEM BOCCTaHOBtE ee.
UnpabJIIOJIe cTePKNJXaJIIO3n TOpN3OHTaJIbHOnpeYIpOBKn
B-ДЯTORO YTO6bI npeDoTbpaTbCTeKaHne KOHdeHCata,He OCTaBnTe JkaJIIO3n BepTKKaJIbHOH peryIpOBKn HaKNoHEHHbIMn BHN3 B TeueHne DInTEbHOrO nepNoJa npu paBoTe BpeKmE COOLING (OXJIAXJDEHNE) nIN DRY (CYXOI).
PpmeaHne:B3tOMpeKmpepyJnpoBkA TeMepaTypbI INCKOpOCTN BpaueHnBEHTnIHTopa HeBO3MOxHa.
ФункцSuper Silent("Oуеньтухая pa6ota")
Pn HaxaTnn KhoNk yctpoCTBO 6ydet paOtaB C Hn3KIM yPOBHEM UyMa, CO3daBaB NomeeHm TnxyIO uIyOTHyO aTMocpepy. 6ydet OTobpaXaTaBC Ha NyIbTe DY.
PnmuueaHne: FyHKuIg OeHb TnxOITOKIOUHTbcr npHaxaTN KhoNk MODE nNOBTOpHOM HaxaTN KhoNk SUPER SILENT.
Daanha yHKnO TcyTCTByeT Ha HeKOTopbIX MOdEJAX.

YNPABJIEHNE B ABAPINHOM PEXKIME
Pn Bo3HKnHOBeHHaBapHHoCHTyaUHNJINpnpnoTepe NylbTa DY ynpabNHeHne yCTPOIcTBOMOcyueCTBnEeTc HaxKaTHEm Ha KHOpyBKJI/BblKJI, pacnonoKeHHyIO Ha BHyTpEHem6Noke.
BKnIOueHHe:ecn npn OTKIOHOHHOM yCTPOINCTBE HaxaTb DaHHyIO KONKy, KOHNIOHep BKNIOHTcH NaHHeT pa60TaTb B peKIme "6-e YYBCTBO".
- OTKIIOUeHHe: ecn haKaTb daHHyIO KHOIIky npi pa6oTaIOuE M yCTpOInCTBe, KOHNIOHep OTKJIIOUHTC.
CNCHEMA 3AUNTbI
YcnoBn3Kcnnyataaun
CnCTema 3aunTbMOXeOTKNIuHTb KOHINIOHOep, eCN BInoNHaIOTc Hxke nepeUncneHHbIe ycIOBna.
| 06orpev | TemnepaType na hyunjhoro bo3duxa bhiie 24°C |
| TemnepaType na hyunjhoro bo3duxa hnxje -10°C | |
| TemnepaType b nomeehen n bhiie 27°C | |
| Oxlaaxdene | TemnepaType na hyunjhoro bo3duxa bhiie *43°C |
| TemnepaType b nomeehen n hnxje 21°C | |
| Ocyuene | TemnepaType na nomeehen n hnxje 18°C |
*Mn moJen, npEHa3HaueHHbIX dIy yCNOB n TpOnuYeCKOrO (T3) KInMaTa, 3HaueHne 3aDaHHoN TeMnepaTypb coCTabJIeT 52^ BMeTo 43^ .Ecnn KOHdUHOEP pa6OtaET B pexIme OXIAxJEHnR INOCYUHEHn, npn 3tOM DoJIro OTkpIta DBepb INN OKHO,aOTHCnTeNbHaB BlaxKHOCTb npEBblAeT 80% ,n3 BBInyCKHOrO OTBepCTn MOKeT KaNaTb KOHDeHCat.
YpOBeHb Wyma
- YcTaHaBnBaIte 6IOKN KOHmIoHepa Ha NOBepXHOCTAx, CNOOCbIx BbIepeXaTb Ix BEC, 3TO yMeHbIHT Wym npu pa6Ote yCTpOncTBA.
- YcTaHabnBaIte HApyXhBb 6NOK B TaKOM MeCTe, B KOTOPOM CO3dAbaEmbI npi pa6Ote yCTpoIcTBa Wym I NOTOK Bo3dyxa He MeWAnI 6bI BaWM CoCEdM.
He pa3meaTe KaKeI-Ni6o npenTCTBnpeD BbInyckHbIM OTBepCTnEM HApxHoro 6NoKa, YTO6bl He yBeMnHBaT bypOBeHb Wyma.
MEPbI INPEIOCTOPOXHOCTN
- Cetb nntaHn ydoJxHa 6bItb c HOMHaIbHbIM HaPraJKeHnEm C COOTBeTCTByOuSei 3JIeKTPnuecko CXeMo, NOxOJaUeN DnA
3JIeKTPoPn6Opa.HopMaIbHbI
3KcIIyatauOnHHbI dNaPa3OH
HaPraJKeHn COCTaBnaE T 90%~110% OT HOMHaIbHOro
HaPraJKeHn. DnaMeTp
ceTeBOrO shHypa DOJKeH
COOTBeTCTBOBaTb
yCTaHOBJIeHHbIM Tpe6OBaHnM. - Cetb nHTaHnI NOJIb3OBaTeJIaOJXHa IMeTb HaJeXHbI 3a3eMIAUoN KOHTaKT. 3anpeuaetc coeINHrTb npOBOD 3a3eMJIeHnco
cneyuOuIMn npedMeTAMn:1)
BoOnpoBODHOr Tpy6oN 2)
Ta3OBoN Tpy6oN 3)
KaHaJIIN3aUIOHNOr Tpy6oN 4)
PiOouIMn npedMeTAMn,
KOTOpbIe CHTaHOTcR
He6e3OpaChbIMn.
3.Heo6xOIMO o6ecneuHTb
HaJeKHOe 3a3EmIeHne I
IpOBOD 3a3EmIeHnra,
CoEINHeHHbIc CO CpeUaJIbHOJ
CNCTeMOJ 3a3EmIeHnra 3daHnra,
CMOHNTiPOBaHHoJ
CpeUaJIncTAMN. KOHNIOHep
DOJIKeH 6bITb O6OpyIDOBaH
PepeKJIIOUaTeJIeM 3aUHTbI OT
yTeUKN TOKa I
DOnOJHInTeJIbHbIM aPnapaTOM
3auntbI cETn DOCTaTOUHOn
EMKoCTn. ABtOMaT 3aunTbI cETn
DOJXHa IMeTb yHKcNIO
MaHHTHOrO n TeNIOBOrO
pacupeJIeHn, uTo6bl
0becneuNTb 3aunTy B Cnyae
KOPOTKOro 3aMbIKAHn I
Ipeerpy3Kn NO TOky.
Tepmon30JnMecT noCoeHHeHr Tpy6:
O6MToaTe MeCTa Tpy6hBx COeINHeHn TEIIOJIOJIpyIOUIM MaTePnaIOM, a 3aTeM BHNIOBOJJeHTOn.

TePMON30NAUR

CLOB BHHIOBOJJeHTbI
TePmon3oJnTpy6onpObOa:
a. Pa3meuante DepehaxHbI ShlaHr NOBepx Tpy6oPoBa.
b. NcnoIb3yIeB KauyeCTBe TepMOI3OJIaUN BCNEHHeHHN IONNIeH TOIuHOn He MeHee 6 MM.
PIMMEUHNE:pehaXhBmShnHnOdrTbNBAe NOJb3OBaTeJIb.
-ДрehaxньшларгdoJongchen6bITbHappaBnEHCTporo BHN3dNpOBnerEHHcTOKaKOHdeHcata.He nepeXIMaTe DpehaxhNBIshnH;OCTaBbTe erO BbICTynatbHapxkyIINCBIOHO CBNCaTb; He norgykaTe KOHeUShaHraBBody.EcIn HEO6XODMO NOCDoeDHHbK DpehaxHO Tpy6Ke HapaunBaHne DpehaxHO ShaHra BblONHHTe HaJIeKaUyTO TepMOUNOuYacTKa, BbIXODAUero NOMeUeHH.
- Ecni Tpy60npoBOn HnpaBInen BnpaBO, Tpy6bI n CnIOBOI Ka6JIb DoJXHbI 6bITb TepMOINOpOBaHbI n 3aKpeNJIeHbI Ha 3aDHeN NOBepxHOCTn 6lOka.
IopcoeHHeHne Tpy6oNpOBoa:
a. POnDCoeDHHnTe Tpy6bI BHyTpHHeRrO 6NOKa npn NMOUIN DBYx RaeyhBIX KJIIOHeH. Heo6xoDMo Ctporo CO6NJIODaTb PnIBeDEeHHBe Hxke 3HaueHnM MometTOB 3aTAAKK, YTO6bl He DeOpMnPOBaTB n He NOpeDnTb Tpy6bl, CoeDInEHnH IN KOHYChIe raIKN.
b.Caayala 3aTnHnte NOcOeINHeHne BpyHyO,a 3aTEM pN NOMOuI raeHbIX KIOUey.

IeHocHTe IIO NOuNCtBaHe N IOdPbJka He Tp86Ba Da ce n3BbPWBaT OT Deca 6e3 HaD3Op.
MEPKI 3A 6E3OJACHOCT IPN U3IIOJI3BAHE HA KJIIMATUKA
CneBbaiTe cTpIKTHO yka3aHnraTa no-dony:
- Пюдьлжнтелно и Диpeктно
нзлагане на CTуdeн Вь3dух може
да 6bde BpeДно 3a 3dpaBeto.
Пренистелно сжалуЗпес HaflacT Taka, Ye da ce n36berHe
Диpeктна CTpyя CTуdeн Вь3duyx И
СТPyЯТа дa ce OTKLOHn KbM
NOMEшенeto.
BcnyaHa Hen3npaBHOCT npbBO n3KIOUeTe ypeJa, KaTO HaTnCHeTe 6yToHa 3a BKJ./N3KJI. Ha dNCTaHcNOHHOTO ynpaBHeHne, i CNeI TOBa rO n3KIOUeTe OT eKeKTPnueckaTa MpeKa.
BnHaHn nbpBO n3KIOUbaIte KImMaTnKa Upe3 DnCTaHcNHOHHOT O npabHe. He n3NoJ3BaIte eJeKtpueckn IpeKbCBAu N He n3BaJdaIte ⅢeNceJa OT KOHTaKTa, 3a Da n3KIOUHTe ypeDa.
He n3KIOUBAIte Hn He BKNIOUBAIte ypeDa npeKaJIeHO YecTo, TbN KaTO TOBa MoKe Da IOBeDe Do NOBpeDN.
He cnaarTe HnkaKbN npeMeTINBbpxy BbHsHOTOTraNo.
-ИЗКЛIOUBAIte KJIIMMaTnKa OT KOHTaKTA,aKO HЯMa Da rO IN3ПОЛ3BaTeДьлroВpeMe,a CbIo N IO BpeMeHa rgbMOTeBnHn 6ypn.
To3n ypei cBdIbpxka fnyopupaHn napHKOBn ra3OBe, BKIOueHN B IpotoKoJa ot KnOTO, KaTO XlaIINHnT ra3 e B xepMeTnueckn 3aTBOpHa cnCTema. (R410a, GWP 2088)
| Моden | 20K 2 | 4K 36K | |
| Терно на заха (кг) | 1.4 2. | 2 2.6 | |
| Ековвальник на CO2 (TOHOBe) | 2.923 4. | 594 5.4 | 29 |
ОПАЗВАЕ HA OKOLHATA CРEDA
To3n ypeE npOn3BeDeH OT MaTePnAaN, rOdHn 3a peuKlnpAne nnIOBTOPO H3NOJ3BaHe. N3xBpbJrHEto Tpr6Ba Da ce n3BbPwBA B CbOTBeTCTBnE C MeCTHaT a HopMaTHNBHa ype6a 3a N3XBpbJrHe Ha OTNaDbu. IpeDn N3XBpbJrHEto 3axpaHbAunr Ka6e Tpr6Ba Da ce OTrpeKe, 3a Da He MoKe ypeBbT da Ce N3NoJ3Ba OTHOB.
3a no-noDpo6Ha nHΦopMaζη 3a TpeTnpaHeTo n peζκιnpaHeTo Ha To3n ype9 Ce CbþkTe C MeCTHNTe BlaCTn, KONTo Ce 3aHmAbat C pa3dεJIHO c6bμpaHe Ha OTNaβbζι, έπι KbM MaRa3uHa, OT KOITo CTe 3aKynΠu ype9a.
N3XBbPJIaHE HA ONAKOBKATA
KaohbT MoKe Da ce peuKlnpa 100%, KaTo noka3Ba CmBOnbT 3a peuKlnpaHe Pa3nuchte qactn Ha onakOBkata He Tp6Ba Da ce pa3nnjBaT, a Tp6Ba Da ce n3XbPnT B cBOTBeTCTBne C HopMaTHNBHTe ype6n, n3daenH OT MeCTHNTe Bnactn.
N3XBbPJIHE HA YPEDA
To3n ypeI e MapKnpaH B cBoTBeTCTBne C EbponeNcKa dIupeKtNbA 2002/96/EC 3a n3xBbPnJaHe Ha eNeKtpnuecko N eNeKtpoHHO o6OpyDbAhe (WEEE).
Kato ce norgnke ToBa n3dene Ha 6bne H3XBpbHeNo n npabIneH NaHH, Bue ue NOMORHeTe 3a npedOTbpaTBAHe Ha Bb3MOxHnTE He6laIopnpyTHn NocJeCTBnA 3a OKoHaTa CpeaN 3dpabeTo Ha XopaTa.
CmmbolbT Bbpxu ypea nnnB npndpykaBaata rO DokymeHaunn NOKa3Ba, yeTo3n npoaykHe Tp86Ba da ce TpeTnpa KaTO 6ntOB OTnAkB, a Tp86Ba da ce npedeB CboTBeTHna NyKt 3a cb6npaHe npueKNIPAhe Ha eJeKtpnuecko n eJeKTPoHNO 60pydahe.
Описиме на урEDA

BbtpewhoTano
1.BxoJeHOTBOp3aBb3dyx
2.Ппеден панел
3.Дицпел
4.ИЗХОДЕН OTBOP 3a Вьздух
5. EneKtpuecka Kytna
6. Byton 3a HynipaHe Ha qnTbpa
7. Xany3n 3a BepTnKaHno perynnpaHe
8. Xany3n 3a xopn3oHTaHNo perynupaHe
9.Bb3dywenaHmTTbp
10.Дистанционноупразьелен.
11.KJIIOU3aBKKIOUbaHe/U3KJIIOUBAHe
NIOCTpaunTe B INHCTpyKunTe 3a noTpe6nteIe Ce 6a3npat Ha BBHnra BnHa CTaHapTHNTe Moen; oOpMaTa N d3aHbT 3aBNCrT OT Moena.
BbHnHO TaNo
12.BxoJeH OTBOp 3a Bb3JyX
13. Tpb6n n eIeKtpo3axpaHbAa Ka6eHa Bp3Ka
14. МаркузяиЗTOUBAHe 3a6eJekka:BojataOTKoHdEHzauNce n3TOUba npi pa6ota BpexIM OXJIAXDAHE nIIN I3CUJABAHE.
15.И3xoJeH OTBOp 3a Bb3dIyX
ОпUCAHWE HA ИнДИКATOPITE HA ДИСПЛЕ HA KOMAHДHOTO TABLO

Индikatop 3a Temnepatypa (1)
Ioka3Ba 3aadaeHaTa TempepaTpa.
Ioka3Ba "FC" kaTo HAnOMHHe da NOUCTHTe QnITbpa.

HndkaTop 3a pa6oTa (2)
CBeTn no BpeMe Ha pa6oTa.
Mura no BpeMe Ha pa3mpa3raBaHe Ha BbHHTO TAnIO.

Индкатор на taiмета (3)
CBeTN, KOraTo TaHMePbTe HAcTpoeH.
YracBa, KOrato TaMepbT npNKJIOU npa6Ota.

HnkaTop 3a cnehe Ha nntbpa (4)
Mura, Korato fHHTbPbT ce HyKdae OT NOuHCTBaHe.
HnKAtopb3a CneHe Ha fntbpa 3anOyBa da Mra ced 200 pa6oTHn Yaca, 3a da BN HAnOMHN da NOuCTnte fntbpa.
Cnei nouCTBaHe Ha hntbpa HATnCHete 6yToHa 3a HynipaHe Ha nltbpa, KOITe H BbTpeHOTo TAno 3ad npednnaHEn, Taka ye HndkaTopbT 3a CneDeHe Ha nltbpa da npectaHe Da Mnra.
ФУнкции ИИнданКATOPИ HAДИCTAHцINHOTO YYPABJIЕНе
1. BYTOH BKJI./M3KJI.
CHaTnCKaHHe Ha To3N 6yToH BkIIOuBaTe N/INN INKIOUBaTe ypea.
2.BYTOH MODE (PEKIM)
I3non3Ba ce 3a n36op Ha pa6oTeH pexkM.
3.5YTOH FAN (BEHTWJATOP)
N3non3Ba ce 3a n36op Ha cKOpOCT Ha BEHTnlaTopa B NocIeIOBaTeIHOCT: aBTOMaTnUHa, BNCOKa, CpeHa, HnCKa.
4-5. BYTOH 3A TEMINEPATYPA
I3non3Ba ce 3a n36op Ha Tempepatypata B cTaraTa.
I3non3Ba ce 3a 3adabaHe Ha BpeMeTO B peKIM Ha TaImeP n 3a YacOBHnka 3a aCTpOHOMUeCKO BpeMe.
7. BYTOH SWING (3ABbPTAHE)
Cnnpa nnnyncka 3aBbptaHTo Ha xkanynte 3a xopn3oHTanHo peYnnpaHe n 3aJaBa XeJHaHATA nocOKa Harope/HaOny Ha Bb3DyHnna NOTOK.
8.5yTOH SLEEP (CbH)
AknBpa nn OTmeHn pexm "Cbh".
9. BYTOH "AROUND U" (OKOJIO BAC)
N3non3Ba ce 3aakTnBupaHe nnOTmHa Ha cyHKunraTa "Around U" (Okono Bac).
10. BTOH TIMER ON (TAMMEP BKJ.)
N3non3Ba ce 3aakTNBupaHe NIN OTMHa Ha cyHKUraTAta TaMepe 3a BkIOuBaHe.
11 BYTOH TIMER OFF (TAMMEP IM3KJI.)
N3non3Ba ce 3aakTNBupaHe NIN OTMnHa Ha yHKnraTATa TaImep 3a n3KIOUbaHe.
12. BYTOH JET (TYP60)
U3non3BaCe 3a BkIIOuBaHe UIN IN3KIOUBaHe Ha cyHKunraTa 3a 6bp3O oxJaXdaHe UIN OTONneHne.

13.6yTOH DIM (3ATbMHRABE)
U3no3Ba ce 3a BkIIOuBaHe nnNnKIOUBaHe Ha CBETINHaTa HAnCnner Ha BbTpewHOTo TJINo.
14.5YTOH POWER SAVE (UKOHOMMUEH PEXKIM)
U3no3Ba ce 3a BkIIOuBaHe Unn N3KIOUBaHe Ha IKOHOMNHypeKM.
15.6YTOH SUPER SILENT (N3KJIOUHTEJIHO TUX)
N3no3Ba ce 3a BkIIOUbaHe NnN INKJIIOUbaHe Ha INKJIIOUHTENHO TUXINPEXMM.
Инданаторни СимBOЛи HA ДИСПЛЕЯHAДИCTAHЦИОHHOTO упРавЛECHNE

INHnkaTop3aOxlaKdAnHe

HnDnKaTOp 3a n3CywaBaHe

INHdikKaTOp 3a "cAmo BeHTnlaTOp"

INHdkaTop 3a OTonJIeHne

ABTomatnHa CKOpOCT Ha BENTnlaTopa

Bucoka ckopocHa BeHTnlaTopa

CpeHa ckopocT ha BeHTnlaTopa

Hncka ckopocT Ha BeHTnlaTopa

HndkaTop 3a n3KlouHTenHO Tnx pexkM

INdikKaTOp 3a cbH 1

INHnKaTOp 3a cbH 2

INHdikKaTop 3a cbh 3

INdikKaTOp 3a cbH4

HnDkaTop "CneBai Me"

Ioka3BaHe Ha 3aJaHeHaTa TempepaType

INHДИКaTOP3aNKOHOMUeHpeKIM
СбхраняBAHEи СьВETИЗПОЛ3BAHE HA ДИCTAHцINOHOTO YYPABJIЕHNE
PnBcKaHOHaTnCKaHe Ha 6yToHa MODE (PEKIM)
peKIMbT Ha pa6ota ce npomeHa B
NOCJIeIOBaTeHOCCT:
OXIAJDAHE 13CUYABAHE
CAMO BEHTNJATOP OTONJIEHNE
Pekm "OtponHe" He e HauuH npn
KINMaTnIeTe, npeHa3NaueHcamaO 3a
OxlaJkaJaHe.
2. Hactpoika Ha ckopoCTHa BeHTnlaTopa
PnBcKaHoHaTnCKaHe Ha 6yToHa FAN
(BEHTUNATOP)ckopocTtHaBEHTUNATOpa ce npomehB NocleOBATeHOCCT:
ABTomaTuHa→ Bucoka→ CpeHa→ Hncka

Bpekm CAMO BEHTNJATOP ca NaIuHn cAmo
CKOPOCTIe: BnCoka, CpeHa HnCKa.
BpekmN3CYLJABAHE ckopocTtHa
BEHTnlaTopa aBTOMaTnUHO Ce 3aDaBa Ha
"abTomatnHa". ByToHbT FAN (BEHTNIATOP) He
pa60tnBTo3nCnyaai.
3. Hacptponka Ha Temnepatypata

HaTnCHeTe BeINbK,3a da yBennuIe
HacTpoiKaTa 3a TeMnepaTpya c 1^
HaTnCHTe BeHbX, 3a Da HAMaNITe
HacTpoiKaTa 3a TeMnepaTpya c 1^
HaTnchTe n 3aDpBxTe Te3n 6yToHn,
3a Da npomehnte 6b30 cnpapa.
| Диапазон за Temпературна настroduка | |
| *OTONJIЕНИWE, OXЛAJКДАНЕ | 16°C-30°C |
| ИЗСУШАВАЕ +/-7°C | |
| CAMO BEHTNЛATOP | He може за се настroduьа |
*3a6eJekka: PexnM "OtonJeHne" HE e Hauuueh npu moeJIte, npedHa3HaueHcAmo 3a oxJaKe.
4.BKJIIOUBaHe
HaTnchete 6yToHa ;Korato ypeBt nOyu cnHana, CBETBa INHdkaTopbT 3a pa60Ta Bbpxy dncnJe Ha BbTpewHOTo TAno.
Pn CmHa Ha pexKIMte u3aKaIte HAKoKcekyHn n NOBTOpe TE Oepaunra, aKO ypeDbT Hepearnpa BeHara. Korato n36epeTe pexkMa HaOTOnJIeHne, Bb3duuHnT NToK TpbrBa Cne2-5 MNHyTu.
YINPABJIEHNE HA IOCOKATA HA Bb3dUshnI NOTOK
5.YnpabneneHa nocokata Ha Bb3dywnnoTOK
Xopn3oHTaHnYBb3dyuH eTOK ce perynnpa abTomatNHO IOI ONpeJeH bTbN B 3aBNCMOCT OT pa60THy peKIM CneB BKIOUbaHe Ha ypea.
IocokataHaBb3DyHnnaTOKMOKeJacepepynnpa n Cbo6pa3HoBaunTe n3NCKBaHnC haNTsKaHe Ha6yToHa SWING(3ABbPTAHE)Ha dntaHNoHHoTo ynpabNeHne.
YnpabneHHe Ha BepTnKaHnBb3dyweH NOtOK (pb4Ho)
3aBbptete ufoTobete 3a ynpablenHe Ha KaIy3nTe 3a BepTKaJIHO peYlnpaHe, 3a da npomeHnte NOCOKaTa Ha BepTKaJIHnBb3dyWeH NOTOK, KaKTo e NOKa3aHO.
3a6eIeKKa:BbHNo ypeBt MoKe Ja n3rIeKda pa3nUHO OT BaUNA KINMaTIK.
A-He 3aBbptaanTe pBuHO xany3nTe 3a XOpN3oHTanHo peryInpaHe; TOBa MoKe da npuHnIOBpeNi. Ako TOBa ce cnyu, nKIOUte yPeDa I rO n3KIOUte OT MpeKaTa, CJeI KOeTO rO BkIOUte OTHOB.
B-ПpenOpbHrTeHNo e da He ce no3BoJBa XaIy3nTe 3a xOpu3oHTaIIHO perynipaHe da ca HaKIOHeHn HAOJIy 3a DbIro BpeMe B pexIM OXIAJDAHE nnn N3CyUABAH, 3a da He KaNe BODeH KOHdEHN3aT.
UHT3a ynpabneHne Ha kany3te 3a BepTKKaHNO perynupahe
ОпИСАне HA PEXКUMTE И ФУHKЦИNTE
Pa60Ta c yacOBHnKa
MoKTe Da HAcTPOnte acTPOHOMUeCKOTO BpeMe, KaTo HaTnCHete CLOCK (YACOBHNK). HaTnCHete To3n 6yToH n rO 3aApBxKe 3a Hn3 cKeyni, 3a da aKTINbPaTe HAcTPOnKaTa Ha YacOBHnKa; uΦPnte Ha YacOBHnKa 3aNoOBaT da MmRat. CneT OBa n3nON3BaNte 6yToHnTe n
,3aДаЗадаTeTOUHOTOBpeMe.HaTnCHeTe OTHOBO6yToHa-actpoHOMuYeCKOTOBpeMe e 3aJaDeHO.
Pekum SLEEP (CbH)
Pekm CbH MoKe da 6bJe 3aJaen B pa6oTHnte peKmOxJAXDAHE,OTONJIeHNE nn N3CyUWABAHE.
Ta3nФyHKuBnOncuIpyBa no-do6pn yCNoBn 3a cnaHe.
YpeBt Ce n3KIOUBA aBTOMaTNUHO cIe8 yaca pa6ota.
CkopoCTHa HBeHTnlaTopa ce 3aDaBa aBTOMaTHNO Ha NO-HNCKa.
Cama 3a moen 9K/12K.
PnB BcAko HataNCKaHe Ha 6yToHa SLEEP (CbH) pa6oTHnT peXm Ce npomeHb NocJeOBATeHHOCT:
3 38ykoBn CunHana 6bDaT n3CnyuHaHn
BbTpeshHOTOTJIpeuHaHopMaJIHOTO DnIXKeHHe
3BeHaIe Ce I3KJIOUaABTOMaTHUHO
ПОДДРБЖKA
NouchBaHe Ha npedHnnaHn Ha BbTpewHOTO TAno
1.ИЗкlioуete ypeda ot eilektpnueckata Мржа Пьрвоикlioуete ypeda n cneT TOBaTo IN3KIOHETe OT eilektpnueckata Мржа.
2.Cbane npednnahe OTbopete npednnahe,kaKTo noka3Ba cTpekata (fnr.A). 13dbpnaTe cnotobete otctpaHn Ha npednnae naHc cncla,3a da ro cbanite (fnr.B).
3.Почирете npedня панел ИЗбьршete ro c meka cyxa кьрna. Ако урдт e MHORO 3ambypcen, можeteда ro почирпс tc xладka ВODA (pond 40°C). Cnéд почирваноюзчakайда ИЗсхHe.
4.Bbphete npednnaheHa mactoto my ro n 3aTbopete Bbphte npednnaheHa mactoto my ro n 3aTbopete, KaTO rO HATNCHEt HaDony.
3a6eJekka:
He nouchBaIte ypea c BeueCTBa KaTo 6eH3nHnn nonpaun npaxobe.
- He npbckaTe BOda Bbpxy BbTpewHOTo TraNo. ToBa e onacHo! EneKtpueeKn ydp!
NouCTBaHe Ha Bb3dUHHnA mntTbp
Bb3dywnrTfnnTbp Tp86Ba da ce nouchTa Cnep BceKn 200 yaca pa6ota. NocntbaTe Bb3dywn Hn FNTbp Ha BCEKn DBe CeMNu, aKO KInMaTHKbT pa6oTN B n3KNouHTenHo 3anpaWeHa cpea.
1.ИЗкlioуeteуpedaOTeNEKtpnueckkataМржа ПьрвИЗкlioуeteуpedaиСледTOВaTOИЗкlioуete OT eNEKtpnueckkataМржа.
2.ИЗБадете Вьздушнг ФиNTbp (ФИR.C).
- OToBopeTe npedHnnaHeI.
-
HatncheTe JekO dpKkata Ha 0nItbpa.
3.ПьзHEteФИNTbpaHaBbH. -
NounCTBaHe Ha Bb3dUshnHn FnnTbp (fnr.D) Ako fntbpt e MHO 3aMbpceH, nouNCTeTe c pa3TBOpEH B xnaKa BODa HeyTpaneH Mneu npenapat. Cne noucTbaHTo n3yakaiTe da n3cbxHe.
4.Bbphete fHnTbpaHa MaCTOTMy,HaTnCHte 6yToHa 3a HynipaHe Ha fHnTbpa (fnr.E) ot IaChata CtpaHa,KaTO n3NON3BaTe cHnHdpuueH uΦT,N 3aTbopete npednnaHn.
3a6eJexKa:
3a da n36erHeTe HapaHbAe, He doKocBaItepe6pata Ha BbTpewHOTo TAno C npbCTn, CneKaTO CTE CBANNN FNTbpa.
He ce onntBaTe da nouCTBaTe BbTpewHocTTa Ha KnMaTuKa camu.
- He nouchTbaIte fHntbpa B nepaHa MaunHa.

Φur.A

Φur.B
Φur.C

Qur.D

Φur.E
OTCTPAHЯBAHE HA HEN3ПРABHOCTN
YeTo npo6nemTe npu pa60Ta ce IbIxxat Ha dpe60nn. HanpaBte cnpabKa B Ta6nucata
no-dony, npedn da ce o6aHnte B cepBn3a. Toba MoKe da Bu cneCTN BpeMe n HeHyxHn
pa3xoDi.
| Hem3npabNocT AnlIa3 | |
| UpeIbT He pa60Tu | ·Изгоряло 3auntno yctpoiCtBO Или пеДпа3nteIe? ·Изчakайte 3 MInHyTи BkInOucheTe OTHO BO UpeJa. Bb3mOxHo e 3aunTHOTo yctpoiCTBO Ду He ПОЗВOLЯВа Ha UpeJa DA pa60Tu. ·Изтошени 6aTePIMn Ha dinCTaHcUNOHOTo UnpaBLeHne? ·ШeСeJIbT He e BkInOuCh KaKTo Tpr6Ba B KOtAKeTa? |
| He oxlaJka Ilin He 3aRpaYBa Bb3dUxa | ·Замьрсен Вb3dUweH Φиltbp? ·БлOkIrpaHи BxOДи Ilin I3XODHn OTBOPr 3a Bb3dUyx Ha KInMaTnKa? ·ЗаддЕн Ilin e npaBvIlno TempepaTypata? ·Има Ilin OTBopEHI BpaTи Ilin npozOpzi? |
| HeeΦeKTHBNO uypaBLeHne | ·Имало Ли e cniln CMySeHn (OT pazpejdaNeHa CTaTUnH O leEkpTrpueCtBO Ilin aHOMaIIIN B NaPpeJeuHTo Ha eJeKTPo3axpaHbAneto)? Ималte npeIbVid, Ye She Ima aHOMaIIIN B pa6OtaT; B TaKbB CnyaH aN3KInOte UpeJa ot KOHTaTЯ Iro BkInOuYe To THOBo CpeI 2-3 ceKynDi. |
| UpeIbT He 3aNoUBy Ba da pa60Tu BeDnara | ·При помяну Ha peximMa NO BpeMe Ha pa6Ota She Ima 3-MinHyTHO 3aKbSchenHe. |
| Hoe6nuaHn MInpIz3Ma | ·ТаЗМ МирИЗMa може Ду ИДВа OT Дуг ИЗTOUHк, Наример Me6eIi, ZinrapeHдIMиДр.; Тя с BCMyKBA B UcTpoIcTBOTO И с ИЗdUxBa HabbN 3aedHc Bb3dUxa. |
| 3Byk Na TeuAsa BoDa | ·HorpMaHNoЯВLEHne, ДыЖаIoо Ce Ha DVBJeHneTo Ha XlaDINHn AreHT B KInMaTnKa. ·3Byk pri Pa3Mpa3raBaH Be pexim Ha OTOnPleHne. |
| ПуКaHе | ·ТeЗ N 3Byu MoJGe Da ce ДыЖaT Ha pazUnPraBaHTo Ilin CBVbAHeTo Ha npedHn NaHeI Nopadn PpomEni B TempepaTypata. |
| OTИзхODHn OTBOP 3a Bb3dUyx ИЗЛиЗа Лека МbIgla | ·При ИSCa TempepaTypa B cStaTуа Ce пяВЯВa MbIgla? HorpMaHNoЯВLEHne, ДыЖаIoо Ce Ha ИЗпУСКанИЯ STUeH Bb3dUx OT BbTpEeSHOTo TЯIb B pa6OthnTe peximn OXJIAXDAHE Ilin I3CYUJIABAH. |
| ИндikatopbT 3a pa6Ota Mira, Ho BbTpEseHnY BENTINATop Cnipa | ·UpeIbT пeMHnHbAa OT pexim Ha OTOnPleHne B pexim Ha pa3Mpa3raBaHe. ИндikatopbT уragBa и уpeIbT ce BpIbua B pexim Ha OTOnPleHne. |
3a6eJekka: Ako npo6JIemnte npo4bIkaBaT, n3KIOUcTe ypeDa, n3KIOUcTe ro ot
eNEKtpnueckaTa MpeJa n cIeD TOBa ce CBbPKeTe C hai-6n3Kn yIbHOMOseH cepBn3eH
zENTbp Ha Whirlpool. He ce onNTBaIte da npemeCTBaTe, nonpaBAre, pa3rno6BaTe nIIM
moduΦnucnPate ypeDa camn.
MOHTAXHNYCJyTn
Преши моNTаж
1.ПрочеTeВнмаTeJIHO TOBa pьКOBODCTBO,прдЯ ппСТьПИTe КБМ MOHTaJa.
2. YpeIbT TpI6Ba Da Ce MOHTnpa OT KBaJIHΦNcIpaH TexHnK B CbOTBcETCBnE CHaUNoHaNHTe eJekTPoTeXHnueCKn CTaHdapTN N yKa3aHnraTa B TOBa pBkoBOdCTBO.
3. BcKaKBr npomeHn BbB Bpb3Ka C NOJKeHneTO 3a MOHTaK Tp6Ba Da ce N3BbPWBat OT npOoecNoHaJIncTn.
4. Пюверете урета за поврети, пераимда письптей Кбм монтая.
- MoHTnpaIte HaN-HnCKnTe DBNXeUc Ce Yactn Ha BbTpEshOTo TAnoHa NoHe 2,5 m HAd HnBOTO Ha NODa NJIu HaD 3emHaTa NOBbpxHOCT.
6.След монтаха ИЗПОЛЗВайтуда правилно, според указаюгд В това рьковозбото. Сьхаяныту рьковозбото на похаяшю място, за ду ИЗПОЛЗВай ри Heo6хомоCT OT подрьжka Или пемecтвае на ураза в 6ьдese.
MEPKN 3A B6E3ONACHOCT
1.ИЗTOUHnKbT Ha eIeKtpO3aXpaHbAHe TpЯ6BaДа 6Бдe C HOMnHaJIHo HAnpeJxHne N CNeuHaHa eIeKtpnuecka CXema 3a To3n ypei. HopMaJIHNrT pa6ToH obXbAT Ha HAppeJxHneTo e 90% -110% OT HOMnHaJIHOTo HAppeJxHne. IInaMeTbPbT Ha 3axpaHbAuny Ka6eI TpЯ6BaДa CbOTBeTCTBa Ha I3NCKBaHnYTa.
2.ИЗTOUHnKbT Ha eIeKtpo3axpaHbAHe Ha nOTpe6nteJIa Tp6BaДa ИMa HaNEXdHa KIeMa 3a 3a3eMBAHe. 3a6paHEnO e 3a3eMHTeHNrT pOBoHNk Da ce CBbp3Ba KbM CNeHnTe eIemENTu:1) Tpb6a 3a NOdaBHe Ha BOda;2) ra3Oba Tpb6a;3) Tpb6a 3a OTnaDbuHn BOdu;4) dpyrIn eIeMeHTN, cHTaHn 3a He6e3OpacHn.
- Tp6Ba Da ce ocInrypn 6e3OnacHo 3a3EmBAHe n CBbp3BaHe Ha 3a3EMNTeHnI pOBOdHnK CbC CneuHa hA cTcTeMa 3a 3a3EmBAHe Ha crpaDAta, HCTaHnpaHa OT npoFecNoHaJIncn. YpeBt Tp6Ba Da e o6OpyDbAH C pKeKbcBau 3a DeΦeKTHO- TOKOBa 3aUHTa N C DonbHnHTeH eEeKTPnueCKn PpeKbcBau C DOCTaTbueh KaNaUTeT. ELeKTPnueCKnT pKeKbcBau Tp6Ba Da nMa n ΦyHKzIra 3a MaHnHTHa N TempePaTpHa 3aUHTa, 3a Da OCInrpyRa 3aUHTa OT KbCO CbeINHeHne I npetOBapBaHe.
U360pHaHn-NoDxOJaTO MoCTO
MRCTO 3a MOHTAX Ha BbTpewHOT TANO
-Място,КьдetoНЯma ПпенитCBИВбИЗOTdo
ИЗХODнЯ OTBOP 3a ВьзДухи ВьзДухБТ мОже ЛECHО
Да ce ИЗДухВа КьМ BСЕКи bгЛ На CTаЯТа.
KbTeOe necho da npekapat Tpb6nte n da ce HnpaBn OTBOpBT B CteHata.
CnzaBaIte Heo6xOJIMOTO pa3cTOrHne OT TabaHa NOTCTeHaTa, B CbOTBETCTBne Cbc CXEmata 3a MOHTax.
KbTeTO B3yHnT fNtbp MoKe IecHO da ce CBaI.
BbtpeHOTO TJIIO NINCTAHUHOHTO ynpaBHeHnE Tp6Ba da ca Ha noHE 1 m OT TeNEu3Op, paHONpneMHUK H.
BbtpewHOToTnlo Tp6Ba Da e daJece ot LymHeCteHTN lamnn, 3a da ce n36erHaT CMyUeHnO TgX.
He noctabYIe B 6n3OCT Do BXoHnO rTOBp 3a Bb3dyX HnIO, KOEt MoKe Da ro 6Joknpa.
Ha MRCTo, KOeTO MOKe Ja NoeMa TeXeCTTa Ha ypeDa N KbDeTo HMa Da NMa yBEnuHaBaHe Ha UyMa N Bu6paunTe.
BbtpewHOToTnHOHeeNoDxOJaO3aMOHTaKHa MeCTa,KbTeToCeCyuINnpaHe.
MRCTO 3a MOHTaK Ha BbHsHOTo TAnO
- MohtnpaIte ypeDa Ha cyxo I npobetpmbo MxctO.
-ИЗБЯВаITE MOHTIpaHе Ha MeCTa, KbДeTO MoJKe ДуIMa TEu Ha 3anaJIIMn Ra3OBe.
CnBaTe Heo6xOaMTo pa3cTOrHHe OT cTeHaTa, B CbOTBcETBHe CbC CXeMaTa 3a MOHTax.
Pa3cTOrHnETo MeKdy BbTpEshOTo N BbHnHOTo TraIO Tp8Ba Da e 3 MeTpA u MoXe Da cTtRHe Do MaKcMymM 15 MeTpA c DonbHnTeJIHO 3apeXdaHe Ha XlaaIJIeH aReHT.
He MoHTnpaTBe BbHnHOTo TAno Bbpxy 3AmbpceHa nnMa3Ha CTeHa, HINTO B6IIN3OCT Do N3XoD 3a BykKaHN3npaHn Ra3OBe.
-ИЗБЯВаITE MOHTINPанe 6ЛИЗОdo ПТЯ,КБДЕТOуpeДБТ мОже Дa ce 3aMbpcN OТ пьбкN KaJIHа BODa.
Bbpxy cta6nHa ochoBa, 3a da He ce yBeneu nIymbT npn pa6oTa.
KbTeTo Hnio He 3aKpNa n3XoHn8 OTBop 3a Bb3DyX.
- МостOTO 3a мontж Тразба Да мозе Да ИЗдрхи.Tergnotи вибраципerte Ha BbHшOTо TЯно Даг rapaHTnpa 6e3onacHOCT;
KbTeOOTnuaata Ce BOna HMa da Cb3daBnpo6Jemn. - MoHTnpaIe BbHsHOTo TAno Ha MAcTo, KbDeTo H3nyCKaHnT Bb3DyX N WymbT npu pa6Ota Hma da 6e3NOKoT CbceNdTe BN.
3. MoHTaX Ha Tpb6nte Ha BbTpewHOTo TaNo
- Hamectete Tpb6nte (3a TeuHocn raz) n Ka6ennte ppe3 cTeHHN OTBbH nn Nk OTBbTpce, cnei KaTO CTE 3aBbpwnn nonaraHTo Ha BbTpewHnTe Tpb6n n Ka6en 3a CbP3BaHe KbM BbHhOto TaIO.
-Ппeцене далд отржete пл actMacobataчacB 3aBnCIMOCT OT NOCOKaTa Ha Tpb6uTe (KaKTo e nokkaasoNo-dony).

3A6EJIEXKA:
Korato fikcnpatetpbsataB nocokn 1,2nn4,otpekeTe cboTBeHaTa nactMacobaaactOT OCHOBaTa Ha BbTpewHOTO TANO.
CneI KaTo CTe CBbp3aHn Tpb6bnte Cbo6pa3HO 3NcKBaHnra, MOHTnpaTe Mapkyua 3a N3TOBaHe. CneTobA CbbpKxeTe Ka6enHaTa Bp3Ka. CneI Cbbp3BaHeTo 06BnTe 3aeHNO Tpb6bnte, Ka6ena n Mapkyua 3a N3TOBaHe C TePMOn3OJInpaU MaTePnAn.
3A6EJEXKA: He cBbP3BaIe KbM eNEKTPo3aXpaHbHaTeO N0 BpeMe Ha MOHTaKa.
BAXHO:
Tepmon3oIauIHa Tpb6HnTe CbeDnHeHHa:
06BnTe Tp6bHnTe CbeDInHeHn C TePmOn3OJnPaaM MaTePnaNn n CneT TOBa C BHNIOBa JeHTa.

Tepmon30ana

YBnBaHe C BnHnNoBaJeHTa
Tepmon30napaHn Tpb6n:
a. NocTaBete Mapkya 3a IN3ToUbaHe NOI Tp6aTa.
b.ИЗолацнон MaTePnaJI:ПОЛистуpeНова пяпс с дeбелп ha n6 mm.
3A6EJIEXKA: MapkybT 3a n3ToUbaHe ce noIroTBra OT notpe6ntela.
Mapkyb3a n3TOUbaHe Tp6Ba Da e Hacoeyn HADONY 3a NO-NECHO n3TOUbaHe. He ycykbaIte Mapkya 3a n3TOUbaHe; OCTabeTe rO da ce noDaBa HABH NII Na Ce ORbBA CBO6OJHO He NotanJeKpaMy BB BODA.AKO CBpb3BaTe YdbJXHTeNeH MapKyu KbM Tpb6aTa 3a n3TOUbaHe, ToT P6Ba Da e TepMON3OJnpaH pni npemHaBHeTo My npe3 BbTpEshHOTOTJIO.
Korato Tpb6nte ca Hacouehn HaJrcho, Tpb6nte, (noTobEN OT notpe6nt 3axpaHbauIaT Ka6en I MapkybT 3a N3TOUbaHe Tp6Ba Da ca TePmOn3OInpaHn I nnKcnpaHn Ha Tbp6a Ha BbTpseHOTo TaNo.

Cbbp3BaHe Ha Tpb6nTe:
a. Cbpxe Te Tp6nte Ha BbtpewHOTo TnIO C NOMOuTa Ha Dba raeuH NkUoya. O6bpHeTe cneuaHNO BHIMAHHe Ha pa3peWeHn MOMeHT Ha 3aTgAhe (KaKTo e NOKa3aHO NO-dony), 3a Da He dOnyChete DeOpMnpaHe n NobpeXdAhe Ha Tp6nte, CbeDInHeHnTA u KOHyCHnte raIKN.
b. Пьрвгзатгнete на рьки слд TOВИЗЛЗВАТе raeЧИNTe KJIIOUObE.

| Размер на Трьбату | Момент на Затяганe | ШирINA на гайкату | Мин. дeбенинa |
| Стupa на оTKыm тeчесда (1/4inchua) 15-20 N.m 17 mm 0,5mm | |||
| Стupa на оTKыm ra3a (3/8inchua) 30-35N.m 22 mm 0,7mm | |||
| Стupa на оTKыm ra3a (1/2inchua) 50-55N.m 24 mm 0,8mm | |||
| Стupa на оTKыm ra3a (5/8inchua) 60-65N.m 27 mm 0,8mm | |||
4.Cbbp3BaHe Ha Ka6eHa
BbtpewhoTano
1) OToBopTe npEHHn naHEn n CBAte Te NOKpNBHaTa nnactHa, KaTo pa3Xna6nte BnHTa.
2) Cbpxe eJektpo3axpaHbuaata Ka6enHa Bpb3ka KbM BbTpewHOTo TAno, KaTO CbpxeTe npOBODnUte eINH NO eINH KbM KneMITE Ha KOHTpOHOTa6No B CbOTBETCTBne c eJektpuueckaTa CXema.
3) 3akpenete enektpo3axpaHbauata Ka6enHa Bp3ka KbM KOHTponHOTo Ta6Ioo Upe3 Ka6enHaTa CkO6a.
4)Bbphete nokpmbhata nlaactnHa Ha MRCTOU 3aterheTe BnHTa.
3A6ELEKKA: (B 3aBnCIMOCT OT MoDena) Tp86Ba Da CBAJIte KyTnTa, 3a Da CBpXKeTe npOBAnuTe KbM KJIeMTe Ha BbTpewHOTo TAnO.

BbHuHO TaNO
1) Cbane Te BpaTata 3a DoCTbN OT BbHsHOTo TAnO, KaTO pa3XnA6nte BnHTa. CbByKeTe npOBOnHnCnTe eINH NO eINH KbM KJIemNTe Ha KOHTpONHOTo Ta6No, B CbOTBeTCTBne C Bpb3KInTe Ha BbTpEwHOTo TAnIO.
2)3akpenete enektpo3axpaHbauata Ka6enHa Bp3ka KbM KOHTPOJHOTa 6nope3 Ka6eJHaTa Cko6a.
3)BbPHeTe BpaTata 3a IOCTbI Ha MRCTOTo I n 3aTeHHeTe BnHTa.
3aFM20ODUWA2, HmAbBtpeHOTraIOC, D;
3aFM24ODUWA2,намавтpeшOTЯLOD;

BHIMAHHE:
- YBepete ce, Ye cBeTbHa npOBdHnUte n 6poaT KneMa Ha BbHhOto TaIO Ca CbUnte KaTO Te3N Ha BbTpewHOTo TAnO.
2.ИЗползваite OTДЕЛна eileктучесka Берига 3a Клматиka.3a Начиha Ha OKa6eЯBaHe BIXTe eilekтучесkaТа схemaHa уpeda.
3.Поберете далспсификага та на kaбени OTROВаря на ta6niца та no-dony. - Поберете побовицпсу уberетe, ч BCNUK ca 3dpaBO 3aTeHATN, cNeД KaTO cTe CBp3aNn Ka6ena. Ka6enbT Tpr6Ba DA 6bde 3dpaBO 3akpenen Upe3 Ka6enHa cko6a.
5.BbB BnaxHa nn Mokpa cpea 3aIbJxNteHNO MOHTnpaiTe npeKbcBaay 3a DeΦeKTHO-TOKOba 3aunTa.
Cneunfkaumna ka6ena
| Тип 3ххалвац Kaбел Кабелна Врьзka | Оснobно е leкторо-Зхалвано (збелекка) | |
| FM20ODUWA2 H05RN-F,3G 2.5mm² | H07RN-F, 4G 0.75mm² | Кым ВьншOTO ТАЛо |
| FM24ODUWA2 H05RN-F,3G 4.0mm² | H07RN-F, 4G 0.75mm² | Кым ВьншOTO ТАЛо |
| FM36ODUWA2 H05RN-F,3G 4.0mm² | H07RN-F, 4G 0.75mm² | Кыm ВьншOTO TАЛо |
MOHTAX HA BbHsHOTO TЯло
1. MoHTax Ha KaHana 3a n3ToUBaHe n MapKyuA 3a n3ToUBaHe
KoHdEHNaTbCTe H3TOUBA OBTBbHsHOTO TAnO, KOrATo ypeBt pa60TN B pexnHa OToPJIeHne. 3a Da He npeuHte Ha CbCeDInTe N da Ce NorpIXknte 3a Ona3BaHeTo Ha OKoJHaTa CpeDa, MOHTnpaIte KaHaN mApKyu 3a H3TOUBAHe, NO KOnTO Da ce OTTuBaODHnT KOHdEHaT. MoHTnpaIte KaHaJa 3a H3TOUBAHe KbM NoCTaBkAta Ha BbHsHOTo TAnO INocLe CBbPxKeTe KbM Hero Mapkyua 3a H3TOUBAHe, KaKTo e NOKa3aHO Ha fHyypata BdACHO.
2. MoTakn 3aKpenBaHc BbHNoTO TAnO
ФИКСИРаTe 6ОЛТовеТe rайКITE 3ДравО KBМ XОПЗОТАнHA, coNДнA HOCEsa NOBbpxHOCr. AKO yCTpoIcTBOTо ce MOHTnpa Ha CTeHa nIN Ha NOKpNB, HENpeMeHNo 3aKpeNeTe Do6pe ONOPaTa, 3aД п徳OTВpaTte KNaTyUkKaHe BCJIeDcTBnE Ha CInHn Bn6paCn INn BnTbp.

Ipenopbka: Hau-do6pe e da cnoxnte rymeha noDIOXKa (Ouun) noB bHnHOTo TNO, KOaTO da nOrnbua Bn6paunTe npa6ota.
3.Cbbp3BaHe Ha Tpb6nte Ha BbHnHOToTnO
CbaIeKaanayetataOTBBybTHNnITPNbTHNBEHTIN.
Cbpxte Tpb6nte KbM DBybTHNn I TpInbTHNn BEHTIN NOOTdJIHO C Heo6xOJIMN MOMEHT Ha 3aTgAHe.
4.CBbp3BaHe Ha Ka6eHnTe Ha BbHnHOTo TAno (BX. npEiHnHaTa cTpaHnua)
OБЕЗВБЗДУШАВЕ
OcTaTbueH BnaJxH B3DyX B uKbHa Ha XnAaHINHra3 MoKe Da npuHn NOBpeH Ha KOMnPecopa. Cne KaTO cTe CBp3aHn BbTpEshOTO H BbHshHOTo TAn, n3TerIeTe B3DyXa H BnaFATA OT CNCTemata 3a XnAaHHeH ra3 C NOMUHTa Ha BaKyUMHa NOMNa, KaKTo e NOKa3aHO NO-DOly.
3a6eEKKa: Tb KaTo HaJIraHrTo B CnCTeMaTa e BnCOKo n C cen Ona3BaHe Ha OKOJHaTa CpeJa, He H3nyckaIte XnaUNHra ra3 HanpaBO BbB Bb3Dyxa.

06e3Bb3dyywabaHe Ha Bb3dyuHHTe Tpb6n:
- Pa3BnHTeTe n CBAIeTe KanaeTaTa Ha IByntTHNr I TpNtBTHNr BEHTNI.
- Pa3BnHTeTe n CbaIeTe KaNaeTo Ha cepBn3HnBEHTnJ.
3.CbpxKeTe rBkabnMapkyHa BaKyHMHaTaNOMna Cbc cepBn3HnBEHTnI. - BkIIOUeTe BaKyMMHaTa nomnla 3a 10-15 MmHyTn,doKATO DCOTnHe a6COJIIOTeH BaKyM oT 10 mm Hg.
5.ДokаTO BaKyyMHaTa NOMna BCE OSe pa6Otn,3aTBopeTe pBvKaTa 3a HnCKo HaJIraHe Ha pa3npedeJIeNTeI Ha BaKyyMHaTa NOMna.CneToBa cPpeTe BaKyyMHaTa NOMna. - Otvbopete DBytBnna BENTnHa 1/4 o6opot n ro 3aTbopote cnei 10 ckyHn. Ipobepete 3dpabnHaTa Ha BCNUKn CbeHNHeHn C NOMOuTa Ha Teueh canyH n eEeKtpoHn DeTeKTOp 3a yTeKn.
- 3aBbptete cte6Ioto Ha dBytbTHn I TpInbTHn BeHTn.I OTkaueTe rBkabn Mapkyu Ha BaKyymHaT a nomna.
- BbPheTe No MeCTaTaN 3aTeHHeTe KaNaYeTaHa BCNUKn BeHTNJI.
1. BUTONUL ON/OFF (PORNIT/OPRIT)
Porniti s/sau opriti aparatul, prin apasarea pe acest buton.
2. BUTONUL MODE (MOD)
Specifications cablu
| Model | Cablu de alimentare (exterior) | Cablu de alimentare de la rețea | Sursă principală de alimentare (Notă) |
| FM20ODUWA2 H05RN-F,3G 2.5mm² | H07RN-F, 4G 0.75mm² | Spre exterior | |
| FM24ODUWA2 H05RN-F,3G 4.0mm² | H07RN-F, 4G 0.75mm² | Spre exterior | |
| FM36ODUWA2 H05RN-F,3G 4.0mm² | H07RN-F, 4G 0.75mm² | Spre exterior |
MONTAREA UNITÁTII DE EXTERIOR
- SAFETY PRECAUTIONS
- AIR CONDITIONER PRECAUTIONS
- Please strictly follow the below instructions:
- SAFEGUARDING THE ENVIRONMENT
- SCRAPPING OF PACKAGING
- SCRAPPING OF APPLIANCE
- PRODUCT DESCRIPTION
- Indoor unit
- Outdoor unit
- CONTROL PANEL DISPLAY INDICATORS DESCRIPTION
- Temperature indicator (I)
- Running indicator (2)
- Timer indicator (3)
- Filter monitor indicator (4)
- REMOTE CONTROL FUNCTIONS AND INDICATORS
- ON/OFF BUTTON
- MODE BUTTON
- FAN BUTTON
- 4-5. TEMPERATURE BUTTON
- SWING BUTTON
- SLEEP BUTTON
- AROUND U BUTTON
- TIMER ON/CLOCK BUTTON
- II TIMER OFF BUTTON
- 12.JET BUTTON
- DIM BUTTON
- POWER SAVE BUTTON
- SUPER SILENT BUTTON
- INDICATOR SYMBOLS ON RC DISPLAY
- STORAGE AND TIPS FOR USING THE REMOTE CONTROL
- How to insert the batteries
- How to remove the batteries
- Disposal of the batteries
- Precautions
- OPERATING MODE DESCRIPTION
- Operation Modes:
- Selecting mode
- FAN mode
- Setting temperature
- Turning on
- AIRFLOW DIRECTION CONTROL
- Airflow direction control
- Vertical airflow control (using the remote control)
- Swinging airflow
- Desired direction airflow
- Horizontal airflow control (with hands)
- MODE AND FUNCTION DESCRIPTIONS
- Clock function
- SLEEP mode
- SLEEP for Adults (mode I)
- SLEEP for Elderly (mode 2):
- SLEEP for Youngsters/Teenagers (mode 3):
- SLEEP for Children (mode 4):
- JET mode
- Note:
- Timer function
- How to set TIMER ON
- How to cancel TIMER ON
- Around U function
- DIM function
- POWER SAVE function
- SUPER SILENT function
- EMERGENCY OPERATION
- PROTECTION
- Operating condition
- Noise pollution
- Features of protection device
- Features of COOLING mode
- Anti-freezing
- Features of HEATING mode
- Preheating
- Defrosting
- Mode interfere
- cooling dry heating fan
- MAINTENANCE
- Clean front panel of Indoor Unit
- Clean Air filter
- TROUBLESHOOTING
- INSTALLATION SERVICE
- Before installation
- SAFETY PRECAUTION
- INSTALLATION INSTRUCTIONS
- Select the best location
- Location for Installing Indoor Unit
- Location for Installing Outdoor Unit
- INDOOR UNIT INSTALLATION
- Installing the Mounting Plate
- Drill a Hole for Piping
- Indoor Unit Piping Installation
- IMPORTANT:
- Piping Joints Thermal Insulation:
- Thermal Insulation piping:
- Piping Connection:
- Connecting the Cable
- - Indoor Unit
- - Outdoor Unit
- CAUTION:
- OUTDOOR UNIT INSTALLATION
- Install Drain Port and Drain Hose
- Install and Fix Outdoor Unit
- Outdoor Unit Piping Connection
- AIR PURGING
- How to Purge Air Tubes:
- AFTER SALES SERVICE
- Before contacting the Customer Care Centre:
- If after carrying out the above checks, the fault persists, contact the Customer Care Centre.
- SERVICE
- AVANT D'UTILISER L'APPAREIL
- TOUCHE SWING (Oscillation)
- VOORZORGSGMAATREGELEN
- VOOR DE VEILIGHEID
- AFVALVERWERKING VAN HET APPARAAT
- INSTALLATIE BINNENUNIT
- BOTAO FAN (VENTOINHA)
- Como colocar as pilhas
- KOYMNI SLEEP (YTNNOs)
- KOYMNI AROUND U
- KOYMNI TIMER ON (Xpovodiaokotnc Evepyonoinoc)
- KOYMNI TIMER OFF (Xpovodiaokonnc anevpyooinoc)
- KOYMNI JET (TAXEIA Y H / O E P M A N H
- KOYMNI DIM (ΦΩTI ΣMΩ)
- KOYMNI POWER SAVE (EEOIKONOMHENEPTEIA)
- KOYMNI SUPER SILENT (E3AIPETIKA AGOPYBH AEITOYPTIA)
- ΣYMBOLA ENΔEIEΕΩN ΣTHN OΘONH THΛEXEΙΡΙΣΤΗΡΙΟΥ
- POPIS PROVOZNÍCH REŽIMÜ
- Provozní režímy:
- Volba režimu
- Rezim FAN (ventilator)
- POPIS REŽIMÜ A FUNKCI
- Funkce HODINY
- SPÁNKOVÍ režim
- 4-5. TLACIDLO TEPLOTY
- TLACIDLO SWING (NATOGENIE)
- SLEEP preDSPelych (rezim 1)
- 8.SLEEP (EJSZAKAI) GOMB
- MEPbI INPEIOCTOPOXKHOCTN
- MEPbI INPEIOCTOPOXHOCTN INPNIOBPAUHIN C KOHNIOHEPOM
- Ctporo co6louaTe mHcTpyKu, npBedeHHbIe Hxke:
- COBETbI IO XPAHEHnIO N IcNoJIb3OBAHnIO NyJIbTA DInCTAHzNOHHOуNpABJIeHnIA
- Kak BCTaBnTb 6aTapei
- Kak BbIHMaTb 6aTapen
- YtJn3aun6atapen
- Mepbl npedoctoPOXHOCTN
- Опиcaне PEXКIMOB PABOTbl YCTPOIcTBA
- Pexnmbi pa60tbl:
- Bb6op pexuma
- Pekim FAN
- 3.YctaHObKa TEMnepaTpypbI
- Bb60p HxHoro HnpaBHeHn BO3dyuHoro nToKa
- PerynnpoBaHne HnpaBneHn B03dyuHoro nToKa no rOpn3OHTaNN (BpyHy)
- ФункцSuper Silent("Oуеньтухая pa6ota")
- YNPABJIEHNE B ABAPINHOM PEXKIME
- CNCHEMA 3AUNTbI
- YcnoBn3Kcnnyataaun
- YpOBeHb Wyma
- MEPbI INPEIOCTOPOXHOCTN
- Tepmon30JnMecT noCoeHHeHr Tpy6:
- TePmon3oJnTpy6onpObOa:
- IopcoeHHeHne Tpy6oNpOBoa:
- MEPKI 3A 6E3OJACHOCT IPN U3IIOJI3BAHE HA KJIIMATUKA
- CneBbaiTe cTpIKTHO yka3aHnraTa no-dony:
- ОПАЗВАЕ HA OKOLHATA CРEDA
- N3XBbPJIaHE HA ONAKOBKATA
- N3XBbPJIHE HA YPEDA
- Описиме на урEDA
- BbtpewhoTano
- BbHnHO TaNo
- ОпUCAHWE HA ИнДИКATOPITE HA ДИСПЛЕ HA KOMAHДHOTO TABLO
- ФУнкции ИИнданКATOPИ HAДИCTAHцINHOTO YYPABJIЕНе
- BYTOH BKJI./M3KJI.
- 2.BYTOH MODE (PEKIM)
- 3.5YTOH FAN (BEHTWJATOP)
- 4-5. BYTOH 3A TEMINEPATYPA
- BYTOH SWING (3ABbPTAHE)
- 8.5yTOH SLEEP (CbH)
- BYTOH "AROUND U" (OKOJIO BAC)
- BTOH TIMER ON (TAMMEP BKJ.)
- BYTOH TIMER OFF (TAMMEP IM3KJI.)
- BYTOH JET (TYP60)
- 13.6yTOH DIM (3ATbMHRABE)
- 14.5YTOH POWER SAVE (UKOHOMMUEH PEXKIM)
- 15.6YTOH SUPER SILENT (N3KJIOUHTEJIHO TUX)
- Инданаторни СимBOЛи HA ДИСПЛЕЯHAДИCTAHЦИОHHOTO упРавЛECHNE
- СбхраняBAHEи СьВETИЗПОЛ3BAHE HA ДИCTAHцINOHOTO YYPABJIЕHNE
- Hactpoika Ha ckopoCTHa BeHTnlaTopa
- Hacptponka Ha Temnepatypata
- 4.BKJIIOUBaHe
- YINPABJIEHNE HA IOCOKATA HA Bb3dUshnI NOTOK
- 5.YnpabneneHa nocokata Ha Bb3dywnnoTOK
- YnpabneHHe Ha BepTnKaHnBb3dyweH NOtOK (pb4Ho)
- ОпИСАне HA PEXКUMTE И ФУHKЦИNTE
- Pa60Ta c yacOBHnKa
- Pekum SLEEP (CbH)
- Cama 3a moen 9K/12K.
- ПОДДРБЖKA
- NouchBaHe Ha npedHnnaHn Ha BbTpewHOTO TAno
- 3a6eJekka:
- NouCTBaHe Ha Bb3dUHHnA mntTbp
- 2.ИЗБадете Вьздушнг ФиNTbp (ФИR.C).
- 3a6eJexKa:
- OTCTPAHЯBAHE HA HEN3ПРABHOCTN
- MOHTAXHNYCJyTn
- Преши моNTаж
- MEPKN 3A B6E3ONACHOCT
- U360pHaHn-NoDxOJaTO MoCTO
- MRCTO 3a MOHTAX Ha BbTpewHOT TANO
- MRCTO 3a MOHTaK Ha BbHsHOTo TAnO
- MoHTaX Ha Tpb6nte Ha BbTpewHOTo TaNo
- 3A6EJIEXKA:
- BAXHO:
- Tepmon30napaHn Tpb6n:
- Cbbp3BaHe Ha Tpb6nTe:
- 4.Cbbp3BaHe Ha Ka6eHa
- BbHuHO TaNO
- BHIMAHHE:
- MOHTAX HA BbHsHOTO TЯло
- MoHTax Ha KaHana 3a n3ToUBaHe n MapKyuA 3a n3ToUBaHe
- MoTakn 3aKpenBaHc BbHNoTO TAnO
- 3.Cbbp3BaHe Ha Tpb6nte Ha BbHnHOToTnO
- OБЕЗВБЗДУШАВЕ
- 06e3Bb3dyywabaHe Ha Bb3dyuHHTe Tpb6n:
- BUTONUL ON/OFF (PORNIT/OPRIT)
- BUTONUL MODE (MOD)
- MONTAREA UNITÁTII DE EXTERIOR
Brand : WHIRLPOOL
Model : WA24ODU
Category : Air conditioner