
WX283.9 - Drill WORX - Free user manual and instructions
Find the device manual for free WX283.9 WORX in PDF.
| Product Type | Cordless Hammer Drill |
| Brand | WORX |
| Model | WX283.9 |
| Rated Voltage | 12 V |
| No-load Speed (screwdriver) | 0-600 rpm |
| No-load Speed (drilling/hammer) | 0-2200 rpm |
| Impact Rate | 0-3000 bpm |
| Max Torque (hammer) | 100 Nm |
| Max Torque (drilling) | 15 Nm |
| Torque Setting | 22 positions |
| Drilling Capacity in Wood | 20 mm |
| Drilling Capacity in Steel | 8 mm |
| Chuck | Hexagonal 6.35 mm + Keyless 10 mm removable |
| Weight | 1.2 kg |
| Sound Pressure Level | 80.9 dB(A) |
| Sound Power Level | 91.9 dB(A) |
| Vibration Value | 3.74 m/s² |
| Battery Type | Li-ion 1.3 Ah |
| Charging Time | 3 to 5 hours |
| Lighting | Integrated LED (capacity indicator) |
| Functions | Screwdriving, drilling, hammer |
| Protection | Overload, temperature, deep discharge |
| Maintenance | Clean with a dry cloth |
Frequently Asked Questions - WX283.9 WORX
User questions about WX283.9 WORX
0 question about this device. Answer the ones you know or ask your own.
Ask a new question about this device
Download the instructions for your Drill in PDF format for free! Find your manual WX283.9 - WORX and take your electronic device back in hand. On this page are published all the documents necessary for the use of your device. WX283.9 by WORX.
USER MANUAL WX283.9 WORX
natural_image
Line drawing of a WORX electric drill (no text or symbols on the diagram itself)| 3 in1 drill/driver/impact driver EN | P06 |
| 12 Volt Lithium-lonen-3-in-1-Schlagschrauber D | P14 |
| Moteur d'entraînement à impact 3 en 1 fonctionnant sur batteries12V li-lon F | P22 |
| Avvitatore ad impulso 3 in 1, da 12V con batteria agli ioni di litio I | P30 |
| Atornillador de impacto 3-en-1 de iones de litio de 12V ES | P38 |
| Aparafusadora de impacto 3-em-1 com bateria de iões de lítio de 12V PT | P46 |
| 3-in-1-slagschroevendraaier op 12V Li-lon-batterij NL | P54 |
| 12V lithium-lon 3-i-1 hammer/skruetrækker DK | P62 |
| 12V li-loni 3 1:ssä iskumeisseli FIN | P70 |
| 12V li-lon 3-i-1 slagtrekker NOR | P78 |
| 12V li-jon 3-i-1 sammansatt medbringare SV | P86 |
| 12V li-lon 3’ü 1 arada darbeli tornavida TR | P94 |
| Кроустико брапао 3-σε-1 με μπαταρία ιόντων λιθίου 12V GR | P102 |
| Ударная дрель «3 в 1» с 12-В литий-ионным аккумулятором RU | P110 |
| Original instructions EN | |
| Originalbetriebsanleitung | |
| Notice originale F | |
| Istruzioni originali | I |
| Manual original ES | |
| Manual original PT | |
| Oorspronkelijke gebruiksaanwijzing NL | |
| Original brugsanvisning DK | |
| Alkuperäiset ohjeet FIN | |
| Original driftsinstruks NOR | |
| Bruksanvisning i original SV | |
| Orijinal isletme talimatı TR | |
| Прωτότυπο οδηγιών χρήσης GR | |
| Оригинальное руководст-во по эксплуатации RU | |

natural_image
Completely dark image with no visible content, text, or symbols.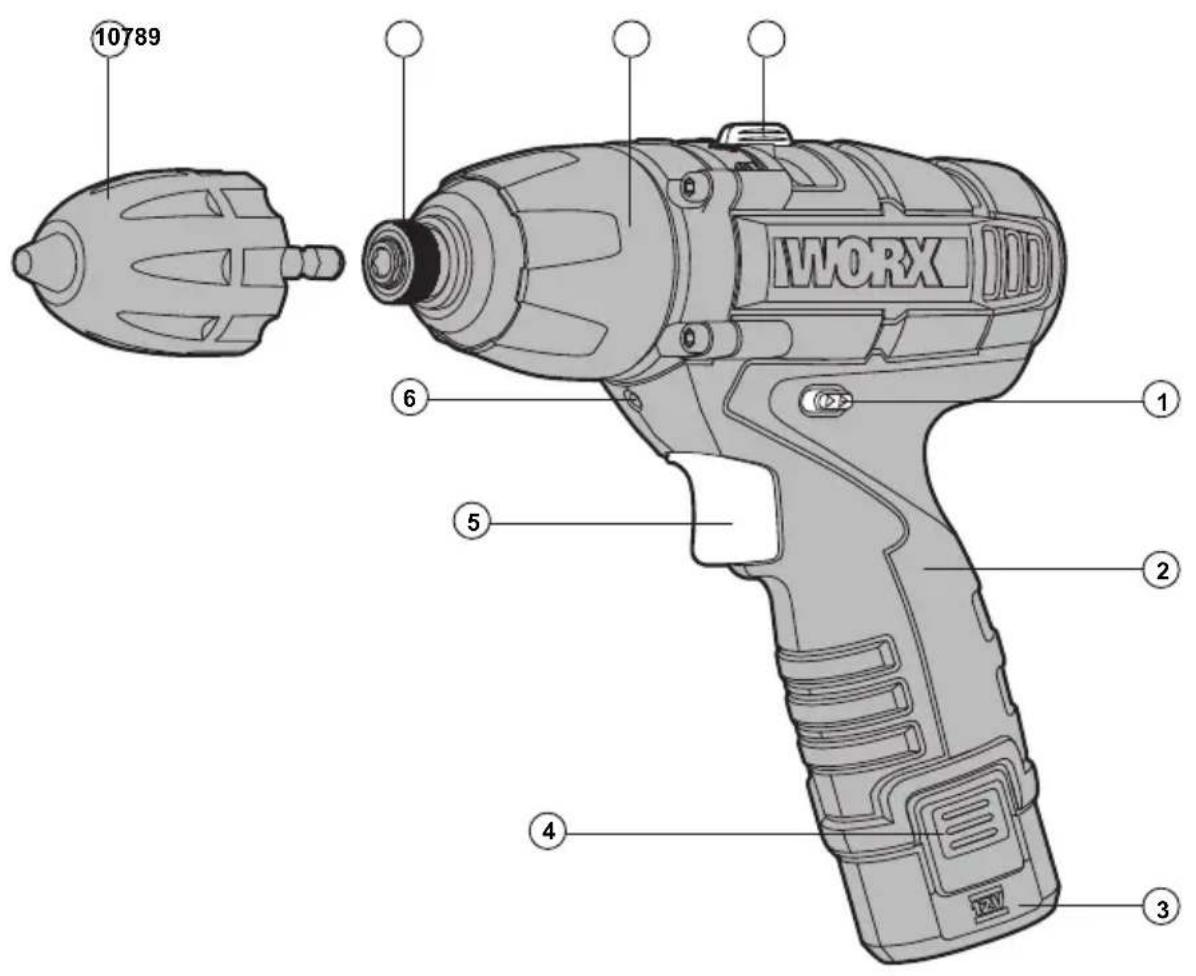

natural_image
Illustration of a WORX electric drill with a mechanical component, showing no text or symbols on the device itself.A
B
C
natural_image
Illustration of a WORX electric drill with blade blades (no text or symbols)D
natural_image
Top-down schematic of a vehicle or vehicle interior with no visible text, numbers, or symbolsE1
natural_image
Technical line drawing of a mechanical component with no visible text or symbolsE2
natural_image
Top-down line drawing of a cabinet or storage unit with three cylindrical components and a door (no text or symbols)E3
F
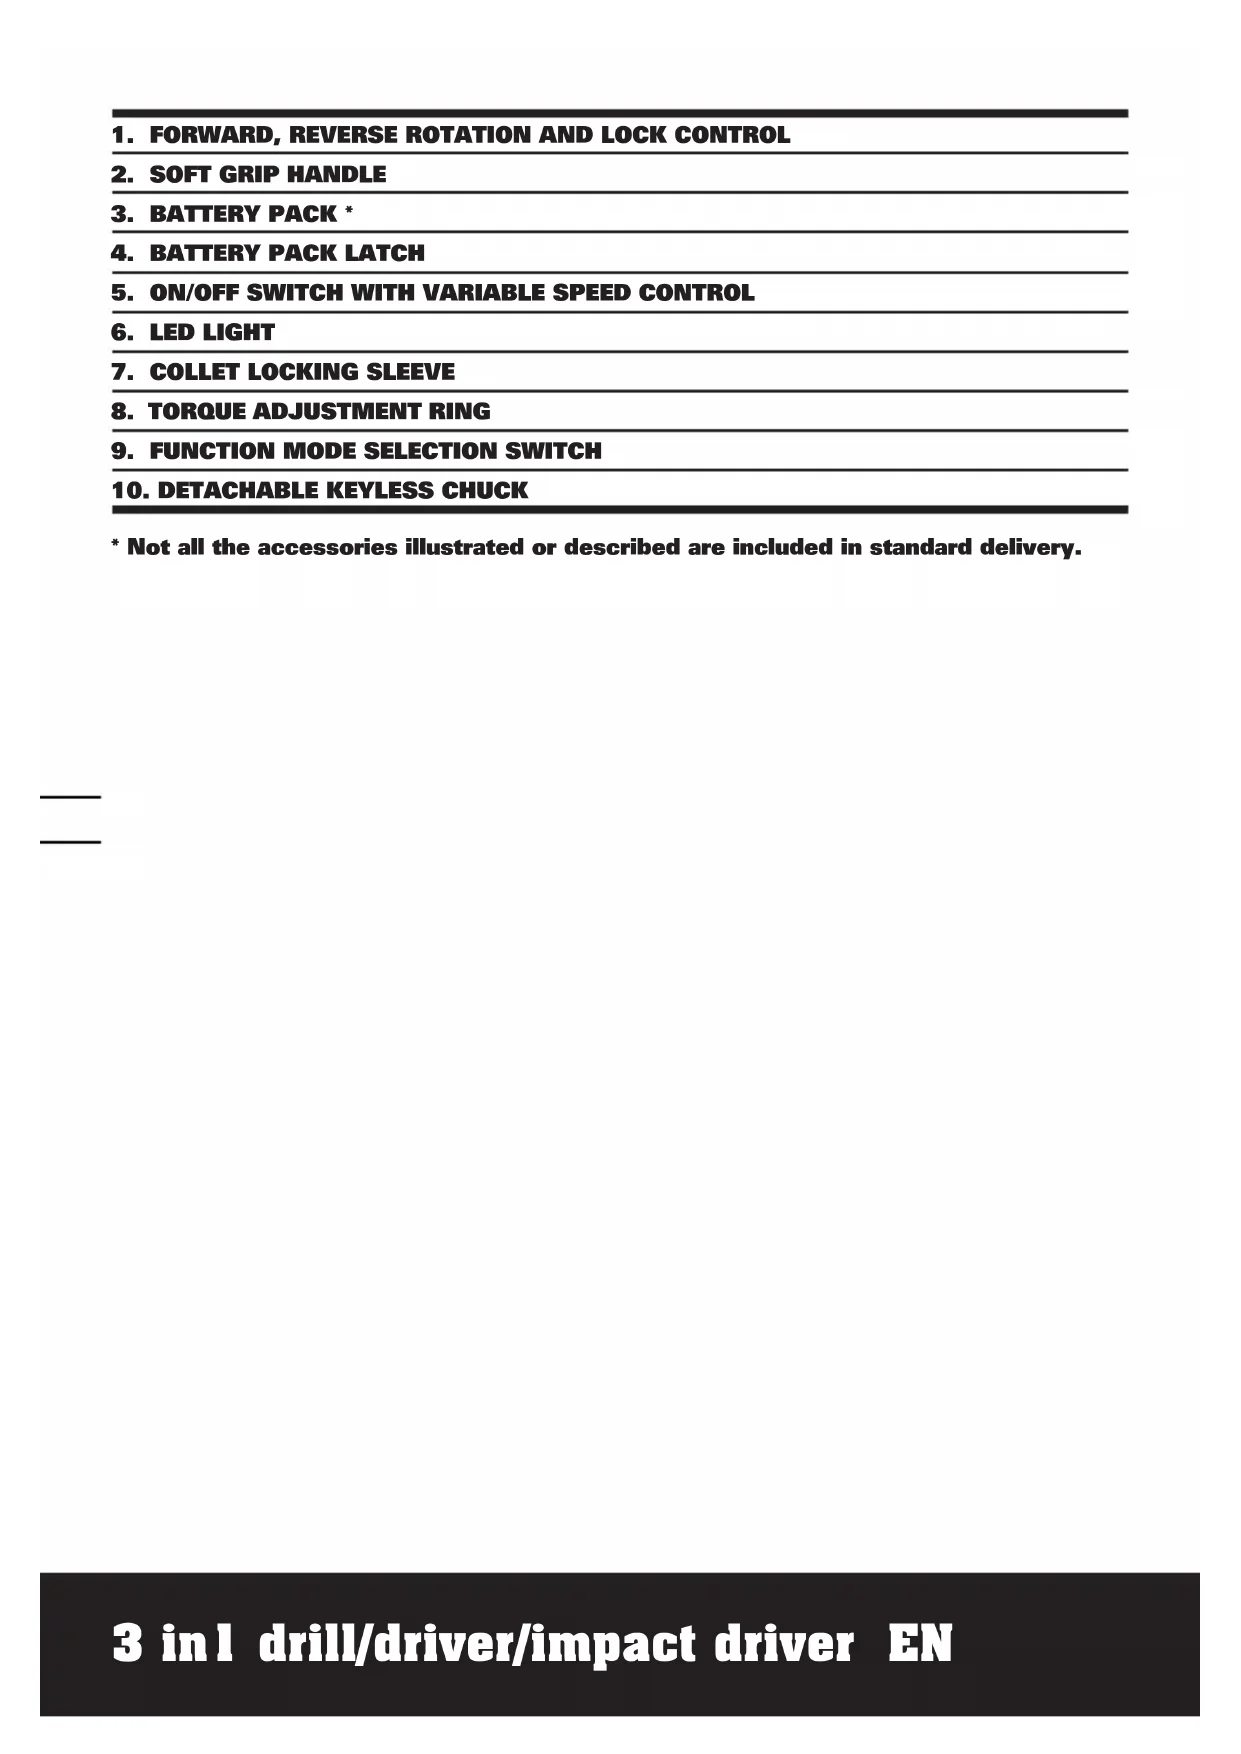
- FORWARD, REVERSE ROTATION AND LOCK CONTROL
- SOFT GRIP HANDLE
- BATTERY PACK *
- BATTERY PACK LATCH
- ON/OFF SWITCH WITH VARIABLE SPEED CONTROL
- LED LIGHT
- COLLET LOCKING SLEEVE
- TORQUE ADJUSTMENT RING
- FUNCTION MODE SELECTION SWITCH
- DETACHABLE KEYLESS CHUCK
TECHNICAL DATA
Type WX283 WX283.3 WX283.9 (280\~289-designation of machinery, representative of Cordless Impact Driver)
| Voltage 12V | |
| No load speed | Screwdriver mode 0-600/min |
| Drill mode (Lo-Hi) 0-600/ 0-2200/min | |
| Impact driver mode 0-2200/min | |
| Impact rate 0-3000 /min | |
| Max torque | Impact driver mode 100 N.m |
| Drill mode 15 N.m | |
| Torque setting 22 | |
| Drilling capacity | Wood 20mm |
| Steel 8mm | |
| Chuck type | 6.35 mm (1/4") hex |
| Machine weight | 1.2kg |
NOISE INFORMATION
| A weighted sound pressure | L_pA :80.9dB(A) |
| A weighted sound power | L_wA :91.9dB(A) |
| K_pA & K_wA | 3.0dB(A) |
| Wear ear protection when sound pressure is over | 80dB(A) |
VIBRATION INFORMATION
| Vibration total values (triax vector sum) determined according to EN 60745: | |
| Typical weighted vibration | Vibration emission value a_h = 3.74m/s^2 |
| Uncertainty K = 1.5m/s^2 | |

WARNING: The vibration emission value during actual use of the power tool can differ
from the declared value depending on the ways in which the tool is used dependant on the
following examples and other variations on how the tool is used:
How the tool is used and the materials being cut or drilled.
The tool being in good condition and well maintained
Always use the correct accessories for the tool and ensure they are sharp and in good condition.
And the tool is being used as intended by its design and these instructions.
This tool may cause hand-arm vibration syndrome if it is not managed correctly.
3 in 1 drill/driver/impact driver EN

WARNING: To be accurate, an estimation of exposure level in the actual conditions of use
should also take account of all parts of the operating cycle such as the times when the tool
is switched off and when it is running idle but not actually doing the job. This may significantly reduce the exposure level over the total working period.
Helping to minimise your vibration exposure risk.
Always use sharp chisels, drills and blades.
Maintain this tool in accordance with these instructions and keep well lubricated (where appropriate).
If the tool is to be used regularly then invest in anti vibration accessories.
Avoid using tools in temperatures of 10^0 C or less.
Plan your work schedule to spread any high vibration tool use across a number of days.
ACCESSORIES
| WX283 WX283.3 WX283.9 | |||
| 1.3Ah lithium battery pack | 1 1 / | ||
| Charger | 3-5hr 30min / | ||
| 2" Driver bits | 2 2 2 | ||
| Hex shank drill bits | 2 2 2 | ||
| 10mm detachable keyless chuck | 1 1 1 | ||
We recommend that you purchase your accessories from the same store that sold you the tool. Use good quality accessories marked with a well-known brand name. Choose the type according to the work you intend to undertake. Refer to the accessory packaging for further details. Store personnel can assist you and offer advice.
ADDITIONAL SAFETY RULES FOR YOUR CORDLESS IMPACT DRIVER
-
Remove the battery pack from the impact wrench before carrying out adjustments.
-
Do not expose to rain or water.
-
Do not store the battery pack in temperatures over 40^ C.
-
Always charge the battery pack between temperatures 0^ C to 30^ C. Ideal charging temperature is 18^ C to 24^ C.
-
Only use the charger and the battery pack provided no others.
-
Avoid short circuit of the battery pack connections (screws & nails).
-
Do not incinerate or burn the battery pack, it may explode.
-
Do not charge a damaged battery pack.
-
Replace any damaged supply cords on your charger.
-
Always disconnect the charger power supply before making or breaking the connections to the battery pack.
-
Battery pack and charger will be warm during charging, this is normal.
-
When not in use, remove a charged battery pack from the charger.
-
Always remove the battery pack from the charger immediately after re-charging is completed.
-
Your impact wrench and battery pack will be warm when working, this is normal.
-
Do not dispose of batteries in fire, or with household waste. Return exhausted batteries to your local collection or recycling point.
-
Wear ear protection when operating cordless impact wrench. Exposure to noise can cause hearing loss.
-
Accessories and metal parts can become very hot.
-
Hold power tool by insulated gripping surfaces, when performing an operation where the fastener may contact hidden wiring. Fasteners contacting a "live" wire may make exposed metal parts of the power tool "live" and could give the operator an electric shock.
WARNING: If a small amount of electrolyte should leak from the battery pack under extremes of temperature or after heavy use, then wash off immediately from your skin and hands using clean water. For eye contact, rinse thoroughly with clean water and seek medical treatment immediately.

Warnings for the charger:
-
Before using the tool, read the instruction book carefully.
-
Charger is for indoor use only. Do not expose to rain or water.
-
Do not charge non-rechargeable batteries.
SYMBOLS OPERATING INSTRUCTIONS

To reduce the risk of injury, user must read instruction manual

Warning

Wear eye protection

Wear ear protection

Wear dust mask

Indoor use only

Do not expose to rain or water

Do not burn
Do not dispose of batteries. Return exhausted batteries to your local collection or recycling point

Li

Always charge the battery pack between temperatures 0°C to 30°C

NOTE: Before using the tool, read the instruction book carefully.
INTENDED USE
The machine is intended for driving in and loosening screws as well as for drilling in wood, metal and plastic.
The battery charger supplied is matched to the Li-Ion battery installed in the machine. Do not use another battery charger.
The Li-lon battery is protected against deep discharging. When the battery is empty, the machine is switched off by means of a protective circuit: The chuck no longer rotates. In a warm environment or after heavy use, the battery pack may become too hot to permit charging. Allow time for the battery to cool down before recharging.
When the battery is charged for the first time and after prolonged storage, the battery will only accept approximately 60% charge. However, after several charge and discharge cycles the battery will accept a 100% charge.
B) TO REMOVE OR INSTALL BATTERY PACK (See Fig. A)
Depress the battery pack release button to release and slide the battery pack out from your tool. After recharge, slide it back into your tool. A simple push and slight pressure will be sufficient.
OPERATION
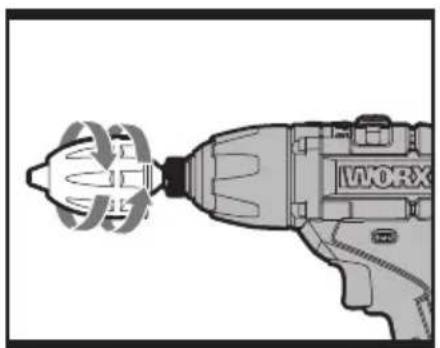
1. INSTALLING OR REMOVING A DRIVER BIT, DRILL BIT OR DETACHABLE KEYLESS CHUCK (See Fig. B)
To install the desired bit or the detachable keyless chuck, pull the collet locking sleeve (7) forward and insert the desired bit or hex shank of the detachable keyless chuck into the sleeve as far as it will go. Then release the collet locking sleeve to secure the bit or the chuck. To remove the bit or the chuck, pull the collet locking sleeve (7) forward and take the tool out firmly.
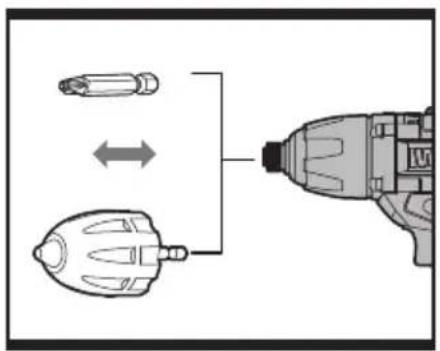
2. ON / OFF SWITCH (See Fig. C)
Depress the On/Off switch (5) to start and release it to stop your tool. The on/off switch is fitted with a brake function which stops your chuck immediately when you quickly release the switch.
It is also a variable speed switch that delivers higher speed and torque with increased trigger pressure. Speed is controlled by the amount of switch trigger depression.
WARNING: Do not operate for long periods at low speed because excess heat will be produced internally.
3. SWITCH LOCK
The switch trigger can be locked in the OFF position. This helps to reduce the possibility of accidental starting when not in use. To lock the switch trigger, place the rotation control in the center position.
4. REVERSIBLE (See Fig. C)
For drilling and screw driving use forward rotation marked “◀(lever is moved to the left). Only use reverse rotation marked “▶(lever is moved to the right) to remove screws or release a jammed drill bit.
WARNING: Never change the direction of rotation when the chuck is rotating, wait until it has stopped!
5. CHUCK ADJUSTMENT (See Fig. D)
Detachable chuck is suggested for using in the drill mode.
To open the chuck jaws, firmly hold the rear sleeve of the chuck, and then rotate the front sleeve. Insert the drill bit between the chuck jaws and rotate the front sleeve in the opposite direction. Ensure the drill bit is in the center of the chuck jaws. Finally, hold the rear sleeve of the chuck and firmly rotate the front sleeve in the opposite directions. Your drill bit is now clamped in the chuck.
6. USING THE LED LIGHT
To turn on the light simply press the on/off switch. When you release the on/off switch, the light will be off.
LED lighting increases visibility-great for dark or enclosed area. LED is also a battery capacity indicator. It will flash when power gets low.
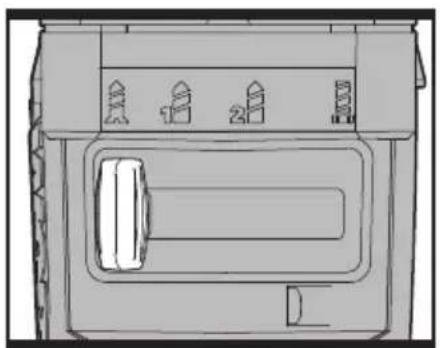
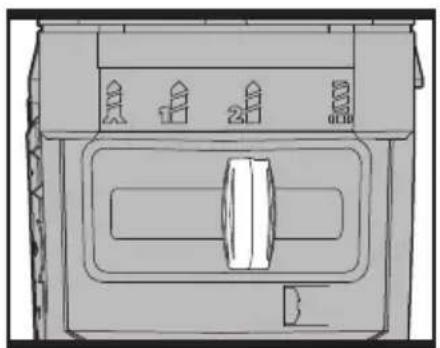
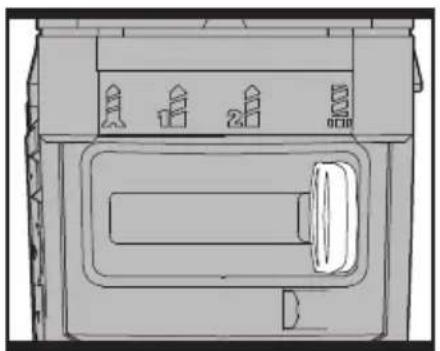
7. FUNCTION MODE SELECTION
The operation of the tool for each application is set with the function mode selection switch (9). To change between functions, slide the function mode selection switch (9) to the desired operating mode as follows:
| Screwdriver mode (See Fig. E1) | |
| Drill driver mode (See Fig. E2) | |
| Impact driver mode (See Fig. E3) |
WARNING: When using the function mode selection switch, use only when the tool stops. But when the switch does not easily move, depress the On/off switch slightly to rotate the spindle and then move the function mode selection switch.
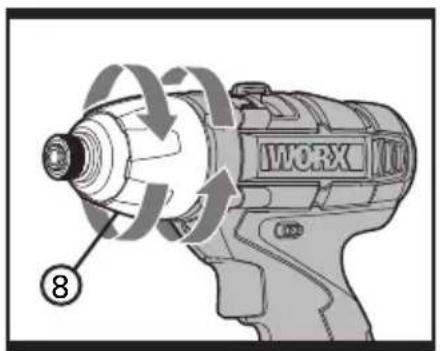
Slide the function mode selection switch (9) to mark "A". Adjust the adjusting ring (8) to the proper torque level for your work.
The torque is adjusted by rotating the torque adjustment ring (See Fig. F). The torque is greater when the torque adjustment ring is set on a higher setting. The torque is less when the torque adjustment ring is set on a lower setting.
Make the setting as follows:
| 1 - 4 For driving small screws | |
| 5 - 9 | For driving screws into soft material |
| 10 - 14 | For driving screws into soft and hard material |
| 15 - 19 | For driving screws into hard wood |
| 20 - 22 | For driving larger screws |
DRILLING OPERATION
Slide the function mode selection switch (9) to mark
“” “” The adjusting ring can be aligned in any torque levels for this operation. The drill has a two-speed gear control designed for drilling or driving at LO (mark is #or HI (mark is ) speed (See Fig. E2). When using the drill in the LO speed range, the speed will decrease and the drill will have greater power and torque. When using the drill in the HI speed range, the speed will increase and the drill will have less power and torque.
WARNING: To prevent gear damage, always allow the chuck to come to a complete stop before changing the direction of rotation or the two-speed gear control.
When drilling into a hard smooth surface, use a center punch to mark the desired hole location. This will prevent the drill bit from slipping off center as the hole is started. Hold the tool firmly and place the tip of the bit at the point to be drilled. Depress the switch trigger to start the tool. Move the drill bit into the workpiece, applying only enough pressure to keep the bit cutting. Do not force or apply side pressure to elongate a hole.
Tungsten carbide drill bits should always be used for concrete and masonry. When drilling in metal, only use HSS drill bits in good condition. Always use a magnetic bit holder (not included) when using short screwdriver bits. When screw-driving, apply a small quantity of liquid soap or similar to the screw threads to ease insertion.
Slide the function mode selection switch (9) to mark "
The adjusting ring can be aligned in any torque levels for this operation.
8. DISPOSAL OF AN EXHAUSTED BATTERY PACK

To preserve natural resources, please recycle or dispose of the battery pack properly. This battery pack contains
Lithium batteries. Consult your local waste
authority for information regarding available recycling and/or disposal options. Discharge your battery pack by operating your tool, then remove the battery pack from the tool housing and cover the battery pack connections with heavy-duty adhesive tape to prevent short circuit and energy discharge. Do not attempt to open or remove any of the components.
9. OVERLOAD PROTECTION
When overloaded, the motor comes to a stop. Relieve the load on the machine immediately and allow cooling for approx. 30 seconds at the highest no-load speed.
10. TEMPERATURE DEPENDENT OVERLOAD PROTECTION
When using as intended for the power tool cannot be subject to overload. When the load is too high or the allowable battery temperature of 75^ C is exceeded, the electronic control switches off the power tool until the temperature is in the optimum temperature range again.
11. PROTECTION AGAINST DEEP DISCHARGING
The Li-lon battery is protected against deep discharging by the “Discharging Protection System”. When the battery is empty, the machine is switched off by means of a protective circuit: The inserted tool no longer rotates.
MAINTENANCE
Your power tool requires no additional lubrication or maintenance.
There are no user serviceable parts in your power tool. Never use water or chemical cleaners to clean your power tool. Wipe clean with a dry cloth. Always store your power tool in a dry place. Keep the motor ventilation slots clean. Keep all working controls free of dust. Occasionally you may see sparks through the ventilation slots. This is normal and will not damage your power tool.
3 in 1 drill/driver/impact driver EN
ENVIRONMENTAL PROTECTION

Waste electrical products must not be disposed of with household waste. Please recycle where facilities exist.
Check with your local authorities or retailer for recycling advice.
DECLARATION OF CONFORMITY
We,
POSITEC Germany GmbH
Declare that the product, Description
WORX 3 in1 drill/driver/impact driver Type WX283 WX283.3 WX283.9
(280\~289-designation of machinery, representative of Cordless Impact Driver)
Function Drilling, tightening and loosening screws, nuts with a rotary impact mechanism
Complies with the following Directives, Machinery Directive 2006/42/EC
Electromagnetic Compatibility Directive
2004/108/EC
RoHS Directive 2011/65/EU
Standards conform to
EN 55014-1
EN 55014-2
EN 60745-1
EN 60745-2-1
EN 60745-2-2
The person authorized to compile the technical file,
Name: Russell Nicholson
Address: Positec Power Tools (Europe) Ltd, PO Box 152, Leeds, LS10 9DS, UK


2012/12/07
Leo Yue
POSITEC Quality Manager
Name: Russell Nicholson
Anschrift: Positec Power Tools (Europe) Ltd, PO Box 152, Leeds, LS10 9DS, UK
$$ \text {leo.yue} $$

2012/12/07
Leo Yue
INFORMATIONS RELATIVES AU BRUIT
INFORMATIONS RELATIVES AUX VIBRATIONS
DÉCLARATION DE CONFORMITÉ
Nous,
POSITEC Germany GmbH
Directive RoHS 2011/65/EU
Ltd, PO Box 152, Leeds, LS10 9DS, UK


2012/12/07
Leo Yue
Codice WX283 WX283.3 WX283.9
Ltd, PO Box 152, Leeds, LS10 9DS, UK


2012/12/07
Leo Yue
EndereçoL Positec Power Tools (Europe) Ltd, PO Box 152, Leeds, LS10 9DS, UK


2012/12/07
Leo Yue
Gestor de Qualidade POSITEC
- KNOP VOOR LINKS OF RECHTS DRAAIEN EN VERGRENDELING
- HANDGREEP MET SOFT-GRIP
- ACCUPACK *
- PAL ACCUPACK
- AAN/UITSCHAKELAAR MET INSTELBAAR TOERENTAL
- WERKLAMPJE
- VERGRENDELINGSBUS SPANHULS
- KOPPELINSTELLINGEN
- FUNCTIEMODUS
- AFNEEMBARE, SLEUTELLOZE BOORHOUDER VAN 10mm
TECHNISCHE GEGEVENS
VOORDAT U HET APPARAAT IN BEDRIJ NEEMT
A) HET ACCUPACK OPLADEN

Type WX283 WX283.3 WX283.9
Type WX283 WX283.3 WX283.9
Ltd, PO Box 152, Leeds, LS10 9DS, UK


2012/12/07
Leo Yue
Chef for kvalitetskontrollen hos POSITEC
- SUUNTAVALITSIN
- SOFT GRIP -KAHVA
- AKKUPAKKAUS *
- AKKUPAKKAUKSEN SALPA
- VIRTAKYTKIN NOPEUDENSÄÄDÖLLÄ
- TYÖVALO
- LUKKOHOLKKI
- VETOKYTKIN
- TOIMINTAMUODON VALINTAKYTKIN
- IRROTETTAVA AVAIMETON ISTUKKA
TEKNISET TIEDOT
Tyyppi WX283 WX283.3 WX283.9
Ltd, PO Box 152, Leeds, LS10 9DS, UK


2012/12/07
Leo Yue
Type WX283 WX283.3 WX283.9
Ltd, PO Box 152, Leeds, LS10 9DS, UK


2012/12/07
Leo Yue
Typ WX283 WX283.3 WX283.9
Adress: Positec Power Tools (Europe)
Ltd, PO Box 152, Leeds, LS10 9DS, UK


2012/12/07
Leo Yue
Tipi WX283 WX283.3 WX283.9
Adress: Positec Power Tools (Europe)
Ltd, PO Box 152, Leeds, LS10 9DS, UK
leo.yue
CE
2012/12/07
Leo Yue
Τύπος WX283 WX283.3 WX283.9
(Europe) Ltd, PO Box 152, Leeds, LS10 9DS, UK


2012/12/07
Leo Yue
you've got the power
Copyright © 2013, Positec. All Rights Reserved.
2CDS81PPK11001A2