
WX540.9 - Saw WORX - Free user manual and instructions
Find the device manual for free WX540.9 WORX in PDF.
| Product Type | Combined multifunction saw (jigsaw and reciprocating saw) |
| Brand | WORX |
| Model | WX540.9 |
| Rated voltage | 12 V |
| No-load speed | 2200 min⁻¹ |
| Piston stroke | 16 mm |
| Wood cutting capacity | 50 mm |
| PVC cutting capacity | 45 mm |
| Steel cutting capacity | 4 mm |
| Weight | 1.2 kg |
| Sound pressure level | 72 dB(A) (K=3 dB) |
| Sound power level | 83 dB(A) (K=3 dB) |
| Vibration emission (metal) | 7.89 m/s² (K=1.5 m/s²) |
| Vibration emission (panel) | 9.67 m/s² (K=1.5 m/s²) |
| Vibration emission (wood beam) | 10.34 m/s² (K=1.5 m/s²) |
| Battery type | Lithium-ion |
| Charging time | 3 to 5 hours |
| Head rotation | 6 positions (0, 18, 36, 54, 72, 90°) |
| Blade holder | Tool-free (rotating ring) |
| Lighting | Integrated LED |
| Safety | Unlock switch, safety bar |
| Maintenance | Clean with a dry cloth; do not use water or chemicals |
| Included accessories | Charger, battery, blades (wood, metal, aluminum) |
| Spare parts | Blades, battery, charger |
Frequently Asked Questions - WX540.9 WORX
User questions about WX540.9 WORX
0 question about this device. Answer the ones you know or ask your own.
Ask a new question about this device
Download the instructions for your Saw in PDF format for free! Find your manual WX540.9 - WORX and take your electronic device back in hand. On this page are published all the documents necessary for the use of your device. WX540.9 by WORX.
USER MANUAL WX540.9 WORX
natural_image
Completely black image with no visible content, text, or symbols.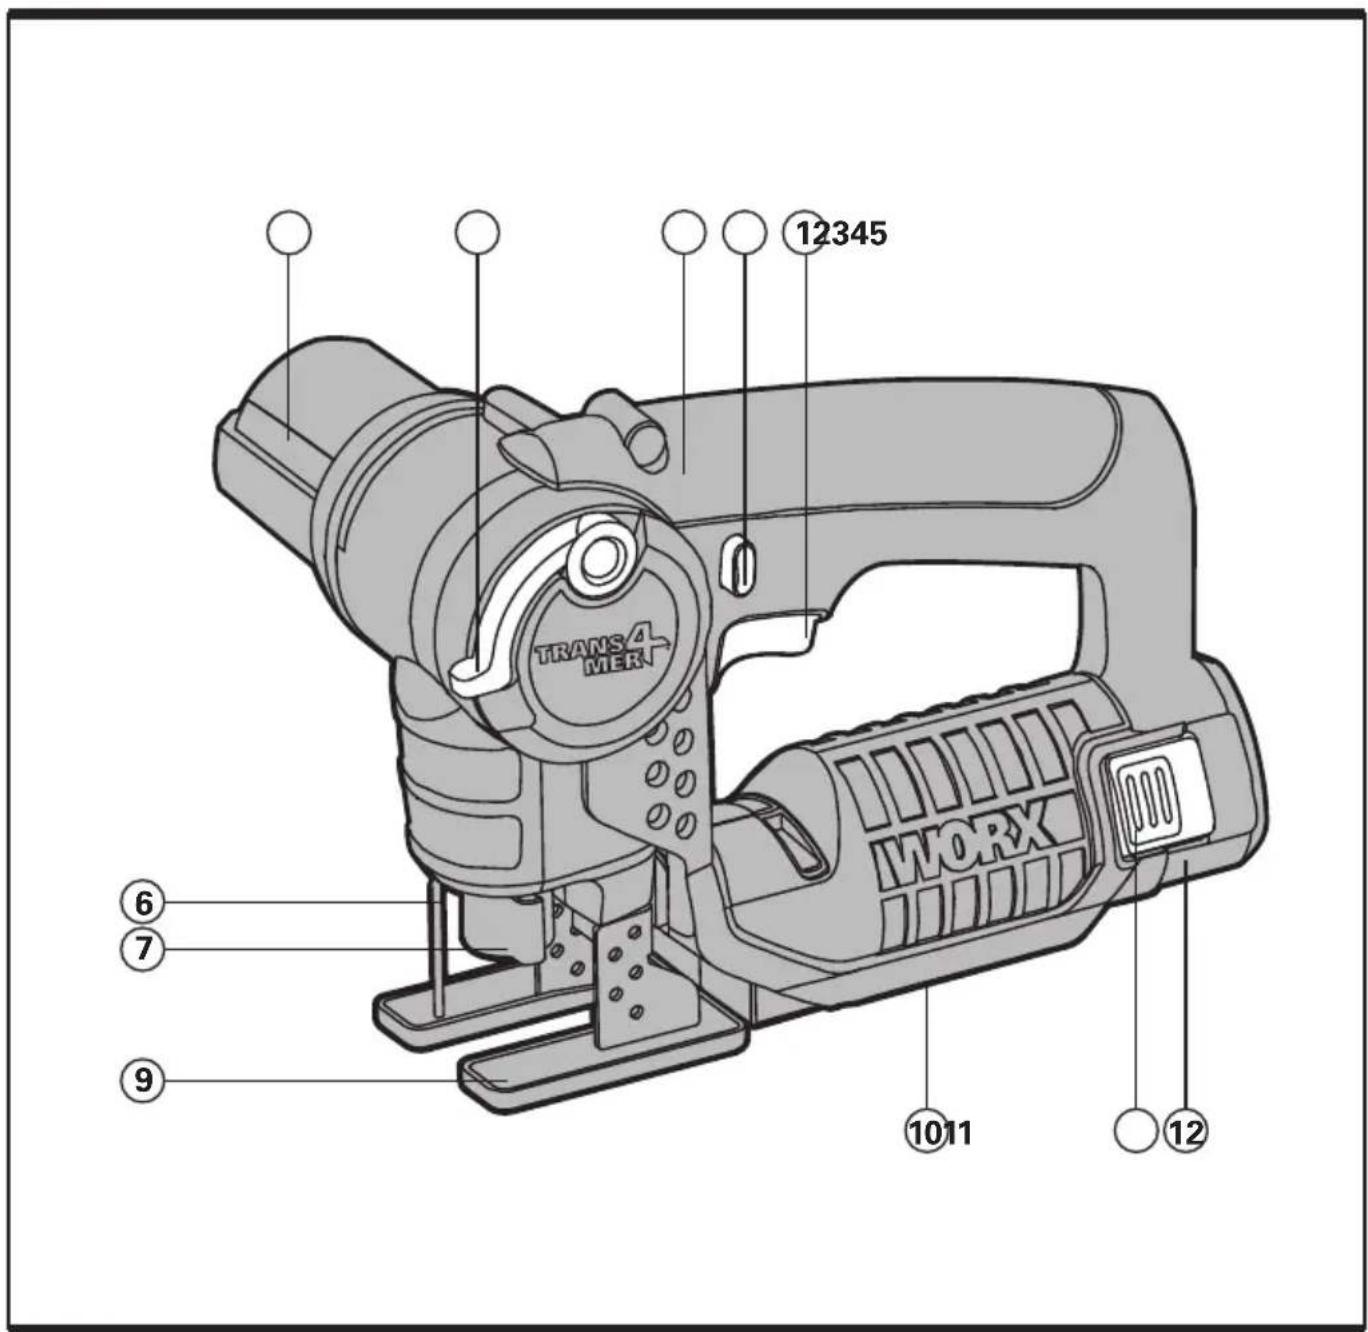
text_image
TRANS4 MERX 12345 6 7 9 1011 12 WORK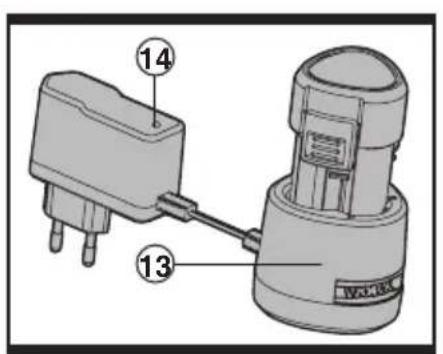
text_image
14 13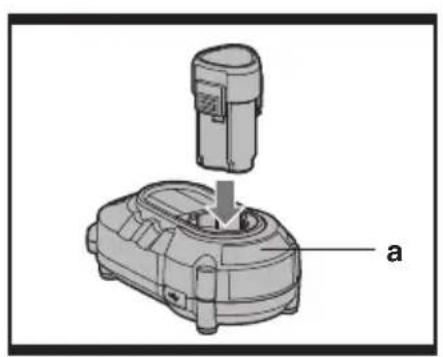
natural_image
Diagram of a mechanical device with a cylindrical component and a base housing, labeled 'a' (no text or symbols on the diagram itself)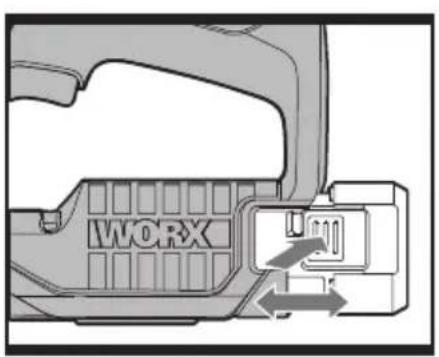
text_image
WORXA1A2B
natural_image
Illustration of a hand using a tool to adjust or install a mechanical component, showing a circular dial and handle (no text or symbols present)CDE1
text_image
Position VI 0-90° Position I广力云智慧零售收银系统
natural_image
Illustration of hands using a WORXC tool to adjust a mechanical component (no text or symbols visible)(No text)
text_image
Diagram showing hands operating a precision tool with a cross mark and labeled component 'MCPX'E2
natural_image
Illustration of hands operating a mechanical device with a cross symbol (no text or symbols present)E3
natural_image
Diagram of a saw blade with a labeled end (15), showing tooth profile and scale (no text or symbols beyond the number)F
text_image
Technical diagram of a mechanical device with labeled component 8 and directional arrow indicating rotation or movement.G1G2

natural_image
Illustration of hands fastening a small mechanical component with a tool (no text or symbols visible)
natural_image
Illustration of hands fastening a small mechanical component with a tool (no text or symbols visible)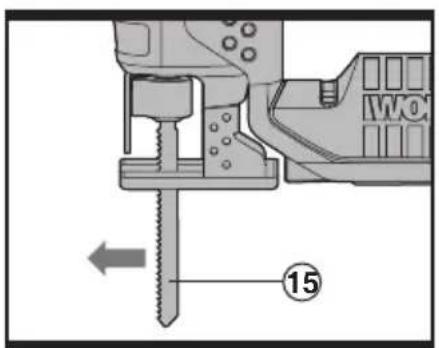
text_image
WO 15
text_image
WO 15
text_image
WO 15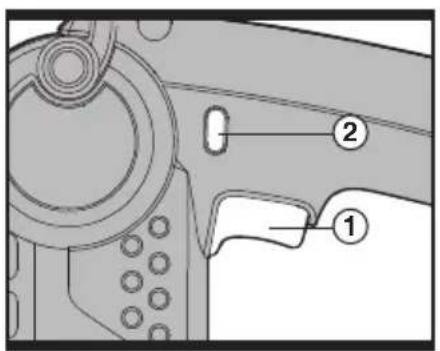
text_image
Technical diagram of a mechanical component with labeled parts 1 and 2I
H
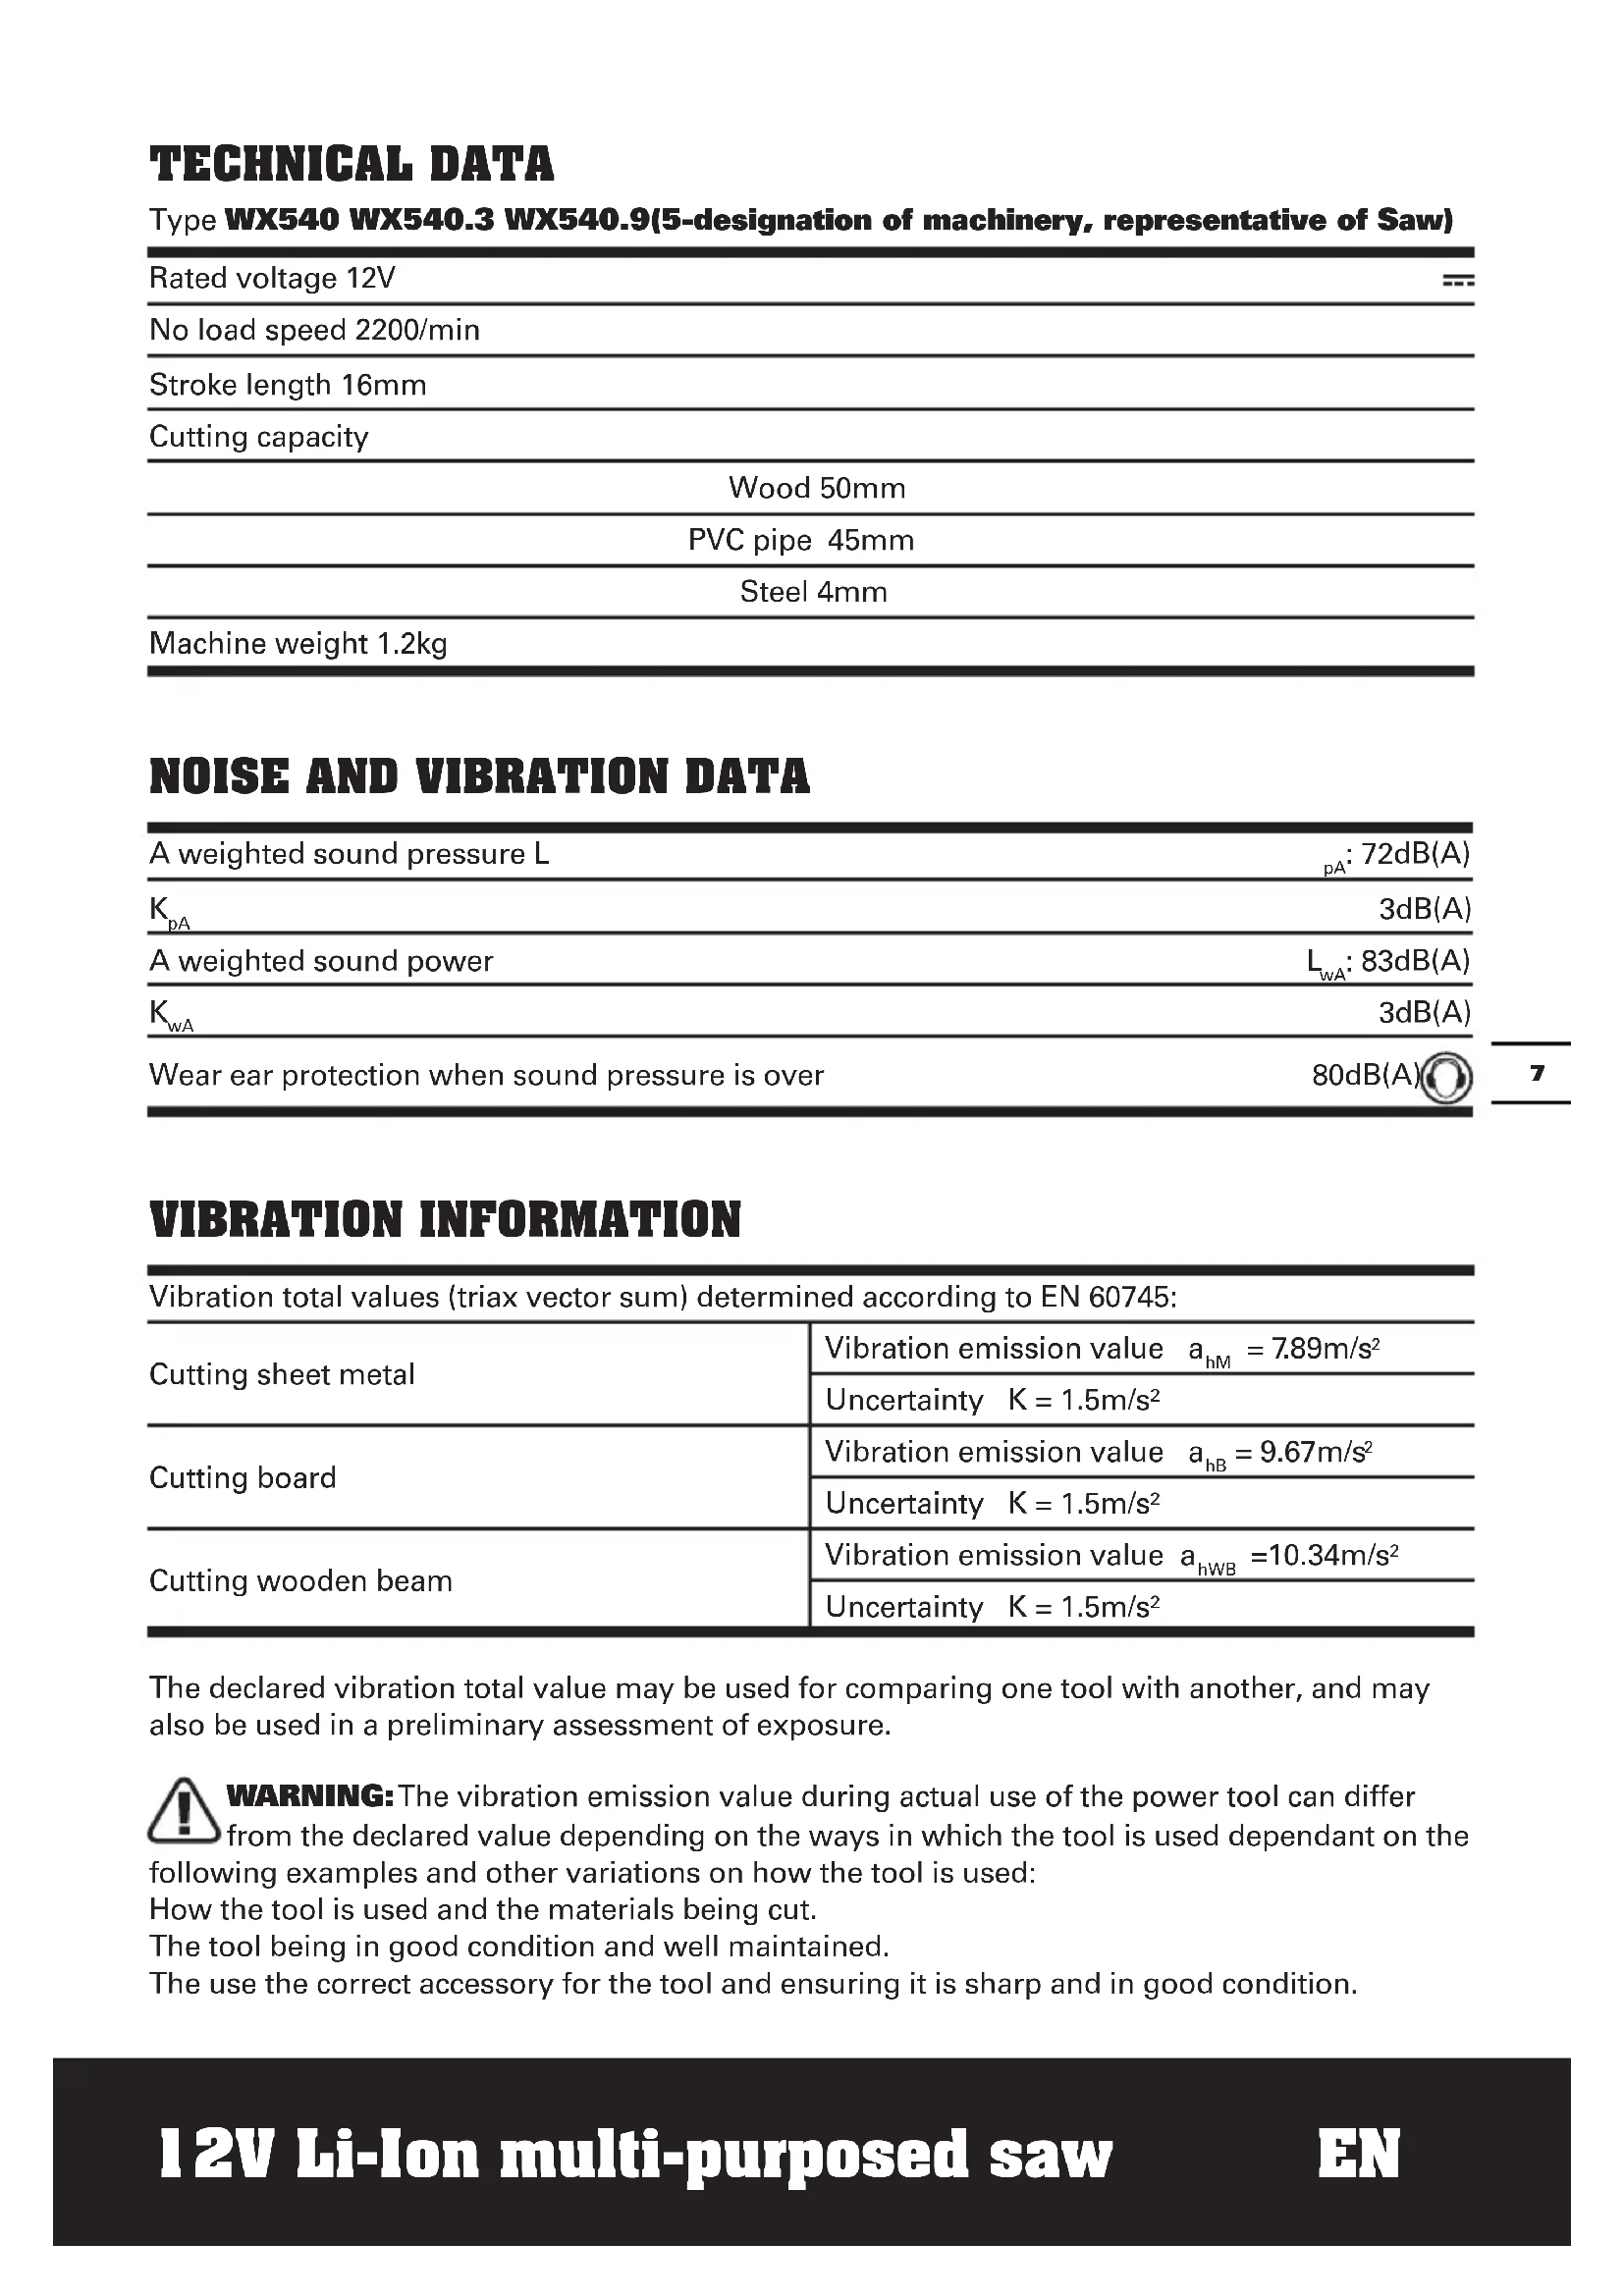
- ON/OFF SWITCH
- LOCK-OFF BUTTON
- HAND GRIP AREAS
- PIVOT RELEASE LEVER
- MOTOR COVER
- PROTECTION FINGER
- BLADE HOLDER
- LED WORK LIGHT (See Fig. G1)
- FOOT PLATE
- BASE PLATE
- BATTERY RELEASE BUTTON
- BATTERY PACK
- CHARGER (See Fig. A1)
- CHARGED INDICATOR LIGHT (See Fig. A1)
- BLADE (See Fig. F)
Not all the accessories illustrated or described are included in standard delivery.
TECHNICAL DATA
Type WX540 WX540.3 WX540.9(5-designation of machinery, representative of Saw)
| Rated voltage 12V | --- |
| No load speed 2200/min | |
| Stroke length 16mm | |
| Cutting capacity | |
| Wood 50mm | |
| PVC pipe 45mm | |
| Steel 4mm | |
| Machine weight 1.2kg | |
NOISE AND VIBRATION DATA
| A weighted sound pressure L | _pA : 72dB(A) |
| K_pA | 3dB(A) |
| A weighted sound power | L_wA : 83dB(A) |
| K_wA | 3dB(A) |
| Wear ear protection when sound pressure is over | 80dB(A) |
VIBRATION INFORMATION
| Vibration total values (triax vector sum) determined according to EN 60745: | |
| Cutting sheet metal | Vibration emission value a_hM = 7.89m/s^2 |
| Uncertainty K = 1.5m/s2 | |
| Cutting board | Vibration emission value a_hB = 9.67m/s^2 |
| Uncertainty K = 1.5m/s2 | |
| Cutting wooden beam | Vibration emission value a_hWB = 10.34m/s^2 |
| Uncertainty K = 1.5m/s2 | |
The declared vibration total value may be used for comparing one tool with another, and may also be used in a preliminary assessment of exposure.

WARNING: The vibration emission value during actual use of the power tool can differ
from the declared value depending on the ways in which the tool is used dependant on the
following examples and other variations on how the tool is used:
How the tool is used and the materials being cut.
The tool being in good condition and well maintained.
The use the correct accessory for the tool and ensuring it is sharp and in good condition.
The tightness of the grip on the handles and if any anti vibration accessories are used. And the tool is being used as intended by its design and these instructions.
This tool may cause hand-arm vibration syndrome if its use is not adequately managed.

WARNING: To be accurate, an estimation of exposure level in the actual conditions of use should also take account of all parts of the operating cycle such as the times when the tool is switched off and when it is running idle but not actually doing the job. This may significantly reduce the exposure level over the total working period.
Helping to minimise your vibration exposure risk.
ALWAYS use sharp chisels, drills and blades
Maintain this tool in accordance with these instructions and keep well lubricated (where appropriate).
If the tool is to be used regularly then invest in anti vibration accessories.
Avoid using tools in temperatures of 10^ C or less.
Plan your work schedule to spread any high vibration tool use across a number of days.
ACCESSORIES
| WX540 WX540.3 WX540.9 | ||
| Charger | 3-5h 30min / | |
| Battery pack | 1 1 / | |
| Metal cutting blade | 1 1 1 | |
| Wood cutting blade | 1 1 1 | |
| Aluminum cutting blade | 1 1 1 |
You can only use the blade type shown in Fig F. Don't use other blade types.
We recommend that you purchase your accessories from the same store that sold you the tool. Use good quality accessories marked with a well-known brand name. Choose the type according to the work you intend to undertake. Refer to the accessory packaging for further details. Store personnel can assist you and offer advice.
ADDITIONAL SAFETY RULES FOR YOUR TOOL
- Always wear a dust mask.
- Hold power tool by insulated gripping surfaces, when performing an operation where the cutting accessory may contact hidden wiring. Cutting accessory contacting a "live" wire may make exposed metal parts of the power tool "live" and could give the operator an electric shock.
SAFETY WARNINGS FOR BATTERY PACK
a) Do not dismantle, open or shred cells or battery pack.
b) Do not short-circuit a battery pack. Do not store battery packs haphazardly in a box or drawer where they may short-circuit each other or be short-circuited by conductive materials. When battery pack is not in use, keep it away from other metal objects, like paper clips, coins, keys, nails, screws or other small metal objects, that can make a connection from one terminal to another. Shorting the battery terminals together may cause burns or a fire.
c) Do not expose battery pack to heat or fire. Avoid storage in direct sunlight.
d) Do not subject battery pack to mechanical shock.
e) In the event of battery leaking, do not allow the liquid to come into contact with the skin or eyes. If contact has been made, wash the affected area with copious amounts of water and seek medical advice.
f) Seek medical advice immediately if a cell or battery pack has been swallowed.
g) Keep battery pack clean and dry.
h) Wipe the battery pack terminals with a clean dry cloth if they become dirty.
i) Battery pack needs to be charged before use. Always refer to this instruction and use the correct charging procedure.
j) Do not maintain battery pack on charge when not in use.
k) After extended periods of storage, it may be necessary to charge and discharge the battery pack several times to obtain maximum performance.
I) Battery pack gives its best performance when it is operated at normal room temperature (20°C ± 5°C).
m) When disposing of battery packs, keep battery packs of different electrochemical systems separate from each other.
n) Recharge only with the charger specified by WORX. Do not use any charger other than that specifically provided for use with the equipment.
A charger that is suitable for one type of battery pack may create a risk of fire when used with another battery pack.
o) Do not use any battery pack which is not designed for use with the equipment.
p) Keep battery pack out of the reach of children.
q) Retain the original product literature for future reference.
r) Remove the battery from the equipment when not in use.
s) Dispose of properly.
SYMBOLS OPERATING INSTRUCTIONS

To reduce the risk of injury, user must read instruction manual

Warning

Wear ear protection

Wear eye protection

Wear dust mask

Do not expose to rain or water

Do not burn
Do not dispose of batteries, Return exhausted batteries to your local collection or recycling point
This product has been marked with a symbol relating to removing electric and electronic waste. This means that this product shall not be discarded with household waste but that it shall be returned to a collection system which conforms to the European Directive 2002/96/CE. It will then be recycled or dismantled in order to reduce the impact on the environment. Electric and electronic equipment can be hazardous for the environment and for human health since they contain hazardous substances.

NOTE: Before using the tool, read the instruction book carefully.
INTENDED USE
The machine is 2 saws in 1 tool with rep saw and jig saw function, intended for sawing wood, plastic, metal and building materials while resting firmly on the workpiece. It is suitable for straight and curved cuts.
CHARGING PROCEDURE
1. CHaRGING yOUR baTTERy PaCK

waRNING!
The charger and battery pack are specifically designed to work together so do not attempt to use any other devices. Never insert or allow metallic objects into your charger or battery pack connections because an electrical failure and hazard will occur.
2. bBEFORE USING yOUR CORDLESS TOOL
Your battery pack is UNCHARGED and you must charge once before use. When you charge the new battery or one which has not been used for long periods of time, it may not reach full charge until after you have discharged it fully in use and recharged it several times.
3.1. H0w TO CHARGE yOUR batterY PaCK (wX540 wX540.9) (See Fig. a1)
Connect the battery charger (13) to the power supply and the green light (14) will illuminate. Slide the battery pack (12) into the charger base to make the connections. And the red light (14) will illuminate to show charging has started.
After charging approx 3-5hours, the red light will switch to green, which means the battery is full, and charging is completed.
3.2. CHaRGING PROCEDURE (wX540.3) (See Fig. a2)
1) Plug the charger into an appropriate outlet. The light (a) will be green.
2) Insert the battery pack into the charger, the
light will be red to indicate the charging process has started.
3) On completion of charge, the light will turn to be green. The pack is now fully charged, unplug the charger and remove the battery pack.
4. TO REMOVE OR INSTALL BATTERY PACK (See Fig. B)
Locate the battery release buttons (11) on side of battery pack and depress both sides to release the battery pack from your tool. Remove the battery pack from your tool. After it has recharged insert the battery pack into the battery port. A simple push and slight pressure will be sufficient.
ADJUSTMENT
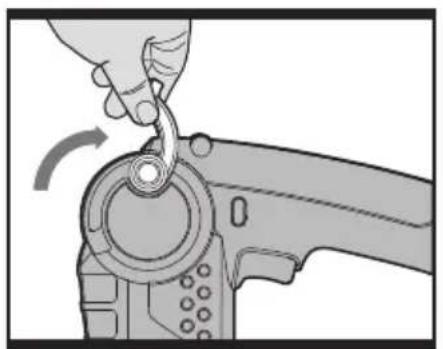
Function of this tool is the combination of a jigsaw and a reciprocating saw, which is realized by operating the pivot release lever (4).
Lift up the pivot release lever to full until it cannot be lifted. (See Fig. C)
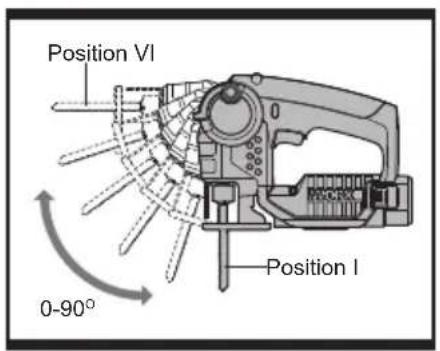
Rotate the front portion of the tool into any of the SIX positions (0, 18, 36, 54, 72 and 90deg) (See Fig. D). Restore the pivot release lever. In Position I, this tool can be worked as a jigsaw.
In Position VI, this tool can be worked as a reciprocating saw.

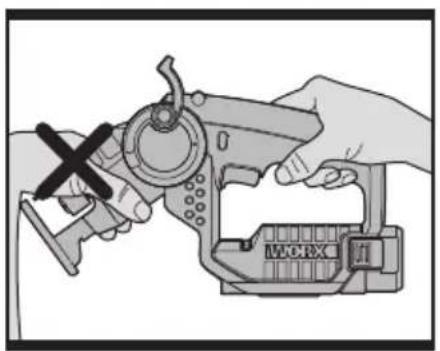
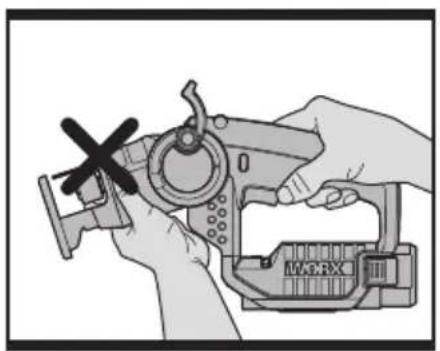
WARNING!
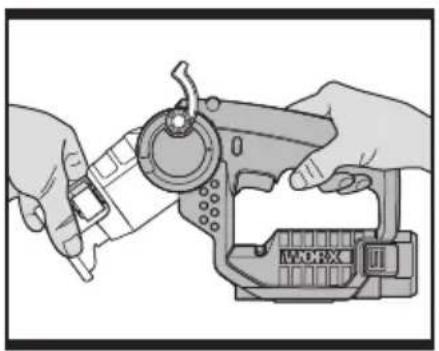
When adjusting the tool, you can only hold the foot plate (9) as shown in Fig.E1. Never hold the pivot head as shown in Fig. E2, E3.

WARNING!
- To avoid being pinched, keep hands away from the hinge when changing positions.
- To avoid tool being turned on accidentally, make sure keep your hands away from the lock-off button.
REPLACING / INSERTING THE SAW BLADE
Before any work on the machine itself,
remove the battery.
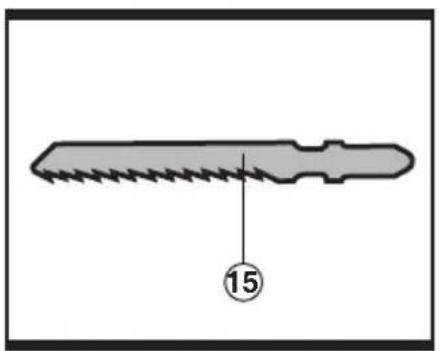
The blade (15) should extend past the foot plate and the thickness of the workpiece during the cut. Select the blade best suitable for the material to be cut and use the shortest blade suited for the thickness of the material.

WARNING! Cut hazard. Blade breakage may occur if the blade does not extend past the foot plate and the workpiece during the cut. Increased risk of personal injury, as well as damage to the foot plate and workpiece may result.
CAUTION: Keep your hands away from the lock-off button to prevent switch actuation before making any adjustments or removing or installing attachments or accessories.
— INSERTING THE SAW BLADE (See Fig. F-H)
Wear protective gloves when assembling the saw blade. Contact with the saw blade can lead to injuries. You can only use the blade type shown in Fig F.
The machine is equipped with a tool-free blade holder (7). This makes possible easy and quick changing of the saw blade without any additional tools.
Rotate the ring counterclockwise and hold in position. Fully insert the blade into the blade holder slot with blade teeth facing forward then release the ring, which will self-rotate and clamp over the top of the blade. (See Fig. G1&G2)
— REMOVING THE SAW BLADE
To remove a blade, hold the blade and rotate the blade holder ring counterclockwise to release the blade.

WARNING: The blade may be spring ejected so protect your eyes.
NOTE: When using JIGSAW MODE (90 deg), the blade teeth face forward as shown in Fig. H.
OPERATION

WARNING: Always wear eye protection while operating this or any other power

WARNING: Burn hazard. Do not touch the blade immediately after use. Contact
with the blade may result in personal injury. Before you begin work, ensure the material to be cut is rigid. Small workpieces should be securely clamped to a work table.
1. SWITCHING ON AND OFF (See Fig. I)
For starting operation of the machine, press the lock-off button (2) first, then press and hold the On/Off switch (1) afterwards. To switch off the machine, release the On/Off switch (1).
For safety reasons the On/Off switch of the machine cannot be locked; it must remain pressed during the entire operation.
2. HAND GRIP AREAS
Always ensure you maintain a firm grip while operating your jigsaw.
3. PROTECTION FINGER
The finger is located in front of the blade holder. While working, it will help prevent accidental contact with the moving blade.
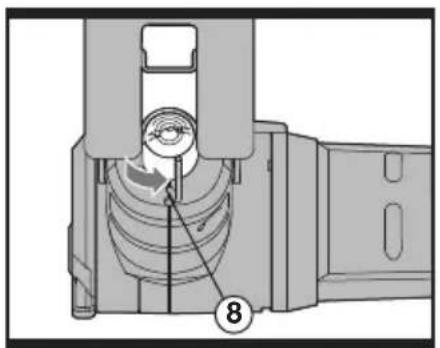
4. LED WORK LIGHT
A light (8) is built-in near the end of the protection finger. The light will automatically come on each time the on/off switch is depressed.
5. CUTTING

WARNING: Always wear eye protection while operating this power tool.

WARNING:
- Never hold the pivot head when operating the tool.
- Never hold the motor cover when operating the tool.
Before cutting any type of material, be sure it is firmly anchored or clamped to prevent slipping. Holding the work by hand or against your body leaves it unstable and may lead to loss of control.
- Place blade lightly against work to be cut, depress the trigger switch and allow it to obtain maximum speed before applying pressure.
- Whenever possible, the saw foot plate must be held firmly against the material being cut. This will prevent the saw from
jumping or vibrating and minimize blade breakage.
- Any cut which puts pressure on the blade, such as angle or scroll cuts, increases potential for vibration, kickback and blade breakage.

WARNING: Shock hazard. Use extra caution when cutting overhead and pay particular attention to overhead wires which may be hidden from view.

WARNING: Use extra caution when cutting overhead and anticipate the path ing branches and debris ahead of time.

WARNING: Inspect work site for hidden gas pipes, water pipes, or electrical before making blind or plunge cuts.
Failure to do so may result in explosion, property damage, electric shock, and/or serious personal injury.
WORKING HINTS FOR YOUR MULTI-PURPOSED SAW
If your power tool becomes too hot, run no-load for 2-3 minutes to cool the motor. Avoid prolonged usage at very low speeds.
GENERAL
Always use a blade suited to the material and material thickness to be cut.
Always ensure the work-piece is firmly held or clamped to prevent movement.
Any movement of the material may affect the quality of the cut. The blade cuts on the upward stroke and may chip the uppermost surface.
Ensure your uppermost surface is a non-visible surface when your work is finished.
MAINTENANCE
Your power tool requires no additional lubrication or maintenance.
There are no user serviceable parts in your power tool. Never use water or chemical cleaners to clean your power tool. Wipe clean with a dry cloth. Always store your power tool in a dry place. Keep the motor ventilation slots clean. Keep all working controls free of dust.
Occasionally you may see sparks through the ventilation slots. This is normal and will not damage your power tool.
TROUBLESHOOTING
| Symptom | Possible Causes | Possible Solution |
| The tool suddenly stops during operation. | Over loadBattery temperature too high | Relieve the load on the machine immediately and allow cooling for approx. 30 seconds by running the machine on on-load . |
| Low battery capacity | Charge the battery pack. |
ENVIRONMENTAL PROTECTION

This product has been marked with a symbol relating to removing electric and electronic waste. This means that this product shall not be discarded with household waste but that it shall be returned to a collection system which conforms to the European Directive 2002/96/CE. It will then be recycled or dismantled in order to reduce the impact on the environment. Electric and electronic equipment can be hazardous for the environment and for human health since they contain hazardous substances.
DECLARATION OF CONFORMITY
We,
POSITEC Germany GmbH
Declare that the product,
Description
WORX Li-Ion Multi-Purposed Saw
Type WX540 WX540.3 WX540.9
(5-designation of machinery, representative of Saw)
Function Sawing various materials
Complies with the following Directives,
2006/42/EC
2004/108/EC
2011/65/EU
Standards conform to
EN55014-1
EN55014-2
EN60745-1
EN60745-2-11
The person authorized to compile the technical file,
Name: Russell Nicholson
Address: Positec Power Tools (Europe)
Ltd, PO Box 152, Leeds, LS10 9DS, UK
$$ \text {leo.yue} $$

text_image
C€2014/02/17
Leo Yue
POSITEC Quality Manager
Typ WX540 WX540.3 WX540.9
Name: Russell Nicholson
Anschrift: Positec Power Tools (Europe)
Ltd, PO Box 152, Leeds, LS10 9DS, UK

text_image
leo.yue2014/02/17
Leo Yue
INFORMATIONS RELATIVES AU BRUIT
INFORMATIONS RELATIVES AUX VIBRATIONS
DÉCLARATION DE CONFORMITÉ
Nous,
POSITEC Germany GmbH
Modèle WX540 WX540.3 WX540.9
Ltd, PO Box 152, Leeds, LS10 9DS, RU
$$ \text {leo.yue} $$
2014/02/17
Leo Yue
Codice WX540 WX540.3 WX540.9
Ltd, PO Box 152, Leeds, LS10 9DS, UK
$$ \text {leo.yue} $$
2014/02/17
Leo Yue
Modelo WX540 WX540.3 WX540.9
Ltd, PO Box 152, Leeds, LS10 9DS, UK
$$ \text {leo.yue} $$

text_image
C€2014/02/17
Leo Yue
1. DE BATTERIJEN OPLADEN WAARSCHUWING!
WAARSCHUWING: Kans op
elektrische schokken. Wees extra
WAARSCHUWING: Wees extra
WAARSCHUWING: Inspecteer de
TIPS VOOR HET WERKEN MET UW APPARAAT
Type WX540 WX540.3 WX540.9 (5
Typ WX540 WX540.3 WX540.9
Tip WX540 WX540.3 WX540.9
Ltd, PO Box 152, Leeds, LS10 9DS, UK

text_image
leo.yue
text_image
C€2014/02/17
Leo Yue
Director de calitate POSITEC
- SÍTOVÝ VYPÍNAČ
- UVOLŇOVACÍ TLAČÍTKO
- MÍSTA ÚCHOPU
- OTOČNÁ UVOLŇOVACÍ PÁČKA
- KRYT MOTORU
- OCHRANNÝ PRST
- DRŽÁK LISTU
- PRACOVNÍ LED SVĚTLO (Viz Obr. G1)
- PATNÍ DESKA
- ZÁKLADNÍ DESKA
- UVOLŇOVACÍ TLAČÍTKO BATERIE
- AKUMULÁTOR
- NABÍJEČKA (Viz Obr. A1)
- SVĚTELNÝ INDIKÁTOR NABITÍ (Viz Obr. A1)
- LIST (Viz Obr. F)
3.2. POSTUP NABÍJENÍ (WX540.3) (Viz Obr. A2)
Typ WX540 WX540.3 WX540.9
Standards conform to
EN55014-1
EN55014-2
EN60745-1
EN60745-2-11
Ltd, PO Box 152, Leeds, LS10 9DS, UK
$$ \text {leo.yue} $$

text_image
C€2014/02/17
Leo Yue
4. PRACOVNÉ SVETLO LED
Lampa (8) je vstavaná tesne pri konci chrániča prstov. Lampa sa automaticky zapne pri každom stlačení vypínača.
5. PÍLENIE

Ltd, P. O Box 152, Leeds, LS10 9DS, UK
$$ \text {ko.yue} $$

text_image
C€2014/02/17
Leo Yue
you've got the power
Copyright © 2014, Positec. All Rights Reserved. 2CSJ04APK11000A5