WX646.1 - Sander WORX - Free user manual and instructions
Find the device manual for free WX646.1 WORX in PDF.
User questions about WX646.1 WORX
0 question about this device. Answer the ones you know or ask your own.
Ask a new question about this device
Download the instructions for your Sander in PDF format for free! Find your manual WX646.1 - WORX and take your electronic device back in hand. On this page are published all the documents necessary for the use of your device. WX646.1 by WORX.
USER MANUAL WX646.1 WORX
natural_image
Illustration of a hand holding a helmet with a tool, no text or symbols present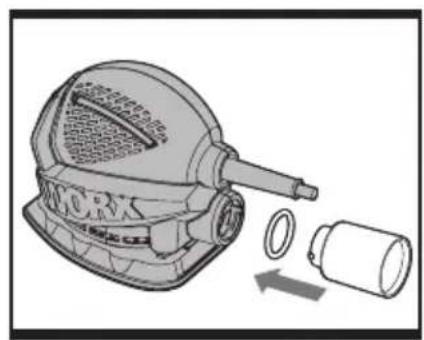
natural_image
Illustration of a mechanical device with a labeled component and two cylindrical parts, showing internal components and motion arrows (no text or symbols)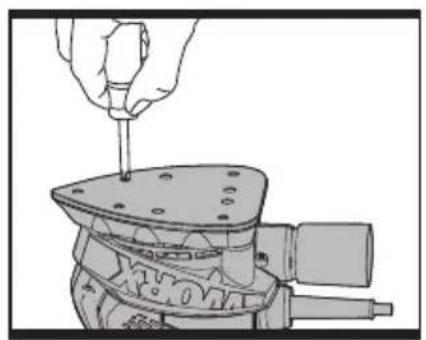
natural_image
Illustration of a hand using a screwdriver to adjust or install a mechanical component (no text or symbols visible)ABC
natural_image
Mechanical assembly diagram showing a tool inserted into a component with a numbered label (6) pointing to it, no text or symbols present.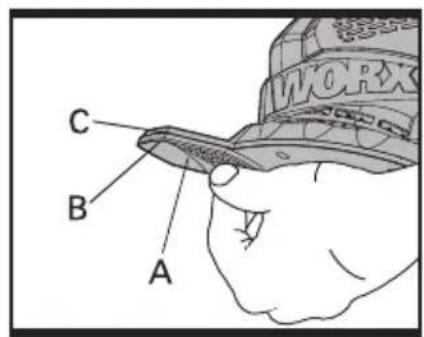
text_image
C B A
natural_image
Illustration of hands using a workpiece to clean or wear a work object (no text or symbols visible)DEF
- ON-OFF SWITCH
- SOFT GRIP HANDLE
- DUST EXTRACTION ADAPTOR
- SANDING PLATE
- SANDING PAPER* (See Fig. A)
- FINGER PAD
*Not all the accessories illustrated or described are included in standard delivery.
TECHNICAL DATA
Type WX646 WX646.1(645-649-designation of machinery, representative of palm sander)
| Voltage 220-240V~50/60Hz | |
| Power input | 160 W |
| No load speed | 12000opm |
| Base size | 140 x 140 x 95mm |
| Protection class | ☐ /II |
| Net weight | 0.9kg |
NOISE AND VIBRATION DATA
| A weighted sound pressure L | _pA : 80.8dB(A) |
| K_pA 3dB(A) | |
| A weighted sound power L | _wA : 91.8dB(A) |
| K_wA 3dB(A) | |
| Wear ear protection when sound pressure is over 80dB(A) | |
VIBRATION INFORMATION
Vibration total values (triax vector sum) determined according to EN 60745:
| Typical weighted vibration | Vibration emission value a_h = 3.38m/s^2 |
| Uncertainty K = 1.5m/s2 |

WARNING: The vibration emission value during actual use of the power tool can differ from the declared value depending on the ways in which the tool is used dependant on the
following examples and other variations on how the tool is used:
How the tool is used and the materials being cut or drilled.
The tool being in good condition and well maintained
The use the correct accessory for the tool and ensuring it is sharp and in good condition.
The tightness of the grip on the handles and if any anti vibration accessories are used.
And the tool is being used as intended by its design and these instructions.
This tool may cause hand-arm vibration syndrome if its use is not adequately managed.

WARNING: To be accurate, an estimation of exposure level in the actual conditions of use should also take account of all parts of the operating cycle such as the times when the tool is switched off and when it is running idle but not actually doing the job. This may significantly reduce the exposure level over the total working period.
Helping to minimise your vibration exposure risk.
ALWAYS use sharp chisels, drills and blades
Maintain this tool in accordance with these instructions and keep well lubricated (where appropriate)
If the tool is to be used regularly then invest in anti vibration accessories.
Avoid using tools in temperatures of 10^0 C or less
Plan your work schedule to spread any high vibration tool use across a number of days
ACCESSORIES
Sanding papers: 9
80grit; 2
100grit; 2
120grit; 2
Finger pad sander paper 3
Finger pad 1
Dust extraction adaptor 1
We recommend that you purchase your accessories from the same store that sold you the tool. Use good quality accessories marked with a well-known brand name. Choose the type according to the work you intend to undertake. Refer to the accessory packaging for further details. Store personnel can assist you and offer advice.
SYMBOLS OPERATING INSTRUCTIONS

To reduce the risk of injury, user must read instruction manual

Double insulation

Warning

Wear ear protection

Wear eye protection

Wear dust mask

Waste electrical products should not be disposed of with household waste. Please recycle where facilities exist. Check with your Local Authority or retailer for recycling advice.

NOTE: Before using the tool, read the instruction book carefully.
INTENDED USE
The machine is intended for dry sanding of wood, plastic, filler and coated surfaces.
1. FITTING THE SANDING PAPER (See Fig. A)
Fit the paper over the pad so that it covers the entire area. Make sure the sanding paper is even with the edges and that the dust collection holes in the pad and sanding paper is aligned and the sanding paper evenly overlaps the pad. Never use your sander without a sanding paper.
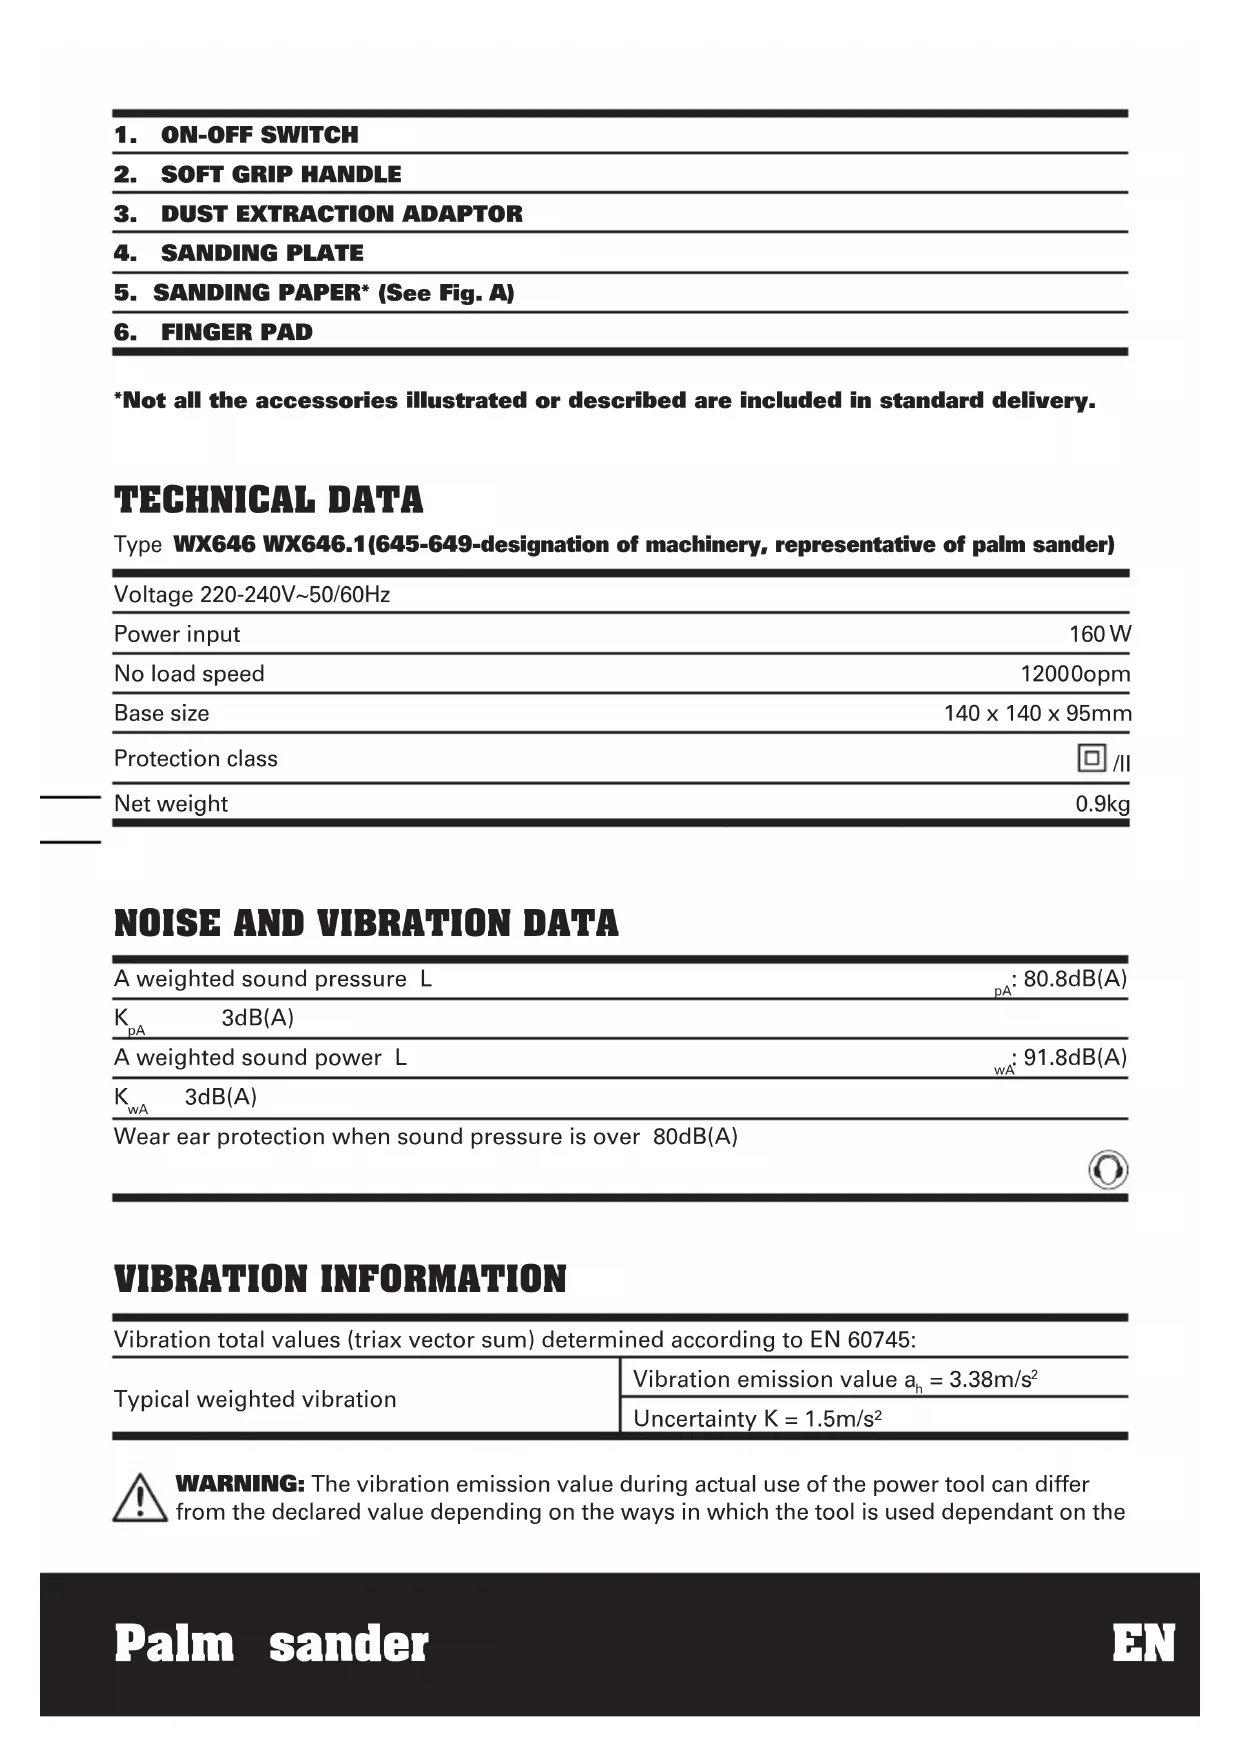
2. USING THE DUST ADAPTER (See Fig. B)
Your sander is equipped with a dust adapter, which is designed for collecting dust task. Insert the dust adapter into the rear dust outlet of sander. Then pull the dust adapter and make sure it is tightened securely on the dust outlet. Then connect the hose of a vacuum cleaner. First please turn on the vacuum cleaner, then turn on the sander. If you stop sanding, first turn off the sander, then turn off your vacuum cleaner.
3. ON/OFF SWITCH
To start your sander, depress the protective cover over the switch at the position marked "I". To stop your sander, depress the protective cover at the position marked "0".
4. FLUSH SANDING FACILITY
Your sander can sand flush on three sides of the base-plate which allows easy access to corners and edges of moulding.
5. ORBITAL SANDING
Your sander operates in small circular rotations which allows efficient material removal. Operate your sander in long sweeping movements across your workpiece and even across the grain. For a finer finish, always use a fine grain sandpaper and only move the sander in the direction of the grain and never across the grain.
Do not allow your sander to remain in the same position otherwise you will remove material and create and uneven surface.
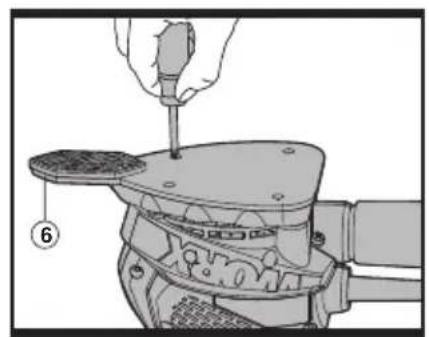
6. CHANGE THE BASES (See Fig. C, D)
1) Remove the 5 Phillips head screws holding the triangular base.
2) Replace triangular base by fastening the detail sanding attachment to base position.
3) Fix it by 5 screws.
4) Similar process is conducted when detail sanding attachment is changed to triangular base.
7. ATTACH SANDING SHEETS AND PADS (See Fig. E)
This sander features an easy hook and loop accessory fastening system for quick changing without clamps.
1) Unplug the sander.
2) Carefully center the sanding sheet (A) or pad over the base (3/4) to be used. Line up the tip of the sanding sheet (B) or pad with the tip of the base (C).
3) Press the sheet or pad firmly in place.
4) To remove sheet or pad, simply pull it off.
WARNING: Failure to unplug the sander could result in accidental starting causing possible serious personal injury.
8. SANDING WITH EITHER BASE (See Fig. F)
Always hold the sander as shown in Fig F. Move the sander in long, sweeping strokes across the sanding surface. Light pressure is needed for sanding, polishing and scrubbing. Let the sander do the work. Always check your work. This sander removes material quickly.
IMPORTANT: Applying excessive pressure will slow the sander and produce unsatisfactory results.
WORK HINTS FOR YOUR PALM SANDER
If your power tool becomes too hot, run no load for 2-3 minutes to cool the motor. Always ensure the work-piece is firmly held or clamped to prevent movement. Any movement of the material may affect the quality of the sanding finish.
Start your sander before sanding and turn off only after stopping sanding. For best results sand wood in the direction of the grit.
Do not start sanding without sandpaper fitted. Do not allow the sandpaper to wear away, it will damage the base-plate. The guarantee does not cover base-plate wear and tear.
Use coarse grit paper to sand rough surfaces, medium grit for smooth surfaces and fine grit for the final surfaces. If necessary, first make a test on scrap material.
Use only good quality sandpaper.
The sanding efficiency is controlled by the sandpaper not the amount of force you apply to the tool. Excessive force will reduce the sanding efficiency and cause motor overload. Replacing the sanding paper regularly will maintain optimum sanding efficiency.
MAINTENANCE
Remove the plug from the socket before carrying out any adjustment, servicing or maintenance.
Your power tool requires no additional lubrication or maintenance.
There are no user serviceable parts in your power tool. Never use water or chemical cleaners to clean your power tool. Wipe clean with a dry cloth. Always store your power tool in a dry place. Keep the motor ventilation slots clean. Keep all working controls free of dust. Occasionally you may see sparks through the ventilation slots. This is normal and will not damage your power tool.
If the supply cord is damaged, it must be replaced by the manufacturer, its service agent or similarly qualified persons in order to avoid a hazard.
ENVIRONMENTAL PROTECTION

Waste electrical products should not be disposed of with household waste.
Please recycle where facilities exist.
Check with your local authorities or retailer for recycling advice.
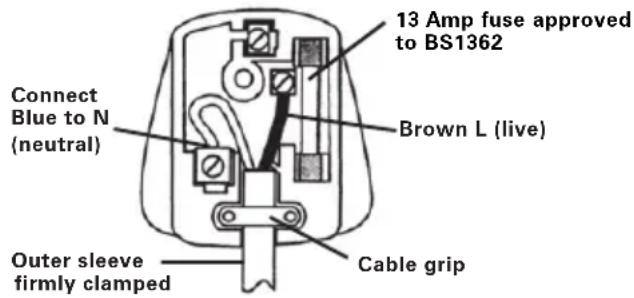
PLUG REPLACEMENT (UK & IRELAND ONLY)
If you need to replace the fitted plug then follow the instructions below.
IMPORTANT
The wires in the mains lead are colored in accordance with the following code:
BLUE = NEUTRAL
BROWN = LIVE
As the colors of the wires in the mains lead of this appliance may not correspond with the colored markings identifying the terminals in your plug, proceed as follows. The wire which is colored blue must be connected to the terminal which is marked with N. The wire which is colored brown must be connected to the terminal which is marked with L.
WARNING: Never connect live or neutral wires to the earth terminal of the plug. Only fit an approved 13ABS1363/A plug and the correct rated fuse.
NOTE: If a moulded plug is fitted and has to be removed take great care in disposing of the plug and severed cable, it must be destroyed to prevent engaging into a socket.
text_image
13 Amp fuse approved to BS1362 Brown L (live) Connect Blue to N (neutral) Cable grip Outer sleeve firmly clampedDECLARATION OF CONFORMITY
We,
POSITEC Germany GmbH
Declare that the product,
Description WORX Palm sander
Type WX646 WX646.1
(645-649-designation of machinery, representative of palm sander)
Function Remove surface material with a plate
Complies with the following Directives,
Machinery Directive 2006/42/EC
Electromagnetic Compatibility Directive
2004/108/EC
RoHS Directive 2011/65/EU
Standards conform to:
EN 55014-1
EN 55014-2
EN 61000-3-2
EN 61000-3-3
EN 60745-2-4
EN 60745-1
The person authorized to compile the technical file,
Name: Russell Nicholson
Address: Positec Power Tools (Europe)
Ltd, PO Box 152, Leeds, LS10 9DS, UK

text_image
leo.yue
text_image
C€2012/12/07
Leo Yue
POSITEC Quality Manager
Name: Russell Nicholson
Adresse: Positec Power Tools (Europe)
Ltd, PO Box 152, Leeds, LS10 9DS, UK

text_image
leo.yue
text_image
C€2012/12/07
Leo Yue
INFORMATIONS RELATIVES AUX VIBRATIONS
DÉCLARATION DE CONFORMITÉ
Nous,
POSITEC Germany GmbH
Directive RoHS 2011/65/EU
Et conforme aux normes:
EN 55014-1
EN 55014-2
EN 61000-3-2
EN 61000-3-3
EN 60745-2-4
EN 60745-1
Ltd, PO Box 152, Leeds, LS10 9DS, UK

text_image
keo.yue
text_image
C€2012/12/07
Leo Yue
Codice WX646 WX646.1
Ltd, PO Box 152, Leeds, LS10 9DS, UK

text_image
leo.yue
text_image
C€2012/12/07
Leo Yue
Modelo WX646 WX646.1
(645-649-denominaciones de
Ltd, PO Box 152, Leeds, LS10 9DS, UK

text_image
keo.yue
text_image
C€2012/12/07
Leo Yue
Nome: Russell Nicholson Endereço: Positec Power Tools (Europe) Ltd, PO Box 152, Leeds, LS10 9DS, UK

text_image
leo.yue
text_image
C€2012/12/07 Leo Yue Gestor de Qualidade POSITEC
-
AAN-UIT-SCHAKELAAR
-
ZACHTE HANDGREEP
-
STOFAFZUIGINGSADAPTER
-
SCHUURPLATEAU
-
SCHUURPAPIER* (Zie A)
-
VINGERBASIS
5. SCHUREN IN CIRKELS
Ltd, PO Box 152, Leeds, LS10 9DS, UK

text_image
keo.yue
text_image
C€2012/12/07
Leo Yue
Ltd, PO Box 152, Leeds, LS10 9DS, UK

text_image
leo.yue
text_image
CE2012/12/07
Leo Yue
Ltd, PO Box 152, Leeds, LS10 9DS, UK

text_image
keo.yue
text_image
C€2012/12/07
Leo Yue
Ltd, PO Box 152, Leeds, LS10 9DS, UK

text_image
keo.yue
text_image
C€2012/12/07
Leo Yue
Adress: Positec Power Tools (Europe)
Ltd, PO Box 152, Leeds, LS10 9DS, UK

text_image
leo.yue
text_image
CE2012/12/07
Leo Yue
Ltd, PO Box 152, Leeds, LS10 9DS, UK

text_image
leo.yue
text_image
C€2012/12/07
Leo Yue
(Europe) Ltd, PO Box 152, Leeds, LS109DS, UK

text_image
keo.yue
text_image
C€2012/12/07
Leo Yue
Ltd, PO Box 152, Leeds, LS10 9DS, UK

text_image
keo.yue
text_image
C€2012/12/07
Leo Yue
text_image
WORX you've got the powerCopyright © 2013, Positec. All Rights Reserved. 2PPS06CPK11001A4