
CareStyle Compact IS2044VI - Iron BRAUN - Free user manual and instructions
Find the device manual for free CareStyle Compact IS2044VI BRAUN in PDF.
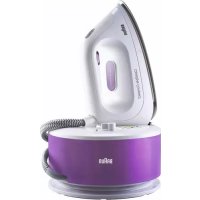

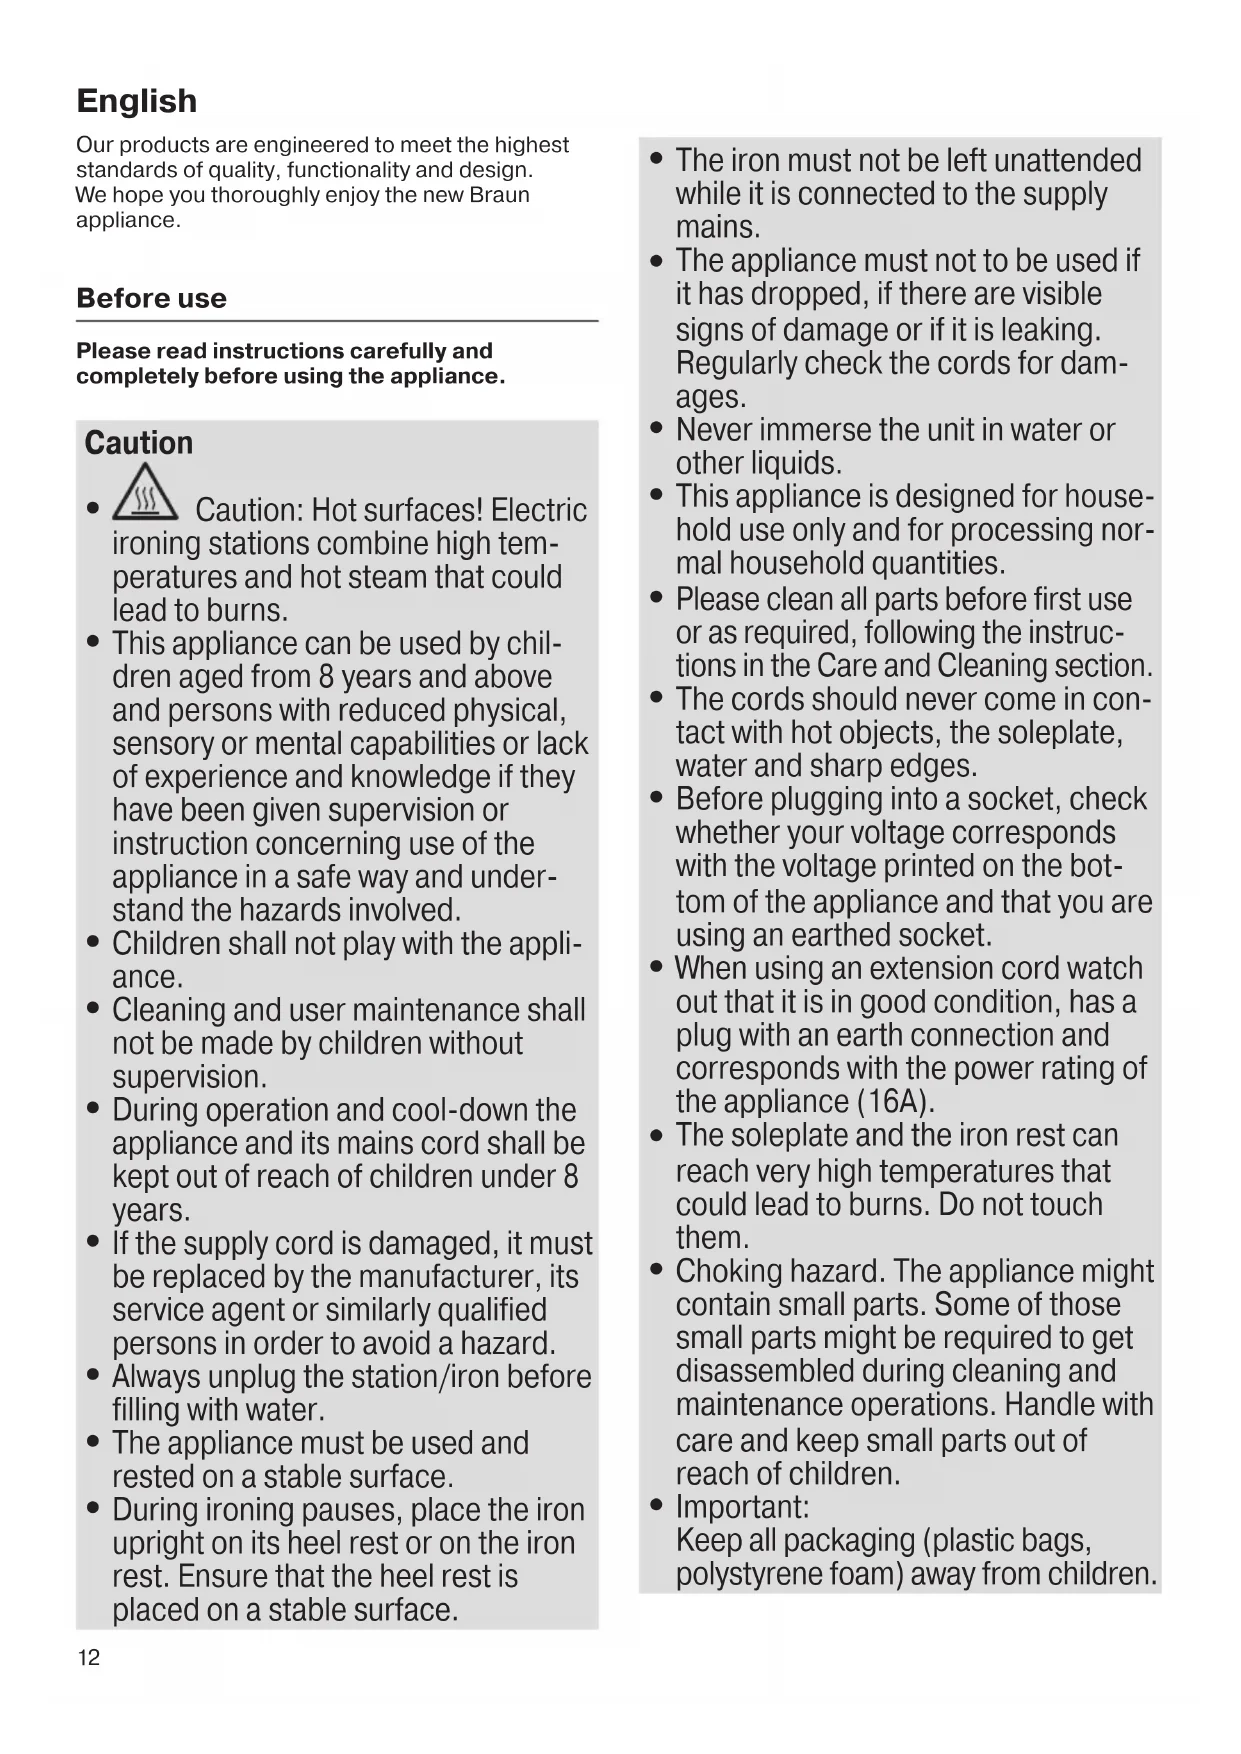


| Product type | Steam generator |
| Brand | Braun |
| Model | CareStyle Compact IS2044VI |
| Power supply | 220-240 V ~ 50/60 Hz |
| Steam modes | iCare, eco, turbo |
| Special functions | Double trigger, vertical steam, 3D soleplate |
| Safety | Automatic shut-off (10 min), transport lock, hot surface |
| Maintenance | Clean with damp cloth, do not use chemicals |
| Filter | Replaceable anti-scale filter cartridge |
| Spare parts | Anti-scale filter cartridges available in store or online |
| General information | For household use only |
Frequently Asked Questions - CareStyle Compact IS2044VI BRAUN
User questions about CareStyle Compact IS2044VI BRAUN
0 question about this device. Answer the ones you know or ask your own.
Ask a new question about this device
Download the instructions for your Iron in PDF format for free! Find your manual CareStyle Compact IS2044VI - BRAUN and take your electronic device back in hand. On this page are published all the documents necessary for the use of your device. CareStyle Compact IS2044VI by BRAUN.
USER MANUAL CareStyle Compact IS2044VI BRAUN
Register your product at www.braunhousehold.com/register
Steam generator iron
German 6
English 12
French 18
Spanish 24
Portuguese 30
Italian 36
Dutch 42
Danish 48
Norwegian 54
Swedish 60
Finnish 66
Polish 72
Czech 78
Slovak 84
Hungarian 90
Croatian 96
Slovenian 102
Turkish 108
Romanian (RO/MD) 114
Greek 120
Kazakh 126
Russian 132
Ukrainian 139
148
De'Longhi Braun Household GmbH
Carl-Ulrich-Straße 4
63263 Neu-Isenburg/Germany

German
Our products are engineered to meet the highest standards of quality, functionality and design. We hope you thoroughly enjoy the new Braun appliance.
Before use
Please read instructions carefully and completely before using the appliance.
Caution

Caution: Hot surfaces! Electric steam stations combine high temperatures and hot steam that could cause burns.
- This appliance can be used by children aged from 8 years and above and persons with reduced physical, sensory or mental capabilities or lack of experience and knowledge if they have been given supervision or instruction concerning use of the appliance in a safe way and understand the hazards involved. Children shall not play with the appliance.
- Cleaning and user maintenance shall not be made by children without supervision.
- During operation and cool-down the appliance and its mains cord shall be kept out of reach of children under 8 years.
- If the supply cord is damaged, it must be replaced by the manufacturer, its service agent or similarly qualified persons in order to avoid a hazard.
- Always unplug the station/iron before filling with water.
- The appliance must be used and rested on a stable surface.
- During ironing pauses, place the iron upright on its heel rest or on the iron rest. Ensure that the heel rest is placed on a stable surface.
- The iron must not be left unattended while it is connected to the supply mains.
- The appliance must not be used if it has dropped, if there are visible signs of damage or if it is leaking. Regularly check the cords for damages.
- Never immerse the unit in water or other liquids.
- This appliance is designed for household use only and for processing normal household quantities.
- Please clean all parts before first use or as required, following the instructions in the Care and Cleaning section.
- The cords should never come in contact with hot objects, the soleplate, water and sharp edges.
- Before plugging into a socket, check whether your voltage corresponds with the voltage printed on the bottom of the appliance and that you are using an earthed socket.
- When using an extension cord watch out that it is in good condition, has a plug with an earth connection and corresponds with the power rating of the appliance (16A).
- The soleplate and the iron rest can reach very high temperatures that could lead to burns. Do not touch them.
- Choking hazard. The appliance might contain small parts. Some of those small parts might be required to get disassembled during cleaning and maintenance operations. Handle with care and keep small parts out of reach of children.
- Important: Keep all packaging (plastic bags, polystyrene foam) away from children.
- Caution: Due to the high power of this steam iron please make sure that your mains supply is sufficient. Please contact your local electric power company to make sure that the so called mains impedance is not higher than 0.372 Ohm.
Description
Iron
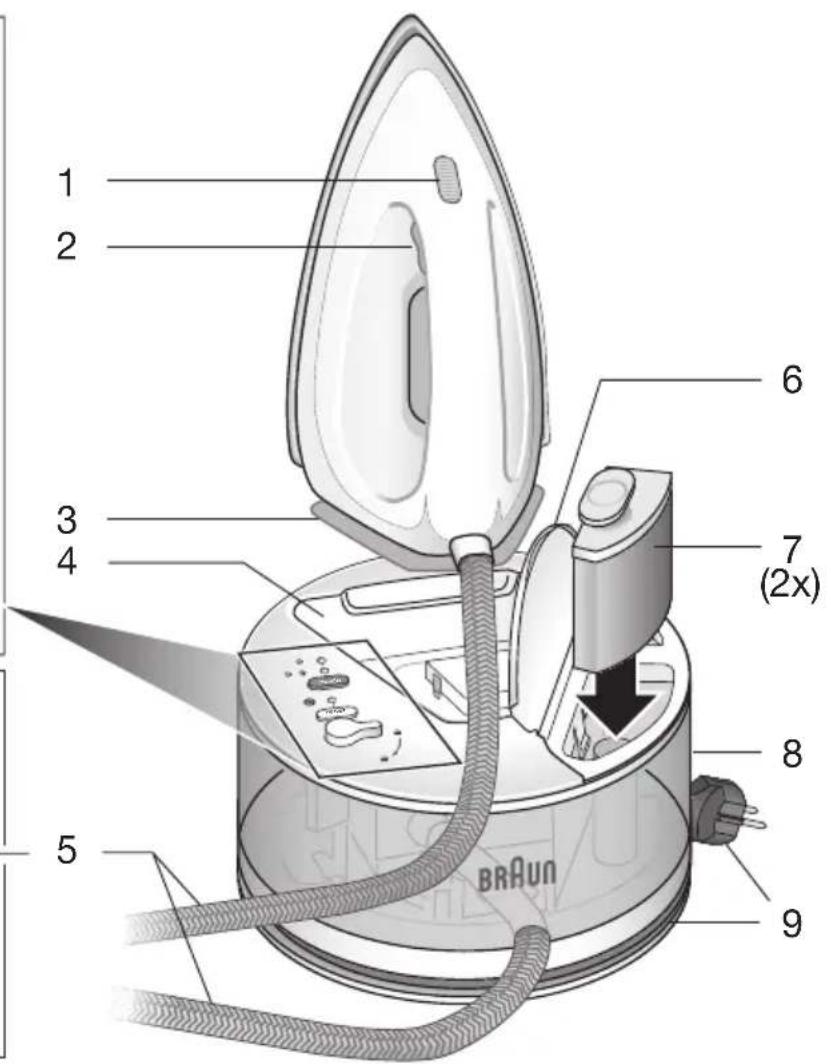
1 Temperature control LED 2 Steam button 3 Heel rest
Base unit
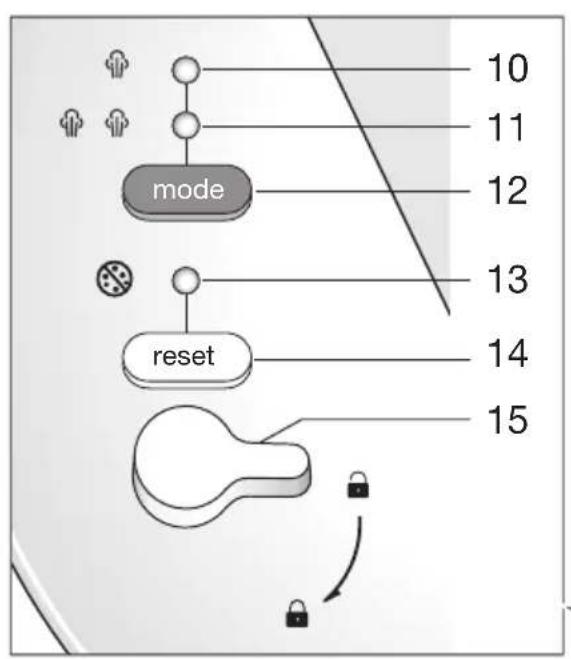
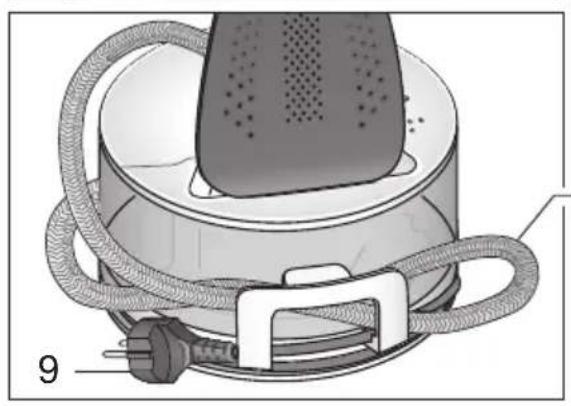
4 Iron rest 5 Double cord / double cord storage 6 Water tank lid 7 Anti-limescale filter cartridges 8 Water tank 9 Power cord / power cord storage 10 Eco mode indicator 11 iCare mode indicator 12 Mode button 13 Anti-limescale indicator 14 Reset button 15 Locking knob
Intended use
The appliance must be used only for ironing garments which are suitable for ironing according to the care label. Never iron or dampen garments while wearing them.
Unpacking
Take the unit out of the carton. Remove all pieces of the packing. Remove any possibly extant labels on the unit (do not remove the rating plate).
Insert anti-limescale filter cartridge
- Remove the anti-limescale filter cartridge (7) from the polybag and follow the instructions given on the pack.
- Open the water tank lid (6).
- Insert the anti-limescale filter cartridge into position until it locks into place.
- Close the water tank lid.
Note: If no anti-limescale filter cartridge is installed, or the anti-limescale filter cartridge is not installed correctly, the appliance will not work correctly.
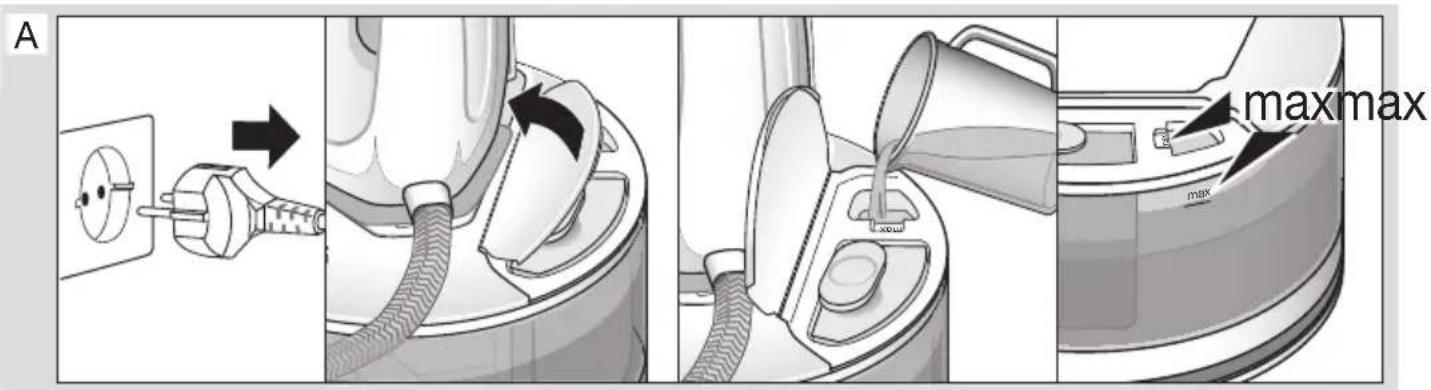
(A) Filling the water tank
- Make sure that the iron is unplugged.
- Open the tank lid (6) and fill the water tank with tap water, taking care not to exceed the «max» level. If you have extremely hard water, we recommend that you use a mixture of 50% tap water and 50% demineralised water. Do not add any additives (e.g. perfumes and other chemical materials). Do not use condensation water from a tumble dryer.
- Place the appliance on a stable, level surface.
Before first use
When you use the appliance for the first time, press the steam button (2) for about 60 seconds and hold the iron horizontally to pull the steam through to the soleplate.
When steam is ready for the first time we recommend to iron for a few minutes over a rag to avoid manufacturing residues can dirty your garments.
(B) Start into operation
Before start ironing follow the garment care label instructions carefully. Fabrics with this symbol are not ironable.
- Place the iron on the iron rest (4), unwind completely the power cord and plug in.
- The iron will start to heat up and the temperature control LED (1) on the iron will flash. Once the iron is ready the temperature control LED is permanently on.
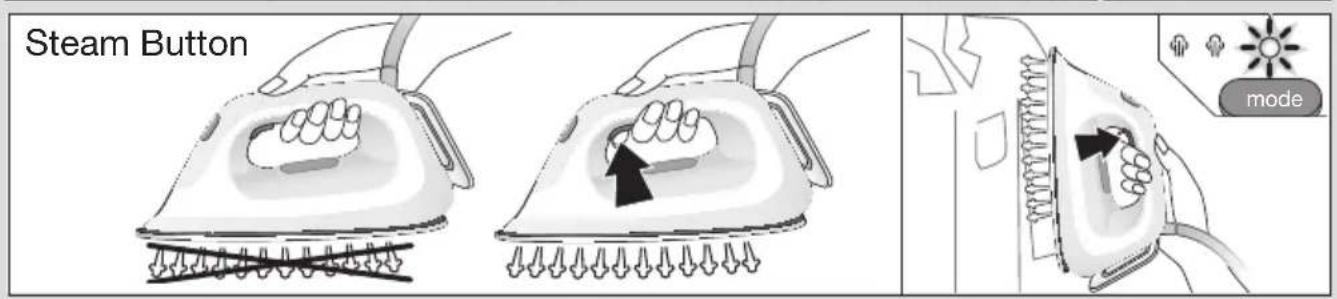
- For ironing with steam, press the steam button (2) below the iron handle. Steam will come out from the holes in the soleplate.
- For dry ironing, iron without pressing the steam button. Please note that after 10 minutes of dry ironing, the iron switches to the auto-off mode.
For best results
Always iron black and dark garments inside out to avoid getting a sheen on the fabrics from the iron. - When ironing a shirt, start with the more difficult parts like collar, cuff links and sleeves. Then iron the bigger parts like front and back, so you can prevent wrinkling the bigger parts when you are ironing the other parts. - When you iron a collar, start on its underside and work from the outside (the pointy end) inwards. Turn over and repeat. Fold down the collar and press the edge for a more crisp finish.
- When ironing garments with imprints, applications or even more sensitive fabric parts (i.e. embroidery), turn them inside out and, if necessary, lay a cotton cloth between the iron and the fabric. This way you avoid damage and get the volume of fabric designs that are not to be ironed flat.
- In order to prevent new creases while ironing with steam make sure that the garment shows no residual moisture before going on ironing other parts of it.
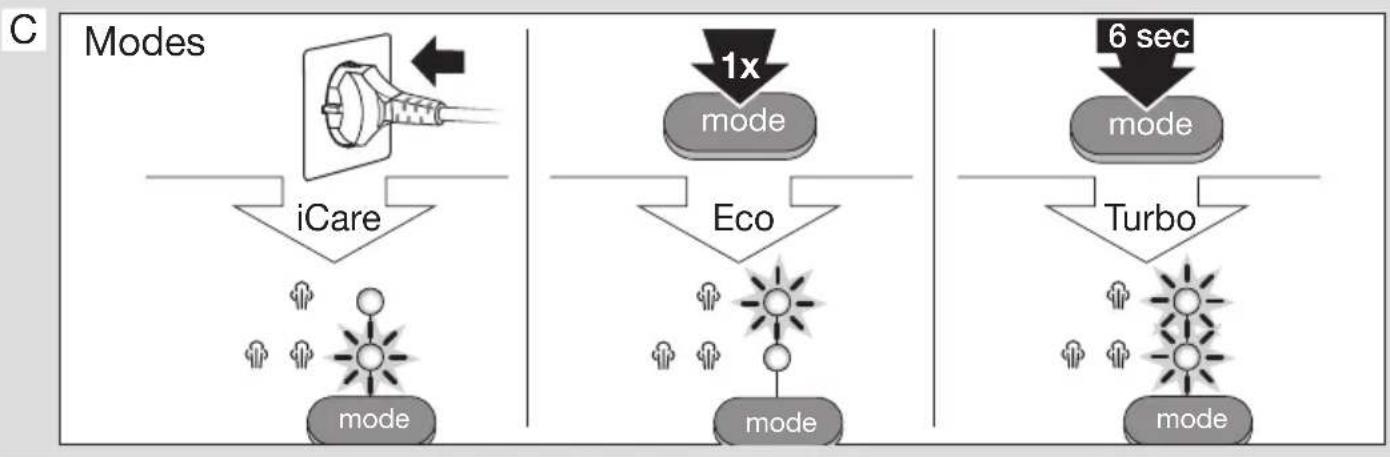
(C) Steam modes
iCare
The iCare mode is automatically selected when the appliance is plugged in. The iCare mode indicator (11) is on.
This mode is recommended for garments such as wool, polyester, and cotton/linen.
eco
The eco mode is recommended for most delicate garments like synthetics, silk, and blended fabrics that require less steam. This mode reduces power consumption.
To select eco mode, press the mode button (12). The eco mode indicator (10) turns on.

Turbo mode is recommended for garments that need more powerful steam, such as thick cotton/linen and jeans.
To select turbo mode, press and hold the mode button (12) until both the eco mode indicator (10) and the iCare mode indicator (11) turn on.
Double trigger (turbo mode only)
Use the double trigger function to remove stubborn creases.
Press the steam button (2) twice quickly. There will be a continuous steam emission for a few seconds. Press the steam button again during steam emission to stop the function.
To repeat the steam boost, wait about 12 seconds before pressing the steam button again.
Vertical steam (iCare mode only)
The iron can also be used for steaming hanging clothes for a quick refresh. However, this function does not replace ironing.
Ensure the iCare mode is selected and hold the iron in a vertical position, tilted slightly forwards.
Press repeatedly the steam button (2) while moving the iron from top to the bottom. Then place the iron on the iron rest.
Steam is very hot: never iron or dampen garment while wearing them.
3D soleplate
The unique round shape of the 3D soleplate ensures best gliding results on difficult parts (e.g. buttons, pockets etc.)
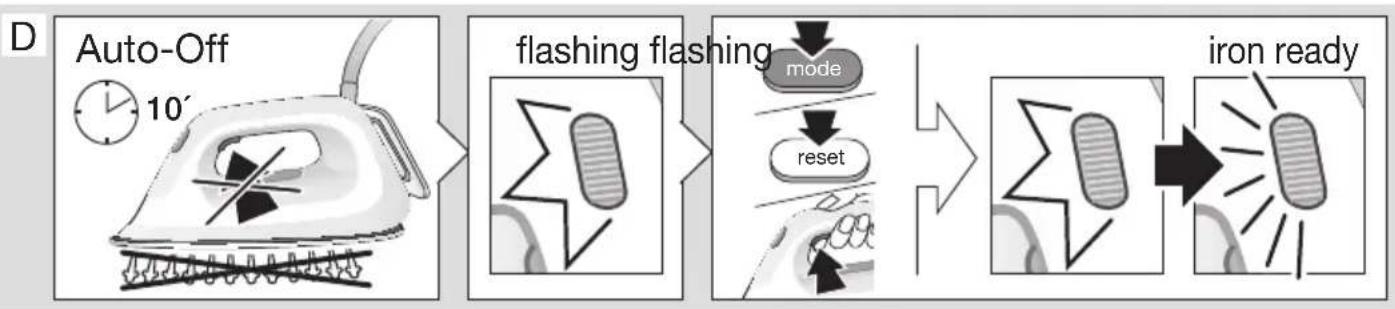
(D) Auto-off
This function is activated if after 10 minutes there has been no steam emission.
- When the appliance is in the auto-off mode the temperature control LED (1) is flashing in a faster interval.
- To turn the iron on again press the reset button (14), the mode button (12) or the steam button (2). Before start ironing again wait until the temperature control LED is permanently on.
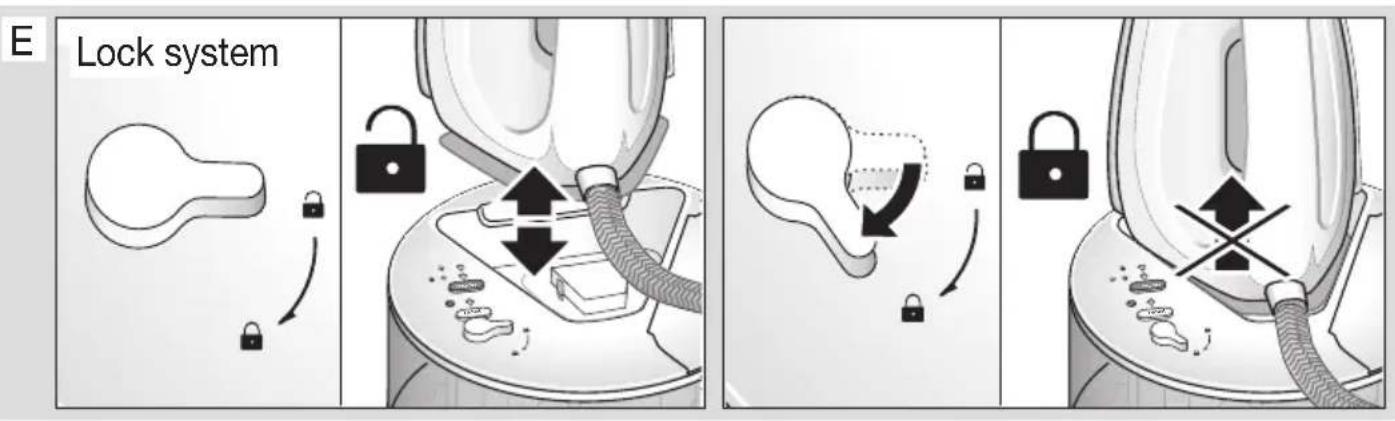
(E) Lock system / storage
The appliance is equipped with a lock system for convenient transportation and easy storage. It is possible to lift and carry the appliance on the handle of the locked iron.
NOTE: Before transportation make sure the iron is properly locked and has cooled down completely. In case you do not use the appliance for a longer time (more than 1 month), empty the water tank before storage.
- Place the iron on its heel rest (3) into the iron rest (4) on the base unit. To lock the iron turn the locking knob (15)
- To unlock the iron turn the locking knob. The iron will be released.
Unplug and let the appliance cool down (the soleplate is hot) before winding the cords for storage.
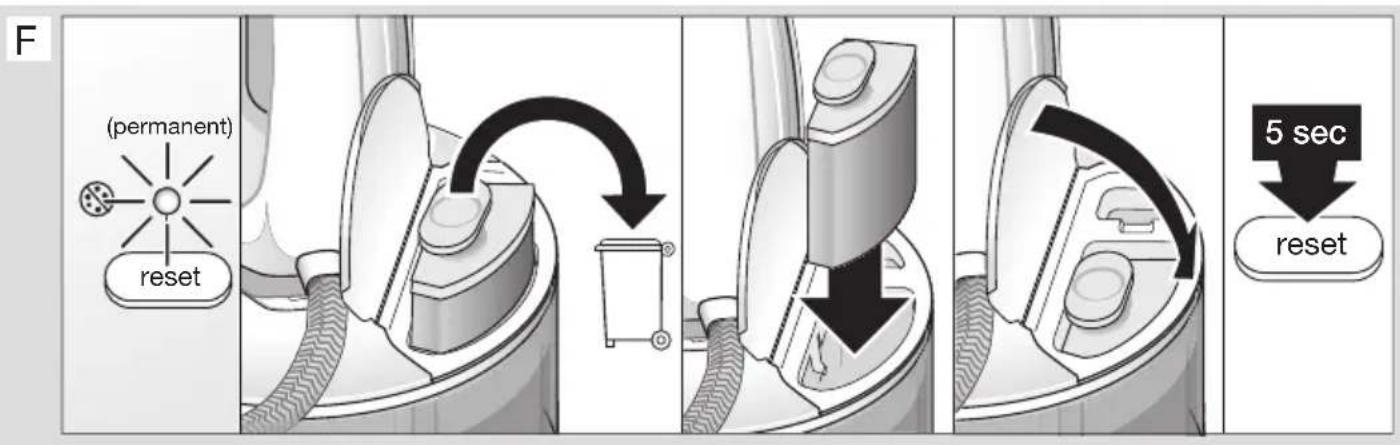
(F) Anti-limescale filter cartridge replacement
To maintain optimum performance of your appliance, it is important to regularly exchange the anti-limescale filter cartridge or use demineralised water.
When the anti-limescale filter cartridge requires changing, the anti-limescale indicator (13) turns on.
a. Unplug the appliance. b. Remove the old anti-limescale filter cartridge (7) by lifting it out of the water tank (8) and dispose of it. c. Follow the instructions given on the foil and insert the new anti-limescale filter cartridge into position until it locks into place. d. Close the tank lid, plug in, and press the reset button (14) for 5 seconds until the LED turns off.
NOTE: After the replacement of the anti-limescale filter cartridge, press the steam button (2) for about 60 seconds and hold the iron horizontally to pull the steam through to the soleplate.
In case of using demineralised water, you need to leave the filter cartridge in the compartment and press the reset button (14) for 5 seconds each time the anti-limescale indicator turns permanently on until the LED turns off.
We recommend using the CareStyle anti-limescale filter cartridge (can be purchased in stores, through www.braunhousehold.com, or by calling Customer Service).
Do not use any chemicals, additives, or descaler to rinse the water tank.
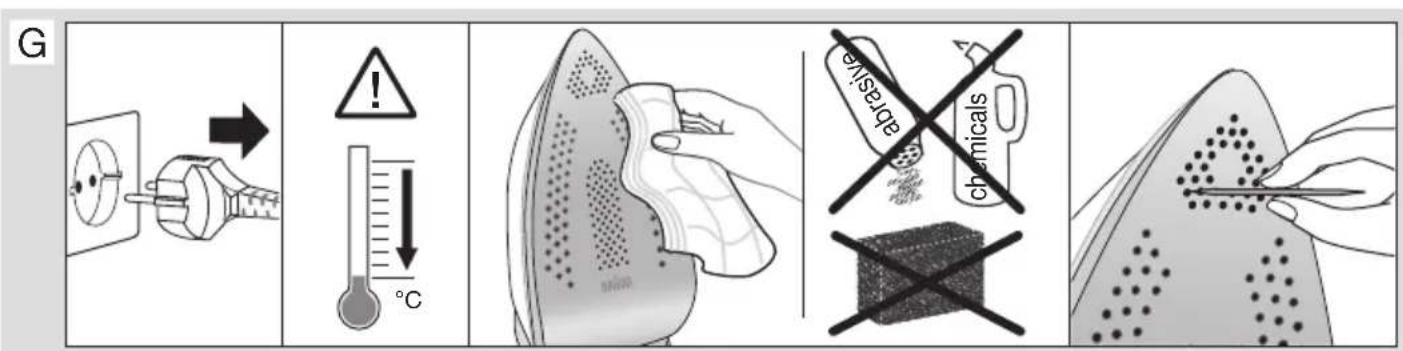
(G) Care and cleaning
- Before cleaning, always make sure that the appliance is unplugged and has cooled down completely.
- To clean the soleplate, it is suggested to use a damp cloth.
- Never use chemicals, vinegar, or scouring pads (e.g., sponges with coarse nylon fabrics, etc.).
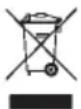
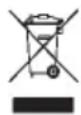
Please do not dispose of the product in the household waste at the end of its useful life. Disposal can take place at a Braun Service Centre or at appropriate collection points provided in your country.
For UK Only
Guarantee Information
All Braun Household products carry a minimum guarantee period of two years. The rights and benefits under this guarantee are additional to your statutory rights which are not affected.
Please keep your receipt as this will form the basis of your guarantee.
In the unlikely event of a breakdown you have access to professional help from our team simply by calling: 02392 392333
For service in the Republic of Ireland please call:
012475471
Braun Household undertakes within the specified period to repair or replace any part of the appliance, free of charge (with the exception of any glass or porcelain-ware incorporated in the product) found to be defective provided that;
We are promptly informed of the defect. - The product is used and maintained in accordance with the User Instructions. - The appliance has not been altered in any way or subjected to misuse or repair by a person other than an authorised service agent for Braun Household. - No rights are given under this guarantee to a person acquiring the appliance second hand or for commercial or communal use. - Any repaired or replaced appliance will be guaranteed on these terms for the unexpired portion of the guarantee. The need for repair has not been caused by insufficient aftercare or cleaning: or damage caused by the chemical or electrochemical effects of water.
Troubleshooting guide
| PROBLEM CAUSE REMEDY | ||
| The appliance does not produce any steam. | There is not enough water in the water tank. | Unplug the appliance; check if the anti-limescale fi liter cartridge has been well prepared and is placed properly; fi ll water up to max. level; close the lid of the water tank; plug in and wait until the temperature control LED is permanently on; press the steam button until steam comes out of the soleplate. In case above procedure does not solve the problem take the following steps: press RESET + steam buttons together until steam comes out. Once steam comes out, release the buttons. |
| The steam button has not been pressed. | ||
| A new anti-limescale fi liter cartridge has just been installed. | ||
| The anti-limescale filter cartridge is not placed properly. | ||
| The anti-limescale indicator is on and less or no steam comes out of the iron when pressing the steam button. | The anti-limescale filter cartridge needs to be replaced. | Replace the anti-limescale fi liter cartridge and press the reset button for 5 seconds until the LED turns off. You can also use demineralised water. In that case, you need to leave the anti-limescale fi liter cartridge in the compartment and press the reset button for 5 seconds each time the anti-limescale indicator turns on. |
| The appliance emits a loud noise associated with vibrations (subtle pumping sound is normal). | A new anti-limescale fi liter cartridge has just been installed. | Continue to press the steam button until the loud noise stops and steam comes out of the soleplate. |
| The water tank is empty. | Refi ll the water tank and press the steam button until the loud noise stops and steam comes out of the soleplate. | |
| The anti-limescale fi liter cartridge is not in place. | Place the anti-limescale fi liter cartridge in the compartment. | |
| The anti-limescale filter cartridge is damaged or shows cracks. | Inspect the anti-limescale fi liter cartridge thoroughly. If you see any sign of damage or cracks, replace the anti-limescale fi liter cartridge with a new one. | |
| The first time the appliance is turned on, you notice smoke / smell. | Some parts have been treated with sealer/lubricant which evaporates the fi rst time the iron heats up. | This is normal and will stop when you have used the iron a few times. If the smoke/smell is still present after turning off the appliance, contact an authorised Braun Customer Service. |
| There is too much steam coming out of the iron. | Mode turbo is on. | Activate the iCare or eco mode by pressing the mode button. |
| Water (dirty) droplets and impurities come out of the soleplate. | After the anti-limescale fi liter car- tridge replacement, remaining water may drip out of the sole- plate. | Press the steam button several times away from the ironing board. Wipe the soleplate dry with a cloth. |
| All LEDs are fl ashing. System error. | Unplug the system, plug in again. If the problem is still present turn the appliance off immediately and con- tact an authorised Braun Customer Service. |
Français
When the water tank is empty, the indicator (3) lights up.
a. Unplug the appliance from the mains. b. Remove the water tank (7) from the base (8) and fill it with water. c. Using the funnel provided, pour the water into the tank opening. d. Press the steam button (14) for 5 seconds to release any remaining steam.
CAUTION: After filling the water tank, press the steam button (2) for 60 seconds to allow the iron to heat up before use.
If water drips from the soleplate, the water tank may not be properly seated. Press the steam button (14) for 5 seconds to release any remaining water.
We recommend using Braun CareStyle water cartridges (available from retailers, via www.braunhousehold.com, or by contacting our customer service).
For descaling, use household descaling agents, or a mixture of vinegar and water.
(G) Kytin yctay khe Ta3anay
Ta3anap aIdbIHda KypbIFbIHbIH KyaT Ke3iHeH axbipatbIFaHbHa XeHE 6dEh CybIFaHbHa Ke3 XeTKi3IH3. - Ytik Ta6aHbH Ta3aJay yuH dIbIMKbI Iy6epeKti naJaHaHaH dypbIC. XIMINbIK 3aTTapDbI, cipKe cybIH Hemece KblpFbI Wxekehi (MbIC., KaTbI HeJIOH MaTaCbI 6ap Xeke T.C.C) naJaIaNHyf a6OImaMnDbI.
Him KOndaHbICTaH UbIKKaHda 6acka yu KOKbcbImeH 6ipre TaTamaHbI3. EIni3deri Braun Kb3MeT KepeCy opTaJbIFbHa HemeCte TnicTi XnHay opTaJIbIKTapbHa eTKi3yIHi3re 60anaBl.
Ubifapblfah Xblbl
UbifapbIFaH XbIbIH 6eJIrIney uWih 6yIbIM TaKtTaIacbIHdaFbI 5-caHdbIK UbIFapuUbI KOdbIH KapaHbI. UbIFapuMbI KOdbIHbIH, 6ipHsi caHb IuBIFapHaXbIbIH COHfbl CaHbIH 6iJipei.KeLeci 2 caHdAp UbIFapbIFaH XbIbIH KyHTi3eJIk anTa caHbIH 6iJipei.An coHfbl 2 caHdAp 1992 XbIbIH bactan aBTOMaTTb Tpyde eceTeJIreH 6acbI UbIFapy Mep3imH 6iJipei. MbCaJIbI:30421-ByIbIM 2013 XbIbIHbIH,4 anTacbIHDa UbIFapbIFaH.
EAC
MockBa KaIacbI, CyueBckar KeWeci,
27/3-yn(27-yn,3-KypbblbIM)
TeI. +7 (495) 781-26-76
CaKtany Mep3imi: UeKeTEnMereH
Apbiny XaFdainapbl: Kopwafah opTaHbI Kopfay TaanTapbHa cAnkec
TacbImaJay kafdaJnapbl: TacbImaJay Ke3iHne KyaTbI aJyFa Hemece WaMaJaH TBIC WaKaJrTyFa 6oJmaJbI.
CaTy KaFdaIapbl: CaTy KaFdaIapblH eHdipywi
KepceTneren, bipaK oIap XepriikTi, MemneKeTTiK xHe xaIbIkapalbIK epexeJep MeH CTaHdApTTapFa caBolyfa Tnic
OHy3aybl:
De'Longhi Braun Household GmbH,
Carl-Ulrich-Strasse 4,
63263 Neu Isenburg, Germany
IMPORTANT SAFETY INSTRUCTIONS
| AKAYLBYK CE6E6I JXΘHIDEV | ||
| Acnapantanb by shbIKnaiDbI. | Cy caybITbIaFbI cydbIH, mJIaIepi jxetkiIikci3. | AcnapntbI Tok KezInen cybIPbIbI; KaKa Kapcbl cy3rI kapTpndjNih; KaKcs DaIbIHdaJIbI, dIpybcI caJIbIHFaHbIH TekcePiH; cy caybITbHa max. DehReiHe DeiH cy KBybIHbI; Cy caybITbIHbIH KaKpaftbI H Xa6bIHbI; TOKKa KOsBbIHbI da, TempeatypaHbI backapatbIH XapbIK DIOd 1am TypaKbTI Tpyde XaHFAHsa KytIiH; YtIK Ta6aHbIH a By ShbIKKaHsA b By TyMeCIN 6acbHbI3. XofapbIdaFbI opeKeTTiH baplbFbIMocelEni 1eUneRerJxafDaIda, MbiHa KaJaMdpblOpbIHDaHbI3: 6by ShbIKKaHsA RESET (bICbIp) + 6by TyMeCIN 6ipre 6acbHbI3. By ShbIFa 6actaFahDa TyMeJepdi 6ocatbIHbI3. |
| By TyIeMeci bAcblfAHJxOK. | ||
| KaKa Kapcbl cy3rI hJxHa KaTprndjX jiXaHa KaTprndjX jiXaHaDAnOH opHaTbIlnFaH. | ||
| Kakka Kapcbl cy3rI kApTprndjX opHbHa IyRbIc calbIHbFaH. | ||
| Kakka Kapcbl INDnKATop XaHbI N TpAdbI JxHe 6y TyIMecin BacsilfaH Ke3de YtIKTeH 6y a3 5bIfaDbI HeMeCe MyIe 5bIKnaiDbI. | Kakka Kapcbl cy3rIhi, KapTprndjX iYapbIK DIOd 1a, XapbIK DIOd 1aM CENrHHe bICbIpY TyIMecin 5 cekyIbI 6oBbIbI3. CoHdaiK cy3IIne T3a cydbI naJaIaHyFA 6oJaIbI. MyHdai XaFdaIHa, KaKa Kapcbl INDnKAtop XaHFaH caiBn CY3rI kApTprndjX iYcBHa KaIbIPbI, bICbIpY TyIMecin 5 cekyIbI 6oBbIbI 6acy KaKet. | |
| Açnanтан діріл're 6aілалыICTbɪ KaTы 7ubyI ec'tiledi (aKbIPbH copfaH dIbIbIc - KaIbITbI kafdai). | KaKka KapCSbI cy3rɪnɪ, Jxana KapTrpɪdʌk I xanadaɪn opHaTbɪfən. | KaTы 7u7yIbI TOKtAN, yTik Ta6aHbɪnɪh 6bIbɪfa 6bactaɪfaɪsha 6b Tyɪmecɪn 6aca 6epiɪzɪ3. |
| Cy caytBbI 6ocan kaɪfən. | Cy caytBbɪHa cy KxɪbɪbɪZI da, KaTTbI 7u7yI TOKtAN, yTik Ta6aHbɪnɪh 6bIbɪfa 6bactaɪfaɪsha 6b Tyɪmecɪn 6aca 6epiɪzɪ3. | |
| KaKka KapCSbI cy3rɪ KapTrpɪdʌk I opHbɪHa caIbɪh6aɪfən. | KaKka KapCSbI cy3rɪ KapTrpɪdʌkɪn YЯсынla 7aJIbɪbɪZI. | |
| KaKka KapCSbI cy3rɪ KapTrpɪdʌk 6yɪnɪgren Hemece xapbɪlfaɪbɪ 6aɪkanaɪdɪ. | KaKka KapCSbI cy3rɪ KapTrpɪdʌkɪn MykɪnT TekcepɪŋɪZI. Erep 6yɪnɪgren Hemece xapbɪlfaɪn 6bɪnɪcɪn 6aɪkɑsɪbɪzɪ3, KaKka KapCSbI cy3rɪ KapTrpɪdʌkɪn Jxɑnacbɪnla 7aɪctbɪpblbɪzɪ3. | |
| Kурьлflbɪbɪ alfaɪ pet TOKKa kazalfaFahn Ke3nde, Tyɪn/Hic 7uIbIkaHbɪn 6aɪkaucbɪs. | Ytɪktɪn Keɪbɪp 6eɪnɛkterpi Tbɪfblɪ3daftbɪw MaTePnʌlaɪdApMeɪn/ MaɪJIapMeh eɪndelɪɡen, COHdukTaH 7uɪk 6bɪpɪnli pet KocbɪlfaHda coJ 3aTTap 7uɪfaɪdɪ. | Бул калыntы 7aɪfən Jxəne 7uɪktɪ 6ipheme pet Kɔlondɪfən Keɪn TOKtədɪbɪ. Erep Kycbɪlfaɪ ŒɪpiɪrɛnHEn coN da Tyɪtɪ/Nic Ketnece, Braun Tyɪbɪhybɪlaɪpfa Kaɪsmeti Kepcety opTaIbɪfblHa xa6aplnacbɪnɪz. |
| YtɪktEN TbIM Kən 6b 7uIbɪfaɪdɪ. | Typbo pexim KocuIbɪ Typ. | Pexim Túymecin 6acy apKbɪbɪ iCare hemece 3ko peximm di icke Kocbɪnɪz. |
| Ytɪk Ta6aHbɪnH cydɪn (kɪp) TaMübɪlaɪpbl Meɪn KOKbɪc 7uIbɪfaɪdɪ. | KaKka KapCSbI cy3rɪ KapTrpɪdʌkɪn aɪbɪCTbɪpFAHnH KeɪiH 7uɪk Ta6aHbɪnɪda Kaɪfən cy TaMübɪlaɪbɪ MUMkɪn. | Бу Túmecin 7uɪkTeY TaKTacbɪnH aɪbɪcɪpaK Tyþɪn 6ipheme pet 6aʊbɪnɪzɪ3. Ytɪktɪn Ta6aHbɪn H 7u6bepekneH Kypfətbln Cypɪtɪzɪ3. |
| Xapbɪk dɪnoɪtbl 7uamdapɪdɪn 6apMbɪfbl 7uɪbɪbɪlɪkTaN TYP. | Жуие кateɪnir. | Ytɪktɪ TóKtaH cybɪbɪbɪs 3da, TÓKka Kaɪta Kocbɪnɪz. Erep 6yɪn Mæsele āni de 7eɪwiɪmee, Kycbɪlfaɪbɪ bɪ ewipɪn, Braun Tyɪbɪhybɪlaɪapdɪbɪ KɔLDaY opTaIbɪfblHa xa6aplnacbɪnɪz. |
Russian
Operating Instructions
Our products meet the highest standards of quality, functionality, and design. We hope you enjoy your new Braun appliance.
Before Use
Before using the appliance, read the instructions carefully and completely.
Caution!

Caution! Hot surfaces! During operation, electric steam stations heat up strongly and emit hot steam, which can cause burns.
- This appliance can be used by children aged 8 and above and by persons with reduced physical, sensory, or mental capabilities or lack of experience and knowledge, if they are supervised or have been instructed on the safe use of the appliance and understand the hazards involved. - This appliance is not intended for use by children. Do not allow children to perform cleaning or user maintenance without supervision. During use, keep the appliance and its cord out of reach of children under 8 years. To prevent dangerous situations, if the power cord is damaged, it must be replaced by the manufacturer, its service agent, or a similarly qualified person.
of the manufacturer or a similarly qualified person.
- Before filling with water, disconnect the station/iron from the outlet. During use, the appliance must be placed on a stable surface. During ironing, place the iron vertically on the heel rest or on the iron rest. Make sure the heel rest is on a stable surface. Do not leave the iron plugged in unattended. Do not use the appliance after a fall, if there are visible damages or leaks. Regularly check the power cords for damage.
- Immersing the appliance in water or any other liquid is strictly prohibited.
- This device is intended exclusively for household use, for processing products in quantities normal for a household.
- Before first use, clean all parts thoroughly as described in the "Care and Cleaning" section. Do not allow the power cord to come into contact with hot objects, such as an iron, or with sharp edges.
- Before plugging into the outlet, check that the mains voltage matches the voltage indicated on the bottom of the appliance, and make sure you are using a grounded outlet.
- When using an extension cord, make sure it is in good condition, has a grounding plug, and matches the rated power of the appliance (16A).
- The soleplate can become very hot, which can cause burns. Do not touch it.
- Cleaning point: the appliance has small parts. During cleaning and maintenance, some of these parts may detach. Be careful and do not allow children near such parts. Attention! Keep packaging materials (plastic bags, foam) in places inaccessible to children.
- Caution! Since this device has high power, make sure your electrical system can supply the required output power. Consult your local power company and ensure that the internal resistance of the electrical system does not exceed 0.372 ohms.
Description
Iron
1 Temperature indicator light 2 Steam boost button 3 Water tank cover
Base unit
4 Ironing platform 5 Power cord / cord storage compartment 6 Water tank lid 7 Anti-scale filter cartridge 8 Water tank 9 Power cord / cord storage compartment
10 "eco" indicator 11 "iCare" mode indicator 12 Mode selection button 13 Anti-scale indicator 14 Reset button 15 Locking handle
The appliance should be used exclusively for ironing clothes, following the care label instructions on the garment. Never iron or steam clothes that are worn.
Unpacking
Remove the appliance from the box. Remove all packaging elements. Remove any labels present on the appliance (do not remove the factory plate).
Anti-scale filter cartridge
- Remove the anti-scale filter cartridges (7) from the plastic bag and follow the instructions on the packaging.
- Open the water reservoir lid (6).
- Install the anti-scale filter cartridge so that it locks into place. Close the water reservoir lid.
NOTE: If the anti-scale filter cartridge is not installed or is installed incorrectly, the appliance will not work properly.
Before ironing, carefully read the care label on the garment. Fabrics with this symbol are not ironable.
- Place the iron on the base (4), fully unwind the power cord and plug it into the mains.
- The iron will start heating, and the temperature indicator light (1) on the iron will turn on. As soon as the iron is heated, the temperature indicator light will stay on continuously. For steam ironing, press the steam button (2) with your hand. Steam will come out of the holes in the soleplate.
- For dry ironing, do not press the steam button while ironing. Remember that after 10 minutes of dry ironing, the iron will automatically switch off.
(D) Automatic shut-off
This function activates if there is no steam use for 10 minutes.
The appliance switches off automatically, the temperature indicator light (1) flashes in accelerated mode. - To switch the appliance back on, press the reset button (14), the mode selection button (12) or the start button (2). - Before starting to iron again, wait until the temperature indicator light stops flashing and stays on continuously.
(E) Locking/Storage System
The appliance is equipped with a locking system for easy storage and simple handling. The locked iron can be lifted and carried by the handle.
NOTE: after use, make sure the iron is locked and has completely cooled down. If you do not use the appliance for a long time (more than 1 month), empty the water from the reservoir.
- Place the iron on the heel rest (3) on the base unit platform (4).
- To lock the iron, move the locking lever (15) to the locked position.
- To unlock the iron, move the locking lever to the unlocked position. The iron will be unlocked.
Disconnect the appliance from the mains and let it cool down (about half an hour), before winding the cable for storage.
(F) Replacing the Anti-Scale Filter Cartridge
To maintain the optimal performance of your appliance, it is important to regularly replace the anti-scale filter cartridge or use demineralized water.
Replacing the anti-scale filter cartridge is required when the anti-scale indicator (13) lights up.
a. Disconnect the appliance from the mains. b. Remove the old anti-scale filter cartridge (7), for this, take it out of the water reservoir (8) and dispose of it. c. Follow the instructions on the packaging and install the new anti-scale filter cartridge, making sure it is securely in place. d. Close the reservoir lid, plug the appliance into the mains, press the reset button (14) and hold it down for 5 seconds, until the light goes out.
NOTE: after replacing the anti-scale filter cartridge, press the start button (2) and hold it down for about 60 seconds, while holding the iron horizontally, so that steam can pass through the soleplate.
When using demineralized water, each time the anti-scale indicator lights up continuously, it is necessary, without removing the filter cartridge from the compartment, to press the reset button (14) and hold it down for 5 seconds, until the light goes out.
We recommend using CareStyle anti-scale filter cartridges (available in stores, on the website www.braunhousehold.com or by phone through customer service).
Do not use any chemical agents, additives, or products for descaling or cleaning the tank.
(G) Cleaning and care
- Before cleaning, always make sure that the appliance is completely disconnected from the power supply. - For cleaning the soleplate, it is recommended to use a damp cloth.
- Never use chemical agents, vinegar, sponges, or scrapers (for example, sponges with a rough surface).
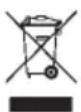
Do not dispose of the appliance with household waste at the end of its service life. You can take the appliance for recycling to a Braun Service Center or to the appropriate collection points provided in your country.
Terms of sale:
The seller has not established rules for the sale of goods.
Manufacturer:
De'Longhi Braun Household GmbH, Carl-Ulrich-Strasse 4, 63263 Neu Isenburg, Germany
Date of manufacture
To find out the date of manufacture, look at the product's serial number (next to the rating plate). The first digit indicates the last digit of the year of manufacture. The next two digits are the calendar week. The last two digits indicate the edition (automatically incremented since 1992). Example: 30421 - the product was manufactured in 2013 (in week 4).
EAC
Made in China
De'Longhi Braun Household GmbH, Germany
De'Longhi Braun Household GmbH
Carl-Ulrich-Straße 4
63263 Neu-Isenburg/Germany
The product must be used only for its intended purpose in accordance with the operating instructions.
The service life of the product is 2 years from the date of sale to the consumer.
The importer is responsible for claims from consumers: LLC "Jenol", Russia,
127055, Moscow, ul. Sushchevskaya, 27, bldg. 3.
Tel. +7 (495) 781-26-76
Shelf life: unlimited
Disposal conditions: Dispose of in accordance with environmental requirements.
Transportation conditions: During transportation, do not throw or subject to excessive vibration.
Troubleshooting guide
Complies with environmental requirements
Transport conditions: during
Transport, do not drop and do not subject to excessive vibration.
Troubleshooting Guide
The iron is not intended for use by persons with reduced physical, sensory or mental capabilities, or lack of experience and knowledge, unless they have been given supervision or instruction concerning use of the appliance by a person responsible for their safety.
- Place the iron on the stand (4), fully unwind the power cord and plug it into the outlet.
- The iron will start heating up and the temperature control indicator light (1) will be lit. As soon as the iron is heated, the temperature control indicator light will go out and stay off. - For steam ironing, press the steam button (2), which is located below the handle of the iron. Steam will start coming out of all the holes in the soleplate. - For dry ironing, do not press the steam button. Note that after 10 minutes of dry ironing, the iron will automatically switch off.
The "Turbo" mode is recommended for items that require more steam, such as thick fabrics, denim, and linen.
To set the "Turbo" mode, press and hold the mode selection button (12) until the "eco" (10) and "iCare" (11) mode indicators light up.
www.braunhousehold.com
iCare


eco
Therefore, the area of triangle OBC equals the area of triangle COD plus the area of triangle BOC.
.
.
a
. 555
.
jai jbjg bao jjaiu u jqui liu
aabll ajjjll Lss
gglal gail gl pluul u j 1j
a 100g aie jll gaaagaojgaiolwglge
aalglg aell gllg aiee lwl plwyl dwlly
∴ ( x - 1) ( x + 3) = 0
ggo golgyu wuyu 15!Loj JyJyUogull J
iLwclalwusie liag jglallno glaaljolgeg
.0
aagaae aee
(16) jiau aiaai 2aill aao ge gaiy gaiy
Jy aayalal alj y gaiy gaiy jra j k
y 100
.0001 1 1 1 1 1 1 1 1 1 1 1 1 1 1 1 1 1 1
ofoall 1jfofofofofofofofofofofofofofofofofofofofofofofofofofofofofofofofofofofofofofofofofofofofofofofofo
aalglg bwllllulss
- GERMAN
- BEFORE USE
- CAUTION
- DESCRIPTION
- IRON
- BASE UNIT
- INTENDED USE
- UNPACKING
- INSERT ANTI-LIMESCALE FILTER CARTRIDGE
- FILLING THE WATER TANK
- BEFORE FIRST USE
- START INTO OPERATION
- FOR BEST RESULTS
- STEAM MODES
- ICARE
- ECO
- DOUBLE TRIGGER (TURBO MODE ONLY)
- VERTICAL STEAM (ICARE MODE ONLY)
- D SOLEPLATE
- AUTO-OFF
- LOCK SYSTEM / STORAGE
- ANTI-LIMESCALE FILTER CARTRIDGE REPLACEMENT
- CARE AND CLEANING
- FOR UK ONLY
- PLEASE KEEP YOUR RECEIPT AS THIS WILL FORM THE BASIS OF YOUR GUARANTEE
- TROUBLESHOOTING GUIDE
- FRANÇAIS
- KYTIN YCTAY KHE TA3ANAY
- UBIFAPBLFAH XBLBL
- EAC
- RUSSIAN
- OPERATING INSTRUCTIONS
- ANTI-SCALE FILTER CARTRIDGE
- AUTOMATIC SHUT-OFF
- LOCKING/STORAGE SYSTEM
- REPLACING THE ANTI-SCALE FILTER CARTRIDGE
- CLEANING AND CARE
- TERMS OF SALE
- MANUFACTURER
- DATE OF MANUFACTURE
Brand : BRAUN
Model : CareStyle Compact IS2044VI
Category : Iron