
RC660 - Radio HAMA - Free user manual and instructions
Find the device manual for free RC660 HAMA in PDF.
| Product type | Radio-controlled alarm clock with temperature and humidity display |
| Brand | Hama |
| Model | RC660 |
| Power supply | 4.5 V (3 LR03/AAA batteries) |
| Radio reception | DCF 77.5 kHz |
| Display | Date, time, temperature, humidity |
| Main functions | Alarm with two alarms, snooze, automatic backlight with light sensor |
| Temperature measurement range | -9.9°C to +50°C (14°F to 122°F) |
| Humidity measurement range | 20% to 95% |
| Time format | 12h/24h (manual and automatic setting via DCF signal) |
| Alarm mode | Normal (every day) or working days (WORKING DAY) |
| Light sensor | Yes, can be activated/deactivated via SENSOR ON/OFF switch |
| Maintenance and cleaning | Clean with a slightly damp, lint-free cloth; avoid harsh detergents |
| Safety | Use in dry rooms; do not repair yourself; observe battery polarity |
| Repairability | Repair by qualified technicians only |
| General information | Compliant with Directive 2014/53/EU; frequency band 77.5 kHz |
Frequently Asked Questions - RC660 HAMA
User questions about RC660 HAMA
0 question about this device. Answer the ones you know or ask your own.
Ask a new question about this device
Download the instructions for your Radio in PDF format for free! Find your manual RC660 - HAMA and take your electronic device back in hand. On this page are published all the documents necessary for the use of your device. RC660 by HAMA.
USER MANUAL RC660 HAMA
Radio Controlled Clock RC 660
Funkwecker
Operating Instructions
Bedienungsanleitung
Mode d'emploi
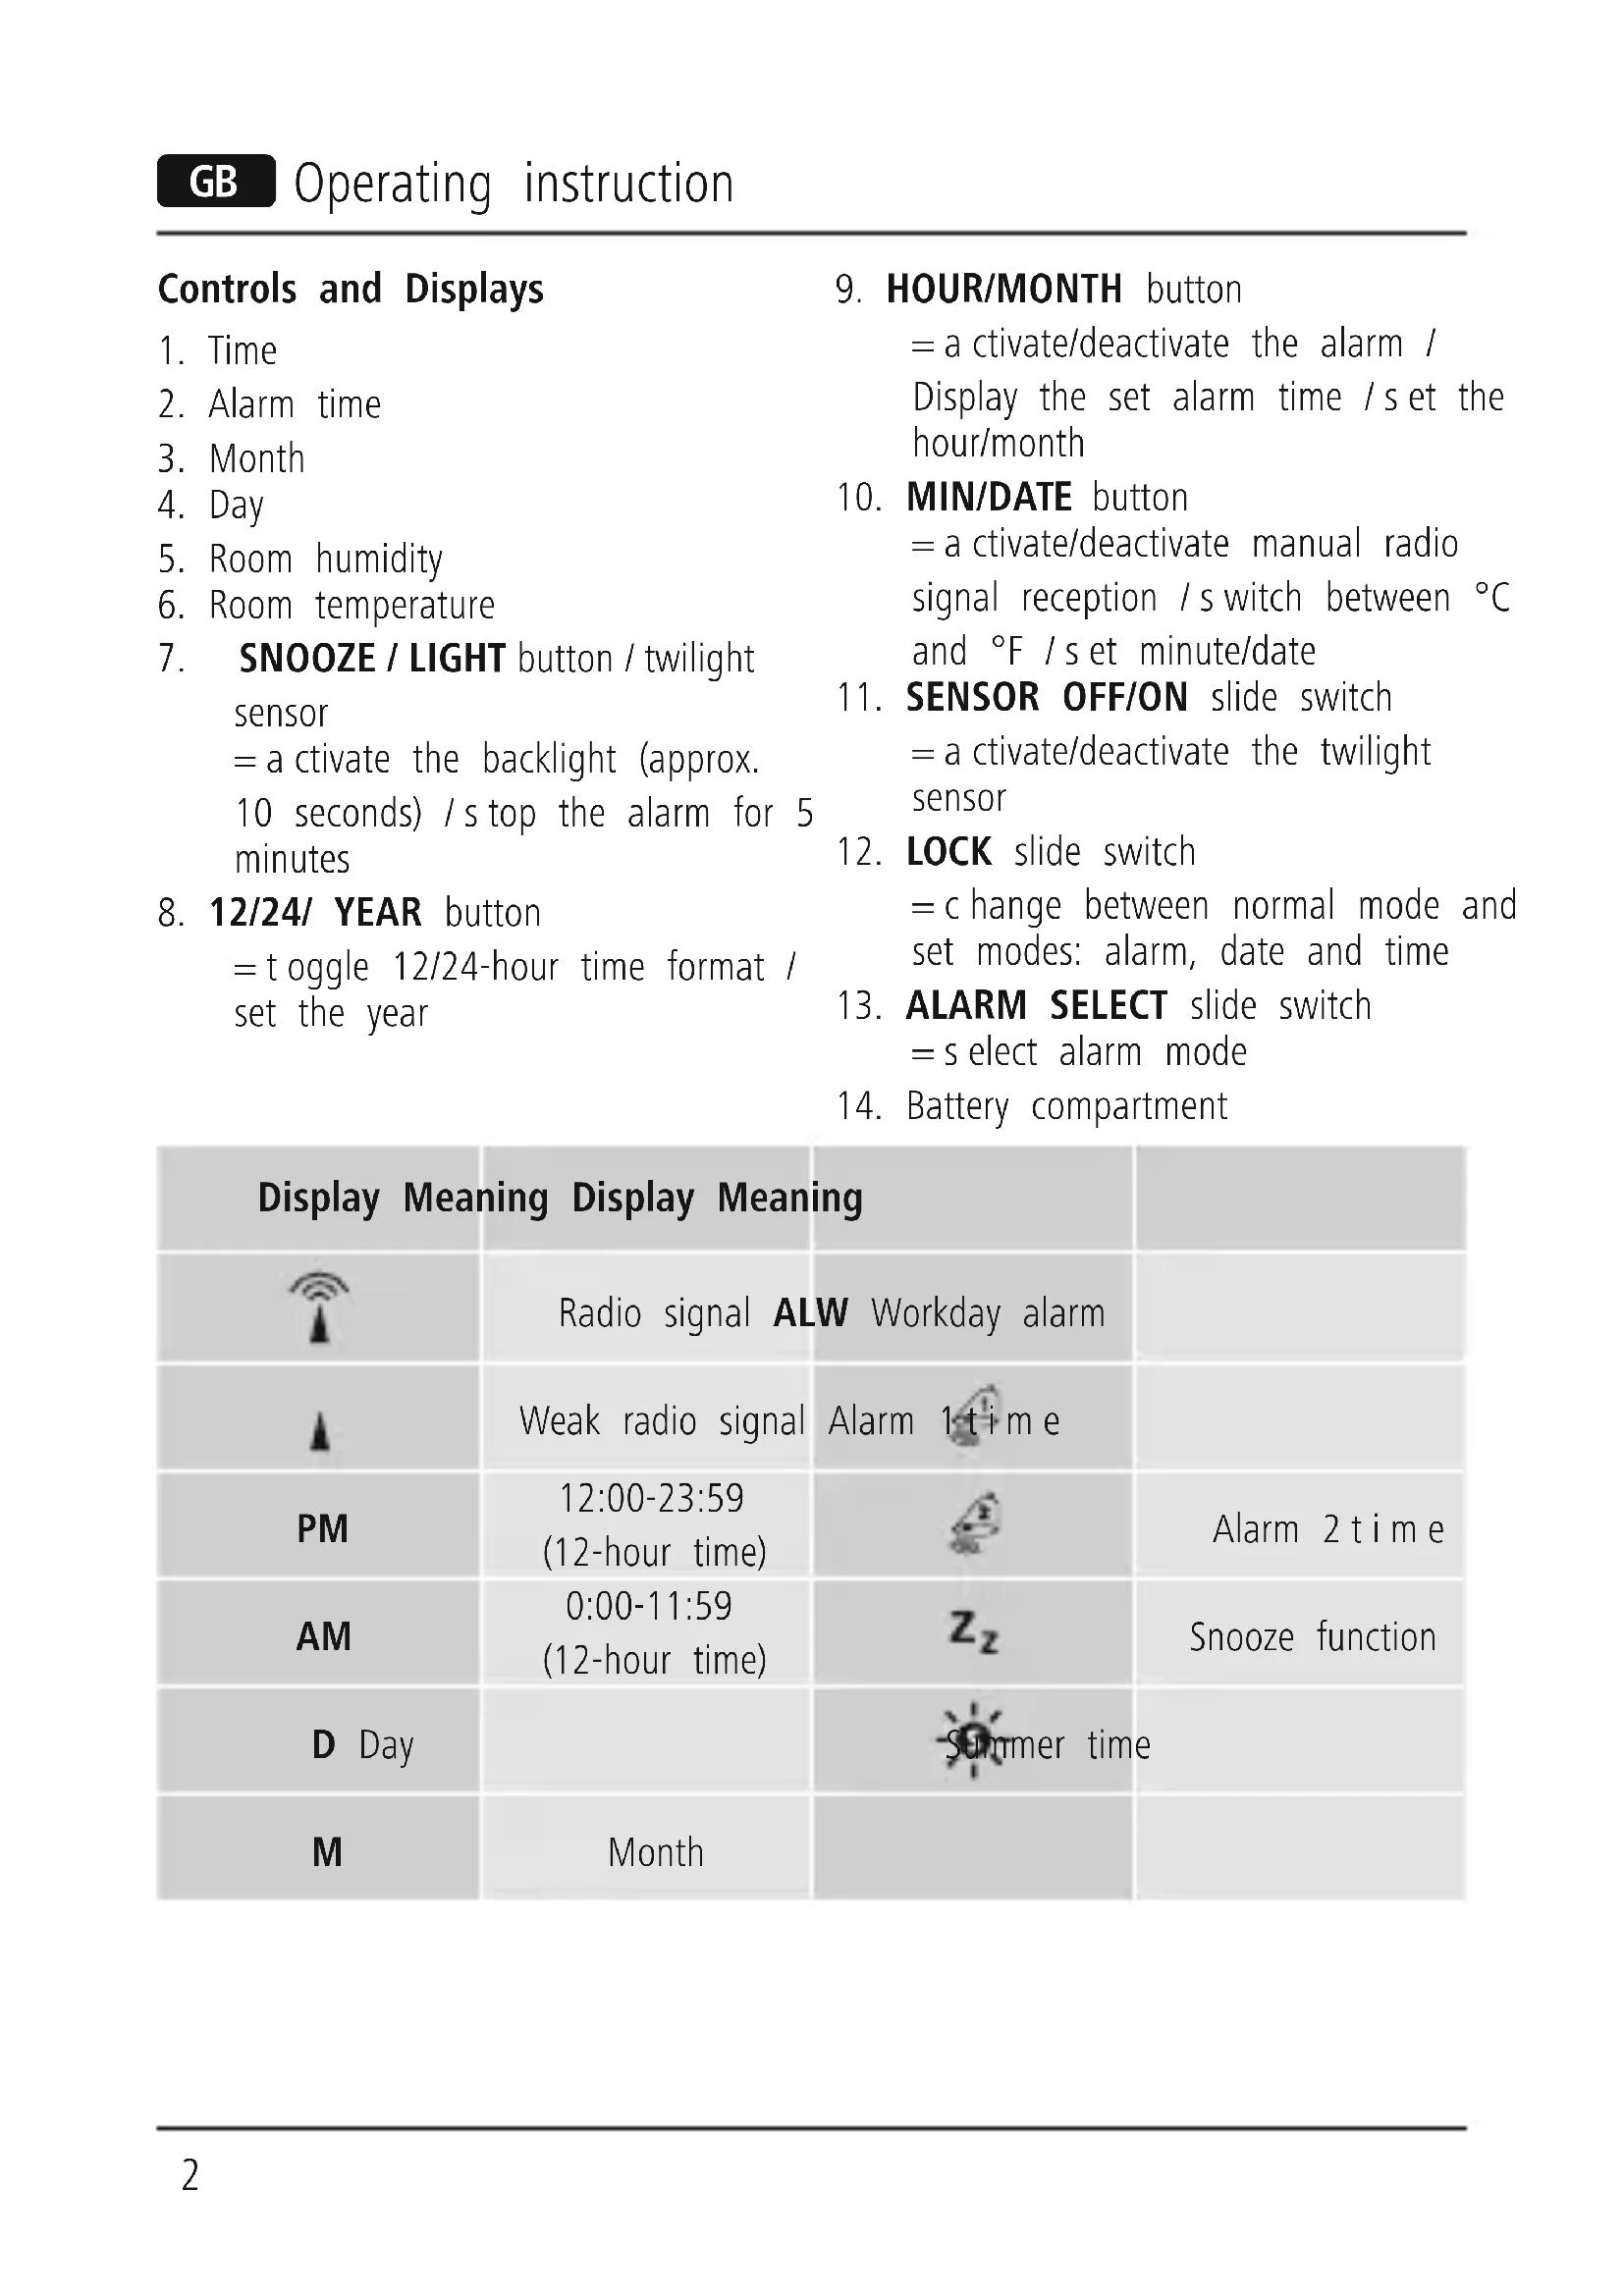
Controls and Displays
- Time
- Alarm time
- Month
- Day
- Room humidity
-
Room temperature
-
SNOOZE / LIGHT button / twilight sensor
= a c t i v a t e the backlight (a p pro x.
10 seconds) /s top the alarm for 5 minutes
- 12/24/ YEAR button
= toggle 12/24-hour time format /
set the year
- HOUR/MONTH button
= a c t i v a t e/de a c t i v a t e the alarm /
Display the set alarm time / s et the hour/month
- MIN/DATE button
= a c t i v a t e/de a c t i v a t e man u a l r a d i o
signal reception /s switch between ^ C and ^ /set minute/date
- SENSOR OFF/ON slide switch
= a c t i v a t e/de a c t i v a t e the twilight sensor
- LOCK slide switch
= c hange between normal mode and set modes: alarm, date and time
- ALARM SELECT slide switch
= select alarm mode
- Battery compartment
Display Meaning Display Meaning

Radio signal ALW Workday alarm

Weak radio signal Alarm 1-time
PM
12:00- 23:59
(12-hour time)
AM
0:00-11:59
(12-hour time)
D Day
Month


Alarm 2 time
Snoopze function
M
1. Explanation of Warning Symbols and Notes
Warning

This symbol is used to indicate safety instructions or to draw your attention to specific hazards and risks.
Note

This symbol is used to indicate additional information or important notes.
2. Package Contents
- Radio Controlled Alarm Clock RC 660
- 3 x AAA batteries
These operating instructions
3. Safety Notes
The product is intended for private, non-commercial use only.
- Protect the product from dirt, moisture and overheating, and only use it in a dry environment.
- Do not use the product in areas where the use of electronic devices is not permitted.
- Do not put the product near interference fields, metal frames, computers, TVs, etc. Electronic devices and window frames can negatively affect the product's functionality.
- Do not drop the product and do not expose it to any major shocks.
- Do not attempt to service or repair the product yourself. Leave any and all
service work to qualified experts.
- Do not modify the product in any way. Doing so voids the warranty.
- Keep the packaging material out of the reach of children due to the risk of suffocation.
- Dispose of packaging material immediately according to locally applicable regulations.
Warning - Batteries

- Immediately remove and dispose of dead batteries from the product.
- Only use batteries (or rechargeable batteries) that match the specified type.
- Do not mix old and new batteries or batteries of a different type or make.
- When inserting batteries, note the correct polarity (+ and - m arkings) and insert the batteries accordingly. Failure to do so could result in the batteries leaking or exploding.
- Do not overcharge batteries.
- Keep batteries out of the reach of children.
- Do not short circuit the batteries/rechargeable batteries and keep them away from uncoated metal objects.
4. Getting Started
- Move the LOCK slide switch (12) to the LOCK position to select normal mode.
4.1. Inserting the batteries
- Open the battery compartment (14), insert three AAA batteries with the correct polarity and close the battery compartment (14).
4.2. Replacing the batteries
- Open the battery compartment (14), remove and properly dispose of the dead batteries and insert three new AAA batteries with the correct polarity. Replace the battery compartment cover.
| Display | Searching for the DCF signal |
| Display flashing | Active |
| Display steady (not flashing) | Successful - signal is being received |
| Not displayed | Inactive - no signal reception |
5. Operation
Note

- Immediate Hold down the 12/24/ YEAR button (8), HOUR/MONTH button (9) or the MIN/DATE button (10) to select the values faster. ly remove and dispose of dead batteries from the product.
5.1. Automatic date/time setting using the DCF signal
Once you have inserted the batteries, the display is switched on, an acoustic signal sounds and the alarm clock automatically starts searching for a D C F radio signal. During the search, the radio icon/ will flash. This process can take 3 to 5 minutes.
- When the wireless signal is received, the date and time are automatically set.
- Press and hold the MIN/ DATE button (10) for approx. 3 seconds to start a manual search for the DCF radio signal.
Note - Time settings

- If, during initial setup of the device, no DCF radio signal is received within the first few minutes, the search is aborted. The radio icon will go out.
If there are reception problems, we recommend leaving the clock to sit overnight, since interference is generally less at night. - In the meantime, you can start a manual search for the DCF radio signal at another location or you can manually set the time and date.
The clock automatically continues to search for the DCF signal every hour. If the signal is received successfully, the manually set time and date are overwritten.
Note - Summer time

The clock automatically switches to summer time. appears on the display as long as summer time is activated.
5.2. Manually setting the date/time Time
- Move the LOCK slide switch (12) to the TIME SET position to manually set the time (1).
- Set the hour by pressing the HOUR/MONTH button (9).
- Set the minute by pressing the MIN/DATE button (10).
- Move the LOCK slide switch (12) to the LOCK position to save your settings and return to normal mode.
Date
- Move the LOCK slide switch (12) to the DATE SET position to manually set the date (3/4).
- Set the year by pressing the 12/24/ YEAR button (8).
- Set the month by pressing the HOUR/MONTH button (9).
- Set the day by pressing the MIN/DATE button (10).
- Move the LOCK slide switch (12) to the LOCK position to save your settings and return to normal mode.
Selecting 12 or 24-hour format
- Press the 12/24/ YEAR button (8) to switch between the 12 and 24-hour formats (1/2).
5.3. Temperature display
- Press the MIN/ DATE button (10) to choose between ^ C and ^ F for the temperature display (6).
5.4. Alarm
Setting the alarm time
- Move the LOCK slide switch (12) to the ALARM SET position to manually set the alarm time (2).
- Repeatedly press the 12/24/YEAR button (8) to set the time of alarm 1 (2) or alarm 2 (2).
Either the symbol or the symbol is displayed accordingly. - Set the hour by pressing the HOUR/MONTH button (9).
- Set the minute by pressing the MIN/DATE button (10).
If necessary, press the 12/24/YEAR button (8) again to set the other alarm. - Move the LOCK slide switch (12) to the LOCK position to save your settings and return to normal mode.
Repeatedly press the HOUR/MONTH button (9) to display the set time of alarm 1 (2) or alarm 2 (2).
The corresponding symbol (or is displayed for about 10 seconds.
- By default, in normal mode (LOCK) the time for alarm 1 (2) is displayed.
LIGHT button (7)) to stop the alarm.
Otherwise, it will stop automatically after 2 m inutes.
Activating/deactivating the alarm
- Press the HOUR/MONTH button (9) once or repeatedly and hold it for about 3 seconds to enable or disable one of the alarms.
If an alarm is activated, the corresponding symbol (or) is displayed.
Select alarm mode
- Move the ALARM SELECT slide switch (13) to the WORKING DAY position.
If alarm 1 or alarm 2 is activated, the weekday alarm only triggers an alarm on weekdays (Monday to Friday). ALW (7) appears on the display. - Move the ALARM SELECT slide switch (13) to the NORMAL position.
If alarm 1 or alarm 2 is activated, the normal alarm triggers an alarm daily. The display does not show any additional indicator.
Note - A larm mode

Selecting an alarm mode (WORKING DAY or NORMAL) only has an effect if an alarm is enabled.
Alarm mode exit/snoopze function
If the alarm is triggered, the alarm symbol / will begin to flash and an alarm will sound.
- Press any button (except the SNOOZE/
Note -S nooze function

While the alarm signal is sounding, press the SNOOZE/LIGHT button (7) to activate the snooze function. The alarm symbol / and will begin to flash. The alarm signal will be stopped for 5 minutes, after which it will sound again.
5.5. Backlight
If you press the SNOOZE/ LIGHT button (7), the display will light up for approx. 10 seconds.
The alarm clock is equipped with a twilight sensor (7) that automatically switches on the backlight of the display (10) to a dimmed setting as soon as it gets dark.
- During the day or if there is enough light, the twilight sensor (7) automatically switches off the dimmed backlight on the display.
- Move the SENSOR OFF/ ON slide switch (11) to the SENSOR ON or SENSOR OFF position to activate or deactivate the twilight sensor (7).
Note - B a c k l i g h t

- We recommend deactivating the twilight sensor while the clock is not in use, while it is packed during travel, etc.
- Continuous use of the twilight sensor will drain the battery.
7. Warranty Disclaimer
Hama GmbH & Co KG assumes no liability and provides no warranty for damage resulting from improper installation/ mounting, improper use of the product or from failure to observe the operating instructions and/or safety notes.
6. Care and Maintenance
Only clean this product with a slightly damp, lint-free cloth and do not use aggressive cleaning agents. Make sure that water does not get into the product.
8. Technical Data

Power supply
Measuring range
Temperature
Air humidity
Radio Controlled Clock
4.5 V
3 x AAA batteries
$$ - 9, 9 ^ {\circ} \mathrm {C} - + 5 0 ^ {\circ} \mathrm {C} $$
$$ 1 4 ^ {\circ} F - 1 2 2 ^ {\circ} F $$
$$ 20 \% - 95 \% $$
9. Declaration of Conformity

Hereby, Hama GmbH & Co KG declares that the radio equipment type
[00186321, 00186322, 00136250, 00136251, 00136252] is in compliance
with Directive 2014/53/EU. The full text of the EU declaration of conformity
is available at the following internet address:
www.hama.com >00186321, 00186322, 00136250, 00136251,
00136252->Downloads.
Frequency band(s) 77.5 kHz
HnkaCnBcETTCNOCTOHNO
HET nHnKaun
Ycneesho - cnHan npnHrT
HeakTnBHO - npHcHnHa oTcyTCTByeT
WORKING DAY NNN NORMAL
PnIMHeTcTToIbKO B TOM Clyuae,
ecn yHKnna 6yDnJIbHnKa BkIIOyeHa.
OrklioqueeHne cnHaJa 6yDnIbHnKa / aBToNOBTOp cnHaJa 6yDnIbHnKa
- Pn cpa6aTaBHaHnn 6yDnJIbHnKa
Mnraet 3HaQOK 6yDnIbHnKa / nNoDaETc8 3ByKOBo CnHaJ.
- Yo6bl OTKJIIOHTb CnHaN, HaxMNTe
JIHO6yIO KHONKy, KpOme SNOOZE/ LIGHT (7).
- Ecln cnHaJI He 6bl OTKIOUeH
BpyHyIO,TO OH aBTOMaTnueCKN
OTKJIIOHTcYepe3 2 MNHyTbI.

PpimmeaHne - cyHKun aBToNobTopa cnHaJa 6yDnIbHnKa
BoBpeMaIpoaun cnHaJa
6yndnIbHnKa HaxMnte KHOngKy
SNOOZE/LIGHT (7), yTO6bI BKJIIOUHTb
Функцию abToNoBTopa cnHaJa.
Ha nncnnee HauHET Mrratb 3 HaoyK
6yndnIbHnKaa /n .ZpOdaua
CnHaJa npepbBaetc Ha 5 MHyT,
Nocne Yero CnHaI NOnaETc CHOBA.
5.5.ПодсВeТka
- Пи Нжати Кногк SNOOZE /
LIGHT (7) npimepno Ha 10 cekyHn BkIouaetcnoCBeTKa nCnJIeJ.
BydnilbHK OchaueH DaTcNKOM
OCBeUeHHOCTn (7), KOToPbI B YcIOBnax NIOXoN O CBeUeHHOCTn aBTOMaTnueckn BKJIouHaET IOdCBETKy DInCnJIeJ.
- Pn DHeBHom CBTe n/nnn OoctaToHOn OCBeUeHHOCTn DaTnK OCBeUeHHOCTn (7) ABTOMaTHueCKN OTKJIIOuAeT NOcCBETKy IUCnJIpeJ.
- YctaHOBInTe nepeKJIouaTeIb SENSOR
ON INN SENSOR OFF, YTO6bI
BKJIIOHTb IIN OTKJIIOHTb DaTNUK
OCBeUeHHoCTn (7).

00136252- >Downloads.
ДиаэзOH/ДиаэзОнblчacTOT77,5kHz
WORKING DAY resp. NORMAL
14^ F - 122^ F
Humidade do ar
20% - 95%
14^ F - 122^ F
Ilmankosteus
20% - 95%
I36npaHe Ha 12-ycob nn 24-ycob opmat
- Hata nche Te 6ytoHa 12/24/YEAR (8), 3a da npebkIouHte Mejdy 12- n 24-ycob fopMaT (1/2).
5.3. Temnepatypa
- Hata ncheTe 6yToHa MIN/DATE (10), 3a Da npBkIouHte INnKaunra Ta 3 a Tempepatya (6) mexdy ^ C n ^ F .
5.4.6ydnHnK
Hactpoika Ha yac 3a cb6yKdahe
- Пльзnete npeBknHouBaTeIa LOCK (12)Впложене ALARM SET, 3a Да NaHacTpOte pBHyNo Yaca 3a cb6yXdane (2).
HaTnchHe TIOBTOPO 6yToHa 12/24/ YEAR (8),3a Da HAcTpOnTe Yaca 3a Cb6yXdAHe 1(2) nn Yaca 3a Cb6yXdAHe 2(2). - ПокаЗВа ce cIMBOЛьТ nДn
3aДаи3берeteчacOBeTe(BbB Bb3XODIЯpe),HaTnCHeTe 6yToHa HOUR/MONTH (9).
3aДаи3беретe MInHyTITe (BbB Bb3XODIЯп, peД), HaTnCHTe 6yToHa MIN/DATE (10). - Ako e Heo6xOIMo, HATnCHeTe 6yToHa 12/24/YEAR (8) n NOBtOpTe NaCTpoiKaTa 3a npYrna Yac 3a Cb6yXdaHe.
- Пльзные певкювателя LOCK(12)В поожене LOCK,за за заразиerte
HactpoynKeIe N da c e B bpHeTe B HopMaJIen peXIM.
- Hatnchete HekoJIKOKpatHO 6yToHa HOUR/MONTH (9), 3a Na HacTpOnte yaca 3a c6yKdaHe 1 (2) nIu yaca 3a c6yXdaHe 2 (2).
- ПокаЗВа ce сИМВОЛьТ ИЛN 3a OKOло 10 ceKунди.
- По порраЗбиране в Нормален peжим (LOCK) вини ce пoka3Ва часьт 3a сбухданe 1(2).
AKTNBnpaHe/DeaKTNBnpaHe Ha 6ydnHnka
HaTnCHHeI 3aApbXTe 6yToHa HOUR/MONTH (9) HeKoJIkoKpaTHO 3a OkJIo 3 cekuHn, 3a Ja aKTINBpuTe/ DeakTNBpuTe yaca 3a cb6yJaHe 1 nIn/n Yaca 3a cb6yJaHe 2.
- Пи akTNbIpaH yac 3a cb6yXdAne ce nOKa3Ba cBOTBeTHnT CmBOJ /
I36op Ha peXm Ha 6yDnHnK
- Плбзhevпpeвклочьатя ALARM SELECT (13) в поожене WORKING DAY.
-Будуннкьт -akoeakTNBupan yac 3a cb6yxdahe 1 n/niln 2-noanda BCnHaJI 3a cb6yxdahe camo Bp a6OTHnTe dHI (OT noHeJeHNK Do neTbK).Ha dIscPJIe Ce noka3Ba ALW (7). - Плбз Hedgeпразькючbatел ALARM SELECT (13) в поожене NORMAL.
- BydINHnKbT - aKO e aKTINBipan Yac 3a cb6yXdaHe 1 n/nIn 2 - noDaBa
eKeiHeBHO cIrHaJI 3a cb6yXdaHe. Ha IINcIIpe He Ce NOKa3Ba HnIO.

3a6eJexka - PekmHa 6yDnHnK
I36opbT Ha pexnM Ha 6ydnHnK WORKING DAY, pcn. NORMAL mMa eΦeKT camo npn aKTHBnpan 6ydnHnK.
CnnpaHe Ha 6yDnHnKa/ΦyHKcna "DpMa"
Ako 6yDnHnKbT ce 3aJeNCTBa, CnMBOJbT 3 a a napMa / 3aNoCbIa MnRa n Ce yBa CnHaI 3a Cb6yXdaHe.
- ДOKОСHEТЕ РОИЗВОЛЕН 6уTOH (6e3 6уTOHa SNOOZE/LIGHT (7)), за за спpeTe aларMaTa.
B npotnbEN cnyaT Ta une cnpe aBTOMaTHNO cJe2 MNHyTN.
3a6eJexKa -Функия "Дрмka"

3aДаakTNBnpateФyHKunraTa "Дрмka",HaTncheTe6byToHa SNOOZE/LIGHT(7),DOKATO TpaeCnHaNbT3acb6yKdane.Ha DnCnIe 3anOuBa DaMnRa CnMBOJbT "BynJIHnK" /m. cnHaNbT3a Cb6yXdaHe npeKbcBA 3a5 MNHyn i CJIeI TOBa Ce 3aJeNCTBa OTHOBO.
5.5.ФоновocBetлeнe
-
Ako haTnchTe 6byToHa SNOOZE/LIGHT (7),ДиСплЯт ce OcBETЯBa 3a OkoJIo 10ceKyuHdN.
-
BydINHkBt e cHa6eH CbC ceH3Op 3a 3dpaq (7), KoITo B IIO-TbMHa OKoJHa cpea aBTOMaTnUHO BKJIIOuBa npRnySeHo fOHOBO OCBetJeHne Ha DnCpIeJ.
Ha DHeBHa CBeTInHa, CbOTBeTHO npn DoCTaTbUHO CBeTla OKoJHa cpeJa, CeH3OpbT 3a 3npa4 (7) aBTOMaTnHo N3KJIIOuBa PpIgLyUeHTo fOHOBO OCBetJIeHne Ha DnCnJIeJ. - Пльзhevпpeвклочьатя SENSOR OFF/ON (11) в поожене SENSOR ON, песn. SENSOR OFF, за заakтувinate, песn. заakтувiateceнзора 3a 3драч (7).
3a6eJexKa -ФoHOBOOCBeTJIeHne

- Пpenopьыа ce ceH3OpbT 3a 3dpaчда ce DeakTNBnpa, KOrato He ceI3NoJ3Ba, NO BpeMe Ha nbTyBaHe B6araX nT. H.
- Пордьлжnteното n3пол3ВаHe Ha ceH3Opa 3a 3Драч n3TOцаВa 6aTepeиTe.
6. Texnuecko obcnykbahe n nodpbxxka
IOnuNCTBaIte To3n IpoDyKT cAmO cIeKO HAbJaXHeHa KbPna, KoTTo He NycKa BlnacINKn, Hne 3NoJ3BaIte arpeCnBn IOnuNCTBaUH npenapatn. BnImaBaIte da He IOnaDa BOda B nPoDyKta.
7.ИЗКЛЮУВанеHa rapaHцЯ
Xama Tm6X & Ko. KHe Inoema HnKaKBa OTROBOpHocT nIi rapaHcIa 3a NOBpeN B pe3yIiTat Ha He npabInHa INCTaJaCn, MoHTax N He npabInHa yNoTpe6a Ha npOdykTa nIi HeCnA3BaHe Ha yNbTBaHeTo 3a O6CnyXBaHe n/IIn INHCTpyKcIInTe 3a 6e30NaChOCT.
8. TexHnueckn daHHN

Papno6yndnHnK
EneKtpo3axpaHbaHe
4,5
3 6aTeepn AAA
Диапазон
Temnepatypa
BlaXHocT Ha Bb3dyxa
-9,9°C - + 50°C
14^ F - 122^ F
20 % - 95 %
9.ДeКларацnia 3a CbOTBeTCTBnE

C hactoTo Hama GmbH & Co KG neKnapupa, ye TnIbT paNocntema
[00186321, 00186322, 00136250, 00136251, 00136252] cboTBeTCTBa Ha
OCHOBHnTe n3NCKBaHnHa dIpuKeTnBa 2014/53/E0. IbJIHnT TeKCT Ha EC
deKnapaunra 3a cboTBetCTBne e Ha pa3noJoxHne Ha CJeHNy INHTepHET aDPEC:
www.hama.com ->00186321, 00186322, 00136250, 00136251,
00136252->Downloads.
PapnoecToTeH nnana3OH/
PapnoecToTHn DnaPa3OHn
77,5 kHz
hama®
Hama GmbH & Co KG 86652 Monheim/Germany
Service & Support

www.hama.com

+49 9091 502-115
D
GB
www.hama.com/nep
All listed brands are trademarks of the corresponding companies. Errors and omissions excepted, and subject to technical changes. Our general terms of delivery and payment are applied.

- Radio Controlled Clock RC 660
- Funkwecker
- Controls and Displays
- Display Meaning Display Meaning
- Explanation of Warning Symbols and Notes
- Warning
- Note
- Package Contents
- Safety Notes
- Warning - Batteries
- Getting Started
- Inserting the batteries
- Replacing the batteries
- Operation
- Automatic date/time setting using the DCF signal
- Note - Time settings
- Note - Summer time
- Manually setting the date/time Time
- Date
- Selecting 12 or 24-hour format
- Temperature display
- Alarm
- Setting the alarm time
- Activating/deactivating the alarm
- Select alarm mode
- Note - A larm mode
- Alarm mode exit/snoopze function
- Note -S nooze function
- Backlight
- Note - B a c k l i g h t
- Warranty Disclaimer
- Care and Maintenance
- Technical Data
- Declaration of Conformity
- WORKING DAY NNN NORMAL
- OrklioqueeHne cnHaJa 6yDnIbHnKa / aBToNOBTOp cnHaJa 6yDnIbHnKa
- PpimmeaHne - cyHKun aBToNobTopa cnHaJa 6yDnIbHnKa
- 5.5.ПодсВeТka
- I36npaHe Ha 12-ycob nn 24-ycob opmat
- Temnepatypa
- 5.4.6ydnHnK
- Hactpoika Ha yac 3a cb6yKdahe
- AKTNBnpaHe/DeaKTNBnpaHe Ha 6ydnHnka
- I36op Ha peXm Ha 6yDnHnK
- 3a6eJexka - PekmHa 6yDnHnK
- CnnpaHe Ha 6yDnHnKa/ΦyHKcna "DpMa"
- 3a6eJexKa -Функия "Дрмka"
- 5.5.ФоновocBetлeнe
- 3a6eJexKa -ФoHOBOOCBeTJIeHne
- Texnuecko obcnykbahe n nodpbxxka
- 7.ИЗКЛЮУВанеHa rapaHцЯ
- TexHnueckn daHHN
- 9.ДeКларацnia 3a CbOTBeTCTBnE
- hama®
- Hama GmbH & Co KG 86652 Monheim/Germany
Brand : HAMA
Model : RC660
Category : Radio