Baby Camera - Baby monitors LANAFORM - Free user manual and instructions
Find the device manual for free Baby Camera LANAFORM in PDF.

User questions about Baby Camera LANAFORM
0 question about this device. Answer the ones you know or ask your own.
Ask a new question about this device
Download the instructions for your Baby monitors in PDF format for free! Find your manual Baby Camera - LANAFORM and take your electronic device back in hand. On this page are published all the documents necessary for the use of your device. Baby Camera by LANAFORM.
USER MANUAL Baby Camera LANAFORM
We thank you for buying the LANAFORM® Baby Camera. Ideal to keep an eye on your baby, this cordless infrared camera will allow you to hear and to watch your child day and night. The Baby Camera is a useful instrument for you and your baby in the course of the first months of his existence.
PLEASE READ ALL THE INSTRUCTIONS BEFORE USING YOUR BABY CAMERA, ESPECIALLY THESE FEW FUNDAMENTAL SAFETY INSTRUCTIONS :
Make sure the voltage of the electricity grid corresponds to the one of the apparatus.
See to it that the camera and the cable of the adaptor are always out of baby's reach.
Never connect or disconnect the plug from the power point with wet hands.
• Always put the Baby Camera on a hard, flat and horizontal surface, keep it away from heat sources like stoves, radiators, etc.
- Do not use this apparatus in a room where aerosols (sprays) are being used or in a room where oxygen is administered.
- Do not use this apparatus under a cover or under a pillow. excessive heat may cause fire, electrocution or burns.
Do not use this apparatus in the proximity of wet zones like the bathtub, the sink, etc.
Condition of functioning: from -10°C to 40°C; with a humidity of 85%RH.
Condition of storage: from -20°C to 60°C; with a humidity of 85%RH.
- In order to avoid risks of electrocution, do not open the camera unit nor the surveillance unit (apart from the battery compartment).
- The adaptors and batteries may warm up a little during functioning. This is perfectly normal.
The cables of the power adaptor must be laid away from the passageway.
- Use only the power adaptors supplied. To avoid overheating do not use an extension cord.
- Do not roll the cable around the apparatus.
- Do not move this apparatus by its supply cable.
- If the supply cable is damaged, it needs to be replaced by a special or similar cable available at your supplier's or at his after-sales service.
- Be sure to turn off and unplug the apparatus after each use.
- Do not use in any case a camera other than the one from the make of Lanaform.
- When you use the Baby Camera, you use public waves. The sounds and the images may be broadcasted to other receivers. The conversations, even the ones coming from rooms that are close to the camera unit, can also be broadcasted. To protect your privacy, always unplug the camera unit when you are not using it.
- This apparatus is not intended to be used by persons, including children, whose physical, sensory or mental capacities are limited, or persons without experience or knowledge, unless they have the advantage of, by mediation of a person responsible of their security, a supervision or preceding instructions regarding the use of the apparatus. It is convenient to keep an eye on the children to make sure they don't play with the apparatus.
- Exclusively use the Baby Camera according to the purpose it is made for and as described in this manual.
ADDITIONAL INFORMATION
- The sound- and picture quality is affected by the use of microwave ovens, as well as by the use of other cordless systems, such as Bluetooth, local cordless networks, ...
-
The Baby Camera is a product based on the Radio Frequency (RF). That means that its functioning can be disturbed by the same type of interference as the mobile phones, portable radios as well as any other product based on the radiofrequency.
-
The Baby Camera is not limited to your baby's room. You can use it all over your house. Consequently, if a person in your neighbourhood also possesses a Baby Camera on the same channel, this person will be able to hear and see your baby.
- Safety of wave radios: when turned on, the Baby Camera emits and receives radio waves. The Baby Camera is in conformity with the corresponding standards.
1. LIST OF COMPONENTS SUPPLIED
1) Camera 2,4 GHz cordless
2) Receiver 2,4 GHz cordless
3) Headphones
4) Adaptor for camera
5) Adaptor for receiver
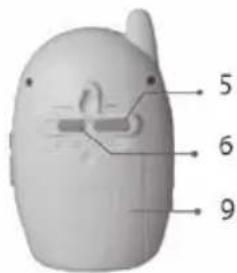
2. COMPONENTS
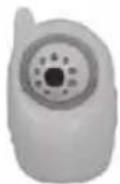
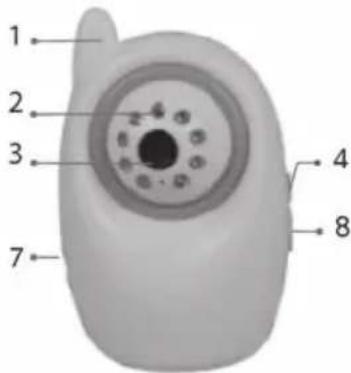
2-1. Structure of the camera
1) Aerial
2) Infrared indicators
3) Lens
4) Alimentation On/Off
5) Alarm button « Alarm »
6) Acquisition button « Learning »
7) Power supply plug
8) Channel button
9) Lid for the battery compartment
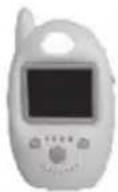
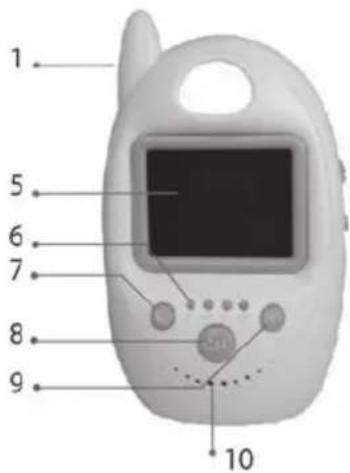
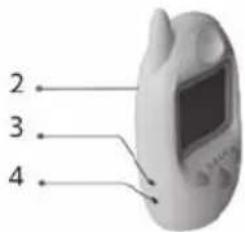
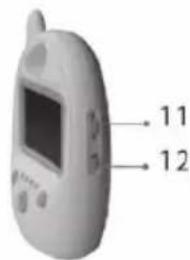
2-2. Structure of the receiver
1) Aerial
2) Lid for the battery compartment
3) Headphones
4) Power supply plug
5) TFT-LCD
6) Channel indicator
7) Standby button
8) Channel button
9) Stop button for the alarm
10) Speaker
11) Adjustable volume button
12) Power On/Off
①
②
③
④
⑤
3. INSTALLATION
3-1. Installation of the camera
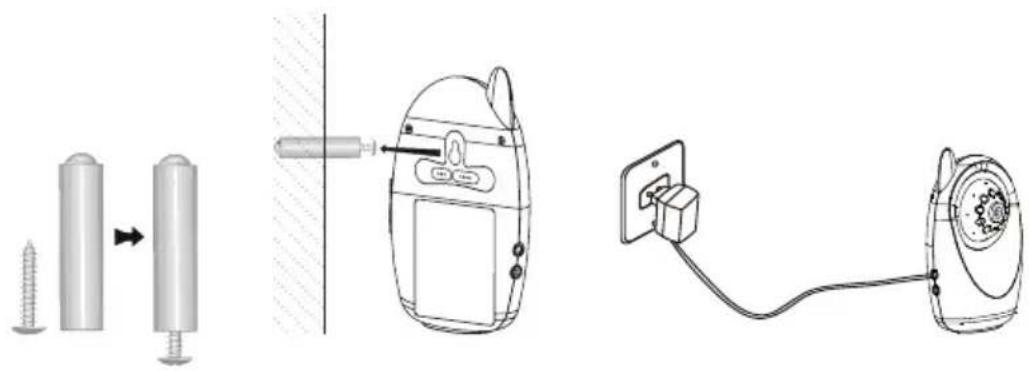
- Installation of the base of the camera
- Never put the camera unit inside the bed or the baby's playpen
- Put the camera at least 1 metre away from your baby.
- The unit can be fixed to the wall or placed on a stable and flat surface, like a sideboard or a tabletop. For wall mounting, please refer to our following schemes
- Connect the camera to the adaptor, and then put the power button in position ON.
- Make the round head of the camera swivel in an angle that allows practising surveillance.
natural_image
Diagram showing three different electrical components: screw, two cylindrical pins, and a power plug connected to a motor (no text or symbols present)Remark:
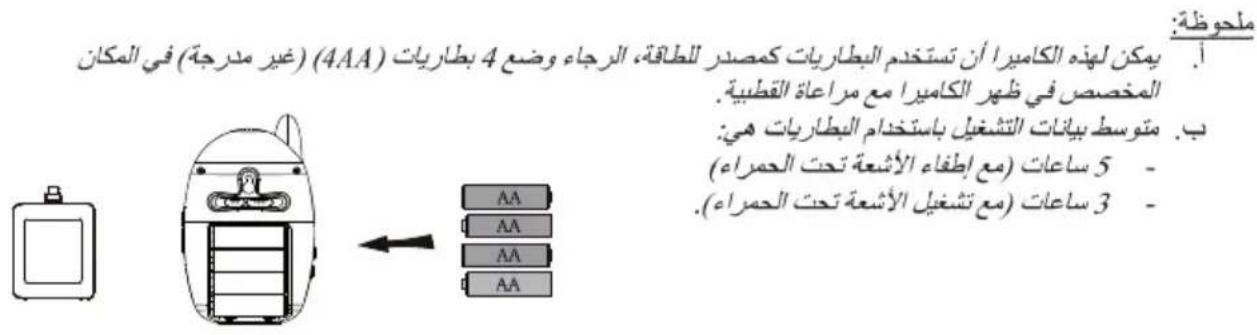
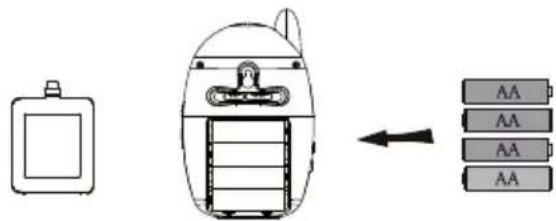
a. This camera can also use batteries as a source of supply. Please put 4 AA batteries (not supplied) in the compartment located at the back of the camera and see to it that you respect their polarity.
b. Average data of constant functioning while using batteries :
5 hours (infrared OFF)
3 hours (infrared ON).
- Configuration of the acquisition of data on the camera
In order to avoid the possible interferences intervening at the time you are using the camera.
Push the acquisition button « Learning ». Move the acquisition button at the back of the camera from OFF to ON, then hold the stop button (for the alarm) « 📄 » of the receiver pushed in for 3 seconds. A clear image will appear on the screen.
There is not need to change the channel to avoid the interferences.
The range of the apparatus (without obstacles) is about 100 metres.
However, this range may be reduced to +/- 30 metres depending on the environment of the place of application (the walls, ceilings).
- Configuration of the alarm of the camera
The camera has a function to detect sound.
The volume of the sound alarm is adjustable.
Configuration of the alarm for the detection of sound:
In order to configure the sound alarm, put the alarm button on « VOX ». The system then goes into sound alarm mode, which will allow it to detect sounds from 65 dB and to set off the alarm.
In case of the detection of a sound the alarm rings out during 2 minutes until the stop button for the alarm « 📄 » is activated. You will then have to wait 35 seconds before the system goes into the sound alarm mode again.
If the stop button for the alarm is not pushed within 2 minutes, the sound alarm will stop automatically after this period of time and the system will once again put itself into the sound alarm mode.
Configuration of the alarm OFF:
The alarm is not activated when the alarm button is in position OFF.
3-2. Installation of the receiver
- Connect the receiver to the adaptor, and then put the power button in position ON.
- Adjust the volume control to the desired level.
- Configure the receiver on the same channel as the camera by pushing the channel button «CH»; the images appear on the screen.
a. The original channel for the receiver is defined to correspond with the one of the camera.
b. A single camera is offered with this set. Nevertheless the receiver takes on up to 4 cameras working simultaneously. If 2, 3 or 4 cameras are functioning, keep the channel button «CH» pressed in for about 3 seconds to enter the automatic navigation mode and the system will alternate between the actual channels in reason of 6 seconds each.
If you wish to have an extra camera at your disposal, please contact your retailer.
c. The monitoring screen turns black in the absence of a signal or interference.
Remark:
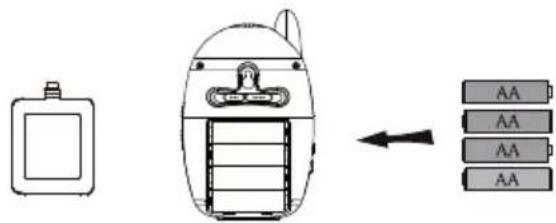
c. This camera can also use batteries as a source of supply. Please put 4 AA batteries (not supplied) in the compartment located at the back of the camera and see to it that you respect their polarity.
d. Average data of constant functioning while using batteries :
5 hours (infrared OFF)
3 hours (infrared ON).
| Element Value | |
| GENERAL | |
| Frequency of transmission ISM 2 400~2 483 MHz | |
| Power of transmission 10 maw/CE ; 2 maw/FCC | |
| Effective range without obstruction* 100 m | |
| Spectre of diffusion FHSS | |
| Mode of modulation GFSK | |
| Functioning temperature -10 °C ~ +40 °C/+14 °F ~ +104 °F | |
| Functioning humidity ≤85 % | |
| CAMERA | |
| Type of imaging sensor CMOS | |
| Total number of pixels of the images NTSC : 720 x 480 pixels ; PAL : 720 x 576 pixels | |
| Minimal exposure 0 Lux (infrared ON) | |
| Distance of night vision 5 m | |
| Angle of vision 55° | |
| Time limit of battery function | 5 hours |
| Image resolution | 320 x 240 to 10 l/s |
| Sensibility of the sound detection | >65 dB |
| Consumption of electricity (max.) | 280 mA |
| Power supply | CC + 8 V |
| Dimensions (I x P x H) | 86 x 48 x 135 mm |
| Weight (approx.) | 146 g |
| RECEIVER | |
| Type of screen LCD | 2,36" TFT-LCD |
| Real pixels | 480 x 234 |
| Sensibility of reception | ≤-85 dBm |
| Consumption of electricity (max.) | 200 mA |
| Time limit of battery function | 5 hours |
| Power supply | CC +8 V |
| Dimensions (I x P x H) | 86 x 54 x 143 mm |
| Weight (approx.) | 130 g |
* The real transmission range is liable to vary in function of the weather, the location, the interferences and the construction of the building.
LIMITED GUARANTEE
LANAFORM ^® guarantees that the product is free from any material or manufacturing defect for a period of two years as from the date of purchase, except as stipulated herebelow.
The guarantee on this LANAFORM ^® product does not cover damage caused by inappropriate or misuse, accident, attachment of any unauthorized accessory, any modification made to the product or any circumstance of any kind beyond the control of LANAFORM ^® .
LANAFORM ^® cannot be held liable for indirect, consequential or special damage of any kind.
All implicit guarantees of the aptitude of the product are limited to two years as from the initial date of purchase.
On reception, LANAFORM ^® will repair or replace your appliance as appropriate and will return it to you. This guarantee must be carried out by LANAFORM ^® Service Centre. Any maintenance of this product entrusted to anyone other than the LANAFORM ^® Service Center voids this guarantee.
MANUEL D'INSTRUCTION
natural_image
Technical line drawings of three electrical components: screw, battery, and socket connected to a power outlet (no text or symbols)Remarque :
natural_image
Illustration of three different electrical components: screw, two cylindrical sensors, and a power plug (no text or symbols present)
Opmerking :
natural_image
Diagram showing three different electrical components: screw, two cylindrical pins, and a device connected to a plug (no text or symbols present)
Observación:
natural_image
Diagram showing three different electrical connections: screw, battery, and power plug (no text or symbols present)
Hinweis:
natural_image
Illustration of three different electrical components: screw, battery, and socket connected to a power outlet (no text or symbols present)
N.B:
natural_image
Diagram showing three different electrical components: screw, two cylindrical pins, and a device with a plug (no text or symbols present)INFORMACJE DODATKOWE
natural_image
Diagram showing three different electrical components: screw, battery, and power plug connection (no text or symbols present)
Przypomnienie :
natural_image
Technical line drawings of three different electrical components: screw, push-button switch, and power plug (no text or symbols present)Napomena:
Ova kamera kao izvor za napajanje može koristiti i baterije. Molimo vas da umetnete 4 AA baterije (nisu isporučene) u odjeljak smješten na stražnjoj strani kamere i pazite da im odgovaraju polariteti.
Prosjek podataka konstantnog rada uz korištenje baterija :
5 sati (infracrveno OFF (Isklj.))
3 sata (infracrveno ON (Uklj.))
2. Konfiguracija akvizicijskih podataka na kameri
Kako biste izbjegli moguće smetnje koje se događaju u vrijeme kada koristite svoju kameru, pritisnite akvizicijski gumb « Learning ». Pomaknite akvizicijski gumb na stražnjem dijelu kamere iz položaja OFF (Isklj.) u ON (Uklj.), potom držite pritisnutim gumb za prekid (za alarm) « » na prijamniku za 3 sekunde. Na zaslonu se prikazuje jasna slika.
natural_image
Diagram showing three different electrical components: screw, two cylindrical pins, and a device connected to a power outlet (no text or symbols present)Opomba:
natural_image
Illustration of three different electrical components: screw, two cylindrical pins, and a connected power plug (no text or symbols present)