
RoninSC - Tripod DJI - Free user manual and instructions
Find the device manual for free RoninSC DJI in PDF.
| Product Type | Camera stabilizer (gimbal) with tripod |
| Brand | DJI |
| Model | Ronin-SC |
| Dimensions (folded gimbal) | 220 × 200 × 75 mm |
| Dimensions (unfolded gimbal) | 370 × 165 × 150 mm |
| Weight (gimbal) | Approximately 830 g |
| Weight (handle) | Approximately 258 g |
| Weight (tripod) | Approximately 160 g |
| Power | Lithium battery 18650, 2450 mAh, 7.2 V, 17.64 Wh |
| Static current | 0.2 A |
| Maximum standby time | 11 hours |
| Operating temperature | -20 °C to 45 °C |
| Bluetooth frequency | 2.4 to 2.4835 GHz |
| Bluetooth transmitter power | < 8 dBm |
| Main functions | Joystick, M button, trigger, 3-axis locks, Ronin app |
| Getting started | Download the app, activate via Bluetooth, balance the camera |
| Maintenance | Clean with a soft dry cloth, recharge via USB-C port with 5V/2A adapter |
| Safety | Transport locks on all three axes, power button and standby mode |
| Spare parts | Tripod, handle, mounting plate, USB-C cable, installation plate |
| Camera compatibility | Check the official DJI list |
Frequently Asked Questions - RoninSC DJI
User questions about RoninSC DJI
0 question about this device. Answer the ones you know or ask your own.
Ask a new question about this device
Download the instructions for your Tripod in PDF format for free! Find your manual RoninSC - DJI and take your electronic device back in hand. On this page are published all the documents necessary for the use of your device. RoninSC by DJI.
USER MANUAL RoninSC DJI
KpaTKoe pyKOBOCTBO NOb3OBaTeA
v1.0
Contents
EN Quick Start Guide 2
CHS 快速入门指南 10
CHT 快速入門指南 18
JP イイックスタ一トガイド 26
KR LKStTJ3I3 34
DE Kurzanleitung 42
ES Guia de inicio=rápido 50
FR Guide de démarrage rapide 58
IT Guida di avvio rapido 66
NL Snelstartgids 74
PT Guia de inicio=rápido 82
PT-BR Guia de inicio=rápido 90
RU KpaTKoe pyKOBoIDCTBO noJIb3OBaTeJIa 98
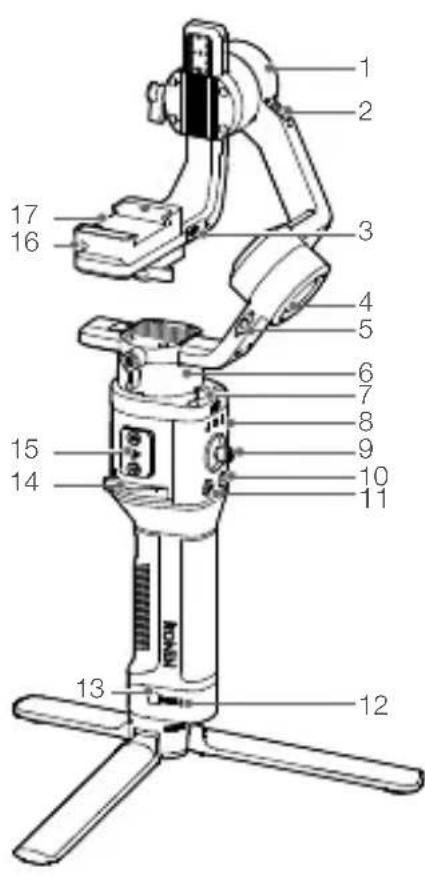
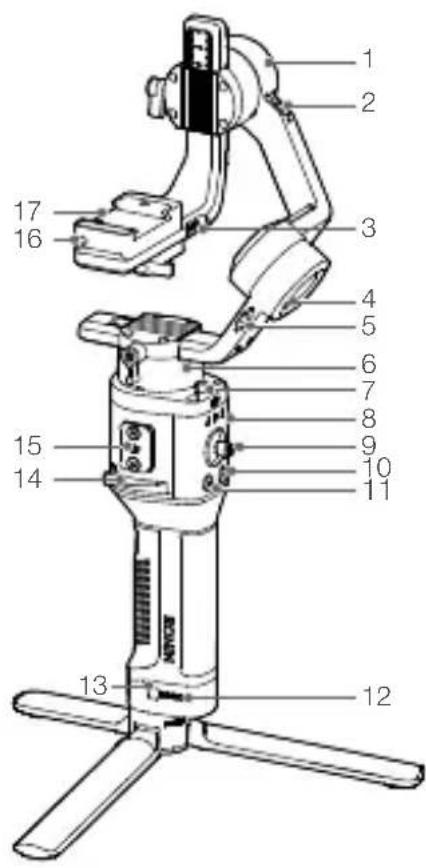
- Tilt Motor
- Tilt Lock
- Camera Control/ Accessories Port (USB-C)
- Roll Motor
- Roll Lock
- Pan Motor
- Pan Lock
- Profile LED Indicators
- Joystick
- Camera Control Button
- M Button
- Battery Level Indicators
- Battery Level Button
- Lever
- Ronin Series Accessories (RSA) Port
- Safety Lock
- Camera Mounting Plate
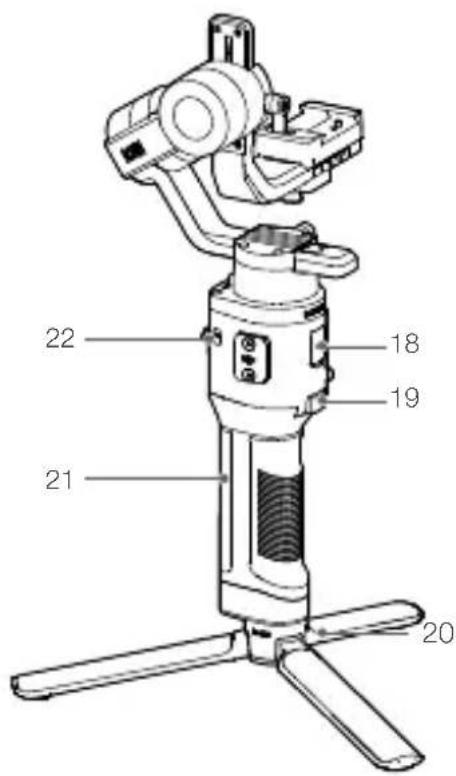
18.Power Port (USB-C)
19. Trigger
20. Tripod
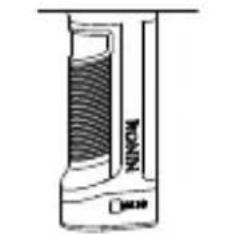
21. Grip (Inc. 1/4" and 3/8" Mounting Holes)
22. Power Button
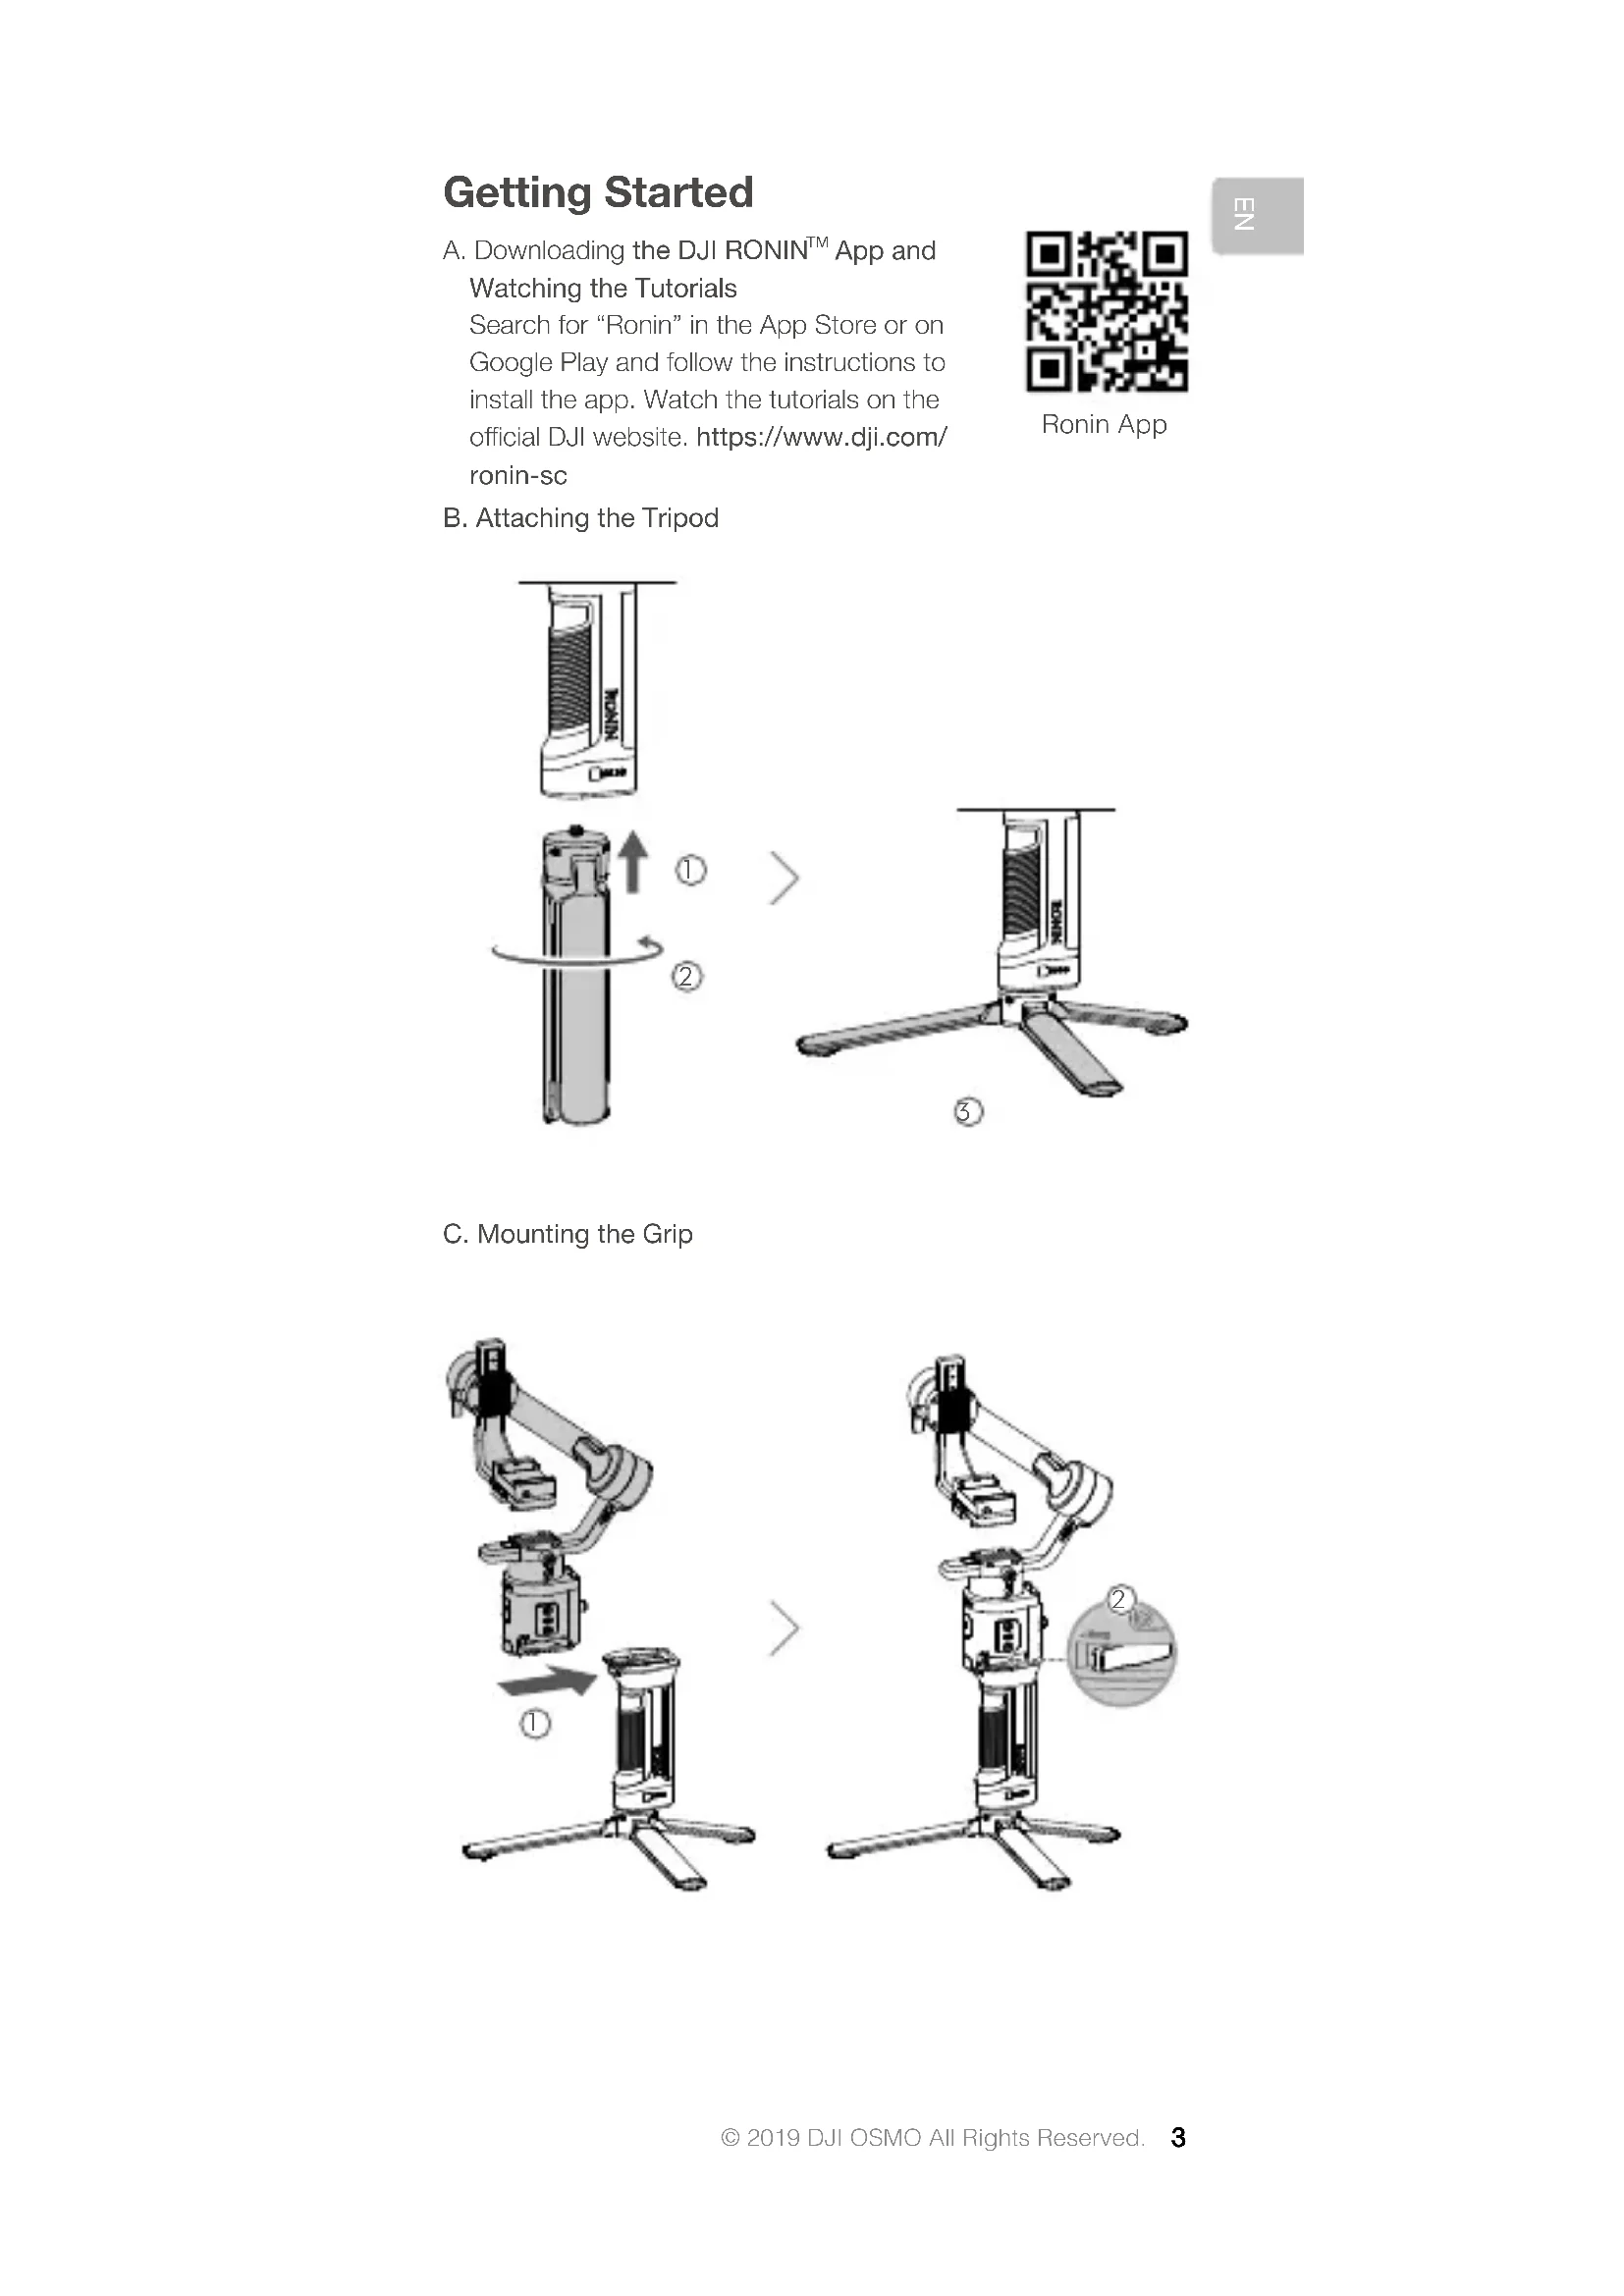
Getting Started
A. Downloading the DJI RONIN™ App and Watching the Tutorials Search for "Ronin" in the App Store or on Google Play and follow the instructions to install the app. Watch the tutorials on the official DJI website. https://www.dji.com/ronin-sc
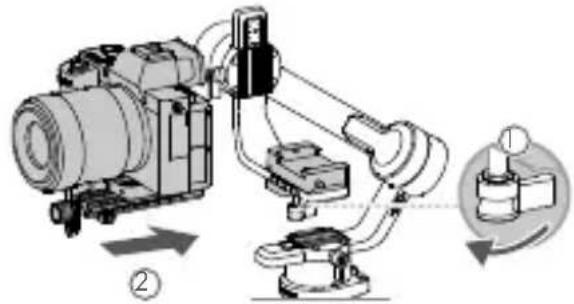
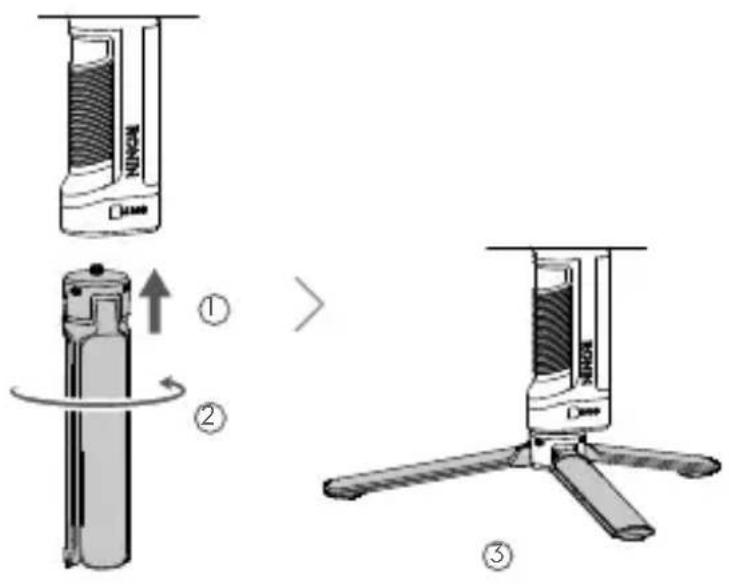
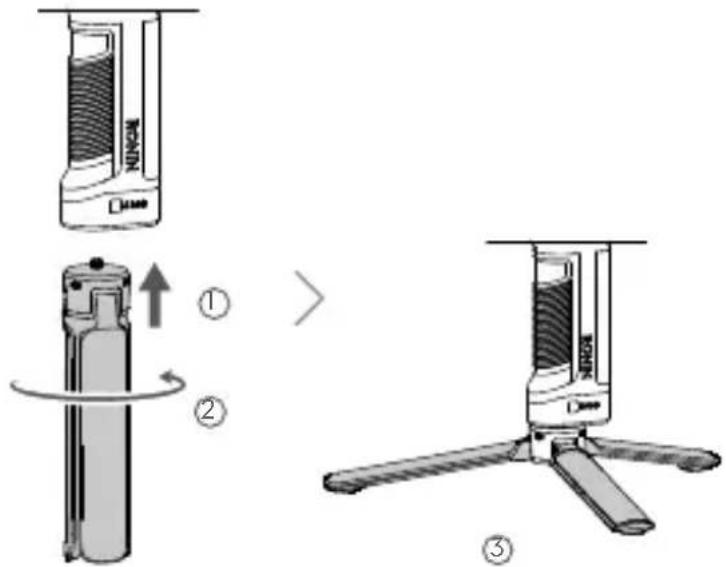
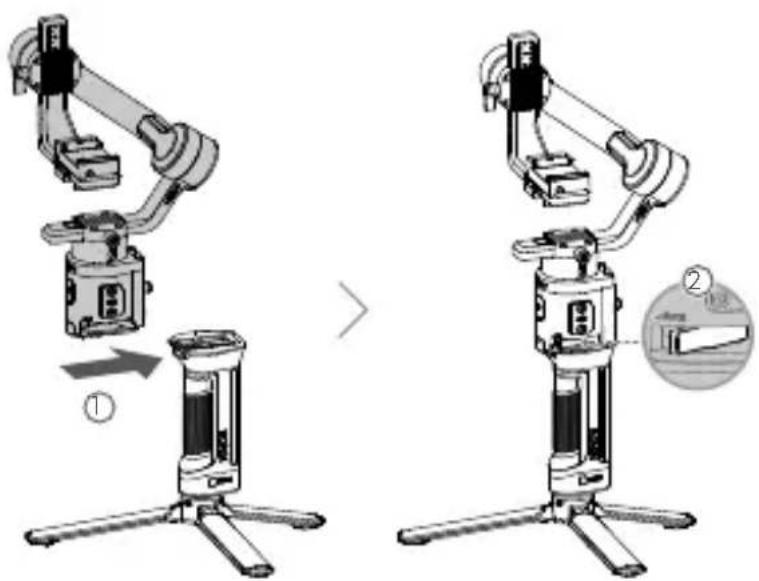
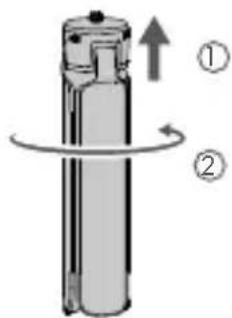
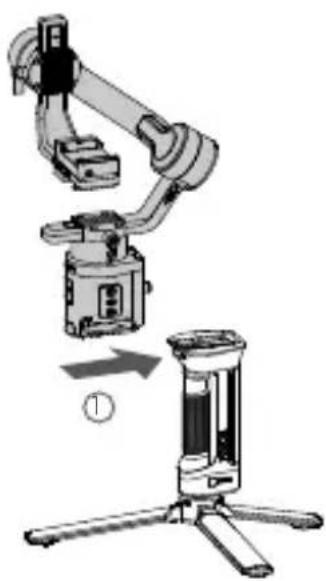
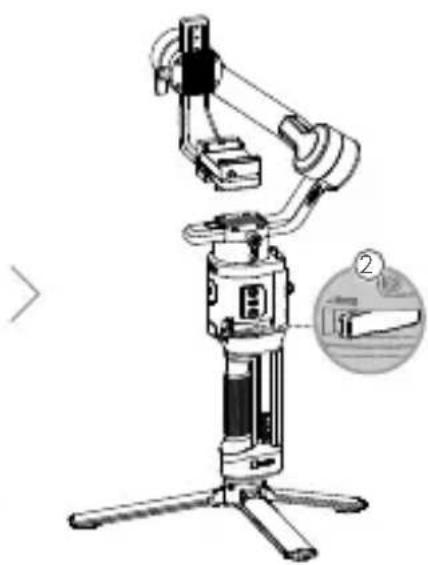
B. Attaching the Tripod

C. Mounting the Grip


Ronin App
昙
D. Charging the Battery
Before using for the first time, charge the grip through the power port using a power cable (included) and a USB adapter (not included). It is recommended to use a 5V/2A USB adapter.

E. Checking the Battery Level
During charging, the battery level indicators indicate the battery level. When not charging, press the battery level button to check the battery level.
F. Powering On/Off and Sleep Mode
Press and hold the power button to turn Ronin-SC on or off
Tap the power button to enter sleep mode. Tap again to exit sleep mode.

- Ronin-SC can be operated during charging.
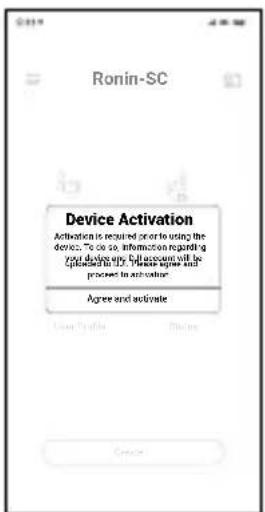
Activating Ronin-SC
Ronin-SC needs to be activated through the Ronin app before using for the first time.
- Press and hold the power button to power on the gimbal.
- Enable Bluetooth on your mobile device and launch the Ronin app. Note that a DJI account is required to launch the Ronin app. Once detected in the list of Bluetooth devices, select Ronin-SC and input the default Bluetooth password: 12345678.
- Make sure you are connected to the internet and follow the on-screen instructions to activate Ronin-SC.
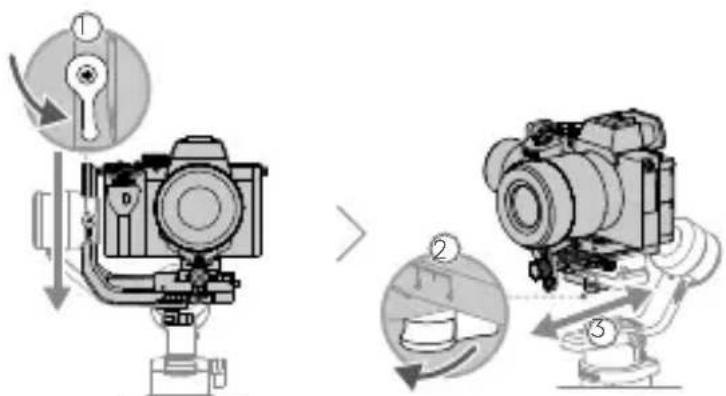
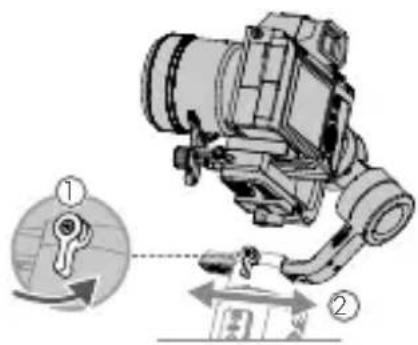
Mounting the Camera
Make sure to prepare the camera before mounting it to RoninSC. Remove the lens cap and make sure the battery and memory card are inserted in the camera.
-
The three axes of the gimbal are locked by default. Unlock the three axes, adjust the gimbal to the position as shown, and lock the three axes again.
-
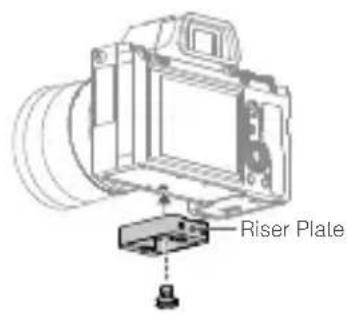
If required, attach the riser plate* to the bottom of the camera using a flathead screwdriver.

-
Riser plate is required in the following scenarios:
-
When using a small and lightweight camera such as a Sony A6300 camera.
- When using a lens with a large diameter such as a Sony A7M3 camera with a 16-35 mm f/2.8 GM lens.
- When used with a focus motor.
Refer to the Ronin-SC product page on the official DJI website (http://www.dji.com/ronin-sc) for the most updated Camera Compatibility List.
- Attach the dovetail plate and lens support. Move the slider to the front of the plate. The camera lens and the arrow on the dovetail plate must face the same direction. Mount the camera according to the indicators on the dovetail plate. Use the lens support for optimal performance.
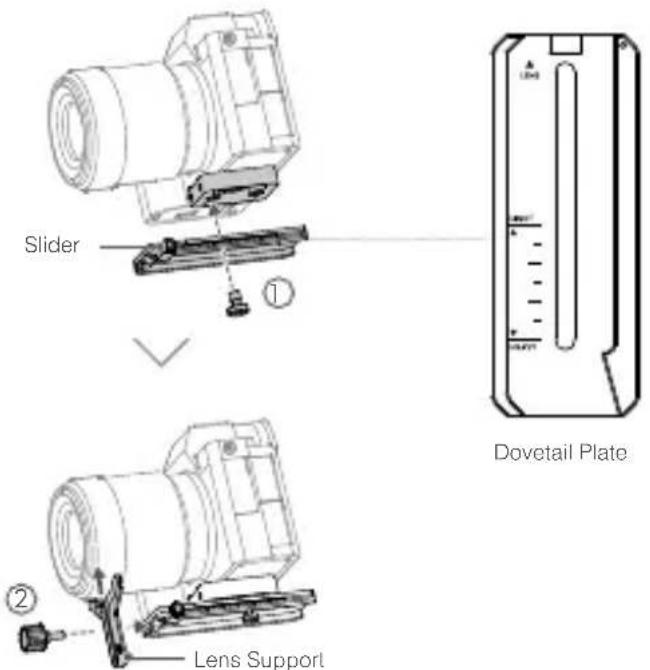
- Loosen the knob on the bottom of the camera mounting plate and move it to the side of the axis. Slide the camera into the plate 2 tighten the knob when the camera is in the middle of the plate.

-
If using accessories such as the phone holder or focus motor, make sure to mount all accessories before balancing. Refer to the manual documents of the accessories for more information.
-
Make sure to tighten the screw under the dovetail plate.
Balancing
Balancing is required before shooting. Before balancing, make sure to power on the camera if using a optical zoom lens and to select the focal length if using a varifocal lens. There are balancing tutorials in the Ronin app, which can be viewed after activation. Balancing can also be performed without connecting to the Ronin app. In that scenario, make sure Ronin-SC is powered off or in sleep mode before balancing.
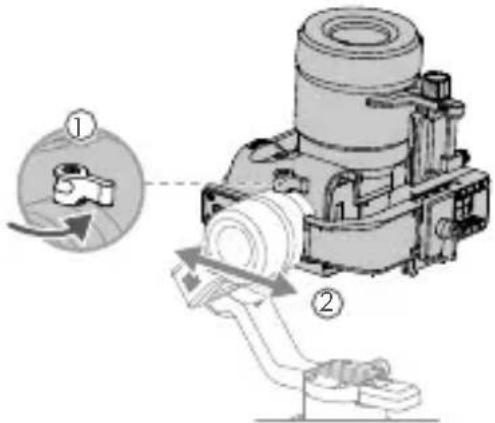
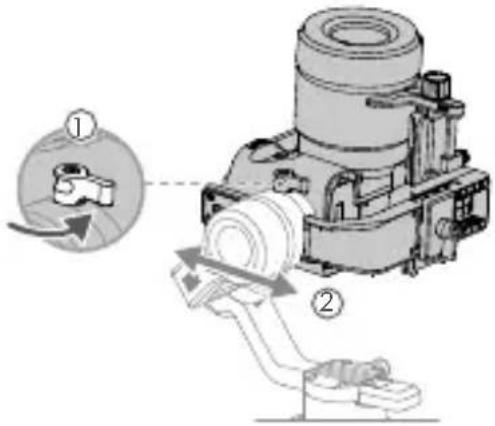
- Balancing depth for the tilt axis
a. Unlock the tilt axis and lower the camera by loosening the tilt axis knob ①
b. Rotate the tilt axis so that the camera lens is pointing forward. Check to make sure the camera is not front or back-heavy. If front-heavy, move the camera backward. If back-heavy, move the camera forward.
c. Loosen the knob under the camera mounting plate and adjust the camera balance until the camera is steady.
d. Tighten the knob.
- Balancing the vertical tilt
a. Rotate the tilt axis so that the camera lens is pointing upward. Check to make sure the camera is not top or bottom-heavy. If the camera is tilted to one side, pull the tilt arm towards the other side.
b. Loosen the knob on the tilt motor ① and adjust the balance of the camera until the camera is steady without tilting up or down.
c. Tighten the knob.
d. Repeat Step 1 to balance the depth of the tilt axis. The slider on the dovetail plate is used to record the balance position. Move the slider next to the mounting plate and tighten the slider.
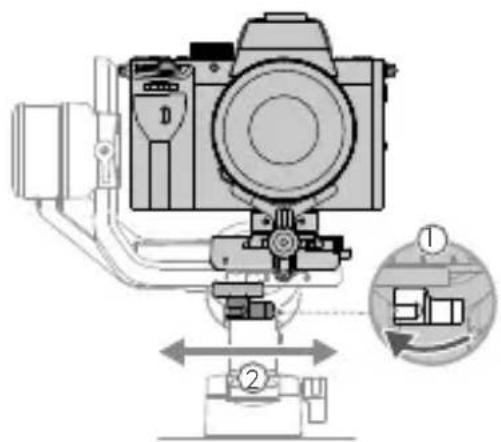
- Balancing the roll axis
a. Lock the tilt axis and unlock the roll axis. Check the direction in which the roll motor swings. If the camera rotates to the left, move the camera to the right. If the camera rotates to the right, move the camera to the left.
b. Loosen the knob on the camera mounting plate and adjust position of the plate until the camera is steady.
c. Tighten the knob. If the camera moves forward, move the camera back until the slider is next to the mounting plate.
- Balancing the pan axis
a. Unlock the pan axis. Hold the grip, tilt Ronin-SC sideward, and check the movement of the pan axis. If the camera lens rotates downward, push the pan axis backward. If the camera lens rotates upward, push the pan axis forward.
b. Loosen the knob on the pan motor . Adjust the camera balance until the camera is steady when rotating the pan while lifting the grip.
c. Tighten the knob.
Operation
Auto Tune
After installation, activation, and balancing, Ronin-SC must be auto-tuned before it can be used. Make sure to place Ronin-SC on a flat surface before conducting an auto tune. There are two ways to auto-tune Ronin-SC.
A. Press and hold the M button and trigger on Ronin-SC simultaneously for four seconds to start Auto Tune.
B. Launch the Ronin app, go to the Motor Parameters page, and select Auto Tune.
Button Features
Power Button: press and hold the power button to turn the Ronin-SC on or off. Tap the power button to enter or exit sleep mode.
M Button: tap to select a user profile. Press and hold to enter Sport mode.
Joystick: push the joystick up or down to control the movement of the tilt axis, and push it left or right to control the movement of the pan axis. Go to the Joystick page of the Ronin app to adjust the parameters for the pan, tilt, and roll axes.
Camera Control Button: after connecting the camera control port and camera, press halfway for autofocus, as you would the shutter button on a camera. Press to start or stop recording. Press and hold to take a photo. For the most updated Camera Compatibility List, refer to the Ronin-SC product page on the
official DJI website (http://www.dji.com/ronin-sc).
Trigger: press and hold the trigger to enter Lock mode. Press twice to recenter the gimbal. Press three times to turn the gimbal 180^ so that the camera faces you.
艺

- When the camera and Ronin-SC are connected using the camera control cable (USB-C), playback cannot be used. In that scenario, press the power button to enter sleep mode and then use playback.
Specifications
Weight Gimbal: Approx. 830 g
Grip: Approx. 258 g
Tripod: Approx. 160 g
Dimensions Gimbal (folded): 220 × 200 × 75 mm
Gimbal (unfolded): 370 × 165 × 150 mm
Input Power Model: RB2-2450 mAh-7.2 V
Type: 18650 Lithium
Capacity: 2450 mAh
Energy: 17.64 Wh
Operating Current Static Current: 0.2 A
Bluetooth Operating
2.40 GHz -2.4835 GHz
Frequency
Bluetooth Transmitter
<8 dBm
Power
Operating Temperature
-20° to 45°C (-4° to 113° F)
Max. Standby Time 11 hours
For more information, read the User Manual:
http://www.dji.com/ronin-sc
※This content is subject to change without prior notice.
认识 Ronin-SC
中
https://www.dji.com/ronin-sc

Ronin App
CHS
B. 安装三脚架

C. 安装手柄
D. 充电
https://www.dji.com/ronin-sc

Ronin App
中
B. 安裝三腳架
C. 安装把手
D. 充電
https://www.dji.com/ronin-sc
B.三脚の取り付け

Roin
号

C. ヰリフの取り付款
kaMraJr.:kMRAJr.FoT MfF KMAReLto EnelH H JI.
KMAReLto 1.
Rt.
Ta.
J.
J.
J.
J.
J.
J.
J.
J.
J.
J.
J.
J.
J.
J.
J.
J.
J.
J.
J.
J.
J.
J.
J.
J.
J.
J.
J.
J.
J.
J.
J.
J.
J.
J
TrIi: T1Rn 180°

*kamaRrJrERKcIeIR(USB-C)uRnHARKcMRAaRrRONIN-SCrJrEerJrAeRrJrERKcIeIR(USB-C)uRnHARKcMRAaRrRONIN-SC
A
早
摇摇: 830g
上:258g
当 当 当 160g
3
220× 200× 75mm
370× 165× 150mm
启用脚手架:RB2-2450 mAh-7.2V
用 :18650
容量:2450mAh
电话:17.64 Wh
自动进料量:0.2A
龍臥杜士糟同主2.40GHz\~2.4835GHz
龍默杜士 息士
秋通运 20~45℃
如大大
答
http://www.dji.com/ronin-sc
Tripode: Aprox. 160 g
http://www.dji.com/ronin-sc
http://www.dji.com/ronin-sc
Handgreep: circa 258 g
Tripod: circa 160 g
B. 3aTaNHTpepyTApTOp.
r. NOBTOPHTe 1, YTO6bI c6aHcHPOBaT bIy6Hy OCN HAKHOHa. No3yHOK Ha KpeJIeHN «NaCTOCH XBOCT» NCNOJb3yETcI dIpeRnCTpaCIN BaIaHCpOBOUHOro NOLOXKeH.NepemecTeNo3yHOKKMOHTaXHOI PAACTInHe I 3ATRHTe ERO.
pykoBODCTBO NOIb3OBaTeJIa: http://www.dji.com/ronin-sc
TaHOpMaU MOKeT 6bITb N3MeHeHa 6e3 npedBapuTEJIbHO rYBeOMJeHn.
DJI Support
DJI技术支持
DJI技術支援
DJI 咋示一卜
DJI工具
DJI Support