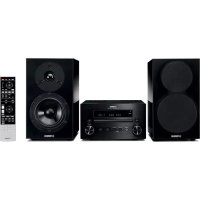
MCRB043DAB - Audio System YAMAHA - Free user manual and instructions
Find the device manual for free MCRB043DAB YAMAHA in PDF.
| Product type | Audio system with CD player, DAB+/FM radio, Bluetooth, USB port, AUX input |
| Brand | YAMAHA |
| Model | MCRB043DAB |
| Dimensions (W × H × D) | 180 × 130 × 281 mm |
| Weight | 2.6 kg |
| Power supply | AC 230 V, 50 Hz |
| Power consumption | 30 W (operation); normal standby ≤ 3.5 W, ECO standby ≤ 0.5 W |
| Output power | 15 W + 15 W (6 Ω, 1 kHz, 10% THD) |
| Speaker | 11 cm cone, Bass Reflex system, non-magnetic shielding |
| Frequency response | 50 Hz – 20 kHz (-10 dB) |
| Radio tuner | DAB/DAB+ (Band III: 174 – 240 MHz) and FM (87.50 – 108.00 MHz) |
| Supported audio formats | Audio CD, CD-R/RW, MP3, WMA (on CD or USB via FAT16/32) |
| Bluetooth | Version 3.0, A2DP and AVRCP profiles, SBC codec, max range 10 m |
| Equalizer | Bass, midrange, treble: ±10 dB each |
| Main functions | CD/USB playback, DAB+/FM radio (30 presets each), Bluetooth, AUX input, IntelliAlarm, timer, clock |
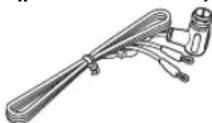
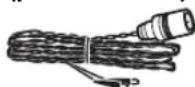
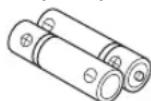
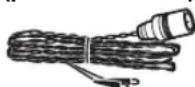
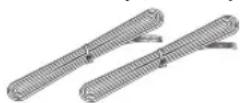
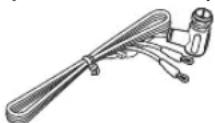
| Included accessories | Remote control, speaker cables (1.5 m × 2), DAB/FM antenna |
| Maintenance and cleaning | Use a dry, clean cloth; do not use chemical solvents |
| Safety | Semiconductor laser (Class 1), auto-off, overvoltage protection |
| Spare parts and repairability | Remote control batteries (AAA); any repair must be carried out by an authorized Yamaha service |
| General information | ECO standby function, adjustable auto standby, condensation possible with temperature changes |
Frequently Asked Questions - MCRB043DAB YAMAHA
User questions about MCRB043DAB YAMAHA
0 question about this device. Answer the ones you know or ask your own.
Ask a new question about this device
Download the instructions for your Audio System in PDF format for free! Find your manual MCRB043DAB - YAMAHA and take your electronic device back in hand. On this page are published all the documents necessary for the use of your device. MCRB043DAB by YAMAHA.
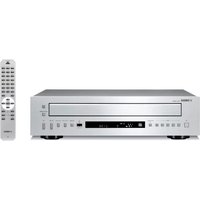
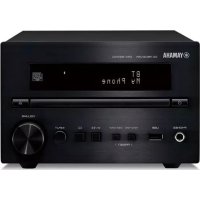
USER MANUAL MCRB043DAB YAMAHA
Micro Component System
Micro-Chaine
MCR-B043
MCR-B043D
OWNER'S MANUAL
MODE D'EMPLOI
1 To assure the finest performance, please read this manual carefully. Keep it in a safe place for future reference.
2 Install this unit in a well ventilated, cool, dry, clean place away from direct sunlight, heat sources, vibration, dust, moisture and cold. For proper ventilation, allow the following minimum clearances. Top: 15cm (6 in) Rear: 10cm (4 in) Sides: 10cm (4 in)
3 Locate this unit away from other electrical appliances, motors, or transformers to avoid humming sounds.
4 Do not expose this unit to sudden temperature changes from cold to hot, and do not locate this unit in an environment with high humidity (i.e. a room with a humidifier) to prevent condensation inside this unit, which may cause an electrical shock, fire, damage to this unit, and/or personal injury.
5 Avoid installing this unit where foreign object may fall onto this unit and/or this unit may be exposed to liquid dripping or splashing. On the top of this unit, do not place:
- Other components, as they may cause damage and/or discoloration on the surface of this unit.
- Burning objects (i.e. candles), as they may cause fire, damage to this unit, and/or personal injury.
- Containers with liquid in them, as they may fall and liquid may cause electrical shock to the user and/or damage to this unit.
6 Do not cover this unit with a newspaper, tablecloth, curtain, etc. in order not to obstruct heat radiation. If the temperature inside this unit rises, it may cause fire, damage to this unit, and/or personal injury.
7 Do not plug in this unit to a wall outlet until all connections are complete.
8 Do not operate this unit upside-down. It may overheat, possibly causing damage.
9 Do not use force on switches, knobs and/or cords.
10 When disconnecting the power cable from the wall outlet, grasp the plug; do not pull the cable.
11 Do not clean this unit with chemical solvents; this might damage the finish. Use a clean, dry cloth.
12 Only voltage specified on this unit must be used. Using this unit with a higher voltage than specified is dangerous and may cause fire, damage to this unit, and/or personal injury. Yamaha will not be held responsible for any damage resulting from use of this unit with a voltage other than specified.
13 To prevent damage by lightning, keep the power cable disconnected from a wall outlet or this unit during a lightning storm.
14 Do not attempt to modify or fix this unit. Contact qualified Yamaha service personnel when any service is needed. The cabinet should never be opened for any reasons.
15 When not planning to use this unit for long periods of time (i.e. vacation), disconnect the AC power plug from the wall outlet.
16 Be sure to read the "TROUBLESHOOTING" section on common operating errors before concluding that this unit is faulty.
17 Before moving this unit, press set the unit to off, and disconnect the AC power plug from the wall outlet.
18 Condensation will form when the surrounding temperature changes suddenly. Disconnect the power cable from the outlet, then leave this unit alone.
19 When using this unit for a long time, this unit may become warm. Turn off, then leave this unit alone for cooling.
20 Install this unit near the wall outlet and where the AC power plug can be reached easily.
21 The batteries shall not be exposed to excessive heat such as sunshine, fire or the like. When you dispose of batteries, follow your regional regulations.
- Keep the batteries in a location out of reach of children. Batteries can be dangerous if a child were to put in his or her mouth.
- If the batteries grow old, the effective operation range of the remote control decreases considerably. If this happens, replace the batteries with new one as soon as possible.
- Do not use old batteries together with new ones.
- Do not use different types of batteries (such as alkaline and manganese batteries) together. Read the packaging carefully as these different types of batteries may have the same shape and color.
- Exhausted batteries may leak. If the batteries have leaked, dispose of them immediately. Avoid touching the leaked material or letting it come into contact with clothing, etc. Clean the battery compartment thoroughly before installing new batteries.
- If you plan not to use the unit for a long period of time, remove the batteries from the unit. Otherwise, the batteries will wear out, possibly resulting in a leakage of battery liquid that may damage the unit.
- Do not throw away batteries with general house waste. Disposc of them correctly in accordance with your local regulations.
22 Excessive sound pressure from earphones and headphones can cause hearing loss.
This unit is not disconnected from the AC power source as long as it is connected to the wall outlet, even if this unit itself is turned off by in this state, this unit is designed to consume a very small quantity of power.
WARNING
TO REDUCE THE RISK OF FIRE OR ELECTRIC SHOCK,DO NOT EXPOSE THIS UNIT TO RAIN OR MOISTURE.
CAUTION
Danger of explosion if battery is incorrectly replaced. Replace only with the same or equivalent type.
There is a chance that placing this unit too close to a CRT-based (Braun tube) TV set might impair picture color. Should this happen, move this unit away from the TV set.
CONTENTS
NAMES OF PARTS AND THEIR FUNCTIONS ....2
Front panel. 2
Front panel display. 2
Remote control. 3
CONNECTIONS 4
Connecting the speakers and antenna 4
Connecting the power cable. 5
Other connections. 5
About the standby state 5
ADJUSTING THE CLOCK (OPTION MENU) 6
LISTENING TO CD AND USB DEVICES 7
Listening to a CD. 7
Listening to a USB device. 8
Using repeat/shuffle playback (remote control only)....8
Playing back from your Bluetooth component. 9
Connecting an already-paired component via Bluetooth... 10
Disconnecting a Bluetooth connection 10
LISTENING TO DAB STATIONS (MCR-B043D only) ...11
Preparing for DAB reception 11
Selecting DAB stations. 12
Presetting DAB stations (remote control only) 13
Selecting preset DAB stations. 14
Checking the signal strength of DAB stations (Option menu) 14
LISTENING TO FM STATIONS 15
Selecting an FM station. 15
Presetting FM stations (remote control only) 16
Selecting preset FM stations. 17
LISTENING TO EXTERNAL SOURCES 17
USEFUL FUNCTIONS 18
Using the Option menu 18
Using the sleep timer 19
Using the alarm function (IntelliAlarm) 19
Setting the alarm. 20
Operations while the alarm sound is playing. 21
TROUBLESHOOTING 22
NOTES ON DISCS AND USB DEVICES. 25
SPECIFICATIONS. 26
(at the end of this manual)
Additional information..
Features
- Play back music from external devices such as your audio/data CDs, USB devices, or external devices via the AUX jack, and listen to the radio.
- (MCR-B043D only) Listen to the DAB radio.
- By the Bluetooth technology, you can enjoy clear sound without wire connections.
- Use your favorite music or a beep tone as an alarm. When the set time arrives, the music you select is played at the volume that you specify, giving you the ideal start to your day (IntelliAlarm function).
- You can easily store and recall of your favorite radio stations, up to 30 FM and 30 DAB stations (DAB function is only for MCR-B043D).
- Bass, middle, and treble can be adjusted to your taste.
About this manual
- If an operation can be performed using either the buttons on the unit itself or from the remote control, the explanation will focus on operation using the remote control.
- i!cates precautions for use of the unit and its feature limitations.
- indicates supplementary explanations for better use.
Supplied accessories
Remote control Speaker cable
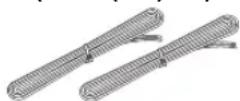
(1.5 m (4.9') x 2)
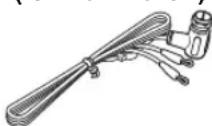
DAB/FM antenna (for MCR-B043D)

FM antenna for MCR-B043)

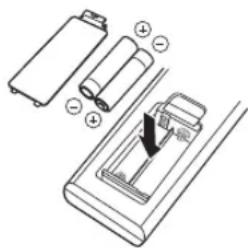
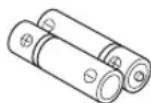
Batteries (x 2) AAA, R03, UM-4)
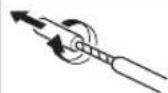
How to use the remote control
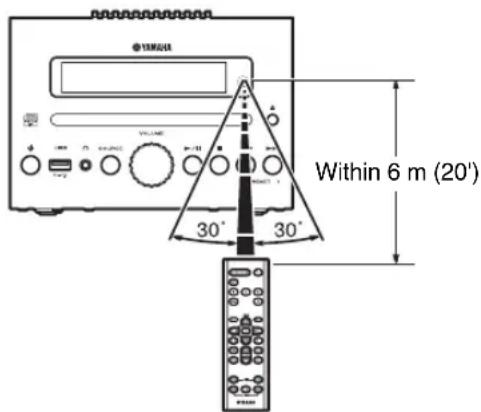
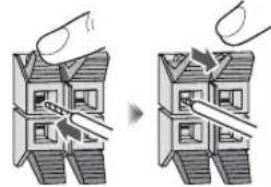
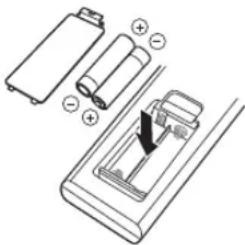
Installing batteries in the remote control
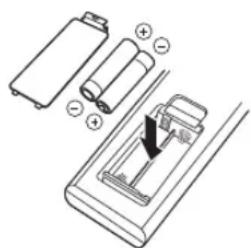
Check the "+" and "- of the batteries and insert them the correct way around.
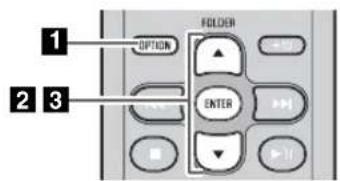
NAMES OF PARTS AND THEIR FUNCTIONS
Front panel
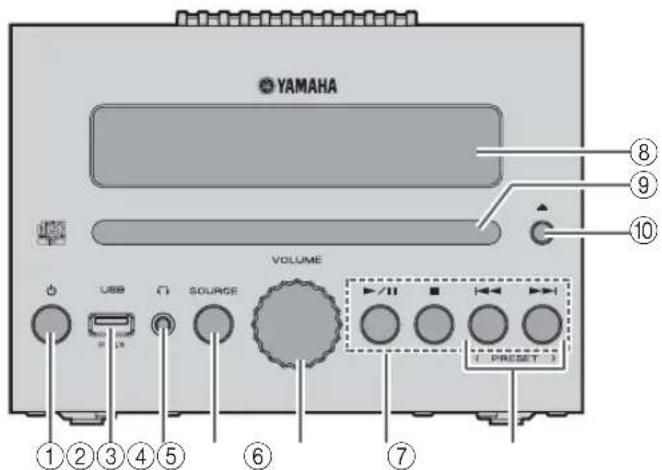
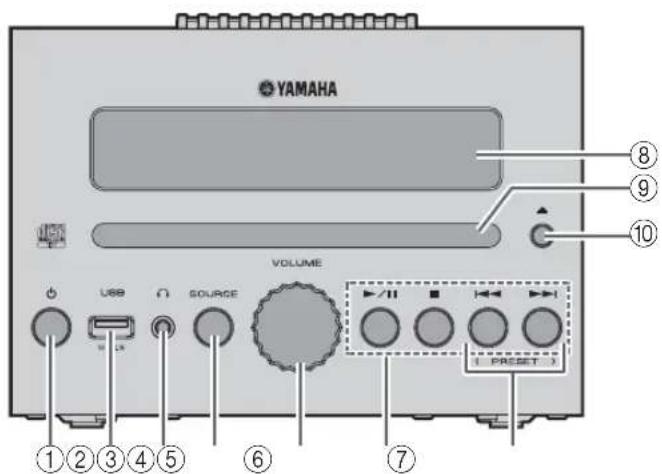
① (Power)
Press to turn the unit on/off (standby).
There are two types of the standby state (P. 5).
②USB port
Connect your USB device here (P.5,8).
③ (H) padphone jack
Connect headphones here.
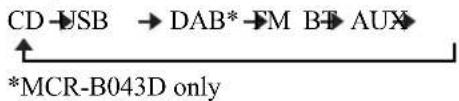
④SOURCE
Switch the audio source to be played.
Pressing this repeatedly will change the selection in the following order.
⑤VOLUME knob
Adjust the volume.
⑥ Audio control buttons
Use these to operate the CD/USB device.
▶II: Play/Pause
:Stop
Skip, Search backward/forward (press and hold down)
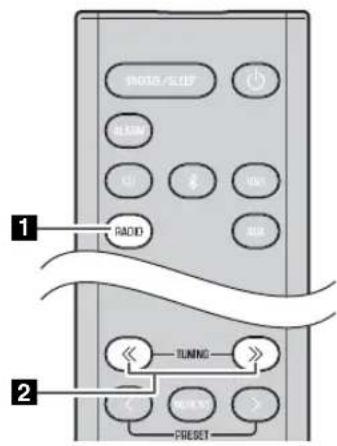
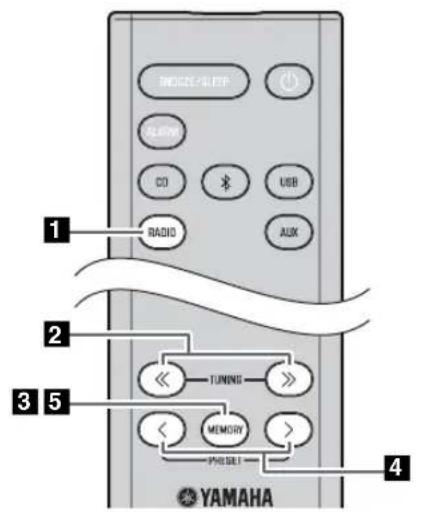
⑦PRESET
Use these buttons to select a radio station that you've stored (P. 16, 17).
⑧Front panel display
The clock and other information is displayed here.
⑨Disc slot
Insert a CD here (P.7).
10 (Eject button)
Eject the CD (cannot be operated while the option menu P.18) is displayed).
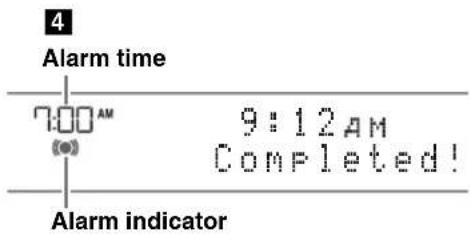
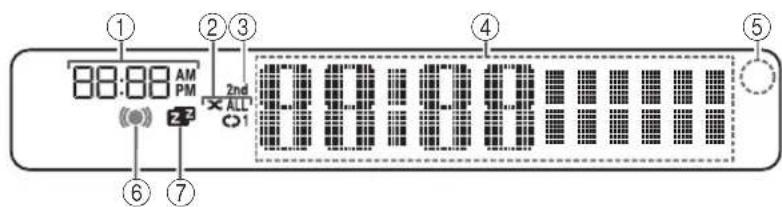
Front panel display
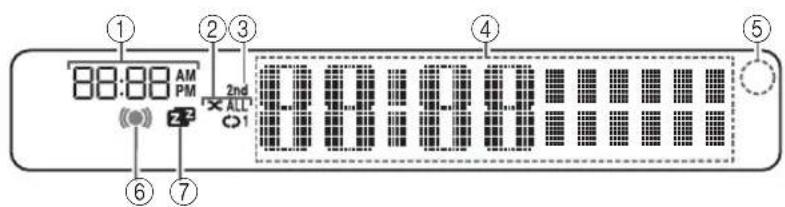
① Alarm time
Indicates the alarm time (P. 20).
②Repeat/shuffle indicator
Displays the playback mode (P. 8).
③ Secondary indicator (MCR-B043D only)
Turns on if a secondary station is playing when you listen to a DAB station.
④ Multi-function indicator
Displays various information, including the clock time, information about the currently-playing track, and the frequency of the radio station.
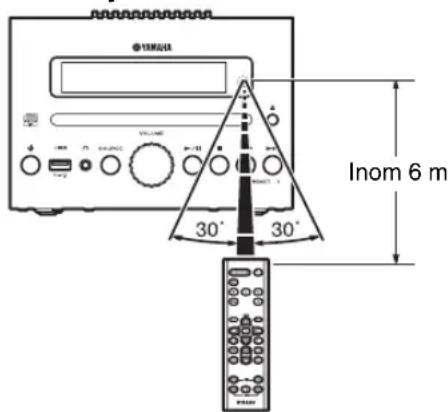
⑤Remote control signal receiver
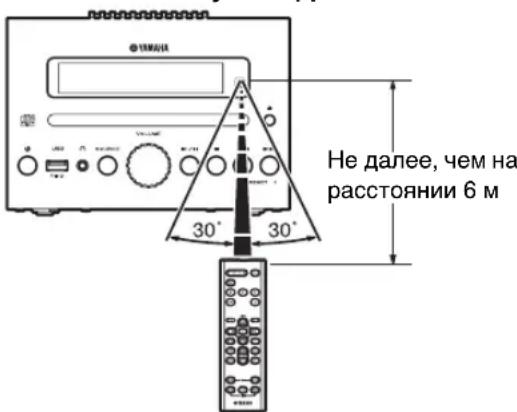
Make sure that this sensor is not obstructed (P. 1).
⑥ Alarm indicator
Turns on if the alarm has been set (P. 20).
⑦Sleep indicator
Turns on if the sleep timer has been set (vP. 19).
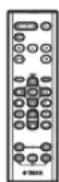
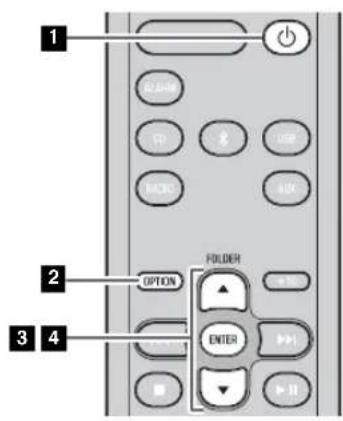
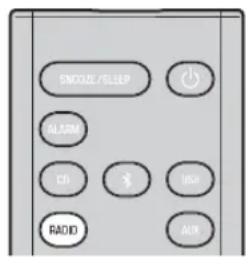
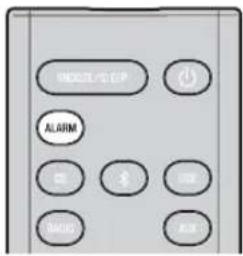
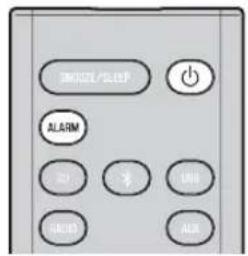
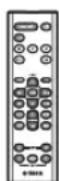
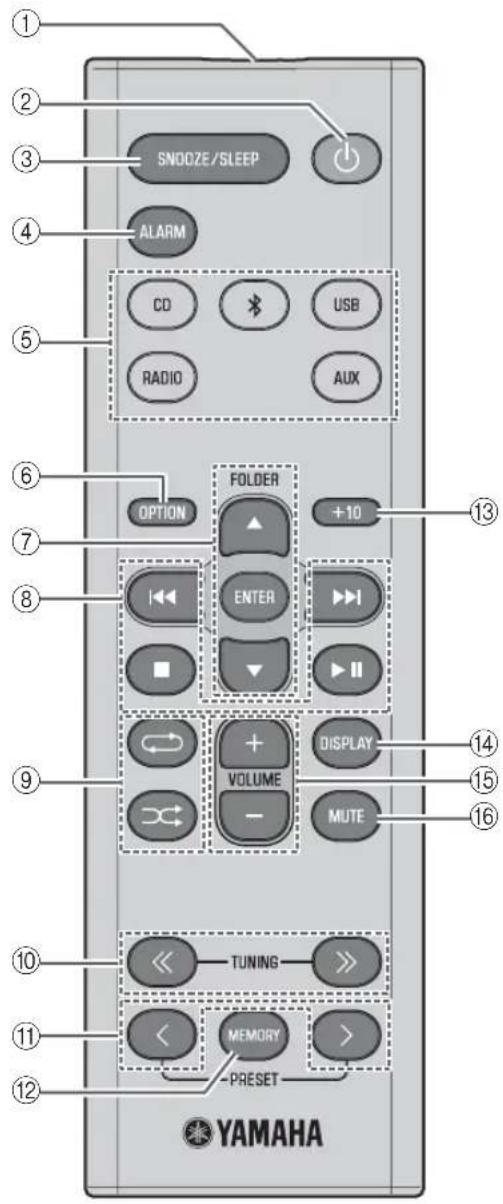
Remote control

① Remote control signal transmitter
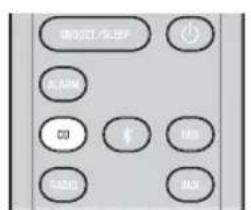
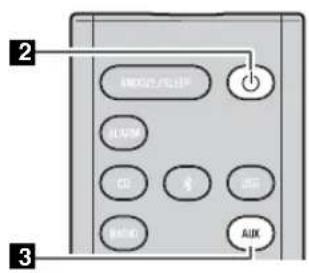
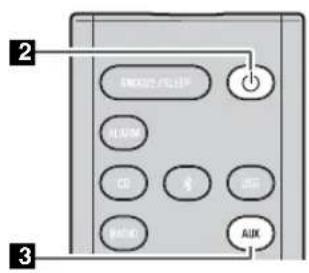
② (Power) Press to turn the unit on/off (standby).
There are two types of the standby state (P. 5).
③SNOOZE/SLEEP
Set the sleep timer or switch the alarm to snooze mode (P. 19, 21).
④ALARM
Switch the alarm on/off (P. 21).
⑤Source buttons
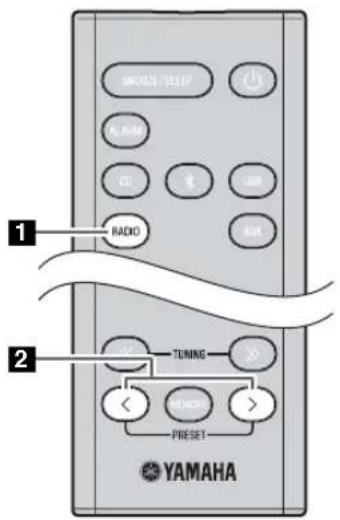
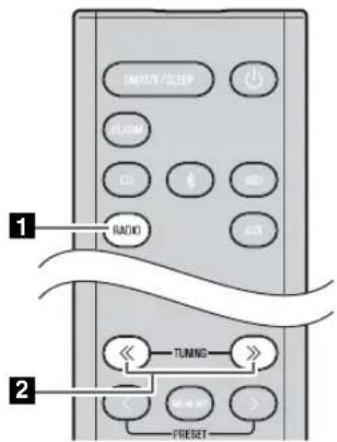
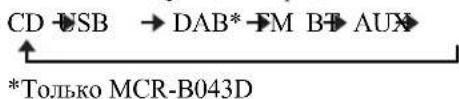
Switch the audio source to be played. If you press one of these while the unit is in standby (except ECO standby), the unit will automatically turn on.
(MCR-B043D only) When listening to the radio, press RADIO to switch between DAB/FM.
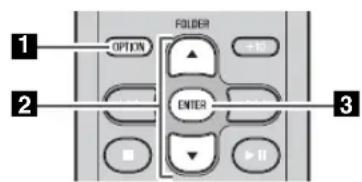
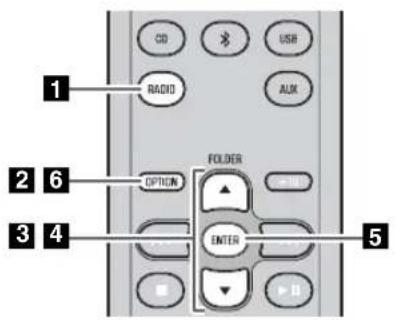
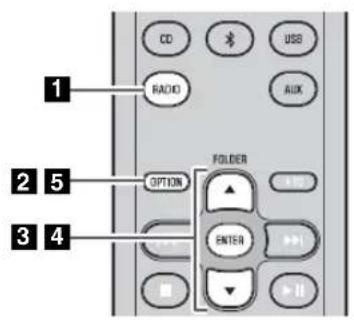
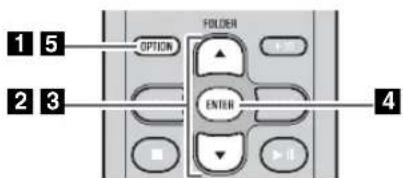
(6)OPTION
Display the option menu (P. 18).
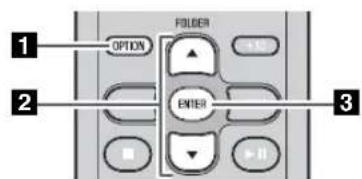
⑦Item selection buttons
FOLDER / : Switch the playback folder and select items or edit numerical values when playing music on data CDs or USB devices.
ENTER: Confirm a selected item or value.
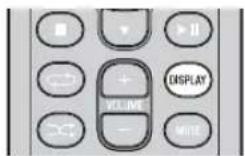
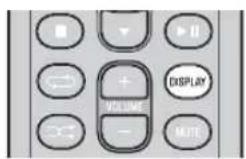
⑧ Audio control buttons
Use these to operate the CD/USB device.
:Stop
▶II: Play/Pause
Skip, Search backward/forward (press and hold down)
(Repeat)/ (Shuffle)
Play music on a CD or USB device in repeat/shuffle mode (P.8).
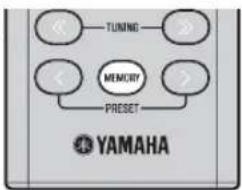
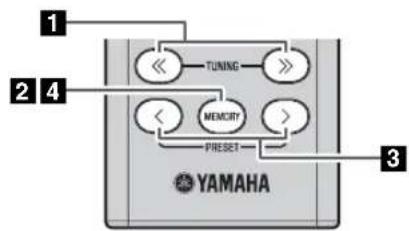
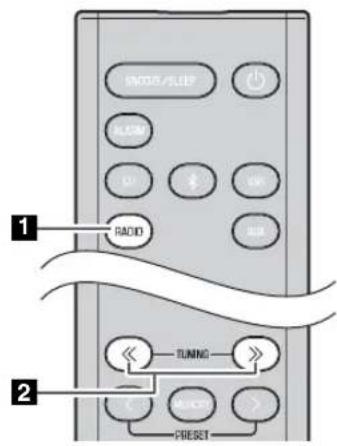
10TUNING /
Tune the radio (P. 15, 16).
11PRESET
Select a radio station that you stored (P. 16, 17).
(2) MEMORY
Store a radio station (P. 16).
⑬+10
Skip ten songs ahead of the currently-playing song.
When playing a data CD or a USB device, this button skips ten songs within the current folder.
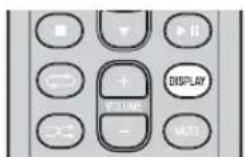
⑭DISPLAY
Switch the information shown in the front panel display (P. 7, 8, 15).
15VOLUME+/-
Adjust the volume.
16MUTE
Mute or unmute the sound.
CONNECTIONS
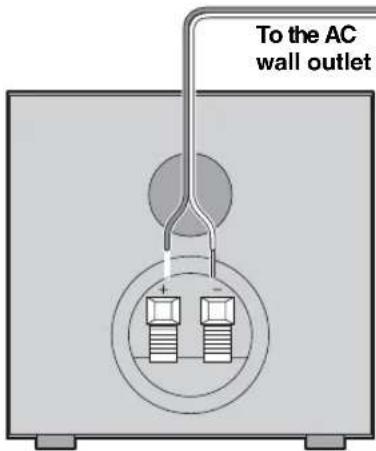
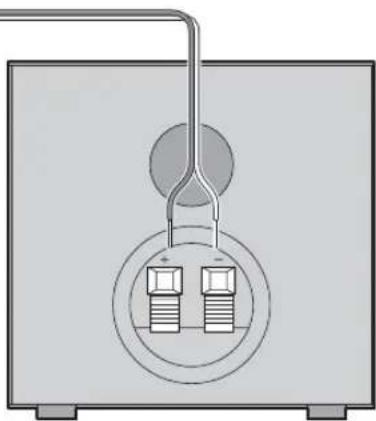
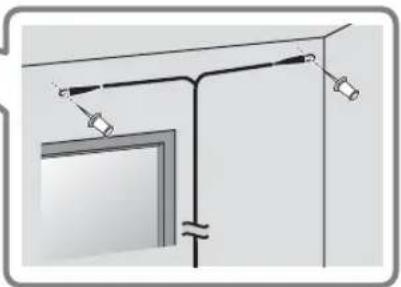
Connecting the speakers and antenna
Connect the speakers and antenna.
Do not connect this unit's power cable until you've finished connecting all cables.
If the radio reception is poor, try changing the height or direction or placement of the antenna to find a location that has better reception.
If you use a commercially available outdoor antenna instead of the supplied antenna, reception may be better.
Speakers

- You must peel off the insulation (covering) from the tip of the speaker cable to expose the conductor.
- Check the connections; make sure that left and right (L, R) and polarity (red: +, black: -) are connected correctly. If connections are incorrect, the sound will be unnatural and the low frequencies may be insufficient. There might not be any sound at all if connections are incorrect.
- Take care that the conductors of the speaker cable do not touch each other, and that the conductors do not touch any other metal part. Such conditions can damage this unit or the speakers.
- Use only the supplied speakers. Using other speakers may result in unnatural sound.
- If you're using this unit nearby a CRT display and you notice distorted color or noise in the display, move the speakers farther away from the display.
Twist the bare wires tightly so the individual strands are not splayed.
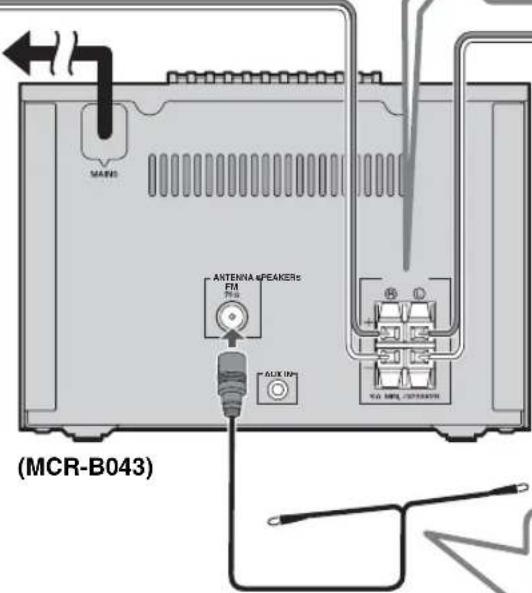


Be sure to stretch out the antenna.
Connecting the power cable
When you've completed all connections, connect this unit's power cable to an AC outlet.
Other connections
USB device
Connect your USB device to the USB port on the front panel. For details on playable files, refer to "NOTES ON DISCS AND USB DEVICES" (P. 25).
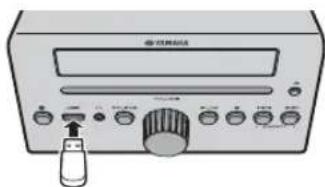

The USB device is automatically charged when this unit is connected to the AC outlet.

- Stop playback before disconnecting the USB device.
- Charging may not be possible depending on the USB device.
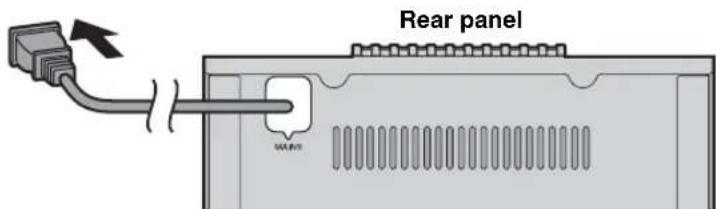
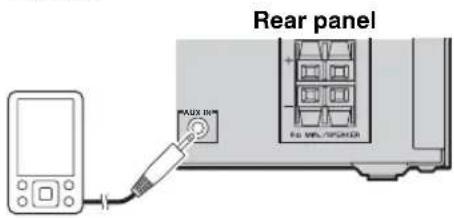
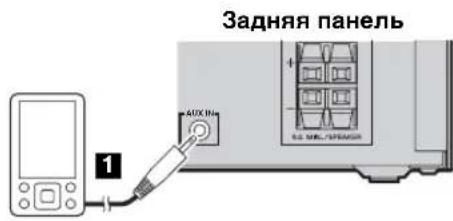
External devices
Using a commercially available 3.5mm mini- plug cable, connect your external device to the AUX jack on the rear panel of this unit.
About the standby state
This unit has the following two types of standby state. Select the mode in POWER SAVING settings menu (P. 18).
| Mode | Setting menu (POWER SAVING) | Clock display | Bluetooth connection | Charging of USB devices | Alarm setting |
| ECO standby* (power saving mode) | ECO No clock display Disable Enable | ||||
| Standby NORMAL Show | Enable Enable Enable | ||||
- Default setting
ADJUSTING THE CLOCK (OPTION MENU)
You'll use the option menu (P. 18) to set this unit's date and time.
Clock display
Display (24-hour) when the unit is on

Display (24-hour) when the unit is off (standby)*

Jan Feb Mar Apr May Jun
January February March April May June
Jul Aug Sep Oct Nov Dec
July August September October November December
- In ECO standby, the clock display will disappear.
1 Press to turn the unit on.
Press OPTION.
The option menu will appear.
Press / to select "CLOCK SET," and then press ENTER.
The display will indicate "CLOCK YEAR," and the numerical value to be set will blink.
4 Set the date and time.
Press / to edit each numerical value, and then press ENTER to confirm the setting.
Set the items in the order of year-month day hour minute.
When clock setting has finished, the display will indicate "Completed!"
The clock will be set to 0 second the moment you complete the clock settings.

- While making these settings, you can press DISPLAY to select the time format (12-hour / 24-hour).
- If you decide to cancel without changing the setting, press OPTION before confirming the change.

The time settings will be reset if the unit remains unpowered for about one hour.
LISTENING TO CD AND USB DEVICES
The unit will operate as follows when playing back tracks/files on CD/USB devices.
- If the CD/USB device being played is stopped, the track that you listened will start playback from the beginning of the track the next time you play.
- If you press while playback is stopped, tracks will play as follows the next time playback begins:
Audio CD: Play from the first track of the CD.
- Data CD/USB device: Play from the first track of the folder contains the track you listened to last time.
This unit automatically turns off if no operation has been performed for 20 minutes after CD/USB device playback is stopped.
"Data CD" is a CD that contains MP3/WMA files.

For details on playable discs and files, refer to "NOTES ON DISCS AND USB DEVICES" (P. 25).
Listening to a CD

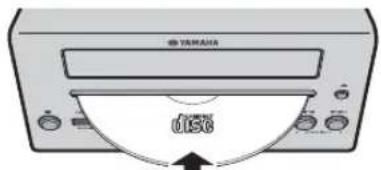
2
Press the CD source button to switch the audio source to CD.
If a CD is already inserted, playback will start.
2 Insert a CD into the disc slot.
Playback starts automatically.
Playback can be controlled with either the remote control, or the front panel on this unit (P. 2, 3).

Insert the CD with the label side facing upward.

Folders and files on a data CD are played in alphabetical order.
Skipping folders (remote control only)

While a data CD is playing, you can use the remote control's FOLDER / buttons to select the folder.
Display information (remote control only)
The folder number (only for a data CD) or the song/file number is shown for several seconds when starting playback or skipping tracks.
If you press DISPLAY on the remote control while a song is playing or paused, the information shown on the front panel display will be switched in the following order.
- Shown only if this data is included in the song.
Listening to a USB device
Press the USB source button to switch the audio source to USB.
If a USB device is already connected, playback will start.
Connect a USB device to the USB port.
Playback starts automatically.
Playback can be controlled with either the remote control, or the front panel on this unit (eP.2,3).
Folders and files will play in the order in which they were written.
Stop playback before disconnecting the USB device.
Skipping folders (remote control only)
While a USB device is playing, you can use the remote control's FOLDER / buttons to select the folder.
Display information (remote control only)
The folder/file number is shown for several seconds when starting playback or skipping tracks.
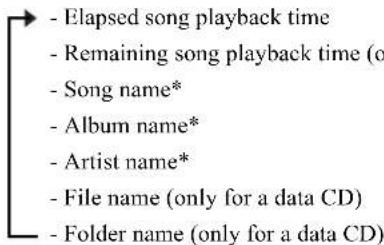
If you press DISPLAY on the remote control while a song is playing or paused, the information shown on the front panel display will be switched in the following order.
- Elapsed song playback time
- Song name*
-A I b um name* - Artist name*
-File name -
Folder name
-
Shown only if this data is included in the song.
Using repeat/shuffle playback (remote control only)
The playback status is shown by the repeat/shuffle indicator in the front panel display.
Repeat playback
Press (repeat) repeatedly to select one of the following playback modes.
Shuffle playback
Press shuffle) repeatedly to select one of the following playback modes.
No display: Repeat mode off
:1 track
: All tracks within the folder (data CD/USB device only)
: All tracks
No display: Shuffle mode off
: All tracks within the folder (data CD/USB device only)
: All tracks
LISTENING TO MUSIC FROM YOUR Bluetooth COMPONENT
This unit provides Bluetooth functionality. You can enjoy wireless music playback from your Bluetooth component (mobile phone, digital audio player, etc.). Please also refer to the owner's manual of your Bluetooth component.
Playing back from your Bluetooth component
You'll need to perform the pairing operation the first time you use your Bluetooth component with this unit, or if the pairing settings have been deleted. Pairing is an operation that registers the communicating component (subsequently called "the other component") with this unit. Once pairing has been completed, subsequent reconnection will be easy even after the Bluetooth connection is disconnected (P. 10). If pairing is not successful, refer to the item "Bluetooth" in "TROUBLESHOOTING" (P. 23).

Yamaha does not guarantee all connections between this unit and Bluetooth component.

- This unit can be paired with up to 4 other components. When pairing with the fifth component has succeeded, pairing data for the component with the oldest connection date will be deleted.
- While connecting to the Bluetooth component and perform the pairing with another component, the current Bluetooth connection will be canceled.


3
Press the source button for more than 2 seconds to enter pairing mode.
- Pairing mode lasts for 5 minutes.
In pairing mode, the front panel display of this unit will indicate "BT Pairing...".

You can also enter pairing mode by holding down SOURCE on this unit.
Perform Bluetooth pairing on the other component.
For details refer to the owner's manual of the other component.
From the Bluetooth connection list of the other component, choose this unit (MCR-B043 Yamaha or MCR-B043D Yamaha).
When pairing has been completed, the front panel display of this unit will indicate "BT Pairing OK".

If you are asked to enter a password, enter the numerals "0000".
4 Connect this unit and your other component via Bluetooth.
5 Play back music from your Bluetooth component.

Take care that the volume setting of this unit is not too high. We recommend that you adjust the volume on the other component.

- If you connect via Bluetooth from your other component while this unit is in standby (except ECO standby), this unit will automatically turn on.
- If you disconnect the Bluetooth connection from your other component while the audio source is set to Bluetooth, this unit will automatically turn off.
- If Bluetooth is selected as the audio source, this unit will automatically turn off when 20 minutes have elapsed without any Bluetooth connection nor any operation performed.
Connecting an already-paired component via Bluetooth
Once pairing has been completed, connecting a Bluetooth will be easy the next time.
Connecting from this unit

15:30
15:30
BT
Press the source button to switch the audio source to Bluetooth.
The Bluetooth indicator will blink in the front panel display; this unit will search for the other component that was most recently connected via Bluetooth, and will then establish a connection (You must first turn on the Bluetooth setting of the other component).
When the Bluetooth connection has been established, the Bluetooth indicator will light, and the name of the other component will be displayed.
Connecting from the other component
In the Bluetooth settings of the other component, turn Bluetooth on.
From the Bluetooth connection list of the other component, choose this unit (MCR-B043 Yamaha or MCR-B043D Yamaha).
The Bluetooth connection will be established, and the front panel display of this unit will indicate the name of the other component.

Bluetooth connections cannot be established from the other component when this unit is in ECO standby (P.5).
Disconnecting a Bluetooth connection
If any of the following operations are performed while a Bluetooth connection is being used, the Bluetooth connection will be disconnected.
- Switch the audio source other than Bluetooth.
- Turn the unit off.
- Turn off the Bluetooth setting of the other component.
LISTENING TO DAB STATIONS (MCR-B043D only)
DAB (Digital Audio Broadcasting) and DAB^+ use digital signals for clearer sound and more stable reception compared to analog signals.
DAB^+ is based on the original DAB standard but uses a more efficient audio codec.
DAB and DAB^+ are broadcast in blocks of data called "ensembles" containing up to several radio stations that are simultaneously broadcast.
DAB and DAB^+ can also include an extensive amount of text information, enabling you to select a station by name.
Other information, such as the ensemble name or the status of the digital signal, can be displayed on the front panel display.
"DAB" described in this manual may also refer to "DAB+".
Preparing for DAB reception
Before tuning into DAB stations, an initial scan must be performed. When you select the DAB for the first time, the initial scan is performed automatically.
To listen to a DAB station, connect the antenna as described in "Connecting the speakers and antenna" (P. 4).
Press the RADIO source button to switch the audio source to DAB.
The initial scan starts. During the scan, the degree of progress is displayed on the front panel display.
When scan is completed, the number of receivable DAB stations appear on the front panel display.

If the initial scan is performed, stored DAB station information and preset DAB stations are cleared.
Performing the initial scan again (Option menu)
1 Press OPTION.
The option menu will appear.
Press / to select DAB INIT SCAN, and then press ENTER.
The display will indicate "Press ENTER".
Press ENTER.
The initial scan starts.
Selecting DAB stations

Display information (remote control only)
Press the RADIO source button to switch the audio source to DAB.
Press TUNING / to select the DAB station.
While receiving DAB, DAB station information is shown on the front panel display.
If the unit does not receive a DAB signal, "Off Air" is displayed instead of the DAB station name.
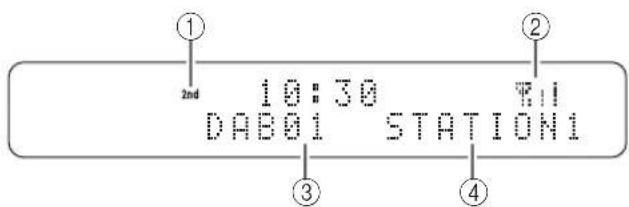
① Secondary indicator:
Some stations have sub (secondary) stations.
If a secondary station is playing, the secondary indicator is displayed.
② Signal strength indicator:
Shows current signal strength.
③ Preset number
④DAB station name
If you press DISPLAY on the remote control, the information shown on the front panel display will be switched in the following order.
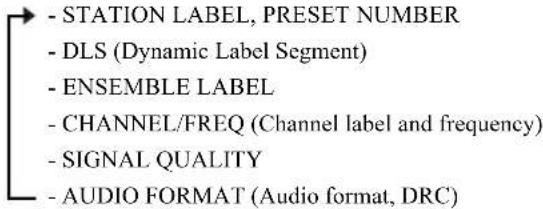
DAB frequency information
This unit can receive Band III only.
| Frequency Channel label |
| 174.928 5A 197.648 8B 220.352 11C |
| 176.640 5B 199.360 8C 222.064 |
| 178.352 5C 201.072 8D 223.936 |
| 180.064 5D 202.928 9A 225.648 12B |
| 181.936 6A 204.640 9B 227.360 |
| 183.648 6B 206.352 9C 229.072 |
| 185.360 6C 208.064 9D 230.784 |
| 187.072 6D 209.936 |
| 188.928 7A 211.648 |
| 190.640 7B 213.360 |
| 192.352 7C 215.072 |
| 194.064 7D 216.928 |
| 195.936 8A 218.640 11B |
| Frequency | Channel label |
| 11D | |
| 12A | |
| 12C | |
| 12D | |
| 13A | |
| 232.496 13E | |
| 234.208 13C | |
| 235.776 13D | |
| 237.488 13E | |
| 239.200 13F |
| Frequency | Channel label |
Presetting DAB stations (remote control only)
Use the preset function to store your favorite 30 stations.
10:30 DAB01 STATION1
Deleting a stored preset (Option menu)
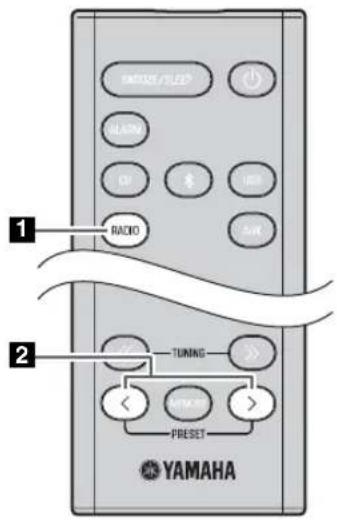
Press the RADIO source button to switch the audio source to DAB.
Press TUNING / to select a station that you want to preset.
Press MEMORY.
The display will indicate "PRESET MEMORY," and the preset number will blink.
4 Press PRESET < / > to select the preset number that you want to store.

- The lowest preset number that has not been stored will be selected first.
- If you want to cancel the presetting, press
- If you select a preset number in which a station has already been stored, it will be overwritten by the new station.
5 Press MEMORY.
This stores the DAB station.
When presetting has finished, the display will indicate "Completed!".
Press the RADIO source button to switch the audio source to DAB.
2 Press OPTION.
The option menu will appear.
Press / to select PRESET DELETE, and then press ENTER.
4 Press / to select the preset number that you want to delete.

If you want to cancel the deleting, press OPTION.
5 Press ENTER to complete the operation.
When deleting has finished, the display will indicate "Deleted!".
6 Press OPTION to exit the option menu.
Selecting preset DAB stations
Press the RADIO source button to switch the audio source to DAB.
Press PRESET < / > to select the DAB station that you want to hear.

You can only select presets that have been stored.
Checking the signal strength of DAB stations (Option menu)
Press the RADIO source button to switch the audio source to DAB.
2 Press OPTION.
The option menu will appear.
Press / to select TUNE AID, and then press ENTER.
4 Press / to select the DAB station. The signal strength will appear.
5 Press OPTION to exit the option menu.
LISTENING TO FM STATIONS
Selecting an FM station
To listen to the FM station, connect the antenna as described in "Connecting the speakers and antenna" (F 4).
Press the RADIO source button to switch the audio source to FM.
2 Tune FM stations
Automatic tuning: Press and hold TUNING / Manual tuning: Press TUNING / repeatedly.

If you tune to a station manually while receiving FM, the sound will be monaural.
Display information (remote control only)
If you press DISPLAY on the remote control, the information shown on the front panel display will be switched in the following order.
Preset number and frequency Reception status*
- Example of reception status indication.
TUNED/STEREO: A strong FM stereo broadcast is being received.
TUNED/MONO: A monaural FM broadcast is being received (even if the FM broadcast is stereo, reception will be monaural if the signal is weak).
Not TUNED: No broadcast is being received.
Displaying Radio Data System information
If you press DISPLAY on the remote control while Radio Data System information is being received, the information shown on the front panel display will be switched in the following order.
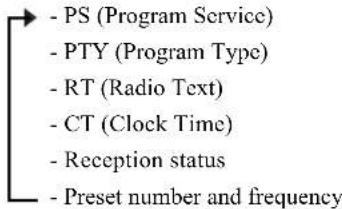

If the signal transmission of the Radio Data System station is too weak, this unit may not be able to receive Radio Data System information completely. In particular, RT (Radio Text) information uses a lot of bandwidth, so it may be less available compared to other types of information.
Presetting FM stations (remote control only)
Use the preset function to store your favorite 30 stations.
First, press the RADIO source button to switch the audio source to FM.
Auto preset
This method tunes automatically, and automatically preset only the stations that have good reception.
12
AUTO PRESET Press MEMORY
Manual preset
PRESSET MEMORY FM01 87.50MHz
Deleting a stored preset (Option menu)
Press and hold down MEMORY.
"AUTO PRESET" will appear and "Press MEMORY" will blink.
2 Press MEMORY.
Auto preset will begin.
When presetting has finished, the display will indicate "Completed!".

When you perform auto preset, all stored stations are cleared and the new stations are stored.

If you want to stop auto preset before it is completed, press
Press TUNING / to tune a station that you want to preset.
Press MEMORY.
The display will indicate "PRESET MEMORY," and the preset number will blink.
Press PRESET / to select the preset number that you want to store.

- The lowest preset number that has not been stored will be selected first.
- If you want to cancel the presetting, press
- If you select a preset number in which a station has already been stored, it will be overwritten by the new station.
4 Press MEMORY.
When presetting has finished, the display will indicate "Completed!".
Press OPTION.
The option menu will appear.
Press / to select PRESET DELETE, and then press ENTER.
Press / to select the preset number that you want to delete.

If you want to cancel the deleting, press OPTION.
4 Press ENTER to complete the operation.
When deleting has finished, the display will indicate "Deleted!".
5 Press OPTION to exit the option menu.
Selecting preset FM stations

Press the RADIO source button to switch the audio source to FM.
Press PRESET < / > to select the FM station that you want to hear.

You can only select presets that have been stored.
LISTENING TO EXTERNAL SOURCES
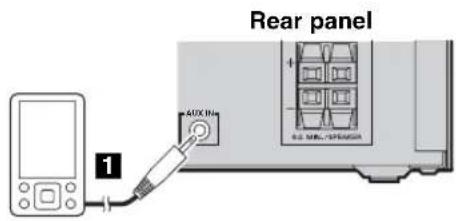
Using a commercially available 3.5mm miniplug cable, connect your external device to the AUX jack on the rear panel of this unit.

- Turn the unit off before connecting the audio cable.
- Turn down the volume of the unit and your external audio device before connection.
Press to turn the unit on.
Press the AUX source button to switch the audio source to AUX.
4 Start playback on the connected external audio device.
USEFUL FUNCTIONS
Using the Option menu
When you press OPTION, the option menu will appear in the front panel display, allowing you to make the following settings.

(eject button) cannot be operated while the option menu is displayed.
| Option menu Setting or range See page | |
| PRESET DELETE | Deletes a stored preset (shown only if the audio source is DAB *1/FM). |
| DAB INIT SCAN*1 | Performs the initial scan (shown only if the audio source is DAB). |
| DAB TUNE AID*1 | Checks the signal strength of DAB station (shown only if the audio source is DAB). |
| DIMMER | Adjusts the brightness of the front panel display (12: bright, 2: medium, 3: dim). |
| EQ LOW | Adjusts the tonal character (low frequencies) (-10 - 0*2 - +10 dB). |
| EQ MID | Adjusts the tonal character (mid frequencies) (-10 - 0*2 - +10 dB). |
| EQ HIGH | Adjusts the tonal character (high frequencies) (-10 - 0*2 - +10 dB). |
| BALANCE | Adjusts the volume balance of the left and right speakers (L+10 - CENTER*2 - R+10). |
| POWER SAVING S | Switches the standby state, NORMAL or ECO (power saving mode) |
| AUTO PWRSTDBY | You can specify the time after which the unit will turn off automatically.If no operation occurs for the duration you specify, the unit will turn off automatically(TIME 12H: 12 hours, TIME 8H*2: 8 hours, TIME 4H: 4 hours, TIME 2H: 2 hours, OFF: the unit will not turn off). |
| CLOCK SET Sets the date and time. | |
| ALARM SET Sets the alarm. | |
| BLUETOOTH | Connects this unit and your component via Bluetooth (ON*2: enable, OFF: disable). |
1 MCR-B043D only
2 Default setting
Procedure for settings

1 Press OPTION.
The option menu will appear.
Press / to select the menu item that you want to set, and then press ENTER.
Press / to edit the setting, and then press ENTER to confirm the setting.
If you want to continue making other settings, repeat the procedure from step 2
4 Press OPTION to exit the option menu.

If you decide to cancel without changing the setting, press OPTION before confirming the change.
Using the sleep timer
When the specified time has elapsed, the unit will turn off automatically.
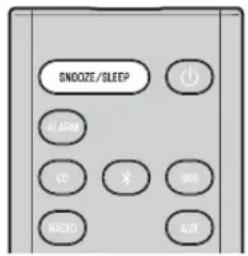
Press SNOOZE/SLEEP repeatedly to specify the time after which the unit will turn off.
You can specify 30, 60, 90, 120 or OFF.
When you select a time, the sleep timer is turned on, and the sleep indicator (2) is shown in the front panel display.

If you press SNOOZE/SLEEP while the sleep timer is activated, the sleep timer setting will be canceled.
Using the alarm function (IntelliAlarm)
The unit includes an alarm function that plays back audio sources or a set of beep (internal alarm sound) at the set time using a variety of different methods. The alarm function has the following features.
3 types of alarms
Select from 3 alarm types, combining music and beep sounds.
| SOURCE+BEEP | The selected audio source and the beep sound are played at the set time. Source playback begins to fade in 3 minutes before the set time and the volume gradually increases to the set volume. Then, at the set time, the beep sound is activated. |
| SOURCE | The selected audio source is played at the set time. The volume fades in gradually and increases to the set volume. |
| BEEP The beep sound | is played at the set time. |
Various audio sources
You can choose from audio CD, data CD, USB device, or DAB/FM. The following playback methods can also be selected depending on the audio source:
| Source | Playback method | Function |
| Audio CD | Selected track The selected track is played repeatedly. | |
| Resume The track you listened to last time is played back. | ||
| Data CD/USB device | Folder The selected folder is played repeatedly. | |
| Resume The track you listened to last time is played back. | ||
| DAB*/FM | Preset station The selected preset station is played. | |
| Resume | The DAB*/FM station you listened to last time is played back. | |
- MCR-B043D only

You can not choose Bluetooth and AUX as the audio source.
Snooze
The snooze function can be enabled to replay the alarm after 5 minutes (rP.21).
Setting the alarm
Setting the alarm time and alarm type (Option menu)

The alarm will not function when the unit is in ECO standby. To use the alarm function, set the Option menu item POWER SAVING to NORMAL (P. 18).
1 Press OPTION.
The option menu will appear.
Press / to select "ALARM SET", and then press ENTER.
The alarm indicator (1) numerical value you're setting will blink.
3 Set the alarm.
Set items ①-④ described below.
Press / to select a numerical value, and press ENTER to confirm it.
| Items | Setting or range |
| ① ALARM TIME | Make settings in the order of hours → minutes. |
| ② ALARM TYPE | Select from SOURCE+BEEP, SOURCE or BEEP. For details, refer to “3 types of alarms” (P. 19).If you selected BEEP, proceed to item ④. |
| ③ ALARM SOURCE(If you selectedSOURCE+BEEP orSOURCE as thealarm type) | CD: Play back music from a CD.Specify the track number (data CD: folder number) (RESUME*1, 1-99).USB: Play back music from a USB device.Specify the folder number (RESUME, 1-999).DAB*2/FM: Play a DAB*2/FM station.Specify the preset number (RESUME, 1-30).If the selected source cannot be played back at the time set for the alarm, the beep sound is played back. |
| ④ ALARM VOLUME | Specifies the volume (5-60) of the alarm. |
1 If you choose RESUME when specifying the track/folder/preset number, the last-played track/folder/station will be played (resume playback)
2 MCR-B043D only
4 Complete the settings.
When you set the VOLUME for item ④, the display will indicate
"Completed!" and your settings will be confirmed.
The alarm will be turned on and the alarm indicator light.

If you press OPTION or turn the unit off while making alarm settings, the settings will be cancelled.
Switching the alarm on/off
Press ALARM to turn the alarm on/off.
When the alarm is on, the alarm indicator (1) light, and the alarm time will be shown.
If you press ALARM again, the alarm indicator (0●1) and the alarm will turn off.

If the Option menu item POWER SAVING is set to ECO, the alarm will not function (P.18).
Operations while the alarm sound is playing
When the set time arrives, the selected alarm sound will play. During playback, the following operations are available.
To pause the alarm (Snoopze)
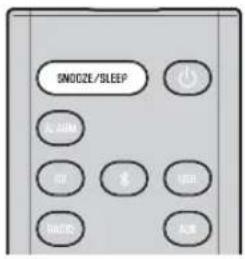
Press SNOOZE/SLEEP.
Snoopze will stop the alarm and play it again 5 minutes later.

- If SOURCE + BEEP is set as the alarm type, you can press SNOOZE/SLEEP once to stop the beep sound, and twice to stop the audio source.
5 minutes after the audio source is stopped, it will start fading in again and the beep sound will resume.
- Buttons on the unit other than the will also function as the snooze button.
To turn the alarm off
Press ALARM or

- You can also stop the alarm by holding down SNOOZE/SLEEP.
- If you don't stop the alarm, it will stop automatically after 60 minutes and the unit will turn off.
- The alarm setting will be saved even if the alarm is turned off. If the alarm is turned on again by pressing ALARM, the alarm will sound with the previous alarm settings.
TROUBLESHOOTING
If there is a problem with the unit, check the following list first. If you cannot resolve the problem with the suggested solutions or if the problem is not listed below, turn off and unplug the unit, and consult the nearest authorized Yamaha dealer or service center.
General
| Problem Cause Solution | ||
| The speakers make no sound. The volume might be set to the minimum level, or muted. | Adjust the volume level. | |
| Check the connections (P.4). | ||
| Raise the volume of the external device. | ||
| Sound suddenly turns off. | The sleep timer may be set (P.19). | Turn the unit on and play the source again. |
| The auto power standby function may have operated. | When the time specified for AUTO PWR STDBY in the option menu has elapsed (P.18) or when 20 minutes have elapsed without any operation being performed after stopping USB device or CD playback, the unit will turn off automatically. | |
| Sound is cracked/distorted or there is abnormal noise. | Input source volume is excessive, or volume of this unit is excessive (especially Bass). | Adjust volume with VOLUME, or use the option menu (P.18) to adjust the bass range. If an external device is playing back, lower the volume of the external device. |
| The unit does not operate properly. | The unit may have received a strong electrical shock such as lightning or excessive static electricity, or power supply may have dropped. | Restart the unit by holding down the bar about 10 seconds. |
| The unit turns on but immediately shuts off. | ||
| A digital or high-frequency equipment produces noises. | The unit may be placed too close to the digital or high-frequency equipment. | Place the unit farther away from the equipment. |
| The clock setting has been cleared. | The unit remained unpowered for about one hour. | Plug the power cable into the wall outlet firmly, and set the clock again (P.6). |
| Alarm does not sound. | The unit is set to ECO standby. | In the option menu, set POWER SAVING to NORMAL (P.18). |
| The front panel display indicates “ALARM not work” and can’t set the alarm. | ||
| The unit turns off unexpectedly. | The auto power standby function may have operated. | When the time specified for AUTO PWR STDBY in the option menu has elapsed (P.18) or when 20 minutes have elapsed without any operation being performed after stopping USB device or CD playback, the unit will turn off automatically. |
CD playback
| Problem Cause Solution | ||
| Disc cannot be inserted. | Another disc is already inserted. | Unload the disc with▲. |
| You are attempting to insert a disc that cannot be used by this unit. | Use a disc supported by the unit (■P. 25). | |
| Some button operations do not work. | The disc loaded into the unit may not be compatible. | Use a disc supported by the unit (■P. 25). |
| Playback does not start immediately after pressing▶(stops immediately). | The disc may be dirty. | Wipe the disc clean (■P. 25). |
| The disc loaded into the unit may not be compatible. | Use a disc supported by the unit (■P. 25). | |
| If the unit was moved from a cold to warm place, condensation may have formed on the disc reading lens. | Wait for an hour or two until the unit adjusts to the room temperature, and try again. | |
| The front panel display indicates “no operation”, and a disc cannot be inserted or unloaded. | The option menu is displayed. Alternatively, the alarm is playing. | Press OPTION to exit the option menu. Alternatively, press ALARM to stop the alarm. |
| When you insert a disc, the front panel display indicates “CD No Disc” or “CD Unknown.” | The disc loaded into the unit may not be compatible. | Use a disc supported by the unit (P. 25). |
| The disc may be dirty, or a foreign object may have adhered to it. | Wipe the disc clean. Alternatively, remove any foreign object that has adhered to the disc (P. 25). | |
| The disc does not contain playable files. | Use a disc contains playable files (P. 25). | |
| The disc was inserted upside down. Insert the disc | with the label facing upward. | |
USB device playback
| Problem Cause Solution | ||
| MP3/WMA file in the USB device does not play. | The USB device is not recognized. Turn the unit off and reconnect the USB device to the unit.If the solutions above do not resolve the problem, the USB device is not playable on the unit (P. 25). | |
| The USB device does not contain playable files. | Use a USB device contains playable files (P. 25). | |
| When you connect a USB device, the front panel display indicates "USB OverCurrent," and then the front panel display goes blank. | An incompatible USB device was connected to the unit. Alternatively, the USB device is not connect firmly to the unit. | Turn the unit off and reconnect the USB device to the unit. If it does not resolve the problem, the USB device is not playable on the unit (P. 25). |
Bluetooth
| Problem Cause Solution | ||
| Cannot make this unit paired with the other component. | The other component does not support A2DP. Perform pairing operations with a component which supports A2DP. | |
| A Bluetooth adaptor, etc. that you want to pair with this unit has a password other than “0000”. | Use a Bluetooth adaptor, etc. whose password is “0000”. | |
| This unit and the other component are too far apart. | Move the other component closer to this unit. | |
| There is a device (microwave oven, wireless LAN, etc.) outputs signals in the 2.4 GHz frequency band nearby. | Move this unit away from the device that is emitting radio-frequency signals. | |
| In the option menu, BLUETOOTH is set to OFF. | In the option menu, set BLUETOOTH to ON (P.18). | |
| Can’t establish a Bluetooth connection. | This unit is not registered on the other component’s Bluetooth connection list. | Perform pairing operations again (P.9). |
| In the option menu, BLUETOOTH is set to OFF. | In the option menu, set BLUETOOTH to ON (P.18). | |
| No sound is produced or the sound is interrupted during playback. | The Bluetooth connection of this unit with the other component is disconnected. | Perform Bluetooth connection operations again (P.10). |
| This unit and the other component are too far apart. | Move the other component closer to this unit. | |
| There is a device (microwave oven, wireless LAN, etc.) outputs signals in the 2.4 GHz frequency band nearby. | Move this unit away from the device that is emitting radio-frequency signals. | |
| The other component’s Bluetooth function is off. | Turn on the Bluetooth function of the other component. | |
| The other component is not set to send Bluetooth audio signals to this unit. | Check that the Bluetooth function of the other component is set properly. | |
| The pairing setting of the other component is not set to this unit. | Set the pairing setting of the other component to this unit. | |
| The other component’s volume is set to the minimum. | Increase the volume level. | |
DAB reception (MCR-B043D only)
| Problem Cause Solution | ||
| Cannot tune into any DAB stations. | The initial scan operations were not performed. | Perform the initial scan operations (eP. 11). |
| There is no DAB coverage in your area. Check with your dealer or WorldDMB Online at "http://www.worlddab.org" for a listing of the DAB coverage in your area. | ||
| The DAB signals are too weak. Change the height | direction, or placement of the antenna. | |
| The initial scan operations are not successful and "Not Found" appears on the front panel display. | The DAB signals are too weak. | |
| There is no DAB coverage in your area. Check with your dealer or WorldDMB Online at "http://www.worlddab.org" for a listing of the DAB coverage in your area. | ||
| The DAB station reception is weak. | The DAB signals are too weak. Change the height | direction, or placement of the antenna. |
| There is noise interference (e.g. hiss, crackle, or jitter). | The antenna needs to be repositioned. | |
| The DAB signals are too weak. | ||
| The DAB station information does not appear or is inaccurate. | The DAB station may be temporarily out of service, or the DAB station information is not provided by the DAB broadcaster. | Contact the DAB broadcaster. |
FM reception
| Problem Cause Solution | ||
| Too much noise. | The antenna may be connected improperly. | Make sure the antenna is connected properly (P. 4) or use a commercially available outdoor antenna. |
| The antenna is too close to the unit or to an electronic device. | Position the antenna as far away as possible from the unit or the electronic device. | |
| Too much noise during stereo broadcast. | The radio station you selected may be far from your area, or the radio wave reception is weak in your area. | Try manual tuning to improve the signal quality (P. 15) or use a commercially available outdoor antenna. |
| Even with an outdoor antenna, radio wave reception is weak. (Sound is distorted.) | Multipath reflection or other radio interferences may have occurred. | Change the height, direction, or placement of the antenna (P. 4). |
Remote control
| Problem Cause Solution | ||
| The remote control does not work properly. | The remote control may be operated outside its operation range. | For information on the remote control operation range, refer to “How to use the remote control” (P. 1). |
| The remote control signal receiver on the unit (P. 2) may be exposed to direct sunlight or lighting (inverted fluorescent lamps). | Change the lighting or orientation of the unit. | |
| The battery may be worn out. | Replace the battery with a new one (P. 1). | |
| There are obstacles between the remote control signal receiver on the unit (P. 2) and the remote control. | Remove the obstacles. | |
NOTES ON DISCS AND USB DEVICES
CD information
This unit is designed for use with audio CD, CD-R, and CD-RW with the logos followings.


- ISO 9660 format CD-R/RW

This unit can play back discs bearing any of the logo marks above. A disc logo mark is printed on the disc and the disc jacket.

- Do not load any other type of disc into this unit. Doing so may damage this unit.
- CD-R/RW cannot be played back unless finalized.
- Some discs cannot be played back depending on the disc characteristics or recording conditions.
- Do not use any non-standard shaped discs such as a heart-shaped disc.
- Do not use discs with many scratches on their surface.
- Do not load a cracked, warped, or glued disc.
- Do not use 8-cm discs.
Handling a disc
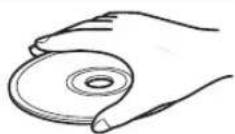
- Do not touch the surface of the disc. Hold a disc by its edge (and the center hole).
- Do not use a pencil or pointed marker to write on the disc.
- Do not put a tape, seal, glue, etc., on a disc.
- Do not use a protective cover to prevent scratches.
- Do not load more than one disc into this unit at one time. This can cause damage to both this unit and the discs.
- Do not insert any foreign objects into the disc slot.
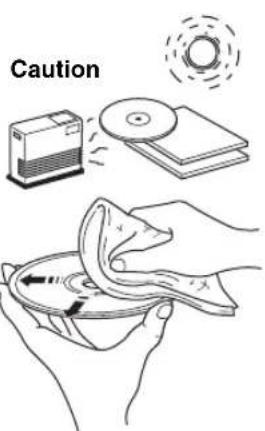
- Do not expose a disc to direct sunlight, high temperature, high humidity, or a lot of dust.
- If a disc becomes dirty, wipe it with a clean, dry cloth from the center out to the edge. Do not use record cleaner or paint thinner.
- To avoid malfunction, do not use a commercially available lens cleaner.
USB device information
This unit supports USB mass storage class devices (e.g., flash memories or portable audio players) using FAT16 or FAT32 format.

- Some devices may not work properly even if they meet the requirements.
- Do not connect devices other than USB mass storage class devices (such as USB chargers or USB hubs), PCs, card readers, an external HDD, etc.
- Yamaha will not be held responsible for any damage to or data loss on the USB device occurring while the device is connected to this unit.
- Playability of and power supply to all kind of USB devices are not guaranteed.
- USB devices with encryption cannot be used.
About MP3 or WMA files

- The unit can play back:
| File Bitrate | kbps) | Sampling frequency (kHz) |
| MP3 8-320** | 16-48 | |
| WMA 16-320** 22.05-48 | ||
** Both constant and variable bitrates are supported.
- The maximum numbers of files/folders that can be played on the unit are as follows.
| Data CD U S B | ||
| Maximum total number of file 512 999 | 99 | |
| Maximum folder number 255 999 | ||
| Maximum file number per folder | 511 | 255 |
Copyright-protected files cannot be played back.
SPECIFICATIONS
PLAYER SECTION
CD
Media CD, CD-R/RW
Audio format. Audio CD, MP3, WMA
USB
Audio format.. MP3, WMA
AUX
- Input connector. 3.5 mm (1/8") STEREO mini jack
Bluetooth SECTION
- Bluetooth version . . . . . . . . . . . . . . . . . . . . . . . . . . . . . . . . . . . . . . . . . . . . . . . . . . . . . . . . . . . . . . . . . . . . . . . . . . . . . . . . . . .
- 3.0
- Supported profile A2DP,AVRCP
Supported codescS - Wireless output. Bluetooth Class 2
Maximum communication distance. 10m (without obstructions)
AMPLIFIER SECTION
Maximum output power. 15W + 15W (6 1 kHz, 10% THD)
- Headphones 3.5 mm (1/8 in) STEREO mini jack (Impedance 16 to 32 Ω)
- Equalizer characteristics
EQ Low (Bass)/EQ Mid (Middle)/EQ High (Treble) ±10 dB
TUNER SECTION
Tuning range
DAB/DAB+ (MCR-B043D only). 174 to 240 MHz (Band III)
FM 87.50 to 108.00 MHz
SPEAKER SECTION
- Type Full range bass reflex non magnetic shielding type
- Driver. 11 cm (4-1/2") cone type × 1
Frequency response. 50 to 20kHz (-10dB) - Dimensions (W × H × D) 129 (5-1/8") × 126 (4") × 251 (9-7/8") mm
Weight 1.5 kg (3.3 lbs.)
GENERAL
- Power supply. AC 230 V, 50 Hz
Power consumption. 30 W - Standby consumption 3.5 W or less (NORMAL)/0.5 W or less (ECO)
- Dimensions (W × H × D) ( MCR-B043) 180 (7-1/8") × 130 (5-1/8") × 276 (10-7/8") mm
( MCR-B043D) 180 (7-1/8") × 130 (5-1/8") × 281 (11") mm
Weight 2.6 kg (5.7 lbs.)
Specifications are subject to change without notice.
Wc, Yamaha Music Europe GmbH hereby declare that this unit is in compliance with the essential requirements and other relevant provisions of Directive 1999/5/EC.
Yamaha Music Europe GmbH
Siemensstr. 22-34 25462 Rellingen, Germany
Tel: +49-4101-303-0

LASER SAFETY
This unit employs a laser. Due to possible eye injury, only a qualified service person should remove the cover or attempt to service this device.
DANGER
This unit emits visible laser radiation when open. Avoid direct eye exposure to beam. When this unit is plugged into the wall outlet, do not place your eyes close to the opening of the disc slot and other openings to look into inside.
Bluetooth
- Bluetooth is a technology for wireless communication between devices within an area of about 10 meters (33 ft) employing the 2.4GHz frequency band, a band which can be used without a license.
- Bluetooth is a registered trademark of the Bluetooth SIG and is used by Yamaha in accordance with a license agreement.
Handling Bluetooth communications
- The 2.4 GHz band used by Bluetooth compatible devices is a radio band shared by many types of equipment. While Bluetooth compatible devices use a technology minimizing the influence of other components using the same radio band, such influence may reduce the speed or distance of communications and in some cases interrupt communications.
- The speed of signal transfer and the distance at which communication is possible differs according to the distance between the communicating devices, the presence of obstacles, radio wave conditions and the type of equipment.
- Yamaha does not guarantee all wireless connections between this unit and devices compatible with Bluetooth function.
Information for Users on Collection and Disposal of Old Equipment and Used Batteries

These symbols on the products, packaging, and/or accompanying documents mean that used electrical and electronic products and batteries should not be mixed with general household waste.
For proper treatment, recovery and recycling of old products and used batteries, please take them to applicable collection points, in accordance with your national legislation and the Directives 2002/96/EC and 2006/66/EC.

By disposing of these products and batteries correctly, you will help to save valuable resources and prevent any potential negative effects on human health and the environment which could otherwise arise from inappropriate waste handling.

For more information about collection and recycling of old products and batteries, please contact your local municipality, your waste disposal service or the point of sale where you purchased the items.
[Information on Disposal in other Countries outside the European Union]
These symbols are only valid in the European Union. If you wish to discard these items, please contact your local authorities or dealer and ask for the correct method of disposal.
Note for the battery symbol (bottom two symbol examples):
This symbol might be used in combination with a chemical symbol. In this case it complies with the requirement set by the Directive for the chemical involved.
If there should be color blotching or noise when used near a TV, move this unit away from the TV when using it.
Do not use this unit within 22cm (9 inches) of persons with a heart pacemaker implant or defibrillator implant.
Radio waves may affect electro-medical devices. Do not use this unit near medical devices or inside medical facilities.
The user shall not reverse engineer, decompile, alter, translate or disassemble the software used in this unit, whether in part or in whole. For corporate users, employees of the corporation itself as well as its business partners shall observe the contractual bans stipulated within this clause. If the stipulations of this clause and this contract cannot be observed, the user shall immediately discontinue using the software.
LASER
Type Semiconductor laser GaAS/GaAlAs
Wave length 790nm
Output Power 7 mW
CAUTION
Use of controls or adjustments or performance of procedures other than those specified herein may result in hazardous radiation exposure.
For U.K. customers
If the socket outlets in the home are not suitable for the plug supplied with this appliance, it should be cut off and an appropriate 3 pin plug fitted. For details, refer to the instructions described below.

The plug severed from the mains lead must be destroyed, as a plug with bared flexible cord is hazardous if engaged in a live socket outlet.
Special Instructions for U.K. Model
IMPORTANT
THE WIRES IN MAINS LEAD ARE COLOURED IN ACCORDANCE WITH THE FOLLOWING CODE:
Blue: NEUTRAL
Brown: LIVE
As the colours of the wires in the mains lead of this apparatus may not correspond with the coloured markings identifying the terminals in your plug, proceed as follows:
The wire which is coloured BLUE must be connected to the terminal which is marked with the letter N or coloured BLACK. The wire which is coloured BROWN must be connected to the terminal which is marked with the letter L or coloured RED.
Make sure that neither core is connected to the earth terminal of the three pin plug.
ATTENTION: VEUILLEZ LIRE CE QUI SUIT AVANT D'UTILISER L'APPAREIL.
FONCTIONS UTILES. 18

Piles (x 2) AAA, R03, UM-4
Selection de stations DAB

Diverses sources audio
- MCR-B043D uniqueness

Supports CD, CD-R/RW
- Format audio CD audio, MP3, WMA
USB
- Format audio . MP3, WMA
AUX
Batterien (x 2) (AAA, R03, UM-4)
Jan Feb Mar Apr May Jun
Jul Aug Sep Oct Nov Dec
DELARNAS NAMN OCH FUNKTIONER. 2
Frontpanel. 2
Frontpanelens teckenfonster. 2
Fjarrkontroll. 3
ANSLUTNINGAR 4
Forbereda for DAB-mottagning. 11
Valja DAB-stationer. 12

DAB/FM-antenn (for MCR-B043D)

FM-antenn or MCR-B043)
Batterier (x 2) AAA, R03, UM-4)
Anvanda fjarrkontrollen
Installera batterier i fjarrkontrollen
Kontrollera polariteten (^ + ^ och"-") for batterierna och satt i dem at ratt hall.
DELARNAS NAMN OCH FUNKTIONER
Frontpanel

① (Strom)
Jan Feb Mar Apr May Jun
Jul Aug Sep Oct Nov Dec
LYSSNA PÅ DAB-STATIONER (endast MCR-B043D)
modello MCR-B043/MCR-B043D
Antenna DAB/FM (per MCR-B043D)
Antenna FM (per MCR-B043)
Batterie (x 2) (AAA, R03, UM-4)
Jan Feb Mar Apr May Jun
Jul Aug Sep Oct Nov Dec
ESCUCHAR EMISORAS DAB (solo MCR-B043D) ...11

Antena DAB/FM (para MCR-B043D)
Antena FM (para MCR-B043)

Pilas (x 2) (AAA, R03, UM-4)
Jan Feb Mar Apr May Jun
Enero Febreno Marzo
Abril
Mayo
Junio
Jul Aug Sep Oct
Nov Dec
Julio
Agosto
embre
Octubre
Novembre
Décembre
ESCUCHAR EMISORAS DAB (solo MCR-B043D)
Recepción DAB (solo MCR-B043D)
(allyen MCR-B043D) 11

Batterijen (x 2) (AAA, R03, UM-4)
Jan Feb Mar Apr May Jun
Audio-indcling.. MP3, WMA
AUX
Bluetooth-communications hanteren
(Tolbko MCR-B043D) 11
Iodrotobka K npneMy DAB-cnHaHa 11
Bb6op DAB-cTaHcnn 12
PpeBapnteHnaHa HacTpoKa DAB-cTaHcN
(Tonbko c nyIbTa Dv) 13
Bb6op npeDbapntelbHO 3aDaHHbIX DAB-CTaHcun...14
PpOBepka ypoBn CnHaJd DAB-CTaHcnn
(MEHIO HAcTpoEK) 14
IPOCJUWBAHNE FM-PAIOCTAHUN 15
BbI6op FM-paIOocTaHcun 15
IpeBapnteHbHa HacTpoKa FM-paNocTaHcnn (ToJIbKO C npIbTa D) 16
Bb6op npedBaPnteNo HacTpoEHhIX
FM-padnoctanu 17
IPOCJyUHBAHNE BHEUHNX ICTOCHIKOB...17
PONJI3HbIEΦYHKUIN 18
IcnoJb3ObaHne MeHIO HAcTpoEK 18
IcnoB3ObaHne TaMepa nepexoDa B pexm
OxuandaHn 19
IcnoB3OBaHne cyHKm6yDnJIbHnka(IntellAlarm) ...19
UcTaHOBKa CnHaJa 6yDnIbHnKa 20
Onerpaun BO BpemBocnpn3BeHnCnHaJa
6yndnblbHka 21
YCTPAHEHNE HENCINPABHOCTE 22
ПРИМЕЧАНИОДИСКAXИУCTPOIÇTBAXUSB...25
TEXHUNECKNE XAPAKTEPNCNU 26
(B KOHcE DaHHoro pyKOBOOCTBa)
DOnonHnTeIbHa HhOpMaun
Функции
Bocipoh3BeHHe My3bIKn C BHeHHx yctpoCTB, HainpHMeP, CD-DCKOB C My3bIKo H daHHBM, USB-ycTpoCTB HIN BHeHHX yctpoCTB Ycepe3 Ie3IO AUX, H IpocIyHHBaHne paAnocTaHIn.
(ToJIbKO MCR-B043D)IpocJyINHbAHNHe DAB-paHnOCTAHII.
- Blaorapra texHOIOrHn Bluetooth BBcMOKeTe HacJaaKdaTbCq NCTbIM 3ByKOM 6e3 HcIOJIb3OBAHHI PpOBoOB.
- HcHIOJIb3OBAHHC JIO6HMOH McIOHN HIN 3ByKOBOrO CHHaJIa B KaueCTBC 3BOHk 6yHJbHnKa. B 3aIaHIOe Bpem ChHaJIa BbIbpaHHa MEIOHN BOcPOnH3BOJNTcR C yKa3aHHoI rPoMkoCTbIO, ObecIeYHBa Bam HDeAIBHOe HaHaIO JHRA (fYHKIIra IntelliAlarm).
- MojHo JIeKo coXpaHHTb JIO6HmBle paJIOocTaHIN: 10 30 FM- H 30 DAB-paJIOocTaHIN (fynKIIIN DAB JIOcTyIIHa TToJIbKO IJIa MOJcIJN MCR-B043D).
Hn3KHe, cpeHHne H BBcOKHe YacToTb MoKHO HaCTPOHTB B COOTBeTCTBHN C HnHBNyaJbHBIMn PpeIIOOTeHHaMn.
O6 3TOM pyKOBoDCTBe
- EcJH ONepaHIO MOKHO BbIIOJIHHbTc IIMOIOBIO KHOIOK Ha cAMOM yCTPOIcTBc HIN C IIyJBTa , B INHcTpkyuHN 6yIDeT OINCbIBaTbCBAIIIOJIHeHHe ONepaHn C IIMOIOBIO IIyJBTa
yka3bBAeT Ha MepbI IpeIOCTOpOxHocTH IIpr HcIOJIb3OBAHH yctPoHCTBa H Na orpaHHueHn erO cyHKnH.
yka3bIbAet Ha IOIOJIHHTeJIbHbe IHCtpyKUnn IIO OITHMajbHOMy HCIOJIb3OBAHHIO.
Ppnilaraemblie akceccyapbl
Nyt dy Ka6eIb dIa IIOKJIIOUeHn KOnoHOK (1,5Mx2)
DAB/FM-aHTeHHa (dЯ MCR-B043D)
FM-aHTehHa (MnMCR-B043)
Батуейки (x 2) (AAA, R03, UM-4)
IcnoIb3ObaHne npIbTa Dv
YcTaHOBka 6aTapeeK B nyIbT dY
HaIHTeOTMeTKN“+”H“-”Ha 6aTaapeKax H BCTabBte HX COOTBeTCTBYIOINM O6pa3OM.
HA3BAHЯчACTEиNXФУHKцИN
PepednnaHelb
① (bHTaHne)
HaKMHTe 3Ty KHOIIKy, YTO6bI BKIOHOTb HJIN BIKIOHOTb (IpepeBcTH B peKHM OxuaHH) ycTPOCTBO.
CyIeCTByET IBa TnHa coCToHnH OxNJaHn (cTp.5).
② Nopt USB
HcnoB3yIte IIOIOKIOOeHHN USB-ycIPOIcTBa (33 crp.5,8).

(rhe3doDJIa NOkJIOUeHn HayuHKnOB)
HcnoJb3yIte IIN NOKIOUeHN HAYIHKNOB.
(4)SOURCE
Bb6op ayHnONCTOCHNka IIN BOCnPOn3BeJeHH.
Iph MHOROKpaTHOM HaKaTHN Bb6paHHb INCTOCHK
H3MCHRCTCB CJcDyIOUcM IOpAKe.
⑤PergyIaTOp VOLUME
PeyIINPOBKA rPOMKOCTH.
⑥KhONKn ynpaBneHn BOCpOn3BeDeHnEm
HcnoB3yIte Hx IINy ynpabJIeHHN CD-IMcKOM/USB-yctpOHTBOM.
//I: BocPOn3BcEeHHe/nay3a
:OCTaHOBka
Ipynyc,6paTbH/npaMoNIOc(HaMHTe yepKBAte KHOUY)
⑦PRESET
HcnoIb3yIte 3TN KHOIIKN, TTO6bl BbIpaTb coXpaHeHHyo paHIOCTAHINIO (cTp.16,17).
⑧Диспел nepeДнй naHeJn
Ha nncnlee oTo6paKaetcBpeMaH npyra HhfoopMaHH.
CNOTdJaDnCKa
YTO6bI BOCIIPOH3BecTH CD-ⅡHCK, BCTaBBte eRO B 3TOT CJOT (cTp.7).
10 (KHONKa n3BneeyHn DnCKa)
H3BJIeueHHe CD-ⅡHcKa (OIIepaIIIN HeBO3MOKHa,ecIIN OTO6paKaAeTcMHeIO HAcTpoE (Cp.18)).
Dncnne nepedne naheI
①BpemnCnHaJa
YKa3bIbAeT BpeMnCnHaJa (cTp.20).
②ИндикатOP NOBTOpHOrO BOCnpon3BeDEHn/BOcnpoN3BeDEHnB CnyaHOM NoprKe
Ioka3bIBaETpeKHMBOCIIPOUN3BeJeHHN(CTp.8).
③ДононтеловиндИкадур (TOЛьКOMCR-B043D)
BkHouaetcB cIyac IIpoHrpbBaHHN IOIOIHHTcJIbHOI cTahnH BO BpemI IpocIyHHBaHH cTaHINH DAB.
④MHoroФункционаЛьньй ИndиKaTOp
Ioka3bIbAcT pa3HHyIO HhOpMaHIO, BKJIOaY Ioka3aHHaCob, HOMcBOCIIPOH3BOIDMOI DOPOKKIN HACTOTy paHIOCTAHHH.
⑤PnpemHK cnHaJnYnbTa Dy
Y6eHNTecbBTOM,HTO3OTATyHKHeIepKpbT (cTp.1).
⑥ИнданkaTOp 6удиЛьнда
BKNOaETc,ecJIn yCTaHOBJieHO BpeMa cHrHaJIa (Ctp.20).
⑦HДиKaTOppeKImaOxKnDaHnA
BkHouaetc,ecJyctAHOBJIeH TaJIeMepIpepxoJa B peKHM OxHuaHHN (Cp.19).
NyIbT dY
①NepedaTcHK CnHana nyIbTa Dv
② (bntaHne)
HaKMHTe 3Ty KHOITKy, YTO6bI BKIOHOTb HIN BBKIOHOTb (IpebcCTn B peKHM OKNaHn) yCTPOHCTBO.
CytecByeTbTaTHnCoCToHHN OXHnHaHH(cTp.5)
③SNOOZE/SLEEP
YcTaIOBHTe TaIMCp IepexOJA B pckHM OKnIaIIHn HJIH IIpeKIIIOHTe 6yIINbIK B pckHM IOBTOpcHHn cHTHaJa (cTp.19,21).
④ALARM
HcIOJIb3yCTcIJI BKIIIOUChHH H BbIKIOUChHH 6yINJbHnKa (cTp.21).
⑤KhONKn BBi6opa nCTOuHNka
Bb6op ayHONcTOHHKa IIN BOCnPOH3BCdHNN. BpeKHMc OKHJAAHH (KpOme peKHMa OKHJAAHH ECO) HaaKaTHe OIHHO H3 3THX KHOIOK Bb3OBET ABOTOMaTHueCKe BKIOUHeHne yCTPOHCTBA. (ToJIbKO MCR-B043D) IIpi IIpocIyIIHHBaHH paIHo HAKMHTe KHOIIKy RADIO IIN IIpeKIOUeHH MeKJy DAB/FM.
⑥OPTION
Ioka3bBAeT MeHIO HAcTpOeK (cTp.18).
⑦ KhoNk BbIbopa 3JeMeHToB
Ctaryc BocipnoH3BcEHHN Oo3Haayetc HnHKaTOpOM IOBTOPOBOCIPPOH3BcEHHN/BOcIPOH3BeEHN B C1yauHOM IopAke Ha hnciiee HepeHcHn HaeHH.
NOBTOPHoe BOCnpOn3BedeHne
HaKMHTc KIOIky (IOBTOp) HECKOJIbKO pa3, YTO6bI BbIOpaTb OINH H3 CTeIyIOIIHX peKHMOB BOCIIPOH3BCdHH.
Her oTo6paKeHHBocHPOH3BeHeHH OTKHOueH
1:1dojokka
:BceIopOxKINIIaIKe(ToJIbKO CDcIaHHbIMNUSB-ycTpoiCTBO)
ALL:BceIopokKn
Bocnpon3BeDHe B cIyauHOM npAKe
HaKMHTc KIOIky (B CnyaHOM IopRKe) HeCKOJIbKO pa3, YTO6bY BbIpaT bOH H3 cJeNYOIIIX pcKHMOB BOCIIPOH3BCdEHH.
Her oto6paekenn: peKHM BOCnPON3BeDenH N B CnyaHOM IopJKe OTKIOueH
:BceIIOPOJKHNIIaIKe(TOJIbKO CDcIaHHbIMNUSB-ycTpoiCTBO)
ALL:BceIopokKn
ПОСЛУSHINBAHNE MY3bIKN C UCTPOИCTBA, ИМЕЮШERO KOMПОHEHT Bluetooth
JaHHOy cTPOIcTB NOJIepKINBaET paOry IO Bluetooth. Bb MoKeTe HacJaKaTaBc8 6ecPiPoBOJHbIM IPOCJYIIIBaHNEM My3bIKn C yCTPOIcTBa, NIOJIePJKHBAIOIIero fYHKIIIO Bluetooth (MO6NJIbHOrTO TeJIefoHa, INIePBOrO ayIHONpOHpIBaTeJI N T.I). O3HaKOMBeTcB TaKke c pyKOBoIcTBOM IIOJIb3OBATeJIra YcTPOIcTBa c fYHKIIeH Bluetooth.
Bocnpo3BeDeHne My3bIKn c ycTpoiCTBa c cyHKuNei Bluetooth
Ory OIepaHIO Hc06xOIMHO BbIOJIINITb IIIN IIEPBO MIOIKJIOUChHH yCTPOHCTBa C cyHKINCH Bluteoth K ayIOoHCTMC HIN IOcJe ydaJIeHN HAcTPOeK IOKJIOUeHN. IIOKJIOUeHHe Nc cyTN ABJETcpeHCTpAneH NIOKJIOUaEMTO yCTPOHCTBA (B daJIbHCm HA3bIbAcMOrO "pyoc yctPOHCTBO") K daIIHO CNCTcMc. IocIe 3aBepuCINH 3ToH OIIePAUNH IOcJIeYIOUHc IOKJIOUChHH 6byt IpoXoIHb 6bICTpO JaKe IocIe pa3pbBa coEINHcHn HIO Bluetooth (13 ctp. 10). B cIyue OUn6Kn IOKJIOUeHN o6paHTRecb K pa3dJeY"Bluetooth" B pa3dJe "YCTPAHEHNE HENCIPABHOCTEH" (13 ctp. 23).
#
KOMIIAHYamaHa He rapaTHpyET BO3MOXHOCTb KOMMyTAUHH MEXJy DAHHbIM yCTpoiCTBOM H BCCMn IpyHMH yCTPOIcTBAMN, COBMECTMBHm C cyHKuHei Bluetooth.

K DAHHOMy yctpoCTBy MOKHO IOIOIOOHHTb 4pyTHX yctpoCTB. IIpH IOIOIOHOeHH HTOFO yctpoCTBa DaHHbIe o perHcTaHH yctpoCTBa c HAn6oJIcc CTapO JATOIOIOIOIOOCHH6ydyT ydaIChbI.
IIpnIOIOHOeHHK yctpoiCTBy c fYHKHHei Bluetooth N BbIOJIHeHHn perIcTaHH npyTPOiCTBa tekyuiee IIOIKIOueHne IO Bluetooth 6yET OTMeHEHO.


15:30 BT Pairing OK
UydepxnBaIe KHONky 6OJee 2ceKyHd, UTO6bl nepeiTu B peKm perncTpaun.
Pekm peHcTpaHH nnHtca 5 MnHyr.
BpeKHepeHcTpaHHHaIcnIe nepeHne HaeHn DaHHoro yctpoHCTBaNoaBHtca HaIINCb "BT Pairing...

IpeiHTBpeKHMpeHcTpaunnMoKHO TaKKe,HaKaB H yepKBAR KIOKNy SOURCE HaJHOM ycTpoHCTBE.
2BbInonHnTe perncTpaunO pyroro yctpoiCTBa no Bluetooth.
IJIIOJIyueHHIOIOPO6HOH HOpMaHIN O3HaKOMbTcB TaKKe CpyKOBOCTBOMIOIB3OBaTeJIIOpyTOOYCTPOHCTBA.
B Cnncke nodkluehen no Bluetooth pyroro yctpoiCTBa BbIepeHte daHHyIO ayDnOcnCTemy (MCR-B043 Yamaha nn MCR-B043D Yamaha).
IocJIe ycTaHOBKn CoeINHeHnHa IInCIIe IpeEHN HaHeIN DaHHoro ycTpoiCTBa IOBHTcN HADNNCb "BT Pairing OK".

IIpn3aipnoce npoia BBeInte 3naeHne "0000".
4 YcTaHOBnTe CoeINHeHne MeKdy ayDIOOCnCTeMOu npyrrm yCtpoNCTBOM nO Bluetooth.
HaHnTe BocpOn3BeJeHne My3bIKn C yCTpoNCTBa c cyHKuNei Bluetooth.
!
Y6eHITecb,HTO rPOMKocb ayINOCHCTmbl HAcTPOeHa He cIINIKOM BbICOKo. PeKoMeHJyETcA OTPeryIHPOBATb rPOMKocb Ha npyrom yctpoHCTBE.
#
- Ecln BbIOJIHHeTc NOckIIOueHne K daHHOMy yctpoiCTBy IIO Bluetooth c npyTOrO yctpoiCTBa, KOJa daIIHOe ycTPOiCTBO HaxoITcB peKHMoe OKHdAHH (KpOME peKHMa OKHdaHH ECO), daIIHOe ycTPOiCTBO 6yIET ABTOMATHueCKn BKJIOueHO.
- Pn pa3pbbe coeHHeHH H No Bluetooth c npytoro yctpoiCTBa H ycTaHOBJEHOM Bluetooth B KaueCTBe ayIOHCTOHNka ycTPOIcTBa OHa ABOTMATHEeCKN BbIKIOHTC.
EcIN B KaueCTBe ayHONCTOHHKA Bb6paH Bluetooth, daHHoe ycTPOBCTBO ABtOMATHeCKN BHKIOHTCn, npyycIOBH YTO B TeCHHe 20 MHHyT Hc 6yET AKTHBHO HH OJHO NOIKIOCHHe PO Bluetooth Hc 6yT BbIIOJIHTbcr HkKaHc ONepaHH.
Повторhoe подклюецни устpoиства поBluetooth
Iocne npBoH yctaHOBKn coeHHHe H Bce nocJeNyIOIIne NpKIOueHn yCtpoiCTBa C Bluetooth 6yDyT npOxoITb 6bICPo.
PoiKJIuOHeHcaydIOscNCTeMbI
Haxmte KhONky 3yTO6bl BbIbpaTb B kaeeCTBe ayDnONCTOuHnka Bluetooth.
HaIINCIe IepHHe HnHeHn HauHET MHTb HNINKaTOp
Bluetooth,IPu OTOM DaIIIOc ycTPOcCTBO 6yCT HCKaTb
IpTyOe ycTPOcCTBO,KOTOPoe IOIKJHOaJIocb K HeMy IO
Bluetooth NOCIEIHMM,a 3aTeM 6yCTYCAHOBICHO
coEINHEHNE (HaIpyTOm ycTPOcCTBE IIpeIBaHPteJIbHO
IOJIKHs6bTB BKIIIOChHa yHKUHNA Bluetooth).
IocJe YCTAHOBKn COeINHHeHHn IO Bluetooth INHNKATOp
Bluetooth 6yCT TROPCTb IIOCTOaHHo,a Ha IINCHIEc IIOABHTc
HMdpyTOrO ycTPOcCTBa.
IopdkloueHne cdpyroro yctpOcTba
1B hactpoikax Bluetooth npyroro yctpoiCTBa BKNIOHTe pynKcHIO Bluetooth.
B cnncke noDkIouhen no Bluetooth npyroO yctpoiCTBa BbIepeNte daHHoe ycTPOiCTBO (MCR-B043 Yamaha nn MCR-B043D Yamaha).
IocIc yctaIOBKn coeHHcHn IIO Bluetooth Ha IINcIIe cIpeHcHn YcTPONCTBa OTO6pa3HTc HMa dpyrOTo yctpOCTBa.

EeHn DaHoe yctpoHCTBO HaxoHTcB peKHe M OxHJaHH ECO, NOKIOueHHe K Hemy npyTOO yctpoHCTBa IIO Bluetooth HeBO3MOKHO (cTp.5).
Pa3pbIB noKJIuOeHnNo Bluetooth
EcJIH BO BpeMn HcIOJIb3OBAHHN IOIJIIOHeHH NIO Bluetooth 6yET BBIOJIHeHa OJHa H3 IIpHBeEHHbIX HnKe OIEpaHII, IIOKJIIOUeHHne IIO Bluetooth 6yET pa3OpBaHO.
- Bb6epHte HcToHHK, OTHHbIOT Bluethoth.
BbIKIOHHTe JaHHoe yctpoiCTBO. - BbIKIOHTe fHyHKIIIO Bluetooth B HAcTpoKax pyrOro ycTpoIeTBA.
ПОСЛУSHINBAHINE DAB-CTAHЦИ (Толъко MCR-B043D)
DAB (Digital Audio Broadcasting, ΙΦpOBoe ayHOBeIIaHne) n DAB+ nCnOJIb3yOT ΙΦpOBoIe CnHAI bI IIO o6ecIeHnE 6oJIbIe ueKocTH 3Byka H 6oJIbIe HaIEKHOCT HIpHema CnHAI JIO cpaBHeHHIO c aHaJIOrOBbIM CHIHJIaMHN.
DAB+ ochoBBBaetra HcTnHapTHoH TexHOIOrHH DAB, Ho HcHIOJIb3yET 6OJIe eKTHBbI ayHOKOJEK.
DAB n DAB+ nepeaOTc8 6IOKAMn DaHHbIX, “aHcAm6JIaMn cHTHaIIOB”, KOtOpbE MOrY T COJepKaTb HeCKOJIbKO paAnocTaunH, TpaHcJIuHpycMbIX B OIOB Bpem.
DAB N DAB+ MOYr TaKc BKnOaTb 60JIbHIO O6bcm TCKCTOBON HΦopMaUN, YTO IIO3BOJACr BbIbHpAr bCtAUNN IO HA3BaHHM.
Ipyra HOpmaHnaipmep Ha3BaHc aHcAm6JHa HIN daHHbc O coCTOHH HnfoBOrO cHHTa, MoKcT OTo6paKaTbca Ha nCJIeepHei NaHei DaHHoro yctpoHCTBa.
OINcaHHe "DAB" B 3TOM pyKOBoIcTBe MoKTe TaKKe OTHocHTbcR K "DAB+".
Iodrotobka K npneMy DAB-cnHaJa
Ipecn HactpoKo DAB-cTaHn HcO6xOIMMO BbIOJIHTb HaHaJIbHOc cKaHnpOBaHHe. Ipn IepBOM bIbOpce yHKuHN DAB HauJIbHOe cKaHHPOBaHHe BBIOJIHReTcA BtOMaTHueCKn.
IipocjHINHBAHH DAB-ctAHHHIOKJIOHTe aHTEHy, KaK OHHcHoB pa3JeJIe “PiokJIOHeHne KOIOHOK H aHTEHbI (cp.4).
HaXMMTe KHONKy RADIO, YTO6bI Bbl6paTb DAB B KaueCTBe ayDnONCTOuHnka.
HaHHeTc cKaHnPoBaHne. Bo BpeM cKaHnpoBaHH HIIHKaTOp BbIIOJIeHH OTo6paKaETc Ha IINCIIE PepeHHe IIeHN.
IocJIe 3aBepHHeHH cKaHNpOBaHH qNcIO IOCTyINbIX DAB-ctAnm OTo6pa3nTcHa IINCIIeE HpeDHe nAneHn.

IocJIe BbIOJIHeHnHaayIbHorO cKaHHpOBaHHc coxpaehHHa HIIΦopMaHnO DAB-CTaHnHex IIpeBapHTeIbIbIe IacTpOKn DAB-CTaHnIyIaHOTc.
NOBTOPHoe BbINOJIHeHne HaayalbHoro cKaHnPoBaHHa (MeHIO HAcTpoE)
HaXMMTe KhoNky OPTION.
IIOBHTcMHeIOHAcTpoek.
2HaXMMTe KHONky / , YTO6bl BbI6paTb nyHKT DAB INIT SCAN, a 3aTeM HaXMMTe KHONky ENTER.
Ha nncnlee noBvntc naHnncb "Press ENTER".
3HaXMMTe KhoNky ENTER.
HaHTeTcKaHINPOBaHne.
Bb6op DAB-CTaHcnn

HaXMMTe KHOHky RADIO, YTO6bI Bb6paTb DAB B KaueCTBe aydnoNCToUHnka.
HaxMTe KhoNky TUNING / ,yTo6bI BB6paTB DAB-CTaHcUIO.
Ioka npHHMaCTc CnHaJ DAB, HhOpMaHua O DAB-CTaHmN 6yJeT oTo6paKaTaBc Ha nnCJIe e npeiHn HnHn.
EcH DAHHOMy ycTpoIcTBy He ydaetc HIOJIyHTb CnHaJ DAB, BmecTo Ha3BaHHa DAB-CTaHnn 6ydet OTo6paKaTaBcH NaIIINCb "Off Air".
IocJe OKoHuaHHn OepaHHn yJaJIeHHn Ha IINcIIe e NOBHTcH NaIHNCb "Deleted!".
5HaXMMTe KONky OPTION, YTO6bI BbIaTN N3 MEHIO HAcTPOeK.
Bb6op npedBaPteIbHo hAcTpoEHbIX FM-paNoctaHcni
HaXMMTe KHOKNy NCTOCHNka RADIo, YTO6bI Bbl6paTb FM-paIOcTaHcNIO B KaueCTBe ayDnONCTOCHNka.
2HaXmTe KONky PRESET</,YTO6bI Bbl6paTb FM-paIOCTaHcNIO dna npocnyuBaHn.

BbMOKeTe Bb6paTb ToIbKO Te IpeBaPHTeJIbHO HAcTpoEHHepeaHOCCTaHH, KOTOpHE 6bHH COxpaHeHb.
ПОНСЛУSHINBAHNE BHEISHINX NICTOCHIKOB
C NOMOUII HMEIOUeOcB I npoJaXe Ka6eJIa C MHN-ISTeKepom 3,5 MM NOJKNIOHTe BHeHHe yCTpoiCTBO K rHe3dy AUX Ha 3a,dHneI NaHEn DaHHOrO yCTpoiCTBa.

BbIKIOHTYeCTPOCTBOIpeIIOKIOHHeHem ayHOka6eJI.
IpeHIOKIIIOHeHHEM BbIKIOHTe 3Byk DaHHoro yctpoNCTBa H BHeHrero ayHOyCtpoNCTBa.
HaKMITE KONky HTO6bIBKIOUHTb yCTPOINCTBO.
HaXMMTe KHOINky NCTOCHNka AUX, YTO6bl BbI6paTb AUX, B KaueCTBe ayDNNONCTOHNka.
4HaunTe Bocpon3BeDeHne Ha NOKIOeHHOM BHeHem ayINOyCTPOICTBE.
HaxmTe KhoNky SNOOZE/SLEEP.
Ipn 3OM BOCPON3BeHHe CNrHaJa IpeKpaHTcN BO306HOBHTc CHOBA Yepe3 5 MNHyT.

EeB KaeeTbe TnA cnHnA Bb6paIIO nauHne SORUCE + BEEP,naKMHTc KIOKny SNOOZE/SLEEP OaH pa3,TO6bblkHOHTb 3ByKOBOI CNHaJI,IIBa pa3a,TO6bIOCTaHOBTb BOCpON3BeHNE AynOHTOHNK.
Yepe3 5 MHHY T NocJe OCTaHOBKn BOCpON3BeHEny ayHOHCTOHNKA OH CHOBa HAHET IOCTeHHO YCHINBAITbcN 3ByKOBOI CNHaJI BO3O6HOHNTcR.
PacnoIOKcHbIe Ha yCTPOHCTBE KHOHN, KpOMe KHOKN 6ydyT fynHnOHNPoBaT b Tak JKe, KaN KHOINa HOBTOpeHH nHa.
Haxmte KhoNky ALARM nn


OTKJIOHTb 6yHbHK TaKKe MOKHO, yIepKHBa KHOIIky SNOOZE/SLEEP.
EeHN BbHcOTKJIOHTc 6yHJbHHK, OH OTKIOHTcra ABTomathueckn yepe3 60 MmHyt BmecTe C yctpoCTBOM.
YcTaHOBHeHHoc Bpem CHTHaJa 6yIeT coXpaHHeNo JaKe Ipn BBKIOHEn H6yDILbHNka.
IIPN IOBTOP Hom BKIOUeHH 6yINJBHnKa C IOMOIBHO KHOIIKN ALARM 3ByK CHTHaJa 6yIeT BOCPON3BOJNTbcra C 3aAnIHbIMn paie NaCTPOkAMN 6yINJIbHHKa.
YCTPAHEHNE HENCINPABHOCTEIN
B cIyueae Bo3HKnHOBeHHn Ipo6IeM npn HcHIOJIb3OBAHHn ycIPOINCTBa CHaJaIa 6paHTecb K cJIeIyIOUeMy CInNCKy. EciH yctpaHNTb Ipo6IeMy C NOMOIIbIO ppeIIOKeHHbIX cIIOco6OB He ydaTcR, HIN ecII IN Ipo6IeMa HE yka3Ha B cINNCKe, BbIKIOHTe YcIPOINCTBO H OTCOEHHITc OT CCIN 3JIeKTPoIHHTAHN, 3ATcM O6paHTecb K 6JHKaIIeMy ABTOH3OBAHHOMy DInHepy Yamaha HIN B cepBnCHbI ueHtp.
Obuntne
| Пюблесma Пючниа | Р Committees | |
| Из колонок не сль宪ен 3byk. | Возможно, установли有很大инемалы у探测ные гомковские и в�ьк Вьк Лочец. | Отergyларуге у探测ные гомковские. |
| Пелравнын Вьбоги Нсточи. | Быберпесоотberгоста. Быберпесош! Нсточи. | |
| Возможно, колонки有很大 поочи. Полomonдддддддддддддддддддддддддддддддддддддддддддддддддддддддддддддддддддддддддддддддддддддддддддддддддддд徳. Полomonддддддддддддддддддддддддддддддддддддддддддддддддддддддддддддддддддддддддддддддддддддддддддддддд徳. | Опсocл�性. Опсocл�性. Опсocл�性. Опсocл�性. Опсocл�性. Опсocл�性. Опсocл�性. Опсocл�性. Опсocл�性. Опсocл�性. Опсocл�性. Опсocл�性. Опсocл�性. Опсocл�性. Опсocл�性. Орсocл�性. Орсocл�性. Орсocл�性. Орсocл�性. Орсocл�性. Орсocл�性. Орсocл�性. Орсocл�性. Орсocл�性. Орсocл�性. Орсocл�性. Орсocл�性. Орсocл�性. Орсocл�性. ОрсOCLOHNT. ОрсOCLOHNT. ОрсOCLOHNT. ОрсOCLOHNT. ОрсOCLOHNT. ОрсOCLOHNT. ОрсOCLOHNT. ОрсOCLOHNT. ОрсOCLOHNT. ОрсOCLOHNT. ОрсOCLOHNT. ОрсOCLOHNT. ОрсOCLOHNT. Орф�лочи. Орф�лочи. Орф�лочи. Орф�лочи. Орф�лочи. Орф�лочи. Орф�лочи. Орф�лочи. Орф�лочи. Орф�лочи. Орф�лочи. Орф�лочи. Орф�лочи. Ор央лочи. Ор央лочи. Ор央лочи. Ор央лочи. Ор央лочи. Ор央лочи. Ор央лочи. Ор央лочи. Ор央лочи. Ор央лочи. Ор央лочи. Ор央лочи. Ор央лочи. Ор央лочи. Ор央л蜡. Ор央л蜡. Ор央л蜡. Ор央л蜡. Ор央л蜡. Ор央л蜡. Ор央л蜡. Ор央л蜡. Ор央л蜡. Ор央л蜡. Ор央л蜡. Ор央л蜡. Ор央л蜡. Ор央л蜡. Ор央л蜡. Ор央л蜡. Ор央л蜡. Орф�л蜡. Орф�л蜡. Орф�л蜡. Орф�л蜡. Орф�л蜡. Орф�л蜡. Орф�л蜡. Орф�л蜡. Орф�л蜡. Орф�л蜡. Орф�л蜡. Орф�л蜡. Орф�л蜡. Орф�л蜡. Орф�л腊. Орф�л蜡. Орф�л蜡. Орф�л蜡. Орф�л蜡. Орф�л蜡. Орф�л蜡. Орф�л蜡. Орф�л蜡. Орф�л蜡. Орф�л蜡. Орф�л蜡. Орф�л蜡. Орф�л蜡. Орф�л蜡. Oрф�л蜡. Орф�л蜡. Орф�л蜡. Орф�л蜡. Орф�л蜡. Орф�л蜡. Орф�л蜡. Орф�л蜡. Орф�л蜡. Орф�л蜡. Орф�л蜡. Орф�л蜡. Орф�л蜡. Орф�л蜡. Ор央л蜡. Ор央л蜡. Ор央л蜡. Ор央л蜡. Ор央л蜡. Ор央л蜡. Ор央л蜡. Ор央л蜡. Ор央л蜡. Ор央л蜡. Ор央л蜡. Ор央л蜡. Ор央л蜡. Ор央л蜡. Ор央л蜡. Ор央л蜡. Oр央л蜡. Ор央л蜡. Ор央л蜡. Ор央л蜡. Ор央л蜡. Ор央л蜡. Ор央л蜡. Ор央л蜡. Ор央л蜡. Ор央л蜡. Ор央л蜡. Ор央л蜡. Ор央л蜡. Ор央л蜡. Ор央л蜡. Ор央л蜡. Ор央л �. Ор央л �. Ор央л �. Ор央л �. Ор央л �. Ор央л �. Ор央л �. Ор央л �. Ор央л �. Ор央л �. Ор央л �. Ор央л �. Ор央л �. Ор央л �. Ор央л �. Ор央л �. Ор央л �. Орф�л蜡. Орф�л蜡. Орф�л蜡. Орф�л蜡. Орф�л蜡. Орф�л蜡. Орф�л蜡. Орф�л蜡. Орф�л蜡. Орф�л蜡. Орф�л蜡. Орф�л蜡. Орф�л蜡. Орф�л蜡. OKLOHNT. Ор央л蜡. Ор央л蜡. Ор央л蜡. Ор央л蜡. Ор央л蜡. OKLOHNT. OKLOHNT. OKLOHNT. OKLOHNT. OKLOHNT. OKLOHNT. OKLOHNT. OKLOHNT. OKLOHNT. OKLOHNT. OKLOHNT. OKLOHNT. OKLOHNT. OKLOHNT. OKLOHNT. OKLOHNT. OKLOHNT. OKLOHNT. OKLOHNT. OKLOHNT. OKLOH NT. OKLOH NT. OKLOH NT. OKLOH NT. OKLOH NT. OKLOH NT. OKLOH NT. OKLOH NT. OKLOH NT. OKLOH NT. OKLOH NT. OKLOH NT. OKLOH NT. OKLOH NT. OKLOH NT. OKLOH NT. OKLOH NT. OKLOH NT. OKLOH NT. OKLOH NT. OKLOHNT. OKLOH NT. OKLOH NT. OKLOH NT. OKLOH NT. OKLOH NT. OKLOH NT. OKLOH NT. OKLOH NT. OKLOH NT. OKLOH NT. OKLOH NT. OKLOH NT. OKLOH NT. OKLOH NT. OKLOH NT. OKLOH NT. OKLOH NT. OKLOH NT. OKLOHNT. OKLOHNT. OKLOH NT. OKLOH NT. OKLOH NT. OKLOH NT. OKLOH NT. OKLOH NT. OKLOH NT. OKLOH NT. OKLOH NT. OKLOH NT. OKLOH NT. OKLOH NT. OKLOH NT. OKLOH NT. OKLOH NT. OKLOH NT. OKLOH NT. OKLOHNT. OKLOH NT. OKLOHNT. OKLOH NT. OKLOH NT. OKLOH NT. OKLOH NT. OKLOH NT. OKLOH NT. OKLOH NT. OKLOH NT. OKLOH NT. OKLOH NT. OKLOH NT. OKLOH NT. OKLOH NT. OKLOH NT. OKLOH NT. OKLOH NT. OKLOH NT. OKLOHNT. OKLOHNT. OKLOHNT. OKLOH NT. OKLOH NT. OKLOH NT. OKLOH NT. OKLOH NT. OKLOH NT. OKLOH NT. OKLOH NT. OKLOH NT. OKLOH NT. OKLOH NT. OKLOH NT. OKLOH NT. OKLOH NT. OKLOH NT. OKLOH NT. OKLOHNT. OKLOH NT. OKLOH NT. OKLOHNT. OKLOH NT. OKLOH NT. OKLOH NT. OKLOH NT. OKLOH NT. OKLOH NT. OKLOH NT. OKLOH NT. OKLOH NT. OKLOH NT. OKLOH NT. OKLOH NT. OKLOH NT. OKLOH NT. OKLOH NT. OKLOH NT. OKLOHNT. OKLOH NT. OKLOHNT. OKLOHNT. OKLOH NT. OKLOH NT. OKLOH NT. OKLOH NT. OKLOH NT. OKLOH NT. OKLOH NT. OKLOH NT. OKLOH NT. OKLOH NT. OKLOH NT. OKLOH NT. OKLOH NT. OKLOH NT. OKLOH NT. OKLOH NT. OKLOHNT. OKLOHNT. OKLOH NT. OKLOHNT. OKLOH NT. OKLOH NT. OKLOH NT. OKLOH NT. OKLOH NT. OKLOH NT. OKLOH NT. OKLOH NT. OKLOH NT. OKLOH NT. OKLOH NT. OKLOH NT. OKLOH NT. OKLOH NT. OKLOH NT. OKLOH NT. OKLOHNT. OKLOHNT. OKLOHNT. OKLOHNT. OKLOH NT. OKLOH NT. OKLOH NT. OKLOH NT. OKLOH NT. OKLOH NT. OKLOH NT. OKLOH NT. OKLOH NT. OKLOH NT. OKLOH NT. OKLOH NT. OKLOH NT. OKLOH NT. OKLOH NT. OKLOHNT. OKLOH NT. OKLOH NT. OKLOH NT. OKLOHNT. OKLOH NT. OKLOH NT. OKLOH NT. OKLOH NT. OKLOH NT. OKLOH NT. OKLOH NT. OKLOH NT. OKLOH NT. OKLOH NT. OKLOH NT. OKLOH NT. OKLOH NT. OKLOH NT. OKLOH NT. OKLOHNT. OKLOH NT. OKLOH NT. OKLOHNT. OKLOHNT. OKLOH NT. OKLOH NT. OKLOH NT. OKLOH NT. OKLOH NT. OKLOH NT. OKLOH NT. OKLOH NT. OKLOH NT. OKLOH NT OKLOH NT OKLOH NT OKLOH NT OKLOH NT OKLOH NT OKLOH NT OKLOH NT OKLOH NT OKLOH NT OKLOH NT OKLOH NT OKLOH NT OKLOH NT OKLOH NT OKLOH NT OKLOH NT OKLOH NT OKLOH NT OKLOH NT OKLOH NT |
Bocnpon3BeJeHne CD-ДиСков
TEXHnueCKXAPAKTEPNUCTNKN
He hncIOb3yNTc JaHHoc yCTpoCTBO 6JIHKe, cM B 22 cm OT JIOcN c HMIaHTpOBaHHbIM KapINOCTHMyIATOpOM HJIN deΦh6pHJIITopOM.
PaHIOBOJIHbI MOrYT OKa3aTb BJIHnHc Ha 3JIckTPOHHbc yCTpoICTBa MeIHINHCKORo HA3HaHeHH.
He hnoIb3yIte IaHHbI anIpaT B6JIH3n TaHX yCTpoIcTB HINB McIHINCKHX ypeKJENHX.
IIOJIb3OBATeJIb yCTPOIICTBa He JOJIkeH IIPOBOJITb HIXKeHepHIaIaIIN3, JECOMIIHIIPOBaTb, H3McHITb HIN De3accEM6JIHPOBaTb IporpAMMHOe OecneueHHe, HcIOJIb3yEMOe B DAHHOM yCTPOICTBe, HN HAcTHUHO, HN B IeJIOM. KopnOpATHBIIe CIOJIb3OBaTEJIH, COpyIINIKCaMOI KOpIopAINH INx IapTIIEPbI IO6H3IEcy DOJIJKIIb CO6JIIOaTb IOROBOPHbE 3aIPeTbI, OROBOpEHbE B DAHHOI cTAteB. EclIh YcIOBHN DaIIIOH CTaTB NIN DaIIHORO IOROBOPaHE MOYr 6bITb CO6JIIOJIeJIb, IIOJIb3OBaTeJIb IOJIkeH IE3aMeIJNTeJIbHO IpeKpaHTb HCIOJIb3OBAHHe IporpAMMHOrO oecneueHHe.
Jla3ep
TnI IOnynpoBOJHHKOBbI Ja3cp GaAs/ GaAlAs
JIINHa BOJIHbI 790HM
BbIXoJIaH MaIIOHOCTb 7 MBT
IPEIOCTEPEXEHNE
HcIOJIb3OBAHHe OPAHOB yIpaBJIeHH HII IpoH3BeJHeHIE NaCTPOe HIN BbIOJIeHHe IPOIeYp, IIyKa3aIIbIX B JAIIOH IICTpyKIIHH, MOKeT OTpa3HTbcR Ha BblJeHHN OAnCHOH paHaHH.