CD-C603 - Audio System YAMAHA - Free user manual and instructions
Find the device manual for free CD-C603 YAMAHA in PDF.

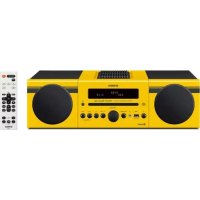
| Product Type | 5-disc carousel auto changer |
| Brand | YAMAHA |
| Model | CD-C603 |
| Category | Audio system |
| Dimensions (W x H x D) | 435 × 116 × 405 mm |
| Weight | 5.6 kg |
| Power supply voltage | AC 110-240 V, 50/60 Hz (depending on region) |
| Power consumption | 11 W |
| Standby power consumption | 0.2 W |
| Supported audio formats | MP3, WMA, AAC, WAV, FLAC (CD and USB) |
| Disc changer capacity | 5 discs (carousel) |
| USB playback | Yes (FAT16/FAT32, up to 65535 files) |
| Advanced playback functions | Random, repeat, programmed, A-B repeat |
| Pure Direct function | Disables digital signal for optimal sound quality |
| PlayXchange function | Allows changing discs during playback |
| Disc Scan function | Listen to 10 seconds of each CD to find the desired disc |
| Display and screen | LCD screen with playback information, brightness adjustment (4 levels) |
| Remote control | Supplied with AA × 2 batteries, range up to 6 m |
| Maintenance | Soft dry cloth, do not use chemicals |
| Laser safety | AIGaAs laser, do not look directly at beam |
| Supplied accessories | Remote control, power cord, RCA cable, batteries (AA × 2), manual |
| Repairability | Refer to a Yamaha authorized technician, do not disassemble yourself |
Frequently Asked Questions - CD-C603 YAMAHA
User questions about CD-C603 YAMAHA
0 question about this device. Answer the ones you know or ask your own.
Ask a new question about this device
Download the instructions for your Audio System in PDF format for free! Find your manual CD-C603 - YAMAHA and take your electronic device back in hand. On this page are published all the documents necessary for the use of your device. CD-C603 by YAMAHA.
USER MANUAL CD-C603 YAMAHA
The precautions listed below are to prevent risk of harm to the user and others, as well as to prevent property damage, and to help the user use this unit properly and safely. Be sure to follow these instructions.
After reading this manual, be sure to keep it in a safe place where it can be referenced at any time.
- Be sure to request inspections or repairs from the dealer where you purchased the unit or from qualified Yamaha service personnel.
- Yamaha cannot be held responsible for injury to you or damage of the products caused by improper use or modifications to the unit.
- This product is for ordinary homes. Do not use for applications requiring high reliability, such as managing lives, health care or high-value assets.

WARNING
This content indicates "risk of serious injury or death."
If you notice any abnormality
- If any of the following abnormalities occur, immediately turn off the power and disconnect the power plug.
- The power cord/plug is damaged.
- An unusual smell, unusual sound or smoke is emitted from the unit.
- Foreign material or water gets into the interior of the unit.
- There is a loss of sound during use.
- There is a crack or damage in the unit.
Continued use could cause electric shocks, a fire, or malfunctions. Immediately request an inspection or repair from the dealer where you purchased the unit or from qualified Yamaha service personnel.
Power supply
- Do not do anything that could damage the power cord.
- Do not place it near a heater.
- Do not bend it excessively or alter it.
- Do not scratch it.
-
Do not place it under a heavy object.
Using the power cord with the core of the cord exposed could cause electric shocks or a fire. -
Do not touch the power plug or cord if there is a chance of lightning. Failure to observe this may cause electric shocks.
- Use this unit with the power supply voltage printed on it. Failure to connect to an appropriate AC outlet may cause a fire, electric shocks, or malfunctions.
- Be sure to use the supplied power cord. Failure to observe the above may cause a fire, burns, or malfunctions.
- Do not use the supplied power cord for other units. Failure to observe the above may cause a fire, burns, or malfunctions.
- Check the electric plug periodically and remove any dirt or dust which may have accumulated on it. Failure to observe this may cause a fire or electric shocks.
- When setting up the unit, make sure that the AC outlet you are using is easily accessible. If some trouble or malfunction occurs, immediately turn off the power switch and disconnect the plug from the AC outlet. Even when the power switch is turned off, as long as the power cord is not unplugged from the wall AC outlet, the unit will not be disconnected from the power source.
- If you hear thunder or suspect approaching lightning, quickly turn off the power switch and pull the power plug from the AC outlet. Failure to observe this may cause a fire or malfunctions.
- If not using the unit for long periods of time, be sure to pull the power plug from the AC outlet. Failure to observe this may cause a fire or malfunctions.
Do not disassemble
- Do not disassemble or modify this unit. Failure to observe this may cause a fire, electric shocks, injury, or malfunctions.
Water warning
- Do not expose the unit to rain, use it near water or in damp or wet conditions, or place on it any containers (such as vases, bottles or glasses) containing liquids which might spill into any openings or places where water may drop. A liquid such as water getting into the unit may cause a fire, electric shocks, or malfunctions.
- Never insert or remove an electric plug with wet hands. Do not handle this unit with wet hands. Failure to observe this may cause electric shocks or malfunctions.
Fire warning
- Do not place any burning items or open flames near the unit, since they may cause a fire.
Handling caution
- Be careful not to drop or apply strong impact to this unit. Failure to observe this may cause electric shocks, a fire, or malfunctions.
Battery use
- Do not disassemble a battery. If the contents of the battery get on your hands or in your eyes, it can cause blindness or chemical burns. Doing so may result in the battery bursting, causing a fire or injury.
- Do not dispose of a battery in fire. Do not expose the battery to conditions of extreme low air pressure, cold or heat (such as in direct sunlight or a fire) or excessive dust or humidity. Doing so may result in the battery bursting, causing a fire or injury.
- Do not attempt to recharge batteries that are not intended to be charged. Charging could cause the battery to burst or leak, which can cause blindness, chemical burns, or injury.
- If the batteries do leak, avoid contact with the leaked fluid. If the battery fluid should come in contact with your eyes, mouth, or skin, wash immediately with water and consult a doctor. Battery fluid is corrosive and may possibly cause loss of sight or chemical burns.
Laser
- Do not look into the laser source. If there is nothing to block it, this unit emits a visible laser. Avoid looking at the laser directly. Laser light entering your eyes may cause visual impairment. When the plug is inserted into the AC outlet, do not place your eyes near openings of the disk tray or other openings, and do not try to look inside the unit.

CAUTION
This content indicates "risk of injury."
Power supply
- Do not use an AC outlet where the power plug fits loosely when inserted. Failure to observe this may cause a fire, electric shocks, or burns.
- When disconnecting the power plug, always hold the plug itself and not the cord. Pulling by the cord can damage it and cause electric shocks or a fire.
- Insert the power plug firmly all the way into the AC outlet. Using the unit when it is not plugged in sufficiently can cause dust to accumulate on the plug, causing a fire or burns.
Installation
- Do not place the unit in an unstable position where it might accidentally drop or fall over and cause injuries.
- When installing this unit, do not obstruct heat dissipation.
- Do not cover it with any cloth.
- Do not install it on a carpet or rug.
- Do not block this unit's ventilation holes (cooling slits).
- Do not install the unit in other ways than indicated.
- Do not use the device in a confined, poorly-ventilated location.
Failure to observe the above may trap heat inside the unit, causing a fire or malfunctions. Ensure that there is adequate space around the unit: at least 2.5 cm on top, 2.5 cm on the sides, and 2.5 cm on the rear.
- Do not install the unit in places where it may come into contact with corrosive gases or salt air or places that have excessive smoke or steam. Doing so may result in malfunction.
- Avoid being near the unit during a disaster, such as an earthquake. Since the unit may turn over or fall and cause injury, quickly move away from the unit and go to a safe place.
- Before moving this unit, be sure to turn off the power switch and disconnect all connection cables. Failure to observe this may damage the cables or cause you or someone else to trip and fall.
Hearing loss
- Before connecting the unit to other devices, turn off the power for all devices. Failing to do so may result in hearing loss, electric shock, or device damage.
- When turning on the AC power in your audio system, always turn on the amplifier or receiver LAST, to avoid hearing loss and speaker damage. When turning the power off, the amplifier or receiver should be turned off FIRST for the same reason. Failure to observe the above may cause hearing impairment or speaker damage.
Maintenance
- Remove the power plug from the AC outlet before cleaning the unit. Failure to observe this may cause electric shocks.
Handling caution
- Do not insert your hand or fingers into the openings of this unit. Failure to observe this may cause injury.
- Do not insert foreign materials such as metal or paper into the openings of this unit. Failure to observe this may cause a fire, electric shocks, or malfunctions.
- Do not do the following:
- Stand on or sit on the equipment.
- Put heavy items on top of the equipment.
- Place the equipment in a stack.
- Apply unreasonable force to buttons, switches, input/output terminals, etc. Failure to observe this may cause injuries or damage to the equipment.
- Avoid pulling the connected cables to prevent injuries or damage to the unit by causing it to fall.
Battery use
- Do not use batteries other than specified batteries.
Doing so may cause fire or burns, or result in fluid leakage that may cause skin inflammation. - Do not use new batteries together with old ones. Using new ones with old ones could cause a fire, burns, or inflammation due to fluid leaks.
-
Do not mix battery types, such as alkaline batteries with manganese batteries, or batteries from different makers, or different types of batteries from the same maker, since this can cause a fire, burns, or inflammation due to fluid leaks.
-
Keep batteries away from children. A child could accidentally swallow a battery. Failure to observe this may also cause inflammation due to battery fluid leaks.
- Do not put in a pocket or bag, carry, or store batteries together with pieces of metal. The battery could short, burst, or leak, causing a fire or injury.
- Always make sure all batteries are inserted in conformity with the +/- polarity markings. Failure to do so might result in a fire, burns, or inflammation due to fluid leaks.
- When the batteries run out, or if the unit is not to be used for a long time, remove the batteries from the remote control to prevent possible leakage of the battery fluid.
- When storing or discarding batteries, insulate the terminal area by applying tape, or some other protection. Mixing them with other batteries or metal objects can cause a fire, burns, or inflammation due to fluid.
Notice
Indicates points that you must observe in order to prevent product failure, damage or malfunction and data loss.
Power supply
- If you plan not to use this product for a long period of time, remove the power cord plug from the AC outlet. Even when (Power) on the front panel is turned off, a small amount of current still flows through this product.
Installation
- Do not use this unit in a location that is exposed to direct sunlight that becomes extremely hot, such as near a heater, or extremely cold, or that is subject to excessive dust or vibration. Failure to observe this may cause the unit's panel to become deformed, the internal components to malfunction, or for operation to become unstable.
Connections
- If connecting external units, be sure to thoroughly read the manual for each unit and connect them in accordance with the instructions.
Failure to properly handle a unit in accordance with the instructions could cause malfunctions.
Handling
- Do not place vinyl, plastic, or rubber products on this unit. Failure to observe this may cause discoloration or deformation in the panel of this unit.
- If the ambient temperature changes drastically (such as during unit transportation or under rapid heating or cooling) and there is a chance condensation may have formed in the unit, leave the unit for several hours without turning on the power until it is completely dry before use. Using the unit while there is condensation can cause malfunctions.
Maintenance
- When cleaning the unit, use a dry, soft cloth. Using chemicals such as benzine or thinner, cleaning agents, or chemical scrubbing cloths can cause discoloration or deformation.
Disposal or transfer
- If you plan to transfer ownership of this product, include this document and the supplied accessories along with the product.
- Follow the rules of your local authority to dispose of this product and its accessories.
- Be sure to discard used batteries in accordance with local regulations.
CAUTION—Use of controls or adjustments or performance of procedures other than those specified herein may result in hazardous radiation exposure.
(504-M01 FDA laser 01)
Information for users on collection and disposal of old equipment and used batteries:
These symbols on the products, packaging, and/or accompanying documents mean that used electrical and electronic products and batteries should not be mixed with general household waste. For proper treatment, recovery and recycling of old products and used batteries, please take them to applicable collection points, in accordance with your national legislation.
By disposing of these products and batteries correctly, you will help to save valuable resources and prevent any potential negative effects on human health and the environment which could otherwise arise from inappropriate waste handling.
For more information about collection and recycling of old products and batteries, please contact your local municipality, your waste disposal service or the point of sale where you purchased the items.
For business users in the European Union:
If you wish to discard electrical and electronic equipment, please contact your dealer or supplier for further information.
Information on Disposal in other Countries outside the European Union:
These symbols are only valid in the European Union. If you wish to discard these items, please contact your local authorities or dealer and ask for the correct method of disposal.
Note for the battery symbol (bottom two symbol examples):
This symbol might be used in combination with a chemical symbol. In this case it complies with the requirement set by the EU Battery Directive for the chemical involved.
(58-M03 WEEE battery en 01)
CONTENTS
BEFORE USING THE UNIT 8
FEATURES 8
About this manual....8
Accessories 9
PREPARATION 10
Connecting to an amplifier....10
Connecting the power cord....11
Turning on the power ....11
PLAYING AUDIO 12
Playing CDs....12
Playing music files stored on your USB flash drive....14
Advanced functions....15
Random-sequence playback 15
Repeat playback....15
Enjoying high-quality sound playback (PURE DIRECT) 15
Playing tracks in the specified order (Program playback) 16
Playing a specified part repeatedly (A-B Repeat playback) 16
Replacing discs during CD playback (PLAYXCHANGE) 17
Locating a CD to listen to (DISC SCAN).... 17
Switching information on the display.... 18
Changing the display brightness 18
APPENDIX 19
Part names ......19
Front panel....19
Display....20
Rear panel 20
Remote control....21
Advanced settings 22
Playback Mode Memory (PLAY MEM)....22
Ready Mode (RDY MODE)....22
Automatic Playback (AUTO PLAY)....22
Auto Power Standby (AUTO STBY) 22
Supported file formats/discs/USB flash drives....23
Moving this product....24
Specifications....25
Troubleshooting....26
BEFORE USING THE UNIT
FEATURES About this manual
- 5-Disc Carousel Auto-changer
- PLAYXCHANGE function (page 17)
• REMOTE IN/OUT jacks (page 10)
• Supports playback of CD-R and CD-RW discs - Supports playback of files stored on USB flash drives or data CDs (MP3/WMA/AAC/WAV/FLAC)
- Convenient playback functions Random-sequence playback (page 15)
Repeat playback (page 15)
Program playback (audio CDs only) (page 16)
A-B Repeat playback (audio CDs only) (page 16)
• PURE DIRECT function (page 15)
- Various advanced settings
Playback Mode Memory (page 22)
Ready Mode (page 22)
Automatic Playback (page 22)
Auto Power Standby (page 22)
- This manual explains operations performed primarily on the supplied remote control.
- All illustrations in this manual are provided for the purpose of operational instruction.
- In this manual, a music CD is referred to as an audio CD, and a CD that contains MP3/WMA/AAC/WAV/FLAC data is referred to as a data CD.
- Specifications and appearance are subject to change without notice.


WARNING is intended to alert you to the risk of death or serious injury.
CAUTION is intended to alert you to the risk of personal injury.
- Notice
observed to avoid malfunction and damage to this product.
• Note
supplemental information that might be handy.
Accessories
- Remote control
- Power cord
- RCA stereo cable
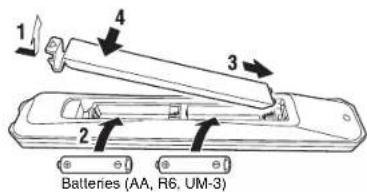
• Batteries (AA, R6, UM-3) (x2) - Owner's Manual (this manual)
Inserting batteries into the remote control
Insert the batteries in the proper orientation.
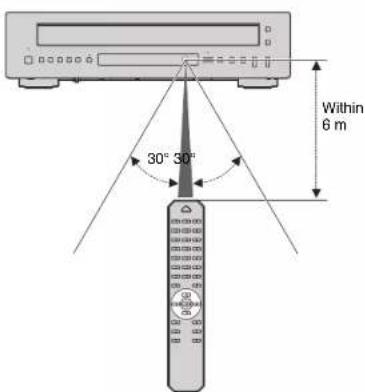
Remote control operating range
Point the remote control toward the remote control sensor on the unit from within the range shown in the figure on the right.
PREPARATION
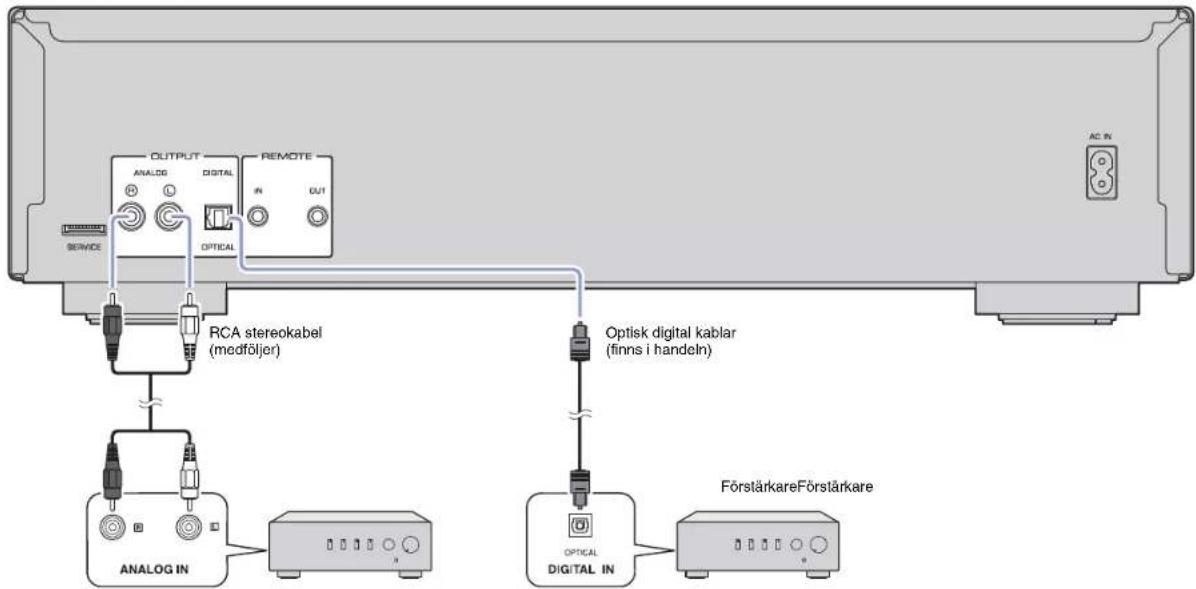
Connecting to an amplifier

CAUTION
- Do not plug the power cords for this unit and other connected devices into AC outlets until all other connections are complete.

Note
- If you connect the REMOTE IN/OUT jacks to an infrared transmitter/receiver or the IN/OUT jacks for remote signals on another audio device, you can transmit remote control signals to or from this product or the other audio device. To do so, use monaural mini-plug cables. You can connect up to six Yamaha devices including this product.
- This product does not support recording via digital connection. For example, it is not possible to record audio on a CD recorder connected to the DIGITAL OUTPUT jack on this product.
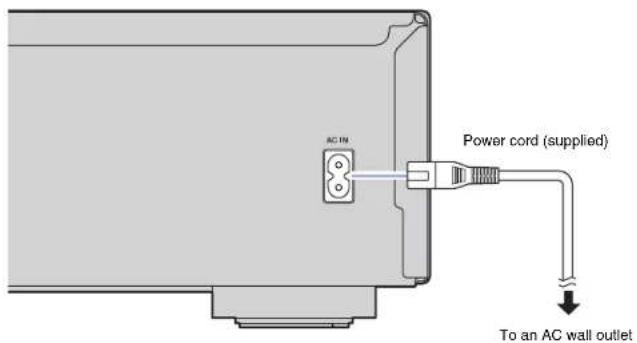
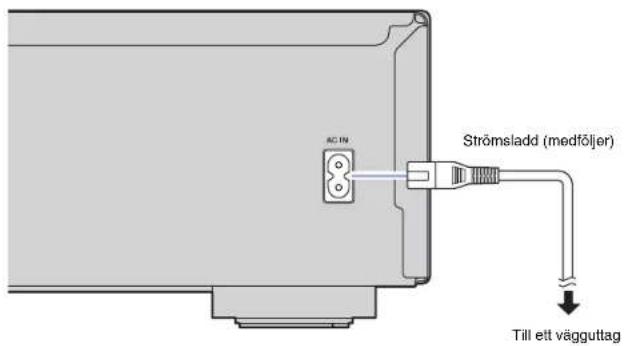
Connecting the power cord
After all the connections between audio devices are complete, connect the supplied power cord to the AC IN connector on this unit, and then plug the other end into an AC outlet.
This unit (rear panel)
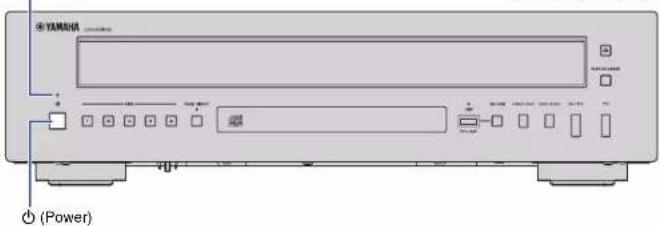
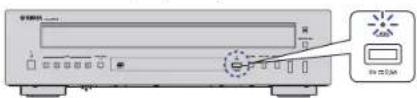
Turning on the power
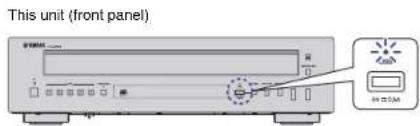
To turn on the power to the unit, press ⏻ (Power) on the front panel.
Power indicator
This unit (front panel)
Notice
- If you plan not to use this product for a long period of time, remove the power cord plug from the AC outlet. Even when the unit is in Standby mode, this product still uses a small amount of electricity.
Note
- If you press STANDBY/ON on the remote control while the power to the unit is on, the unit will enter Standby mode.
- The power indicator on the unit operates as follows: Brightly lit: Power is on Dimly lit: Standby mode Off: Power is off
- This unit features an Auto Power Standby function that reduces power consumption (page 22). (Default: Auto Power Standby On)
PLAYING AUDIO
Playing CDs
This unit enables you to play data CDs as well as audio CDs. For information on the type of CDs that can be played on this unit, please refer to "Supported file formats/discs/USB flash drives" (page 23).
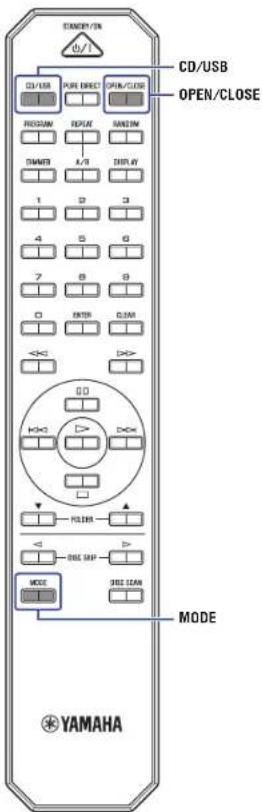
1 If the USB Indicator on the front panel is lit, press CD/USB to switch to Disc mode.
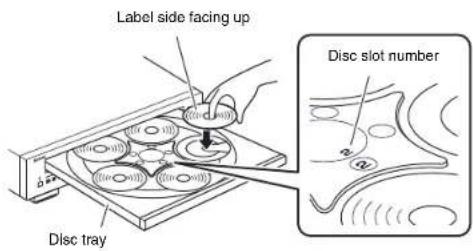
2 Place a disc on the disc tray.
Press OPEN/CLOSE repeatedly to extend and retract the disc tray.
Note
- You can also press (Open/Close) on the front panel repeatedly to extend and retract the disc tray.
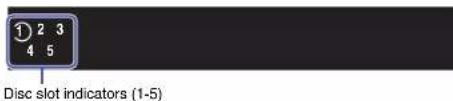
- After the disc tray retracts, disc slot indicators (1-5) light up. If some disc slots are empty while discs are loading, the disc slot indicators corresponding to empty disc slots will turn off.
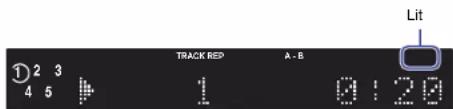
3 Press MODE repeatedly to select the playback mode.
Pressing MODE repeatedly will change the playback mode as follows:
| Playback mode | Playback mode indicator | |
| 1-disc mode One CD | is played. Lit | |
| All-disc mode | Each CD will be played in sequence. | Off |
Playback mode indicator


Numeric keys

Press △
(Play).
The ▶ Indicator appears on the information display and playback starts.
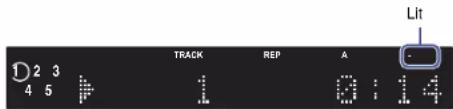
Note
- The disc slot indicator for the currently-playing or selected CD lights up as follows:
Lit
(For example, the CD in disc slot 1 is playing)

- During data CD playback, the playback media indicator corresponding to the file format lights up.

CAUTION
- Do not insert your hand or finger into the disc tray slots. Doing so might cause injury.
Note
- After you place a CD on the disc tray, press (Play) to retract the disc tray and start playback.
- You can configure this product so that playback automatically starts when power to the unit is turned on or when you switch to Disc or USB mode (page 22).
(Default: Automatic Playback On)
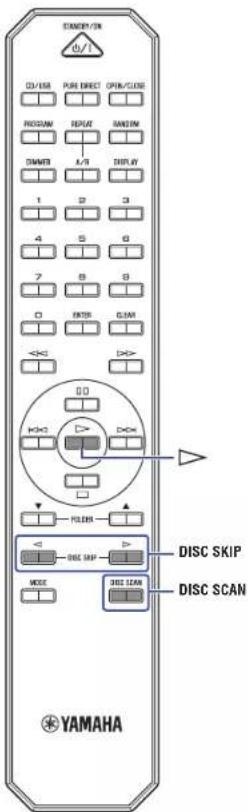
Use the following remote control keys to navigate the operation.
| Available keys Function | |
| ▷(Play) | The ▶ Indicator appears on the information display and playback starts. |
| □□(Pause) | The ▶ Indicator appears on the information display and playback pauses. Press ▶ to resume playback. |
| □(Stop) | Stops playback. |
| ◀◀(Search backward) | Searches tracks backward. |
| ▶◀(Search forward) | Searches tracks forward. |
| ◀◀(Skip backward) | Skips back to the previous track. Skips back to the top of the current track if pressed during playback. |
| ▶◀(Skip forward) | Skips to the next track. |
| Numeric keys | Enter a track number to directly select the corresponding track. |
| DISC SKIP ,◀ ▶ | Selects the next or previous CD. |
| FOLDER ▲, ▼(Data CD only) | Selects the next or previous folder. |
The control buttons on the front panel function as follows:
DISC 1-5:
Selects and plays the CD in disc slots 1-5.

(Skip backward/Search backward):
Skips back to the previous track. Skips back to the top of the current track if pressed during playback. It also searches tracks backward if you press and hold the button.

(Skip forward/Search forward):
Skips to the next track. It also searches tracks forward if you press and hold the button.


Resumes or pauses playback. Press or to resume playback.

Stops playback.

CD/USB
Numeric keys
YAMAHA
Playing music files stored on your USB flash drive
You can play music files (stored on your USB flash drive) on this unit. For information on supported USB flash drives, please refer to "Supported file formats/discs/USB flash drives" (page 23).
1 If the USB indicator on the front panel is off, press CD/USB to switch to USB mode.
The USB indicator on the front panel lights up orange.
2 Connect the USB flash drive to the USB jack.
The USB indicator on the front panel lights up green.
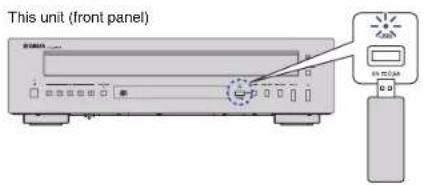
USB flash drive
Notice
- Do not use USB extension cables.
3 Press ▷ (Play).
The indicator appears on the information display and playback starts.
Note
- During audio file playback, the playback media indicator corresponding to the file format lights up.
- If compatible music files are stored on your USB flash drive, the unit will play them in chronological order based on date of creation.
- You can configure this product so that playback automatically starts when power to the unit is turned on or when you switch to Disc or USB mode (page 22). (Default: Automatic Playback On)
Notice
- Do not remove the USB flash drive during playback, or while the information display on the front panel is indicating "USB READING". In this case, first press CD/USB to switch to Disc mode, make sure that the USB indicator turns off, and then remove the flash drive.
Use the following remote control keys to control operation.
| Available keys Function | |
| ▷(Play) | The ▶ Indicator appears on the information display and playback starts. |
| □□(Pause) | The ▶ Indicator appears on the information display and playback pauses. Press ▶to resume playback. |
| □(Stop) | Stops playback. |
| ◀◀(Search backward) | Searches tracks backward. |
| ▶▶(Search forward) | Searches tracks forward. |
| ◀◀(Skip backward) | Skips back to the previous track. Skips back to the top of the current track if pressed during playback. |
| ▶▶(Skip backward) | Skips to the next track. |
| Numeric keys | Enter a track number to directly select the corresponding track. |
| FOLDER ▲, ▼ | Selects the next or previous folder. |
The control buttons on the front panel function as follows:
◀◀/◀◀ (Skip backward/Search backward):
Skips back to the previous track. Skips back to the top of the current track if pressed during playback. It also searches tracks backward if you press and hold the button.
▷/▷(Skip forward/Search forward):
Skips to the next track. It also searches tracks forward if you press and hold the button.
▷/□□(Play/Pause):
Resumes or pauses playback. Press to res me playback.
□ (Stop):
Stops playback.

PURE DIRECT
RANDOM
REPEAT
Advanced functions
Random-sequence playback
Press RANDOM to play tracks in random order. Pressing RANDOM repeatedly will change the Random-sequence playback setting as follows:
| Indicator Setting | |
| RNDM | Plays all tracks in random order.If playback mode is set to All-disc mode, each CD on the tray will play its tracks in random order. |
| Off Turns off Random-sequence playback. | |
Note
- Extending the disc tray will cancel Random-sequence playback.
Repeat playback
Press REPEAT to play tracks repeatedly. Pressing REPEAT repeatedly will change the Repeat playback setting as follows:
| Indicator Setting | |
| REP Plays one track repeatedly. | |
| REP FOLDER(Data CDs and USB flash drives only) | Plays tracks in the current folder repeatedly. |
| REP ALL | Plays all tracks repeatedly.If playback mode is set to All-disc mode, all CDs will play in sequence, and then repeat. |
| Off Turns off Repeat playback. | |
Note
- Do one of the following to cancel Repeat playback:
- Turn off the power to the unit or set the unit to Standby mode.
- Extend the disc tray.
Enjoying high-quality sound playback (PURE DIRECT)
If the PURE DIRECT function is turned on, digital audio will not be output. In this way, the PURE DIRECT function reduces noise that would affect sound quality, enabling you to enjoy playback of high-quality sound.
Pressing PURE DIRECT repeatedly will toggle PURE DIRECT on and off.
Note
- To use the PURE DIRECT function, connect the ANALOG OUTPUT jacks on the rear panel to the amplifier. The OPTICAL DIGITAL OUTPUT jack will not output any signals.
- When the PURE DIRECT function is turned on:
- The PURE DIRECT indicator lights up.
- The front panel display will be turned off while content is playing.
- Only a minimum number of indicators and messages will appear while you are operating the unit.
- This setting will be maintained after you turn off the power to the unit.
Playing tracks in the specified order (Program playback)
You can play tracks of an audio CD on the disc tray in the specified order.
1 Select the disc slot number for the CD to program by pressing the DISC SKIP or button, and then press Play) to play the disc.
Note
- You can also use DISC 1-5 on the front panel to select the slot number.
2 Press (Stop) to stop playback.
3 Press PROGRAM.
The PROG (PROGRAM) indicator lights up.

4 Use the numeric keys to enter the track number of a song.

5 Press ENTER.
Repeat steps 4 and 5 to program each track.
Press CLEAR to cancel each programmed track starting with the last track you programmed.
6 Press ▷ (Play).
The unit starts to play the tracks in the programmed order.
Note
- Program playback does not work with data CDs or USB flash drives.
- You cannot set up program playback across discs.
-
You can program up to 24 tracks.
-
Do one of the following to clear all programmed tracks:
- Press CLEAR while Program playback is stopped.
- Tum off the power to the unit or set the unit in Standby mode.
- Extend the disc tray.
Playing a specified part repeatedly (A-B Repeat playback)
You can specify the start and end points of a track during audio CD playback to play the specified part repeatedly.
1 Play an audio CD.
2 Press A/B at the point you want to start Repeat playback.
The A-B indicator lights up as follows:
3 Press A/B again at the point you want to end Repeat playback.
The A-B indicator lights up as follows, and Repeat playback starts.
Note
- A-B Repeat playback does not work with data CDs or USB flash drives.
- You cannot specify a part across discs for A-B Repeat playback.
- You cannot specify the A-B Repeat playback setting when the PURE DIRECT function is turned on.
- Do one of the following to cancel the A-B Repeat setting:
- Press A/B again.

(Stop).
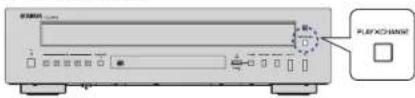
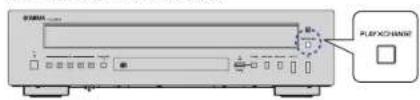
Replacing discs during CD playback (PLAYXCHANGE)
You can replace discs during CD playback.
1 Press PLAYXCHANGE on the front panel while a CD is playing.
The disc tray extends.
This unit (front panel)
2 Replace discs.
Notice
- Do not place a disc in the slot marked with the figure below (farthest from the front edge of the tray). Otherwise, this product or the disc may be damaged.
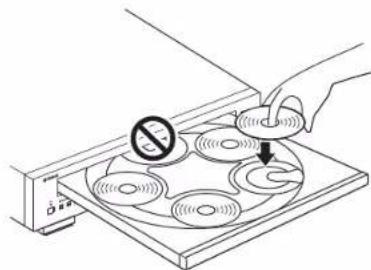
natural_image
Diagram showing a hand using a tool to press or install a circular component with no visible text or symbolsNote
- The DISC SKIP buttons will not work while the disc tray is extended.
3 Press PLAYXCHANGE.
The disc tray retracts.
Locating a CD to listen to (DISC SCAN)
This function enables you to play a 10-second section of each loaded CD to help you find a CD that you want to listen to.
1 Press DISC SCAN while playback is stopped.
The unit starts scanning discs. While scanning, the disc slot indicators (1-5) flash.
The unit plays 10 seconds for each CD. During playback, the corresponding disc slot indicator lights up.
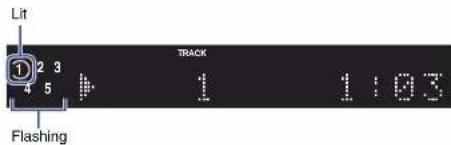
2 Press DISC SCAN or □(Play).
The unit stops scanning, and starts playback from track 1 of the currently playing CD.
Switching information on the display
Pressing DISPLAY repeatedly during playback will switch the information on the display as follows:
| Playback media information on the display | |
| Audio CD | Elapsed time↓Remaining time of the current track (TRACK REMAIN)↓Remaining time of the current CD (TOTAL REMAIN)↓Track name*↓Artist name*↓Album title** If CD-text has been embedded |
| Data CD, USB flash drive | Elapsed time↓Track name*↓Artist name*↓Album title** If track information (tag) has been embedded |
Note
- The information display indicates up to 28 characters (1-byte alphanumeric characters and several symbols).
Changing the display brightness
Press DIMMER repeatedly to switch between four stages of display brightness.
Note
- This setting will be maintained after the unit enters Standby mode or after you turn off the power to the unit.
APPENDIX
Part names
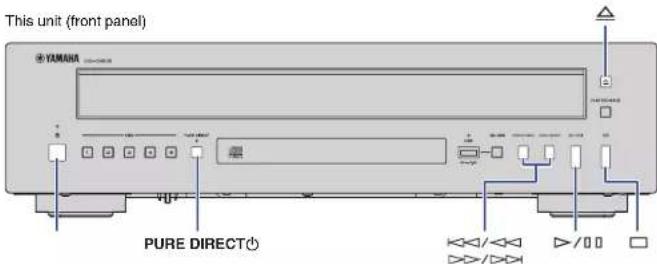
Front panel

1 ⏻ (Power) (page 11)
Power indicator (page 11)
3 DISC 1-5 (page 13)
PURE DIRECT (page 15)
⑤ PURE DIRECT indicator (page 15)
6 Disc tray (page 12)
7 (Open/Close) (page 12)
8 PLAYXCHANGE (page 17)
9 Display
10 Remote control sensor (page 9)
11 USB jack (page 14)
⑫USB Indicator (page 14)
13 CD/USB (pages 12, 14)
⑭ (Skip backward/Search backward) (pages 13, 14)
▶▶/▶▶ (Skip forward/Search forward) (pages 13, 14)
15 (Play/Pause) (pages 13, 14)
16 (Stop) (pages 13, 14)
Display

1 Disc slot indicators
②Playback media indicator (pages 13, 14)
③ Advanced setting indicator (page 22)
4 Time indicator (page 18)
5 PROG (PROGRAM) indicator (page 16)
6 RNDM (RANDOM) indicator (page 15)
7 REP (REPEAT) indicator (page 15)
8 FOLDER indicator (page 15)
9 ALL indicator (page 15)
10 A-B Indicator (page 16)
11 Playback mode indicator (page 12)
12 Information display (page 18)
Rear panel

1 SERVICE connector
Used for repairs or other services. Do not connect anything here.
2 ANALOG OUTPUT Jacks (page 10)
3 DIGITAL OUTPUT jack (page 10)
4 REMOTE IN/OUT Jacks (page 10)
⑤ AC IN connector (page 11)
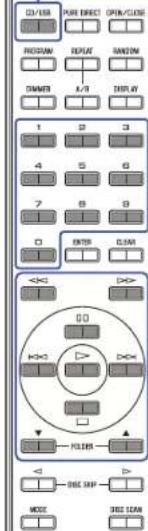
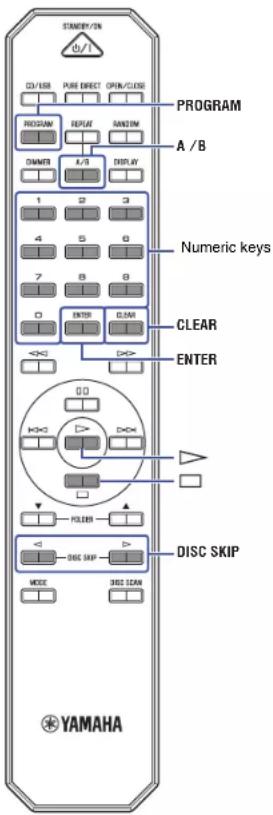
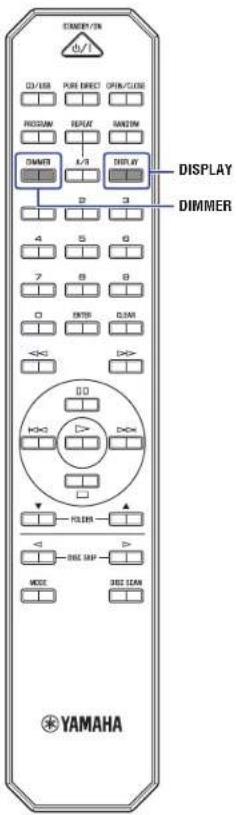
Remote control
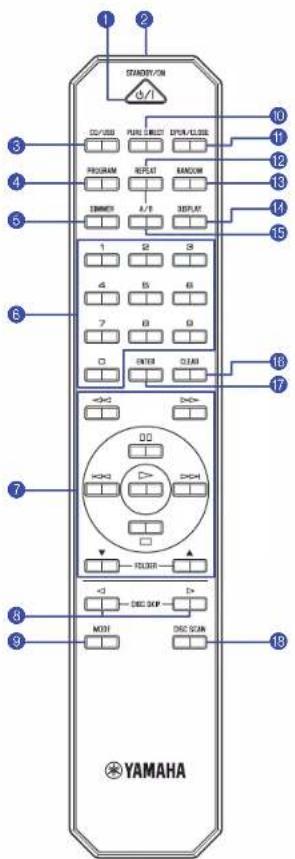
1 STANDBY/ON (page 11)
② Remote control signal transmitter (page 9)
③ CD/USB (pages 12, 14)
4 PROGRAM (page 16)
5 DIMMER (page 18)
6 Numeric keys (pages 13, 14, 16)
⑦ (Search backward), (Search-forward) (pages 13, 14)
□□ (Pause) (pages 13, 14)
◀◀◀ (Skip backward), □(Skip forward) (pages 13, 14)
▷ (Play) (pages 13, 14, 16, 17)
□ (Stop) (pages 13, 14, 16)
FOLDER ▲ (pages 13, 14)
8 DISC SKIP, (pages 13, 16)
9 MODE (page 12)
10 PURE DIRECT (page 15)
11 OPEN/CLOSE (page 12)
⑫ REPEAT (page 15)
13 RANDOM (page 15)
⑭DISPLAY (page 18)
15A/B (page 16)
16 CLEAR (page 16)
⑰ ENTER (page 16)
18 DISC SCAN (page 17)
Advanced settings
This section explains how to configure various advanced functions. You can configure these settings from the front panel.
1 Turn off the power to the unit (page 11).
2 While pressing and holding PURE DIRECT and 4Open/Close) simultaneously, press ⏻ (Power).
The following indicator appears on the information display of the front panel, and the unit enters Setting mode. You can set the Playback Mode Memory, Ready Mode, Automatic Playback, and Auto Power Standby functions in this order.

3 Press (Skip, backward/Search backward) or ▷/□□(Skip forward/Search forward) to set the parameter to on or off.
4 Press □ (Stop).
The setting is saved, and the next parameter is automatically selected. Repeat steps 3 and 4. When all settings are complete, press (PlayPause) and turn off the power to the unit.
Note
- If you press [Play/Pause] during this process, the setting at that point will be saved. Turn off the power to the unit.
Playback Mode Memory (PLAY MEM)
With this function enabled, the unit retains the Repeat playback and Random-sequence playback settings. When the Playback Mode Memory function is turned on, the advanced setting indicator (RESUM) on the display lights up.
Default: Off
Note
- If you turn the power to the unit off and then on after enabling the Playback Mode Memory function, the unit will play the most recently-played track or file from the beginning.
Ready Mode (RDY MODE)
With this function enabled, the unit pauses each time the playback of a track has completed. You can start playback of the next track when you choose. When the Ready Mode function is turned on, the advanced setting indicator (RDY) on the display lights up.
Default: Off
Automatic Playback (AUTO PLAY)
With this function enabled, the unit automatically starts playback when power to the unit is turned on or when you switch to Disc or USB mode.
Default: On
Auto Power Standby (AUTO STBY)
With this function enabled, the unit automatically enters Standby mode if you do not interact with it for 20 minutes after the playback has stopped.
Default: On
Supported file formats/discs/USB flash drives
□Supported file formats
| File | Sampling frequency (kHz) | Bit depth (bit) | Bitrate (kbps) | Number of channels |
| MP3 32/44.1 | 48 — 32-320 2 | |||
| WMA 32/44.1 | 48 — 48-192 2 | |||
| AAC 32/44.1 | 48 — 8-320 2 | |||
| WAV * | 32/44.1/48/64/88.2/96 | 16/24 | — | 2 |
| FLAC | 32/44.1/48/64/88.2/96 | 16/24 | — | 2 |
* Linear PCM format only.
Note
- Files on a data CD or USB flash drive will be played in chronological order based on date of creation.
- This unit supports ISO9660 format discs.
- If the unit is playing a VBR (variable bitrate) file, an accurate elapsed time might not be displayed.
- Digital Rights Management (DRM) encoded content cannot be played back.
| Data CD | USB flash drive | |
| Number of folder hierarchies (including the root folder) | 9 | 9 |
| Number of folders | 999 | 999 |
| Number of files | 1100 | 65535 |
Supported discs
Please use discs with the following logos.

Compact discs (audio CDs)

CD-R and CD-RW discs
• Discs with one of the following descriptions: FOR CONSUMER
FOR CONSUMER USE
FOR MUSIC USE ONLY
- For CD-R or CD-RW discs, the unit plays only finalized discs.

Note
- This unit might not play some CD-R/CD-RW discs or discs that were improperly recorded.

CD-TEXT discs
These discs contain embedded text information, such as album titles, song names, and artist names. This information (alphanumeric characters and some symbols only) along with the elapsed time will be displayed.
Notice
- Do not use odd-shaped discs or discs with tape or a decal attached. Otherwise, malfunction of the unit may occur.
- This unit might not play some CD-RW discs or discs that were improperly recorded.
• To play an 80 mm mini CD, place it in the inner circular indentation of a disc slot on the disc tray. Do not place a regular 120 mm CD on top of an 80 mm mini CD.
Handling a disc
- Handle a disc carefully so as not to scratch the recorded surface. Do not bend a disc.
- If there are any fingerprints or dust on the recorded surface, use a soft cloth to wipe the surface straight from the center toward the perimeter.
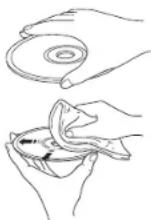
- Never use a vinyl record cleaner, anti-static agent, or other chemical to wipe a disc.
- Use a soft-tip pen to write only on the label side.
- Do not leave a disc in direct sunlight or in a location that is exposed to high temperature or humidity for a long period of time.
- Do not use commercially-available lens cleaners. Otherwise, a malfunction may occur.
Supported USB flash drives
Before you use this unit to play music files stored on a USB flash drive, make sure that the following requirements are satisfied:
- The USB flash drive complies with mass storage class requirements.
- Data has been recorded using the FAT16 or FAT32 file system.
- The USB flash drive complies with mass storage class requirements. - Data has been recorded using the FAT16 or FAT32 file system.
Notice
- Some USB flash drives may not operate properly.
- USB flash drives with encryption cannot be used.
- Yamaha and its dealers are not responsible for the loss of any data stored on a USB flash drive that is connected to this unit. We recommend that you keep backup data in case of loss of data.
- Yamaha will not guarantee the operation or power supply to any USB flash drives.
Moving this product
Before you move this product, remove all CDs from the disc tray, make sure that the front display indicates "NO DISC," and then turn off the power to the unit.
Notice
- If you move this product without removing the CDs, it may malfunction.
Specifications
The specifications of this unit are as follows.
Output Jacks
• Analog audio x 1 (RCA Unbalanced)
• Digital audio
OPTICAL x 1
Other jacks
- USB × 1 (USB2.0)
- REMOTE IN × 1
- REMOTE OUT × 1
Audio Section
- Output Level (1 kHz, 0 dB, Fs 44.1 kHz)....2.0±0.3 V
- S/N Ratio (IHF-A Network) (1 kHz, 0 dB, Fs 44.1 kHz) .... 105 dB or higher
• Dynamic Range (1 kHz, 0 dB, Fs 44.1 kHz) ..... 96 dB or higher
• Harmonic Distortion (1 kHz, 0 dB, Fs 44.1 kHz) 0.003% or lower - Frequency Response Audio CD....2 Hz - 20 kHz Data CD/USB Fs 48 kHz....2 Hz - 22 kHz Fs 96 kHz....2 Hz - 44 kHz, -3 dB
Laser section
- Laser Type ....AlGaAs
- Wavelength 790 nm
- Laser Output .... Max. 2.15 μW
* This output is the value measured at a distance of about 100 mm from the objective lens surface on the Optical Pick-up Block.
General
• Power Supply
U.S.A. and Canada models....AC 120 V, 60 Hz
Australia model....AC 230-240 V, 50 Hz
Europe and U.K. models....AC 230 V, 50 Hz
Asia and General models....AC 110-240 V, 50/60 Hz
• Power Consumption 11 W
- Standby Power Consumption
Power Standby.... 0.2 W
Power Off.... 0.2 W
- Dimensions (W × H × D) 435 × 116 × 405 mm
- Weight 5.6 kg
* The contents of this manual apply to the latest specifications as of the publishing date.
To obtain the latest manual, access the Yamaha website then download the manual file.
Troubleshooting
Refer to the table below if the unit fails to function properly. If the problem is not listed below, or if the symptoms persist after you follow the instructions below, turn off the power to the unit by pressing ⏻ (Power) on the front panel, disconnect the power cord, and contact your nearest authorized Yamaha dealer or service center.
| Problem Cause Solution Page | |||
| Pressing ⏻ (Power) on the front panel does not turn the power on. | The power cord may not be properly plugged in. Connect the power cord firmly to the AC outlet. 11 | ||
| The unit suddenly enters Standby mode. | You did not interact with the unit for a certain amount of time after the playback stopped and the Auto Power Standby function has kicked in. | Disable the Auto Power Standby function. 22 | |
| The disc tray does not close completely. | A foreign object is inside the disc tray enclosure. Check the disc tray and remove any foreign object. — | ||
| Unable to play the inserted disc. Or, the corresponding slot indicator on the front panel does not light up. | The disc is scratched. Change the disc. — | ||
| The lens inside the unit has condensation. | Turn on the power to the unit, wait 20-30 minutes, and then try to play the disc again. | — | |
| The disc is set upside down. Be sure to place the disc with its label side up. — | |||
| The disc is dirty or scratched. | Wipe off the dirt from the disc surface, or use an unscratched disc. | 24 | |
| You tried to play files in a format that is not supported by the unit. | Be sure to use a disc that contains files in a format that is supported by the unit. | 23 | |
| You tried to play a disc that is not supported by the unit. | Be sure to use a disc that is supported by the unit. | 23 | |
| The unit is in USB mode. | Press CD/USB to switch to Disc mode. | 12, 19, 21 | |
| Playback does not start Immediately or from the correct point. | The disc is dirty or scratched. | Wipe off the dirt from the disc surface, or use an unscratched disc. | 24 |
| Unable to play a music file stored on the USB flash drive. | The USB flash drive may not be properly connected to the unit. | Connect the USB flash drive properly. | 14 |
| You tried to play files in a format that is not supported by the unit. | Be sure to use a USB flash drive that contains files in a format that is supported by the unit. | 23, 24 | |
| The unit is in Disc mode. | Press CD/USB to switch to USB mode. | 14, 19, 21 | |
| No sound | The unit is not connected to the amplifier properly. | Check the connection to the amplifier. | 10 |
| Audio is not output from the device connected to the unit's DIGITAL OUTPUT jack. | The PURE DIRECT function is turned on. Turn the PURE DIRECT function off. | 15 | |
| Problem | Cause | Solution | Page |
| The sound skips. | The unit is affected by vibration or impact. Change the location of the unit. — | ||
| The disc is dirty or scratched. | Wipe off the dirt from the disc surface, or use an unscratched disc. | 24 | |
| Buzzing or hum noise is heard. The RCA | stereo cable is not connected firmly. | Connect the RCA stereo cable firmly. If the symptom does not improve, check to see whether the cable itself is defective. | 10 |
| Noise in the tuner The unit is located close to the tuner. | Relocate the unit farther away from the tuner, or turn off the power to the unit. | — | |
| The disc tray is making noise. The disc is deformed. Use a non-deformed disc. — | |||
| No indication on the display | The PURE DIRECT function is turned on | Turn the PURE DIRECT function off. | 15 |
| No folder name or file name appears on the information display. | Characters other than one-byte alphanumeric are used for the folder or file name. | Use one-byte alphanumeric characters for the folder and file names. | 18 |
| The remote control does not work or function properly. | The batteries are weak. | Replace all batteries. | 9 |
| Wrong distance or angle. | Use the remote control within the operative range. | 9 | |
| Direct sunlight or lighting (from an inverter type of fluorescent lamp, etc.) is striking the remote control sensor of this unit. | Reposition the orientation of the lighting or the unit. | — | |
PRÉCAUTIONS D'USAGE
LISEZ ATTENTIVEMENT AVANT DE PROCÉDER À TOUTE UTILISATION. VEILLEZ À SUIVRE CES INSTRUCTIONS.
(58-M03 WEEE battery fr 01)
SOMMAIRE
AVANT D'UTILISER L'APPAREIL 34
FONCTIONS....34
natural_image
Illustration of a hand using a power switch to press a CD on a stove (no text or symbols present)Note
- USB × 1 (USB2.0)
- REMOTE IN × 1
- REMOTE OUT × 1
Section audio
AUDIOWIEDERGABE
CDs abspielen
natural_image
Diagram of a hand using a tool to test a circular component with a no-smoking symbol (no text or labels present)Hinweis
① Anschluss SERVICE
(58-M03 WEEE battery sv 01)
INNEHÅLL
INNAN RECEIVERN ANVÄNDS 86
FUNKTIONER....86
Om denna manual....86
Tillbehör....87
FÖRBEREDELSE 88
Denna receiver (bakre panel)
flowchart
graph TD
    A["Service"] --> B["RCA stereokabel (medföljer)"]
    B --> C["ANALOG IN"]
    B --> D["OPTICAL IN"]
    B --> E["OPTICAL DIGITAL IN"]
    B --> F["OPTISK DIGITAL KABLAR (finns i handeln)"]
    B --> G["Förstärkare Förstärkare"]
    H["OUTPUT"] --> I["ANALOG"]
    H --> J["DIGITAL"]
    H --> K["OPTICAL"]
    H --> L["Förstärkare Förstärkare"]
    M["REMOTE"] --> N["IN"]
    M --> O["OUT"]
Obs!
Denna receiver (bakre panel)
Den här receivern (frontpanelen)
Meddelande
Den här receivern (frontpanelen)
2 Byt ut skivor.
Meddelande
natural_image
Illustration of a hand using a device to clean or inspect a circular component with no visible text or symbolsObs!
1 SERVICE-kontakt
- USB × 1 (USB2.0)
- REMOTE IN × 1
- REMOTE OUT x 1
Ljuddelen
(58-M03 WEEE battery it 01)
INDICE
PRIMA DI UTILIZZARE L'UNITÀ 112
CARATTERISTICHE.... 112
natural_image
Illustration of a hand using a power switch to press down a circular component with no visible text or symbolsNota
Compact disc (CD audio)

Dischl CD-R e CD-RW

natural_image
Illustration of a hand using a power tool to press or install a CD on a stove (no text or symbols present)Nota
1 Conector SERVICE
(58-M03 WEEE battery nl 01)
INHOUD
ALVORENS HET TOESTEL TE GEBRUIKEN 164
EIGENSCHAPPEN.... 164
Ready Mode (RDY MODE)....178
Automatisch afspelen (AUTO PLAY) 178
Auto Power Standby (AUTO STBY) 178
Ondersteunde bestandsindelingen/discs/USB-flashgeheugens ...179
2 Discs vervangen.
Let op
natural_image
Illustration of a hand using a tool to press or install a circular component on a tray (no text or symbols present)Opmerking
- USB × 1 (USB2.0)
- REMOTE IN × 1
- REMOTE OUT × 1
Audiogedeelte
- Uitgangsniveau (1 kHz, 0 dB, Fs 44,1 kHz).... 2,0±0,3 V
- Signaal/ruisverhouding (IHF-A netwerk) (1 kHz, 0 dB, Fs 44,1 kHz)....105 dB of hoger
• Dynamisch bereik (1 kHz, 0 dB, Fs 44, 1 kHz) 96 dB of hoger - Harmonische vervorming (1 kHz, 0 dB, Fs 44,1 kHz)....0,003% of lager
- Frequentierespons Audio-cd 2 Hz - 20 kHz Data-cd/USB Fs 48 kHz 2 Hz - 22 kHz Fs 96 kHz 2 Hz - 44 kHz, -3 dB
Lasersectie
- Lasertype AlGaAs
• Golflengte 790 nm - Laservermogen .... Max. 2,15 μW
natural_image
Diagram of a hand using a tool to press or install a CD on a tray (no text or symbols present)Примечание
Software licenses
This product uses the following software.
Copyright © 2000–2009 Josh Coalson
Copyright © 2011-2021 Xiph.Org Foundation
Redistribution and use in source and binary forms, with or without modification, are permitted provided that the following conditions are met:
- Redistributions of source code must retain the above copyright notice, this list of conditions and the following disclaimer.
- Redistributions in binary form must reproduce the above copyright notice, this list of conditions and the following disclaimer in the documentation and/or other materials provided with the distribution.
- Neither the name of the Xiph.org Foundation nor the names of its contributors may be used to endorse or promote products derived from this software without specific prior written permission.
THIS SOFTWARE IS PROVIDED BY THE COPYRIGHT HOLDERS AND CONTRIBUTORS "AS IS" AND ANY EXPRESS OR IMPLIED WARRANTIES, INCLUDING, BUT NOT LIMITED TO, THE IMPLIED WARRANTIES OF MERCHANTABILITY AND FITNESS FOR A PARTICULAR PURPOSE ARE DISCLAIMED. IN NO EVENT SHALL THE FOUNDATION OR CONTRIBUTORS BE LIABLE FOR ANY DIRECT, INDIRECT, INCIDENTAL, SPECIAL, EXEMPLARY, OR CONSEQUENTIAL DAMAGES (INCLUDING, BUT NOT LIMITED TO, PROCUREMENT OF SUBSTITUTE GOODS OR SERVICES; LOSS OF USE, DATA, OR PROFITS; OR BUSINESS INTERRUPTION) HOWEVER CAUSED AND ON ANY THEORY OF LIABILITY, WHETHER IN CONTRACT, STRICT LIABILITY, OR TORT (INCLUDING NEGLIGENCE OR OTHERWISE) ARISING IN ANY WAY OUT OF THE USE OF THIS SOFTWARE, EVEN IF ADVISED OF THE POSSIBILITY OF SUCH DAMAGE.
Yamaha Global Site https://www.yamaha.com/ Yamaha Downloads https://download.yamaha.com/
© 2023 Yamaha Corporation Published 09/2023 IPEM-A0
VGD8460