AquaPix W510 Neon - Camera EASYPIX - Free user manual and instructions
Find the device manual for free AquaPix W510 Neon EASYPIX in PDF.
| Product type | Underwater digital camera |
| Brand | Easypix |
| Model | AquaPix W510 Neon |
| Sensor | CMOS 5 megapixels (interpolation up to 12M) |
| Image resolution | 4032x3024 (12M), 3456x2592 (9M), 2560x1920 (5M), 2048x1536 (3M), 1280x960 (1.3M), 640x480 (VGA) |
| Video resolution | 640x480 (VGA), 320x240 (QVGA) |
| Waterproof | Up to 10 meters |
| Shock resistance | Up to 1 meter |
| Cold resistance | Up to -10°C |
| Screen | LCD TFT 2.7 inches |
| Lens | f=8.15mm, F3.0 |
| Zoom | Digital 8x |
| Flash | Built-in (Auto, Forced, Red-eye reduction, Disabled) |
| Self-timer | 2s, 5s, 10s, 3 continuous shots |
| Image stabilizer | Yes |
| Face detection | Yes |
| Scene modes | Auto, Night scene, Portrait, Night portrait, Sport, Party, Beach, High sensitivity, Diving |
| White balance | Auto, Daylight, Shade, Tungsten, Fluorescent |
| ISO | Auto, 100, 200, 400 |
| Power supply | Rechargeable lithium-ion battery via USB |
| External memory | Micro SD card up to 32 GB |
| Interface | USB 2.0 |
| Operating system | Windows 2000/XP/Vista/Win7, Mac OS X 10.2.6+ |
| Included accessories | CD-ROM, USB cable, manual, wrist strap, case, lithium battery |
| Dimensions (estimated) | Approximately 10 x 6 x 3 cm |
| Weight (estimated) | Approximately 130 g (with battery) |
| Maintenance | Rinse with fresh water after underwater use, dry with a clean cloth |
| Safety | Do not open the battery compartment underwater; use only a compliant charger |
Frequently Asked Questions - AquaPix W510 Neon EASYPIX
User questions about AquaPix W510 Neon EASYPIX
0 question about this device. Answer the ones you know or ask your own.
Ask a new question about this device
Download the instructions for your Camera in PDF format for free! Find your manual AquaPix W510 Neon - EASYPIX and take your electronic device back in hand. On this page are published all the documents necessary for the use of your device. AquaPix W510 Neon by EASYPIX.
USER MANUAL AquaPix W510 Neon EASYPIX
natural_image
Technical line drawing of a digital camera module with mounting holes and a central lens (no text or symbols)Inhaltsverzeichnis
Einführung....1
Hauptmerkmale....1
natural_image
Line drawing of a battery pack with internal components and an arrow pointing to one (no text or symbols)natural_image
Technical line drawing of a mechanical device with internal components and an arrow indicating motion (no text or symbols)natural_image
Technical line drawing of a digital camera module with internal compartments and external panel (no text or symbols)natural_image
Line drawing of a device with cable and connector, showing internal components and wiring (no text or symbols)natural_image
Line drawing of a device with plug, socket, and power outlet connected by cable (no text or symbols)text_image
This Image All Cancel
text_image
Delete This Image? Cancel OKMenü:
text_image
Resolution Scene Image stabilization QualityAuflösung: MP
12M, 9M, 5M, 3M, 1.3M, VGA
Szene:

text_image
Scene Auto Beach Scenery Night Scene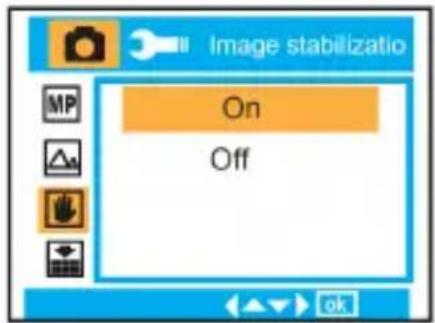
text_image
Image stabilizatio On Off
text_image
Quality Super Fine Fine Normal
text_image
Sharpness Strong Normal SoftBelichtung:

-3, -2, -1, 0, +1, +2, +3
Weißabgleich:

text_image
+3 +2 +1 0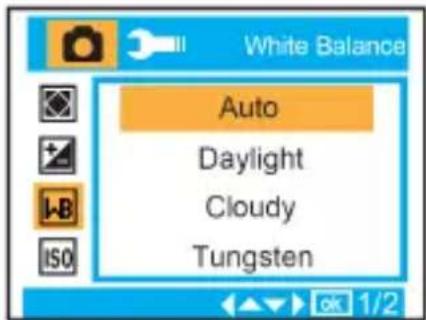
text_image
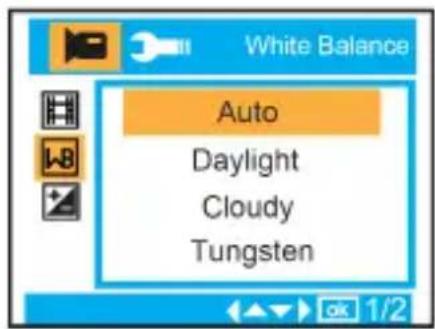
White Balance Auto Daylight Cloudy Tungsten
text_image
Auto 100 200 400
text_image
Face Detection On Off
text_image
Video Resolution White Balance Exposuretext_image
Exposure +3 +2 +1 0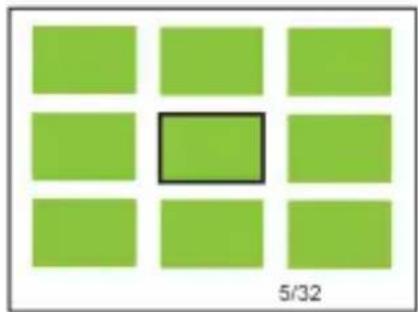
natural_image
Grid of nine green squares with one highlighted in black (no text or symbols)
natural_image
Green background with a small red square containing a white rectangle and a horizontal bar labeled 'W' and 'T' (no text or symbols beyond the labels)text_image
Playback Delete Protect Rotate Crop 1/2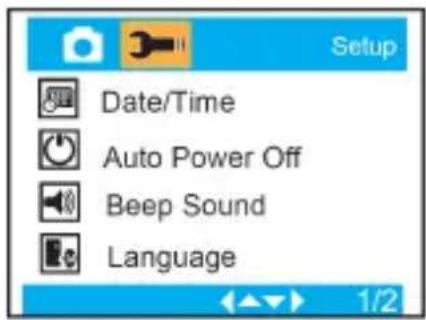
text_image
Setup Date/Time Auto Power Off Beep Sound Language
text_image
Frequency 50 Hz 60 HzFormat :

text_image
Format Internal Memory SD Card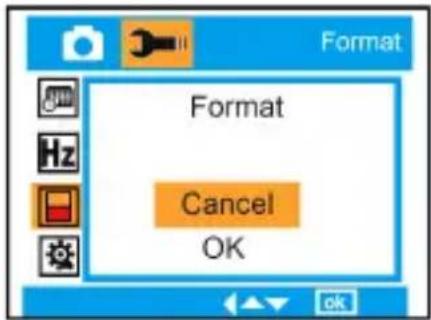
text_image
Format Format Cancel OKWhat Your Camera Includes....1
Computer System Requirement ....1
Use notice....1
When charging the battery via the USB charger (option)....2
Waterproof Notice....2
Quick Look at Your Camera....3
Main Icons on the LCD 3
Prepare Your Camera for use 4
Charging the battery....5
Starting Your Digital Camera....5
Appendix A: Technical Specifications....12
Introduction
Thank you for purchasing this Digital Camera. This model is not only a regular DSC but also a waterproof camera. Please read this manual carefully before using.
Key Features
• Video resolutions-640x480 Pixels (VGA), 320x240 Pixels (QVGA) Camera resolutions- 12M / 9M / 5M / 3M / 1.3M / VGA
• 2.7" TFT LCD
- 8X Digital Zoom
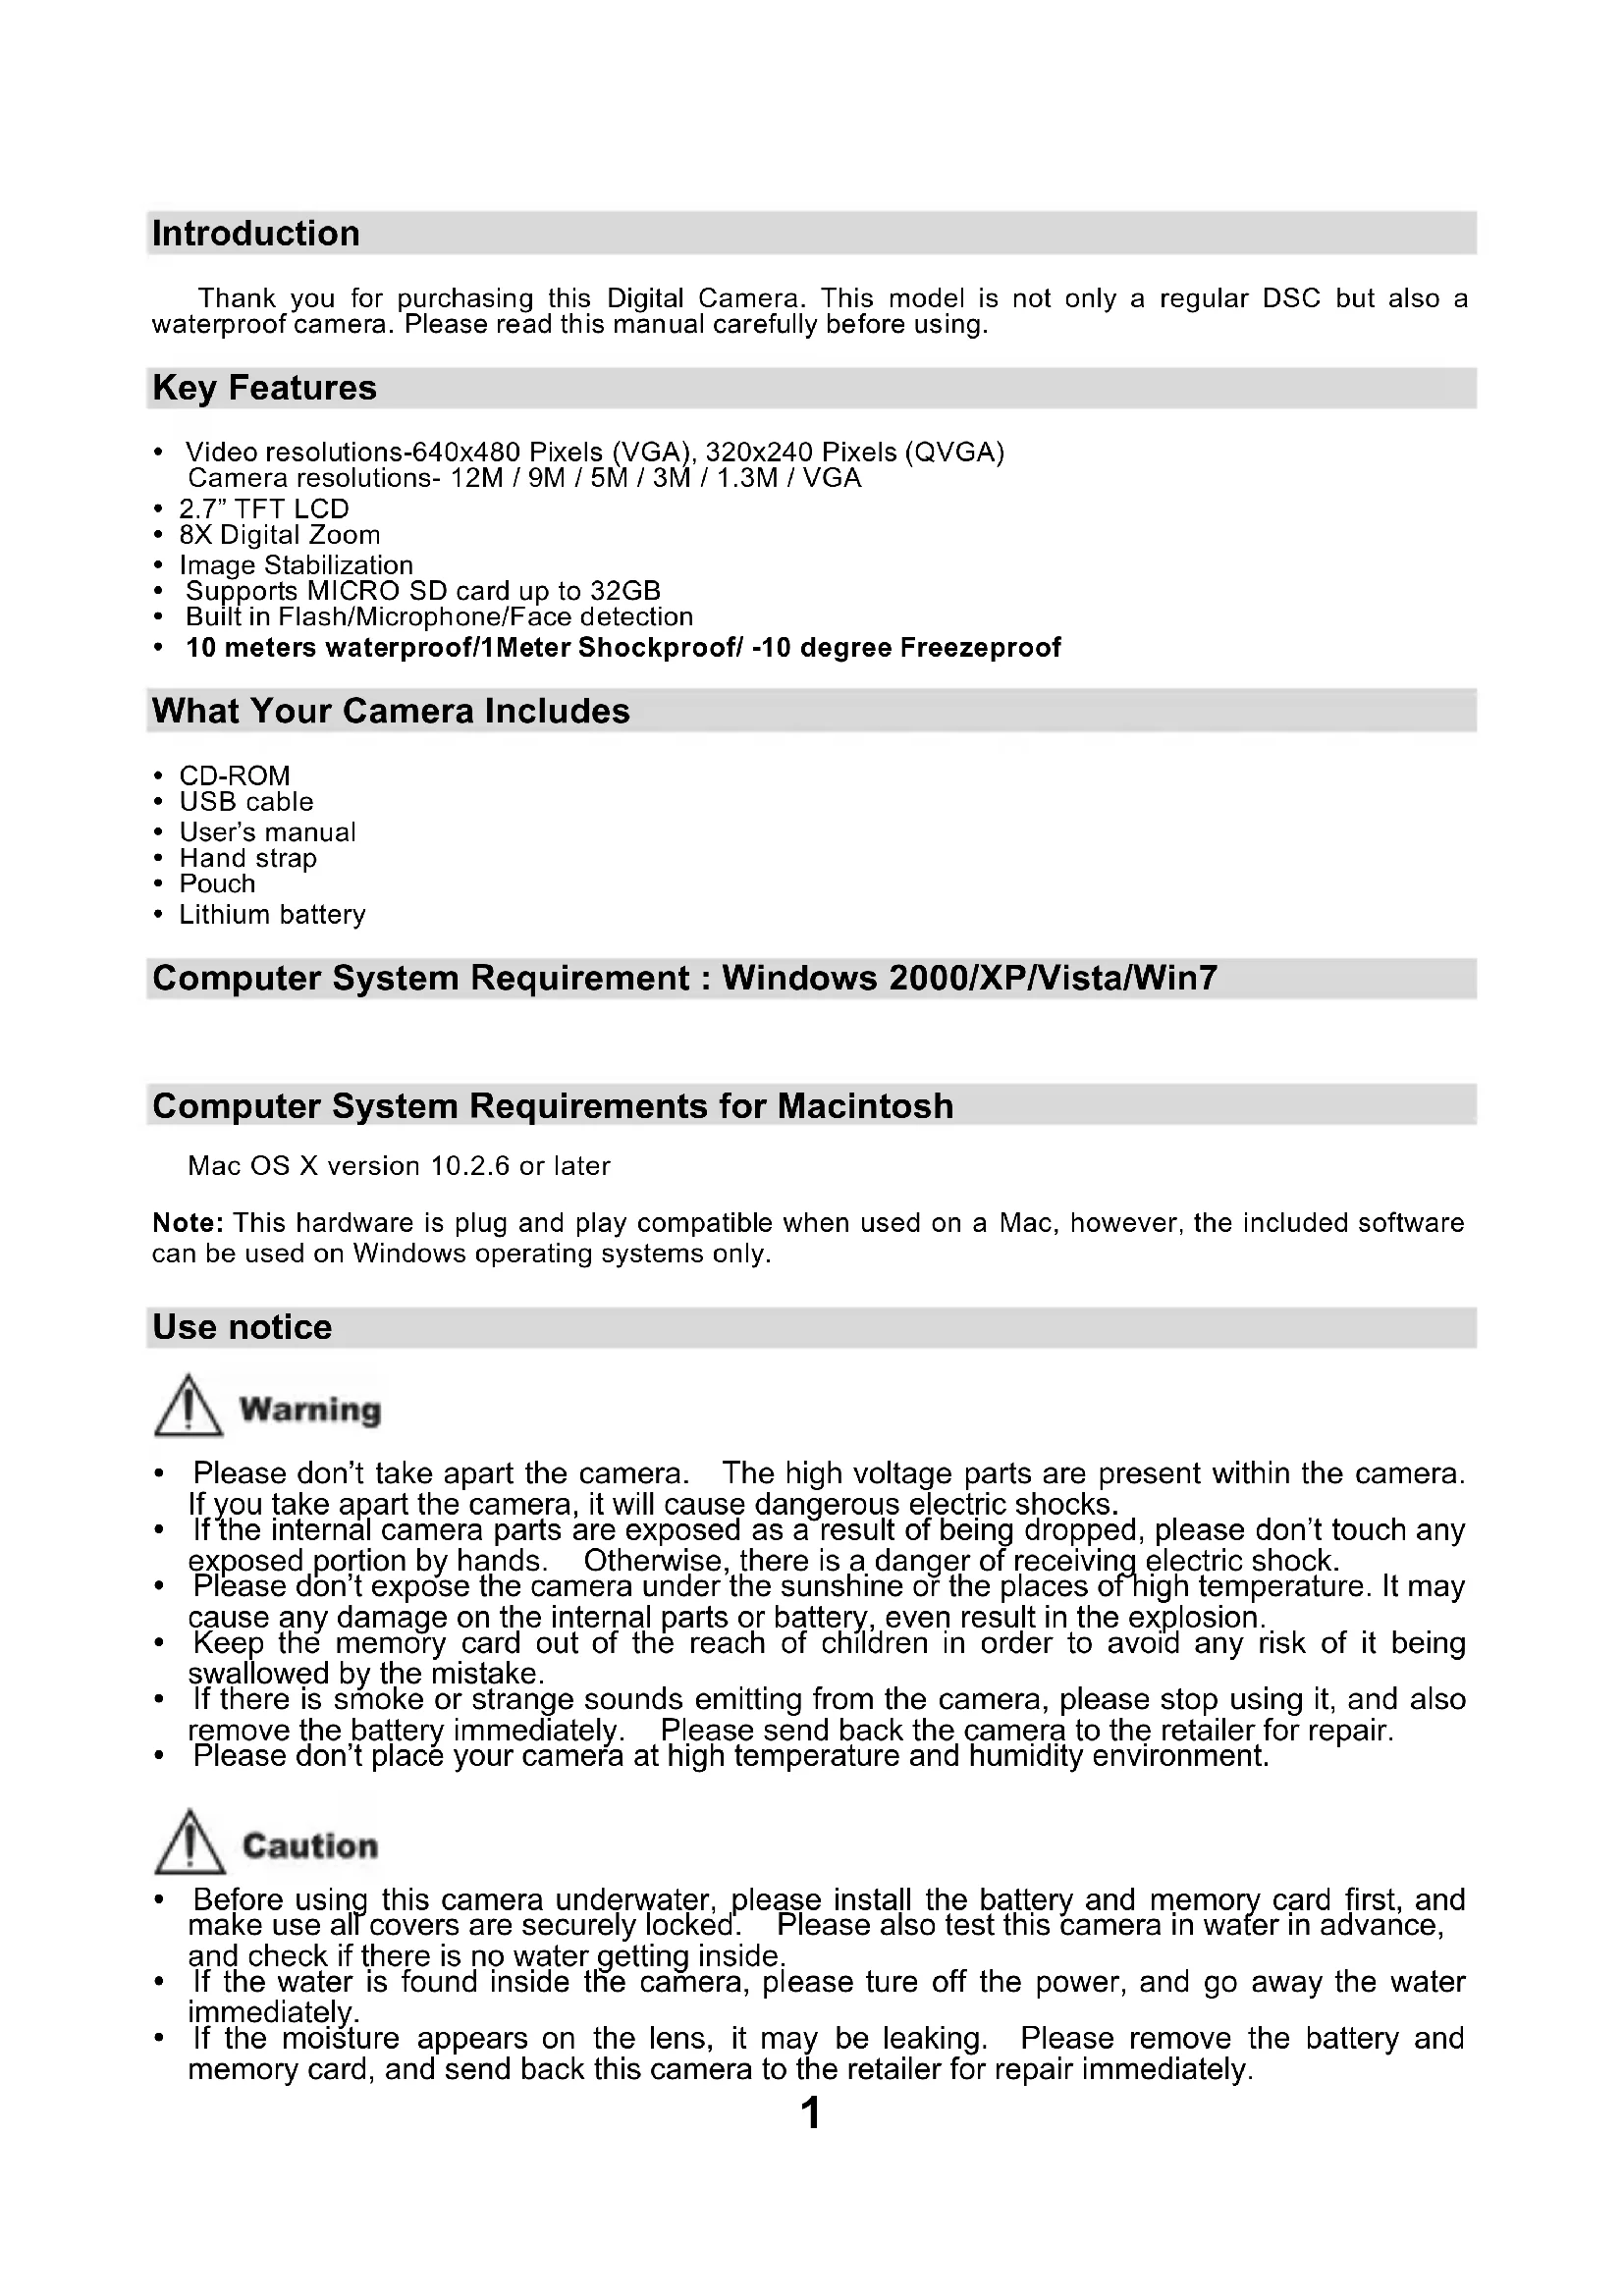
• Image Stabilization
• Supports MICRO SD card up to 32GB
• Built in Flash/Microphone/Face detection
• 10 meters waterproof/1Meter Shockproof/-10 degree Freezeproof
What Your Camera Includes
- CD-ROM
- USB cable
- User's manual
- Hand strap
- Pouch
- Lithium battery
Computer System Requirement : Windows 2000/XP/Vista/Win7
Computer System Requirements for Macintosh
Mac OS X version 10.2.6 or later
Note: This hardware is plug and play compatible when used on a Mac, however, the included software can be used on Windows operating systems only.
Use notice

Warning
- Please don't take apart the camera. The high voltage parts are present within the camera. If you take apart the camera, it will cause dangerous electric shocks.
- If the internal camera parts are exposed as a result of being dropped, please don't touch any exposed portion by hands. Otherwise, there is a danger of receiving electric shock.
- Please don't expose the camera under the sunshine of the places of high temperature. It may cause any damage on the internal parts or battery, even result in the explosion.
- Keep the memory card out of the reach of children in order to avoid any risk of it being swallowed by the mistake.
- If there is smoke or strange sounds emitting from the camera, please stop using it, and also remove the battery immediately. Please send back the camera to the retailer for repair.
- Please don't place your camera at high temperature and humidity environment.

Caution
- Before using this camera underwater, please install the battery and memory card first, and make use all covers are securely locked. Please also test this camera in water in advance, and check if there is no water getting inside.
- If the water is found inside the camera, please ture off the power, and go away the water immediately.
-
If the moisture appears on the lens, it may be leaking. Please remove the battery and memory card, and send back this camera to the retailer for repair immediately.
-
If it becomes hot during the use, please turn off the power and remove the battery immediately.
- This camera is waterproof and dustproof. Please don't take apart this camera by yourself. This action may cause any damage on the camera. If this damage is caused, the user needs to take the responsibility for repair.
- Should the LCD panel be damaged, please don't use it underwater. To avoid any personal injury, please send back this camera to the retailer for repair immediately.
• This camera is 10 meters waterproof, and please do not go over this depth. - If you don't use the camera, please remove the memory card and battery.
When charging the battery via the USB charger (option)

Warning
- Don't use the product at a voltage other than the specified voltage. If using with the power source or voltage other than that designed, it can cause a fire or electric shock. The specified voltage is 100-240VAC.
- Please don't disassemble or remodel the AC adapter. This may cause a fire or electric shock.
- If the smoke or any strange sound occurs during charging, please unplug the power immediately, and send back the USB charger and camera to the retailer for repair.
- If thunder storm happens during the use of the charger, please unplug the power and stop using. Continuing to use the camera can cause the damage to the equipment, a fire or electric shock.

Caution
- Please avoid any strong impact on the charger, or any drop on the hard surface. This can cause a malfunction.
- If the charger heats up during charging, please unplug the power immediately.
- Please don't bend the output terminal of the AC adapter excessively in order to avoid any damage.
- Please don't plug in the charger with wet hands, otherwise it can cause a electric shock.
- Please hold the output terminal of the charger and USB head when you unplug the power. It can cause any damage if you pull the electric cord directly.
- Please put the camera in a safe place when charging the battery. The camera may be damaged because of any carelessness and dropping.
Waterproof Notice
- Be sure to attach the strap and slip it over your wrist when using the camera.
- Please don't subject this camera to a strong shock or pressure. It can cause a loss on waterproof and dustproof performance.
- Before using the camera underwater, please be sure to close battery and microphone covers completely.
- When using the camera underwater, please don't open the battery and microphone covers. It will cause leaking.
- If you need to change the battery or memory card during use, please wipe off any dirt or sand on the camera surface first. Then rinse the camera with fresh water, or leave it in a bowl of fresh water for 2 or 3 minutes. Wipe off all moisture with a clear colth. If the camera is clear and dry, then you can open the battery door. This is to avoid any substance or water getting inside the camera when you replace the battery or memory card.
*** Please don't open the battery and microphone covers at the beach or by the sea, and also avoid replacing the battery or memory card where the camera is likely to get wet or dirty, and make sure your hands are dry.
- After using the camera underwater, please make sure it is power off, and the battery and USB covers are firmly closed. Please wipe off any dirt or sand, and rinse the camera with fresh water, or leave it in a bowl of fresh water for 2 or 3 minutes. Then, wipe the camera with a clear cloth. After cleaning this camera, please remove the battery and memory card. Afterwared, please leave the camera in a bowl of fresh water for 30 minutes again. Finally, please dry this camera with a clean cloth, and store it in a safe place.
- Avoiding using any soap water, mild detergents, or alcohol to clear the camera, it may affect the waterproof and dustproof performance
Quick Look at Your Camera

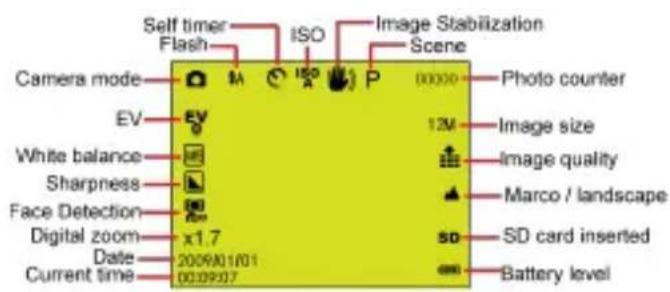
Main Icons on the LCD
text_image
Self timer Flash ISO Image Stabilization Scene Camera mode M ISO P 00000 Photo counter EV 12M Image size White balance Image quality Sharpness Marco / landscape Face Detection SD SD card inserted Digital zoom x1.7 Date: 2009/01/01 Current time: 00:09:07 Battery levelCamera Mode
text_image
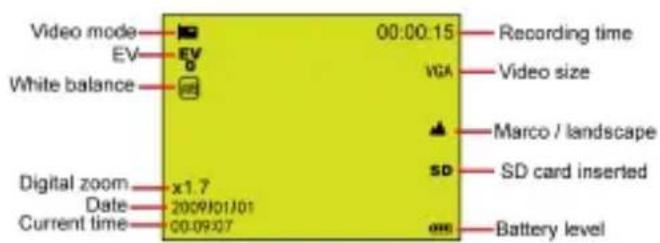
Video mode EV White balance Digital zoom Date Current time x1.7 2009J01J01 00:09:07 00:00:15 Recording time VGA Video size Marco / landscape SD SD card inserted Battery levelVideo Mode
text_image
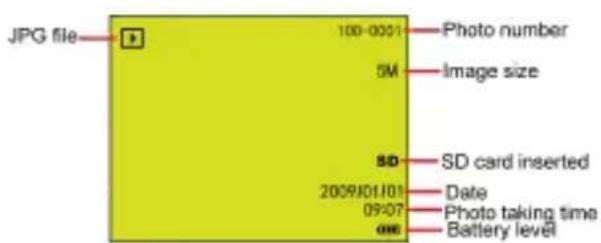
JPG file 100-0001 Photo number 5M Image size SD SD card inserted 2009J01J01 Date 09:07 Photo taking time 006 Battery levelPlayback Mode for photo

text_image
AVI file Video Play Protect 100-0001 Video number VGA Video size 00:09:07 Recording time SD 2009/01/01 09:07 SD card inserted Date Video taking time Battery levelPlayback Mode for Video
Modes

Camera

Video

Playback
FLASH

Force Flash

Auto

Red eye reduction

No Flash
Quality

Super Fine

Fine

Normal
Sharpness

Strong

Normal

Soft
Macro / Far function

Far capture

Macro capture
ISO

Auto / 100 / 200 / 400
Self - timer

Self - timer on (2s)

Self - timer on (5s)

Self - timer on (10s)

Continue shoot (3P)
White Balance

Auto

Daylight

Cloudy

Tungsten

Fluorescent
Battery power level

Full battery power

Medium battery power

Low battery power

Power off
Exposure

+3, +2, +1, 0, -1, -2, -3
Scene

Auto

Scenery

Night Scene

Portrait

Night Portrait

Sports

Party

Beach

High Sensitivity

Under Water
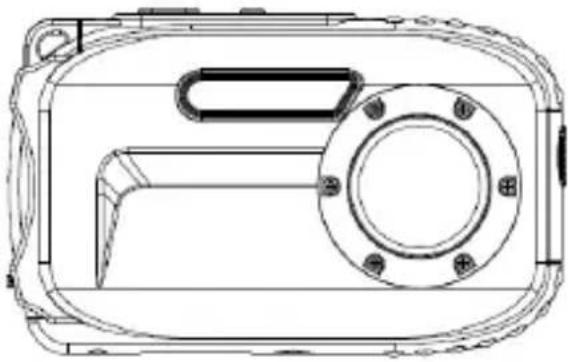
Prepare Your Camera for use
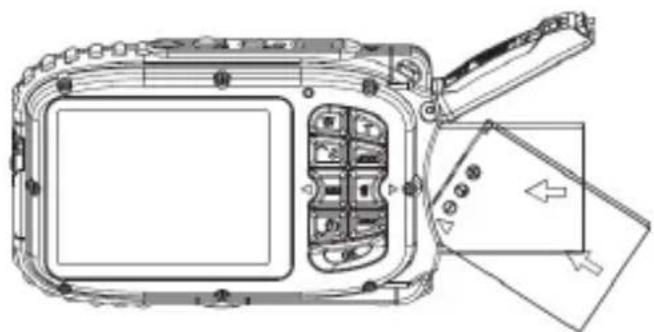
Please refer to the diagram to install battery and memory card

natural_image
Technical line drawing of a vehicle chassis with internal compartments and a directional arrow (no text or symbols)Push to unlock position to open the battery cover

natural_image
Technical line drawing of a mechanical device with internal components and directional arrows (no text or symbols)Micro SD card direction
natural_image
Technical line drawing of a digital camera module with internal components and an external panel (no text or symbols)Battery direction
Battery cover :
Push down the battery cover, and when you hear a sound "click", it means the cover is closed firmly. If not closing well, it will cause the leaking and destroy internal electronic parts. Please be sure to close the battery well before use.
Battery :
- "Low battery" will show on the LCD when battery is insufficient and your camera will be off soon.
- Please uninstall your battery when you don't use your camera for a long time to forbid the battery leakage and corrosion.
Micro SD memory card:
This camera supports Micro SD memory card up to 32GB, and the internal memory is only for you to take one testing photo. Please insert the compatible memory card before use.
Insert a memory card until you feel and hear a "Click" sound. When the SD icon appears on the LCD screen, this indicates that your SD card is installed correctly.
- Formatting will delete all data on the SD memory card including protected data.
- Don't remove the memory card during formatting as this may damage the card and render it unusable.
- Download the photos/videos to your PC and delete the photos and videos from your SD Card in order to continue using your camera.
Charging the battery
- Please load the battery in the camera
- Please use the USB cable to connect DSC and computer / USB charger(option) for charging.
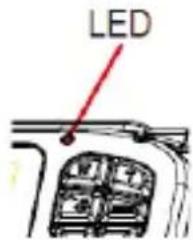
text_image
LEDWhen the battery is charging, the LED will light up.
<1> Via the computer:
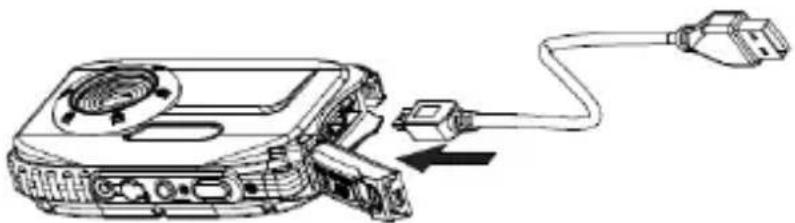
natural_image
Line drawing of a device with cable and plug, showing internal components connected by a cable (no text or symbols)<2> Via the USB charger (option):

natural_image
Line drawing of a device with plug, socket, and power outlet connected by cable (no text or symbols)PS. The specification of the charger: INPUT:100\~240VAC/ OUTPUT: 5VDC. In order to avoid the camera faulty or any mistakes, please don't use non-standard charger to charge the battery.
Starting Your Digital Camera
There are 3 modes on your camera.

Camera Mode

/ideo Mode

Playback Mode
Camera Mode
Taking Photos
It will display the photo number you have taken on the top right of the LCD screen. When the memory is full, the LCD screen will display a message "Memory Full"
Digital Zoom function
Use the T and W buttons to adjust the zoom. The icon x1.7 will show on your LCD screen. Press the T button to zoom in on your subject. Push the W button to zoom back out.
Macro / Lanscape shooting
Slide the Macro/Lanscape switch, and the inon / will appear on the right side of the camera,
Flash
Press the Up button to switch of ⚠ automatic flash / ⏰ forced on(manual flash) / ⏱ red eye reduction / ⏲ flash off.
Self-Timer :
- Press Down button repeatedly to select 🎨 or 🌐 or 📞 seconds self timer or 🏠 3 pictures continuous shooting.
- Press the shutter button to start a 2 /5/10 seconds or 3 pictures continuous shooting to count down, and the photo will automatically be taken.
Delete :
- Press Right button to delete photos.
- After selection, press OK button to confirm OK or Cancel.

text_image
This Image All Cancel
text_image
Delete This Image? Cancel OKMenu:
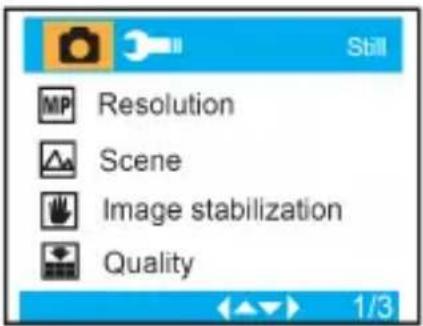
Press Menu button to enter into setting, and press Up/Down button to select Resolution, Scene, Image stabilization, Quality, Sharpness, Exposure, White Balance, ISO, and Face Detection.
text_image
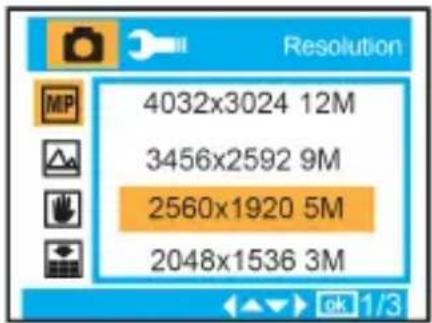
Still MP Resolution Scene Image stabilization Quality 1/3Resolution : MP
12M, 9M, 5M, 3M, 1.3M, VGA
text_image
Resolution 4032x3024 12M 3456x2592 9M 2560x1920 5M 2048x1536 3MScene :

Auto, Scenery, Night Scene, Portrait, Night Portrait, Sports, Party, Beach, High Sensitivity, Underwater.
Image Stabilization : On/Off

Quality :

Super Fine, Fine, Normal
Sharpness :

Strong, Normal, Soft
Exposure :

-3, -2, -1, 0, +1, +2, +3

text_image
Scene Auto Beach Scenery Night Scene
text_image
Image stabilizatio On Off
text_image
Quality Super Fine Fine Normal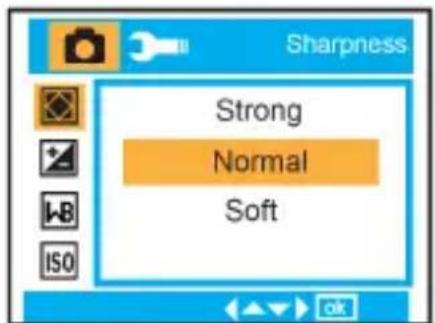
text_image
Sharpness Strong Normal Soft
text_image
Exposure +3 +2 +1 0White Balance : WB Auto, Daylight, Cloudy, Tungsten, Fluorescent
ISO : ISO Auto/ 100/ 200/ 400
Face Detection : On/Off
Video Mode:
Under Video mode, please press Menu button to enter into setting, and press Up/Down button to select Resolution, White Balance, and Exposure.
Resolution: VGA, QVGA

text_image
White Balance Auto Daylight Cloudy Tungsten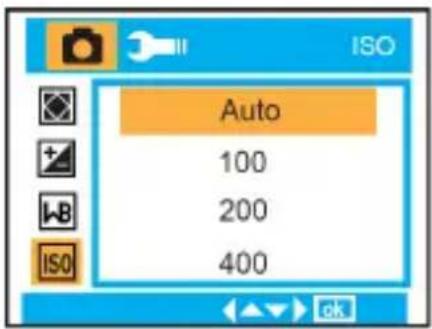
text_image
Auto 100 200 400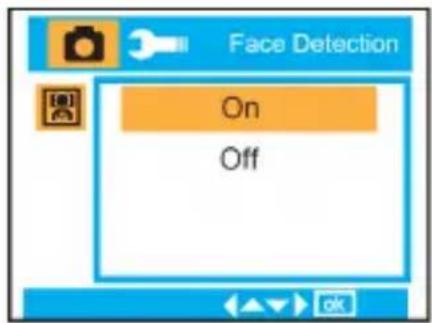
text_image
Face Detection On Off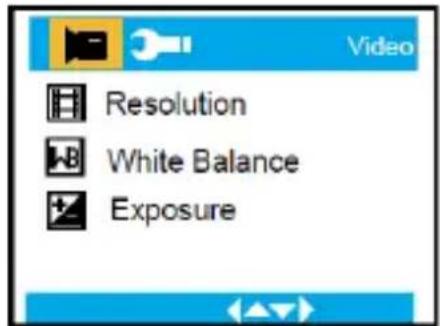
text_image
Video Resolution White Balance Exposure
text_image
Resolution 640x480 VGA 320x240 QVGAWhite Balance : WB
Auto, Daylight, Cloudy, Tungsten, Fluorescent.
Exposure :
t -3, -2, -1, 0, +1, +2, +3
Playback Mode
Under Camera mode, please press MODE button twice quickly to enter into Playback Mode.
Press W button to enter into Photo Mode, and press Up/Down/ Left/ Right button to select the photo you would like to view. After selection, please press OK button to view the photo.
You can press T Button to zoom in the photo, and press Up/Down/ Left/ Right button to adjust the viewing angle.
In playback mode, please press MENU button to enter into Playback setting. There are Delete, Protect, Rotate, Crop, Slide Show, and Pictbridge.
text_image
White Balance Auto Daylight Cloudy Tungsten
text_image
Exposure +3 +2 +1 0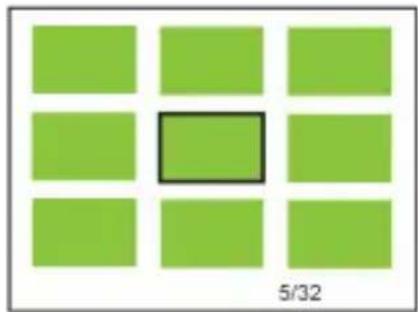
natural_image
Grid of nine green squares with one highlighted in black (no text or symbols)
natural_image
Green background with a small red square containing a white rectangle and a horizontal bar labeled 'W' and 'T' (no text or symbols beyond the labels)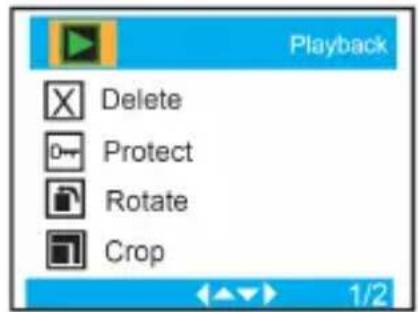
text_image
Playback Delete Protect Rotate Crop 1/2Camera Setup
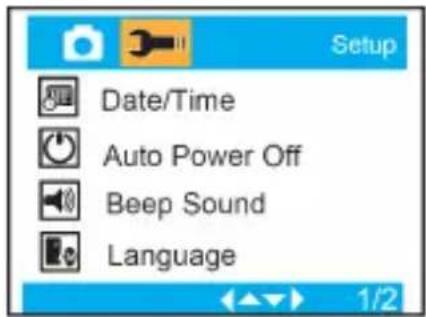
Under Camera or Video Mode, please press MENU button, and then press Right button to enter into setup. Press Up/Down button to select Date/Time, Auto power off, Beep sound, Language, Date Stamp, Frequency, Format, and Default Setting.
Date/Time :

Auto power off :

60 Seconds, 120 Seconds, 180 Seconds, Off
Beep sound :

On/Off
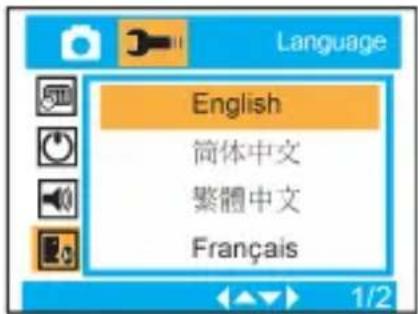
Language :

English, Deutsch, Français, Español, Italiano, Português, 日本語, 簡体中文, 繁體中文, Русский
text_image
Setup Date/Time Auto Power Off Beep Sound Language
text_image
2012 01 01 15:47:10 YY MM DD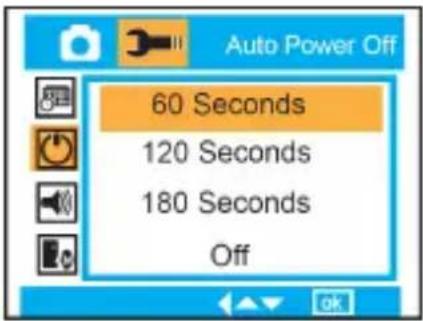
text_image
Auto Power Off 60 Seconds 120 Seconds 180 Seconds Off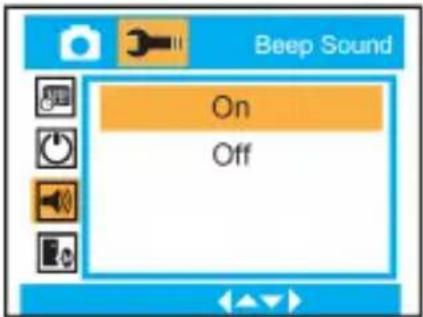
text_image
Beep Sound On Off
text_image
Language English 简体中文 繁體中文 FrançaisDate Stamp : Date/Time, Date, or off.
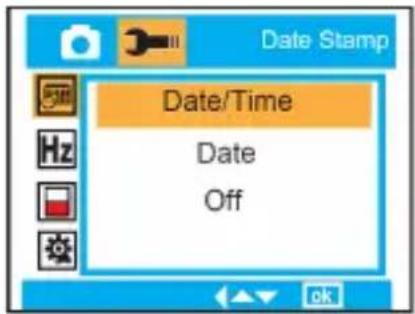
text_image
Date/Time Date OffFrequency : Hz 50 Hz or 60 Hz.
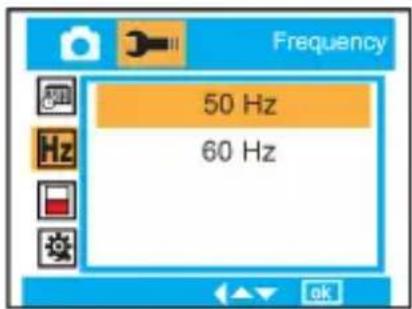
text_image
Frequency 50 Hz 60 HzFormat : Internal Memory or SD Card.

text_image
Internal Memory SD Card
text_image
Format Format Cancel OKDefault Setting : Cancel/ OK
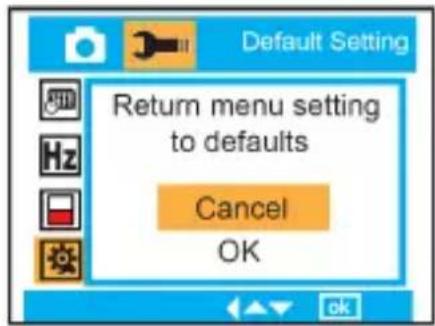
text_image
Default Setting Return menu setting to defaults Cancel OKMaintenance of Your Digital Camera
The digital camera is a delicate device. Please handle your camera with care to avoid any damage
Appendix A: Technical Specifications
| Image Sensor | 5 Mega Pixels CMOS Sensor | |
| Image Resolution | 4032X3024Pixels (12M by interpolation), 3456X2592Pixels (9M by interpolation), 2560X1920Pixels (5M), 2048X1536Pixels (3M), 1280X960Pixels (1.3M), 640X480Pixels (VGA) | |
| Video Resolution | 640x480 Pixels (VGA), 320x240 Pixels (QVGA) | |
| File Format | Image | JPEG |
| Movie | AVI | |
| PC CAM | Yes | |
| External Memory | Micro SD card supports upto 32GB | |
| LCD Display | 2.7 " TFT LCD | |
| Lens | f=8.15mm, F3.0 | |
| Zoom | 8X digital zoom | |
| Exposure | -3, -2, -1, 0, +1, +2, +3 | |
| Scene | Auto, Scenery, Night Scene, Portrait, Night Portrait, Sports, Party, Beach, High Sensitivity, Underwater | |
| White Balance | Auto, Daylight, Cloudy, Tungsten, Fluorescent | |
| ISO | Auto, 100, 200, 400 | |
| Flash | Auto, Force on, Force off, Red-eye reduction | |
| Self-timer | 2, 5, or 10 sec or 3 continuous shooting | |
| Face Detection | Yes | |
| Image stabilization | Yes | |
| Pictbridge | Yes | |
| Interface | USB 2.0 High speed | |
| System Requirements | Window 2000/XP/ Vista/Win7, Mac OS X (10.2.6 or higher) | |
| Battery | Lithium-ion Battery | |
| Working Temperature | -10~40 °C | |
Before using your camera in the water please verify that all lids and locks are tightly closed and sealed.
After using the camera in water please let it dry.
The camera should not be exposed to high temperatures and humidity differences to avoid condensation behind the lens.
Open the battery compartment only when the camera is dry.
HOW TO OPEN THE BATTERY COMPARTMENT OF THE CAMERA
Push the release lever toward the rear of the camera.
At the same time place your fingernail under the cover in the middle of the camera and slide the compartment to the outside.
The battery compartment cover can now be hinged upward.
DECLARATION OF CONFORMITY
easypix hereby declares that the product W510 is in conformity to all
the essential requirements of Directive 1999/5/EC. The declaration of conformity can be
downloaded here:
http://www.easypix.info/download/pdf/doc_w510_neon_easypix_gmbh.pdf
For technical help please visit our support area on www.easypix.eu.

text_image
easypix®LIFESTYLE ELECTRONICS

Only EU
aquapix®
w510 neon
natural_image
Technical line drawing of a digital camera module with mounting holes and a central lens (no text or symbols)Índice
Introducción....1
Características Claves ....1
natural_image
Technical line drawing of a vehicle chassis with no visible text or symbolsnatural_image
Technical line drawing of a mechanical device with internal components and directional arrow (no text or symbols)natural_image
Technical line drawing of a digital camera module with internal compartments and external panel (no text or symbols)Dirección de pila
Tapa de pila :
natural_image
Line drawing of a portable electronic device with cable and connector (no text or symbols)natural_image
Line drawing of a device with plug, socket, and power outlet connected by cable (no text or symbols)text_image
This Image All Cancel
text_image
Delete This Image? Cancel OKMenú:
text_image
MP Resolution Scene Image stabilization Quality 1/3
text_image
Resolution 4032x3024 12M 3456x2592 9M 2560x1920 5M 2048x1536 3MEscena :

text_image
Scene Auto Beach Scenery Night Scene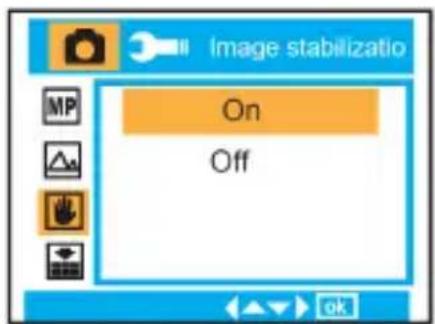
text_image
Image stabilizatio On Off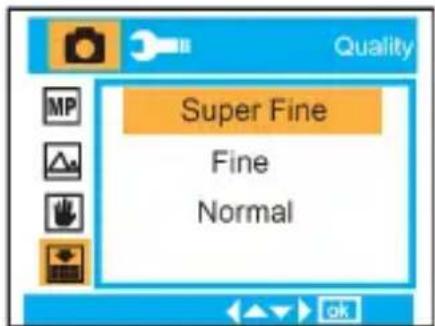
text_image
Quality Super Fine Fine Normal
text_image
Sharpness Strong Normal Soft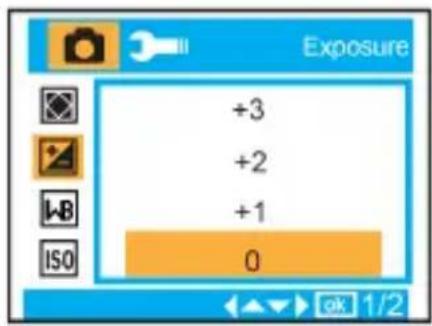
text_image
Exposure +3 +2 +1 0text_image
Video Resolution White Balance Exposure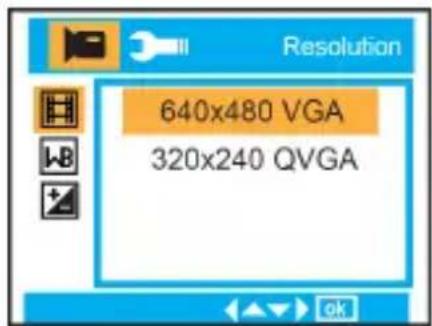
text_image
Resolution 640x480 VGA 320x240 QVGAtext_image
Exposure +3 +2 +1 0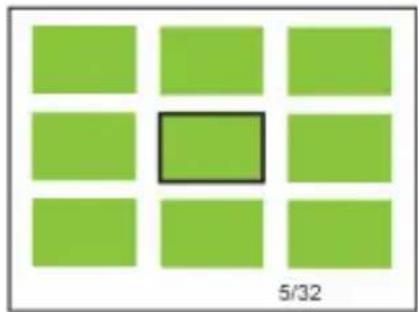
natural_image
Grid of nine green squares with one highlighted in black (no text or symbols)
natural_image
Green background with a small red square containing a white rectangle and a horizontal bar labeled 'W' and 'T' (no text or symbols beyond the labels)
text_image
Playback Delete Protect Rotate Crop 1/2text_image
Frequency 50 Hz 60 HzFormateo :

Memoria Interna o tarjeta SD.

text_image
Internal Memory SD Card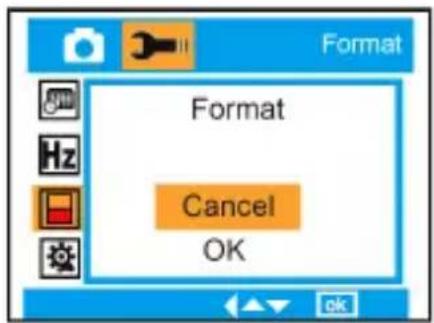
text_image
Format Format Cancel OKConfiguración predefinida : Cancelar/ OK


text_image
Default Setting Return menu setting to defaults Cancel OKFor technical help please visit our support area on www.easypix.eu.

text_image
easypix®LIFESTYLE ELECTRONICS


aquapix® W510 neon
Mode d'emploi

natural_image
Technical line drawing of a digital camera module with mounting holes and a central lens (no text or symbols)Table des matières
Présentation....1
natural_image
Technical line drawing of a battery pack assembly (no text or symbols)natural_image
Technical line drawing of a vehicle's internal components, showing engine, air intake, and fan assembly (no text or labels)natural_image
Technical line drawing of a digital camera module with internal compartments and external casing (no text or symbols)natural_image
Line drawing of a device with cable and connector, no text or symbols presentnatural_image
Line drawing of a device with plug, cable, and socket (no text or symbols)text_image
This Image All Cancel
text_image
Delete This Image? Cancel OKMenu :
text_image
Resolution Scene Image stabilization QualityRésolution : MP 12M, 9M, 5M, 3M, 1.3M, VGA
Scène :

text_image
Scene Auto Beach Scenery Night Scene
text_image
Image stabilizatio On Off
text_image
Quality Super Fine Fine Normal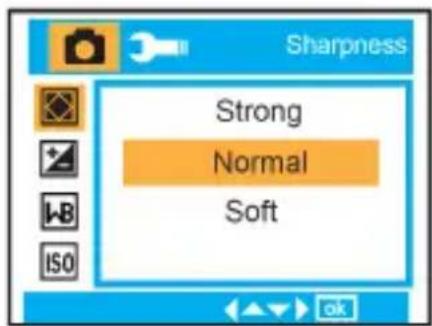
text_image
Sharpness Strong Normal SoftExposition : -3, -2, -1, 0, +1, +2, +3
text_image
+3 +2 +1 0
text_image
White Balance Auto Daylight Cloudy Tungsten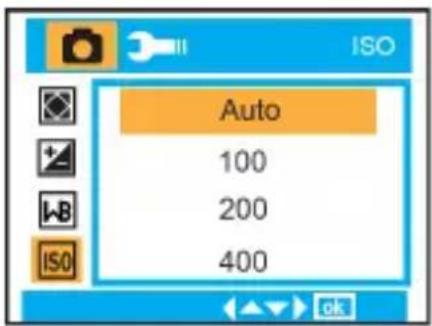
text_image
Auto 100 200 400
text_image
Face Detection On Off
text_image
Video Resolution White Balance ExposureRésolution :

VGA, QVGA
text_image
Exposure +3 +2 +1 0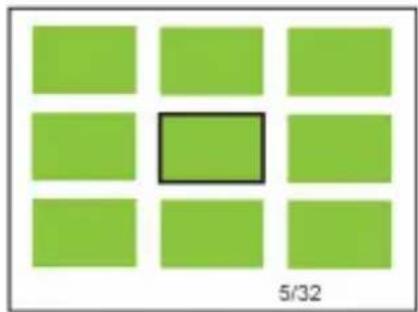
natural_image
Grid of nine green squares with one highlighted in black (no text or symbols)
natural_image
Green background with a small red square containing a white rectangle and a horizontal bar labeled 'W' and 'T' (no text or symbols beyond the labels)text_image
Playback Delete Protect Rotate Crop 1/2
text_image
Setup Date/Time Auto Power Off Beep Sound Language
text_image
Internal Memory SD Cardtext_image
Frequency 50 Hz 60 Hz
text_image
Format Format Cancel OK
text_image
Default Setting Return menu setting to defaults Cancel OKFor technical help please visit our support area on www.easypix.eu.

text_image
easypix®LIFESTYLE ELECTRONICS


aquapix®
w510 neon
natural_image
Technical line drawing of a digital camera module with mounting holes and a central lens (no text or symbols)Indice
Introduzione .... 1
Caratteristiche principali....1
natural_image
Technical line drawing of a mechanical device with internal components and directional arrow (no text or symbols)natural_image
Technical line drawing of a digital camera module with internal components and an open panel (no text or symbols)Direzione batteria
Coperchio batteria:
natural_image
Line drawing of a portable electronic device connected to a cable, showing internal components and wiring (no text or symbols)natural_image
Line drawing of a device with plug, cable, and socket (no text or symbols)text_image
This Image All Cancel
text_image
Delete This Image? Cancel OKMenu:
text_image
Resolution Scene Image stabilization Quality 1/3Risoluzione : MPI
12M, 9M, 5M, 3M, 1.3M, VGA
Scena :
text_image
Scene Auto Beach Scenery Night Scene
text_image
Image stabilizatio On Off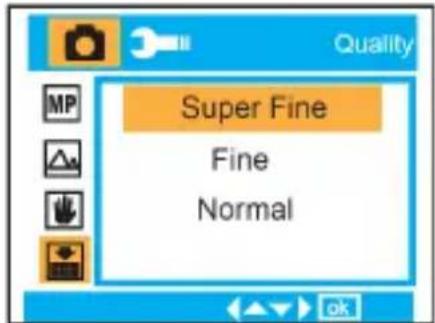
text_image
Quality Super Fine Fine Normal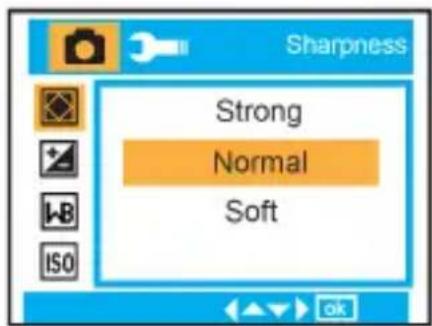
text_image
Sharpness Strong Normal SoftEsposizione : -3, -2, -1, 0, +1, +2, +3
Bilanciamento Bianco : Auto, Luce diurna, Nuvoloso, Tungsteno, Fluorescente
ISO : ISO Auto/ 100/ 200/ 400
text_image
Exposure +3 +2 +1 0
text_image
White Balance Auto Daylight Cloudy Tungsten
text_image
Auto 100 200 400
text_image
Face Detection On Off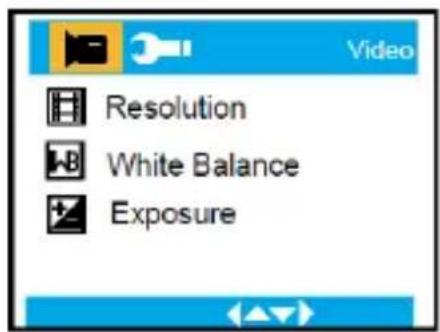
text_image
Video Resolution White Balance ExposureRisoluzione:

VGA, QVGA
Bilanciamento Bianco :

Auto, Luce diurna, Nuvoloso, Tungsteno, Fluorescente.
Esposizione :

t -3, -2, -1, 0, +1, +2, +3
text_image
Exposure +3 +2 +1 0
natural_image
Grid of nine green squares with one highlighted in black (no text or symbols)
natural_image
Green background with a small red square containing a black border and a horizontal bar labeled 'W' and 'T' (no text or symbols beyond the labels)text_image
Playback Delete Protect Rotate Crop 1/2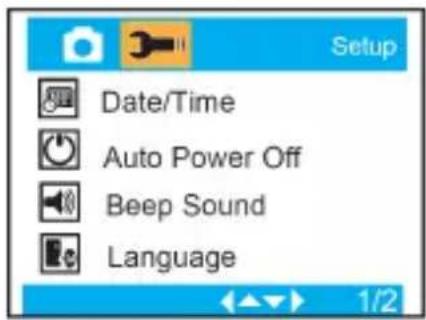
text_image
Setup Date/Time Auto Power Off Beep Sound Language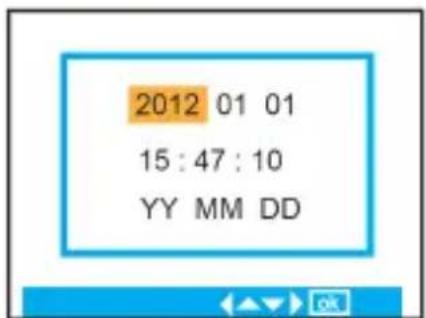
Data/Orario, Data o off.
Frequenza :

50 Hz o 60 Hz.
Formato :

Memoria interna o Scheda SD.

text_image
Internal Memory SD Cardtext_image
Frequency 50 Hz 60 Hz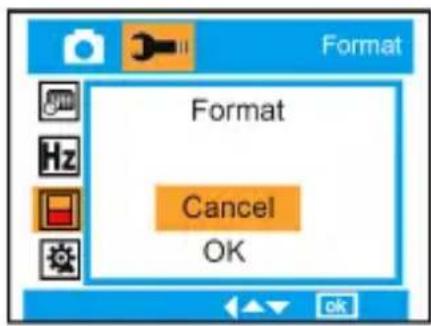
text_image
Format Format Cancel OK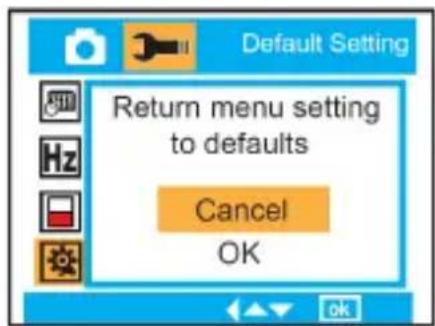
text_image
Default Setting Return menu setting to defaults Cancel OKFor technical help please visit our support area on www.easypix.eu.

text_image
easypix®LIFESTYLE ELECTRONICS


aquapix®
w510 neon
Gebruikshandleiding
natural_image
Technical line drawing of a digital camera module with mounting holes and a central lens (no text or symbols)Inhoudsopgave
Inleiding....1
Camera Gegevens 1
natural_image
Technical line drawing of a mechanical device with internal components and a directional arrow (no text or symbols)natural_image
Technical line drawing of a digital camera module with internal components and an external panel (no text or symbols)natural_image
Line drawing of a portable electronic device connected to a cable with an attached plug (no text or symbols)<2> Via de lichtnetadapter (optioneel):

natural_image
Line drawing of a device with plug, socket, and power outlet connected by cable (no text or symbols)text_image
This Image All Cancel
text_image
Delete This Image? Cancel OKMenu:
text_image
MP Resolution Scene Image stabilization Quality 1/3Resolutie : MP 12M, 9M, 5M, 3M, 1.3M, VGA
Beeldstand :
Automatisch, Landschap, Nachtlandschap, Portret, Nacht Portret, Sport, Feest, Strand, Hoge Gevoeligheid, Onder Water.
text_image
Scene Auto Beach Scenery Night Scene
text_image
Image stabilizatio On Off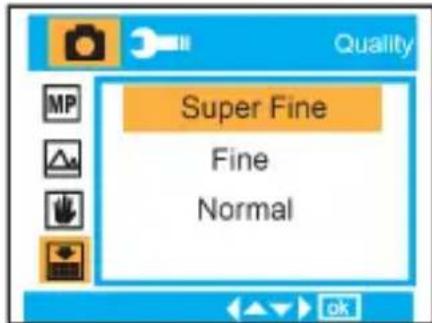
text_image
Quality Super Fine Fine Normal
text_image
Sharpness Strong Normal SoftBelichting : -3, -2, -1, 0, +1, +2, +3
text_image
+3 +2 +1 0
text_image
White Balance Auto Daylight Cloudy Tungsten
text_image
Auto 100 200 400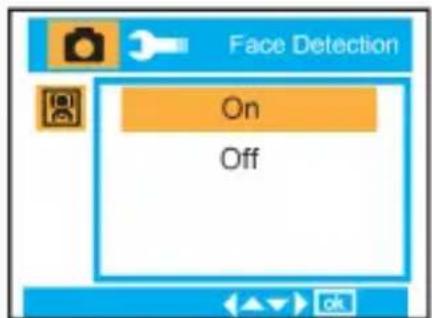
text_image
Face Detection On Off
text_image
Video Resolution White Balance ExposureResolutie:

VGA, QVGA
Witbalans :

text_image
Exposure +3 +2 +1 0
natural_image
Grid of nine green squares with one highlighted in black (no text or symbols)
natural_image
Green background with a small red square containing a white rectangle and a horizontal bar labeled 'W' and 'T' (no text or symbols beyond the labels)text_image
Playback Delete Protect Rotate Crop 1/2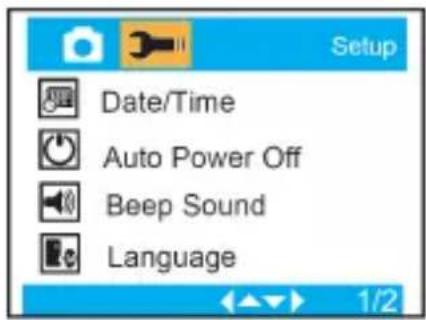
text_image
Setup Date/Time Auto Power Off Beep Sound Language
text_image
Internal Memory SD CardStandaard Instellingen :
Annuleren / OK

text_image
Language English 简体中文 繁體中文 Français
text_image
Date/Time Date Off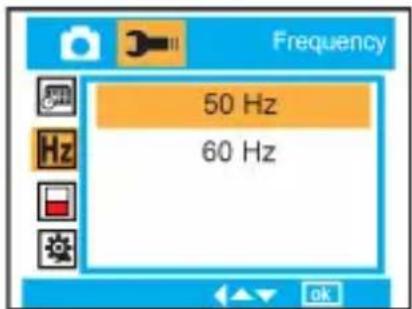
text_image
Frequency 50 Hz 60 Hz
text_image
Format Format Cancel OK
text_image
Default Setting Return menu setting to defaults Cancel OKBefore using your camera in the water please verify that all lids and locks are tightly closed and sealed.
After using the camera in water please let it dry.
The camera should not be exposed to high temperatures and humidity differences to avoid condensation behind the lens.
Open the battery compartment only when the camera is dry.
HOW TO OPEN THE BATTERY COMPARTMENT OF THE CAMERA
Push the release lever toward the rear of the camera.
At the same time place your fingernail under the cover in the middle of the camera and slide the compartment to the outside.
The battery compartment cover can now be hinged upward.
DECLARATION OF CONFORMITY
easypix hereby declares that the product W510 is in conformity to all
the essential requirements of Directive 1999/5/EC. The declaration of conformity can be downloaded here:
http://www.easypix.info/download/pdf/doc_w510_neon_easypix_gmbh.pdf
For technical help please visit our support area on www.easypix.eu.

text_image
easypix®LIFESTYLE ELECTRONICS


aquapix®
w510 neon
natural_image
Technical line drawing of a digital camera module (no text or symbols)Spis treści
Wprowadzenie....1
Kluczowe Cechy 1
natural_image
Technical line drawing of a vehicle chassis with battery compartment, no visible text or symbolsnatural_image
Technical line drawing of a mechanical device with internal components and a directional arrow indicating motion (no text or symbols)natural_image
Technical line drawing of a device casing with internal compartments and external components (no text or symbols)Kierunek baterii
Pokrywa baterii:
natural_image
Line drawing of a device with cable and connector, no text or symbols presentnatural_image
Line drawing of a device with plug, socket, and power outlet connected by cable (no text or symbols)text_image
This Image All Cancel
text_image
Delete This Image? Cancel OKMenu:
text_image
Resolution Scene Image stabilization Quality 1/3Rozdzielczość : MP
12M, 9M, 5M, 3M, 1.3M, VGA
Programy :
text_image
Scene Auto Beach Scenery Night Scene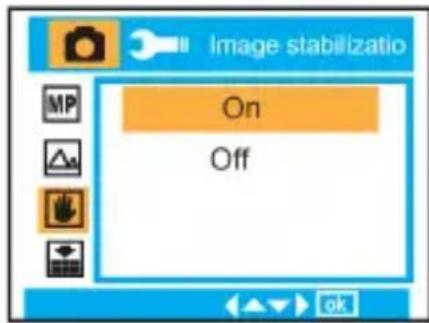
text_image
Image stabilizatio On Off
text_image
Quality Super Fine Fine Normal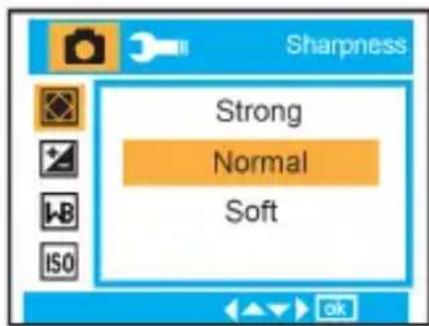
text_image
Sharpness Strong Normal Softtext_image
+3 +2 +1 0
text_image
White Balance Auto Daylight Cloudy Tungsten
text_image
Auto 100 200 400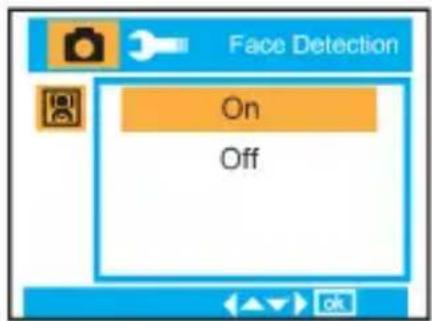
text_image
Face Detection On Off
text_image
Video Resolution White Balance ExposureRozdzielczość:

VGA, QVGA
Balans Bieli :

text_image
Exposure +3 +2 +1 0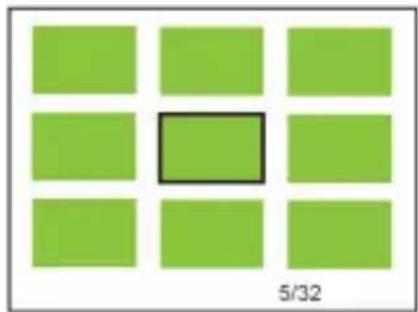
natural_image
Grid of nine green squares with one highlighted in black (no text or symbols)
natural_image
Green background with a small red square containing a black border and a horizontal bar labeled 'W' and 'T' at the bottom (no text or symbols beyond these labels)text_image
Playback Delete Protect Rotate Crop 1/2
text_image
Setup Date/Time Auto Power Off Beep Sound Language
text_image
Internal Memory SD Cardtext_image
Frequency 50 Hz 60 Hz
text_image
Format Format Cancel OK
text_image
Default Setting Return menu setting to defaults Cancel OKFor technical help please visit our support area on www.easypix.eu.

text_image
easypix®LIFESTYLE ELECTRONICS


aquapix®
w510 neon
natural_image
Technical line drawing of a digital camera module with mounting holes and a central lens (no text or symbols)Índice
Introdução ....1
natural_image
Technical line drawing of a mechanical device with internal components and directional arrows (no text or symbols)natural_image
Technical line drawing of a device casing with internal compartments and an open panel showing directional arrows (no text or symbols)Direção da bateria
Tampa da bateria:
natural_image
Line drawing of a portable electronic device with cable and connector (no text or symbols)natural_image
Line drawing of a device with plug, cable, and socket (no text or symbols)text_image
This Image All Cancel
text_image
Delete This Image? Cancel OKMenu:
text_image
Resolution Scene Image stabilization Quality 1/3Resolução: MP
12M, 9M, 5M, 3M, 1.3M, VGA
Cena:
text_image
Scene Auto Beach Scenery Night Scene
text_image
Image stabilizatio On Off
text_image
Quality Super Fine Fine Normal
text_image
Sharpness Strong Normal SoftExposição:

-3, -2, -1, 0, +1, +2, +3
Balanço de branco:

text_image
+3 +2 +1 0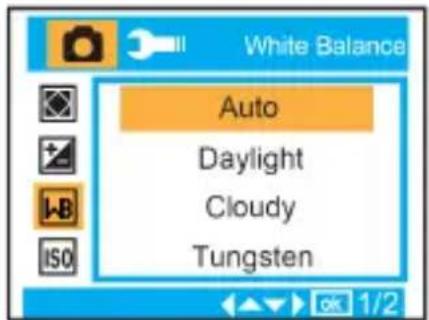
text_image
White Balance Auto Daylight Cloudy Tungsten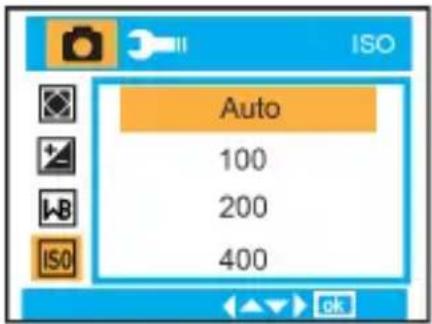
text_image
Auto 100 200 400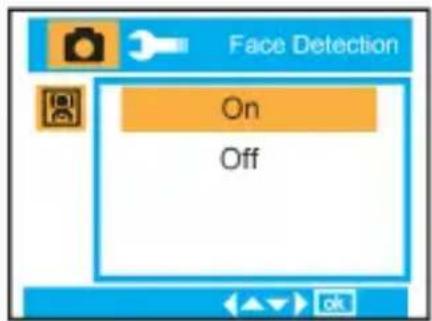
text_image
Face Detection On Off
text_image
Video Resolution White Balance ExposureResolução:

VGA, QVGA
Balanço de branco:

text_image
Exposure +3 +2 +1 0
natural_image
Grid of nine green squares with one highlighted in black (no text or symbols)
natural_image
Green background with a small red square containing a white rectangle and a horizontal black bar labeled 'W' and 'T' (no text or symbols beyond the labels)text_image
Playback Delete Protect Rotate Crop 1/2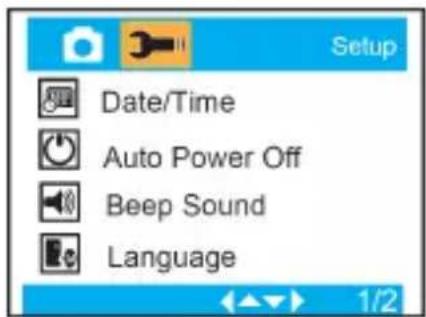
text_image
Setup Date/Time Auto Power Off Beep Sound Language
text_image
Internal Memory SD Cardtext_image
Frequency 50 Hz 60 Hz
text_image
Format Format Cancel OK
text_image
Default Setting Return menu setting to defaults Cancel OKBefore using your camera in the water please verify that all lids and locks are tightly closed and sealed.
After using the camera in water please let it dry.
The camera should not be exposed to high temperatures and humidity differences to avoid condensation behind the lens.
Open the battery compartment only when the camera is dry.
HOW TO OPEN THE BATTERY COMPARTMENT OF THE CAMERA
Push the release lever toward the rear of the camera.
At the same time place your fingernail under the cover in the middle of the camera and slide the compartment to the outside.
The battery compartment cover can now be hinged upward.
DECLARATION OF CONFORMITY
easypix hereby declares that the product W510 is in conformity to all
the essential requirements of Directive 1999/5/EC. The declaration of conformity can be downloaded here:
http://www.easypix.info/download/pdf/doc_w510_neon_easypix_gmbh.pdf
For technical help please visit our support area on www.easypix.eu.

text_image
easypix®LIFESTYLE ELECTRONICS