
S328 - Camera EASYPIX - Free user manual and instructions
Find the device manual for free S328 EASYPIX in PDF.
| Product type | Digital camera |
| Image resolution | Up to 5 Megapixels by interpolation (2592x1944) |
| Sensor | CMOS |
| Lens | f=7.23 mm, F2.8 |
| Internal memory | 8 MB SD RAM (for test photo) |
| External memory | SD/MMC card up to 8 GB (not included) |
| Display | 1.8" TFT color LCD |
| Power supply | 2 AAA batteries (not included) |
| Flash | Auto, forced, red-eye reduction, off |
| Digital zoom | 4x |
| Self-timer | 10 seconds |
| Video mode | AVI format (requires SD card) |
| Anti-shake function | Yes |
| Transmission interface | USB 1.1 |
| Included software | PhoTags Express, PC Cam driver |
| Compatible operating system | Windows 2000/XP/Vista, Mac OS X 10.2.6+ |
| Included accessories | Wrist strap, USB cable, software CD, user manual |
| Care and cleaning | Clean with a soft, dry cloth. Remove batteries if not used for extended periods. |
| Spare parts and repairability | SD memory card, AAA batteries. No user repairs. |
Frequently Asked Questions - S328 EASYPIX
User questions about S328 EASYPIX
0 question about this device. Answer the ones you know or ask your own.
Ask a new question about this device
Download the instructions for your Camera in PDF format for free! Find your manual S328 - EASYPIX and take your electronic device back in hand. On this page are published all the documents necessary for the use of your device. S328 by EASYPIX.
USER MANUAL S328 EASYPIX
English Manual.....P2
German Manual.....P14
French Manual.....P28
Spanish Manual.....P41
Portuguese Manual.....P54
Italian Manual.....P67
INSTRUCTION MANUAL
Table of Content
Table of Content 2
Introduction ....3
Key Features....3
What your camera includes....3
Computer System Requirements for Windows 2000/XP ....3
Computer System Requirements for Windows Vista ....3
Computer System Requirements for Macintosh ....3
A Quick Look at Your Camera....4
Preparing Your Camera for Use 4
Installing SD Memory Card ....5
Starting Your Camera....5
Camera Mode 5
Taking photos....5
Video Mode 7
Playback Mode....7
Installing PhoTags Express Software....8
Everything you need to get the most from your photos....9
Transferring photos to your PC 10
PhoTags Express software owner manual....12
Run the PCCAM software....12
Appendix : Specifications .... 13
Introduction
Thanks for purchasing this Digital Camera. You can not only take good quality digital photos, but also can use it as a removable disk. For more quality and function setting, please read this manual carefully before using.
Key Features
Digital Image Resolution- 5M by the interpolation (2592x1944pixels 4:3), 3M
(2048x1536pixels 4:3), 2M (1920x1080pixels 16:9), VGA (640x480pixels 4:3)
➢ SD RAM 8MB, support SD/MMC memory card (not included) up to 8GB.
4.5cm / 1.8" TFT Color LCD
➢ PhoTags Express software for managing and enhancing your photos, add captions, send E-mail, printing and much more.
What your camera includes
Digital Camera
➢ PhoTags Express software Installation CD
USB cable
User's manual
Strap
Computer System Requirements for Windows 2000/XP
To be able to download photos to your PC, you will need the following minimum configuration:
➢ Pentium process or above with windows 2000, XP
➢ 64 MB RAM, more than 250MB free disk space
➢ Available USB interface
CD-ROM Drive
➢ Recommended screen resolution 24 bit or higher
256 color or higher display adaptor
Computer System Requirements for Windows Vista
To be able to download photos to your PC your will need the following minimum configuration:
Windows Vista
➢ 800MHz processor and 512 MB of system memory
➢ 20GB hard driver with at least 15GB of available space
➢ Support for Super VGA graphics
Available USB Interface
CD-ROM drive
Computer System Requirements for Macintosh
Power Macintosh G3 500 MHz or higher
▶ Mac OS X version 10.2.6 or later
➢ 128 MB or more available system RAM (256 MB recommended), 150 MB free disk space
800 x 600 or higher-resolution monitor displaying millions of colors
Note: This hardware is plug and play compatible when used on a Mac, however, the included software can be used on Windows operating systems only.
A Quick Look at Your Camera

Preparing Your Camera for Use
Battery Installation
Your camera requires 2 AAA batteries. Insert the battery into the camera as following description:
- Slide and open the battery compartment.
- Please make sure that the correct battery is inserted with the correct polarity facing up.
- Close battery door.
When the "No Power" is displaying on the LCD, it indicates your camera has insufficient battery lever and it will be off, you need to download photos to your PC if there is no SD card inserted in.

natural_image
Line drawing of a digital camera module with battery and charging cable (no text or symbols)Note: 1. if you don't intend to use your camera for an extended period, please remove the batteries to avoid battery leakage and corrosion.
- Please don't remove the battery away or power off your camera at will, otherwise the test photo in your Digital Camera will be lost if without SD memory card, so please download your test photo to PC as soon as possible.
- Do not mix old and new batteries.
- Do not mix alkaline, standard (carbon-zinc), or rechargeable (nickel-cadmium metal hydride) batteries.
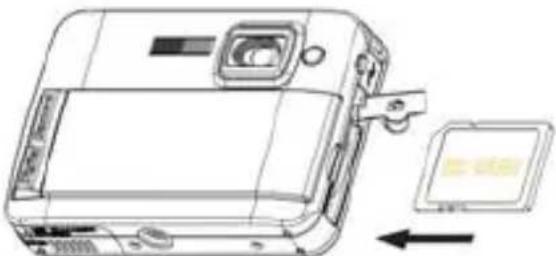
Installing SD Memory Card
Your camera has a memory card slot that enables you to insert any "SD" compatible memory card. Adding a memory card will allow you to increase the capacity of your camera before you have to transfer photos to PC. Installing the SD memory card as below:
- Locate the Memory Card slot.
- Insert the Memory card into the slot as correct direction. (look on the photos as below)
natural_image
Line drawing of a digital camera module with an attached clip and directional arrow (no text or symbols)-
Push the card in until you feel it "click" into position. The top of the card should be flushed with the surface of the camera. An icon will appear on the LCD screen after you turn on your camera.
-
Once an external memory card is inserted in the camera all the images taken will be stored on the external memory card.
Note:
- Limited internal memory is provided for test images. The image will be deleted when camera power is turned off. Please download the images before power off .SD memory card is required for normal use.
- An external memory card is required for normal use; your camera supports any compatible SD memory card.
- "Card inserted, change to SD card" will show on the screen when you inserted the card indicating that photos will be store in the SD memory card, reversely, "Card removed, change to internal memory" will appear on the LCD screen when you take out the card.
- If there are photos in the internal memory when you insert the card to your camera, "copy SDRAM file to your card, please wait..." will show on the screen.
- When you take out the SD memory card, "Card removed, change to Internal RAM" will be appeared on the LCD screen, now you can only take 1 test photo.
Starting Your Camera
Press and hold the Power button to turn on your camera, the LCD screen will be light up; This will confirm that your camera is on and ready for use.
Press and hold the Power button about 3 seconds to power off your camera.
Camera Mode
- Press Menu button.
- Press Right/Left button to select Mode.
- Press Shutter button.
- Press Right/Left button to select SINGLE
- Press Shutter button to confirm. Now you are in camera mode (default).
Taking photos
Power on your camera, the default mode is camera mode.
Hold the camera steady and compose your object with LCD screen. Press Shutter button, a moment later, one photo is taken.
Note: When the internal memory is full, the LCD screen will display Memory Full! Insert a SD Memory Card to Transfer and Take More Photos!' If you attempt to take videos when camera internal memory is full, the camera will beep continuously. Now please download test photo to your
computer as soon as possible or insert an SD memory card for taking more photos!
Flash
Your camera has a flash function enables you to take photos when the light condition is not good. Press Left button, until the icon ⚡A will appear on the LCD, the auto flash is turned on, press Left button until the icon ⚡ will show on the LCD, the red eye reduction function is on. Press Left button until you see icon ⚡ appear on the LCD screen the flash is forced on. Press Left button until the icon ⚡ display on the LCD, it means the flash function is turned off.
Note: "Low Power" will show on the LCD, if you change flash function when the battery power is insufficient. Now please reinstall new batteries for flash function.
Digital Zoom function
You can magnify your subject using the digital zoom. Use the T and W buttons to adjust the zoom up to 4X. Press the T button to zoom in on your subject. Push the W button to zoom back out.
Anti-shake function
Your Digital Camera has a function that prevents photos coming out blurry as a result of trembling or shaking when taking the photo. Because of this function, you are not required to use a tripod and take good quality photos. To set as below:
- Press Menu button.
- Press Right/Left button to select Anti-shake.
- Press Shutter button.
- Use Right/Left button to select:
"Yes" - to activate and turn the anti-shake on. Icon will show on the screen.
"No" - to exit or turn the anti-shake off. Icon will appear on the screen.
- Press Shutter button to confirm.
Change Image Resolution
The build-in memory allows you to take one 3.1 Mega-Pixel testing photo without SD memory card, inserted a SD memory card to get more image size selections.
- Press the Menu button.
- Press the Right/Left button to select the RESOLUTION option.
- Press the Shutter button.
-
Press the Right/Left button to select one of the following resolutions :
(5M) 2592x1944 pixels
(3M) 2048x1536 pixels
(2M) 1920x1080 pixels
(VGA) 640x480 pixels -
Press the Shutter button again to confirm your selection.
Note:
Different image resolutions will affect the photo quality. High resolution photos will be of better picture quality and therefore will take up more camera memory capacity than lower resolution photos.
Self Timer
You can include yourself in a photo by using this feature to delay the time between your pressing the shutter and when the photo is actually taken. It is recommended that you use a tripod when you use the self-timer.
- Press Menu button.
- Press Right/Left button to select MODE.
- Press Shutter button
-
Press Right/Left button to select SELF.
-
Press Shutter button again to confirm. A 📋 icon will appear on the left corner of the LCD.
-
Press Shutter button to take photos, your camera sound beeps and will count down 10 seconds until the photo is taken.
Video Mode
You can shoot movies in this mode. Before shooting, you need insert a SD card to expand camera capacity for shooting movies.
- Insert a compatible SD memory card.
- Power on your camera.
- Press Menu button.
- Press Right/Left button to select MODE.
- Press Shutter button.
- Press Right/Left button to select AVI.
- Press Shutter button again to confirm. A 🎨 icon will show on the left corner of the LCD.
- Press Shutter button to start shooting videos. The elapse time will show on the right bottom of the LCD and the LED indicator will keep flickering.
- Press Shutter button to stop and save it to AVI file.
Note :
- "Insert a SD memory Card" will be shown on the screen when you press the shutter button if without SD memory card inserted.
- You can playback the AVI file in your computer by using Quick time or Media Player.
Playback Mode
You can preview your photos in this mode.
- Power on your camera.
- Press Right button to enter Playback Mode. An icon ▶ will show on the left corner of the LCD. Press Shutter button to exit to the standby mode.
Note: "NO FILE" will show on the LCD when there is no photos/videos in your camera. You can press Shutter button to exit to the camera mode.
Preview photos
Press Right/Left button to select and view your photos/videos. "JPG" will show on the LCD if you selected a photo. "AVI" will appear on the LCD when you select an AVI file.
Delete photo/videos
- In playback mode, press Menu button.
- Press Right/Left button to select Delete.
- Press Shutter button.
- Press Right/Left button to select Delete one/Delete all.
- Press Shutter button again to confirm.
Format
This function will delete all of the files in your camera memory (internal memory or SD memory card, depends on the device selection), please take care using this function:
- Press Menu button.
- Press Right/Left button to select Format.
- Press Shutter button.
- Press Shutter button again to confirm your selection, "Format OK" will show on the LCD.
Print your photos
Your camera supports printing function that allows you to print photos in any time.
- Select a photo you want to print out by pressing Right/Left button.
- Press Menu button.
- Press Right/Left button to select Printer.
- Press Shutter button, "Please connect your DSC to printer" will appear on the LCD.
- Now you can connect your camera to any compatible printer for printing.
Play back AVI file
- Select an AVI file in your SD memory card by pressing Right/Left button.
- Press Menu button.
- Press Right/Left button to select Play.
- Press Shutter button to start playing.
- Press Shutter button again to stop playing.
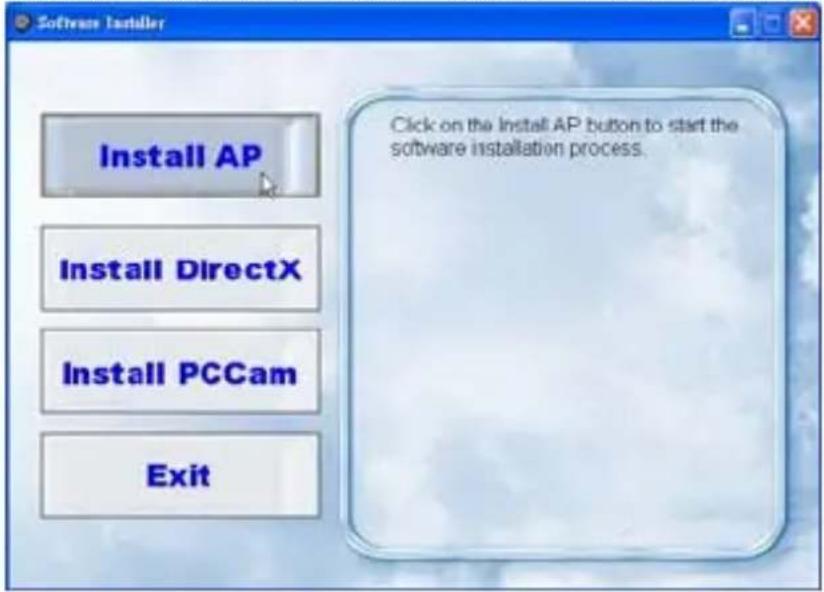
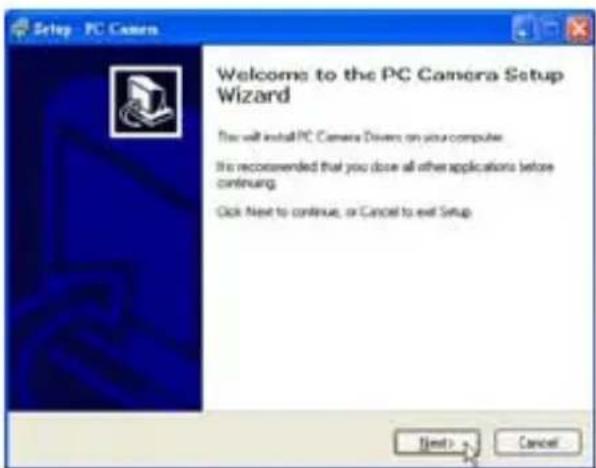
Installing PhoTags Express Software
NOTE: Make sure that your camera is not connected to the computer.
Insert software CD to your computer. After a few seconds, there will be shown an installing main window on the screen.
You can "install AP", "Install DirectX", "Install PC Cam", and "Exit" in this installing main window.
1. Install PhoTags Express
Click on the "Install AP" to start installing process. The language window will be shown on the screen and you can choose the language you want to use.

And then the installer window will be shown as below.
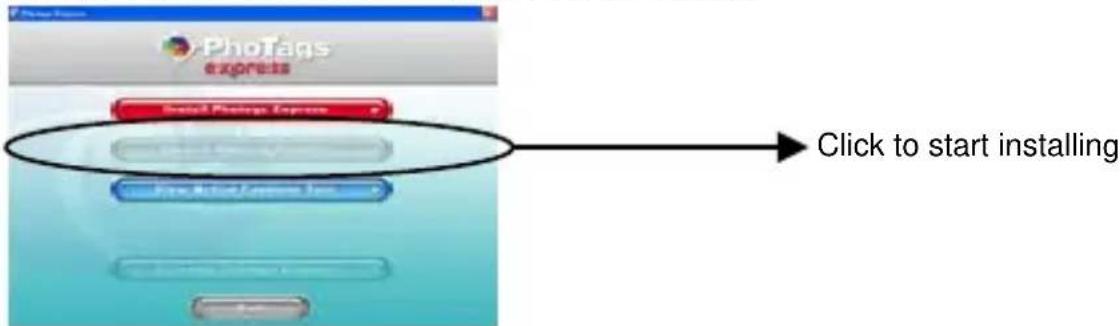
After you click "Install PhoTags Express" button, there will be showing some windows that help you to finish the installing. You are only required to follow the description and click the
buttons that it's defaulted by the software.
Register online
Click "Register online" button to have a registration. Or you can directly click "Continue" for registration next time.

After this step, the main window will appear on the screen.

2. Install DirectX
Click "Install DirectX" on the main window, the DirectX will be installed to your computer.
3. Install PCCam
Click "Install PCCam" on the main window, the PCCam software/driver will be installed to your computer.
Everything you need to get the most from your photos
1. Select photos
Select the photos that you download from your camera. And edit it in the software.
2. Edit photos
Click the "Enhance photos", "Add captions" from the main window to edit your ideal photos.
3. Share photos
Share your photos via "E-mail", "Printing", and "Create HTML web" to uploading online.

4. Workshop
Create "Calendars", two sides "Greeting cards" and "Postcards" on standard photo paper. You can purchase "Album" and "Video CD". Two additional workshop project online at any time and create Photo Album and slide shows on CD that can be viewed on your PC and VCD for viewing on your TV using your DVD player.
How to purchase additional "Workshop" projects
In addition to the free Calendars, two-sided Greeting Cards and Postcards Workshop projects
you have the ability to purchase two additional Workshop projects: "Albums" and "Video CD" online, at anytime.
- To purchase the "Workshop Project" simply click the one you wish to purchase and you will be referred to an online website where you can purchase them.
- Once you purchase the "Workshop projects" they will be automatically activated in the software.
Transferring photos to your PC
Turn on your camera, Change your camera mode to Playback and connect your camera to the computer correctly with USB cable, the screen will be shown a window (Removable Disk H:) as below:
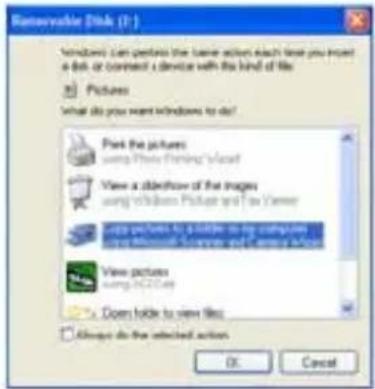
NOTE: Now you can download the photos to your computer with two methods as below:
1. Download photos directly from windows
Choose "copy pictures to a folder on my computer" on the Removable Disk (H:) window. After you click "OK", there will be shown some windows on the screen step by step, you are only required to follow the description and click the buttons that are defaulted by the system to finish transferring. Or you can:
- Click on the START button in Windows.
- Click on the MY COMPUTER Icon on the desktop.
- Your memory card will appear as a REMOVABLE STORAGE DEVICE.
- Click on the REMOVABLE STORAGE DEVICE to view the images. The mages are stored in the subfolder called DCM100.
- You can now copy and paste the images to any directory you choose.
2. Download photos using PhoTags Express
a. Double click the PhoTags Express icon on the desktop to launch the application.
b. Click the "Get Photos" button on the main window.
c. The Get Photos" wizard mode will appear on the screen, you can select "custom copy" to download photos with your individuation.
Or you can select "Express" option to download all photos to the computer without the option of selecting photos. In this mode you will not see a preview of the photos transferred.
Custom copy
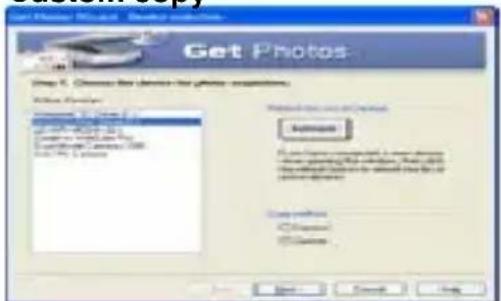
This mode is used to manually select the photos you wish to copy to your computer.
The “Device selection” mode will appear. Both your camera and the memory card will each appear in the “Active Devices” list. Select “Custom copy” click “Next” to continue.
Note: At this moment, you can select "Express" option to copy all photos to your computer in one time without any prompt.
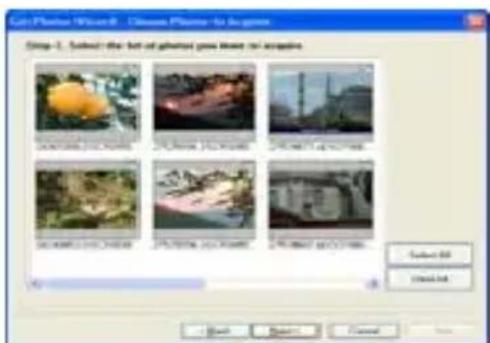
Select your photos click "Next" to continue.
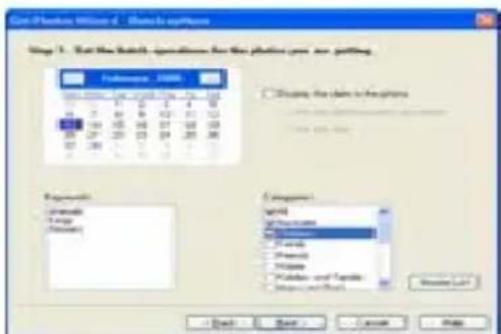
Add active captions to the picture. With this feature you can add a date, keywords and categories. Click "Next" to continue.
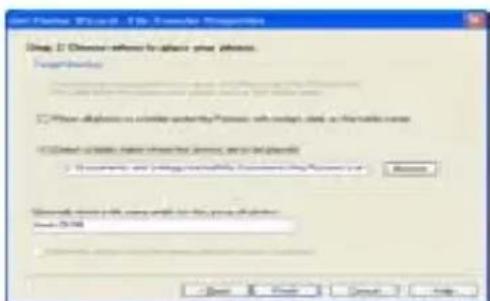
Choose a position where you want to place the photos. Click "Finish" to copy the photos to the location you selected.
Note:
All of the picture you imported will appear in the "Select Photos" main window. And now, you can edit your photos per your idea, and then download it to your computer. For how to edit the photos, you can refer to the Quick Start guide in the PhoTags Express.

PhoTags Express software owner manual
You can edit, printing, sharing photos with PhoTags Express. You can operate it as following step to know how to use PhoTags Express:
- Launch the PhoTags Express.
- Click "tour" button on the main window to view how to use the PhoTags Express in detail.

Click here
Attention:
If PhoTags Express can not promote the DirectX automatically, you can manually install the DirectX in the CD before using the Camera, otherwise, if the edition of DirectX in the windows operation is less than 8.1, then the AVI file can not be played.
Run the PCCAM software
- After the PC CAM software/driver is installed, press the shutter key and plug-in the USB cable, the Windows will show a "Digital Camera" device is installed to your system.
- Double click the PC Camera icon on the Windows desktop.
- PC Camera software will display as,
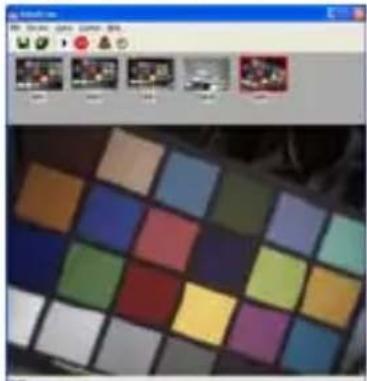
natural_image
Color palette grid with various square swatches, no visible text or symbols- They are 4 sections in the main window, (1) menu, (2) toolbar, (3) thumbnail of the captured image, (4) image playback
(1) Menu – including File, Preview, Option, Capture, Help menu
File menu:
Save Active Item – save the selected image to file.
Save All Items – save all the captured images to files
Set Capture File – select a file name which is used to save the captured video
Allocate File Space – preserved a disk space which is used to save the captured video
Exit – quit this program
Preview menu:
Start Preview – open a window and start the video preview
Stop Preview – stop the video preview, close the video window
Option menu:
Video Format - change video preview resolution, VGA (640x480) or QVGA (320x240)
Capture Frame – snap one or more video frames to image
Self Timer (3 seconds) – snap one or more video frames automatically after 3 seconds
Continuous shots – select one or 3 shots for each snap
Capture menu:
Start Capture – start capturing pc cam frames to the AVI file
Stop Capture – stop capturing AVI file
Capture Audio – select capturing audio data into AVI file or not
Help menu:
About -- display the software version.
(2) Toolbar – for some usual menu operations

(3) thumbnail of the captured images
used to store the captured images
(4) image playback
used to display the active image by clicking a image in thumbnail section
Appendix : Specifications
| Sensor | CMOS | sensor |
| Image resolution 5M, 3M, 2M, VGA | ||
| Lens | f=7.23mm, | F2.8 |
| Internal memory SD RAM 8MB | ||
| External memory Support SD card up to 8GB | ||
| Flash Auto/force on/red eye reduction/off | ||
| Self-timer | 10S | |
| Power saving 60S | ||
| Battery | 2*AAA batteries | |
| Transmission interface | USB V1.1 | |
| Working temperature | 0~40°C | |
| Computer system | Window 2000/XP/ Vista/ Mac OS X (10.2.6 or higher) | |
BENUTZERANLEITUNG
Inhalt
Einführung....15
natural_image
Line drawing of a digital camera module with battery and connector (no text or symbols)natural_image
Line drawing of a digital camera module with an attached flash unit (no text or symbols)1. Installation von PhoTags Express
Achtung:
natural_image
Color palette grid with various square swatches (no text or symbols visible)Mode Apparel photo 31
natural_image
Line drawing of a digital camera with attached battery and sensor (no text or symbols)natural_image
Line drawing of a digital camera module with an attached screen and cable, showing no text or symbols.1. Installer PhoTags Express
Attention:
natural_image
Color palette grid with various square swatches, no visible text or symbolsnatural_image
Line drawing of a digital camera with attached batteries and a display screen (no text or symbols)natural_image
Line drawing of a digital camera module with an attached clip and directional arrow (no text or symbols)1. Instalar PhoTags Express
MANUAL DE INSTRUÇÕES
Tabela de Conteúdo
Introdução ....55
PhoTags Express software owner manual....64
Execute o software PCCAM....65
natural_image
Line drawing of a digital camera with attached batteries and a camera (no text or symbols)natural_image
Line drawing of a digital camera module with an attached clip and directional arrow (no text or symbols)1. Instalar PhoTags Express
2. Download as fotos usando PhoTags Express
PhoTags Express software owner manual
Atenção:
natural_image
Color palette selection grid with various square swatches (no text or symbols visible)natural_image
Line drawing of a digital camera module with attached batteries and a close-up view (no text or symbols)natural_image
Line drawing of a digital camera module with an attached slot and cable, showing no text or symbols.1. Istalla PhoTags Express
Attenzione:
natural_image
Color palette grid with various square swatches (no text or symbols visible)

- INSTRUCTION MANUAL
- Table of Content
- Introduction
- Key Features
- What your camera includes
- Computer System Requirements for Windows 2000/XP
- Computer System Requirements for Windows Vista
- Computer System Requirements for Macintosh
- A Quick Look at Your Camera
- Preparing Your Camera for Use
- Battery Installation
- Installing SD Memory Card
- Note:
- Starting Your Camera
- Camera Mode
- Taking photos
- Flash
- Digital Zoom function
- Anti-shake function
- Change Image Resolution
- Self Timer
- Video Mode
- Note :
- Playback Mode
- Preview photos
- Delete photo/videos
- Format
- Print your photos
- Play back AVI file
- Installing PhoTags Express Software
- Install PhoTags Express
- Register online
- Install DirectX
- Install PCCam
- Everything you need to get the most from your photos
- Select photos
- Edit photos
- Share photos
- Workshop
- How to purchase additional "Workshop" projects
- Transferring photos to your PC
- Download photos directly from windows
- Download photos using PhoTags Express
- Custom copy
- PhoTags Express software owner manual
- Attention:
- Run the PCCAM software
- File menu:
- Preview menu:
- Option menu:
- Capture menu:
- Help menu:
- BENUTZERANLEITUNG
- Inhalt
- Installation von PhoTags Express
- Achtung:
- Installer PhoTags Express
- Instalar PhoTags Express
- MANUAL DE INSTRUÇÕES
- Tabela de Conteúdo
- Download as fotos usando PhoTags Express
- Atenção:
- Istalla PhoTags Express
- Attenzione:
Brand : EASYPIX
Model : S328
Category : Camera