
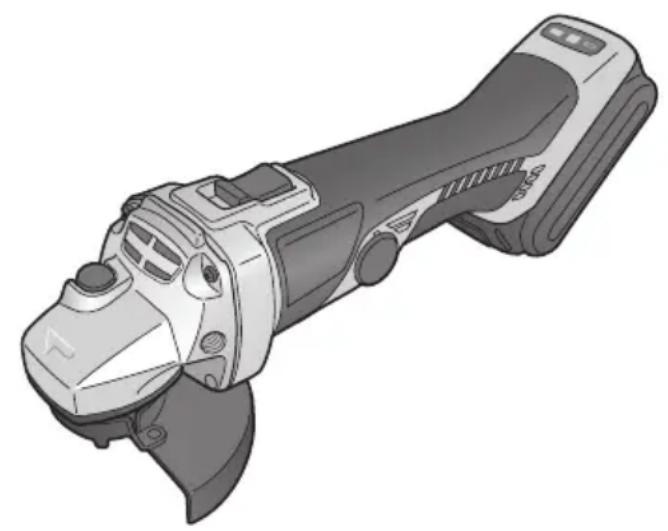
EY4640 - Grinder PANASONIC - Free user manual and instructions
Find the device manual for free EY4640 PANASONIC in PDF.

| Product Type | Cordless Angle Grinder |
| Brand | Panasonic |
| Model | EY4640 |
| Intended Use | Grinding and Cutting |
| Wheel Diameter | 115 mm (4-1/2") |
| Wheel Arbor Diameter | 22 mm (7/8") |
| Spindle Thread Size | M14 |
| Motor Voltage | 14.4 V DC |
| Rated Speed | 9500 min⁻¹ (rpm) |
| Weight (with battery) | 2.2 kg (4.8 lbs) |
| Overall Length | 361 mm (14-7/32") |
| Battery Type | Rechargeable Li-ion |
| Compatible Battery Models | EY9L40 (3 Ah), EY9L41 (3.3 Ah) |
| Battery Voltage | 14.4 V DC |
| Charger | EY0L80 |
| Charging Time (3 Ah) | Approx. 50 min (full charge) |
| Charging Time (3.3 Ah) | Approx. 60 min (full charge) |
| Safety Features | Overload protection, battery protection, switch lock, accidental restart prevention |
| Required Protective Equipment | Safety goggles, dust mask, ear protectors, gloves |
| Maintenance and Cleaning | Clean with a dry cloth, do not use solvents. Regularly check the protective guard and carbon brushes. |
| Spare Parts and Accessories | Abrasive disc (EY9X202E), guard (EY9X212E), cutting disc (EY9X203E), cutting guard (EY9X213E), flange (EY9X221E), tightening nut (EY9X231E) |
| Repairability | Carbon brush replacement possible. Any other repairs must be carried out by an authorized Panasonic service center. |
Frequently Asked Questions - EY4640 PANASONIC
User questions about EY4640 PANASONIC
0 question about this device. Answer the ones you know or ask your own.
Ask a new question about this device
Download the instructions for your Grinder in PDF format for free! Find your manual EY4640 - PANASONIC and take your electronic device back in hand. On this page are published all the documents necessary for the use of your device. EY4640 by PANASONIC.
USER MANUAL EY4640 PANASONIC
Operating Instructions
Bedienungsanleitung
HctpyKzno 3Kcnpyaatau
Ihctpykci3 ekcnnyataui
Panasonic
Cordless Angle Grinding
Kabelloser Winkelschleifer
YrnoBaJnHcObaJIbHaMaUHa cAkkymyIaTOpHbIM nITaHHem
Kytoba wniifyBaIbHa MaunHa 3 6aTapeHm 6JOKOM
Model No: EY4640
Before operating this unit, please read these instructions completely and save this manual for future use.
Thank you for purchasing the Panasonic Angle Grinding. The powerful grinding action of this tool, combined with the convenience of its rechargeable battery pack, provides you with great grinding performance.
This Angle Grinding is only to be used for grinding and cutting-off.
DANGER:
This product is a grinding tool, designed to grind. It has a rotating disc which is capable of cutting you deeply, causing serious injury or death. As a result, please read this manual and the cautionary markings on the tool carefully, and obey all of the Safety Instructions to avoid such injury.
WARNING:
To reduce the risk of injury, always use proper guards when grinding.
How to Use This Manual
- Please read this manual completely before starting to use your grinder. If you let someone else use the grinder, make sure they either read this manual or are fully instructed in the proper use and all safety precautions concerning the grinder.
- Please keep this manual for future reference. It contains important safety information that you must follow to use the grinder safely.
- This manual and product use the following signal words:
NOTE:
Notes provide additional information that you should know about the grinder.
CAUTION:
Caution indicates a potentially hazardous situation, which could result in minor or moderate injury if not avoided. Cautions also alert you to unsafe practices to be avoided.
WARNING:
Warning indicates a potentially hazardous situation, which could result in serious injury or death if not avoided.
DANGER:
Danger indicates an imminent hazard which will result in serious injury or death if not avoided.
Read the "Safety Instructions" booklet and the following before using.
II. ADDITIONAL SAFETY RULES
Safety instructions for all operations
Safety warning common for Grinding or Abrasive Cutting-off operations:
1) This power tool is intended to function as a grinder, or cut-off tool. Read all safety warnings, instructions, illustrations and specifications provided with this power tool. Failure to follow all instructions listed below may result in electric shock, fire and/or serious injury.
2) Operations such as sanding, wire brushing, polishing are not recommended to be performed with this power tool. Operations for which the power tool was not designed may create a hazard and cause personal injury.
3) Do not use accessories which are not specifically designed and recommended by the tool manufacturer. Just because the accessory can be attached to your power tool, it does not assure safe operation.
4) The rated speed of the accessory must be at least equal to the maximum speed marked on the power tool. Accessories running faster than their RATED SPEED can break and fly apart.
5) The outside diameter and the thickness of your accessory must be within the capacity rating of your power tool. Incorrectly sized accessories cannot be adequately guarded or controlled.
6) The arbour size of wheels, flanges, backing pads or any other accessory must properly fit the spindle of the power tool. Accessories with arbour holes that do not match the mounting hardware of the power tool will run out of balance, vibrate excessively and may cause loss of control.
7) Do not use a damaged accessory. Before each use inspect the accessory such as abrasive wheels for chips and cracks. If power tool or accessory is dropped, inspect for damage or install an undamaged accessory. After inspecting and installing an accessory, position yourself and bystanders away from the plane of the rotating accessory and run the power tool at maximum no-load speed for one minute. Damaged accessories will normally break apart during this test time.
8) Wear personal protective equipment. Depending on application, use face shield, safety goggles or safety glasses. As appropriate, wear dust mask, hearing protectors, gloves and workshop apron capable of stopping small abrasive or workpiece fragments. The eye protection must be capable of stopping flying debris generated by various operations. The eye protection must be capable of stopping flying debris generated by various operations. The dust mask or respirator must be capable of filtrating particles generated by your operation. Prolonged exposure to high intensity noise may cause hearing loss.
9) Keep bystanders a safe distance away from work area. Anyone entering the work area must wear personal protective equipment. Fragments of workpiece or of a broken accessory may fly away and cause injury beyond immediate area of operation.
10) Hold power tool by insulated gripping surfaces only, when performing an operation where the cutting accessory may contact hidden wiring or its own cord. Cutting accessory contacting a "live" wire may make exposed metal parts of the power tool "live" and shock the operator.
11) Position the cord clear of the spinning accessory. If you lose control, the cord may be cut or snagged and your hand or arm may be pulled into the spinning accessory.
12) Never lay the power tool down until the accessory has come to a complete stop. The spinning accessory may grab the surface and pull the power tool out of your control.
13) Do not run the power tool while carrying it at your side. Accidental contact with the spinning accessory could snag your clothing, pulling the accessory into your body.
14) Regularly clean the power tool's air vents. The motor's fan will draw the dust inside the housing and excessive accumulation of powdered metal may cause electrical hazards.
15) Do not operate the power tool near flammable materials. Sparks could ignite these materials.
16) Do not use accessories that require liquid coolants. Using water or other liquid coolants may result in electrocution or shock.
Further safety instructions for all operations
Kickback and RelatedWarnings
Kickback is a sudden reaction to a pinched or snagged rotating wheel, backing pad, brush or any other accessory. Pinching or snagging causes rapid stalling of the rotating accessory which in turn causes the uncontrolled power tool to be forced in the direction opposite of the accessory's rotation at the point of the binding.
For example, if an abrasive wheel is snagged or pinched by the workpiece, the edge of the wheel that is entering into the pinch point can dig into the surface of the material causing the wheel to climb out or kick out. The wheel may either jump toward or away from the operator, depending on direction of the wheel's movement at the point of pinching. Abrasive wheels may also break under these conditions.
Kickback is the result of power tool misuse and/or incorrect operating procedures or conditions and can be avoided by taking proper precautions as given below.
1) Maintain a firm grip on the power tool and position your body and arm to allow you to resist kickback forces. Always use auxiliary handle, if provided, for maximum control over kickback or torque reaction during start-up. The operator can control torque reactions or kickback forces, if proper precautions are taken.
2) Never place your hand near the rotating accessory. Accessory may kickback over your hand.
3) Do not position your body in the area where power tool will move if kickback occurs. Kickback will propel the tool in direction opposite to the wheel's movement at the point of snagging.
4) Use special care when working corners, sharp edges etc. Avoid bouncing and snagging the accessory. Corners, sharp edges or
bouncing have a tendency to snag the rotating accessory and cause loss of control or kickback.
5) Do not attach a saw chain woodcarving blade or toothed saw blade. Such blades create frequent kickback and loss of control.
Additional safety instructions for grinding and cutting-off operations
Safety warnings specific for Grinding and Abrasive Cutting-off operations:
1) Use only wheel types that are recommended for your power tool and the specific guard designed for the selected wheel. Wheels for which the power tool was not designed cannot be adequately guarded and are unsafe.
2) The guard must be securely attached to the power tool and positioned for maximum safety, so the least amount of wheel is exposed towards the operator. The guard helps to protect operator from broken wheel fragments and accidental contact with wheel.
3) Wheels must be used only for recommended applications. For example: do not grind with the side of cut-off wheel. Abrasive cut-off wheels are intended for peripheral grinding, side forces applied to these wheels may cause them to shatter.
4) Always use undamaged wheel flanges that are of correct size and shape for your selected wheel. Proper wheel flanges support the wheel thus reducing the possibility of wheel breakage. Flanges for cut-off wheels may be different from grinding wheel flanges.
5) Do not use worn down wheels from larger power tools. Wheel intended for larger power tool is not suitable for the higher speed of a smaller tool and may burst.
Additional SafetyWarnings Specific for Abrasive Cutting-Off Operations:
1) Do not "jam" the cut-off wheel or apply excessive pressure. Do not attempt to make an excessive depth of cut. Overstressing the wheel increases the loading and susceptibility to twisting or binding of the wheel in the cut and the possibility of kickback or wheel breakage.
2) Do not position your body in line with and behind the rotating wheel. When the wheel, at the point of operation, is moving away from your body, the possible kickback may propel the spinning wheel and the power tool directly at you.
3) When wheel is binding or when interrupting a cut for any reason, switch off the power tool and hold the power tool motionless until the wheel comes to a complete stop. Never attempt to remove the cut-off wheel from the cut while the wheel is in motion otherwise kickback may occur. Investigate and take corrective action to eliminate the cause of wheel binding.
4) Do not restart the cutting operation in the workpiece. Let the wheel reach full speed and carefully reenter the cut. The wheel may bind, walk up or kickback if the power tool is restarted in the workpiece.
5) Support panels or any oversized workpiece to minimize the risk of wheel pinching and kickback. Large workpieces tend to sag under their own weight. Supports must be placed under the workpiece near the line of cut and near the edge of the workpiece on both sides of the wheel.
6) Use extra caution when making a "pocket cut" into existing walls or other blind areas. The protruding wheel may cut gas or water pipes, electrical wiring or objects that can cause kickback.
| Symbol Meaning | |
| V | Volts |
| --- | Direct current |
| n | Rated speed |
| ...min-1 | Revolutions or reciprocations per minutes |
| Ah | Electrical capacity of battery pack |
| To reduce the risk of injury, user must read and understand instruction manual. | |
| For indoor use only. | |
| Always wear eye protection | |
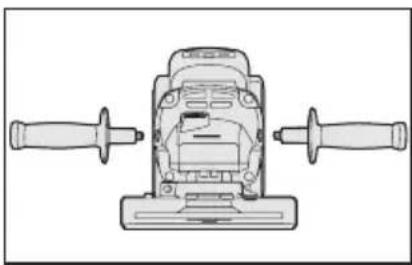
III.ASSEMBLY
NOTE:
When attaching or removing a slide handle, disconnect battery pack from tool.

CAUTION:
Always be sure that the side handle is installed securely before operation.
Screw the side handle securely as shown in the figure.

CAUTION:
- Never actuate the lock pin when the spindle is rotating. The tool may be damaged.
Press the lock button to prevent spindle rotation when installing or removing parts, such as grinding disc, disc guard, etc.
Installing or removing disc
Inspection before use
- Has the correct grinding disc been mounted for the object to be ground?
- Has the proper diameter of the grinding disc been mounted for the tool rating?
- Has the proper grinding disc compiled to safety standard listed below been mounted?
Europe - EN, Australia - AS
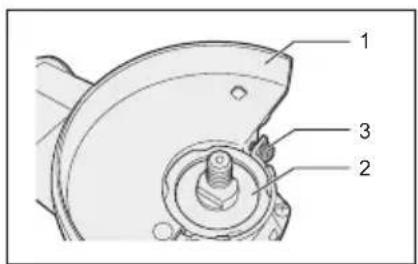
- Grinding disc guard
- Spindle
- Grinding disc guard fixing screw

CAUTION:
- When using, the Grinding disc guard must be installed on the tool so that the closed side of the guard always faces toward the operator.
- Ensure that blotters are used when they are provided with the bonded abrasive product and when they are required;

WARNING:
Always use supplied guard when using tool. Grinding disc can shatter during use and Grinding disc guard helps to reduce chances of personal injury.
- Install the Grinding disc guard, and then securely tighten the screw.
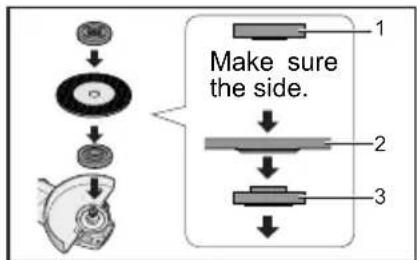
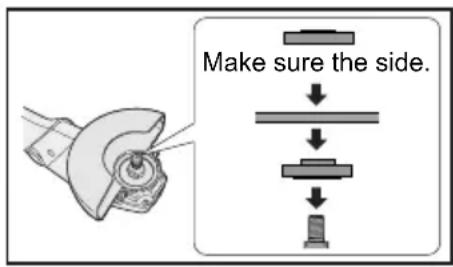
- Clamp nut
- Grinding disc
-
Disc flange
-
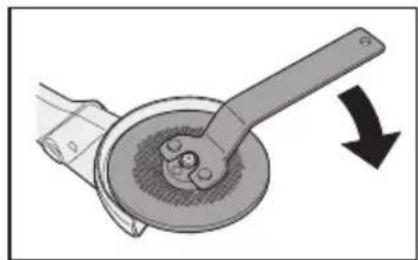
Install the disc flange and the disc to the spindle in order as shown in the figure.
- Tighten the clamp nut onto the spindle so that hollow side faces opposite direction to the disc.
- Push the Spindle lock button to secure the spindle in place, and then use the clamp nut wrench to tighten the clamp nut securely.
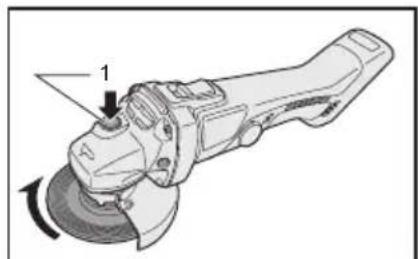
1. Spindle lock button
- To remove the grinding disc, follow the installation procedure in reverse.
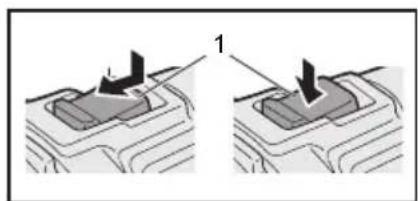
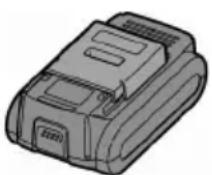
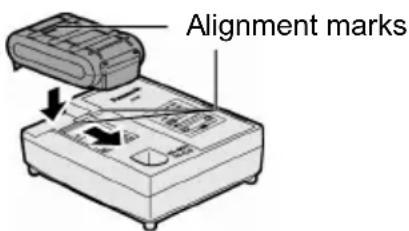
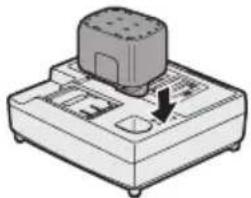
Attaching or Removing Battery Pack
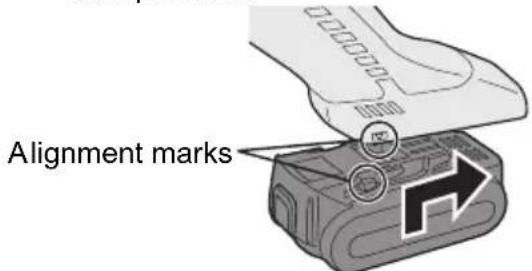
- To connect the battery pack:
Line up the alignment marks and attach the battery pack.
- Slide the battery pack until it locks into position.
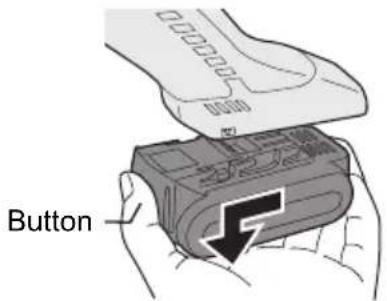
- To remove the battery pack:
Push on the button from the front to release the battery pack.
IV. OPERATION
NOTE:
Be aware that this tool is always in an operating condition, since it does not have to be plugged into an electrical outlet.
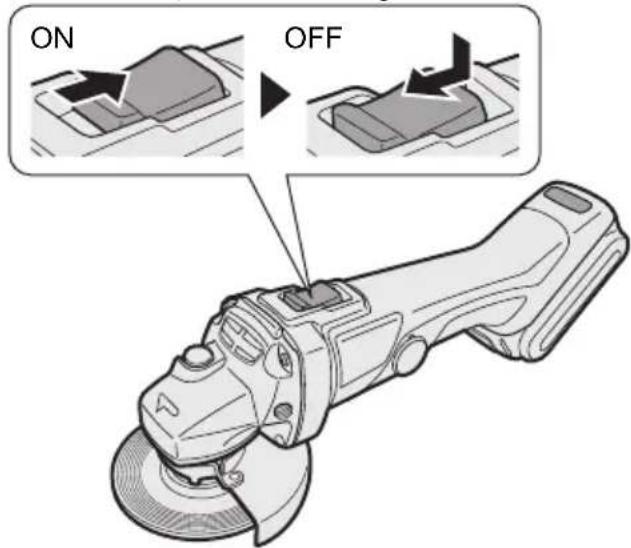
Power switch operation
1. Power switch
CAUTION:
-
Before inserting the battery pack into the tool, always make sure that the power switch operates properly and returns to the "OFF" position when the rear of the power switch is depressed.
-
Power switch can be locked in "ON" position. Stay alert when locking tool in "ON" position and grasp the tool firmly using support handle and grip.
To start the tool, press and slide the power switch toward the "ON" position. For continuous operation, press the front of the power switch to lock it.
To stop the tool, press the rear of the power switch, then slide it toward the "OFF" position.
WARNING:
- It should never be necessary to force the tool. The weight of the tool applies adequate pressure. Forcing and excessive pressure could cause dangerous grinding disc breakage.
- ALWAYS replace grinding disc if tool is dropped while grinding.
- NEVER bang or hit grinding disc.
- Avoid bouncing and snagging the grinding disc, especially when working corners, sharp edges etc. This can cause loss of control and kickback.
CAUTION:
After operation, always switch off the tool and wait until the wheel has come to a complete stop before putting the tool down.
Visual inspection and workout test on disc
- Always make sure that the disc has no cracks before use.
- Always give workout test on the blade as follows.
- Always make sure the disc is firmly fixed.
| Work out time | |
| Brand new disc | more than 3 min. |
| Before use on current disc | more than 1 min. |
Grinding operation
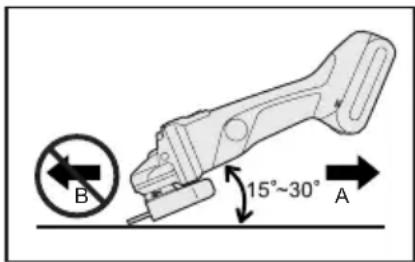
ALWAYS hold the tool firmly with one hand on grip and the other on the side handle. Turn on the tool on and then apply the wheel or disc to the workpiece.
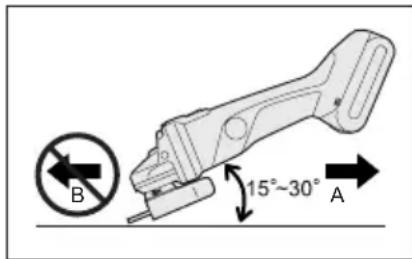
In general, keep the edge of the wheel or grinding disc at an angle of about 15 degrees to the workpiece surface.
When using a new grinding disc, do not work the grinder in the B direction or it will cut into the workpiece. Once the edge of the grinding disc has been rounded off by use, the grinding disc may be worked in both A and B direction.
Using a cut-off disc guard (EY9X213E) (Available as an accessory, not included)
WARNING:
- When using an abrasive cut-off disc, be sure to use only the cut-off disc guard designed for this use with cut-off disc.
- NEVER use cut-off disc for grinding.
- Do not jam the Disc or apply excessive pressure. Do not attempt to make an excessive depth of cut. Overstressing the cut-off disc increases the loading and susceptibility to twisting or binding of the cut-off disc in the cut and the possibility of kickback, cut-off disc
breakage and overheating of the motor may occur.
- Do not start when disc is in the workpiece. To do so causes the cut-off disc binding or kickback. Let the cut-off disc reach full speed and then carefully cut the workpiece.
- During cutting operations, never change the angle of the disc. Placing side pressure on the cut-off disc (as in grinding) will cause the disc to crack and break, causing serious personal injury.
CAUTION:
- To prevent excessive temperature increase of the tool surface, do not operate the tool continuously using two or more battery packs. The tool needs cool-off time before switching to another pack.
- Do not close up ventilation slots on the sides of the body during operation. Otherwise, the machine function is adversely affected to cause a failure.
- Do NOT strain the tool (motor). This may cause damage to the unit.
- Use the tool in such a way as to prevent the air from the ventilation slots from blowing directly onto your skin. Otherwise, you may get burned.
Indicator lamp for On lock warning lamp function
The grinder will not start when the switch is at the ON position (switch lever at ON), even when the battery pack is inserted. The warning lamp will flash at this time to indicate that the on lock start prevention function has operated.
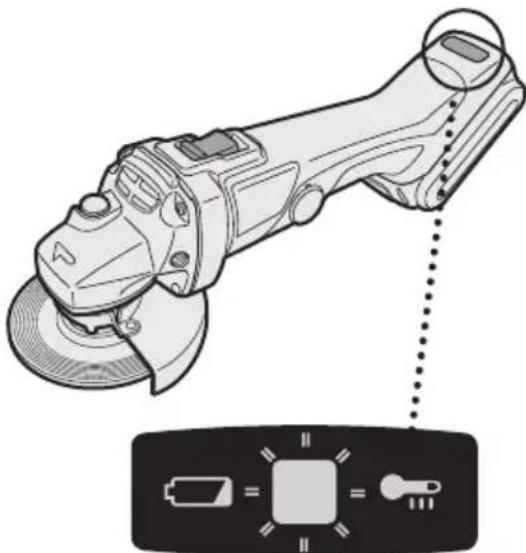
Press the switch to the OFF position (switch lever at OFF) and then press it back to the ON position (switch lever at ON) to start the grinder.
Overheat warning lamp
Off (normal operation)


Flashing: Overheat Indicates operation has been halted due to battery overheating.
The overheating protection feature halts operation to protect the battery pack in the event of overheating. The overheat warning lamp on the control panel flashes when this feature is active.
- If the overheating protection feature activates, allow the tool to cool thoroughly (at least 30 minutes). The battery is ready for use when the overheat warning lamp goes out.
- Avoid using the tool in a way that causes the overheating protection feature to activate repeatedly.
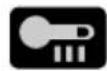
Battery low warning lamp

Off (normal operation)

Flashing (No charge) Battery protection feature active
Excessive (complete) discharging of lithium ion batteries shortens their service life dramatically. The tool includes a battery protection feature designed to prevent excessive discharging of the battery pack.
- The battery protection feature activates immediately before the battery loses its charge, causing the battery low warning lamp to flash.
- If you notice the battery low warning lamp flashing, charge the battery pack immediately.
- Accidental re-start preventive function
- Even if the battery pack is inserted on the tool with the power switch in the "ON" position, the tool does not start. At this time, the lamp flickers slowly and this shows that the accidental re-start preventive function is at work.
- To start the tool, first slide the power switch toward the "OFF" position and then slide it toward the "ON" position.
[Battery Pack]
For Appropriate Use of Battery pack
Li-ion Battery pack (EY9L40/EY9L41)
- For optimum battery life, store the Li-ion battery pack following use without charging it.
- When charging the battery pack, confirm that the terminals on the battery charger are free of foreign substances such as dust and water etc. Clean the terminals before charging the battery pack if any foreign substances are found on the terminals. The life of the battery pack terminals may be affected by foreign substances such as dust and water etc. during operation.
- When battery pack is not in use, keep it away from other metal objects like: paper clips, coins, keys, nails, screws, or other small metal objects that can make a connection from one terminal to another.
Shorting the battery terminals together may cause sparks, burns or a fire.
- When operating the battery pack, make sure the work place is well ventilated.
- When the battery pack is removed from the main body of the tool, replace the battery pack cover immediately in order to prevent dust or dirt
from contaminating the battery terminals and causing a short circuit.
Battery Pack Life
The rechargeable batteries have a limited life. If the operation time becomes extremely short after recharging, replace the battery pack with a new one.
Battery Recycling
ATTENTION:
For environmental protection and recycling of materials, be sure that it is disposed of at an officially assigned location, if there is one in your country.
[Battery Charger]
Charging
Cautions for the Li-ion Battery Pack
- If the temperature of the battery pack falls approximately below -10^ ( 14^ ), charging will automatically stop to prevent degradation of the battery.
Common Cautions for the Li-ion/Ni-MH/Ni-Cd Battery Pack
- The ambient temperature range is between 0^ (32^) and 40^ (104^) . If the battery pack is used when the battery temperature is below 0^ (32^) , the tool may fail to function properly.
- When charging a cool battery pack (below 0^ (32^) ) in a warm place, leave the battery pack at the place and wait for more than one hour to warm up the battery to the level of the am
bient temperature.
Cool down the charger when charging more than two battery packs consecutively.
- During charging, the charger may become slightly warm. This is normal. Do NOT charge the battery for a long period.
CAUTION:
To prevent the risk of fire or damage to the battery charger.
- Do not use power source from an engine generator.
- Do not cover vent holes on the charger and the battery pack.
- Unplug the charger when not in use.
Li-ion Battery Pack
NOTE:
Your battery pack is not fully charged at the time of purchase. Be sure to charge the battery before use.
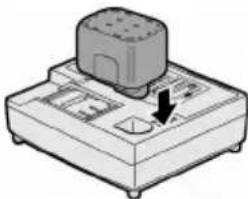
Battery charger (EY0L80)
- Plug the charger into the AC outlet.
NOTE:
Sparks may be produced when the plug is inserted into the AC power supply, but this is not a problem in terms of safety.
-
Insert the battery pack firmly into the charger.
-
Line up the alignment marks and place the battery onto the dock on the charger.
- Slide forward in the direction of the arrow.
- During charging, the charging lamp will be lit.
When charging is completed, an internal electronic switch will automatically be triggered to prevent overcharging.
- Charging will not start if the battery pack is warm (for example, immediately after heavy-duty operation).
The orange standby lamp will be flashing until the battery cools down.
Charging will then begin automatically.
- The charge lamp (green) will flash slowly once the battery is approximately 80% charged.
- When charging is completed, the charging lamp will start flashing quickly in green color.
- If the temperature of the battery pack is 0^ or less, charging takes longer to fully charge the battery pack than the standard charging time.
Even when the battery is fully charged, it will have approximately 50% of the power of a fully charged battery at normal operating temperature.
- If the power lamp does not light immediately after the charger is plugged in, or if after the standard charging time the charging lamp does not flash quickly in green, consult an authorized service center.
- If a fully charged battery pack is inserted into the charger again, the charging lamp lights up. After several minutes, the charging lamp may flash quickly to indicate the charging is completed.
Ni-MH/Ni-Cd Battery Pack
NOTE:
When you charge the battery pack for the first time, or after prolonged storage, charge it for about 24 hours to bring the battery up to full capacity.
Battery charger (EY0L80)
- Plug the charger into the AC outlet.
NOTE:
Sparks may be produced when the plug is inserted into the AC power supply, but this is not a problem in terms of safety.
- Insert the battery pack firmly into the charger.
- During charging, the charging lamp will be lit.
When charging is completed, an internal electronic switch will automatically be triggered to prevent overcharging.
- Charging will not start if the battery pack is warm (for example, immediately after heavy-duty operation).
The orange standby lamp will be flashing until the battery cools down. Charging will then begin automatically.
- When charging is completed, the charging lamp will start flashing quickly in green color.
- If the charging lamp does not light immediately after the charger is plugged in, or if after the standard charging time the charging lamp does not flash quickly in green, consult an authorized service center.
- If a fully charged battery pack is inserted into the charger again, the charging lamp lights up. After several minutes, the charging lamp may flash quickly to indicate the charging is completed.
LAMP INDICATIONS
| Green Lit Charger is plugged into the AC outlet. Ready to charge. | |
| Green Flashing Quickly Charging is completed. (Full charge.) | |
| Green Flashing Battery is approximately 80% charged. (Usable charge. Li-ion only.) | |
| Green Lit Now charging. | |
| Orange Lit Battery pack is cool. The battery pack is being charged slowly to reduce the load on the battery. (Li-ion only.) | |
| Orange Flashing Battery pack is warm. Charging will begin when temperature of battery pack drops. | |
| If the temperature of the battery pack is -10°C or less, the charging status lamp (orange) will also start flashing. Charging will begin when the temperature of the battery pack goes up (Li-ion only). | |
| Charging Status Lamp Left: green Right: orange will be displayed. | |
| Both Orange and Green Flashing Quickly Charging is not possible. Clogged with dust or malfunction of the battery pack. |
Information for Users on Collection and Disposal of Old Equipment and used Batteries
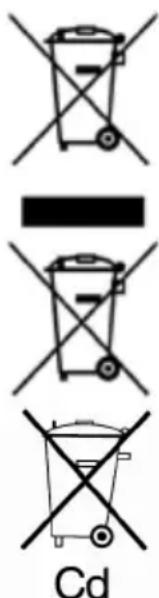
These symbols on the products, packaging, and/or accompanying documents mean that used electrical and electronic products and batteries should not be mixed with general household waste.
For proper treatment, recovery and recycling of old products and used batteries, please take them to applicable collection points, in accordance with your national legislation and the Directives 2002/96/EC and 2006/66/EC.
By disposing of these products and batteries correctly, you will help to save valuable resources and prevent any potential negative effects on human health and the environment which could otherwise arise from inappropriate waste handling.
For more information about collection and recycling of old products and batteries, please contact your local municipality, your waste disposal service or the point of sale where you purchased the items.
Penalties may be applicable for incorrect disposal of this waste, in accordance with national legislation.
For business users in the European Union
If you wish to discard electrical and electronic equipment, please contact your dealer or supplier for further information.
[Information on Disposal in other Countries outside the European Union]
These symbols are only valid in the European Union. If you wish to discard these items, please contact your local authorities or dealer and ask for the correct method of disposal.
Note for the battery symbol (bottom two symbol examples):
This symbol might be used in combination with a chemical symbol. In this case it complies with the requirement set by the Directive for the chemical involved.
Replacing carbon brushes
Keep the carbon brushes clean and free to slip in the holders. When it is less than 5mm (3/16") shorter both carbon brushes should be replaced at the same time. Use only identical carbon brushes.
Insert the top end of slotted bit screwdriver into the notch in the tool and remove the brush cap cover by lifting it up.
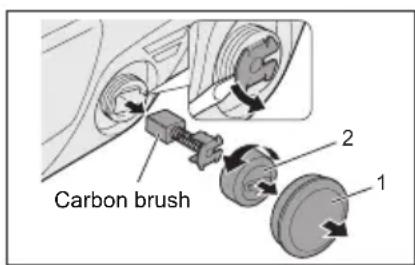
- Brush cap cover
- Brush cap
Use a screwdriver to remove the caps. Take out the worn carbon brushes, insert the new ones and secure the brush caps.
Reinstall the brush cap cover on the tool.
To maintain product SAFETY and RELIABILITY, repairs, any other maintenance or adjustment should be performed by Panasonic Authorized or Factory Service Centers, always using Panasonic replacement parts.
V. MAINTENANCE
Use only a dry, soft cloth for wiping the unit. Do not use a damp cloth, thinner, benzine, or other volatile solvents for cleaning.
VI. ACCESSORIES
CAUTION:
- The use of any accessories not specified in this manual may result in fire, electric shock, or personal injury. Use recommended accessories only.
- Your tool is supplied with a guard for use with a grinding disc. A cut-off disc can also be used with a cut-off disc guard. If you decide to use your Panasonic grinder with approved accessories which you purchase from your Panasonic distributor or factory service center, be sure to obtain and use all necessary fasteners and guards as recommended in this manual. Your failure to do so could result in personal injury to you and others.
Grinding Disc
- EY9X202E
Wheel diameter 115mm (4 - 1 / 2^ )× 6mm(1 / 4^ )× 22mm(7 / 8^ )
Grinding Disc Guard - EY9X212E
Cut-off Disc - EY9X203E
Wheel diameter 115 mm (4-1/2") x 2.5 mm (3/32") x 22 mm (7/8")
Cut-off Disc Guard (For cut-off disc)
- EY9X213E
Disc Flange
- EY9X221E
Clamp Nut
- EY9X231E
VII. SPECIFICATIONS
MAIN UNIT
| Mounting wheel diameter 115 mm (4-1/2") | |
| Mounting wheel innerhole diameter 22 mm (7/8") | |
| Spindle thread size M14 | |
| Motor voltage 14.4 V DC | |
| Rated speed 9500 min | -1 (rpm) |
| Weight (with battery pack:EY9L40/EY9L41) | 2.2 kg (4.8 lbs) |
| Overall length 361 mm (14-7/32") | |
| Noise, Vibration See the included sheet |
BATTERY PACK
| Model | EY9L40 | EY9L41 |
| Storage battery | Li-ion Battery | |
| Battery voltage | 14.4 V DC (3.6 V x 4 cells) | |
| Capacity | 3 Ah | 3,3 Ah |
BATTERY CHARGER
| Model | EY0L80 |
| Rating | See the rating plate on the bottom of the charger. |
| Weight | 0.95 kg (2.1 lbs) |
[Li-ion battery pack]
| Charging time | 3 Ah | 14.4 V 21.6 V | 28.8 V | |
| < img src=""> | < img src=""> | |||
| < img src=""> | < img src=""> | |||
| < img src=""> | < img src=""> | |||
| Full: 50 min. | Full: 60 min. |
| Charging time | 3,3 Ah | 14.4 V | ||
| <Useable: 45 min.> | ||||
| <Full: 60 min.> |
[Ni-Cd/Ni-MH battery pack]
| Charging time | 7.2 V 9.6 V 12 V 15 | 6 V 18 V 24 V | |||||
| 1.2 Ah | EY9065 | EY9080 | EY9001 | ||||
| EY9066 | EY9086 | EY9006 | |||||
| 20 min. | |||||||
| 1.7 Ah | EY9180 | EY9101 | |||||
| EY9182 | EY9103 | ||||||
| 25 min. | |||||||
| 2 Ah | EY9168 EY9188 | EY9106 | EY9136 | EY9116 | |||
| EY9107 | EY9117 | ||||||
| EY9108 | |||||||
| 30 min. 60 min. | |||||||
| 3 Ah | EY9200 EY9230 EY92145 min. | 0 | 90 min. | ||||
| 3.5 Ah | EY9201 EY9231 EY9255 min. 65 min. | 1 | |||||
NOTE: This chart may include models that are not available in your area. Please refer to the latest general catalogue.
NOTE: For the dealer name and address, please see the included warranty card.
ONLY FOR U. K.
VIII. ELECTRICAL PLUG INFORMATION
FOR YOUR SAFETY PLEASE READ THE FOLLOWING TEXT CAREFULLY
This appliance is supplied with a moulded three pin mains plug for your safety and convenience.
A 5 amp fuse is fitted in this plug.
Should the fuse need to be replaced please ensure that the replacement fuse has a rating of 5 amp and that it is approved by ASTA or BSI to BS1362.
Check for the ASTA mark or the BSI mark on the body of the fuse.
If the plug contains a removable fuse cover you must ensure that it is refitted when the fuse is replaced.
If you lose the fuse cover the plug must not be used until a replacement cover is obtained.
A replacement fuse cover can be purchased from your local Panasonic Dealer.
IF THE FITTED MOULDED PLUG IS UNSUITABLE FOR THE SOCKET OUTLET IN YOUR HOME THEN THE FUSE SHOULD BE REMOVED AND THE PLUG CUT OFF AND DISPOSED OF SAFELY.
THERE IS A DANGER OF SEVERE ELECTRICAL SHOCK IF THE CUT OFF PLUG IS INSERTED INTO ANY 13 AMP SOCKET.
If a new plug is to be fitted please observe the wiring code as shown below.
If in any doubt please consult a qualified electrician.
IMPORTANT:
The wires in this mains lead are coloured in accordance with the following code:
Blue: Neutral
Brown: Live
As the colours of the wire in the mains lead of this appliance may not correspond with the coloured markings identifying the terminals in your plug, proceed as follows.
The wire which is coloured BLUE must be connected to the terminal in the plug which is marked with the letter N or coloured BLACK.
The wire which is coloured BROWN must be connected to the terminal in the plug which is marked with the letter L or coloured RED.
Under no circumstances should either of these wires be connected to the earth terminal of the three pin plug, marked with the letter E or the Earth Symbol 1一
How to replace the fuse: Open the fuse compartment with a screwdriver and replace the fuse and fuse cover if it is removable.

This apparatus was produced to BS800.
Operation de meulage
Pacco battery Li-ion
NOTA:
[Pacco battery Li-ion]
| Tempo di caricamento | 3 Ah | 14,4 V | 21,6 V | 28,8 V |
| EY9L40 | EY9L60 | EY9L80 | ||
| Utilizzabile: 35 min. | Utilizzabile: 45 min. | Utilizzabile: 55 min. | ||
| Completa: 50 min. | Completa: 60 min. | Completa: 70 min. | ||
| Tempo di caricamento | 3,3 Ah | 14,4 V | ||
| EY9L41 | ||||
| Utilizzabile: 45 min. | ||||
| Completa: 60 min. | ||||
[Pacco battery Li-ion]
| [Batería de Li-ión] | 3 Ah | 14,4 V | 21,6 V | 28,8 V |
| EY9L40 | EY9L60 | EY9L80 | ||
| Utilizable: 35 min. | Utilizable: 45 min. | Utilizable: 55 min. | ||
| Completa: 50 min. | Completa: 60 min. | Completa: 70 min. |
Varsellampe for overoppheting

Av (normalt arbeid)


V. VEDLIKEHOLDV. VEI
Cpok cnyx6bI aKKymyJrTopHoro 6noka
AkkymyJIaTOPbIe 6aTapeH nMeHOT orpaHnueHHbI cPoK cJyX6bl. EcJIi noCJIe 3apJKn BpeM pa6Otbl CTAHOBNTcaype3MepHo KOpOTkIM, 3aMeHHTe AKKymyJIaTOPbI bNOK HOBbIM.
YTNIN3aun 6aTapeu
BHIMAHNE:
B ueJx 3aunTbI OKpykaOuSei Cpebl I NOBOTOPHO NcNoJIb3OBaHnMaTePnaIIOB, y6eIntecb, YTO OHa YTNIN3NpOBAHa B OΦnuaJIbHO ppeHa3HaueHHom MeCTe, ecNI TaKOBbIe ectb B BaWei cTpaHe.
[3apяДhoe ycTpoIcTBO] 3apяdka3apяdka
Obuime MepbI npedocopoxHocT NJIHTN-NOHOro/HnKeJb-MetaJIornpdHorO/ HnKeJbKaAdMneBoro 6aTapeHoro 6noka
- Ecnn TemnepaTpa 6batapeHoro 6noKa onyuctc Hxke npu6Jn3nteJbHo -10^ (14°F), 3apraKa aBTomatueceKn npeKpatNTc dna npeDoTbpaueHnnyxudseHn xapaKTepncTk 6batapei.
Obuzne MEPBIppeoctopox-HocTN IJIa IOHHO-JNTHeBOrO/HKeJIb-MeTaJIIOrIaPnIDHOrO/HKeJIb-KaDMnEBOrO aKKyMyJITOPHO6Ioka
[InHHO-NTHeBbI aKKymyTOpHbI 6nok]
JIITiI-OHn6aTapeHn 6Jok
ПРИМITKA:
Baш 6atapeин 6Iok He e NOBHicTIO 3apJxKeHmN pId qac npuδaHn. He 3a6yIbTe 3apJntn Ioro nepeD BVKOpNCtAHnM.
3apdHn npncpti (EY0L80)
- BBIMKHiTb 3apAHy npncTpI B wTeNceIbHy po3eTKy 3MiHHoro ctpymy.
ПРИМITKA:
Pn nikoueHHi wTeNceBHOI BNKn Do DxepeJa XNBHeHNa 3MiHHM CTpyMOM MoKyTb 3'BAHTncr iCKpN, aNe ce He CTBOpOe npo6nemy 3 TOnK 3opy 6e3neKn.
-
ΜιNbHo BCTaBTe 6aTapeHn 6Iok B 3a-paHn npucTpi.
-
3piBnIte mITKn BnpiBnHOBaHHn i po3- micTiB 6atapeo y 3aJIi6NeHHi Ha 3apAnHomy npncTpoi.
- 3cynbte noro Bnpey hnapmky ctpiKN.

3.ПдчacЗаряdkибуde ropiTn lamnoquka 3aprKn.
Iicra 3aBepWeHHaPAn ABTomuH No cnpaue BHyTpHi eKeKtpOHn nepemkauch, 3ano6iraouh HAdmipHn 3apdci.
3apraKa He nouHeTbcra, kUo 6aTapeHnB6nok e HADTo rapaum (HaapanKnaD, 6e3nocepEnbO nicJyHKioHyBaHH np BeNkOMy HabaHTaXeHHi).
OpaHkeBa IamnoUka peXmMy oUikyBaHHa Bye MngTn, DOKN BaTapeR He OxOJHOe.
HikeNB-Metanorig6pndn/ HikeNB-KaDiBn 6atapeHn 6Jok
ПРИMITKA:
Ipn nepwomy 3apxjehnhi 6atapeHoro 6loky, a6o nicJrtpBaIoro 36epirAHn, 3apxjynte noRo npotraRom 24 roDInH, uOb doBectn 6atapeIO DO NOBHOi 3apxIDHOI EMKICTb.
3apdHn npncpti (EY0L80)
- BBIMKHiTb 3apAHy npncTpB B wTeNceIbHy po3eTKy 3MiHHoro ctpMy.
ПРИMITKA:
Pn niknoeHHi wTeNceBHOI BnKn Do DxepeJa XNBJeHNa 3MiHHM CtpyMOM MoKyTb 3'ABNTnCra Ickp, aNe ce He CTBOpOe npo6nemy 3 TOnKn 3opy 6e3neKn.
- ΜιNbHo BCTaBTe 6aTapeHn 6nok B 3apdHn npuctri.
3.ПдчacЗардкбуde ropitn lamnoquka 3apdkn.
Iicra 3aBepweHn 3apAKn aBTOMaTHuHo cnpauoe BHyTpiaHni eJeKtpoHHn nepemkaay, 3anobiraoun HaMipHi 3apdci.
3apraKa He nouHeTbcra, kUo 6aTapeHn6bok e HADTo rapaM (HaPnKnaD, 6e3nocepEnbO nicJyHKIOHyBaHH npB eNIkOMy HabaHTaKeHHi).
OpaHkeBa JAMNoUka pexmmy ouikyBaHHa 6yde MURATn, DOKN 6atapea He OxonoHe. DaJI 3apAdka NOHTbcra ABTOMaTHHO.
4.Писязавершенизардклamnoу-ka3apdkn noyHe WbndKO Mrgatn 3eHIM CBITLOM.
5.ЯкsoлamnoqukaЖИВLEHн He 3aropntbca HeraiHo nicna BKJIuoyehnHaapndHoro npncTpo,abo kso nicna 3aKInHuEHHaCTaHdApTHoro yacy lamnoquKaHe noUHe WbNdko MmraTu, 3BepHiTbcAoYNOHBaXeHOrO cepBICHOrO ueHTpy.
6.Якso NOBHCIO 3apJxHn 6aTapeHn 6nOK 3HOBY BCTaBHTN B 3apJHn npIcTpi, 3arOpNTbcra NaMNoUka 3apJKn.Yepe3 DeKInbKa XBINH NaMNoUka 3apJKN MoKe NouATN WBNKO MmTaTN, POKa3YIOuN, 0O 3apJDKa 3aBepSeHa.
CBITNOBI IHdNKATOPNCBITIOBI IHdNKATOPN

3eJIHe noCTiHcBITIO
3apHn npictpi nikluoyen do wTeencbHOi po3etkn 3miHHoro ctpymy.
TOTOBIN DO 3apAKn.

3eJeHe yacto Muraue Cbitno
3apraika 3aBepseHa. (NoBa 3apraKa)

3eine He muraoye Cbitno
[Hikeb-MetaoripnHn/Hikeb-KaMicBn 6atapeHn 6noK]
| Часзардки | 7,2В9,6 | B 12В15,6 | B 18В24В | ||||
| 1,2Amпер-тодина | EY9065 | EY9080 | EY9001 | ||||
| EY9066 | EY9086 | EY9006 | |||||
| 20xB. | |||||||
| 1,7Amпер-тодина | EY9180 | EY9101 | |||||
| EY9182 | EY9103 | ||||||
| 25xB. | |||||||
| 2Amпер-тодина | EY9168 | Y9188 | EY9106 | EY9136 | EY9116 | ||
| EY9107 | EY9117 | ||||||
| 30xB. | 60xB. | ||||||
| 3Amпер-тодина | EY9200 | EY9230 | EY9210 | 90xB. | |||
| 45xB. | |||||||
| 3,5Amпер-тодина | EY9201 | EY9231 | EY9251 | 65xB. | |||
EY971046402 H2102 Printed in China
- Panasonic
- DANGER:
- WARNING:
- How to Use This Manual
- NOTE:
- CAUTION:
- ADDITIONAL SAFETY RULES
- Safety instructions for all operations
- Further safety instructions for all operations
- Kickback and RelatedWarnings
- Additional safety instructions for grinding and cutting-off operations
- Safety warnings specific for Grinding and Abrasive Cutting-off operations:
- Additional SafetyWarnings Specific for Abrasive Cutting-Off Operations:
- III.ASSEMBLY
- Installing or removing disc
- Inspection before use
- Attaching or Removing Battery Pack
- OPERATION
- Power switch operation
- WARNING:
- Visual inspection and workout test on disc
- Grinding operation
- Using a cut-off disc guard (EY9X213E) (Available as an accessory, not included)
- Indicator lamp for On lock warning lamp function
- Overheat warning lamp
- Battery low warning lamp
- - Accidental re-start preventive function
- [Battery Pack]
- For Appropriate Use of Battery pack
- Li-ion Battery pack (EY9L40/EY9L41)
- Battery Pack Life
- Battery Recycling
- ATTENTION:
- [Battery Charger]
- Charging
- Cautions for the Li-ion Battery Pack
- Common Cautions for the Li-ion/Ni-MH/Ni-Cd Battery Pack
- Li-ion Battery Pack
- Battery charger (EY0L80)
- Ni-MH/Ni-Cd Battery Pack
- LAMP INDICATIONS
- Information for Users on Collection and Disposal of Old Equipment and used Batteries
- For business users in the European Union
- [Information on Disposal in other Countries outside the European Union]
- Note for the battery symbol (bottom two symbol examples):
- Replacing carbon brushes
- MAINTENANCE
- ACCESSORIES
- SPECIFICATIONS
- ELECTRICAL PLUG INFORMATION
- IMPORTANT:
- Operation de meulage
- Pacco battery Li-ion
- NOTA:
- [Pacco battery Li-ion]
- Varsellampe for overoppheting
- VEDLIKEHOLDV. VEI
- Cpok cnyx6bI aKKymyJrTopHoro 6noka
- YTNIN3aun 6aTapeu
- BHIMAHNE:
- [3apяДhoe ycTpoIcTBO] 3apяdka3apяdka
- Obuime MepbI npedocopoxHocT NJIHTN-NOHOro/HnKeJb-MetaJIornpdHorO/ HnKeJbKaAdMneBoro 6aTapeHoro 6noka
- Obuzne MEPBIppeoctopox-HocTN IJIa IOHHO-JNTHeBOrO/HKeJIb-MeTaJIIOrIaPnIDHOrO/HKeJIb-KaDMnEBOrO aKKyMyJITOPHO6Ioka
- [InHHO-NTHeBbI aKKymyTOpHbI 6nok]
- JIITiI-OHn6aTapeHn 6Jok
- ПРИМITKA:
- 3apdHn npncpti (EY0L80)
- HikeNB-Metanorig6pndn/ HikeNB-KaDiBn 6atapeHn 6Jok
- ПРИMITKA:
- CBITNOBI IHdNKATOPNCBITIOBI IHdNKATOPN
Brand : PANASONIC
Model : EY4640
Category : Grinder