PA900BS - Sander Pattfield - Free user manual and instructions
Find the device manual for free PA900BS Pattfield in PDF.
| Brand | Pattfield |
| Model | PA900BS |
| Product type | Belt sander |
| Rated power | 850 W |
| Rated voltage | 230 V / 50 Hz |
| No-load belt speed | 300 m/min |
| Belt size | 76 x 533 mm |
| Weight | 2.8 kg |
| Protection class | II |
| Protection rating | IP 20 |
| Sound pressure level | 87 dB(A) (K = 3 dB) |
| Sound power level | 98 dB(A) (K = 3 dB) |
| Vibration emissions | 2.7 m/s² (K = 1.5 m/s²) |
| Intended use | Dry sanding of wood, plastic, metal, filler and painted surfaces (non-professional use) |
| Main functions | On/off switch with lock-on, auxiliary handle, belt tracking adjustment, dust bag, vacuum adapter |
| Maintenance and cleaning | Clean with a soft damp cloth, do not use aggressive products, lubricate moving parts, check supports |
| Safety | Wear safety goggles, hearing protection and dust mask; unplug before maintenance; do not use in wet environments |
| Included accessories | Sander with sanding belt, dust bag, vacuum adapter |
| Warranty | 3 years (according to Hornbach instructions) |
Frequently Asked Questions - PA900BS Pattfield
User questions about PA900BS Pattfield
0 question about this device. Answer the ones you know or ask your own.
Ask a new question about this device
Download the instructions for your Sander in PDF format for free! Find your manual PA900BS - Pattfield and take your electronic device back in hand. On this page are published all the documents necessary for the use of your device. PA900BS by Pattfield.
USER MANUAL PA900BS Pattfield
text_image
Hand holding a printed document with black ink swatches and red warning symbols, suggesting a safety or hazard warning.Pattfield® EKO TOOLS
Hornbacher in Hornbach Bounmarkt AG Hornbschulde 11 76879 Boreheim / Germany
Pattfield® FROO TOOLS

natural_image
Black handheld electronic device with attached cable and control buttons (no visible text or symbols)PA-900BS

text_image
Scanned document with printed images and a red prohibition symbol, showing handwritten notes and a photo of a person holding a book.DE Ausleipungen beschaltet
HI Observe les pages à déplier !
IT Likertu siki pagen puglerecht!
NL Let op de sibouwpage(s)
57 Obnera ubilisbladen!
02. Viz mukbodaci slonky
54. Vitamin A: sodium starch
AN Alunfa: la pugins placal
60 Observe the following page!
陈凯斯 公达控股 V1 CE
DE Überschung der Original Betriebsschung Bestand von 350 M
FR Traduction de la nóbico originale
Pertains a bond: R72 W
F Traduzione delle ostriloni organi
10. Verlating aan de opprekkelijke gebruikszemwijing Rechtchaumach de 250 W
SV Overhanging av originalakszansning
C7. Pricklad rejansloha niewaku i poustli
SK Prakind pravodneho naveda na pouzitie 1:01:24:250 m
80 Traduce a ineducțiilor originele. Maței de 64/19 cu tarele 850 W
G1 Original Instructions
Del. Scode 050/W
III. Scht 1 Aktioperaktion beschäft!
FR Pap: 9 Observer les pages à déplier !
IT Pugra 77
Iudaru situ pagana pughravici
ML Bapre 25 Let op de abouvagegnel
SV S=73 Observera ulabsbladen
02 - S### 21. Viz nüzlebci elonkyi
SK Strana 49 Vismale si maklasze stranky!
R0 Pajra 57 Allicie la pagina plistal
68 Page 85 Choose the initial page!

text_image
Labeled diagram of a handheld device with numbered parts for identification
text_image
Labeled diagram of a handheld electric shaver with numbered parts for identification

natural_image
Three black plastic electronic devices with labeled sizes (1x, 1x, 1x) shown in separate panels (no text or symbols on the devices themselves)DE Listenunfang
FR Elendue de livraison
II. Materiale compreso nella familiare
NL Leveningsomfang
5V Leveransomding
07 Bazzah dodzisky
SK Pozsah doradsky
80 Volumalist
60 Stage of delivery
text_image
Instructional images showing a mechanical device with red arrows indicating movement or change, labeled 1 to 5.Vielen Dank!
text_image
Pattfield® ERGO TOOLS850 W Bandschleifer PA-900BS
hergestellt für:
Hornbach Baumarkt AG
Hornbachstraße 11
text_image
Pattfield® ERGO TOOLStext_image
Pattfield® ERGO TOOLSLevigatrice a nastro 850 W PA-900BS
fabbricato per:
Hornbach Baumarkt AG
Hornbachstraße 11
76879 Bornheim / Germania
text_image
Pattfield® ERGO TOOLS850 W Bandschuurmachine PA-900BS
geproduceerd voor:
Hornbach Baumarkt AG
Hornbachstraße 11
text_image
Pattfield® ERGO TOOLS850 W Bandslipmaskin PA-900BS
tillverkad för
Hornbach Baumarkt AG
Hornbachstraße 11
76879 Bornheim / Tyskland
text_image
Pattfield® ERGO TOOLStext_image
Pattfield® ERGO TOOLS850 W leštička PA-900BS
vyrobená pre:
Hornbach Baumarkt AG
Hornbachstraße 11
text_image
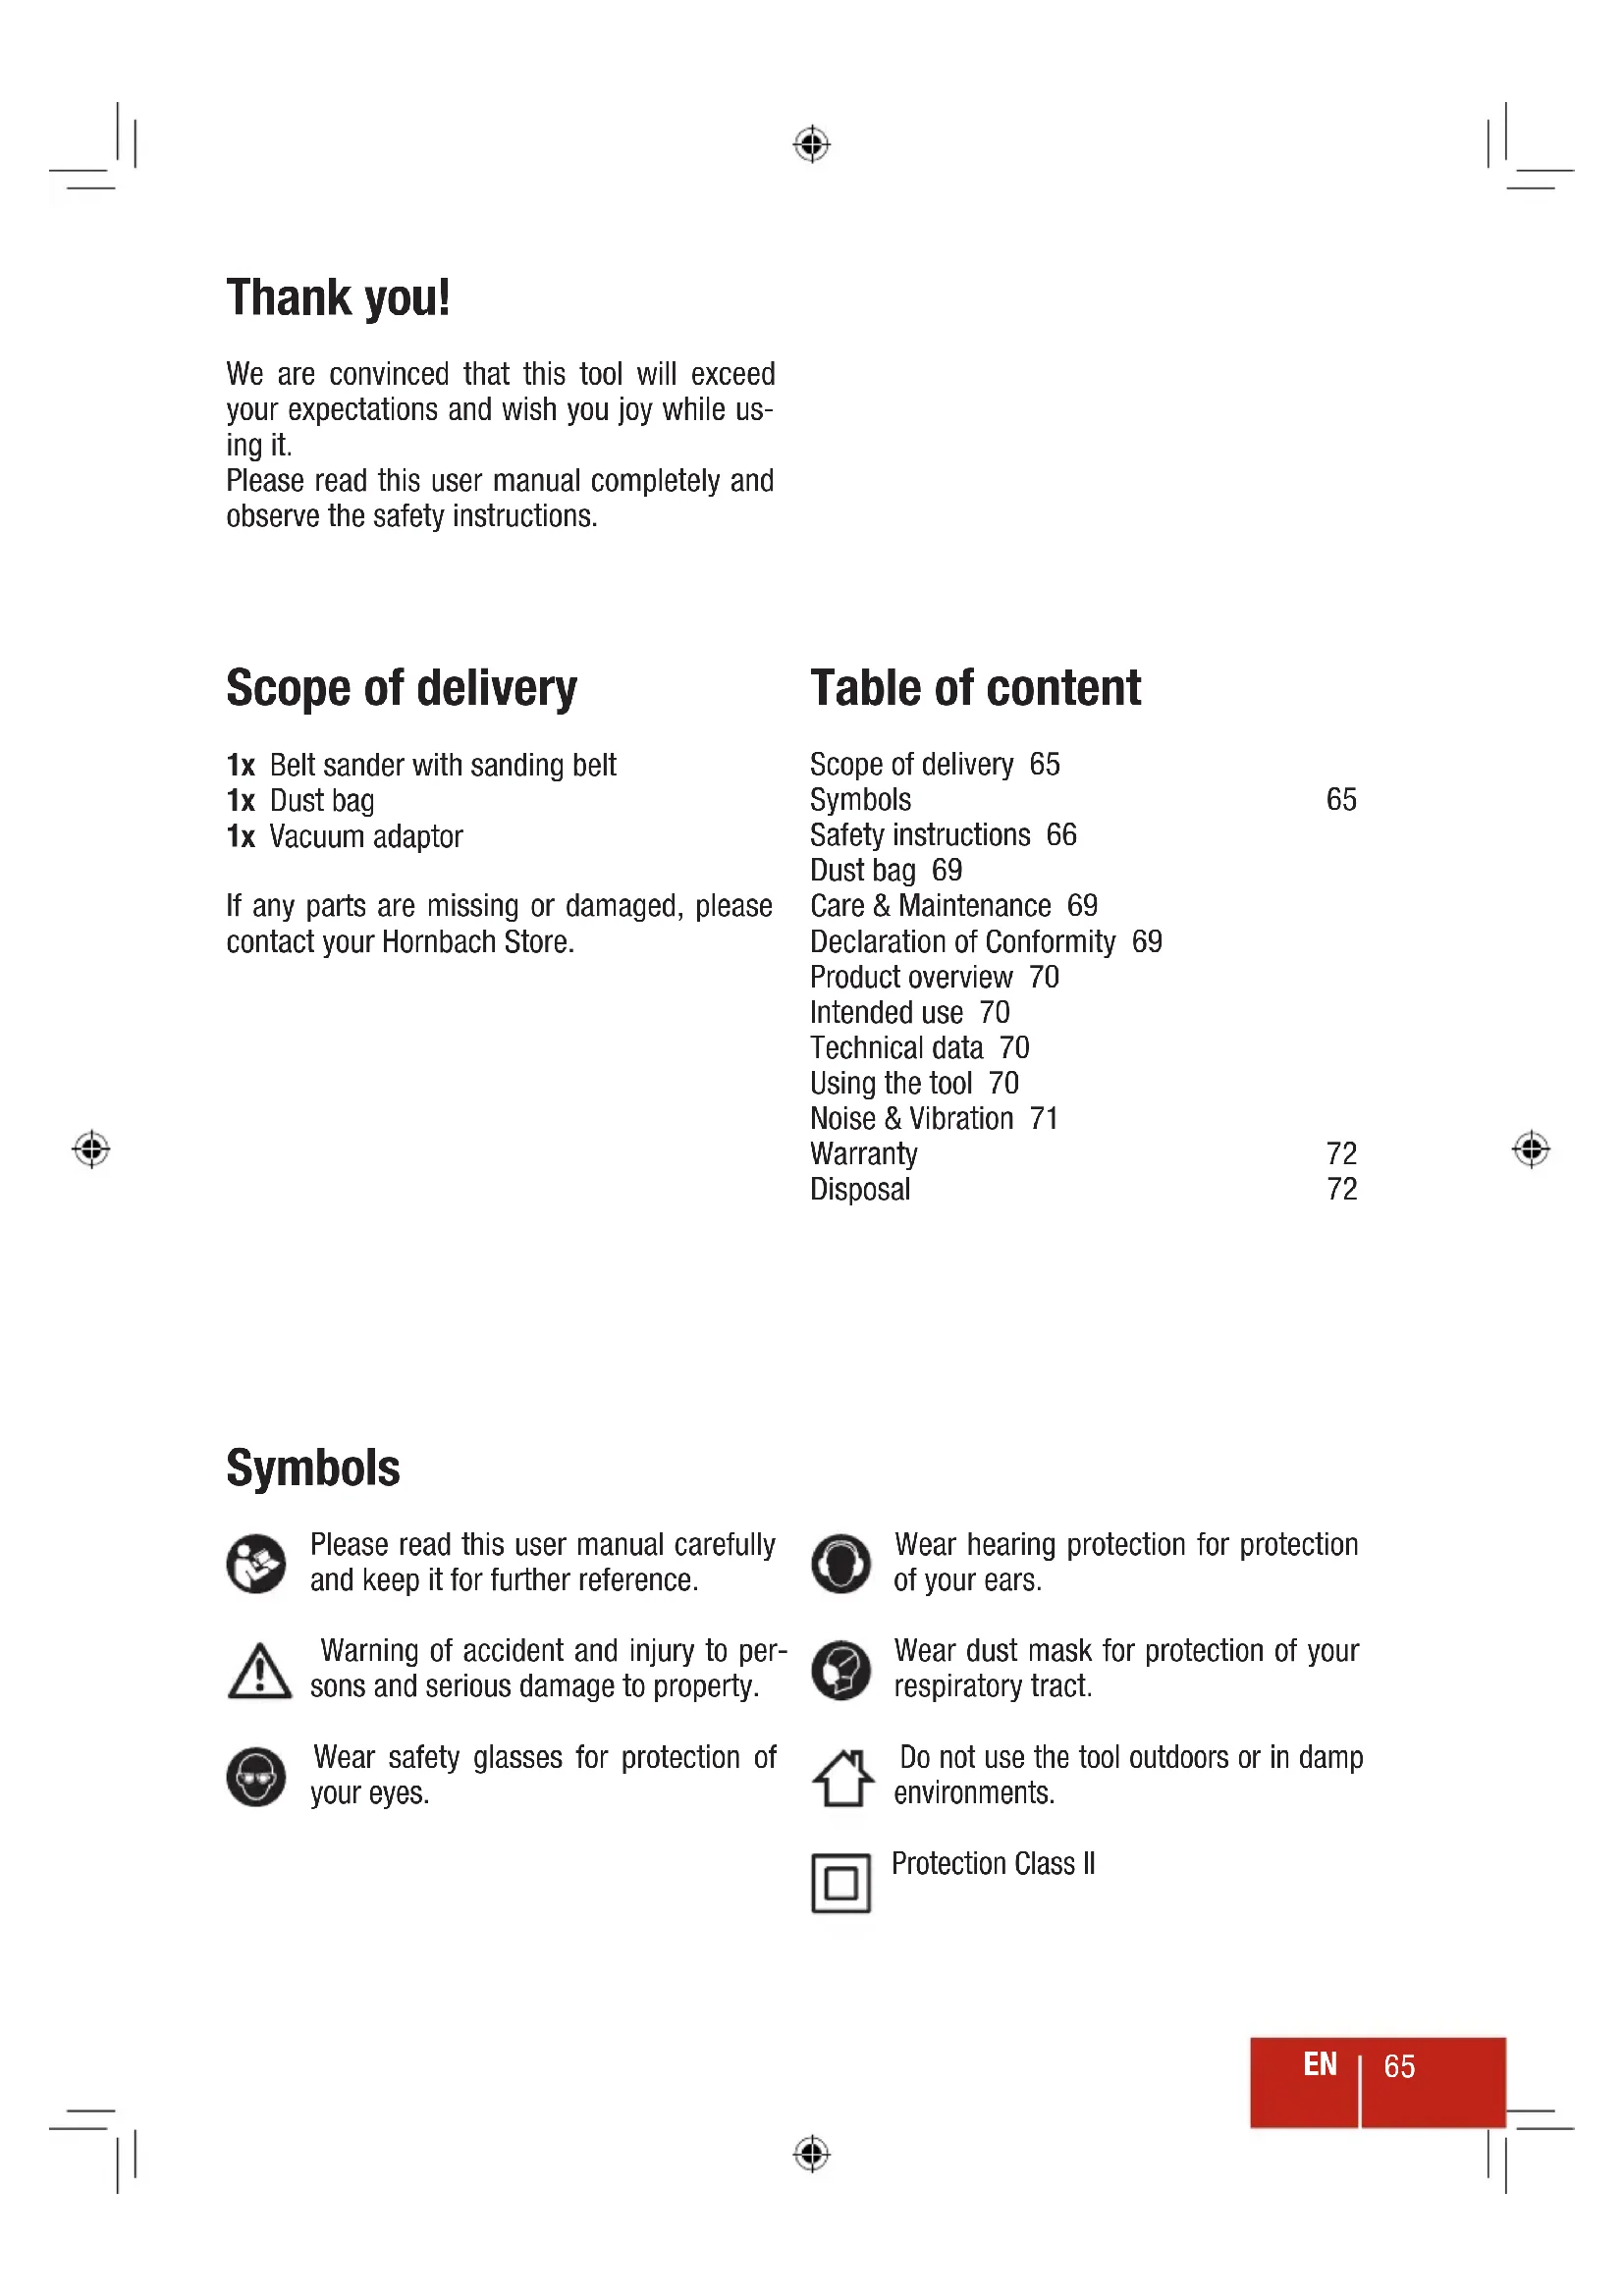
Pattfield® ERGO TOOLSWe are convinced that this tool will exceed your expectations and wish you joy while using it.
Please read this user manual completely and observe the safety instructions.
Scope of delivery
1x Belt sander with sanding belt
1x Dust bag
1x Vacuum adaptor
If any parts are missing or damaged, please contact your Hornbach Store.
Table of content
Scope of delivery 65
Symbols 65
Safety instructions 66
Dust bag 69
Care & Maintenance 69
Declaration of Conformity 69
Product overview 70
Intended use 70
Technical data 70
Using the tool 70
Noise & Vibration 71
Warranty 72
Disposal 72
Symbols

Please read this user manual carefully and keep it for further reference.

Warning of accident and injury to persons and serious damage to property.

Wear safety glasses for protection of your eyes.

Wear hearing protection for protection of your ears.

Wear dust mask for protection of your respiratory tract.

Do not use the tool outdoors or in damp environments.

Protection Class II
Safety Instructions
GENERAL POWER TOOL SAFETY WARNINGS

WARNING Read all safety warnings and all instructions. Failure to follow the warnings and instructions may result in electric shock, fire and/or serious injury.
Save all warnings and instructions for future reference.
The term „power tool“ in the warnings refers to your mains-operated (corded) power tool or battery-operated (cordless) power tool.
1 WORK AREA SAFETY
a) Keep work area clean and well lit. Cluttered or dark areas invite accidents.
b) Do not operate power tools in explosive atmospheres, such as in the presence of flammable liquids, gases or dust. Power tools create sparks which may ignite the dust or fumes.
c) Keep children and bystanders away while operating a power tool. Distractions can cause you to lose control.
2 ELECTRICAL SAFETY
a) Power tool plugs must match the outlet. Never modify the plug in any way. Do not use any adapter plugs with earthed (grounded) power tools. Unmodified plugs and matching outlets will reduce risk of electric shock.
b) Avoid body contact with earthed or grounded surfaces, such as pipes, radiators, ranges and refrigerators. There is an increased risk of electric shock if your body is earthed or grounded.
c) Do not expose power tools to rain or wet conditions. Water entering a power tool will increase the risk of electric shock.
d) Do not abuse the cord. Never use the cord for carrying, pulling or unplugging the power tool. Keep cord away from heat, oil, sharp edges or moving parts. Damaged or entangled cords increase the risk of electric shock.
e) When operating a power tool outdoors, use an extension cord suitable for outdoor use. Use of a cord suitable for outdoor use reduces the risk of electric shock.
f) If operating a power tool in a damp location is unavoidable, use a residual current device (RCD) protected supply. Use of an RCD reduces the risk of electric shock.
3 PERSONAL SAFETY
a) Stay alert, watch what you are doing and use common sense when operating a power tool. Do not use a power tool while you are tired or under the influence of drugs, alcohol or medication. A moment of inattention while operating power tools may result in serious personal injury.
b) Use personal protective equipment. Always wear eye protection. Protective equipment such as dust mask, non-skid safety shoes, hard hat, or hearing protection used for appropriate conditions will reduce personal injuries.
c) Prevent unintentional starting. Ensure the switch is in the off-position before connecting to power source and/or battery pack, picking up or carrying the tool. Carrying power tools with your finger on the switch or energising power tools that have the switch on invites accidents.
d) Remove any adjusting key or wrench before turning the power tool on. A wrench or a key left attached to a rotating part of the power tool may result in personal injury.
e) Do not overreach. Keep proper footing and balance at all times. This enables better control of the power tool in unexpected situations.
f) Dress properly. Do not wear loose clothing or jewellery. Keep your hair, clothing and gloves away from moving parts. Loose clothes, jewellery or long hair can be caught in moving parts.
g) If devices are provided for the connection of dust extraction and collection facilities, ensure these are connected and properly used. Use of dust collection can reduce dust-related hazards.
4 POWER TOOL USE AND CARE
a) Do not force the power tool. Use the correct power tool for your application. The correct power tool will do the job better and safer at the rate for which it was designed.
b) Do not use the power tool if the switch does not turn it on and off. Any power tool that cannot be controlled with the switch is dangerous and must be repaired.
c) Disconnect the plug from the power source and/or the battery pack from the power tool before making any adjustments, changing accessories, or storing power tools. Such preventive safety measures reduce the risk of starting the power tool accidentally.
d) Store idle power tools out of the reach of children and do not allow persons unfamiliar with the power tool or these instructions to operate the power tool. Power tools are dangerous in the hands of untrained users.
e) Maintain power tools. Check for misalignment or binding of moving parts, breakage of parts and any other condition that may affect the power tool's operation. If damaged, have the power tool repaired before use. Many accidents are caused by poorly maintained power tools.
f) Keep cutting tools sharp and clean. Properly maintained cutting tools with sharp cutting edges are less likely to bind and are easier to control.
g) Use the power tool, accessories and tool bits etc. in accordance with these instructions, taking into account the working conditions and the work to be performed. Use of the power tool for operations different from those intended could result in a hazardous situation.
5 SERVICE
a) Have your power tool serviced by a qualified repair person using only identical replacement parts. This will ensure that the safety of the power tool is maintained.
MACHINE SPECIFIC SAFETY WARNINGS FOR SANDERS
a) Hold power tool by insulated gripping surfaces, because the belt may contact its own cord. Cutting a “live” wire may make exposed metal parts of the power tool “live” and could give the operator an electric shock.
b) Use the machine only for dry sanding. Penetration of water into the machine increases the risk of an electric shock.
c) Always wait until the machine has come to a complete stop before placing it down. The tool insert can jam and lead to loss of control over the power tool.
d) Pay attention that no persons are put at risk through sparking. Remove any combustible materials in the vicinity. Sparking occurs when sanding metal materials.
e) Caution, fire hazard! Avoid overheating the object being sanded as well as the sander. Always empty the dust bag before taking breaks. In unfavourable conditions, e.g., when sparks emit from sanding metals, sanding debris in the dust bag, micro filter or paper sack (or in the filter sack or filter of the vacuum cleaner) can self-ignite. Particularly when mixed with remainders of varnish, poly-urethane or other chemical materials and when the sanding debris is hot after long periods of working.
f) When working with the machine, always hold it firmly with both hands and provide for a secure stance. The power tool is guided more secure with both hands.
g) Secure the workpiece. A workpiece clamped with clamping devices or in a vice is held more secure than by hand.
h) Do not touch and/or inhale harmful/toxic dust generated during sanding. All persons in the vicinity of the work area must wear appropriate personal protective equipment for protection against harmful/toxic dusts. Use the dust extraction facility and keep the work area well ventilated.
i) Ensure that you have removed foreign objects such as nails and screws from the workpiece before commencing sanding.
j) Do not force sander, let the tool do the work at a reasonable speed. Overloading will occur if too much pressure is applied and the motor slows resulting in inefficient sanding and possible damage to the sander motor.
k) Don't continue to use worn, torn or heavily clogged sanding belts.
I) Don't touch the moving sanding belt.
Dust bag
Use of the dust bag can reduce dust-related hazards.
Make sure the dust bag is not full or clogged. To clean the dust bag, remove it from the dust port 9. Open the zipper and carefully shake the dust bag with the opening pointing downwards to remove the sanding dust.
Care & Maintenance

Caution! Make sure the tool is switched off and unplugged.
- Always keep the tool clean, dry and free of oil or grease.
- Wear safety glasses to protect your eyes whilst cleaning.
- For safe and proper working, always keep the machine and ventilation slots clean.
- Regularly check to see if any dust or foreign matter has entered the grills near the motor and around the on/off switch. Use a soft brush to remove any accumulated dust.
- If the body of the tool needs cleaning, wipe it with a soft damp cloth. A mild detergent can be used but nothing like alcohol, petrol or other cleaning agent.
- Never use caustic agents to clean plastic parts.
- Lubricate all moving parts at regular intervals.
- Periodically check all fixings. These could become loose with time due to vibration.

Caution! If the supply cord is damaged, it must be replaced by the
manufacturer or its service agent or similarly qualified person in order to avoid hazard.
Declaration of conformity
CE We declare, that the product described in Technical Data:

text_image
Pattfield® ERGO TOOLS850 W Belt Sander PA-900BS
manufactured for:
Hornbach Baumarkt AG
Hornbachstraße 11
76879 Bornheim / Germany
is in conformity with the following directives:
Machinery Directive 2006/42/EC
EMC Directive 2004/108/EC
and in accordance to the following applicable harmonized standards:
EN 60745-1/A11:2010
EN 60745-2-4/A11:2011
EN 55014-1/A2:2011
EN 55014-2/A2:2008
EN 61000-3-2/A2:2009
EN 61000-3-3:2008
A. Indiana Jale
Andreas Back
Head of Quality Assurance
1 On / Off switch
2 Drive wheel
3 Belt release lever
4 Sanding belt
5 Auxiliary handle
6 Belt run adjust knob
7 Power cord
8 Lock on button
9 Dust port
Intended Use
The tool is intended for dry sanding of wood, plastic, metal, filler as well as coated surfaces. The tool is not intended for commercial use. Any other use or modification to the tool is considered as improper use and could cause considerable dangers.
Using the tool
- Place the tool on the workpiece so that the complete sanding belt is in contact. Make sure your workpiece can not slip.
- To switch on the tool, press and hold the on / off switch 1. To lock the on / off switch 1 in position, press the lock on button 8 while the on / off switch 1 is pressed. Start working, while holding the tool firmly with both hands.
- Move the tool slowly over the workpiece in parallel lines and successive passes.
- To switch off the tool, press and release the on / off switch 1.

Warning! Only switch the tool on when the sanding belt is in full conth the workpiece.
Technical Data
Nominal voltage 230 V / \~50 Hz
Rated power 850 W
No-load belt speed 300 m/min
Belt size 76 x 533 mm
Weight 2.8 kg
Protection class / II
Degree of protection IP 20
Sound pressure level ( L_pA )
Sound power level ( L_wA )
Max. vibration emission ( a_h )

87 dB(A) / Uncertainty K = 3 dB(A)
98 dB(A) / Uncertainty K = 3 dB(A)
2.7 m/s ^2 / Uncertainty K = 1.5 m/s ^2
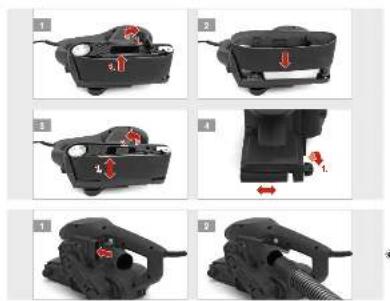
DUST BAG
1 Connect the dust bag to the dust port 9.
2 Use the zipper on the dust bag to empty it.

Make sure the dust bag is empty and not clogged.

Never use the tool without a dust collection system attached.
SANDING BELT
1 Release the belt release lever 3 and remove the sanding belt 4 from the tool.
2 Apply a new sanding belt 4 to the drive mechanism.

Caution! Make sure the tool is switched off and unplugged.

Caution! Observe the rotation direction of the sanding belt.
3 Centre the sanding belt 4 on the drive mechanism and lock the belt release lever 3.
4 To adjust the belt run, turn the belt run adjust knob 6 left or right until the sanding belt 4 runs straight.

Do not use the same sanding paper for metal and wood.
DUST COLLECTION
1 Consoil the vacuum clear arc can be used to collect the dust. Connect the vacuum adaptor to the dust port 9.
2 vacuum adaptor.
Noise & Vibration
The values given in these instructions have been measured in accordance with a standardized measurement procedure specified in EN 60745 and can be used to compare tools. It may be used for a preliminary assessment of exposure. The declared vibration data represents the main applications of the tool, but different uses of the tool or poor maintenance can result in different vibration data. This may significantly increase the vibration level over the total working period.
An estimation of the vibration level should also take into account the intervening periods, when the tool is switched off or it running but is not actually in use. This can result in a much lower vibration load over the whole working period.
Additional safety measure can be taken to protect the user from effects of vibration: Maintain the tool and its accessories, keep the hands warm and organize work patterns.
Warranty
In case of malfunctions, which are pointing out material or manufacturing faults, please contact your Hornbach store:
- These conditions are ruling additional warranty performances and are free of charge. The warranty rules given by law will remain untouched.
- The warranty performance is limited on material or manufacturing faults and the elimination of those or alternatively exchange of the product. As our products are not constructed for professional use, we see the warranty contract as not valid, if the product is used under those circumstances. Excluded are warranty claims for transportation damages, damages coming from non-observance of the installation or user manual (like connection to wrong voltage or wrong electricity), unprofessional installation, abuse or incorrect use (like overstressing the product or usage of not approved tools or accessories), non-observance of the maintenance and safety rules, infiltration of foreign objects (like sand, stones or dust), wrong force or man inducted events (like damages by falling down) plus normal accepted attrition (like battery packs, blades and so on). The warranty claim expires if intrusions were already done.
- The warranty period is three years and is starting with the date of purchase of the product. Warranty claims must be raised within two weeks after realising the defect. Warranty claims coming later are excluded. The warranty period is neither extended after repair or exchange nor a new warranty period is started for the product or possible spare parts.
- To enforce warranty claims contact your Hornbach store and show your bill as an original or another dated buying proof. Therefore keep your receipt accurately. Explain the reason of your claims as good as
possible. Is the defect part of our warranty performance, you will get a repaired or new product at once.
Disposal
The crossed-out wheeled bin logo requires the separate collection of waste electric and electronic equipment (WEEE). Such equipment may contain dangerous and hazardous substances. These tools must be returned to a designated collection point for the recycling of WEEE and must not be disposed as unsorted municipal waste. By doing so, you will help to conserve resources and protect the environment. Contact your local authorities for more information.
Children must not play with plastic bags and packaging material, due to possible injury or danger of suffocation. Store such material safely or dispose of environmentally friendly.