CM1 - Hi-fi system Humantechnik - Free user manual and instructions
Find the device manual for free CM1 Humantechnik in PDF.

User questions about CM1 Humantechnik
0 question about this device. Answer the ones you know or ask your own.
Ask a new question about this device
Download the instructions for your Hi-fi system in PDF format for free! Find your manual CM1 - Humantechnik and take your electronic device back in hand. On this page are published all the documents necessary for the use of your device. CM1 by Humantechnik.
USER MANUAL CM1 Humantechnik
Operating Instructions
Page 22
Communication system
F
Mode d'emploi
Page 42
The CM-1 communication system makes it noticeably easier for hearing-impaired people to take part in conversations in difficult situations.

Each time you switch it on, take care to ensure that the volume on the CM-1 receiver is set correctly to suit your personal needs in order to avoid possible damage resulting from excessive volume. To do this, turn the volume control down low.
The CM-1 communication system contains small parts which can be swallowed and is not suitable for children under the age of 3.
If the device is not used properly, the manufacturer will not accept any liability for damage and injury.
General information page 22
Standard scope of delivery 24
Commissioning and description of the controls
The CM-1 communication system 25
CM-1 receiver 25
CM-1 transmitter 29
CM charger 32
Interconnecting two CM chargers 34
Transport pouch 34
The CM-1 communication system in everyday use
At a presentation 35
Meeting around a table 36
In direct dialogue 37
On a trip - in a car, in a train compartment or on an airplane 37
Enjoying music or TV programmes 38
Changing the transmission frequency 38
Appendix
Safety instructions 39
Maintenance and care 40
Warranty 40
Environmental advice/Disposal 40
Technical data 41
CE symbol 41
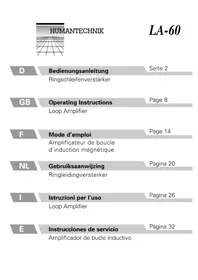
Standard scope of delivery
The complete pack contains the following components:
No. Device component Quantity delivered
1 CM-1 transmitter 1
2 CM-1 receiver and ring loop 1
3 CM charger with a bridge element and 2 safety screws
4 Power supply unit 1
5 Teleloop (induction loop) 1
6 Carrying loop 1
7 Pin to set the transmitter frequency 1
8 Audio cable 1
9 Transport pouche 1
10 Battery AAA* 3
Operating instructions 1
Warranty card 1
Commissioning and description of the controls
The CM-1 communication system
The CM-1 communication system is used for the wireless transmission of speech, music and sounds between a CM-1 transmitter and a CM-1 receiver which may be up to 30m apart.
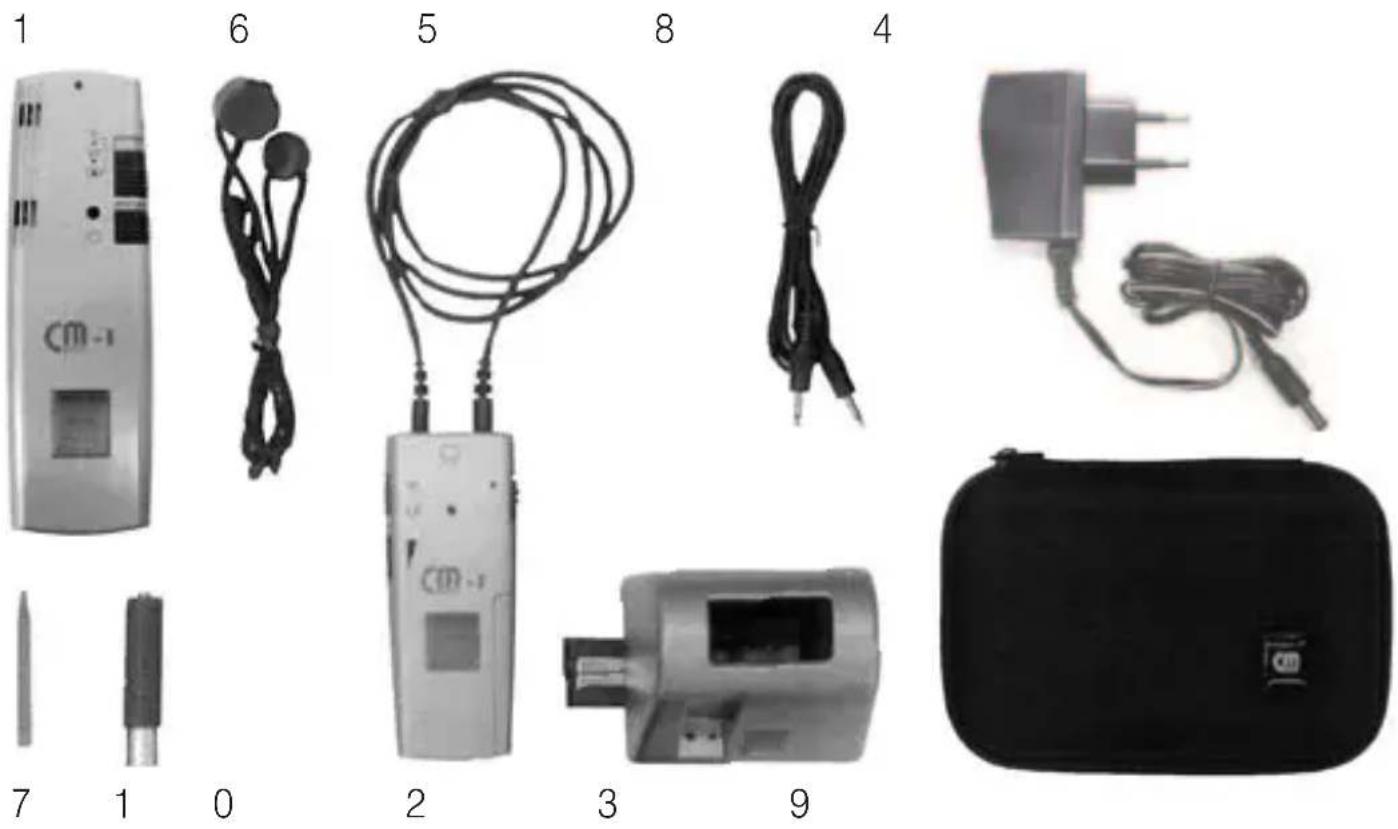
CM-1receiver
No. Control feature Function and application CM-1receiver
| 1 HI/LO selector Switch HI switch setting | Accentuates the transmission of the treble tones LO Accentuates the transmission of the bass tones |
| 2 LED (red) Battery charge status when device is switched on | |
| Continuous Battery is adequately charged light | |
| Flashing Will need to be recharged. light | |
| No light Battery discharged. Place the CM-receiver on the CM charger to re charge the battery. | |
No. Control feature Function and Application CM-1receiver
3 Volume Switch 0 No effective tone transmission control setting 1,2 low volume. (Recommended setting during commissioning) 3,4 Medium volume 5,6 High volume
4 On/off switch Switch On Push the switch up to activate your setting CM-1 receiver Off Push the switch down to deactivate your CM-1 receiver
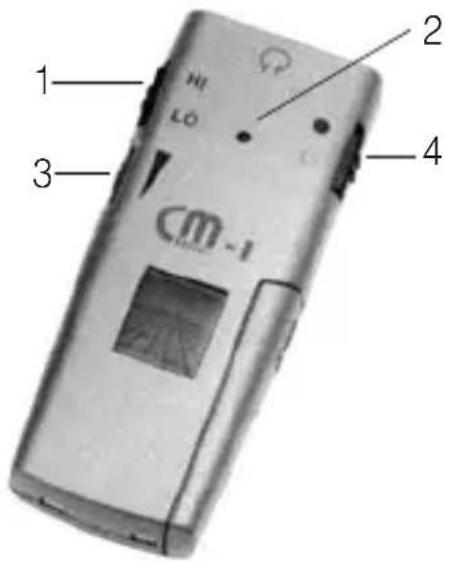
5 Headset jack Option for connecting a headset directly
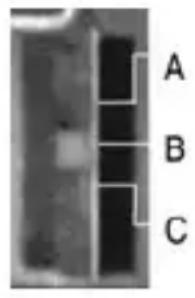
6 Frequency There is a slide switch for setting the following 3 frequency selector switch ranges in the battery compartment of the CM-1 receiver:
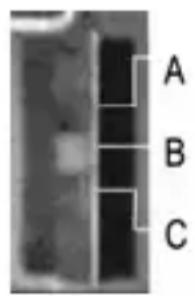
Switch A
setting B
C
863,500 MHz
864,000 MHz
864,500 MHz
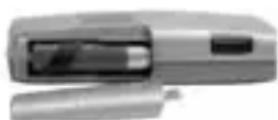
7 Battery compartment- The battery compartment is located on the bottom right. ment cover of the device. The battery is inserted into it.
Inserting the teleloop into the CM-1receiver:
The CM-1 receiver can be used in two ways:
- via the teleloop which is supplied
- via a headset (not included in the scope of delivery)
In order to ensure successful transmission via a teleloop, your hearing aid must have an integrated telecoil (T-coil) with which the sound information is transmitted inductively to your hearing aid. Hearing aids generally tend to have a small T/MT switch which can be used to set your hearing aid to inductive reception.
- Insert the two plugs fully into the jacks on the top of the device. The marking on the side of the plugs points towards the headset jack.
- Turn the plugs through 90^ so that the markings on the side point towards the top of the device.
Inserting the battery into the CM-1receiver:
The device runs on a rechargeable "AAA"-type battery. Where necessary, only use original replacement batteries.
It can also run on a non-rechargeable battery. If you run your CM-1 communication system on disposable batteries, don't place the receiver onto the CM charger.

Ensure that the battery is placed the right way around into the battery compartment. The stipulated installation direction is indicated on the bottom of the battery compartment.
N.B. This battery is not adequately charged upon delivery and has to be charged fully on the CM charger first of all.
- Switch off your CM-1 receiver.
- Remove the battery compartment cover from your CM-1 receiver.
- Place the supplied battery into the battery compartment (note the polarity!).
- Place the cover onto the battery compartment.
- Place the CM-1 receiver into one of the CM chargers.
The right-hand LED on the CM charger lights up in red during the entire charging process. After 10 hours, the battery is fully recharged and the LED now lights up in green.
CM-1transmitter
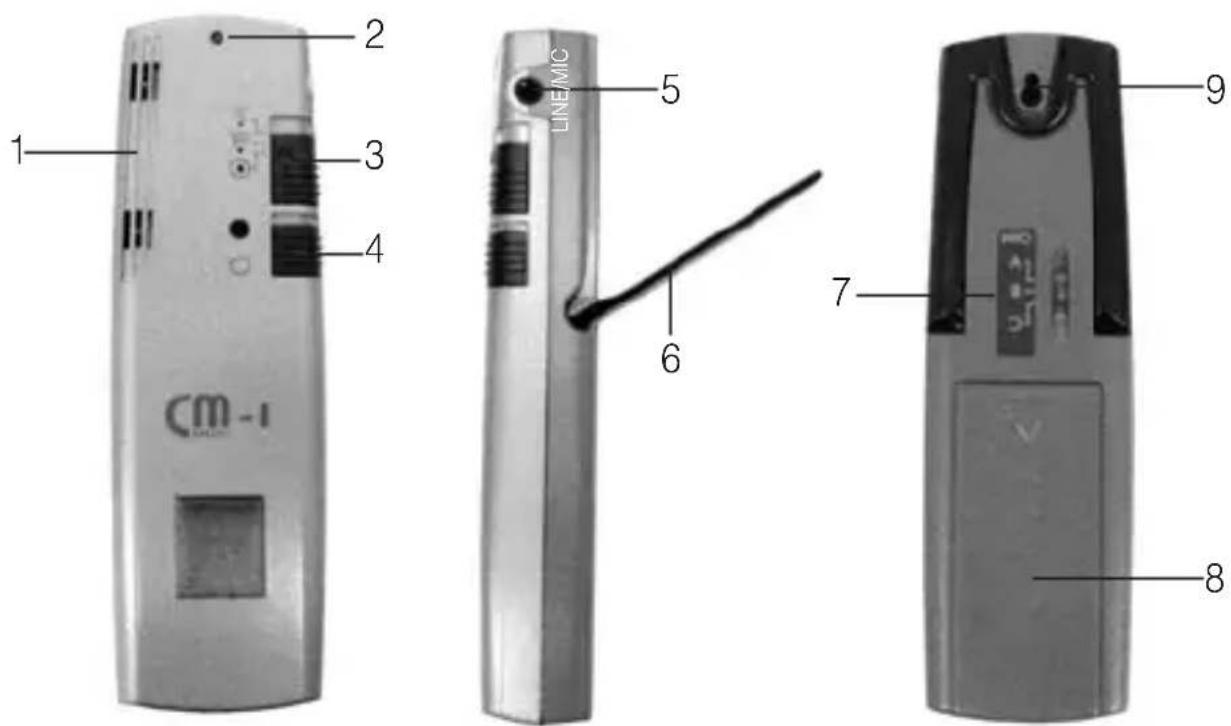
No. Control feature Function and application CM-1transmitter
1 Microphone Two microphones a defined distance from the area unit where the sound is picked up.
2 LED (red) Battery charge status when device is switched on
Continuous Battery is adequately charged light
0 Flashinglight Will need to be recharged.
No light Battery discharged. Place the CM-1 transmitter on the CM charger to recharge the battery.
3 Mode Switch selector switch setting
Super Zoom
Dialogue: audibly reduces disruptive sounds from the sides and from behind. When the device is switched on, the change to this switch position is indicated acoustically by three signal pulses.
Zoom Meeting: audibly reduces dis
ruptive sounds from behind and, at the same time, amplifies signals from in front. When the device is switched on, the change to this switch position is indicated acoustically by two signal pulses.
Omni Presentation:
cation: amplifies the signals from all directions. When the device is switched on, the change to this switch position is indicated acoustically by a signal pulse.
4 On/off switch Switch On Push the switch up to activate
setting your
CM-1 transmitter
Off Push the switch down to deactivate your CM-1 transmitter
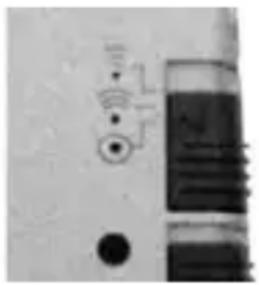
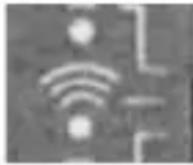
5 Audio/microphone in jack
Facility for connecting the CM-1 transmitter directly to your television or music system. Use the audio cable supplied. Instead of an audio cable, you can also connect an external microphone (special accessory). (If an external microphone is used, the built-in microphone will be switched off automatically.)
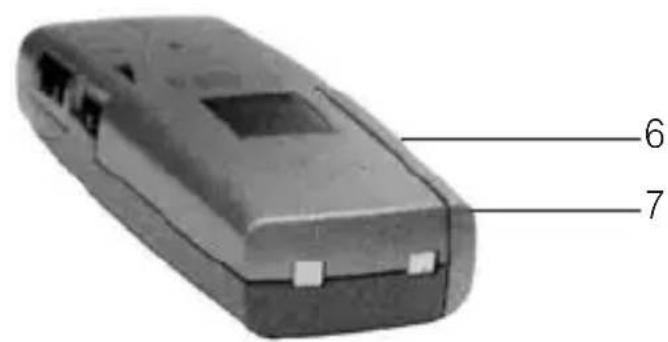
6 Stand Fould-out stand
7 Frequency There is a slide switch on the back of the device for setting selector switch the following 3 frequency ranges:
Switch A 863,500 MHz
setting B 864,000 MHz
C 864,500 MHz
Slide the selector switch to the required frequency position using the supplied pin.
Bear in mind at all times that the CM-1 transmitter and the CM-1 receiver have to be set to the same frequency ranges. Different frequency ranges prevent each transmission.
8 Battery compa- The battery compa ment is located on the back of the ment cover device and holds both batteries.
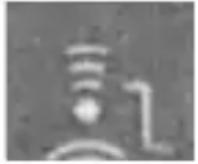
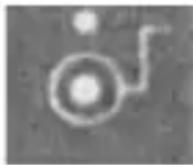
9 Recording Insert the knob of the pendant cord into the circular part device of the device and engage the knob perceptibly by pushing pendant cord it towards he tip of the device.
Inserting the batteries into the CM-1transmitter:
The device runs on two rechargeable "AAA"-type batteries. Where necessary, only use original replacement batteries.
It can also run on non-rechargeable batteries. If you run your CM-1 communication system on disposable batteries, don't place the transmitter onto the CM charger.

Ensure that the batteries are placed the right way around into the battery compartment. The stipulated installation direction is indicated on the bottom of the battery compartment.
N.B. This battery is not adequately charged upon delivery and has to be charged fully on the CM charger first of all.
- Switch off the CM-1 transmitter.
- Remove the battery compartment cover
- Place the supplied batteries into the battery compartment (note the polarity!).
- Place the cover onto the battery compartment.
- Place the CM-1 transmitter onto one of the CM chargers.
The right-hand LED on the CM charger lights up in red during the entire charging process. After 10 hours, the battery is fully recharged and the LED now lights up in green.
CM charger
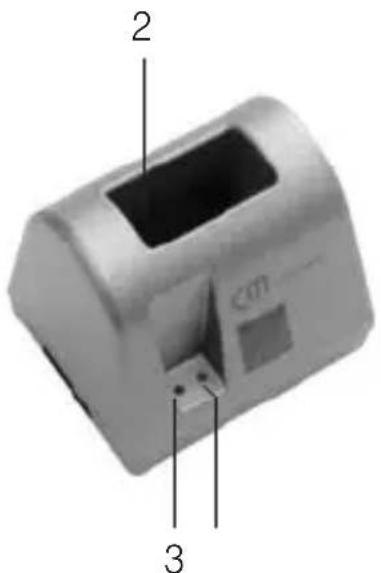
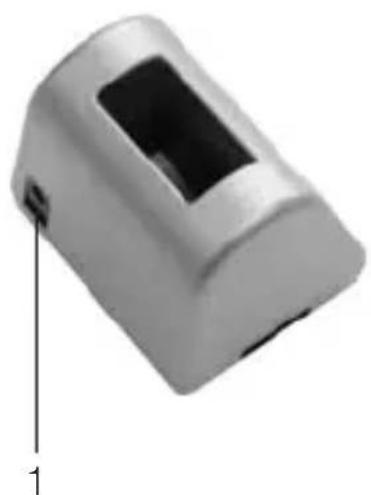
No. Control feature Function and application CM-1charger
1 12 V Jack for the power supply unit on the back of the voltage input CM-charger.
2 Charging cradle 3-pin charging cradle to hold the CM-1 transmitter for device unit or CM-1 receiver unit upright. components
3 LED (blue) Standby indicator lights Power supply is connected
4 LED (red/green) Charge indicator red Battery is recharging green Battery is fully recharged
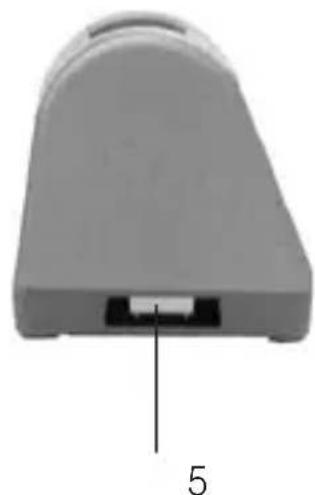
5 Bridge element connector slot
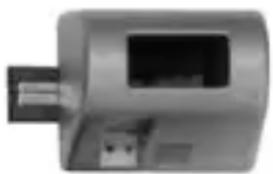
6 Bridge element
There is a connector slot in the base under a plastic cover. A bridge element can be pushed into it to enable two CM chargers to be connected.
Bridge element for connecting two CM chargers electrically.
Installation of the CM charger
- Plug the power supply unit into the 230V mains.
- Connect the CM charger to the power supply unit by inserting the round connector of the power supply unit into the DC jack on the back of the CM charger.
Interconnecting two CM chargers
- Disconnect the two chargers, which you wish to join, from the mains supply.
- Detach one bridge element from the base of one of the chargers.
- On the first charger, remove the plastic covers from the bridge element connector slot. Slide the bridge element into the connector slot.
- Fix the bridge element in place through the underside of the device base using the supplied screws.
- Remove the corresponding plastic cover from the second charger.
- Place the second charger onto the bridge element that protrudes out from the first charger.
- Slide the second charger flush against the first charger.
- Fix the second charger in place through the underside of the device base onto the bridge element using the supplied screws.
- Connect one of the two chargers to the power supply unit by inserting the round connector of the power supply unit into the DC jack on the back of the CM charger.
! Where there are two chargers connected together, only use one power supply unit!
Transport pouch

The CM-1 communication system in everyday use

You can influence the tone of the sound transmitted by varying the tone pattern on the HI/LO selector switch: the HI position accentuates the transmission of the treble tones.
At a presentation

You are seated in groups around a number of tables in a presentation room, for example.
Sound is distributed evenly throughout the room via a loudspeaker system.
Occasional questions are put to the speaker from people seated at the groups of tables.
Use "Omni" transmission mode.
- Set your hearing aid to "T" or "MT" in order to transmit sound information directly to the T-coil in your hearing aid via the teleloop, or connect a headset to a CM-1 receiver.
- Slide the mode selector switch to the Omni position.
- Position your CM-1 transmitter as centrally as possible, e.g. on the conference table.
- Use the fold-out stand to raise the microphone unit somewhat and to mechanically dampen jolting noises from the surface of the table.
- Switch the CM-1 transmitter and CM-1 receiver on at the on/off switch.
- Adjust the transmission volume to a comfortable level by setting the volume controller on your CM-1 receiver to an appropriate level.
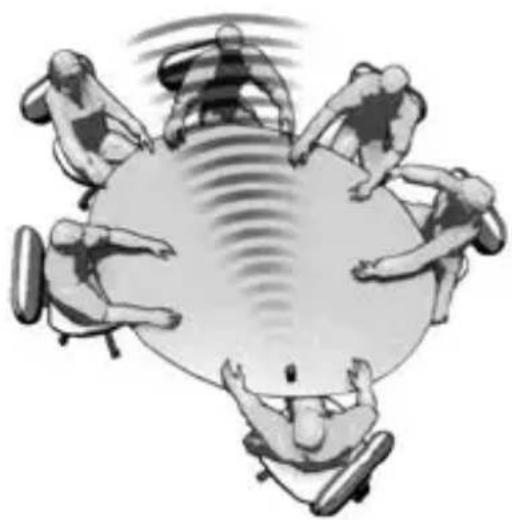
Meeting "around a table"

You are taking part in the meeting shown.
→ The other people are speaking at different levels.
Use the "Zoom" transmission mode to reduce disruptive sounds from behind perceptibly and, at the same time, to amplify speech in front of you.
- Set your hearing aid to "T" or "MT" in order to transmit sound information directly to the T-coil in your hearing aid via the teleloop, or connect a headset to a CM-1 receiver.
- Slide the mode selector switch to the Zoom position.
- Position your CM-1 transmitter as close as possible to the speaker, whereby the device's microphone unit should be pointing as directly as possible towards the speaker.
- Switch the CM-1 transmitter and CM-1 receiver on at the on/off switch.
- Adjust the speech volume to a comfortable level by setting the volume controller on your CM-1 receiver to an appropriate level.
In "direct" dialogue
You are having a more private conversation with another person.
→ You would like to concentrate fully on this person.
You are distracted by all the other types of noise.
Use "Super Zoom" transmission mode to reduce all noises from the sides and from behind perceptibly and to filter out the other person.
- Change the position of your CM-1 transmitter so that it is pointing as directly as possible towards the other person.
- Slide the mode selector switch to the Super Zoom position.
- Adjust the transmission volume to a level which is reasonable for the conversation.
On a trip - in a car, in a train compartment or on an airplane
You are on a journey, for instance as part of a travel group on a train or bus, accompanied by someone in the car or traveling alone by air. You want to be able to chat to the person sitting beside you during the trip, however the person isn't sitting on the same side as your hearing aid.
The situation is compounded by all the other disruptive sounds on board, especially the permanent noise from the air-conditioning, in an airplane for example.
Just like having a private conversation at a meeting, you need to amplify all the sounds made by the other person with the greatest possible concentration.
The CM-1 produces the desired effect in Super Zoom transmission mode by reducing all noises from the sides and from behind perceptibly and by filtering out the conversation with the other person.
Enjoying music or TV programmes
There is an Audio/microphone in jack on the CM-1 transmitter which you can connect directly to your television or music system using the supplied audio cable. How to connect a device:
- Switch off the CM-1 transmitter and the CM-1 receiver.
- Set the volume control on the CM-1 receiver to a low value.
- Insert one of the two cinch plugs (Ø 3.5mm) into the Audio/microphone in jack of the CM-1 transmitter.
- Insert the other cinch plug into the audio output jack of your television or music system.
- Switch the CM-1 transmitter and the CM-1 receiver back on.
- Adjust the transmission volume to a comfortable level.
Changing the transmission frequency
If you experience transmission interference, this may be due to the fact that there are two CM-1 systems being operated in close proximity to one another.
The CM-1 transmitter and CM-1 receiver are capable of communicating in three different frequency ranges. The frequency ranges are characterized by the letters "A", "B" and "C" and apply to transmitters and receivers alike.

Bear in mind at all times that the CM-1 transmitter and the CM-1 receiver have to be set to the same frequency ranges. Discrepancy in frequency ranges will prevent any transmission.
- Switch off the CM-1 transmitter and the CM-1 receiver.
- Open the battery compartment on your CM-1 receiver and take out the battery.
- Use the supplied pin to adjust the frequency selector switch inside the battery compartment.
- Re-insert the battery and place the cover on the battery compartment.
- Turn the CM-1 transmitter around so that it is facing away from you.
- Use the supplied pin to adjust the frequency selector switch on the back of the CM-1 transmitter to the same value that you had previously selected for your CM-1 receiver.
- Switch the CM-1 transmitter and the CM-1 receiver back on.
Appendix
Safety instructions
The CM-1 communication system is designed in accordance with the current state of the art and recognized safety rules. Pay attention to the following safety instructions:
- Position the charger on a non-slip base.
- Lay the connecting cable so that it cannot be tripped over.
-
Never expose the device to the following sources of influence:
-
heaters
- direct sunlight
-
moisture
-
Protect the device from damp, dust, aggressive fluids and vapors.
- Only connect the connecting cables to the designated sockets / jackets.
- Only connect approved accessories.
- Under no circumstances may modifications of a technical or non-technical nature be made to the communication system.
- The CM-1 communication system contains small parts which can be swallowed and is not suitable for children under the age of 3.
Note: This product is not protected against splash water. Do not place any containers filled with water, such as flower vases, or anything with an open flame, such as a lit candle, on or near the product.
Please make sure that the batteries are not exposed to excessive heat from such as sunlight, fire or anything similar.
Maintenance and care
The CM-1 communication system does not require any maintenance. If the unit does become dirty, simply wipe it clean with a soft, damp cloth. Never use spirits, thinners or other organic solvents.
Do not set up the unit where it will be exposed to full sunlight for long periods. In addition it must be protected against excessive heat, moisture and severe mechanical shock.
Warranty
The CM-1 communication system is a very reliable product. Should a malfunction occur despite the unit having been set up and operated correctly, please contact your dealer or the manufacturer directly. This warranty covers the repair of the product and returning it to you free of charge. It is essential that you send in the product in its original packaging, so do not throw the packaging away. The warranty does not apply to damage caused by incorrect handling or attempts to repair the unit by people not authorized to do so (destruction of the seal on the unit). Repairs will only be carried out under warranty if the completed warranty card is returned accompanied by a copy of the dealer's invoice/till receipt.
Always specify the product number in any event.

Environmental advice/Disposal
Disposal of used electric and electronic units (applicable in the countries of the European Union and other European countries with a separate collection
system).
The symbol on the product or the packaging indicates that this product is not to be handled as ordinary household waste but has to be returned to a collecting point for the recycling of electric and electronic units. You protect the environment and health of your fellow men by the correct disposal of this products. Environment and health are endangered by a faulty disposal. Material recycling helps to reduce the consumption of raw material. You will receive further information on the recycling of this product from your local community, your communal disposal company or your local dealer.
Technical data
CM-1transmitter
Dimensions (H x W x D): 19 x 37x120 mm
Weight: 64 g
Power supply: 2 × 1,2V NiMH-batteries (LR03 type)
Charge time (following
complete discharge): max. 10 h
Operating time (load-dependent): max. 10-12 h
CM-1receiver
Dimensions (H x W x D): 20 x 39 x 96 mm
Weight: 45 g
Power supply: 1 x 1,2 V NiMH-batteries (LR03 type)
Charge time
(following complete discharge): max. 10 h
Operating time (load-dependent): max. 10-12 h
CM charger
Dimensions (H x W x D): 67 x 83 x 65 mm
Weight: 94g
Power supply via a PSU: Primary 220/230 V 50-60 Hz AC /
Secondary 12 V DC

CE symbol
This product conforms to the requirements of EU Directive 1999/5/EC on radio equipment and telecommunications terminal equipment and the mutual recognition of their conformity. Conformity with the afore-mentioned directive is confirmed by the CE symbol on the device.
Technical specifications subject to change without notice.
Informations generales
6 Support Support rabatable
Voeding: 2 × 1,2 V NiMH-accu's (type LR03)
Ladingsduur (na volledige ontlading): max. 10 h
Gebruiksduur
0 Nessuna transmission
Dimensioni (A x L x P) 67 x 83 x 65 mm
Peso: 94 g
Matt (H x B x D): 19 x 37x120 mm
Vikt: 64 g