LA215 - Hi-fi system Humantechnik - Free user manual and instructions
Find the device manual for free LA215 Humantechnik in PDF.
| Product type | Magnetic loop amplifier |
| Brand | Humantechnik |
| Model | LA215 |
| Dimensions (L x H x D) | 180 x 42 x 140 mm |
| Weight | 905 g |
| Power supply | 230 V AC, 50 Hz, 20 VA |
| Magnetic loop output power | 2.85 A (output current from 100 to 5000 Hz) |
| Recommended loop resistance | 0.5 to 1.5 Ohm |
| Supplied loop cable | 37 m, 0.75 mm² cross-section |
| Minimum cable length | 11 m (for 0.5 Ohm) |
| Audio inputs | 2 line inputs (A and B, RCA), 2 microphone inputs (one with priority, jack) |
| Headphone output | 3.5 mm jack socket |
| Settings | Volume, tone (bass/treble), microphone priority, AGC, source selection |
| Display | Loop level indicator |
| Special functions | AGC (automatic gain control), microphone priority, background noise reduction |
| Maintenance | Clean with a soft, slightly damp cloth |
| Safety | Not protected against water splashes; do not expose to humidity, heat or vibrations |
| Warranty | Free repair under conditions (return in original packaging, warranty coupon) |
| Included accessories | Connection cable, vertical support, microphone cable, 37 m loop cable, cable ties, cable set, instruction manual, warranty coupon |
| Standards | Conforms to European Union standards (CE declaration available) |
Frequently Asked Questions - LA215 Humantechnik
User questions about LA215 Humantechnik
0 question about this device. Answer the ones you know or ask your own.
Ask a new question about this device
Download the instructions for your Hi-fi system in PDF format for free! Find your manual LA215 - Humantechnik and take your electronic device back in hand. On this page are published all the documents necessary for the use of your device. LA215 by Humantechnik.
USER MANUAL LA215 Humantechnik
Operation Instructions
Page 8
Loop amplifier
F
Mode d'emploi
Page 14
natural_image
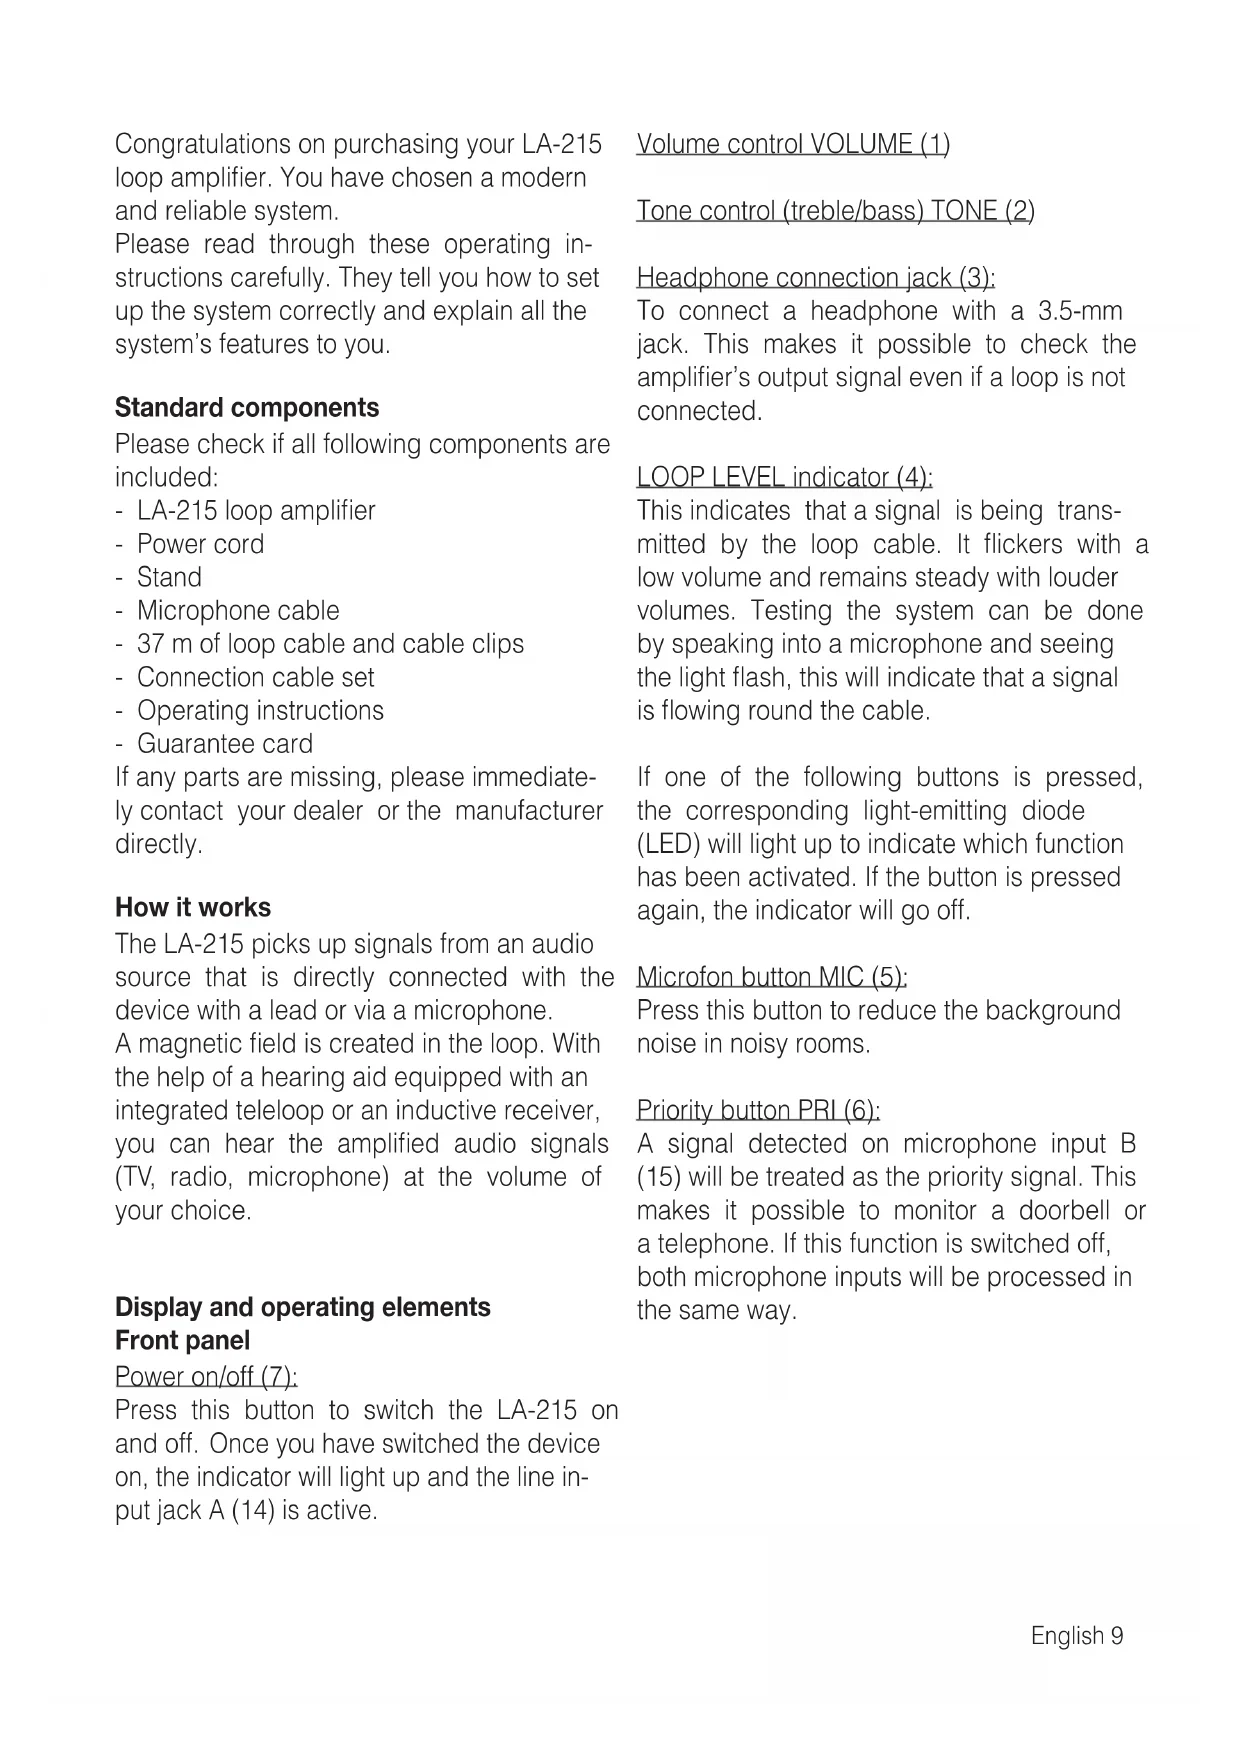
Diagram of a vertical electronic device with three circular buttons and a control knob (no text or symbols)Operating elements – Front panel
1 Volume control
2 Tone control (treble/bass)
3 Headphone connection jack
4 LOOP LEVEL indicator
5 Microphone button
6 Priority button
7 Power on/off
8 Button for the automatic gain control
9 Line input selection button
Operating elements – Back panel

10 Power jack
11 Loop connectors
12 LINE input level control
13 LINE input jack (B) line in
14 LINE input jack (A) line in
15 Priority microphone in jack (B)
16 Microphone in jack (A)
Congratulations on purchasing your LA-215 loop amplifier. You have chosen a modern and reliable system.
Please read through these operating instructions carefully. They tell you how to set up the system correctly and explain all the system's features to you.
Standard components
Please check if all following components are included:
- LA-215 loop amplifier
- Power cord
- Stand
- Microphone cable
- 37 m of loop cable and cable clips
- Connection cable set
- Operating instructions
- Guarantee card
If any parts are missing, please immediately contact your dealer or the manufacturer directly.
How it works
The LA-215 picks up signals from an audio source that is directly connected with the device with a lead or via a microphone.
A magnetic field is created in the loop. With the help of a hearing aid equipped with an integrated teleloop or an inductive receiver, you can hear the amplified audio signals (TV, radio, microphone) at the volume of your choice.
Display and operating elements Front panel
Power on/off (7):
Press this button to switch the LA-215 on and off. Once you have switched the device on, the indicator will light up and the line input jack A (14) is active.
Volume control VOLUME (1)
Tone control (treble/bass) TONE (2)
Headphone connection jack (3):
To connect a headphone with a 3.5-mm jack. This makes it possible to check the amplifier's output signal even if a loop is not connected.
LOOP LEVEL indicator (4):
This indicates that a signal is being transmitted by the loop cable. It flickers with a low volume and remains steady with louder volumes. Testing the system can be done by speaking into a microphone and seeing the light flash, this will indicate that a signal is flowing round the cable.
If one of the following buttons is pressed, the corresponding light-emitting diode (LED) will light up to indicate which function has been activated. If the button is pressed again, the indicator will go off.
Microfon button MIC (5):
Press this button to reduce the background noise in noisy rooms.
Priority button PRI (6):
A signal detected on microphone input B (15) will be treated as the priority signal. This makes it possible to monitor a doorbell or a telephone. If this function is switched off, both microphone inputs will be processed in the same way.
Button for the automatic gain control AGC (8):
If this function is activated, the volume in the induction loop will be limited to the volume selected with the volume control.
This eliminates the needs to constantly adjust the volume for different programs.
Line input selecting button LINE (9):
If you connect 2 audio sources to the LA-215, you can press this button to select the signal you want to hear. When the amplifier is switched on, line input jack A (14) is always active initially. Press this button to activate line in B (13). This function is only available for the LINE input jacks.
Back panel
LINE input level control - LINE INPUT
LEVEL (12):
This control knob can be used to set the overall volume of the input signal. In addition, the volume can be adjusted between the line and the microphone inputs.
Installation
1 Use the connection cable included with the device to connect an audio source to one of the two line in jacks (13, 14) on the back panel (Fig. B).
If your television set or your sound source is not equipped with a direct connection, use the microphone, which you can insert into one of the two microphone jacks (15, 16).
2 Connect the two ends of the loop (Fig. A) with the input jacks (11). Press the red and black button to insert the cable and release the button to lock it in place. Make sure that only the not insulated part of the cable is clamped into the connections. To remove the cable, press the button again and pull the cable out.
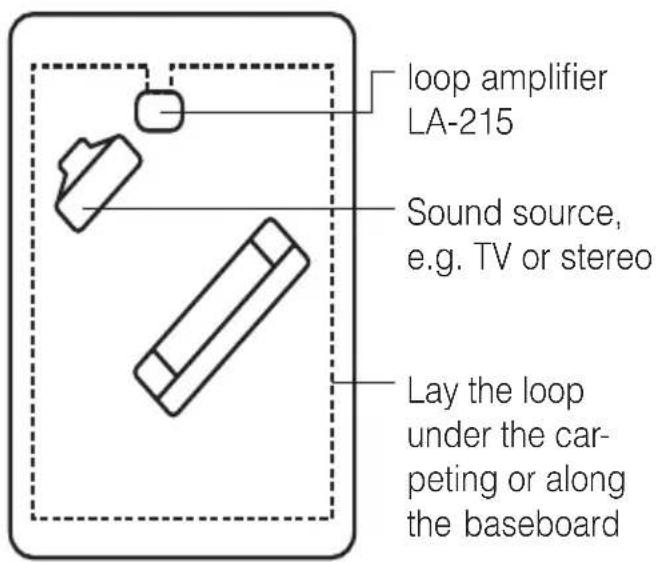
Fig. A
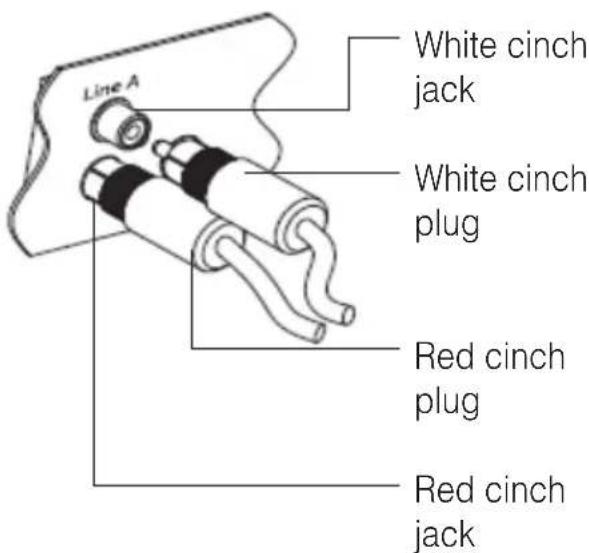
Fig. B
Operation
- Before you insert the power cord into the designated socket on the rear panel of the inductive loop amplifier, set the volume control to its lowest setting.
- Press the Power on/off button (7) to switch the loop amplifier on.
- Now anyone wearing a hearing aid must set it to the T or MT position.
- Adjust the volume control to the desired volume.
Important: Before you connect or disconnect an audio source, always pull the power cord out of the wall outlet.
Troubleshooting
No sound
- Check to make sure that all the cables are connected properly.
- Make sure that the amplifier is switched on.
- Make sure that the hearing aid is set to the "T" or "MT" function.
- Make sure that the volume is set correctly.
Volume level is not loud enough
- The volume control is set too low. Turn up the volume on the amplifier.
- The Line Input control is set too low. Turn up the Line Input control.
- Make sure that you are sitting up fairly straight. The more you lie down, the weaker the signal will become.
Sound distortion
- Loop volume is set too high. Turn the volume down.
- Connection cable is damaged. Replace the cable.
Background noise (humming)
- Switch the loop amplifier off and if the noise continues, this indicates interference caused by another device, such as the TV, neon lights or dimmer switches.
- If the noise disappears when the loop amplifier is switched off, the problem might be a system error, a damaged microphone cable or a noise that is being transmitted by the microphone.
Maintenance and care
The LA-215 loop amplifier does not require any maintenance. If the unit does become dirty, simply wipe it clean with a soft, damp cloth. Note: remove the LA-215 from mains socket! Never use spirits, thinners or other organic solvents. Do not set up the LA-215 loop amplifier where it will be exposed to full sunlight for long periods. In addition, it must be protected against excessive heat, moisture and severe mechanical shocks.
Note: This product is not protected against splash water. Do not place any container s filled with water, such as flower vases, or anything with an open flame, such as a lit candle, on or near the product.
Warranty
The LA-215 loop amplifier is a very reliable product. Should a malfunction occur despite the unit having been set up and operated correctly, please contact your dealer or the manufacturer directly.
This warranty covers the repair of the product and returning it to you free of charge. It is essential that you send in the product in its original packaging, so do not throw the packaging away.
The warranty does not apply to damage caused by incorrect handling or attempts to repair the unit by people not authorised to do so (destruction of the seal on the unit). Repairs will only be carried out under warranty if the completed warranty card is returned accompanied by a copy of the dealer's invoice/till receipt.
Always specify the product number in any event.
Disposal off used electric and electronic units (applicable in the countries of the Euro pean Union and other Euro pean countries with a separate collection system). The symbol on the product or the packaging indicates that this product is not to be handled as ordinary household waste but has to be returned to a collecting point for the recycling of electric and electronic units. You protect the environment and health of your fellow men by the correct disposal of this products. Environment and health are endangered by a faulty disposal. Material recycling helps to reduce the consumption of raw material. You will receive further information on the recycling of this product from your local community, your communal disposal company or your local dealer.
Specifications
Power connection: 230 V AC 50 Hz 20 VA
Loop output power: 2.85 A output power at 100-5000 Hz.
The loop is at full output power at a
resistance of between 0.5 and 1.5 ohms.
Loop cable: Single-wire loop cable 37 m long
(0.75 mm
^2 thick).
Minimum cable length 11 m = 0.5 ohms
Dimensions (WxHxD): 180 x 42 x 140 mm
Weight: 905 g

This product complies with European Union norms.
You can obtain EC compliance declarations from your dealer, or directly from the manufacturer of this product.
Technical specifications subject to change without notice.
natural_image
Illustration of a vertical electronic device with three circular gauges and a rotary knob (no text or symbols)natural_image
Illustration of a vertical electronic device with three circular gauges and a rotary knob (no text or symbols)natural_image
Illustration of a vertical electronic device with three circular gauges and a rotary knob (no text or symbols)For other service-partners in Europe please contact:
Humantechnik Germany
Tel.: ++49-76 21-9 56 89-0
Fax: ++49-76 21-9 56 89-70