Introson 2.4 - Hi-fi system Humantechnik - Free user manual and instructions
Find the device manual for free Introson 2.4 Humantechnik in PDF.

| Product type | 2.4 GHz digital wireless TV/audio listening system |
| Brand | Humantechnik |
| Model | Introson 2.4 |
| Transmission technology | Digital frequency hopping in 2.4 GHz ISM band |
| Transmitter power supply | 5 V / 550 mA via included power adapter |
| Receiver power supply | Lithium polymer battery 3.7 V / 350 mA (included) |
| Range | Up to 25 m |
| Frequency response | 30 Hz - 20 kHz |
| Harmonic distortion | < 0.5 % |
| Signal-to-noise ratio | > 75 dB |
| Main functions | 2.4 GHz wireless transmission, charging station, automatic shutdown without signal, microphone button for conversation, fast charging, compartment for 2 batteries, balance adjustment, sound clarity adjustment (bass/treble) |
| Included accessories | Transmitter, receiver (stethoscopic or LR with magnetic necklace), 2 lithium polymer batteries, power adapter, RCA audio adapter (Cinch), stereo audio cable (2 x 3.5 mm jack plugs), 6.3 mm / 3.5 mm jack adapter, external microphone, warranty certificate |
| Receiver type | Stethoscopic or with magnetic necklace (LR model) |
| Battery charging | Charging on the transmitter (charging station): red LED while charging, green when charged (approx. 2 h) |
| Safety | Do not recharge conventional batteries; use only original rechargeable batteries; do not expose to heat, sun or flames; respect the sound level to avoid hearing damage |
| Maintenance | Clean with a soft, dry cloth. Do not use abrasive products or solvents |
| Warranty | Free repair under conditions (return in original packaging, warranty certificate or invoice) |
| Compliance | Compliant with European directives (CE marking) |
| Weight | Not specified |
| Dimensions | Not specified |
Frequently Asked Questions - Introson 2.4 Humantechnik
User questions about Introson 2.4 Humantechnik
0 question about this device. Answer the ones you know or ask your own.
Ask a new question about this device
Download the instructions for your Hi-fi system in PDF format for free! Find your manual Introson 2.4 - Humantechnik and take your electronic device back in hand. On this page are published all the documents necessary for the use of your device. Introson 2.4 by Humantechnik.
USER MANUAL Introson 2.4 Humantechnik
GB Operation Instructions
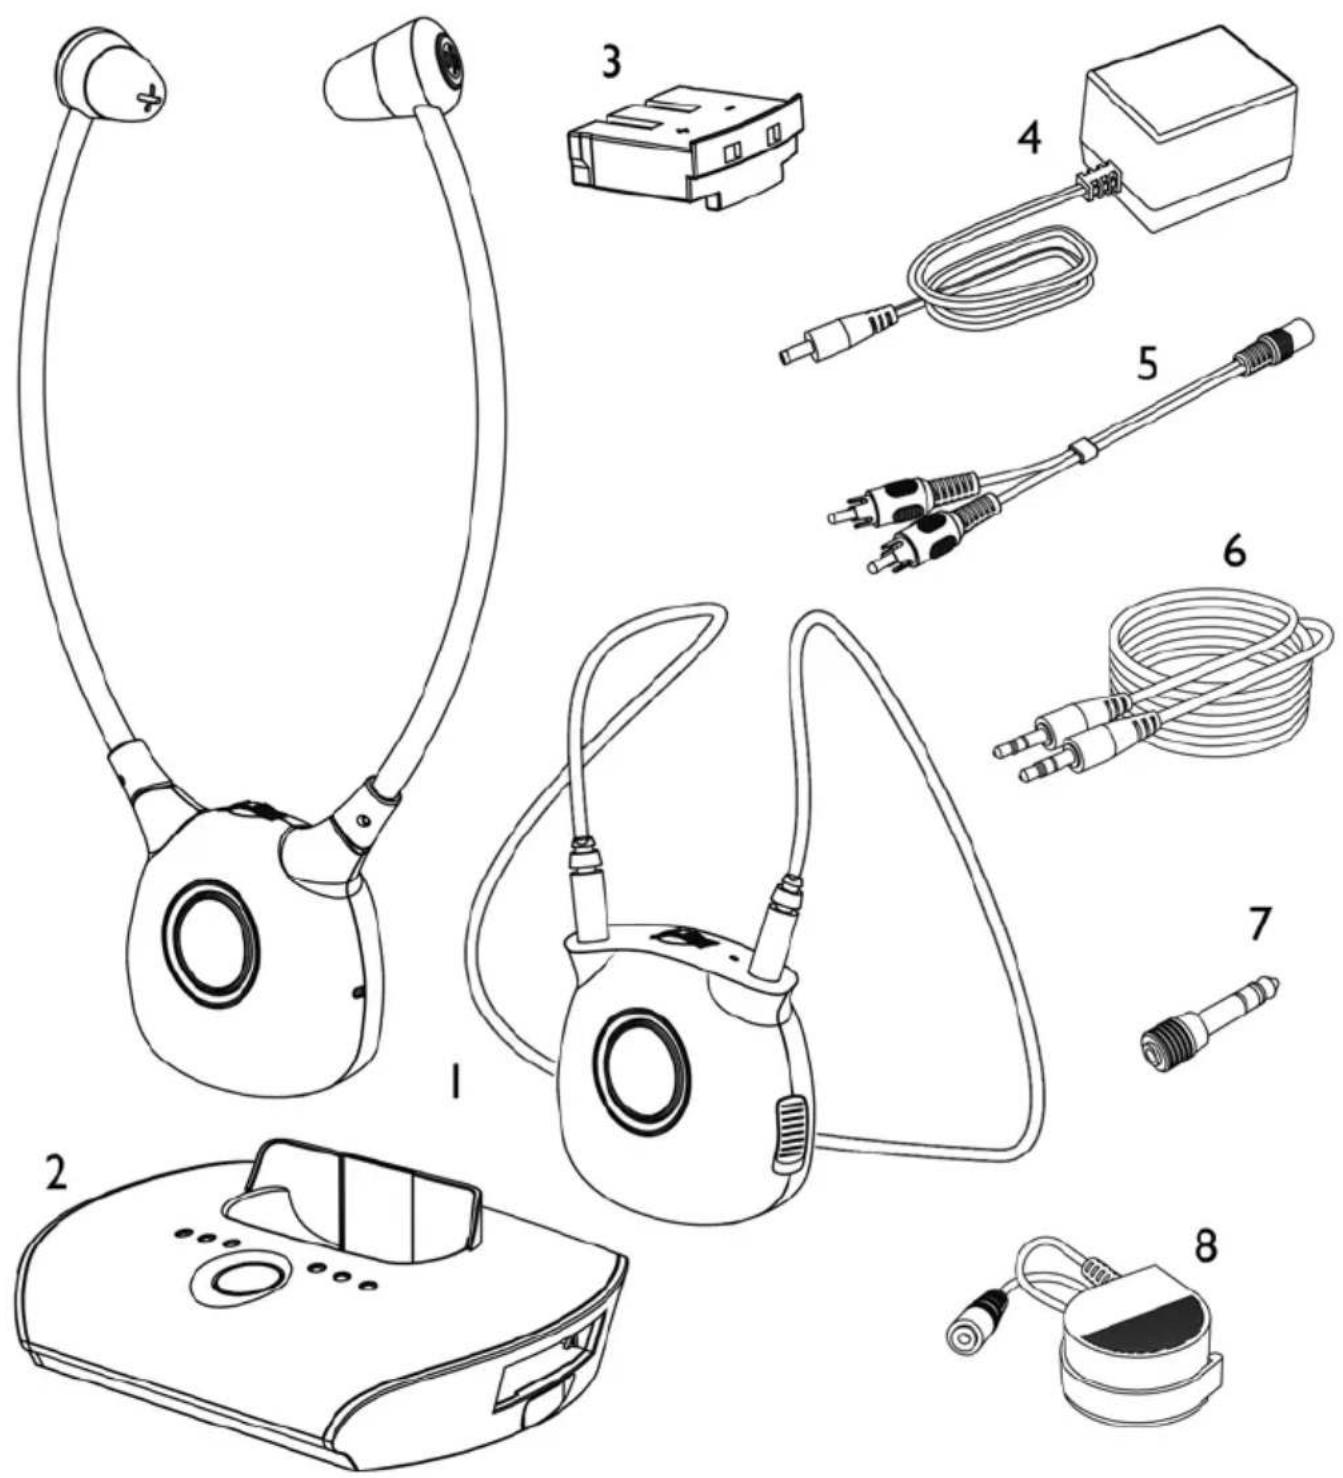
2.4 GHz wireless digital headset
1 Underchin- or loop receiver
2 Transmitter
3 Polymer Lithium Rechargeable Battery x 2 pieces
4 AC/DC Adapter
5 RCA Adapter Cable
6 Audio Cable (both ends with 3,5 mm stereo plug)
7 6,3 mm to 3,5 mm Adapter Plug
8 External Microphone
Warranty card (not depicted)
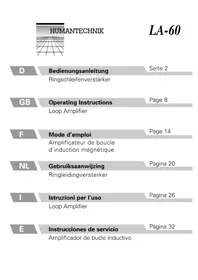
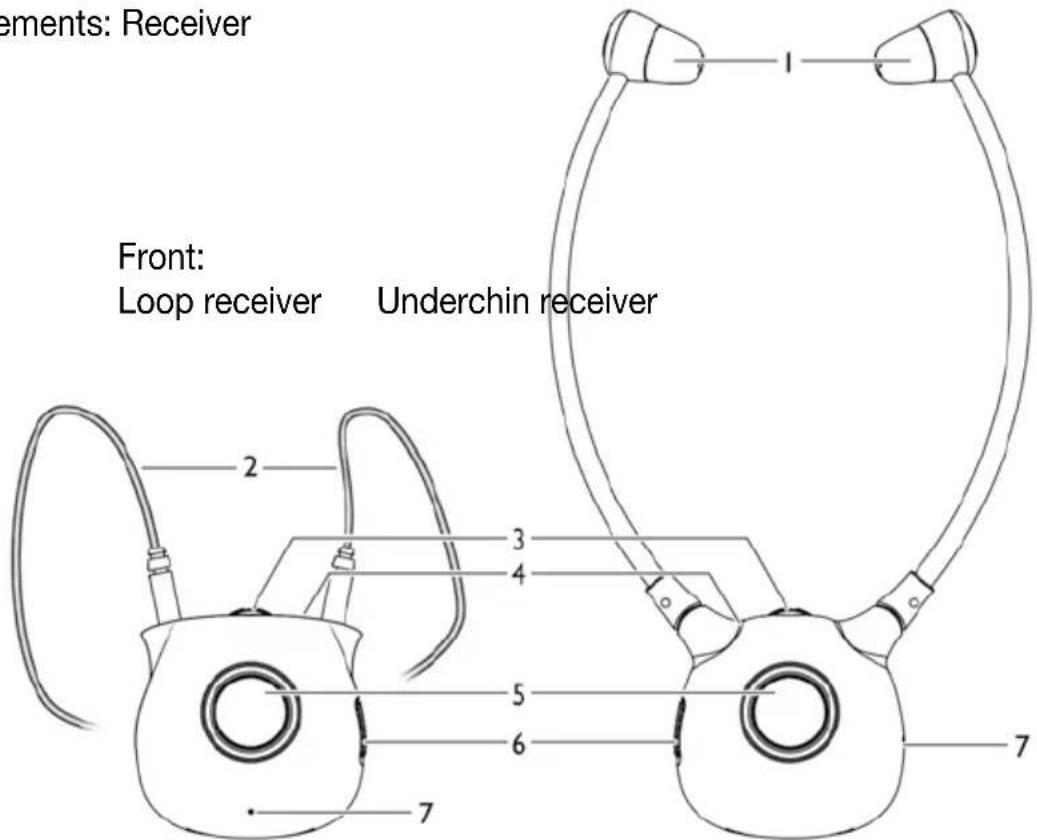
Function elements: Receiver
1 Adjustable Earbuds
2 Induction loop
3 Volume Control
4 LED Indicator of Power/Signal
5 MIC Button for Verbal Communication
6 Power On/Off Switch
7 Microphone
8 Sound Balance Control (Left/Middle/Right)
9 Battery
10 3.5 mm earphone jack (Type LR only)
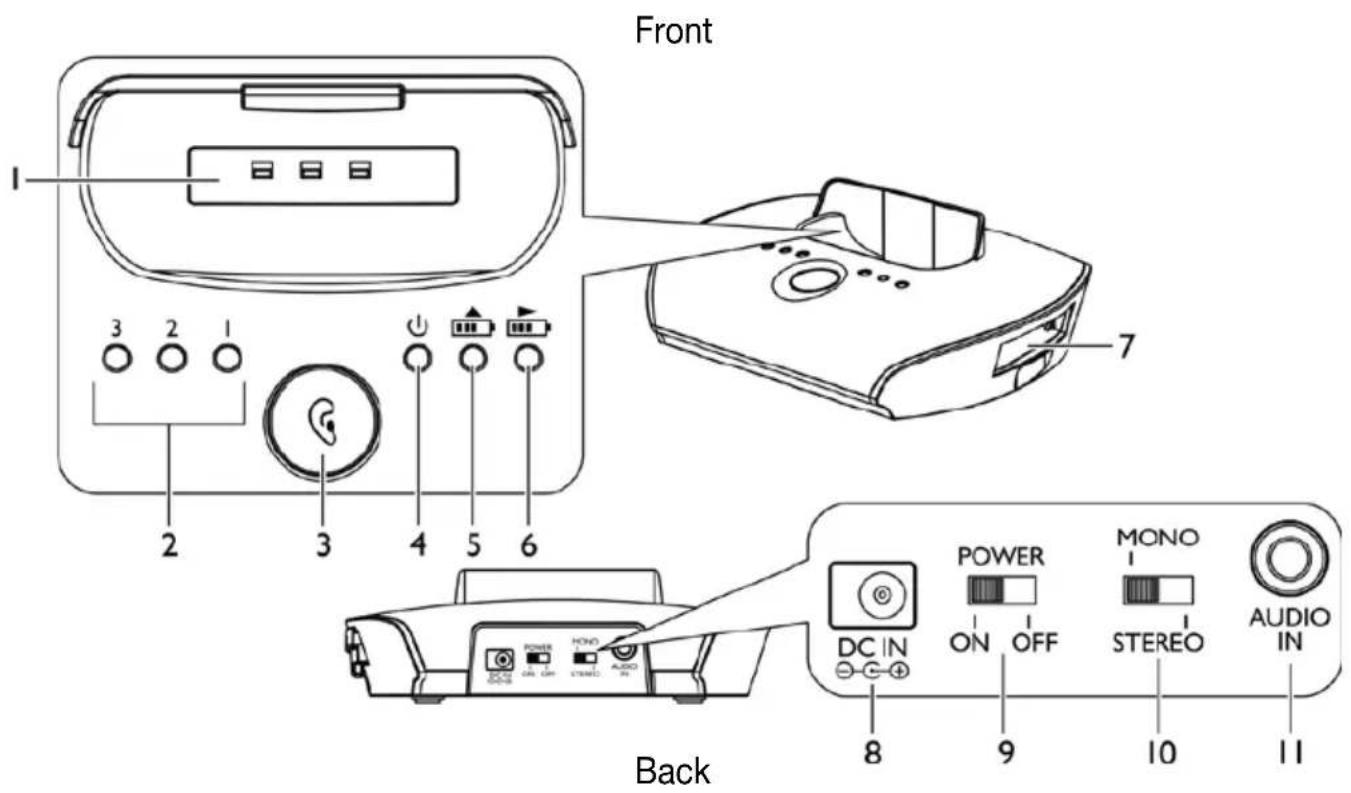
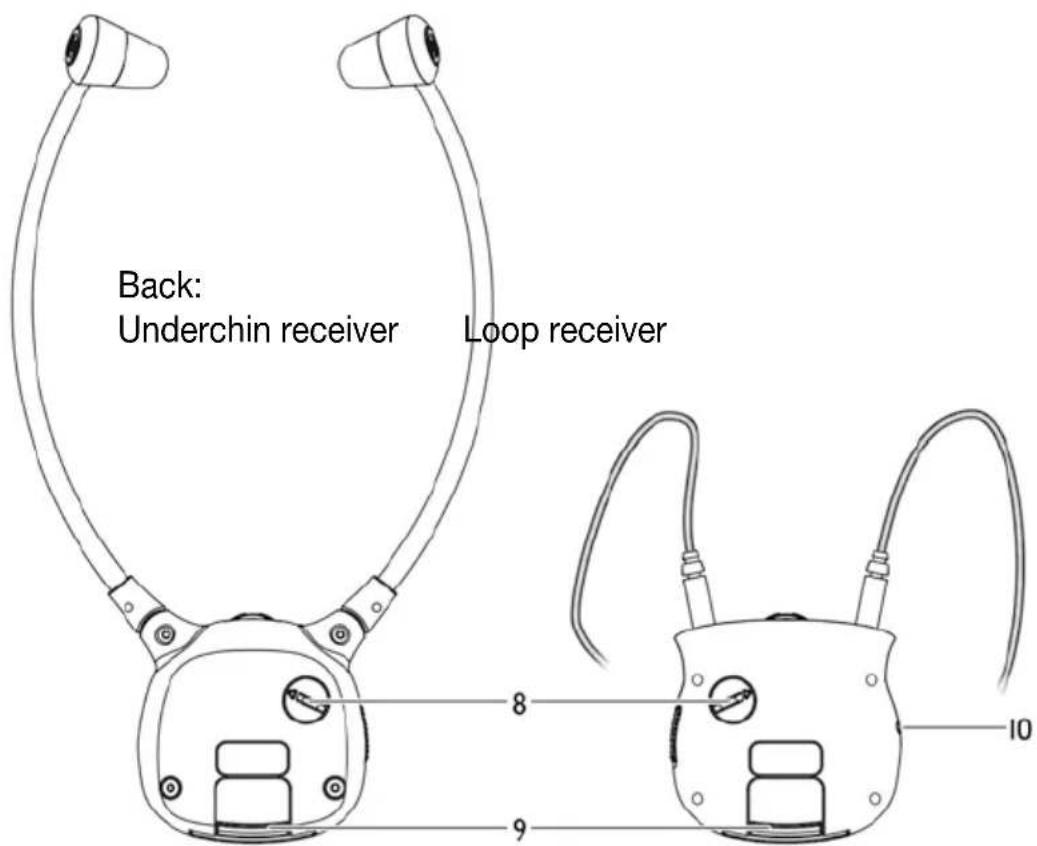
- Charging Cradle
- LED Indicator of Tone Clarity
- Tone Clarity Button
- LED Indicator of Power/Signal
- LED Charging Indicator for Main Battery (attached to Headset Receiver)
-
LED Charging Indicator for Spare Battery
-
Spare Charging Slot
- DC In
- Power ON/OFF
- Mono/Stereo Switch
- 3.5mm Audio In Socket
Introduction
This 2.4GHz digital wireless chin headset uses latest digital wireless technology, and enables to improve the hearing aid capability that may be required by the elderly people to enjoy crystal clear sound stereo music and TV sound anywhere inside your home. Simply connect the transmitter to a desired audio source: DVD player, CD player, TV set, Hi-Fi system, or iPod. Without complicated wiring and installation, the system enables you to enjoy thrilling, lifelike sound in minutes.
Features
- 2.4GHz Digital Hopping System Technology
- Docking Charge Mechanism
- RF Transmission Auto Off (when without audio signal)
- Music Muting for Verbal Communications
- Speed Charging Mechanism
- Spare Battery Charging Design
- Microphone Adapter for sound pick up from audio source.
- Adjustment of Sound Balance
- Adjustment of Treble/Tone Clarity
Installation: Transmitter
- Connect the power adapter to the DC IN input socket located on the transmitter rear panel.
- Connect the power adapter provided to an electrical outlet.
- RCA adapter cable, audio cable, 6.3mm to 3.5mm adapter plug and external microphone are provided for various type of connection to your audio source (e.g. TV set, Hi-Fi system, MP3 or iPod).
- Behind the transmitter, select the power ON/OFF switch to ON position.
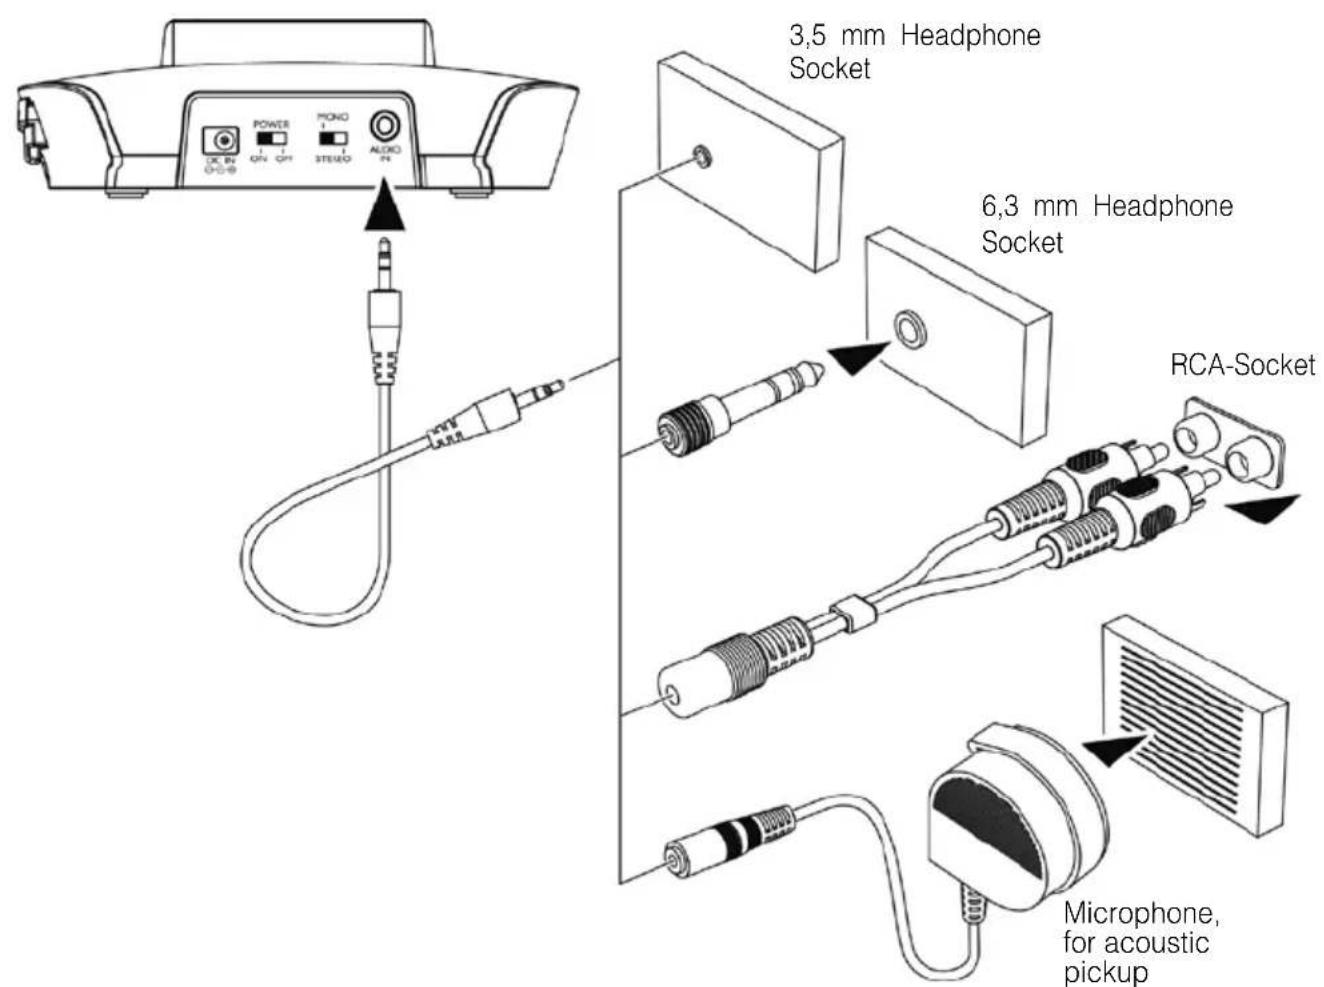
The green power indicator LED will blink as soon as you have connected the power adapter to the electrical outlet, when the audio signal is detected from the audio source, and the green LED indicator will glow constantly.
Receiver
Insert a battery into the receiver with correct polarity.
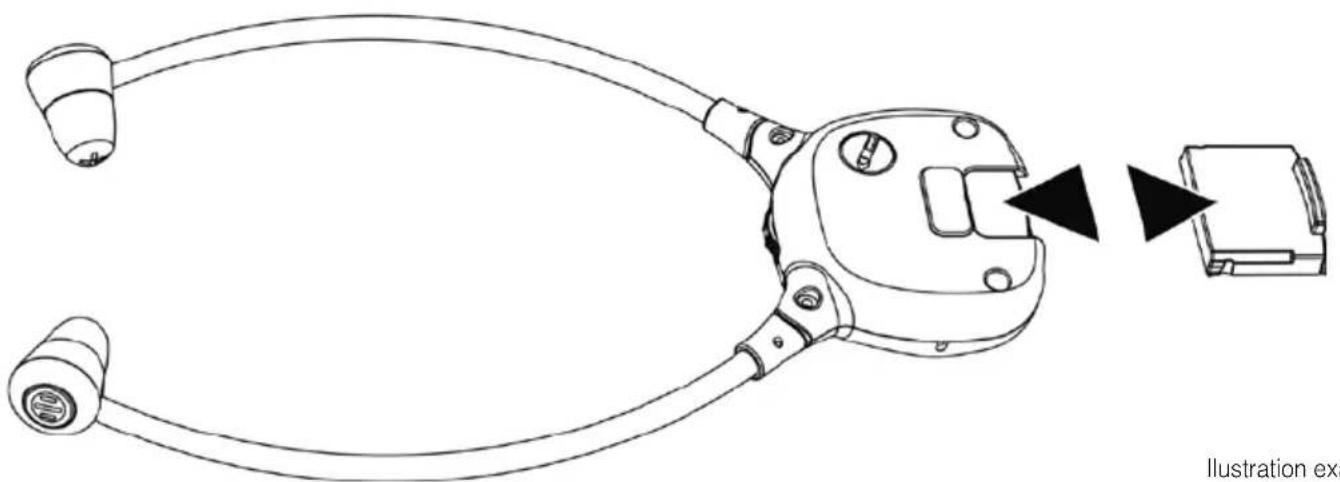
Illustration example: Unc
Operation
- Switch on the audio source (TV set or audio component) that the transmitter is connected to. The green LED indicator will glow constantly.
- Select the On/Off switch in the receiver to ON position, then the green signal LED indicator glows.
- Adjust the volume for desired sound level, then place it on the head.
- The signal green LED indicator on the receiver will blink slowly with "Beep" in every minute when the battery level is low. Recharge the battery.
The loop receiver (Type LR) features a 3,5 mm audio jack at the side, this enables the connection of a regular set of earphones (not included). The loop can be opened: Turn the right loop connection counterclockwise to the limit and pull the connector out. When reinserting the connector, push the tab back in the slot and turn the connector clockwise to lock.
Note:
Make sure the batteries provided in the packing, is fully charged before first use. Charge the battery for about 3 hours before first use.
RF transmission of the transmitter will automatically switch OFF in approximately 5 minutes if there is no audio signal, or the signal that it receives from the audio source is too weak for proper reception. However, if the signal returns to an acceptable level, the transmitter will automatically switch ON again.
16 English
Charging the batteries
- Select the On/Off Switch in the headset receiver to OFF position.
- Place the headset receiver on the transmitter, make sure the charge contact touches the charge cins on the Transmitter.
- The charging process starts automatically. LED indicator of main battery then glows in red constantly. It will glow in green about 2 hours after the battery is fully charged.
- A spare battery is provided for sustained enjoyment. Simply insert it into the transmitter for charging. LED indicator of spare battery will then glow in red constantly. It will glow in green about 2 hours after it is fully charged.
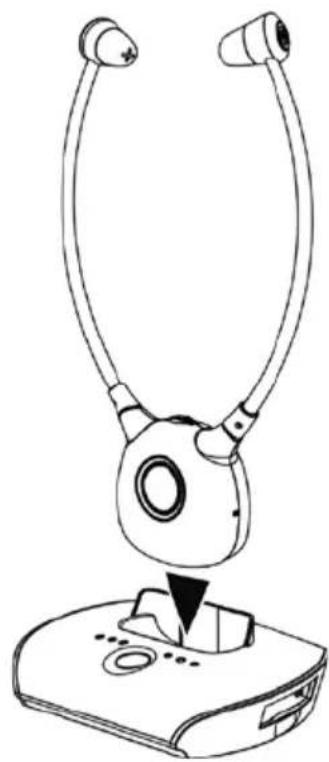
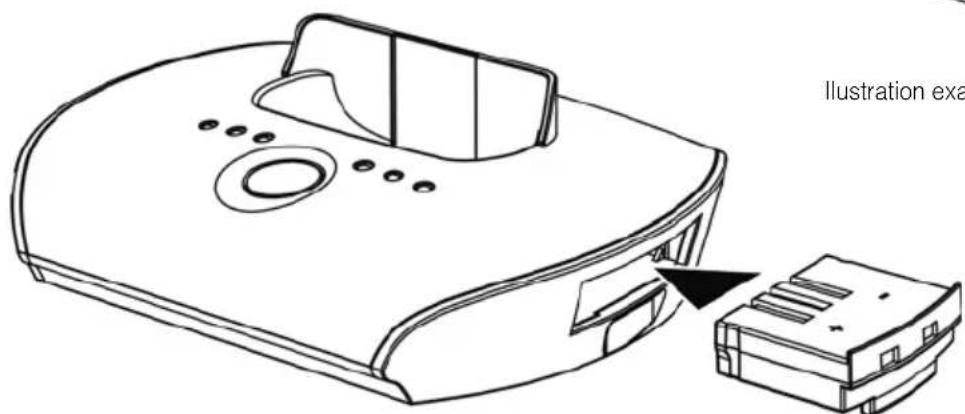
Illustration example: Underchin receiver
Warning:
Never attempt to recharge conventional dry cells.
Batteries (battery pack or batteries installed) shall not be exposed to excessive heat such as sunshine, fire or the like. Never use another type of battery or non-rechargeable batteries to replace the rechargeable batteries supplied. When the headphones are not in use, move the switch to the OFF position to avoid damaging the batteries.
The batteries must always be fully charged before first use. An initial 3 hours charge is required to guarantee an acceptable service life for the rechargeable batteries. Always ensure that the headset receiver is switched to OFF position while the batteries are charging. Excessive sound pressure from earphones and headphones can cause hearing loss.
Important:
This unit should be operated with the special rechargeable batteries only. When replacing the batteries or when disposing of the unit, always comply with applicable laws relating to the disposal of batteries. Please place them in a proper disposal container to ensure that they are eliminated safely and in an environmentally friendly way.
Communication feature:
The sound of the transmission can be interrupted at any time, for example to talk to a person in the same room. Press the MIC-button of the receiver once. The receiver's inbuilt microphone will now register the surrounding sounds and amplifies them. The volume can be adjusted with the volume control. To end this function, press the MIC-button once more - the previous transmission will now continue.
Tone clarity:
When necessary, Tone Clarity for the headset receiver can be adjusted on the transmitter, visible on the orange LEDs 1, 2 and 3. Simply press the Tone Clarity button to select and match to your level of hearing aid capability.
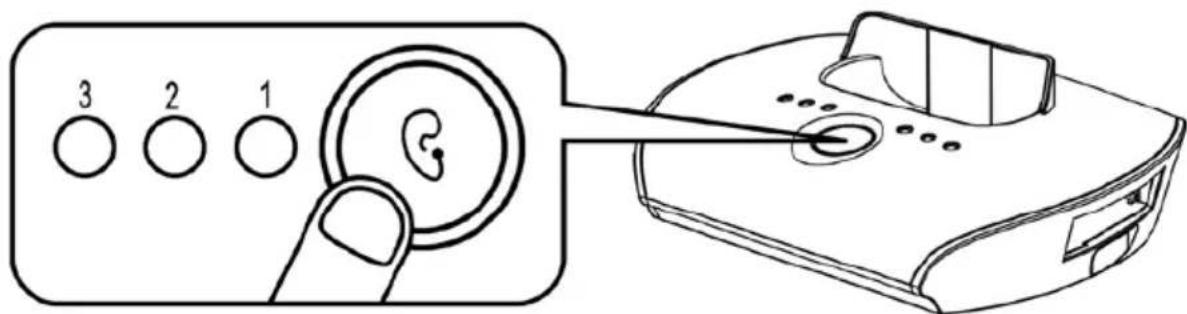
The tone / speech intelligibility can be enhanced individually on the transmitter with the following settings:
| Setting | Orange LED-Indicator | Effect |
| Default | 3 2 1 G | No Adjustment |
| 1 | 3 2 1 G | Enhances Treble and Bass |
| 2 | 3 2 1 G | Enhances Treble only |
| 3 | 3 2 1 G | Enhances Bass only |
Troubleshooting:
No sound:
- Ensure that the mains adapter is pushed fully into the power outlet and that its cable is properly connected to the DC IN connector on the transmitter.
- Ensure that the headset receiver power ON/OFF switch is switched to ON.
- The charge level of the headset receiver battery may be too low. Recharge the battery or replace it with a fully charged battery.
- Ensure that the TV set, Hi-Fi system or audio component is switched ON and set to a channel that broadcasts an audio signal.
- Use the volume control on the Headset Receiver to increase the sound level.
- The connected audio/video equipment may not be in playback mode. Start playback on by the equipment.
- The Headset Receiver output level is set too low. Adjust the volume to a suitable level.
Distortion:
- The charge level of the headset receiver battery may be too low. Recharge the battery or replace it with a fully charged battery.
- The headset receiver may be too far away from the transmitter. Move closer to it.
- The audio signal input level is too low. Increase the volume from the audio source.
In case the headset receiver cannot be linked with the transmitter, please follow the following procedure for pairing :
- Turn OFF the power of the transmitter.
- Turn ON the headset receiver.
- Press and Hold the MIC Button for about 5 seconds, the green LED flashes quickly in the headset receiver, then turn ON the power of the transmitter.
- The headset receiver and the transmitter is then paired automatically, and the green LED on the headset receiver lights steadily.
Warranty
Should a malfunction occur despite the unit having been set up and operated correctly, please contact your dealer or the manufacturer directly.
This warranty covers the repair of the product and returning it to you free of charge. It is essential that you send in the product in its original packaging, so do not throw the packaging away.
The warranty does not apply to damage caused by incorrect handling or attempts to repair the unit by people not authorised to do so (destruction of the seal on the unit). Repairs will only be carried out under warranty if the completed warranty card is returned accompanied by a copy of the dealer's invoice/till receipt.
Always specify the product number in any event.
Disposal off used electric and electronic units (applicable in the countries of the Euro pean Union and other Euro pean countries with a separate collection system). The symbol on the product or the packaging indicates that this product is not to be handled as ordinary household waste but has to be returned to a collecting point for the recycling of electric and electronic units. You protect the environment and health of your fellow men by the correct disposal of this products. Environment and health are endangered by a faulty disposal. Material recycling helps to reduce the consumption of raw material. You will receive further information on the recyc ling of this product from your local community, your communal disposal company or your local dealer.
Battery
The provided battery can be recycled.
Please dispose the battery through the battery container or the specialist shop.
Please dispose only discharged batteries to guarantee environmental protection.
Specifications
Transmission mode: Digital Hopping System
Carrier frequency: 2.4GHz ISM BAND I
Operating voltage: Transmitter : 5V 550mA
Receiver: 3.7 V, 350 mA Lithium Polymer Battery
Frequency response: 30Hz - 20kHz
Distortion: <0.5%
Signal-to-noise ratio: >75 dB
Range: Up to 25 meters (open area)

This device satisfies the following EU directives:
- 2011/65/EG RoHS-directive
- 2002/96/EG WEEE-directive
- 1999/5/EG R&TTE-directive
- 2006/95/EG Low Voltage-directive
Compliance with the directives listed above is confirmed by the CE seal on the device. CE compliance declarations are available on the Internet at www.humantechnik.com.
Technical specifications subject to change without notice.
- 2011/95/CE Directive RoHS
- 2002/96/CE Directive WEEE
- 1999/5/CE Directive R&TTE
- 2006/95/CE Directive basse tension
Transmissie mode: Digitale Hopping system
Frequentie band: 2.4GHz ISM BAND I
For other service-partners
in Europe please contact:
Humantechnik Germany
Tel.: +49 (0) 76 21/95689-0
Fax: +49 (0) 76 21/95689-70