Santa Fe 4S - Barbecue GRANDHALL - Free user manual and instructions
Find the device manual for free Santa Fe 4S GRANDHALL in PDF.

User questions about Santa Fe 4S GRANDHALL
0 question about this device. Answer the ones you know or ask your own.
Ask a new question about this device
Download the instructions for your Barbecue in PDF format for free! Find your manual Santa Fe 4S - GRANDHALL and take your electronic device back in hand. On this page are published all the documents necessary for the use of your device. Santa Fe 4S by GRANDHALL.
USER MANUAL Santa Fe 4S GRANDHALL
1) "Use outdoors only"
2) "Read the instructions before using the appliance"
3) "WARNING: accessible parts may be very hot. Keep young children away"
4) "This appliance must be kept away from flammable materials during use"
5) "Do not move the appliance during use"
6) "Turn off the gas supply at the gas cylinder after use"
7) "Do not modify the appliance"
8) Wear Protective gloves when handling particularly hot area.

ALWAYS CHECK FOR GAS LEAKS EACH TIME YOU USE YOUR BARBECUE.
You should follow this procedure after any of the following:
- Not having used the barbecue for an extended period of time,
- Initial assembly of barbecue,
- Any disconnection and reconnection of hose assembly,
- Changing gas cylinder,
- Upon re-connecting gas cylinder after it has been disconnected for storage.
CHECKING FOR GAS LEAKS

NEVER CHECK FOR LEAKS WITH A FLAME.
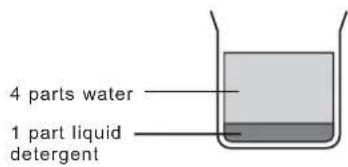
- Make liquid detergent solution by mixing one (1) part liquid detergent and four (4) parts water.
- Turn burner control knob(s) to 'OFF', then turn on gas at source.

IF YOU HAVE A GAS LEAK YOU CANNOT RECTIFY, TURNOFF THE GAS AT THE SOURCE. CONTACT THE SERVICE AGENT
- Apply the liquid detergent solution to all visible and accessible gas connections, including the connection to the gas cylinder. Bubbles will appear in the liquid detergent solution if connections are not properly sealed. Tighten or rectify as necessary.
CHECKING FOR GAS LEAKS
This babecue is approved for use on Natural gas but must be properly converted from the factory built LP.
Contact your service agent for details.
Conversion and installation must be by a licensend plumber or gas fitter and comply with local codes.
ENSURING BURNER CONTROLS ARE OFF
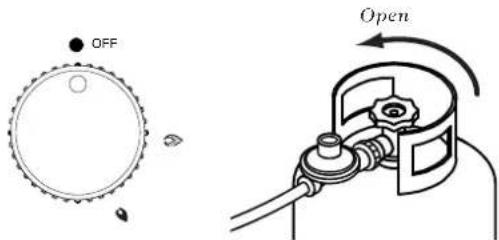
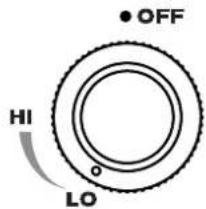
IMPORTANT: Before connecting and disconnecting barbecue to gas source, ensure burner controls are in 'OFF' position.
NOTE: The 'OFF' position on the control panel is identified by either a small black dot / a short vertical black line / or the word 'OFF'.
CAUTION: When the appliance is not in use, the gas must be turned off at the gas cylinder.
Familiarise yourself with the general information and safety guidelines located at the front of this booklet. Check to see that gas cylinder is filled and that end of each burner tube is properly located over each valve orifice. Set burner controls to 'OFF' position.
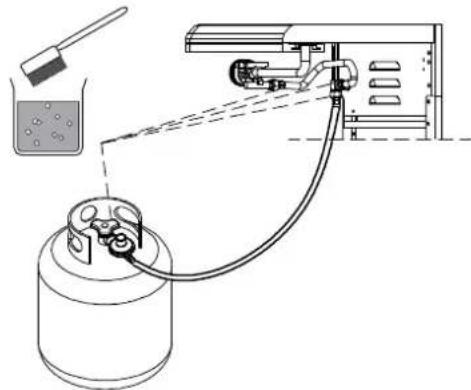
CONNECTING TO, AND DISCONNECTING
- Locate the gas cylinder in the cabinet and secure.
- Attach the regulator and hose assembly to cylinder valve outlet. Tighten firmly.
- Open the gas cylinder valve fully to allow gas to flow.
- Leak test all accessible connections thoroughly using a soapy water solution prior to lighting the barbecue.
- If a leak is found, turn gas cylinder valve off and re-check all connections have been tightened. If there is still a leak do not use barbecue until repairs or replacement can be made.
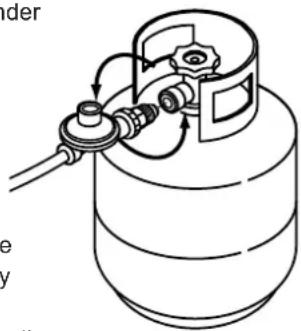
DISCONNECTING FROM GAS SOURCE
- Turn the burner controls 'OFF'.
- Turn the gas cylinder valve off fully.
- Detach the regulator assembly from gas cylinder valve.
Before first use and at the beginning of each barbecue season:
- Please read Safety, Lighting and Operating instructions carefully.
- Check gas valve orifices, burner tubes and burner ports for any obstructions. eg. spiders, webs, insects.
- Check and ensure the gas cylinder is full.
- Ensure all connections are securely tightened. Check for gas leaks.
INSTALLER FINALCHECK LIST
- At least 1m clearance maintained from combustible constructions to the sides and back of this grill.
- There is no unprotected combustible construction over the grill.
- All internal packaging removed.
- Burners are sitting properly on orifices.
- Knobs turn freely.
- Unit tested and free of leaks.
- User informed of gas supply shut off valve location.
GRILL LIGHTING INSTRUCTIONS
WARNING:IMPORTANT!
BEFORE LIGHTING
Finally inspect the gas supply hose before turning the gas "ON". If there is evidence of cuts, wear, or abrasion, it must be replaced before use, the replacement hose assembly shall be that specified by the manufacturer.
VERY IMPORTANT: ALWAYS INSPECT THE HOSE BEFORE EACH USE OF THIS GRILL.
TO LIGHT MAIN BURNERS OF THE GRILL:
- Read instructions before lighting.
- Turn all knobs to "O" then open the tank valve. Always keep your face and body as far from the grill as possible when lighting.
- Open lid during lighting.
- Push and turn any control knob slowly to "MAX" position. The electrode will spark simultaneously to light the burner in sequence. Repeat the same operation when lighting each burner. Turn the control knob to "O" position IMMEDIATELY if the burner does not light within 5 seconds, wait 5 minutes for gas to dispel, then repeat the lighting procedure.
- Follow match lighting instructions if burner can't be lit after repeated 3-4 times.
TO LIGHT THE MAIN BURNERS BY MATCH :
If the burner will not light after several attempts then the burner can be match lit. Usage:
- Read instructions before lighting.
- Open the lid during lighting.
- Simply place a match between the coils on the end of the lighting rod, light the match and insert it into the hole of firebox to ignite.
- Push and turn the knob to "MAX" position, and make sure the burner lights and stays lighted.
- Repeat 3~4 to light other burners.
Keep a spray bottle of soapy water near the gas supply valve and check the connections before each use.
Do not light the grill if odor of gas is present.
FLAME CHARACTERISTICS
Check for proper burner flame characteristics. Each burner is adjusted prior to shipment; however, variations in the local gas supply may take subtle necessary adjustments.
Burner flames should be blue and stable with no yellow tips, excessive noise, or lifting. If any of these conditions exist call our customer service line. If the flame is yellow, it indicates insufficient air. If the flame is noisy and tends to lift away from the burner, it indicates too much air.
NOTE: small yellow tips are ok.
PLACEMENT OF THE GRILL
- Clean the grill.
- Store the grill in well-ventilated dry outdoors and out of reach of children when the gas tank is connected to the grill.
- Store the grill in dry indoors ONLY after the gas tank is turned off and removed, the gas tank must store outdoors, out of the reach of children, NEVER store the tank in a building, garage or any other enclosed area.
- Put on the vinyl cover supplied with this grill.
FAULT FINDING
IF THE BARBECUE FAILS TO LIGHT
- Turn gas off at source and turn burner control knobs to 'OFF', Wait at least five (5) minutes for gas to clear, then retry.
- If your barbecue still fails to light, check gas supply and connections.
- Repeat lighting procedure. If your barbecue still fails to operate, turn the gas off at source, turn the control knobs to 'OFF', then check the following.
Obstruction in gas line
Correction: Remove fuel line from barbecue. Do not smoke! Open gas supply for one second to clear any obstruction from fuel line. Close off gas supply at source and reconnect fuel line to barbecue.
Plugged orifice
Correction: Remove burners from barbecue.
Carefully lift each burner up and away from gas valve orifice. Remove the orifice from gas valve and gently clear any obstruction with a fine wire. Then reinstall all orifices, burners, cotter pins and cooking components.
If an obstruction is suspected in gas valves or manifold, contact your place of purchase or manufacture.
FLOW OF GAS SEEMS ABNORMAL
- Check that gas cylinder is not empty.
- Burner holes are dirty and clogged.
- Gas regulator is not working.
SMELL OF GAS
- Gas valve is open.
- Gas hose is leaking(Check with soapy water)
- Gas hose is bent or damaged or not positioned properly.
BARBECUE DOES NOT HEAT UP
- Gas valve is not open.
- Oven knob not opened properly.
- Oven burner has blown out.
EXCESSIVE SMOKE
- Burnings of oils and fats left behind (oils & fats must be cleaned off after cooking).
COOKING WITH THE HOOD DOWN
IMPORTANT:
Never use all burners on 'HI' when cooking with hood down.
Pre-heating: Operated the BBQ with the hood closed with all burners on high for 10-15mins Cooking: Turn burners to the low setting. The burners can then be adjusted to the required cooking temperature, DO NOT exceed 250C
NOTE: Exceeding 250C for extended times may cause damage to the
CARE & MAINTENANCE
As with all appliances, proper care and maintenance will keep them in top operating condition and prolong their life. Your new gas barbecue is no exception. By following these cleaning procedures on a timely basis, your barbecue will be kept clean and working properly with minimum effort.
FLASH-BACK
Spiders and small insects occasionally spin webs or make nests in the burner tubes during warehousing and transit. These webs can lead to a gas flow obstruction which could result in a fire in and around Cleaning with a soft brush before use and at least every six months is recommended. This type of fire is known as 'FLASHBACK' and can cause serious damage to your barbecue and create an unsafe operating condition for the user.
Although an obstructed burner tube is not the only cause of 'FLASH-BACK' it is the most common cause and frequent inspection and cleaning of the burner tubes is necessary. If fire occurs in and around the burner, immediately turn off gas at its source and turn the burner control to 'OFF', wait until the barbecue has cooled, then clean the burner tubes and burner ports.
CLEANING THE GREASE TRAY
To avoid fat or grease dripping from the barbecue remove and empty the drip tray after each use. A small amount of water can be placed in the drip tray before use to help with fat removal. Wait until the drip tray is cool to touch before disposing of contents. The drip tray should be washed periodically in a mild detergent and warm water solution.
CARE OF COOKING SURFACE
Your barbecue is supplied with an enamel grill and plate. Correct use and care of the cooking surface is important to ensure trouble free cooking.
Clean thoroughly while cooking surface is cooling. Do not leave food on the cooking surface when not in use.
SERVICE
If the appliance cannot be adjusted to perform correctly it should not be used until serviced.
MAINTENANCE
CLEANING THE BURNER TUBES AND BURNER PORTS
To reduce the chance of FLASHBACK FIRE you must clean the burner tubes as follows at least once a month in summer and fall or whenever spiders are active in your area, and if your barbecue has not been used for an extended period of time.
- Turn all burner valves to the full "OFF" position.
- Turn the LP gas cylinder valve to the full "OFF" position.
- Detach the LP gas regulator assembly from your gas barbecue.
- Remove the cooking plates from your barbecue.
- Remove the cotter pin from the rear of each burner using a nose plier.
- Carefully lift each burner up and away from the gas valve orifice.
- Check and clean burner / venturi tubes for insects and insect nests. A clogged tube can lead to a fire beneath the barbecue.
- Refer to diagram 1 and perform one of these three cleaning methods:
METHOD 1: Bend a stiff wire or wire coat hanger into a small hook as shown and run the hook through the burner tube and inside the burner several times to remove debris.
METHOD 2: Use a bottle brush with a flexible handle and run the brush through the burner tube and inside the burner several times to remove any debris.
METHOD 3: Use an air hose to force air through each burner tube. The forced air should pass debris or obstructions through the burner and out the ports.
Regardless of which burner cleaning procedure you use, we recommend you also complete the following steps to help prolong burner life.
- Use a fibre pad or nylon brush to clean the entire outer surface of each burner until free of food residue and dirt.
- CI ean any clogged ports with a stiff wire, such as an open paper clip.
Inspect each burner for damage (cracks or holes) and if such damage is found, order and install a new burner. After installation, check to ensure that the gas valve orifices are correctly placed inside the ends of the burner tubes. Also check the position of your spark electrode.

FOR SAFE OPERATION ENSURE THE GAS VALVE ASSEMBLY ORIFICE IS INSIDE THE BURNER TUBE BEFORE USING YOUR BARBECUE. IF THE ORIFICE IS NOT INSIDE THE BURNER TUBE, LIGHTING THE BURNER MAY CAUSE EXPLOSION AND /OR FIRE RESULTING IN SERIOUS BODILY INJURY AND /OR PROPERTY DAMAGE.

Diagram 1
To clean burner tube, insert hook as indicated by the arrow.


VÉRIFIEZ TOUJOURS S'IL Y A DES FUIITES DE GAZ À CHAQUE UTILISATION DU BARBECUE.
WAARSCHUWING: BELANGRIJK!
VOOR HET AANSTEKEN
serviceagent for mer information.
VARMISTA,ETTA SAATIMET OVAT POIS PAALT
SE ALDRI ETTER LAKKASJER MED EN FLAMME.
PLEIE OG VEDLIKEHOLD
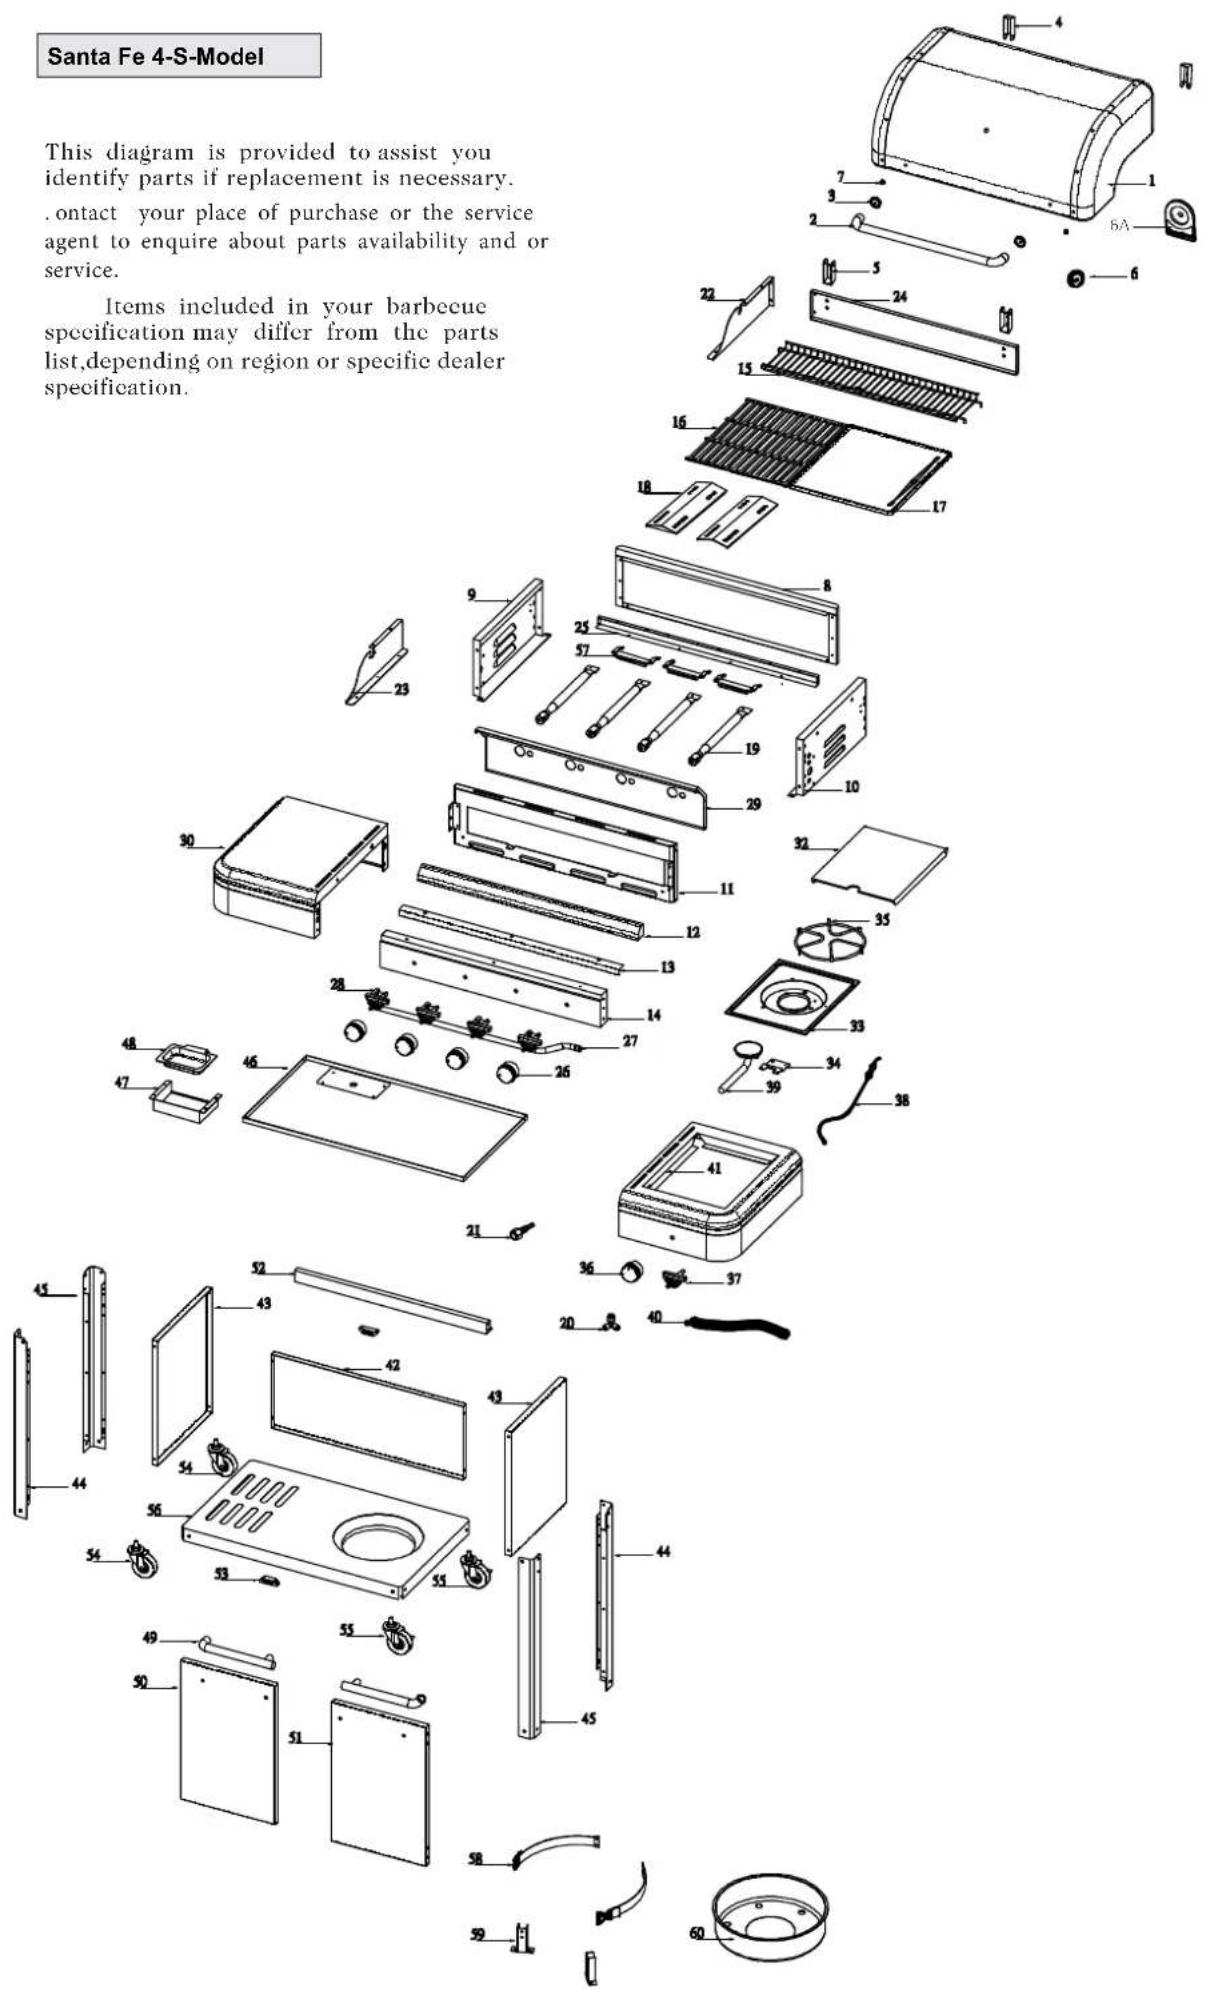
This diagram is provided to assist you identify parts if replacement is necessary. contact your place of purchase or the service agent to enquire about parts availability and or service.
Items included in your barbecue specification may differ from the parts list, depending on region or specific dealer specification.
Main/Side
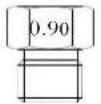
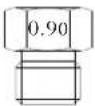
| •Main | 0.90 mm | -13+ (28-30/37) |
| -13B/P (30) | ||
| 0.78 mm | -13B/P (50) | |
| •Side | 0.90 mm | -13+ (28-30/37) |
| -13B/P (30) | ||
| 0.78 mm | -13B/P (50) |
INPUT
| •Main | 4 burner | 13.2 kW | - 960 grams/h |
| •Side | 3.4 kW | - 247 grams/h |
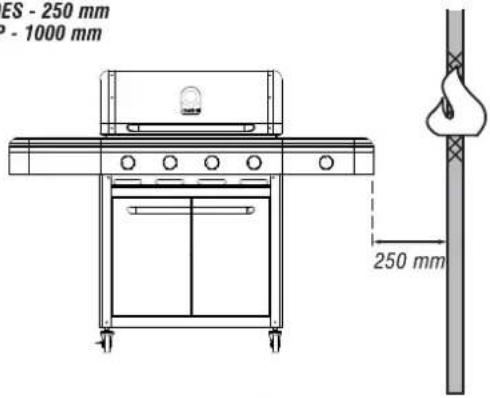
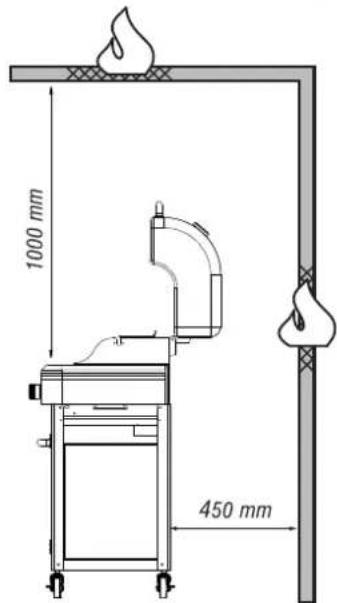
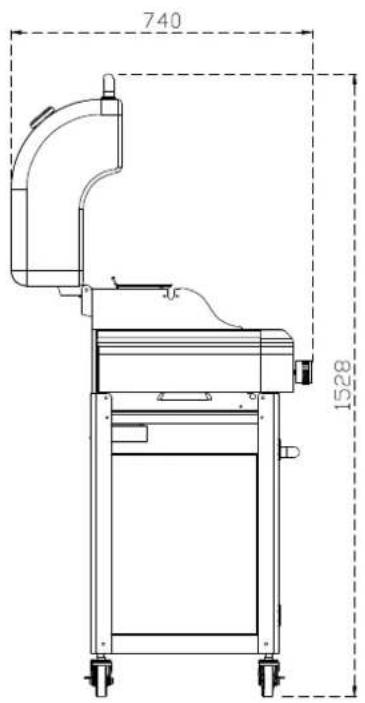
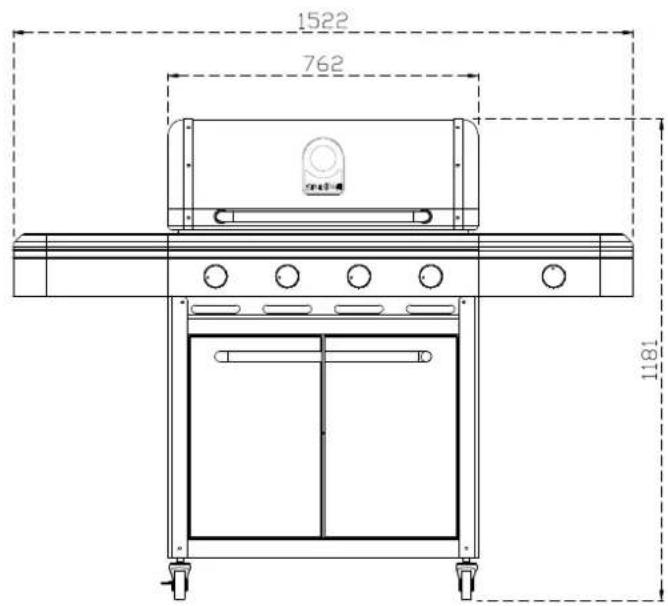
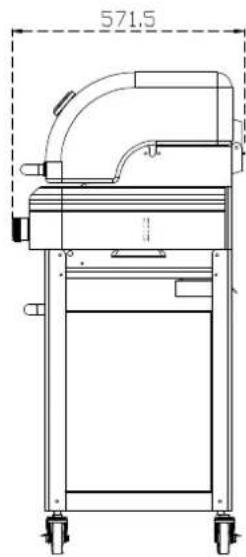
DIMENSIONS
MINIMUM CLEARANCES FROM COMBUSTIBLE MATERIALS MUST BE:
REAR-450mm
SIDES - 250 mm
TOP - 1000 mm
ASSEMBLY
NOTES: Study the assembly diagram first then identify separate parts into groups.
Some assembly steps require two people.
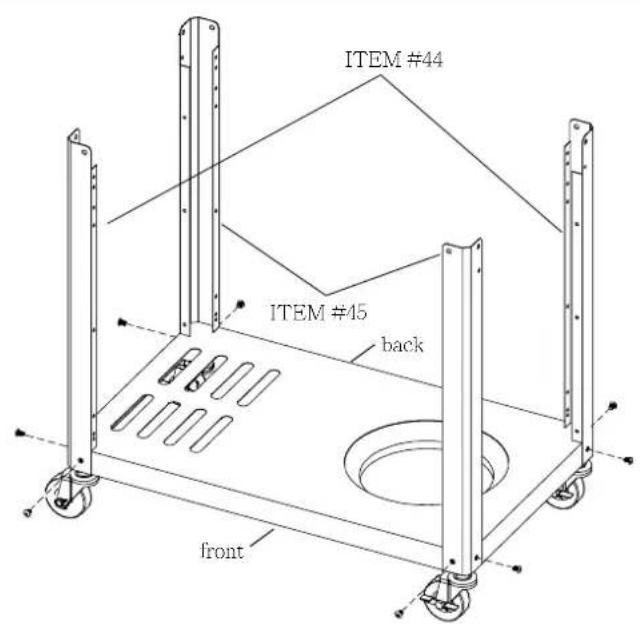
- Install Casters
Install two Casters without brake to the Trolley Seat on the left side of cart bottom. And install two Casters with brake to the Trolley Seat on the right side of the Trolley bottom.
- GB Install Cart legs.
FR Installez les pieds du chariot.
DEWagenbeine installieren.
Installare le gambe del carrello.
NL Plaats de poten van de kar.
SE Montera vagnens ben.
Fi Asenna vaunun tukijalat.
ES Instale las patas del carro.
PT Instale permas no Carrinho.
DK Monter vognens ben.
NO Monter vognben.
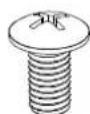
Phillips Head Screw
1/4" X 3/8"
Qty. 8
- GB Install Trolley Doors and Door Handles.
Phillips Head Screw
3/16" x 1/2"
Qty. 4

Phillips Head Screw
M3 X 10
Qty. 8

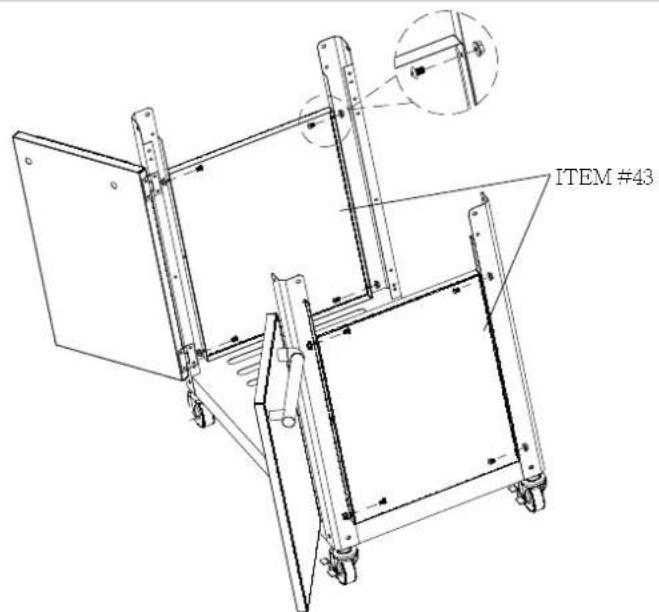
- GB Install Trolley Side Panels.
Phillips Head Screw
3/16" X 3/8"
Qty. 8

Flange Nut : 3/16" Qty.8
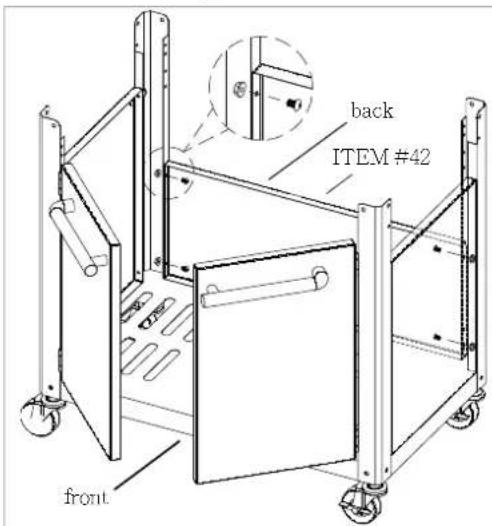
5.
GB Install Trolley Rear Panel and Cart Bracket, Front.
FR Installez le panneau arrriere du chariot et le support de chariot avant.
DE Installieren Sie die Wagenrückwand und die vordere Wagenhalterung.
IT Installare il pannello posteriore e la staffa del carrello, parte anteriore.
NL Plaats het Achterpaneel en de verbindingsbalk aan de voorkant.
SE Montera vagnens bakpanel och framre vagnsfaste.
Fi Asenna vaunun takapaneeli ja etukiinnike.
ES Instale el panel trasero de carrito y el soporte de car ro, delantero.
PT Instale Painei Traseiro do Carro e Suporte de Carri nho, Frente.
DK Monter vognens bagpanel og vognbeslag, front.
No Monter bakpanel pa trolley og vognbrakket, foran.
Phillips Head Screw
3/16" X 3/8"
Qty .8

Flange Nut : 3/16" Qty. 8
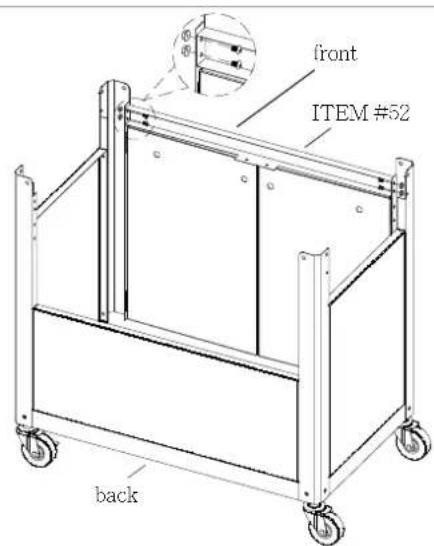
6.
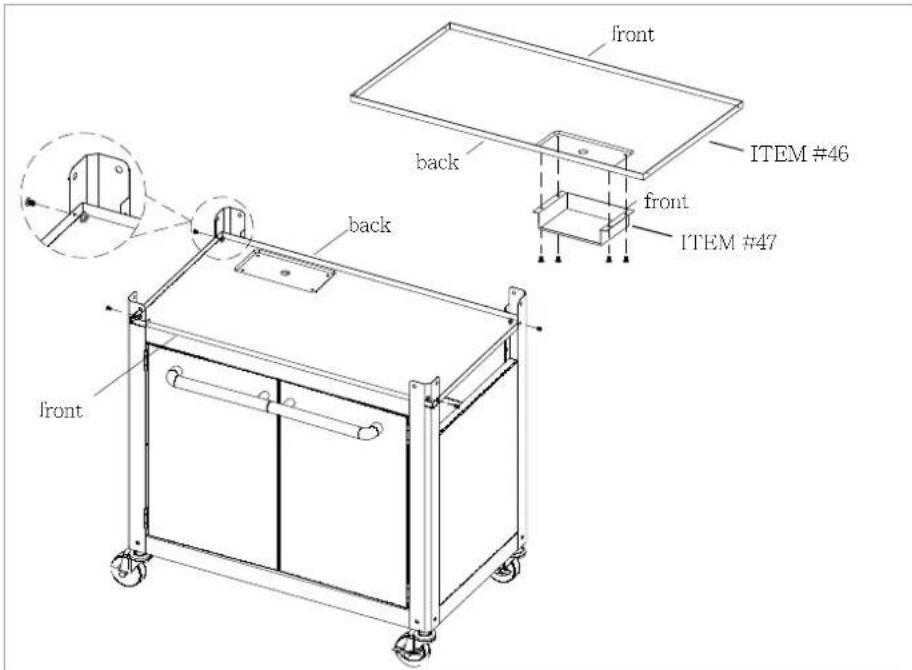
GB Install Separation Panel
Note: Do not fully tighten the 4 screws attaching the "Separation Panel (item #46)" to the trolley legs until the BBQ head has been installed.
Phillips Head Screw
3/16 "X 3/8"
Qty. 8

Flange Nut : 3/16" Qty.4
- GB Install Barbecue Head to Trolley. Note: This step requires two people.
Phillips Head Screw
1/4" X 3/8"
Qty. 8
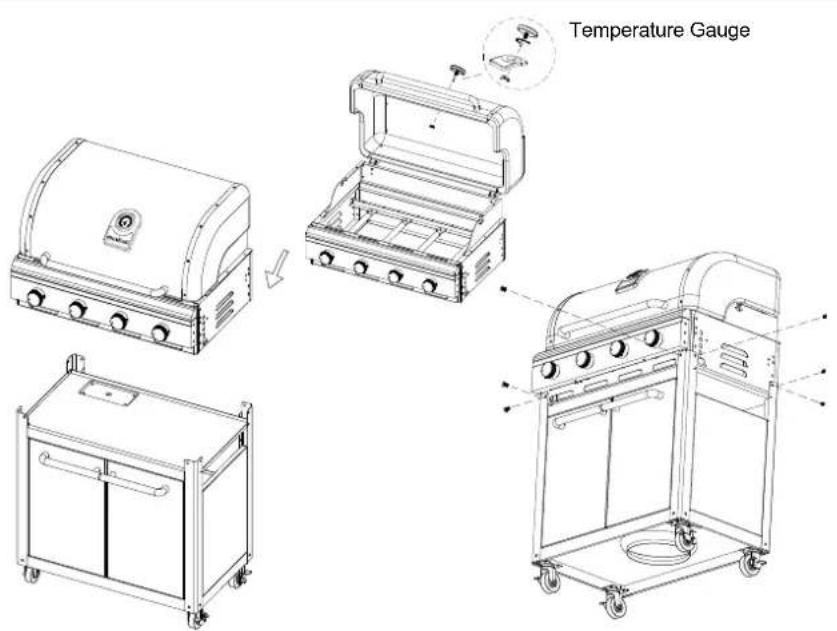
- (GB) Install Side Shelf and side Burner.
Fi Asenna sivuhylly ja sivupoltin.
FR Installé le plateau latorial et le brûleur latorial.
ES Instale la balda lateral y el quemador lateral.
DE Installieren Sie die Seitenablage und den seitlichen Brenner.
PT Instale a Prateleira Lateral e o Queimador lateral.
IT Installare la mensola laterale il bruciatore laterale.
DK Monter sidehylde og sidebrender.
NL Plaats het zijpaneel en de zijbrander.
NO Monter sidehylen og sidebrenneren.
SE Montera sidohyllan och sidobrannaren.
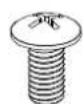
Phillips Head Screw
1/4"x1/2"
Qty. 1 2

Flange Nut:1/4" Qty.4

- GB Install Grease Receptacle.
WARNING: Failure to install grease tray will cause hot grease to drip from bottom of grill with risk of fire or property damage.
To prevent the risk of cross threading the connection finger tighten first. Then tighten securely with a spanner.
Do not use thread sealant tapes or similar products on this connection.
Leak check before operating the appliance, refer page 3.
FR Raccord du tuyau
Note: Do not operate the barbecue before leak checking the gas connections.
- GB Install Cooking Components.
Note: The cooking grids must be located over the flame tamers.
The cooking grids must be located over the flame tamers.
WARNING

-
No not cover entire cooking surface with solid plates, as this will result in poor cooking performance, or the burners may go out, creating a hazardous situation
-
You will violate the gas approval and your warranty will be voided. The grill provides the ventilation needed for the barbecue to operate safely.
3.Cylinder valve must face to right front of trolley once tank is attached.
Failure to install cylinder correctly may allow gas hose to be damaged in operation, resulting in the risk of fire.
BLOCKERA EJ VENTILATIONSHÄLEN I GRILLBAREN.

KARRYNTUULETUSAUKKOJA EI SAA PEITTAA.

NO OBSTRUYA LAS ABERTURAS DE VENTILACION DEL CARRITO.

EN COOKING WITH THE HOOD CLOSED
Pre-heating: Operated the BBQ with the hood closed with all burners on high for 10-15mins
Cooking: Turn burners to the low setting. The burners can then be adjusted to the required cooking temperature, DO NOT exceed 250C.
NOTE: Exceeding 250C for extended times may cause damage to the BBQ.
ES COCCION CON LA TAPA CERRADA
Grand Hall Europe B.V.
Tolstraat 17a
7482 DC Haaksbergen
The Netherlands
www.grandhall.eu
All specifications are subject to change without notice.
Zhuhai Prokan Relaxation Equipment Co., Ltd.
Jinfa Industrial Area Of Jinding Town, Zhuai, Guangdong, China