
Rebel 26 Reach - Vacuum Cleaner DIRT DEVIL - Free user manual and instructions
Find the device manual for free Rebel 26 Reach DIRT DEVIL in PDF.
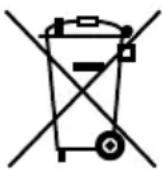
| Product type | Cyclone canister vacuum cleaner |
| Model | Rebel 26 Reach (DD2226, DD2226-X) |
| Separation technology | Simple cyclone |
| Nominal power | 550 W |
| Supply voltage | 220 – 240 V ~, 50 – 60 Hz |
| Dust container capacity | 1.6 L |
| Weight | 5.1 kg (models DD2226-0/-1) / 5.2 kg (models DD2226-3/-5) |
| Power cord length | 6.0 m (DD2226-0/-1) / 8.0 m (DD2226-3/-5) |
| Filter type | Washable motor protection filter + air outlet filter |
| Power adjustment | Progressive power variator |
| Main brush | Switchable hard floor/carpet brush |
| Suction tube | Telescopic metal tube |
| Cord winder | Yes, with automatic rewind button |
| Parking position | Storage notch on the device |
| Included accessories | Suction hose, handle, telescopic tube, switchable brush |
| Optional accessories | 3-in-1 brush, parquet brush, mini turbo brush, medium turbo brush, flexible long crevice nozzle |
| Maintenance | Removable and washable dust container, washable motor filter, air outlet filter to clean with soft brush |
| Noise level | Not specified |
| Energy class | Indicated on the energy label (not specified in the manual) |
| Use | Household only |
| Warranty | Legal warranty in accordance with European directive 2011/83/EC |
Frequently Asked Questions - Rebel 26 Reach DIRT DEVIL
User questions about Rebel 26 Reach DIRT DEVIL
0 question about this device. Answer the ones you know or ask your own.
Ask a new question about this device
Download the instructions for your Vacuum Cleaner in PDF format for free! Find your manual Rebel 26 Reach - DIRT DEVIL and take your electronic device back in hand. On this page are published all the documents necessary for the use of your device. Rebel 26 Reach by DIRT DEVIL.
USER MANUAL Rebel 26 Reach DIRT DEVIL
International Service
DE
** Charges for calls from abroad depend on the current charges imposed by the respective foreign telephone company and the respective rates.
AT,CH
We are pleased that you decided to purchase a Dirt Devil product. We hope you enjoy using your appliance and we would like to thank you for your purchase.
You will find further information on your product in this operating manual and at our website www.dirtdevil.de. To contact our Dirt Devil service team, refer to the contact details on page 2.
Technical data
Environmental protection and disposal
Do not dispose of the appliance with the domestic waste. Your local administration will provide you with information on proper disposal.

Warranty
If you have purchased the appliance as a consumer within the European Union, the respective national legislation implemented as per EU Directive 2011/83/EU applies as the minimum warranty standard. In non-EU countries the minimum warranty requirements in the respective country apply.
SAFETY INSTRUCTIONS
About the operating manual
Read the operating manual completely before working with the appliance. Keep the operating manual for reference. If you pass the appliance on to third parties, it must be accompanied with this operating manual. Failure to adhere to this operating manual can lead to serious injuries or damage to the appliance. We assume no liability for damage caused as a result of failure to adhere to this operating manual. Important information not included in this chapter is indicated as follows:

WARNING!
Wards of health hazards and identifies possible risks of injury.

CAUTION!
Indicates possible dangers to the appliance or other objects.
NOTE
Highlights tips and information.
You can also download this operating manual from our website at any time:
www.dirtdevil.de
Concerning certain groups of persons
The appliance can be used by children of 8 years and upwards and persons with impaired physical, sensory or mental abilities, or insufficient experience or knowledge, providing they are supervised or have been
instructed in the proper use of the appliance and understand the risks involved.
Children must not perform cleaning or user maintenance tasks without supervision. Children must not play with the appliance.
Packing material and small parts must not be used as toys. There is risk of asphyxiation.
Children under the age of 8 years should be kept away from the appliance and the connection cord whilst the appliance is switched on, plugged in at the mains socket or cooling down.
Information on the power supply
The appliance is operated with electrical current. Thus there is always a risk of electrical shock.
You must therefore observe the following:
Never immerse the appliance in water or other liquids.
If you want to pull the connection cord out of the mains socket, always pull directly on the plug. Never pull on the connection cord.
Make sure that the connection cord is not kinked, trapped or run over and does not come into contact with heat sources.
Always check the connection cord for possible damage before using the appliance. Do not use a connection cord with a damaged plug or cord.
Before cleaning or performing maintenance on the appliance, ensure that the appliance is switched off and that the connection cord is not connected.
Information on the rotating brush roller
The brush roller in the mini turbo brush (optional) rotates at high speed. This poses various hazards to people, animals and objects:
Never vacuum clean people, animals plants. Keep parts of the body and items of clothing away from the moving parts and openings on the appliance when it is in operation. They may otherwise be drawn in and may cause injuries.
Before you detach or attach, open or an the floor nozzle, switch off the appliance.
Do not run over cords, cables etc. as there is a risk of them becoming tangled in the rotating brush roller and may become damaged.
- Keep the rotating brush roller away from all delicate surfaces. Otherwise there is a risk of damage. Comply with the care and cleaning instructions provided by the manufacturer.
Also keep the rotating brush roller away from curtains, long tassels and the like. The objects may otherwise become drawn in and damaged.
If the appliance is faulty
If the appliance or the connection cord are damaged, they will need to be replaced by the manufacturer, the manufacturer's customer service department or a similarly qualified person in order to prevent hazards.
Hand over a faulty appliance to an authorised dealer or send it to the Dirt Devil customer service department for repairs, ≥ "International Service" on page 2.
Never use a faulty appliance or a faulty connection cord.
Information on proper use
This appliance is intended for domestic use only. It is not suitable for industrial or commercial use. Only use the appliance for cleaning lightly soiled, dry hard floors, carpets or upholstered furniture. Any other use is considered improper use and is prohibited.
In particular, the following is prohibited:
Vacuuming:
- People, animals, plants or items of clothing on the body
High risk of injury!
Hot ash, burning cigarettes, matches and highly flammable substances
Risk of fire.
Water and other liquids
Risk of short circuit!
- Toner (for laser printers, copying machines, etc.)
Risk of fire and explosion.
Use
-
in the vicinity of explosive or highly flammable substances
Risk of fire and explosion! -
outdoors
Risk of destruction due to rain and dirt!
- of non-original accessories
Impairment of appliance safety!
Carrying out repairs yourself
Risk of injury and loss of entitlement to free replacement!
Concerning disposal
After its service life, dispose of the appliance in an environmentally friendly manner, as described, > "Environmental protection and disposal" on page 13.
Preparatory work
Getting to know the appliance
Fig.1: ① Suction hose port; ② Lower dust bin cover release; ③ Dust bin; ④ Upper dust bin cover release; ⑤ Carrying handle; ⑥ ON/OFF button;
⑦ Cord rewind button; ⑧ Connection cord; ⑨ Exhaust filter cover; ⑩ Parking bracket; ⑪ Suction power controller; ⑫ Dust bin release; ⑬ Handle;
14 Suction hose; 15 Bypass vent; 16 Suction hose release; 17 Switchable floor nozzle; 18 Telescopic tube stop catch; 19 Telescopic tube
Accessories (optional): A 3-in-1 combi nozzle;
B Parquet nozzle; C Mini turbo brush
Unpacking and assembling
1 Check that the unpackaged contents are complete (Fig. 1). If you notice any transport damage or if anything is missing, contact your dealer immediately. 2 Insert the suction hose into the suction hose port so that you hear and feel it click into place (Fig. 2). 3 Connect the handle with the telescopic tube and adjust the length of the telescopic tube (Fig. 3). 4 Connect the telescopic tube and the switchable floor nozzle (Fig. 4). 5 Ensure that the bypass vent (Fig. 1/15) is completely closed.
Using the accessories

CAUTION!
If using the mini turbo brush (optional) (Fig. 1), make sure that the surface can withstand the rotating brush roller without becoming damaged.
NOTE:
In order to be able to use the furniture brush, push the release key (Fig. 6/1) and pull the furniture brush over the crevice brush so that it clicks into place.
1 Connect the required accessory to the handle or the telescopic tube (Fig. 5). 2 Make sure that the accessory is securely connected. The appliance can be connected.
Connecting the appliance

CAUTION!
If the red marking is visible (Fig. 8/2), retract the connection cord by pressing the cord rewind button to pull in the cord up to the yellow mark (Fig. 8/1) (Fig. 9). Otherwise, the connection cord might be damaged.
Pull the connection cord out of the appliance (Fig. 7). Insert the plug into a mains socket.
Vacuum cleaning
Flexible vacuum-cleaning

CAUTION!
Especially when vacuum-cleaning stairs make sure that you always stand on a higher level than the appliance. Otherwise there is a risk that the appliance will fall and injure you.

CAUTION!
For hard floors, only use the switchable floor nozzle with the brush (Fig. 11) extended, as the hard floor may otherwise become damaged.
NOTE:
In normal situations the bypass vent must be completely closed. With the bypass vent, you can quickly reduce the suction power, e.g. to release curtains that have accidentally been sucked in. To close the bypass vent, push it down. To open the bypass vent, push it up (Fig. 12).
1 Connect the required accessories > "Using the accessories" on page 16.2 Connect the appliance > "Connecting the appliance" on page 17.3 To switch on the appliance, press the ON/OFF button (Fig.10). The appliance starts vacuuming.4 When working with the appliance, pull it after you like a sleigh.5 To switch off the appliance, press the ON/OFF button again (Fig.10). The appliance switches off.
Regulating the suction power
The suction power can be set continuously variable as required:
To reduce the suction power, turn the suction power controller to the left. To increase the suction power, turn the suction power controller to the right (Fig. 13).
Storing the appliance
1 Switch off the appliance and pull the plug from the mains socket. 2 Push the cord rewind button (Fig. 9) until the connection cord has been fully rewound. 3 Hang the telescopic floor nozzle or parquet nozzle (connected to the telescopic tube or handle) in the parking bracket (Fig. 14).
Maintaining the appliance
Emptying and cleaning the dust bin
Switch off the appliance and pull the plug from the mains socket. Press the dust bin release and remove the dust bin from the appliance (Fig. 15).
Hold dust bin over a waste bin and release the lower dust bin cover (Fig. 16). Dust drops out.
4 Close the lower dust bin cover.5 Hold dust bin over a waste bin and release the upper dust bin cover (Fig. 17). Remove fluff and hair from the dust bin.
Close the upper dust bin cover. Push the dust bin firmly back into its console so that you hear and feel it click in place (Fig. 18).
Cleaning the pre-motor filter
NOTE:
The appliance and the pre-motor filter should be cleaned regularly in order to maintain the suction power.
1 Switch off the appliance and pull the plug from the socket. 2 Press the dust bin release and remove the dust bin from the appliance (Fig. 15). 3 Remove the filter holder including the pre-motor filter (Fig. 19). 4 Remove the pre-motor filter from the filter holder (Fig. 20). 5 Clean the pre-motor filter thoroughly under running water and leave it to dry completely at room temperature for at least 24 hours.
6 Insert the pre-motor filter into the filter holder and place the filter holder back in its opening.
Push the dust bin firmly back into its console so that you hear and feel it click in place (Fig.18).
Cleaning the exhaust filter

CAUTION!
The fine fins on the exhaust filter are sensitive. Never clean the fins with water and only ever use soft brushes for cleaning.
NOTE:
Replace any damaged, very heavily soiled, discoloured or deformed exhaust filters with new ones.
1 Press both keys to release the exhaust filter cover and flip the exhaust filter cover away towards the rear (Fig. 21). Remove the exhaust filter by pulling on the catch (Fig. 22). Carefully tap out the exhaust filter. Carefully clean the exhaust filter with a soft brush (Fig. 23). Re-insert the exhaust filter into its console on the appliance. Insert the exhaust filter cover into its bottom opening first, and then flip it up so that you hear and feel it click into place (Fig. 24).
Cleaning the mini turbo brush (optional)
1 Disconnect the mini turbo brush from the suction hose or the telescopic tube. 2 Unscrew the retaining ring by turning it anti-clockwise (Fig. 25). 3 Carefully open up the top of the housing of the mini turbo brush (Fig. 25). 4 Thoroughly clean the brush by hand. In case of stubborn soiling, carefully use tweezers or scissors (Fig. 26). 5 Place the top of the housing on the 3 tabs on the bottom of the housing and then carefully close the top of the housing (Fig. 27).
Screw the retaining ring back on by turning it clockwise (Fig. 27).
Accessory parts and spare parts
- Filter set (1 exhaust filter +1 motor filter) - 2226022 (Fig. 28/A)
- Parquet brush - M203-5 (Fig. 28/B)
- Mini turbo brush "Fellino" - M219 (Fig. 28/C)
- Midi turbo brush - M221 (Fig. 28/D)
- Long flexible crevice nozzle - M232 (Fig. 28/E)
- Hard floor nozzle - M236-1 (Fig. 28/F)
Troubleshooting
Before you contact our Dirt Devil service team or send the appliance to the Dirt Devil customer service department, you will find a lot of additional information in the service area of our website which will help you solve problems.
Always switch off the appliance and disconnect it from the mains socket before starting troubleshooting. Never use a faulty appliance.
Merci beaucoup!
3a6paheHo e Han-Beue:
PpaxocmyueheToHa
- Xopa,ЖИВОТи,paCTeHnI NJIHaДрexN Bbpxy TЯЛOTO
Bucok pnck ot hapaHbAhe!
Tneeea nee, 3ananeHn uRapn, K6pnteHn KneuKn I leCHO 3anaMm MaTePnaIi
0nacnoct or noxkap!
- BODa N IpyrN TeuHOCTN
0nacnoct ot Kbco cbeHHeHne!
- Tohep (3a Ia3epHn npHTepn, KOnnpHm MaunHn n T. H.)
→0nacnoct ot nojkap n ekcnlo3na!
Ynotpe6ata
B6n30CTdoeknIO3NBHINJIINJeCHO 3aapanMmMaTePnaIi
→Onacnoct ot nojap n ekcnlo3na!
- HaOTKpntO
0nacnoct ot pa3pyuwaBaHe npaIbXd n 3aMbpcraBaHna!
- Ha HeopuHaJIHn npHaJNeXHOCTN
HapyuBaHHe Ha 6e30nacHoCTTa Ha ypeHa!
CamopbHn INHTepBeHcHn 3a peMOHT
0nachocTOTnapaHbAHe Nn3rapHe Ha npabTOHa 6e3nlaTHa 3amHa!
OTHOCHO m3XBbPpIaHeTo
CpeKpaHa ynoTpe6aTa n3XBbPnTe ypeDa cAmO eKOJOruHOn N KaKTo e OINcAHO, >_·3a nta Ha OKoJIHaTa CpeDa N IN3XBbPnJaHe"Ha CTpaHnUca 115.
Iodrotobka
3an03HaBaHe cypeda
Φnir.1:① n3BOJ 3a 3acMyKBaU MapKyU;② 6yToH 3a OCBO60XdaBAHe Ha dOJIHHa KaIaK Ha KOHTeHepa 3a npax;③ KOHTeHep 3a npax;④ 6yToH 3a OCBO60X daBAHe Ha rOpHna KaIaK Ha KOHTeHepa 3a npax;
⑤Дрьхka 3a HocHe; ⑥6yToH BKЛ/N3KЛ; ⑦6yToH 3a HabuBaHe Ha Ka6eJa; ⑧3axpaHbuaq Ka6eJ; ⑨Ka- NaK Ha n3XoDnHaФnTbp; ⑩ДbpЖaU 3a NapKnupaHe;
11peryaTOp Ha cmykaTeJHaTa MoUHoc; 126yToH 3a ocbo6oxJaBaHe Ha KOHTeHepa 3a npax; 13pb- KoxBaTKa; 143acMyKbau Mapkpy; 15 peryaTOp Ha cmykaTeJHaTa MOUHcT; 166yTOH 3a OCBO6OxJaBa- He Ha 3acMyKbaunu Mapky; 17 npebKnUoyBaU ce HaKpaHnK 3a NOD; 18 fNkCaTOp 3a TeJeCKOnNuHa Tpb- 6a; 19 TeJeCKOnNuHa Tpb6a
PnHaJnxHocTn (onu): A KOM6nHnpaH HaKpaHnk 3B1; B HApaiHnk 3a NapKeT; C MmHt Typ-6o HApaiHnk
Pa30nakobaHe mOHTnpaHe
1IpoBepTe nblHOTaHa pa30nakOBaHOTo cb-dbpXaHne (pnr. 1).Ako 3a6eJKeTte etsa OT TpaHC-nOpTnpaHTo nnn aKO Heo IINcBA,He3a6abHO ce CBbpKte C Baunr TbproBeu.2 BkapaTe 3acMykBaunr MapKyu Bn3BOda 3a 3acMyKBauNna MapKyu, DOKaTO Ce ue N ycetn KaK Toi ce fNKcnpa (pnr. 2).
CbpxkeTe pkoXbaTkata C TeNECKONNuHaTa Tpb6a n perynpaTe DblxHnHa Ta H TeNECKONuHaTa Tpb-6a (phi. 3). CbpxkeTe TEeCKONuHaTa Tpb6a n npebknOuBaunCe HaKpaHnK 3a NOD (phi. 4).
5 YBepeTe Ce, Ye peryNaTOpbT 3a HaMaIyBaHe Ha CmyKaTeJIHaTa MoUHOCt (ΦnR. 1/15 e HAnbJHo 3aTBOpEn.
I3no3BaHe Ha npHaJekHoCTn

BHIMAHHE!
Pn ynoTpe6a Ha MNH Typ6o yeTkata (onzna) (fnr. 1/0 ce yBepTe, ye ochOBaTa Ha BbpTaaNc Ce YETkaU BaJIaK n3IbPjka, 6e3 da ce NOBpeu.
YKA3AHNE:
3a da MoXkeTe da n3nOJ3BaTe YeTKaTa 3a Me6eN, HATNCHeTe 6yToHa 3a OCBO6oKJaBAHe (fnt. 6/1) ndpbHete YeTKaTa 3a Me6eN Bbp-xy YeTKaTa 3a fyn, dOKaTO Ta ce fukcnpa.
1 NocTaBeTe JKeHaHaTApnHaIeJXHOCT Ha pBkoX-BaTKaTaNn Ha TeJeCKoNHyHATA Tpb6a (pnr.5).
yBepTe ce,ye npHaJnxHocTtae Cbbp3aHa 3npaBO. ypeBt MoKe Da 6bDe BKnIOueH.
BkIIOUvaHeHa ypeDa

BHIMAHHE!
Ako uepBeHaTa MapKnupOBKa ce Buxka (Φnrg. 8/②), npnbepeTe 3axpaHbuaaNa Ka6e n c NOMOHTa Ha 6byToHa 3a HABBaHe Ha Ka6eNa Do XbTTata MapKnupOBKa (Φnrg. 8/①) (Φnrg. 9).B npOTnBEh Cnya3axpaHbuaaNr Ka6e MoKe da ce NOBpeDi.
1ИЗдьрпай Te 3axpaHbauи Ka6e ot ypeda (fIr.7).2 BkIIOyTe ueNceNa BV KOHTaKt.
PpaxocmyeHe
TbBkaBO npaxocmyuehe

BHIMAHHE!
HaB-Beue npn nouchTaBaHeTo Ha CTbI6n BHNMaBaIte BnHaRn da ce HAmnPate Hnd ypeDa. B npoTINBEH CNyauH Ma onaCHOCT ypeDbT da naHne n Da Bn HapaHn.

BHIMAHHE!
Pn TBbpDn NOOBe n3NoJ3BaIe npEbkIouyBa- 7a Ce hakpaHnK 3a noD cAmo C n3BaJeHa YeTka (fNr.11), TbB KaTO B npOTnBEH cNyau TbbpDnT PNO MoKe Da ce NOBpeDi.
YKA3AHNE:
O6nKHOeHO peryIaTOPbT 3a HAMJIaBaHe Ha
CMyKaTeJIHaTa MOUHOC Tp8Ba Da e HAnbIHO
3aTBOpEH.C NOMoUta Ha peryIaTopa 3a HAMJIaBAHe Ha CMyKaTeJIHaTa MOUHOC T pN He06xOuMIOCT MoXeTe 6bp3O Da HAMJIte CMyKaTeJIHaTa MOUHOC, HApPIMep 3a Da OCBO6OJTE OTHOBO
3aCMyKaHN nepDeTa.
3a Da 3aTBOpITE peryIaTopa 3a HAMJIaBaHe Ha
CMyKaTeJIHaTa MOUHOC, rO PJIb3HeTe HaDOny.
3a Da OTBOpITE peryIaTopa 3a HAMJIaBaHe Ha
CMyKaTeJIHaTa MOUHOC, rO PJIb3HeTe HaRope
(ФИr.12).
1 PnpncbeHHe JKeHaHaTa npnHaJNeJXHOCT>IN3- nOJI3BaHe Ha npnHaJNeJXHOCTn" Ha cTpaHnca 118. 2 BkIIOUe Te ypeDa >BkIIOUbaHe Ha ypeDa" Ha cTpaHnca 119. 3 3a Da BkIIOUte ypeDa, HATNCHe-Te 6yToHa BKJI/IM3KJI (phi. 10). YpeBt 3anoYba da pa6OTi. 4 3a npaxOCMyueHe Dbpnaite ypeDa cnei Bac KaTO WeiHa. 5 3a Da IN3KlIOUte ypeDa, HATNCHeTe OTHOBO 6yToHa BKJI/IM3KJI (phi. 10). YpeBt Ce IN3KlIOUBA.
Perynupahe Ha cmykateHaTAMoHocT
Pn Heo6xOdmoCT CmyKaTeJIHaTa MOUHOCT MoKe Da ce perynipa nlaBHo:
3a da HamaJInte CMyKaTeJIHaTa MOUHOCT, 3aBbPTeTepeYJatopa Ha CMyKaTeJIHaTa MOUHOCT HaJIBAO. 3a Da NOBNIHTe CMyKaTeJIHaTa MOUHOCT, 3aBbPTeTepeYJatopa Ha CMyKaTeJIHaTa MOUHOCT HaIARCHO (frr.13).
CbxaHЯBaHe ha ypeDa
1 N3KIOUcTe Upea n 3IbPnaIte uenCena OT KOHTAKTa. 2 HatnckaIte 6yToHa 3a HabNBaHe Ha Ka6eNa (fur.9),doKaTO 3axpaHbAunr Ka6e Ce npu6epe n3zraNo. 3 OkayTe HApauHnka 3a noi nn NapKeT, CBbp3An C TeNECKOINuHaTa Tpb6a nn PbKOxBaTkata Ha DbpxaHa 3a napKnipaHe (fur.14).
TexHnuecka noDpBxKa Ha ypeDa
I3npa3BaHe ha pe3epBoapa 3a npax nnouchTbaHe
1 N3KIOUeTe ypeHa n 3dIbPnaIte IeIeCena OTOKHTa.2 HATUCHeTe 6yToHa 3a oCBO6OxJaBaHe n 3BaTeTe KOHTeHepa 3a npax OT ypeDa (fnr.15).
3ДрбжTe KOHTeHepa 3a npax HnCKo Ha Kofoa 3a 6oknyk NOCBO6OJeTe DOHNHa KOHTeHepa 3a npax (Φnr.16).→PpaxbT nada.43aTbopeTe DOHNHa KOHTeHepa 3a npax.5ДрьжTe KOHTeHepa 3a npax HnCKo Ha Kofoa 3a 6oknyK NOCBO6OJeTe RopHna KaNAK Ha KOHTeHepa 3a npax (Φnr.17).N3npa3HeTe Mbxa NIN KOCMTe OT KOHTeHepa 3a npax.63aTbopeTe rOpHna KaNAK Ha KOHTeHepa 3a npax.7 HatncheTe KOHTeHepa 3a npax CnIHHO Ha3ad B HerOBaTa KOH0Ja,doKaTo ce ue n YcETn KaTOn ce ΦnKcnpa (Φnr.18).
Ipei Da nOtbpCnTe np6nema, n3KIOUcTe ype- da n 3dBpNaTe uencena ot KONTaT. Hnkora He n3NoJ3BaIe Te deEkeTeH ypei.
Najljepsha hvala!
Drago nam je što ste se odlučili za proizvod tvrtke Dirt Devil. Želimo Vam puno zadovoljstva u radu s urežajem i zahvalujemo Vam na kupnjil!
Daljnje informaciè o Vašem proizvodu nacićete u ovim Uputama za rukovanje i na nasoj web stranici www.dirtdevil.de. Servisni tim tvrtke Dirt Devil要不要 kontaktirati preko detalja zakontakt navenenih na stranici 2.
Tehnicki podaci
| Vrsta uredeja Singlecyclone podni usisavač za prašinu | |
| Model DD2226; DD2226-X (X = 0..9) | |
| Napon 220 - 240 V ~, 50 - 60 Hz | |
| Snaga 550 W | |
| Zapremina spremnika za prašinu 1,6 l | |
| Težina DD2226-0/-1: 5,1 kg | DD2226-3/-5: 5,2 kg |
| Duljina priključnog kabela DD2226-0/-1: 6,0 m | DD2226-3/-5: 8,0 m |
*Indicative annual energy consumption (kWh per year), based on 50 cleaning processes. The actual annual energy consumption depends on how the appliance is used. The data is based on the Delegated Regulation (EU) No. 665/2013 of the commission of 3rd May 2013 which supplements Directive 2010/30/EU. All the methods which are not described in more detail in these instructions have been implemented based on DIN EN 60312-1:2014. Date: July 2017
Information on the energy label
This universal vacuum cleaner achieves the declared energy efficiency class and the specified cleaning class on carpet with the supplied flexible floor nozzle when the brush is retracted. The cleaning class on hard floor with joints and crevices is achieved with the supplied floor nozzle when the switch is set to "hard floor" (Fig.11).
FR

- International Service
- DE
- AT,CH
- Technical data
- Environmental protection and disposal
- Warranty
- SAFETY INSTRUCTIONS
- About the operating manual
- WARNING!
- CAUTION!
- NOTE
- Concerning certain groups of persons
- Information on the power supply
- Information on the rotating brush roller
- If the appliance is faulty
- Information on proper use
- In particular, the following is prohibited:
- Concerning disposal
- Preparatory work
- Getting to know the appliance
- Unpacking and assembling
- Using the accessories
- NOTE:
- Connecting the appliance
- Vacuum cleaning
- Flexible vacuum-cleaning
- Regulating the suction power
- Storing the appliance
- Maintaining the appliance
- Emptying and cleaning the dust bin
- Cleaning the pre-motor filter
- Cleaning the exhaust filter
- Cleaning the mini turbo brush (optional)
- Accessory parts and spare parts
- Troubleshooting
- Merci beaucoup!
- 3a6paheHo e Han-Beue:
- OTHOCHO m3XBbPpIaHeTo
- Iodrotobka
- 3an03HaBaHe cypeda
- Pa30nakobaHe mOHTnpaHe
- I3no3BaHe Ha npHaJekHoCTn
- BHIMAHHE!
- YKA3AHNE:
- BkIIOUvaHeHa ypeDa
- PpaxocmyeHe
- TbBkaBO npaxocmyuehe
- Perynupahe Ha cmykateHaTAMoHocT
- CbxaHЯBaHe ha ypeDa
- TexHnuecka noDpBxKa Ha ypeDa
- I3npa3BaHe ha pe3epBoapa 3a npax nnouchTbaHe
- Najljepsha hvala!
- Tehnicki podaci
- Information on the energy label
- FR
Brand : DIRT DEVIL
Model : Rebel 26 Reach
Category : Vacuum Cleaner