
5KSM6521XECA - Hand blender KITCHENAID - Free user manual and instructions
Find the device manual for free 5KSM6521XECA KITCHENAID in PDF.
User questions about 5KSM6521XECA KITCHENAID
0 question about this device. Answer the ones you know or ask your own.
Ask a new question about this device
Download the instructions for your Hand blender in PDF format for free! Find your manual 5KSM6521XECA - KITCHENAID and take your electronic device back in hand. On this page are published all the documents necessary for the use of your device. 5KSM6521XECA by KITCHENAID.
USER MANUAL 5KSM6521XECA KITCHENAID
5KSM7580X, 5KSM7591X, 5KPM5, 5KSM6521X
KitchenAid

English 5
Deutsch 17
Francais 29
Italiano 41
Nederlands 53
Espanol 65
Portugues 77
Elambdavika 89
Svenska 101
Norsk 113
Suomi 125
Dansk 137
Islenska 149
Pycckn 161
Polski 173
Ceský 185
197

TABLE OF CONTENTS
STAND MIXER SAFETY
Important safeguards 6
Electrical requirements 7
Electrical equipment waste disposal 7
PARTS AND FEATURES 8
ASSEMBLING THE STAND MIXER
Attaching the bowl and beaters 9
Adjusting the beater to bowl clearance. 10
Speed control guide — 10 speed Stand Mixers
Removing the bowl and beaters 12
TIPS FOR GREAT RESULTS
Stand Mixer use 12
Mixing time 13
Mixing tips 13
ATTACHMENTS 13
CARE AND CLEANING 14
TROUBLESHOOTING 15
WARRANTY AND SERVICE
KitchenAid Stand Mixer warranty 16
Customer service 16
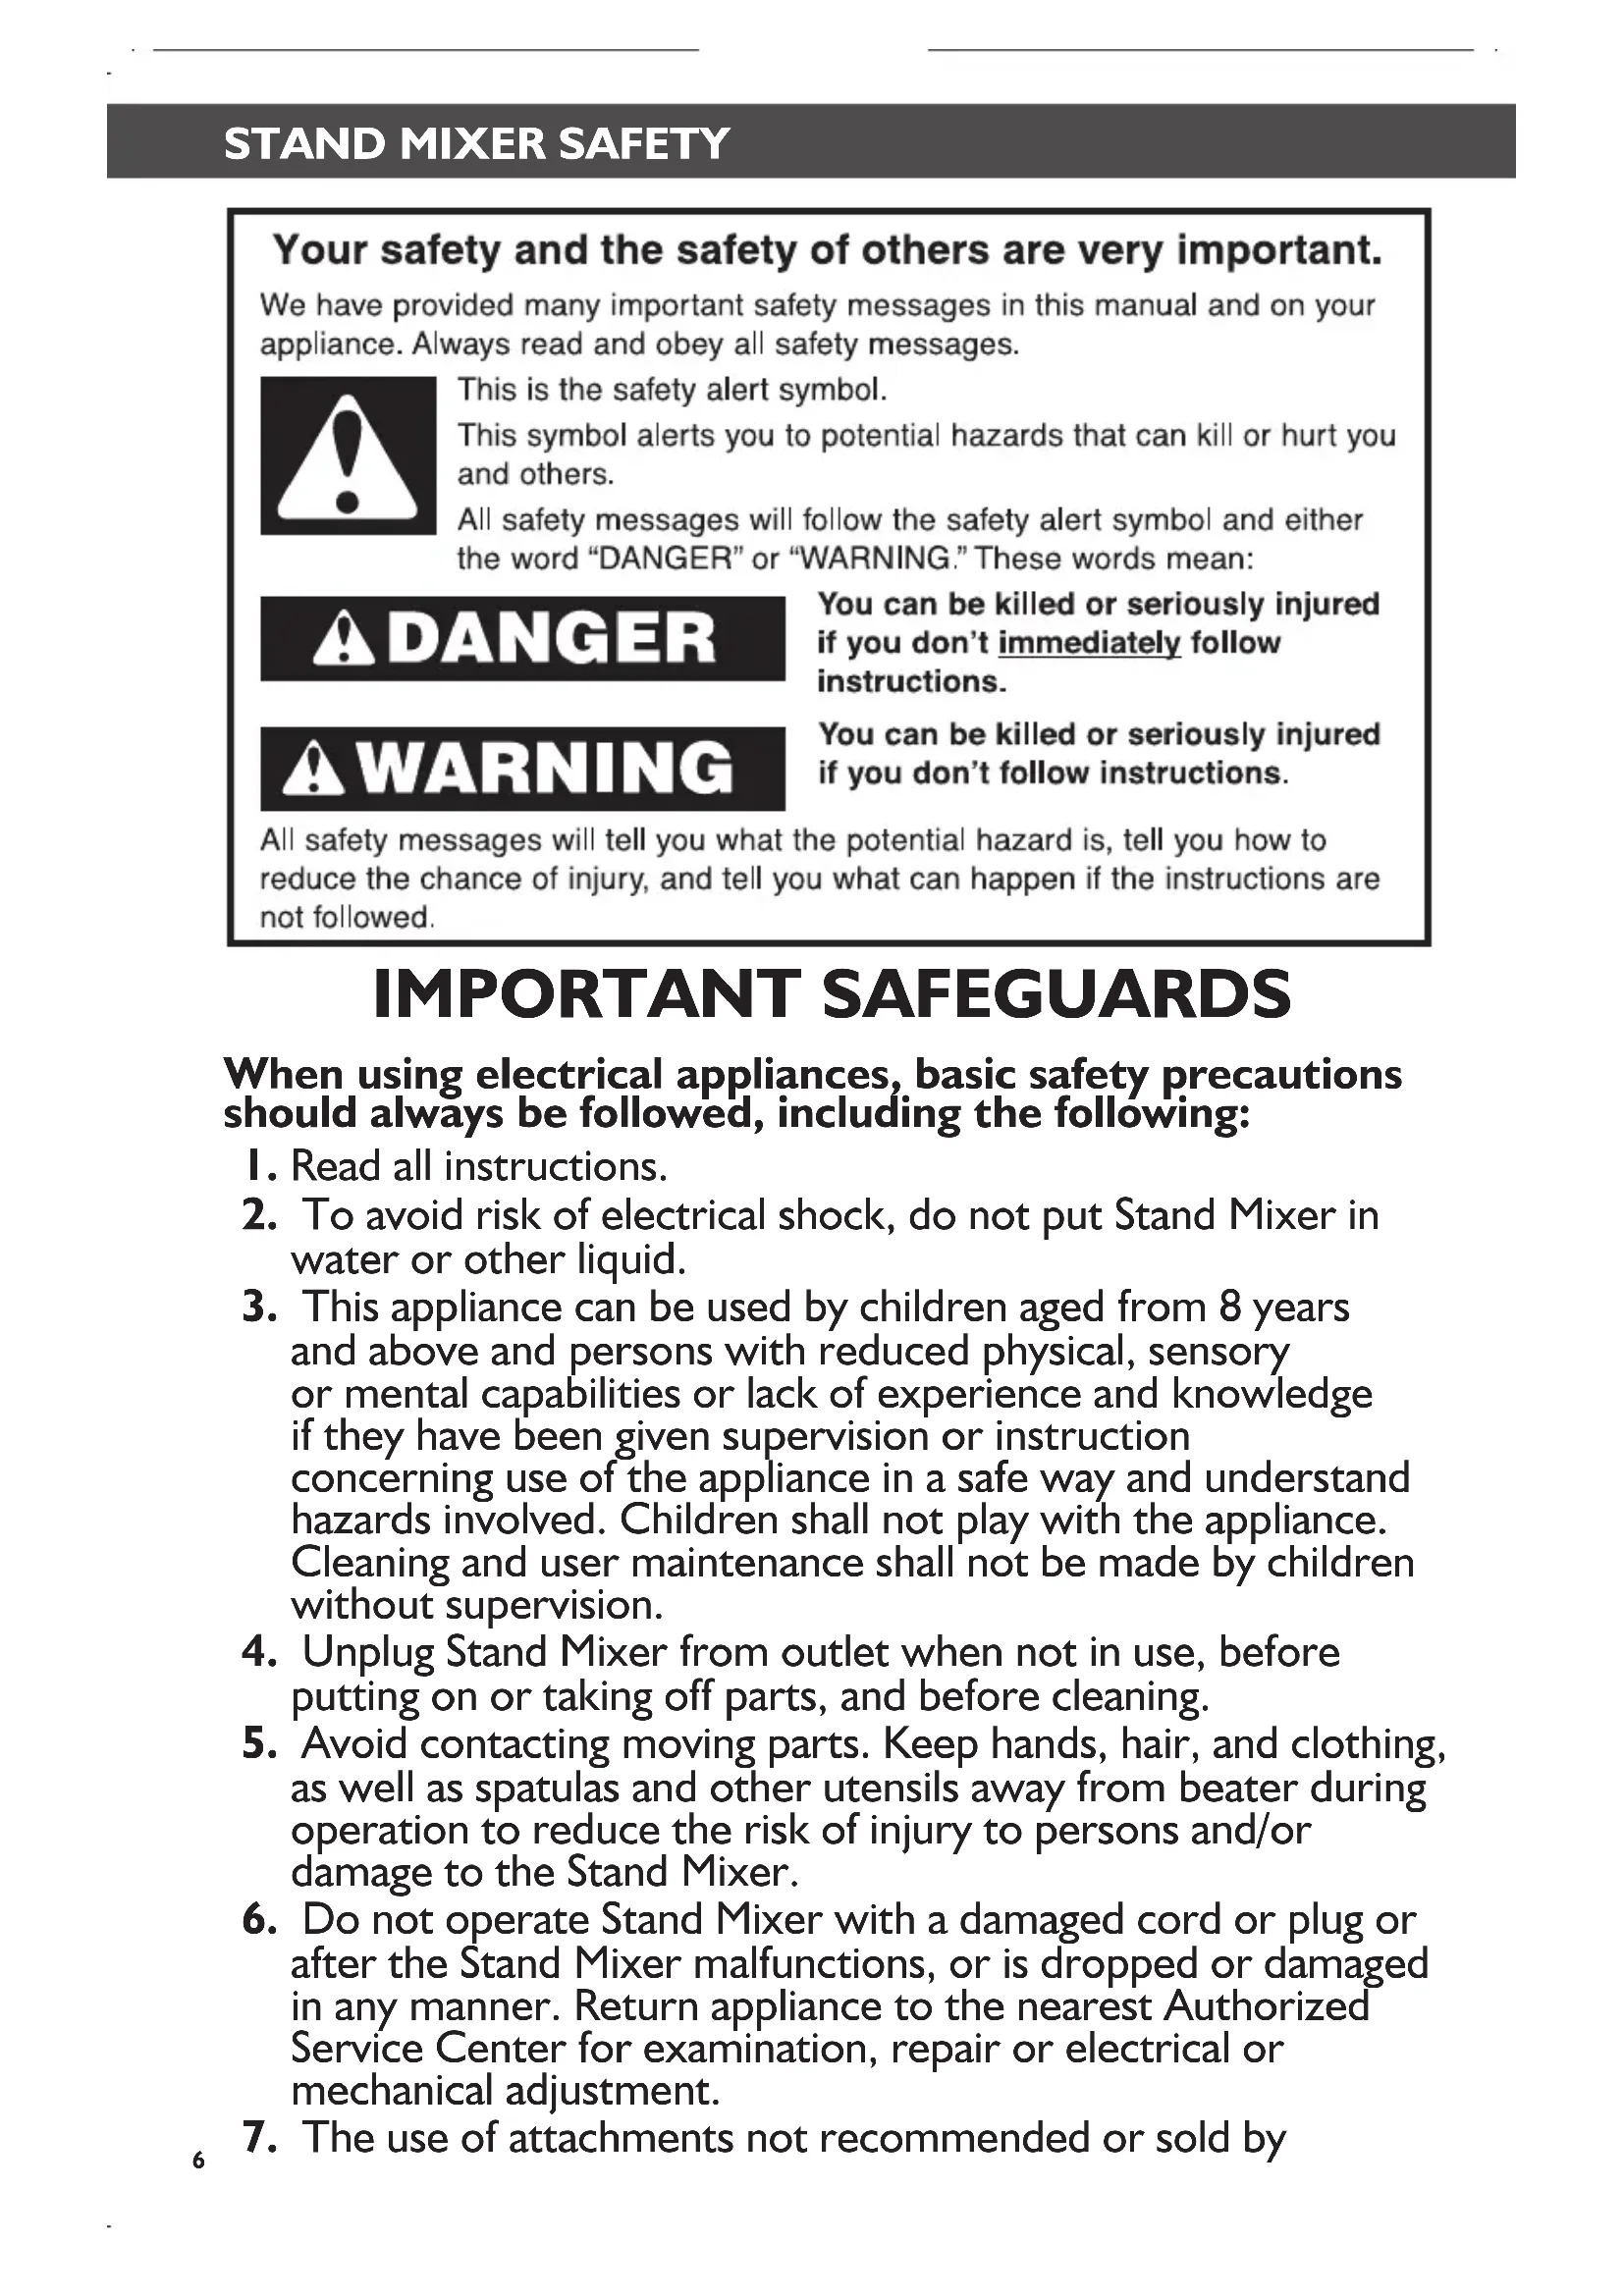
Your safety and the safety of others are very important.
We have provided many important safety messages in this manual and on your appliance. Always read and obey all safety messages.

This is the safety alert symbol.
This symbol alerts you to potential hazards that can kill or hurt you and others.
All safety messages will follow the safety alert symbol and either the word "DANGER" or "WARNING." These words mean:
DANGER
You can be killed or seriously injured if you don't immediately follow instructions.
WARNING
You can be killed or seriously injured if you don't follow instructions.
All safety messages will tell you what the potential hazard is, tell you how to reduce the chance of injury, and tell you what can happen if the instructions are not followed.
IMPORTANT SAFEGUARDS
When using electrical appliances, basic safety precautions should always be followed, including the following:
- Read all instructions.
- To avoid risk of electrical shock, do not put Stand Mixer in water or other liquid.
- This appliance can be used by children aged from 8 years and above and persons with reduced physical, sensory or mental capabilities or lack of experience and knowledge if they have been given supervision or instruction concerning use of the appliance in a safe way and understand hazards involved. Children shall not play with the appliance. Cleaning and user maintenance shall not be made by children without supervision.
- Unplug Stand Mixer from outlet when not in use, before putting on or taking off parts, and before cleaning.
- Avoid contacting moving parts. Keep hands, hair, and clothing, as well as spatulas and other utensils away from beater during operation to reduce the risk of injury to persons and/or damage to the Stand Mixer.
- Do not operate Stand Mixer with a damaged cord or plug or after the Stand Mixer malfunctions, or is dropped or damaged in any manner. Return appliance to the nearest Authorized Service Center for examination, repair or electrical or mechanical adjustment.
- The use of attachments not recommended or sold by
KitchenAid may cause fire, electrical shock, or injury.
- Do not use the Stand Mixer outdoors.
- Do not let the cord hang over edge of table or counter.
- Remove Flat Beater, Stainless Steel Whip, or Spiral Dough Hook from Stand Mixer before washing.
III. To avoid product damage, do not use the mixer bowls in areas of high heat such as an oven, microwave, or on a stovetop. - This product is designed for household use only. SAVE THESE INSTRUCTIONS
Electrical requirements
WARNING

Electrical Shock Hazard
Plug into a grounded outlet.
Do not remove ground prong.
Do not use an adapter.
Do not use an extension cord.
Failure to follow these instructions can result in death, fire, or electrical shock.
Volts: 220-240 A.C.
Hertz: 50/60 Hz
Wattage: 315 Watts for model 5KPM5
500 Watts for models
5KSM7580X, 5SM7591X,
and 5KSM6521X
NOTE: The power rating for your Stand Mixer is printed on the serial plate, placed under your Stand Mixer.
Do not use an extension cord. If the power supply cord is too short, have a qualified electrician or serviceman install an outlet near the appliance.
The wattage rating is determined by using the attachment that draws the greatest load (power). Other recommended attachments may draw significantly less power.
Electrical equipment waste disposal
Disposal of packing material
The packing material is 100% recyclable and is marked with the recycle symbol. The various parts of the packing must therefore be disposed of responsibly and in full compliance with local authority regulations governing waste disposal.
Scrapping the product
- This appliance is marked in compliance with European Directive 2002/96/EC, Waste Electrical and Electronic Equipment (WEEE).
- By ensuring this product is disposed of correctly, you will help prevent potential negative consequences for the environment
and human health, which could otherwise be caused by inappropriate waste handling of this product.
- The symbol on the product or on the accompanying documentation indicates that it should not be treated as domestic waste but must be taken to an appropriate collection centre for the recycling of electrical and electronic equipment.
For more detailed information about treatment, recovery and recycling of this product, please contact your local city office, your household waste disposal service or the shop where you purchased the product.
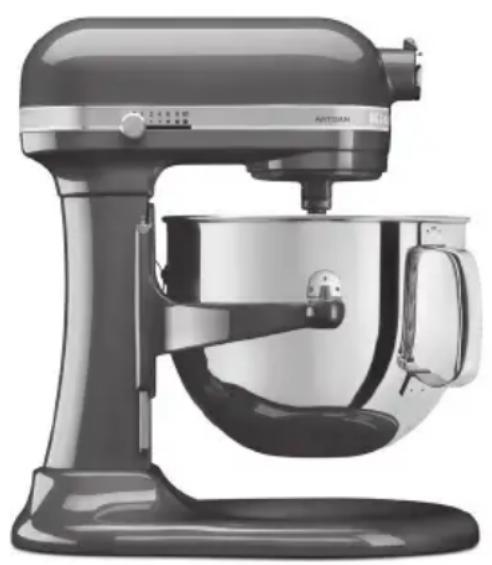
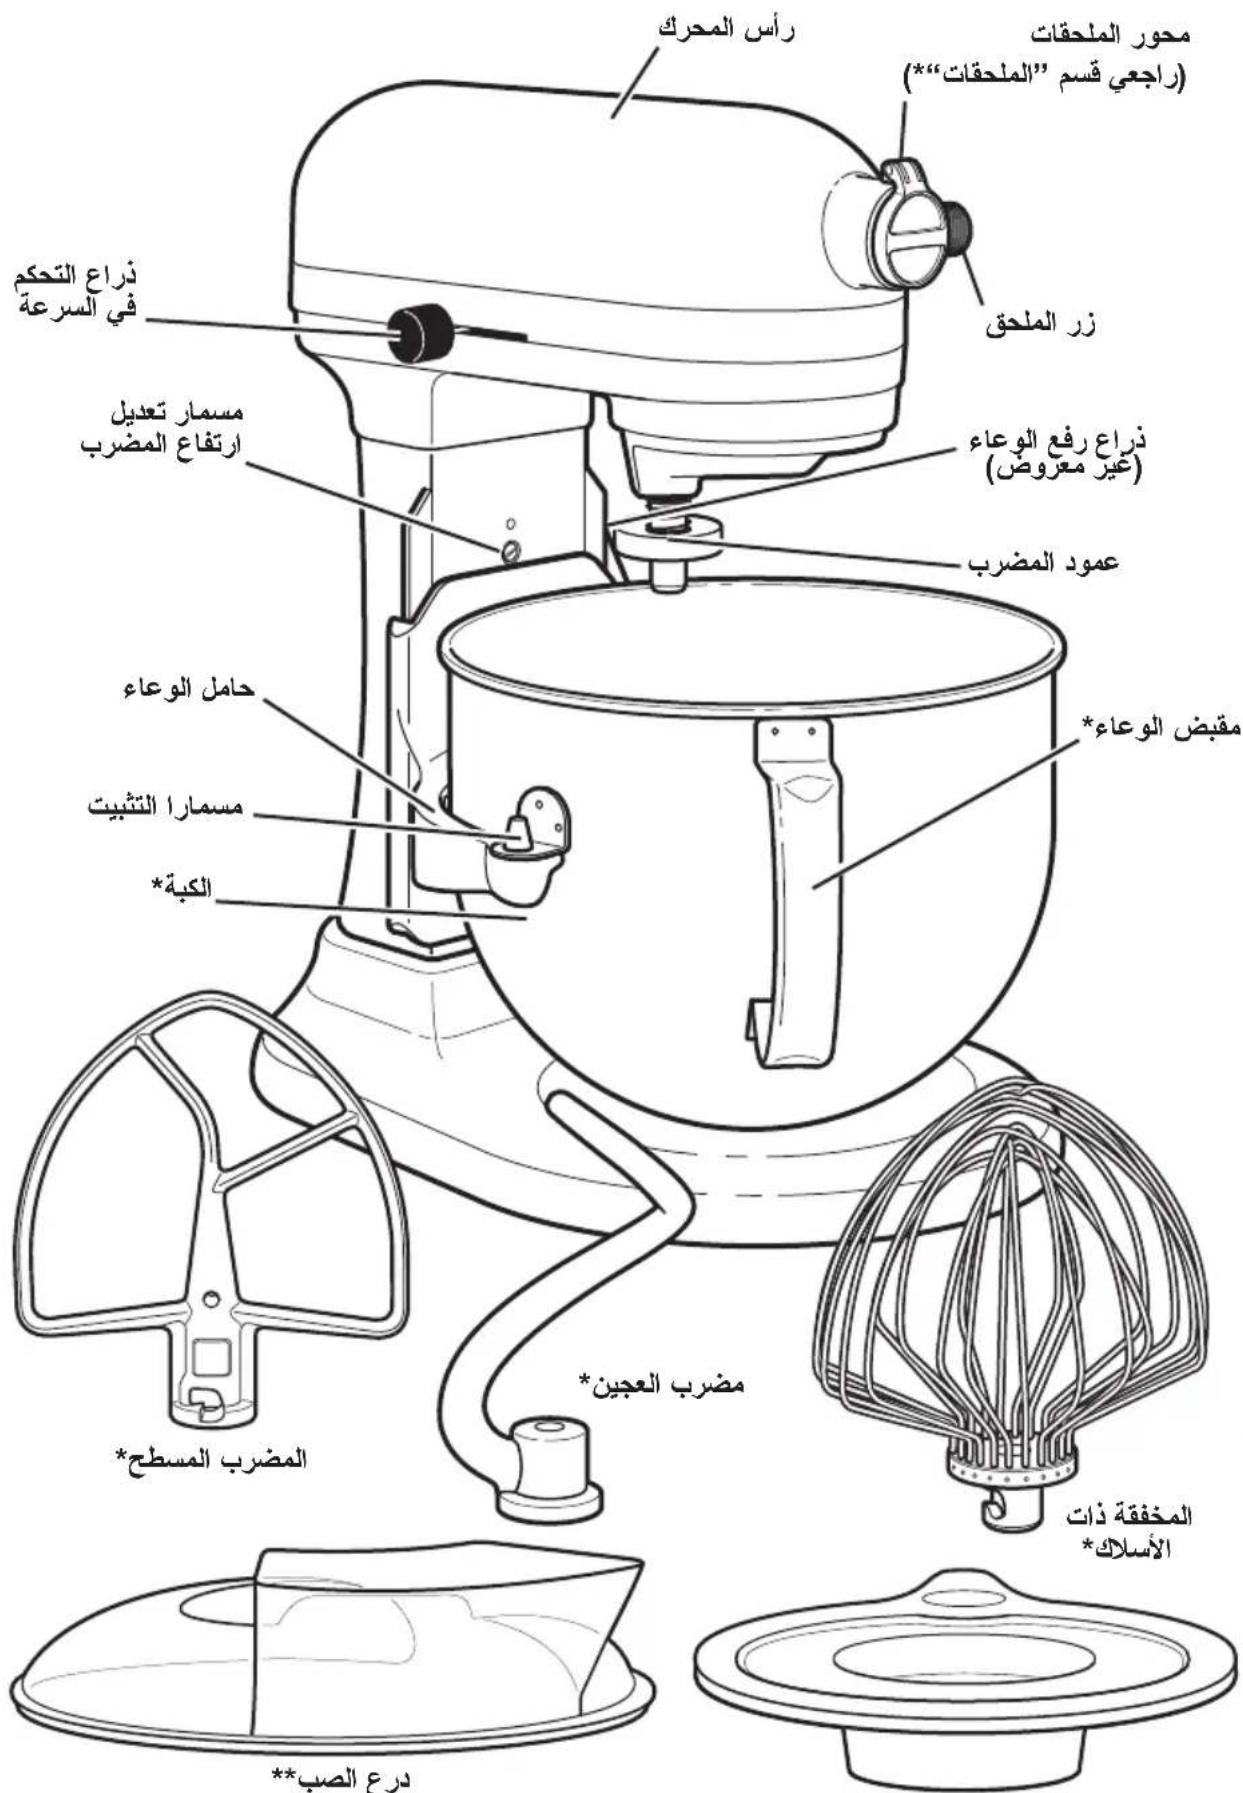
PARTS AND FEATURES
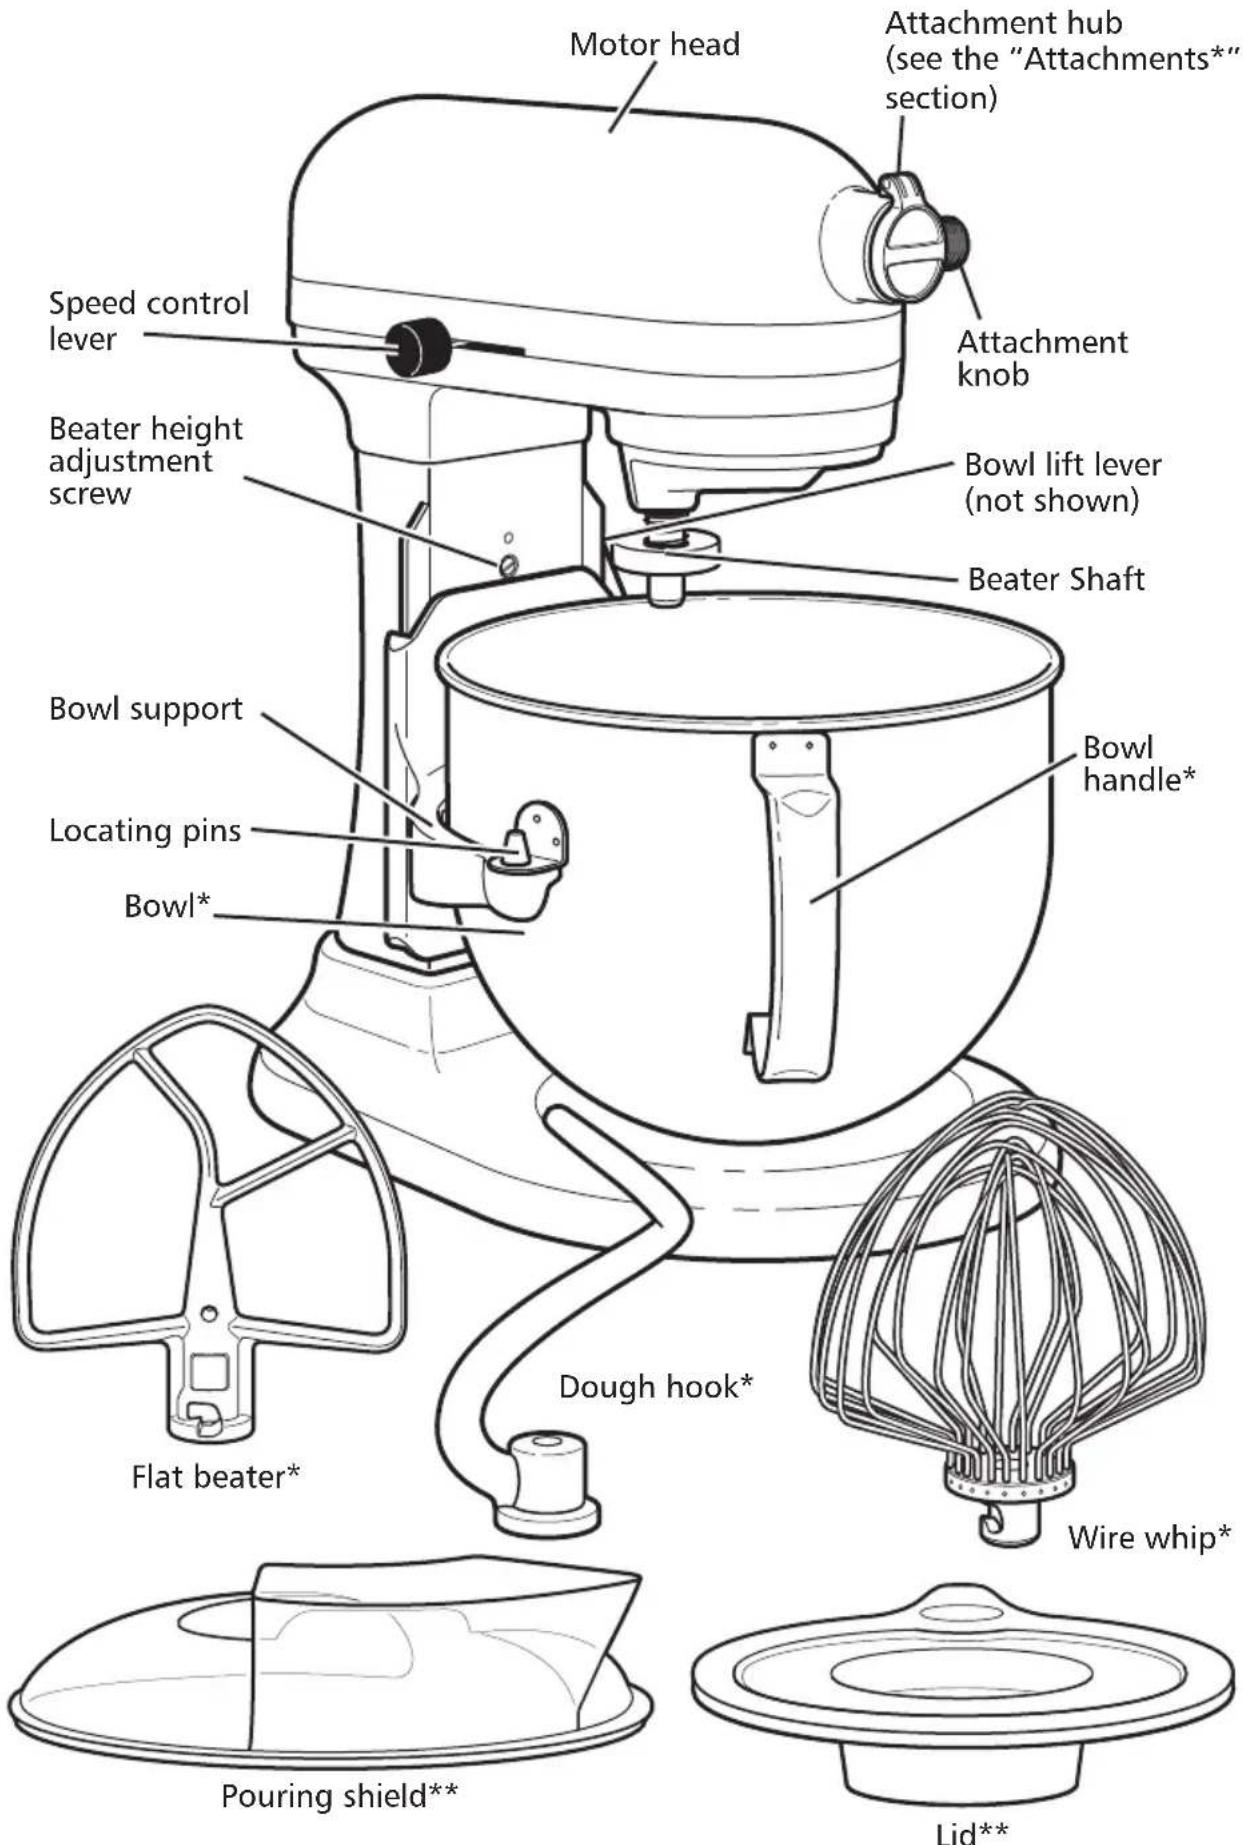
Material, style, and size may differ depending on model.
* Pouring shield included only for models 5KPM5, 5KSM7580X and 5KSM7591X / Lid included only for models 5KPM5 and 5KSM6521X.
ASSEMBLING THE STAND MIXER
Attaching the bowl and beaters
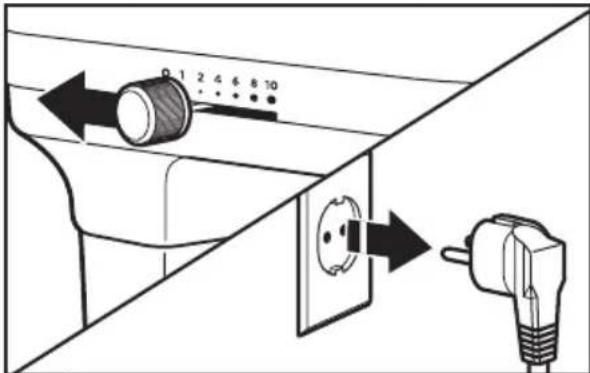
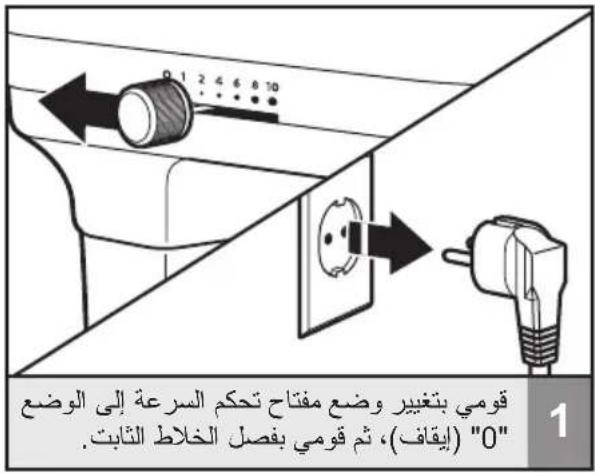
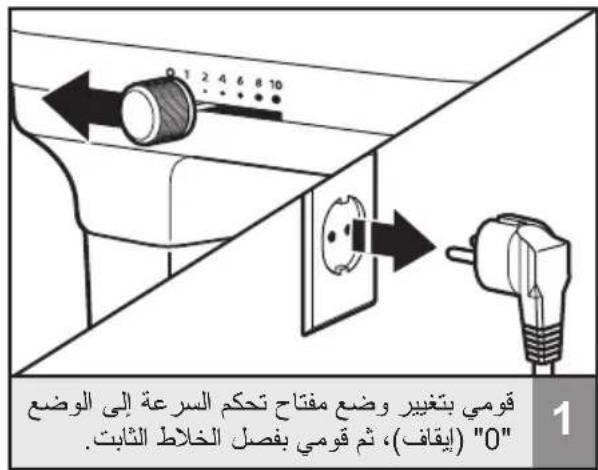
Turn speed control to "0" (OFF), and unplug Stand Mixer.
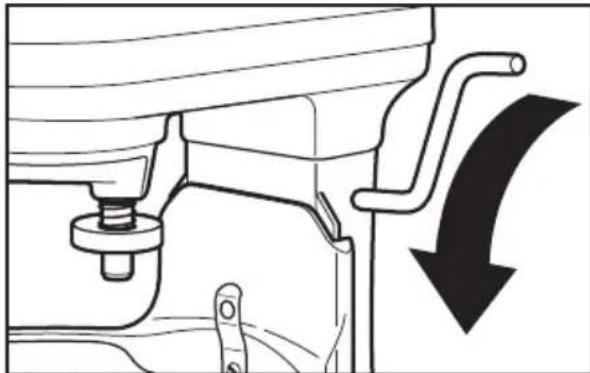
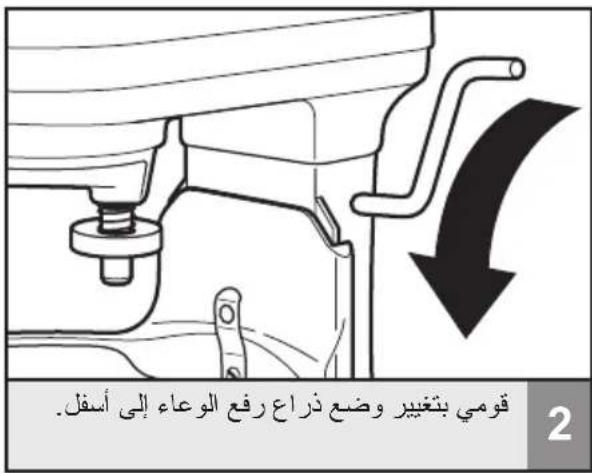
Place bowl lift lever into down position.

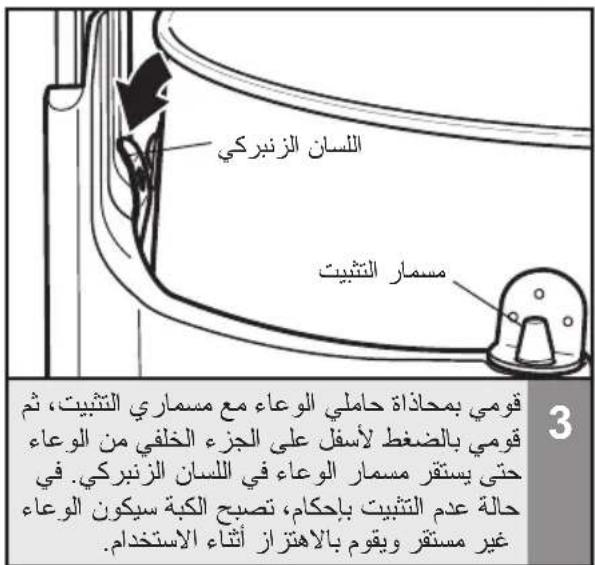
3 Fit bowl supports over locating pins; press down on back of the bowl until bowl pin snaps into the spring latch. If not securely snapped into place, bowl will be unstable and wobble during use.
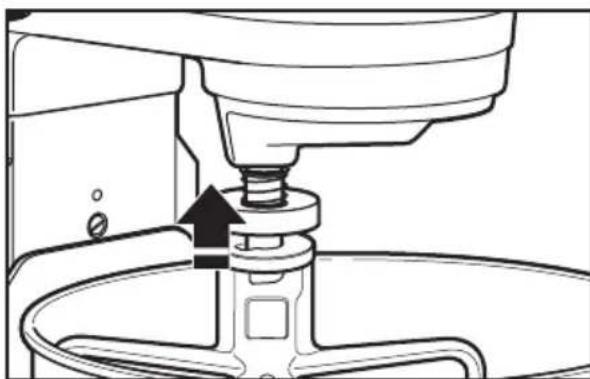
4 Slip a beater (flat, wire whip, or dough hook) onto the beater shaft and press upward as far as possible. Turn beater to the right, hooking it over the pin on the beater shaft.
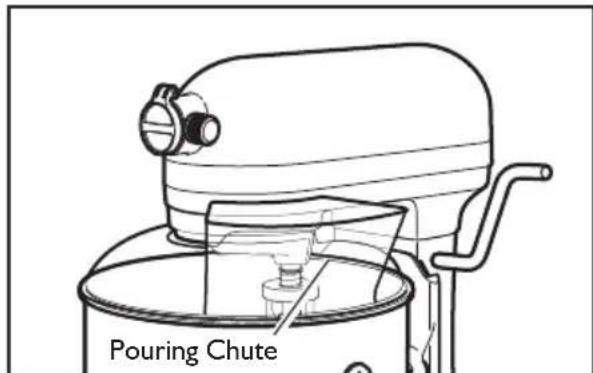
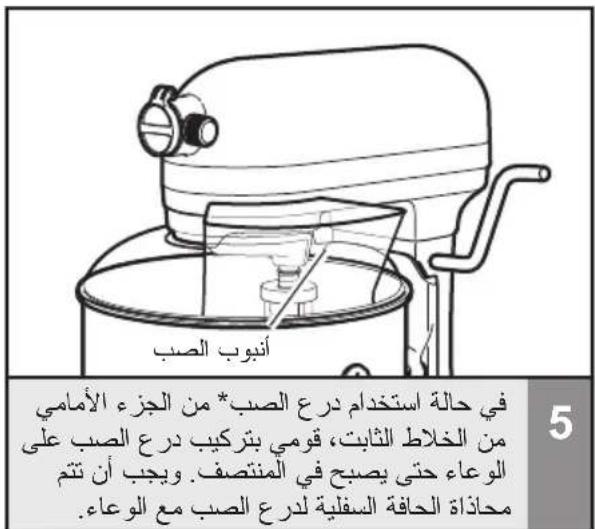
5 If using the pouring shield*, from the front of the Stand Mixer, slide the pouring shield over the bowl until it is centered. The bottom rim of the pouring shield should fit within the bowl.
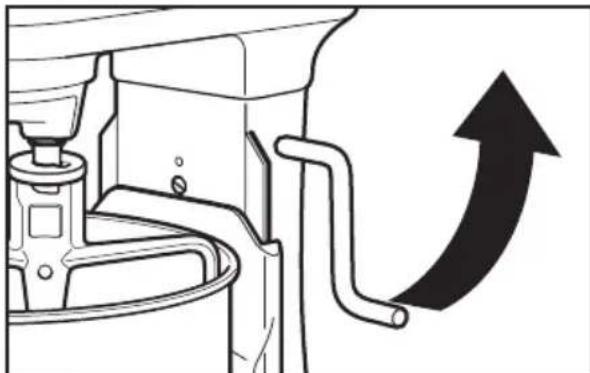
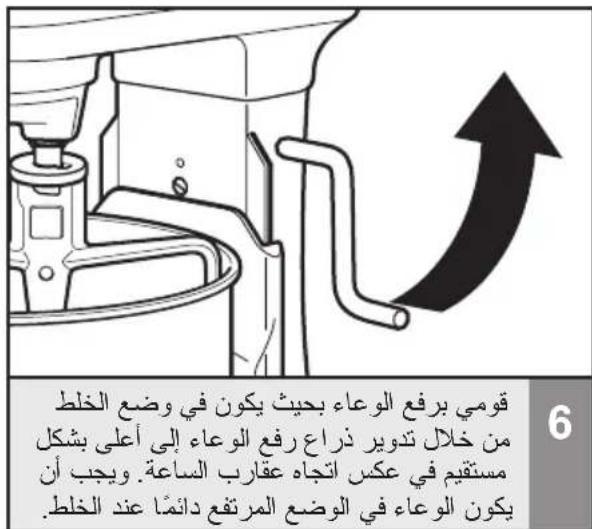
6 Raise the bowl into mixing position by rotating the bowl lift lever counterclockwise to the straight up position. The bowl must always be in the raised position when mixing.
NOTE: Rotate the pouring shield* so the motor head covers the U-shaped gap in the shield. The pouring chute will be just to the right of the attachment hub as you face the Stand Mixer.
ASSEMBLING THE STAND MIXER
Adjusting beater to bowl clearance
Your Stand Mixer is adjusted at the factory so the flat beater just clears the bottom of the bowl. If, for any reason, the flat beater hits the bottom of the bowl or is too far away from the bowl, you can correct the clearance easily.
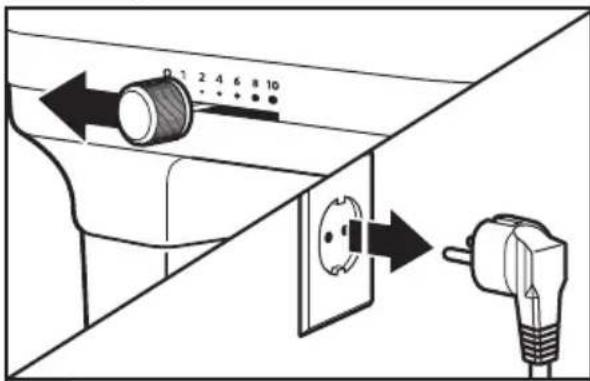
Turn speed control to "0" (OFF), and unplug Stand Mixer.

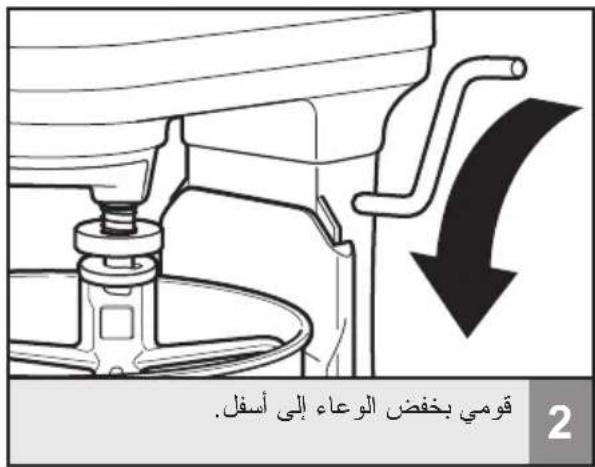
2 Lower the bowl to the down position.
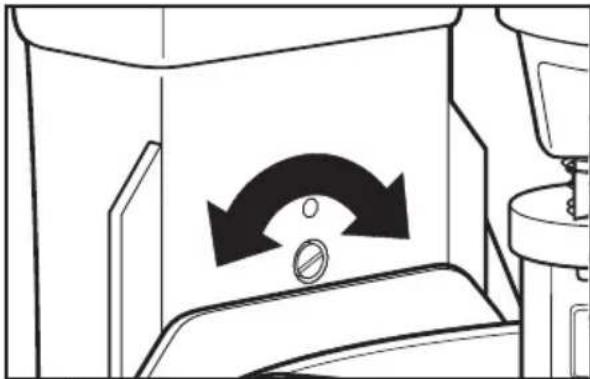
3 Turn beater height adjustment screw (A) slightly counterclockwise (left) to raise the flat beater; or turn clockwise (right) to lower the flat beater. Adjust so that the flat beater just clears the surface of the bowl. If you over adjust the screw, the bowl lift lever may not lock in place.
NOTE: When properly adjusted, the flat beater will not strike on the bottom or side of the bowl. If the flat beater or the wire whip is so close that it strikes the bottom of the bowl, the coating may wear off the flat beater (for coated beaters) or wires on the wire whip may wear.
Scraping sides of bowl may be necessary under certain conditions regardless of beater adjustment. The Stand Mixer must be stopped to scrape bowl or damage to Stand Mixer may occur.
Speed control guide - 10 speed Stand Mixers
All speeds have the Soft Start feature that automatically starts the Stand Mixer at a lower speed to help avoid ingredient splash-out and "flour puff" at start-up, then quickly increases to the selected speed for optimal performance.

| Speed | Used for Accesso | ries Description | |
| 1 Stirring For slow stirring, combining, mashingstarting all mixing procedures. Use toadd flour and dry ingredients to batter,and add liquids to dry ingrediptions. Do not use Speed I to mixyeast doughs. | |||
| 2 Slow mixing, For slow mixing,mashing, fasterKneading Use to mix and knead yeast doughs,heavy batters, and candies; start mashingpotatoes or other vegetables; cutshortening into flour; mix thin orsplashy batters. | stirring. | ||
| 4 Mixing,For mixing semi heavy batters,suchBeating as cookies.Use to combine sugar andshortening and to add sugars to eggwhites for meringues. Medium speedfor cake mixes. | |||
| 6 Beating,For medium-fast beating(creaming)Creaming or whipping.Use to finishdoughnut, and other batters. Highspeed for cake mixes. | (mixing cake, | ||
| 8-10Fast beating,boiled frostings. For whippingsmallFast whipping amounts of cream, egg whiffinal whipping of mashed potatoes. | or whisking smallities or for | ||
NOTE: Use Speed 2 to mix or knead yeast doughs. Use of any other speed creates high potential for Stand Mixer failure. The dough hook efficiently kneads most yeast dough within 4 minutes.
Removing the bowl and beaters

Turn speed control to "0" (OFF), and unplug Stand Mixer.
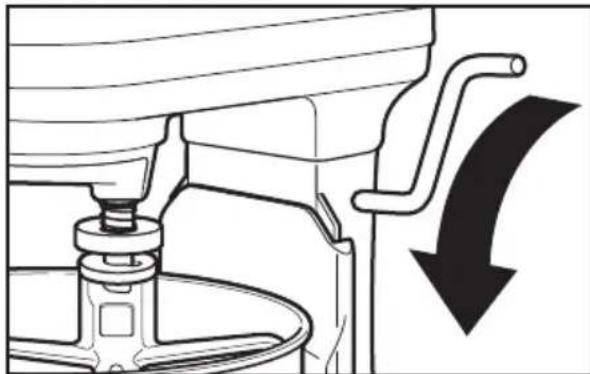
Lower the bowl to the down position.

3 Press the beater up as far as possible and turn left, then pull beater from the beater shaft.
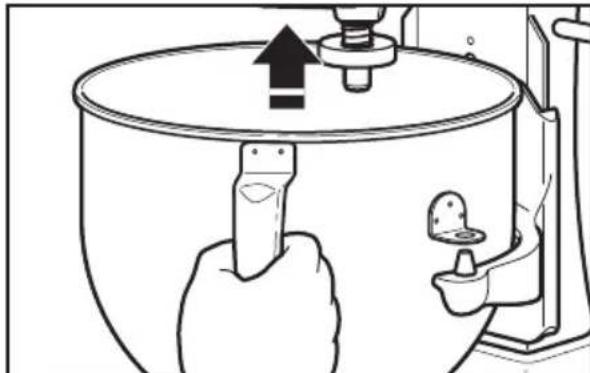
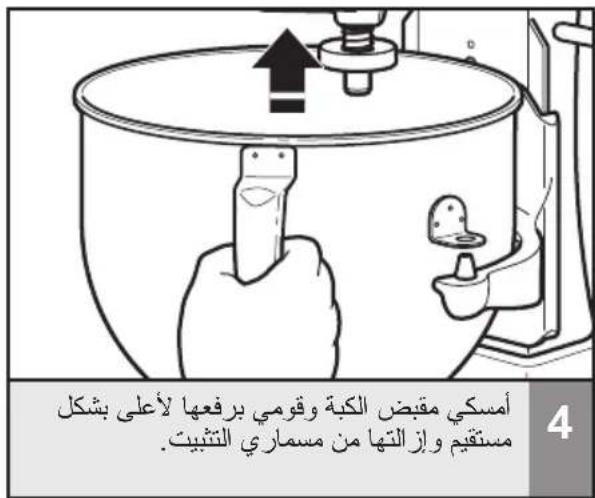
4 Grasp the bowl handle and lift it straight up and off the locating pins.
TIPS FOR GREAT RESULTS
Stand Mixer use
WARNING
PERSONAL INJURY HAZARD
To avoid personal injury and damage to the beater, do not attempt to scrape bowl while mixer is operating; turn mixer off. Should scraper or other object drop into bowl, turn motor OFF before removing.
The bowl and beater are designed to provide thorough mixing without frequent scraping. Scraping the bowl once or twice during mixing is usually sufficient.
The Stand Mixer may become warm during use. Under heavy loads with extended mixing time periods, you may not be able to comfortably touch the top of the Stand Mixer. This is normal.
TIPS FOR GREAT RESULTS
Mixing time
Your KitchenAid Stand Mixer will mix faster and more thoroughly than most other electric mixers. Therefore, the mixing time in most recipes must be adjusted to avoid overbeating.
To help determine the ideal mixing time, observe the batter or dough and mix only until it has the desired appearance described in your recipe, such as "smooth and creamy." To select the best mixing speeds, use the "Speed control guide" section.
Mixing tips
Adding Ingredients
Always add ingredients as close to side of bowl as possible, not directly into moving beater. The Pouring Shield can be used to simplify adding ingredients. Use Speed I until ingredients have been blended. Then gradually increase to desired speed.
Adding Nuts, Raisins, or Candied Fruits
Follow individual recipes for guidelines on including these ingredients. In general, solid materials should be folded in the last few seconds of mixing on Speed I. The batter should be thick enough to keep the fruit or nuts from sinking to the bottom of the pan during baking. Sticky fruits should be dusted with flour for better distribution in the batter.
Liquid Mixtures
Mixtures containing large amounts of liquid ingredients should be mixed at lower speeds to avoid splashing. Increase speed only after mixture has thickened.
NOTE: If ingredients in very bottom of bowl are not thoroughly mixed, then the beater is not far enough into the bowl. See the "Setting up your Stand Mixer" section.
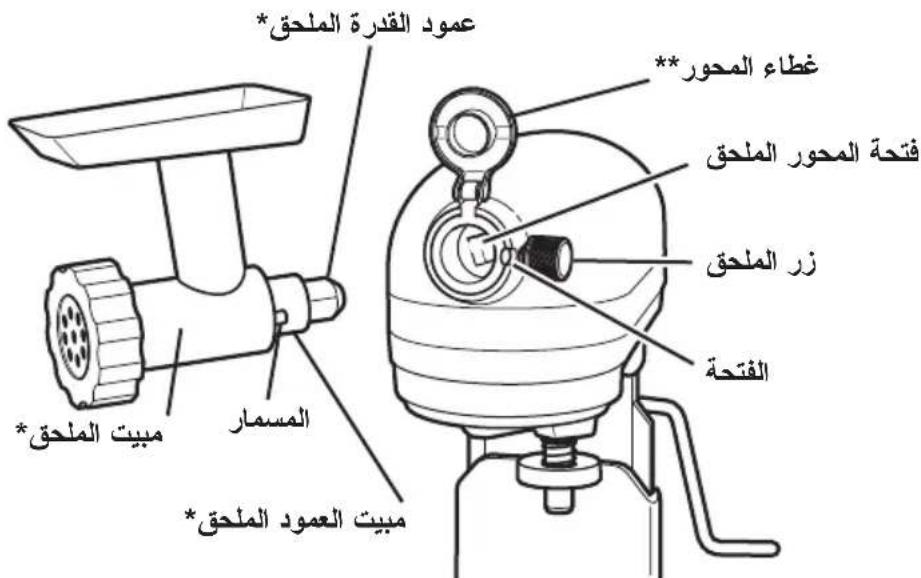
ATTACHMENTS
KitchenAid optional attachments are designed to assure long life. The attachment power shaft and attachment hub socket are of a square design, to eliminate any possibility of slipping during the transmission of power to the attachment. The hub and shaft housings are tapered to assure a snug fit, even after prolonged use and wear. KitchenAid attachments require no extra power unit to operate them; the power unit is built-in.
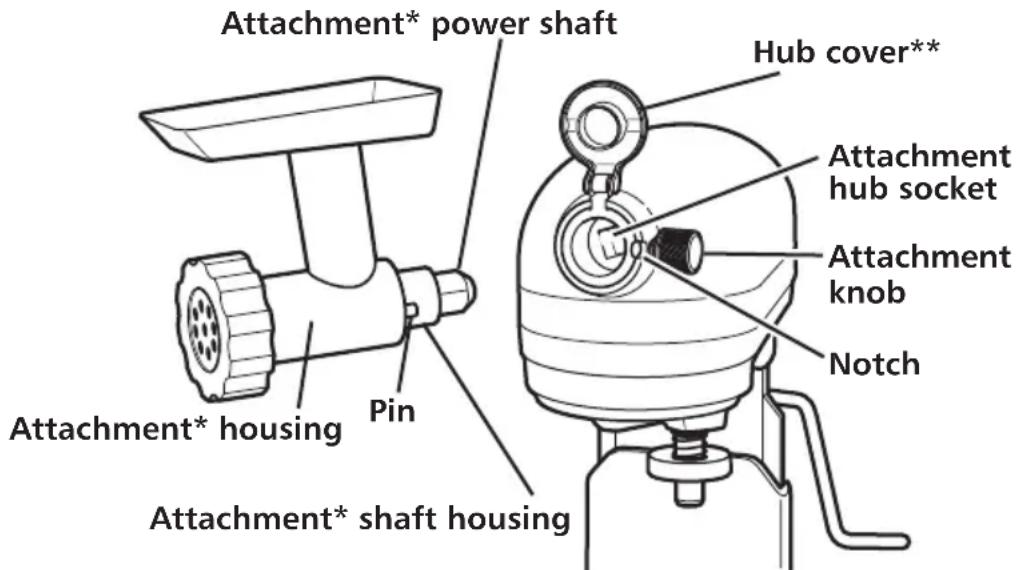
Optional attachment, not part of the mixer.
* Style may vary depending on model.
WARNING
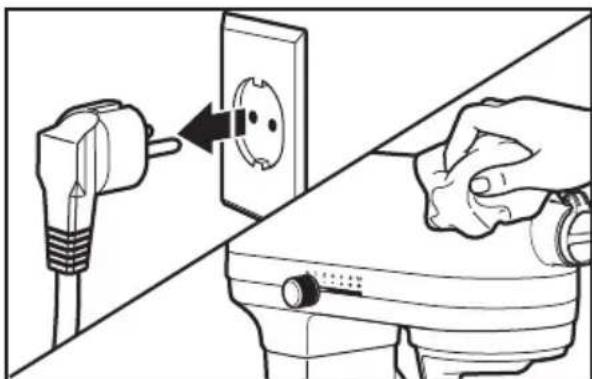
ELECTRICAL SHOCK HAZARD ALWAYS BE SURE TO UNPLUG MIXER BEFORE CLEANING TO AVOID POSSIBLE ELECTRICAL SHOCK.
Wipe mixer with a damp cloth. DO NOT IMMERSE IN WATER. Wipe off beater shaft frequently, removing any residue that may accumulate.

Always be sure to unplug Stand Mixer before cleaning. Wipe Stand Mixer with a soft, damp cloth. Do not use household/commercial cleaners. Wipe off beater shaft frequently, removing any residue that may accumulate. Do not immerse in water.
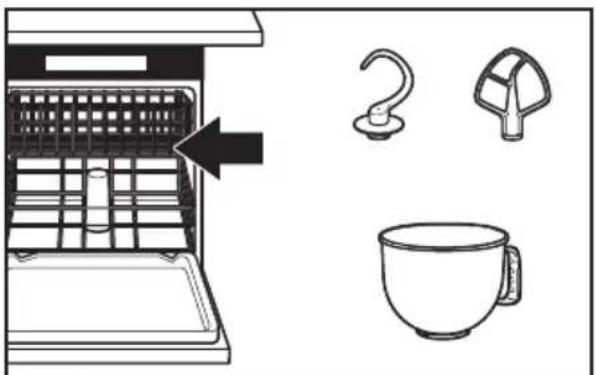
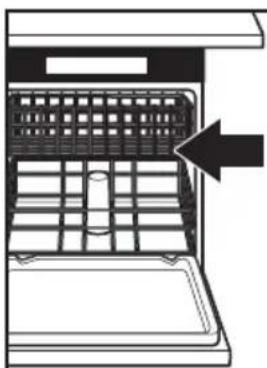
The bowl, flat beater, and dough hook may be washed in a dishwasher. Or, clean them thoroughly in hot sudsy water and rinse completely before drying. Do not store beaters on shaft.
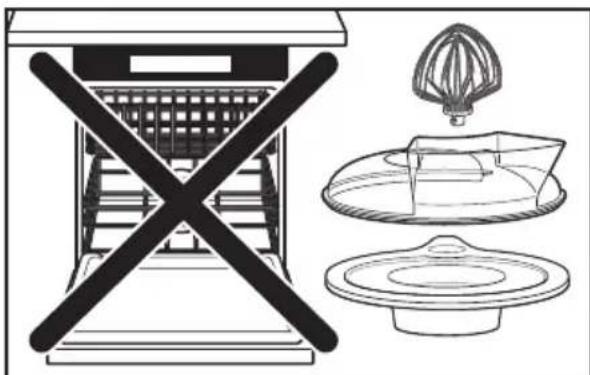
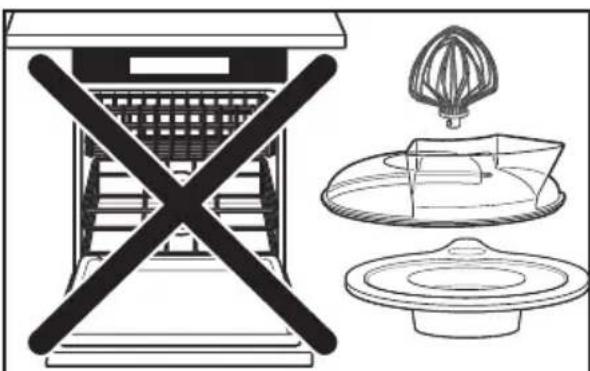
3 IMPORTANT: The wire whip, pouring shield, and lid are not dishwasher safe. Clean thoroughly in hot sudsy water and rinse completely before drying. Do not store wire whip on shaft.
** Pouring shield included only for models 5KPM5, 5KSM7580X and 5KSM7591X / Lid included only for models 5KPM5 and 5KSM6521X.
TROUBLESHOOTING
WARNING

Electrical Shock Hazard
Unplug before servicing.
Failure to do so can result in death or electrical shock.
Please read the following before calling your service center.
I. The Stand Mixer may warm up during use. Under heavy loads with extended mixing time periods, you may not be able to comfortably touch the top of the unit. This is normal.
- The Stand Mixer may emit a pungent odor, especially when new. This is common with electric motors.
- If the Flat Beater hits the Bowl, stop the Stand Mixer. See the "Setting Up Your Stand Mixer" section.
If your Stand Mixer should malfunction or fail to operate, please check the following:
- Is the Stand Mixer plugged in?
Is the fuse in the circuit to the Stand Mixer in working order? If you have a circuit breaker box, be sure the circuit is closed. - Turn off the Stand Mixer for 10-15 seconds, the turn it back on. If the mixer still does not start, allow it to cool for 30 minutes before turning it back on.
- If the problem is not due to one of the above items, see the "Customer service" section.
KitchenAid Stand Mixer warranty
| Length of Warranty: | KitchenAid Will Pay For: | KitchenAid Will Not Pay For: |
| Europe, Middle East and Africa:For models 5KPM5, and 5KSM7591X: One year full warranty from date of purchase.For models 5KSM7580X, 5KSM6521X:Five years full warranty from date of purchase. | The replacement parts and repair labor costs to correct defects in materials or workmanship. Service must be provided by an Authorized KitchenAid Service Center. | A. Repairs when Stand Mixer is used for operations other than normal household food preparation.B. Damage resulting from accident, alterations, misuse, abuse, or installation/operation not in accordance with local electrical codes. |
KITCHENAID DOES NOT ASSUME ANY RESPONSIBILITY FOR INDIRECT DAMAGES.
Customer service
In U.K. and Ireland:
For any questions, or to find the nearest KitchenAid Authorized Service Center, please find our contact details below.
NOTE: All service should be handled locally by an Authorized KitchenAid Service Center.
Contact number for U.K. and Northern Ireland:
Tollfree number 0800 988 1266 (calls from mobile phones are charged standard network rate)
Contact number for Ireland:
Tollfree number +44 (0) 20 8616 5148
E-mail contact for U.K. and Ireland:
Go to www.kitchenaid.co.uk, and click on the link "Contact Us" at the bottom of the page.
Address for U.K. and Ireland:
KitchenAid Europa, Inc.
POBOX19
B-2018 ANTWERP 11
BELGIUM
In other countries:
For all product related questions and after sales matters, please contact your dealer to obtain the name of the nearest Authorized KitchenAid Service/Customer Center.
www.KitchenAid.eu
INHALTSVERZEICHNIS
500 Watt (Modelle 5KSM7580X,
GARANTIA E ASSISTÊNCIA
Garantia da batedeira KitchenAid 88
Centros de assistencia 88
Servico de assistencia 88
MANUTENÇÂO E LIMPEZA
AVISO
PERIGO DE CHOQUE ELECTRICO
DESLIGUE A BATEDEIRA DA TOMADA ANTES DE A LIMPAR, PARA EVITAR O RISCO DE CHOQUE ELECTRICO.
IoXuc: 315 Watt yia to oovTeAo 5KPM5
Koawak, IaTp. Iwakεiμ 33
+30 210 7237615
o i k n, Toiokn 26,
+30 2310 220933,231388
www.KitchenAid.eu
INNEHÄLLSFORTECKNING
SÄKER ANVÄNDNING AV KÖKSMASKINEN
VEDLIKEHOLD OG RENGJØRING
ADVARSEL
FARE FOR ELEKTRISK STØT
SORG ALLTID FOR Å FRAKOPLE MIKSEREN FÖR DEN RENGJÖRES FOR Å UNNGÅ ELEKTRISK STÖT.
Tørk mikseren med en fuktig klut. IKKE SENK NED I VANN.
info@servicecompaniet.no
Kundeservice
Norsk Importør:
HOWARD AS:
Hansteensgate 12
0253 OSLO
Tel: 23 08 41 30
www.KitchenAid.eu
SISÄLLYSLUETTELO
YLEISKONEEN TURVALLISUUS
Brug/DDne n adapter.
Brug/DD: forlaengerledning.
Watt: 315 watt for model 5KPM5
500 watt for modellerne
5KSM7580X, 5SM7591X
og 5KSM6521X
Garanti for KitchenAid Mixer
HAETTA A LIKAMSTJONI
Til ao forostlikamstjong skemmdir a hrararanum skal ekki reyna ao skafa skalina amedan hrerivelin er i gangi; slokktuahrivelinn. Ef skafa eoa annar hlutur dettur ofan i skalina skal SLOKKVA amotornum aoeur en hluturinn er fjarlagour.
BbIbJIeHHe U YCTPAHeHMe HeNCnPABHOCTeI 171
TAPAHNTI N TeXHNUeCKOe OBCJyxNBAHHe
TapaHTnHoe o6cnyXuBaHne MUKcepa KitchenAid. 172
LcHTpbI o6cnyxuBaHnra 172
O6cnykBaHne KIneHTOB 172
Bawa 6e3oNaChocTb n 6e3oNaChocTb dpyrnx cTouT ha nepBOM MeCTe.
B daHHo nHCTpykunn H aBaWem yctpoiCTBe mbl pa3MeCTuM MHOKeCTBO BaXhBX COO6eHn 063oNaChocTN. O6a3aTeNbHO npOHTte BCE coo6uEHNr O 6e3oNaChocTN n CledyTe INx yka3aHnM.

3To cMBOJ npdUnpyekxHnna 6 onaCHOCTn.
3TOT CUMBOI npedynpexkaet Bac O BO3MOXHbIX ONaCHOCTx, CNOCO6HbIX HaheCTN TpaBMy nn daJe y6ntb Bac n dpynx IIOe.
Bce coo6eHnO 6e3onacHOCTn CneIyOT 3a 3Tm CNMBONM n CIOBaMn «OPACHOCTb» nn «BHHMAHNE>.3Tu cNoBA O3HaayoT:
ONACHOCTb
Bb moKTe nOrn6HyTb nn nOnyUHTb TaXKeIbe TpaBmbl, ecHmHeMeDHeHo He NoCleNyTe MHCTpyKzmaM.
BHUMAHNE
Bb moKeTe nOrn6Hyt nn noLyuHT TaKeIbe TpaMbI, ecn He noCneDyete HNcTpyKUaM.
Ipeynpejckenno 6 onachoctny kkaayt Bam Ha notehnnaIbHyIO onachoctb, dayt pekomedauu n OTHOCHTBHO TOTo, KaK yMeHbWntb BepoarthOCTb TpaBMbl, a TaKxte Ha To, YTO MOxET npou3oITn, ecn Bb He 6ydeTe CneioBaT HNCTpykunm.
MEPbI INPEdoCTOPOXKHOCTN
Pn nCnoJb3OBaHnn 6bITOBbIX 3JIeKTpOpnp6OpOB Heo6XoJMo CO6JIIOdaTb OCHOBHeIe Mepbl PpeIOCTOPoJxHOcTN, B YAcTHOCTN:
1.Прочтente BCE INHCTpyKcnn.
2.Bo n36eJahne pncKa nopaxKeHnRA TokOM KaTeROpNueckn 3aIpeSeHO NOrpyKaatb MInKcep B BODy IIN DpyrYIO XnIDKOCTb.
3. ΘTOT npi6op moKet nCnOJb3OBaTbcra DeTbMn cTapwe 8 let
H IINUAMN C ORpaHnueHHbIMN φn3nueCKnIMN, CeHCOPhbIMN
HINU YMCTBEHNbIMN BO3MOXHOCTaMn, He IMeIOUIMN ONbITA
ObpaSeHnC TexHnKO; eCNI OHN HaxoJrTCra NOD KOHTPOJeM
HINUa OTBETCTBeHHORO 3a INX 6e3ONaCHOCtB, INN O3HaKOMJIeHbI
C PrpABNJamn erO 6e3ONaCHOkCNpyatauHn. He NO3BOJYte
DeTAM INrPaTb C UcTpoiCTBOM. YnCTKa IN ObcnyKJBAHHe He
DOLJXHbI BblONHЯTbcra DeTbMn 6e3 PnncMOtpa.
4. OTcoeHnHTe MmKcep OT po3etKn, KOrDa Bbl erO He nCNoJIb3yTe, nepeD yCTaHOBKOI nII ChrTneM HaCaIOK, a TAKKe nepeD qNCTKOJ.
5.ИЗberайткоHTaKТаСДВИЖУшIMNCSДeТалЯМ.ДляпразOTВрашени Трави/NЛП NOВрждЕня МИКсерапг eRo ИСПОЛьЗOBAHи He ДОПУСКaIte COпРИКОСHObEняHaCaДКи-B36ИВaJIKN CpyKaMn,BOLOcAmN,ОДжДоJ,a TaKJKeCпрИБOPamN IДPyrIMN KYXOHhbIMN рпнадлжHOCTaMn.
6. He nCnoIb3yIte Mnkcep C NOBpeJdeHhbIM shHypom NITaHn IIN NocLe NaJeHnI prN6Opa, INI KaKOro-JIn60 NOBpeJdeHnI. OTdAite np6Op B 6JIxKaIshn IpaBOMOHybI YeHTp OBCnyKuBaHnI dIg OBCJeIOBaHnI, peMOHTa INI peRyInpOBKn 3JIeKTpNueCKo INI MeXaHNueCKo YacTn.
7. История Нарын既可以 сбдддддддддддддддддддддддддддддддддддддддддддддддддддддддддддддддддддддддддддддддддддддддддддддддддддд徴псьгл
KitchenAid, Рожет повесени К пожару, пораженю
эльктуческин TOKOM ил Травme.
MHCTPYKUIMI NO TEXHUNKE BE3ONACHOCTN
- He nCloIb3OBaTb BHe NOMEeHnA.
- He donyckaite CBncaHna shHypa nHTaHna C Kpaar cTol a nn pyro pa6ooye NOBepxHOCTN KOHTaKTA C RopayMN npedMeTaMn.
- YdaIaIe IIOCKyU B36uBaIky, BeHcN K3 HepXaBeIoIeI CtaII INI KpOK DJIa 3aMeuBaHnA TeCTa N3 MUKcepa NepeI MbITbEIM.
- YTo6bI npOdyKtBi He nCnOpTnJIncB, He nCNoJb3yIte yaShn Mnkcepa B 30Hax NObblweHHo TEmpePaTypbl, TaKnx KaK dYXOBKa, MnkpoBOJHOBa Jneyb NII NOBepxHOCTb PIIITbl.
- 3TOT npi6op npedHa3HaueH dIy nCnOJb3OBaHnA TOJbKO B Domaunem Xo3YICTBe.
COXPAHNTE DAHHOE PYKOBODCTBO
Tpe6obAHnK əJIeKtpoNTaHnIO
BHUMMAHNE

Onachoctb nopaxeHna 3JIeKTPnueckm TOKOM
IopKluOHTe K 3a3emHeHHo p03eTke.
He ydaneTe 3a3emnlooun 3neKtpoI.
He nCnoJIb3yIte aIaIaTeP.
He nCnonb3yIte ydmmHnteIb.
Heco6IIODeHne 3TNX MHTpyKuIM MOKeT PnVBECTN K CMEpTN, NOxApy UIN NopaxKeHHIO 3NeKTpueckIM TOKOM.
BolbT: 220-240 A.C.
Tepu:50/60 T
MoHocTb: 315 BaTT—MoJeNb 5KPM5
500 BaTT - MoDJIIN
5KSM7580X, 5SM7591X
n 5KSM6521X
PIMMEAHNE:ДаHHbIe O HOMHaJIbHoi MOUHOCTN BaWeRo MInKcepa YKa3aHbI Ha Ta6JIuChe C cepINHbIM HOMepom, KOtOpaHaxODNTcB HnXHeN qactn np6opa.
He nCnoIb3yIte ydIINHITeI. O6paTntecb K KBaIINΦnIUPOBaHHOMy 3JIeKTpNKU INI pa6OTHNKU cepBnC ueHTpa 3a NOMOuBIO.
HOMHaIbHaJ MoUHOCTb ONpeDeJIeTcA npn IcNoIb3OBaHN HacAdK, Tpe6yIoJeMaKcImaJIbHyO MOUHOCTb. Pnp INcNoIb3OBaHN dpyrNX peKOMeHdyEmbIX HaCaIOK MmKcep MOxHO 3KcNlyaTnpoBaTb npn MeHbWeJ MOUHOCTn 3Heprn.
Ytuln3aunr OTXoOB 3neKtpnueckoro o6OpydoBaHn
Ytuln3aunynaKOBOHybIX MaTepeNaIOB
YnakoBouHbIe MaTePnaJIbI NOJLeKaT BTOpUHOI nepepa6OTKe IN COdepXkAT COOTBeTCTByIOUcN 3HaK .Tem He MeHee, OTDeJIbHbIe YactuYnakoBKn DOJXHbI 6bITyTNJIN3OBAHbICORNaCHO ppaBUNAM MeCTHOaDMNHNCtPaCUn, KacaIOUImCra JIKBnuDauCN OTxODOB.
Ytunn3aunn n3denn
-TOO6OpUoBaHneMapKnpOBaHOcOrlaCHO EbponeckOnIupeKtNBe2002/96/EC NIOICNoJIb3OBAHNIOJNeKtpnueCKoro I3JeKToPHHO6OpUoBaHna(WEEE).
-Co6nOHeHne npabIn yTnIn3aunu N3deNnI NOMoraet npeD0TBpaTntb NOTeHuaJIbHbIe HeRaTINBhIe NOcIeDCTBnI DnI OKpyKaIOSeI
CpeBn 3OpOBbYeNoBeka, KOTOpbIe MOrIIb 6bl 6blTb Bbl3BaHbl HeNpaBnblHOyTNlN3aUne 3TOrO npOdykTa.
-3Ha Ha n3delen nn Ha COnpoBOnTeJIbHbIX DOkymeHTax 06O3NaUaET, YTO yCTpOJCTBO NOIpaAet NOI ONpeJeHne 6bITOBbIX OTXODOB IN DONKHO 6bITb IOCTaBHeO B COOTBETCTByIOuINI ueHtp No nepepa6OTke 3JIeKtpnueckoro IN 3JIeKTPOHORO 6OpydoBaHna.
PykoBODCTBO NO Bbl6opy yactOTbI BpaueHn I CKOPOCTN
Bce ckopoctn Imeot fHyKcIIO pnaBHoro nycKa, KOTOPa np3aNysCke aBTOMaTnueckn HaunHaet pa6OtaTb Ha HnKHei cKOPOCTn, 3aTeM 6bICTpo Bo3pactaET Do Bbl6paHHoN CKOPoCTn dJa oBeCneHEn ONTmAlbHOJ POn3BOIDntelbHOCTn.ФyHKUr Heo6xOIma dJa ppeD0TBpaUeHnB bInlNeCKNbAHn INHrpdeNHeTOB N «PaccloEHNr Tecta>.

| Скорочь | Исконьз汞сдя дя | АкCEDСур ы | Опсане | |
| 1 | Раимшованe | Для медленио размени вань н. komбинирав н. приготовен ney п у р е . смени н. И с р ль з у т .de д об а vel н у к и с у х и н г р � ent ob В ж д к о с т с о , а tak ke д у д об а vel н. х д к ост у к с у х и н г р � ent am. Скорочь 1 н с le у et и с р ол ь э в а р . д я с м ш ь ан ь и л з м ш ь ан ь Д р ож ж ев ог о т с т а . | ||
| 2 | Мedlyнhoe смени ан е, Зам ш ь ан е | Для медлени раз m ени н. prinigotob ney п у р о B36а ль в ан ь и. И с р ль з у т de смени н у ct b x В д ов т с т а и К ар м ел ь н о M а с ь у Д р rin� otob н у р и д у р х O о Б у pa р bix nt B у C ш pa S c c c c c c c c c c c c c c c c c c c c c c c c c c c c c c c c c c c c c c c c c c c c c c c c c c c c c c c c c c c c c c c c c c c c c c c c c c c c c c c c c c c c c c c c c c c c c c c c c c c c c c c c c c c c c c c c c c c c c c c c c c c c c c c c c c c c c c | ||
| 4 | Смени ан е, В36 ш ь ан е | Д 人民银行 д у д ом ш н у п с р ль з у Д р pa р bix L Caxapar B P prinigotob н у M CoxoCTb д К COKOBX | ||
| 6 | В36 ш ь ан е, Сливков36 ш ь ан е | Д 人民银行 О (B36 ш ь ан е CINBOK) B36 ш ь nli BENCHIKOM. И 3aBPSSAOUZEGO əTaNA Смени KekCOBbIX CMECEI, CMECEI n Ду BVDOB XJUDKO TECTA. Вы СКОPOCTb д КЕCOBbIX CMECEI. | ||
| 8-10 | Схорочь hoe В36 ш ь ан е, В36 ш ь ан е ВEDHUMKOM, Схорочь hoe В36 ш ь ан е ВEDHUMKOM | Д 人民银行 О nla3ypn, n ICPONlb3yra Jlonatky Д Cmeшени nli B36 ш ь BENCHIKOM He6OJIbSOO KOJIueCTBA CINBOK nli YIMNHbIX 6EJKOB. |
BbIABJIeHnE N YCTPAHEHnE HENCnPABHOCTeN
BHUMAHVE

Onachoctb nopaxeHn 3JKeKtpnueckm TOKOM
IpeTeK KAp NpOBoAnTb Texo6cnyKuBaHne, OTKIOUHTe MUKCep OT p03eTKI.
HeBbINOJIHHeNcE 3TOro Tpe6OBAHNJ MOKeT npNBecTeK CMeptn NnN nopaxeHIO 3JIeKtpuYeCKM TOKOM.
PpoTnte cneyuOnn pa3JeI nepeo6paueHHeM B cepBnchbI ueHtp.
-
Minkcep MoKeT HarpeBaTbCn npu pa6Ote. PnBbICOKHX HArpy3kax N DInTeIbHOM CMeunBaHnn PnKocHOBeHne K BepXHeN qACTn Pnp6opa MoKeT 6bItb HePpNArTHbIM. 3TO He RaJIaTeCn Pn3HaKOM HeNCnPpaBHOCTn.
-
Minkcep MoKeT BbIeJrB pe3Kn 3anax, Oc06eHNO ecn OH HObl. 3TO o6bHuOe ABLeHne dJa 3JeKTPOMOTOPOB.
- Ecnn nnocka B36nbalka ynpaetcB ya, BbIKIOUHTe MUKcep.Cm.pa3dEe《HaJaKa BaWeroCTaCNOHapHOrO MUKcepa》
EcnB Baw HactoBhBmKcep BbiweN3 CToPnHn He pa60Taet, npOBepbTe cneDuOoe:
-ПодсоeДинeн Ли МИКсер К розтke?
- He cropen li n ceTeBOI npedoxpaHnteB? Ecnn B dome ycTaHOBNeH ABTomuYeCKn BbIKIOUaTeJIb, OH DOJKeH 6bITb BKJIIOUeH.
- BbIKIQUHTe CTAUHOHApHbIM MKNcep Ha 10-15 cekyHd, 3aTeM CHOBA BKIQUHTe. Ecnn MKNcep BCE JHe BKNIOUaETcA, daTte eMy OCTbITb B TeueHn 30 MNHyT DO TORO KaK BKNIOUHTb CHOBA.
- Ecnn npo6nemy peuNTb He ydaIocb, o6paTntecb K pa3dEny «O6cnjKuBaHne KIneHTOB».
TapaHTnHoe 6cnyxuBaHne HactoIbHoro MmKcepa KitchenAid
glulllblll o jia aclb:
111 1
aill 2gjoo jks13j xss
Jaa Jaoa Jao Jc Jc Jc S ia icia iia
jll jol jall lgl 1o
alal alalal 100
Clllall Jai liy. (aill) yj jai jai alil giny
Jzalao Jkiy jai aia dlaig 1e gssgall

auiy
a
Cllgall 21
1
y
A
aiee eae ee eee
a a a a a a a a a a a a a a a a a a a a a a a
ailll lalaiall aullll gll i j
Jds no jai kuiy iit gill .juiy
eall laiylo 00
glll j g jlll 1000
aie 100 Jalaill jay y ciiall lla jai jai rall
ailllll jss sll lalil jil jil
a. a. 1234567890
aill Jg aui aill clogall jy jao
iikai juii i 1
j jll jll jll jll jll jll jll jll jll
aia jai jai jai
a
jss, 100% 令 的一条向量为 x1,y1 ,则 | | = | | = 1
jai jia jaii 1
111 Jioi 10 aI ginaia jai iiaill algal atis
aaiy aay yaaal ayaiy jao aiil x
aalil
J 2002/96/EC
.(WEEE)
Aaagaae aegg
Laii jj. jgally jlll l 1s aagall xlll jssn nn dall liq
14y jll, 4xLwJlW
"DANGER" alk y aXll 111 jra Xll Jn .

a a 100

aaiy g

aaiuuii iiaaii iiaaiii aaiinai iaiaiai iaiai iaiai iaiai
aale aie g 1r
i 1
1
1 1
J 8
glll glll glll glll glll glll glll glll glll glll
y
. 1 1 1 1 1 1 1 1 1 1 1 1 1 1 1 1 1 1 1 1 1 1 1 1 1 1 1 1

y 1

Jb 1000000000000000000000000000000000000000000000000000000000
5KSM7591X,5KSM7580X,5KPM5 jg
**e[123456]
.
jI jI 5KSM7591X,5KSM7580X,5KPM5 jI jI
5KSM6521X,5KPM5
10-4e 1

bll l y i sall oill s jay cale jy jai jilui ci 0e laall jie jw ie lii lill jii pi .jisiill ic "gdi" jbi" ,ci gall aell ginaa!
a a a a a a a a a a a a a a a a a a a a a a a a a a a a a a a a a a a a a a a a a a a a a a a a a a a a a a a a a a a
blll 100
jll 1

aai jilii joi
J 1 J 1 J 1 J 1 J 1 J 1 J 1 J 1 J 1 J 1 J 1 J 1 J 1 J 1 J 1 J 1 J 1 J 1 J 1 J 1 J 1 J 1 J 1 J 1 J 1 J 1 J 1 J 1 J 1 J 1 J 1 J 1 J 1 J 1 J


a
i i 1
Lioic aolis oalil 1yll bll jao y.2
ill o jzj1 gai l joi j j j j j j
aaiy 3
:Jy Ia aia Jaa 1e aeg g j Cbll bcl Jbe J!
j 1
10 15 10
ooie 2jll jolil 1o l i aal o s p 1

jy jyj yjyj jbj
y 1
aaiy plal 1 aai 1 1
J 1
1
e 1211 b111 111 111 111 111 111 111 111 111 111 111 111 111 111 111 111 111 111 111 111 111 111 1
1
#
y
i 1
y. 1 a 2a b y 2 a
1 1 1 1 1 1 1 1 1 1 1 1 1 1 1 1 1 1 1 1 1 1 1 1 1 1 1 1 1 1 1 1 1 1 1 1 1 1
3


jbnll jnll jie jna J
jil g jil g jil g jil g jil g jil g jil g jil g jil g jil g jil g jil g jil g jil g jil g jil g jil g jil g jil g jil g jil g jil g jil g jil g jil g jil g jil g jil g jil g jil g jil g jil g jil g jil g jjlg jil g jil g jil g jil g jil g jil g jil g jil g jil g jil g jil g jil g jil g jil g jil g jil g jil g jil g jil g jil g jil g jil g jil g jil
2
5KSM7591X,5KSM7580X,5KPM5 5KSM6521X,5KPM5
KitchenAid
© 2014. All rights reserved.
Specifications subject to change without notice.

- TABLE OF CONTENTS
- STAND MIXER SAFETY
- PARTS AND FEATURES 8
- ASSEMBLING THE STAND MIXER
- TIPS FOR GREAT RESULTS
- ATTACHMENTS 13
- CARE AND CLEANING 14
- TROUBLESHOOTING 15
- WARRANTY AND SERVICE
- Your safety and the safety of others are very important.
- DANGER
- WARNING
- IMPORTANT SAFEGUARDS
- When using electrical appliances, basic safety precautions should always be followed, including the following:
- Electrical requirements
- Electrical equipment waste disposal
- Disposal of packing material
- Scrapping the product
- PARTS AND FEATURES
- Attaching the bowl and beaters
- Adjusting beater to bowl clearance
- Speed control guide - 10 speed Stand Mixers
- Removing the bowl and beaters
- Stand Mixer use
- PERSONAL INJURY HAZARD
- Mixing time
- Mixing tips
- Adding Ingredients
- Adding Nuts, Raisins, or Candied Fruits
- Liquid Mixtures
- ATTACHMENTS
- TROUBLESHOOTING
- Please read the following before calling your service center.
- If your Stand Mixer should malfunction or fail to operate, please check the following:
- KitchenAid Stand Mixer warranty
- KITCHENAID DOES NOT ASSUME ANY RESPONSIBILITY FOR INDIRECT DAMAGES.
- Customer service
- In U.K. and Ireland:
- In other countries:
- INHALTSVERZEICHNIS
- GARANTIA E ASSISTÊNCIA
- MANUTENÇÂO E LIMPEZA
- AVISO
- INNEHÄLLSFORTECKNING
- SÄKER ANVÄNDNING AV KÖKSMASKINEN
- VEDLIKEHOLD OG RENGJØRING
- ADVARSEL
- Kundeservice
- SISÄLLYSLUETTELO
- YLEISKONEEN TURVALLISUUS
- Garanti for KitchenAid Mixer
- HAETTA A LIKAMSTJONI
- TAPAHNTI N TeXHNUeCKOe OBCJyxNBAHHe
- Bawa 6e3oNaChocTb n 6e3oNaChocTb dpyrnx cTouT ha nepBOM MeCTe.
- ONACHOCTb
- BHUMAHNE
- MEPbI INPEdoCTOPOXKHOCTN
- Pn nCnoJb3OBaHnn 6bITOBbIX 3JIeKTpOpnp6OpOB Heo6XoJMo CO6JIIOdaTb OCHOBHeIe Mepbl PpeIOCTOPoJxHOcTN, B YAcTHOCTN:
- MHCTPYKUIMI NO TEXHUNKE BE3ONACHOCTN
- COXPAHNTE DAHHOE PYKOBODCTBO
- BHUMMAHNE
- Ytuln3aunr OTXoOB 3neKtpnueckoro o6OpydoBaHn
- Ytuln3aunynaKOBOHybIX MaTepeNaIOB
- Ytunn3aunn n3denn
- PykoBODCTBO NO Bbl6opy yactOTbI BpaueHn I CKOPOCTN
- BbIABJIeHnE N YCTPAHEHnE HENCnPABHOCTeN
- BHUMAHVE
- PpoTnte cneyuOnn pa3JeI nepeo6paueHHeM B cepBnchbI ueHtp.
- EcnB Baw HactoBhBmKcep BbiweN3 CToPnHn He pa60Taet, npOBepbTe cneDuOoe:
- TapaHTnHoe 6cnyxuBaHne HactoIbHoro MmKcepa KitchenAid
- aiee eae ee eee
- Aaagaae aegg
- aale aie g 1r
- 10-4e 1
- #
- KitchenAid
Brand : KITCHENAID
Model : 5KSM6521XECA
Category : Hand blender