
49HFL2839T - TV PHILIPS - Free user manual and instructions
Find the device manual for free 49HFL2839T PHILIPS in PDF.
| Product type | 49" LED TV |
| Brand | Philips |
| Model | 49HFL2839T |
| Screen size | 49 inches (124 cm) |
| Resolution | Full HD (1920 x 1080) |
| Dimensions with stand (WxHxD) | 1112 x 691 x 220 mm |
| Dimensions without stand (WxHxD) | 1112 x 653 x 60 mm |
| Weight | 11.60 kg |
| Power supply | 220-240 V AC, 50 Hz |
| Power consumption | 75 W |
| Audio power | 2 x 8 W RMS |
| Tuner | DVB-T/C (DVB-T2 compatible) |
| Number of preset channels | 1000 |
| Connectivity | HDMI, USB, SCART, RF Antenna |
| Main features | Energy saving, CEC, ARC, EPG, Parental control, Software update |
| Supported video formats (USB) | MPEG1/2, H.264, MPEG4, WMV, AVI, MKV, etc. |
| Supported audio formats (USB) | MP3, AC3, AAC, WMA, PCM, etc. |
| Supported image formats (USB) | JPEG, PNG, BMP |
| USB playback | Photo, music, video |
| Subtitles | Internal (DVD, DVB) and external (.srt, .ssa, .smi, .sub, .txt) |
| Included accessories | Remote control, batteries |
| Security | Parental control, menu lock, maturity lock |
| Maintenance | Disconnect before cleaning, use a soft dry cloth |
| Repairability | Repair by qualified professional recommended |
Frequently Asked Questions - 49HFL2839T PHILIPS
User questions about 49HFL2839T PHILIPS
0 question about this device. Answer the ones you know or ask your own.
Ask a new question about this device
Download the instructions for your TV in PDF format for free! Find your manual 49HFL2839T - PHILIPS and take your electronic device back in hand. On this page are published all the documents necessary for the use of your device. 49HFL2839T by PHILIPS.
USER MANUAL 49HFL2839T PHILIPS
PykoBoDCTBO noIb30BaTeJIa
Brugervejledning
Käytöohje
Mode d'emploi
Bedienungsanleitung
Användarmanual
Manuale utente
Notifications, features and accessories. 4
Energy efficiency 4
TV scroll button. 4
Switching on/off 4
First time installation 4
Play media files from a USB drive. 5
Media browser menu 5
CEC. 5
Change TV settings 6
Display options 6
Sound options.. 6
Configuring parental settings.. 6
Electronic program guide (EPG). 7
Update your TV . 7
Troubleshooting & Tips 7
Specifications 8
PC input typical display modes 9
AV and HDMI signal compatibility. 9
Supported Video File Formats for USB Mode.....10
Supported Picture File Formats for USB Mode ...10
Supported Audio File Formats for USB Mode .... 11
Supported Subtitle File Formats for USB Mode ..12
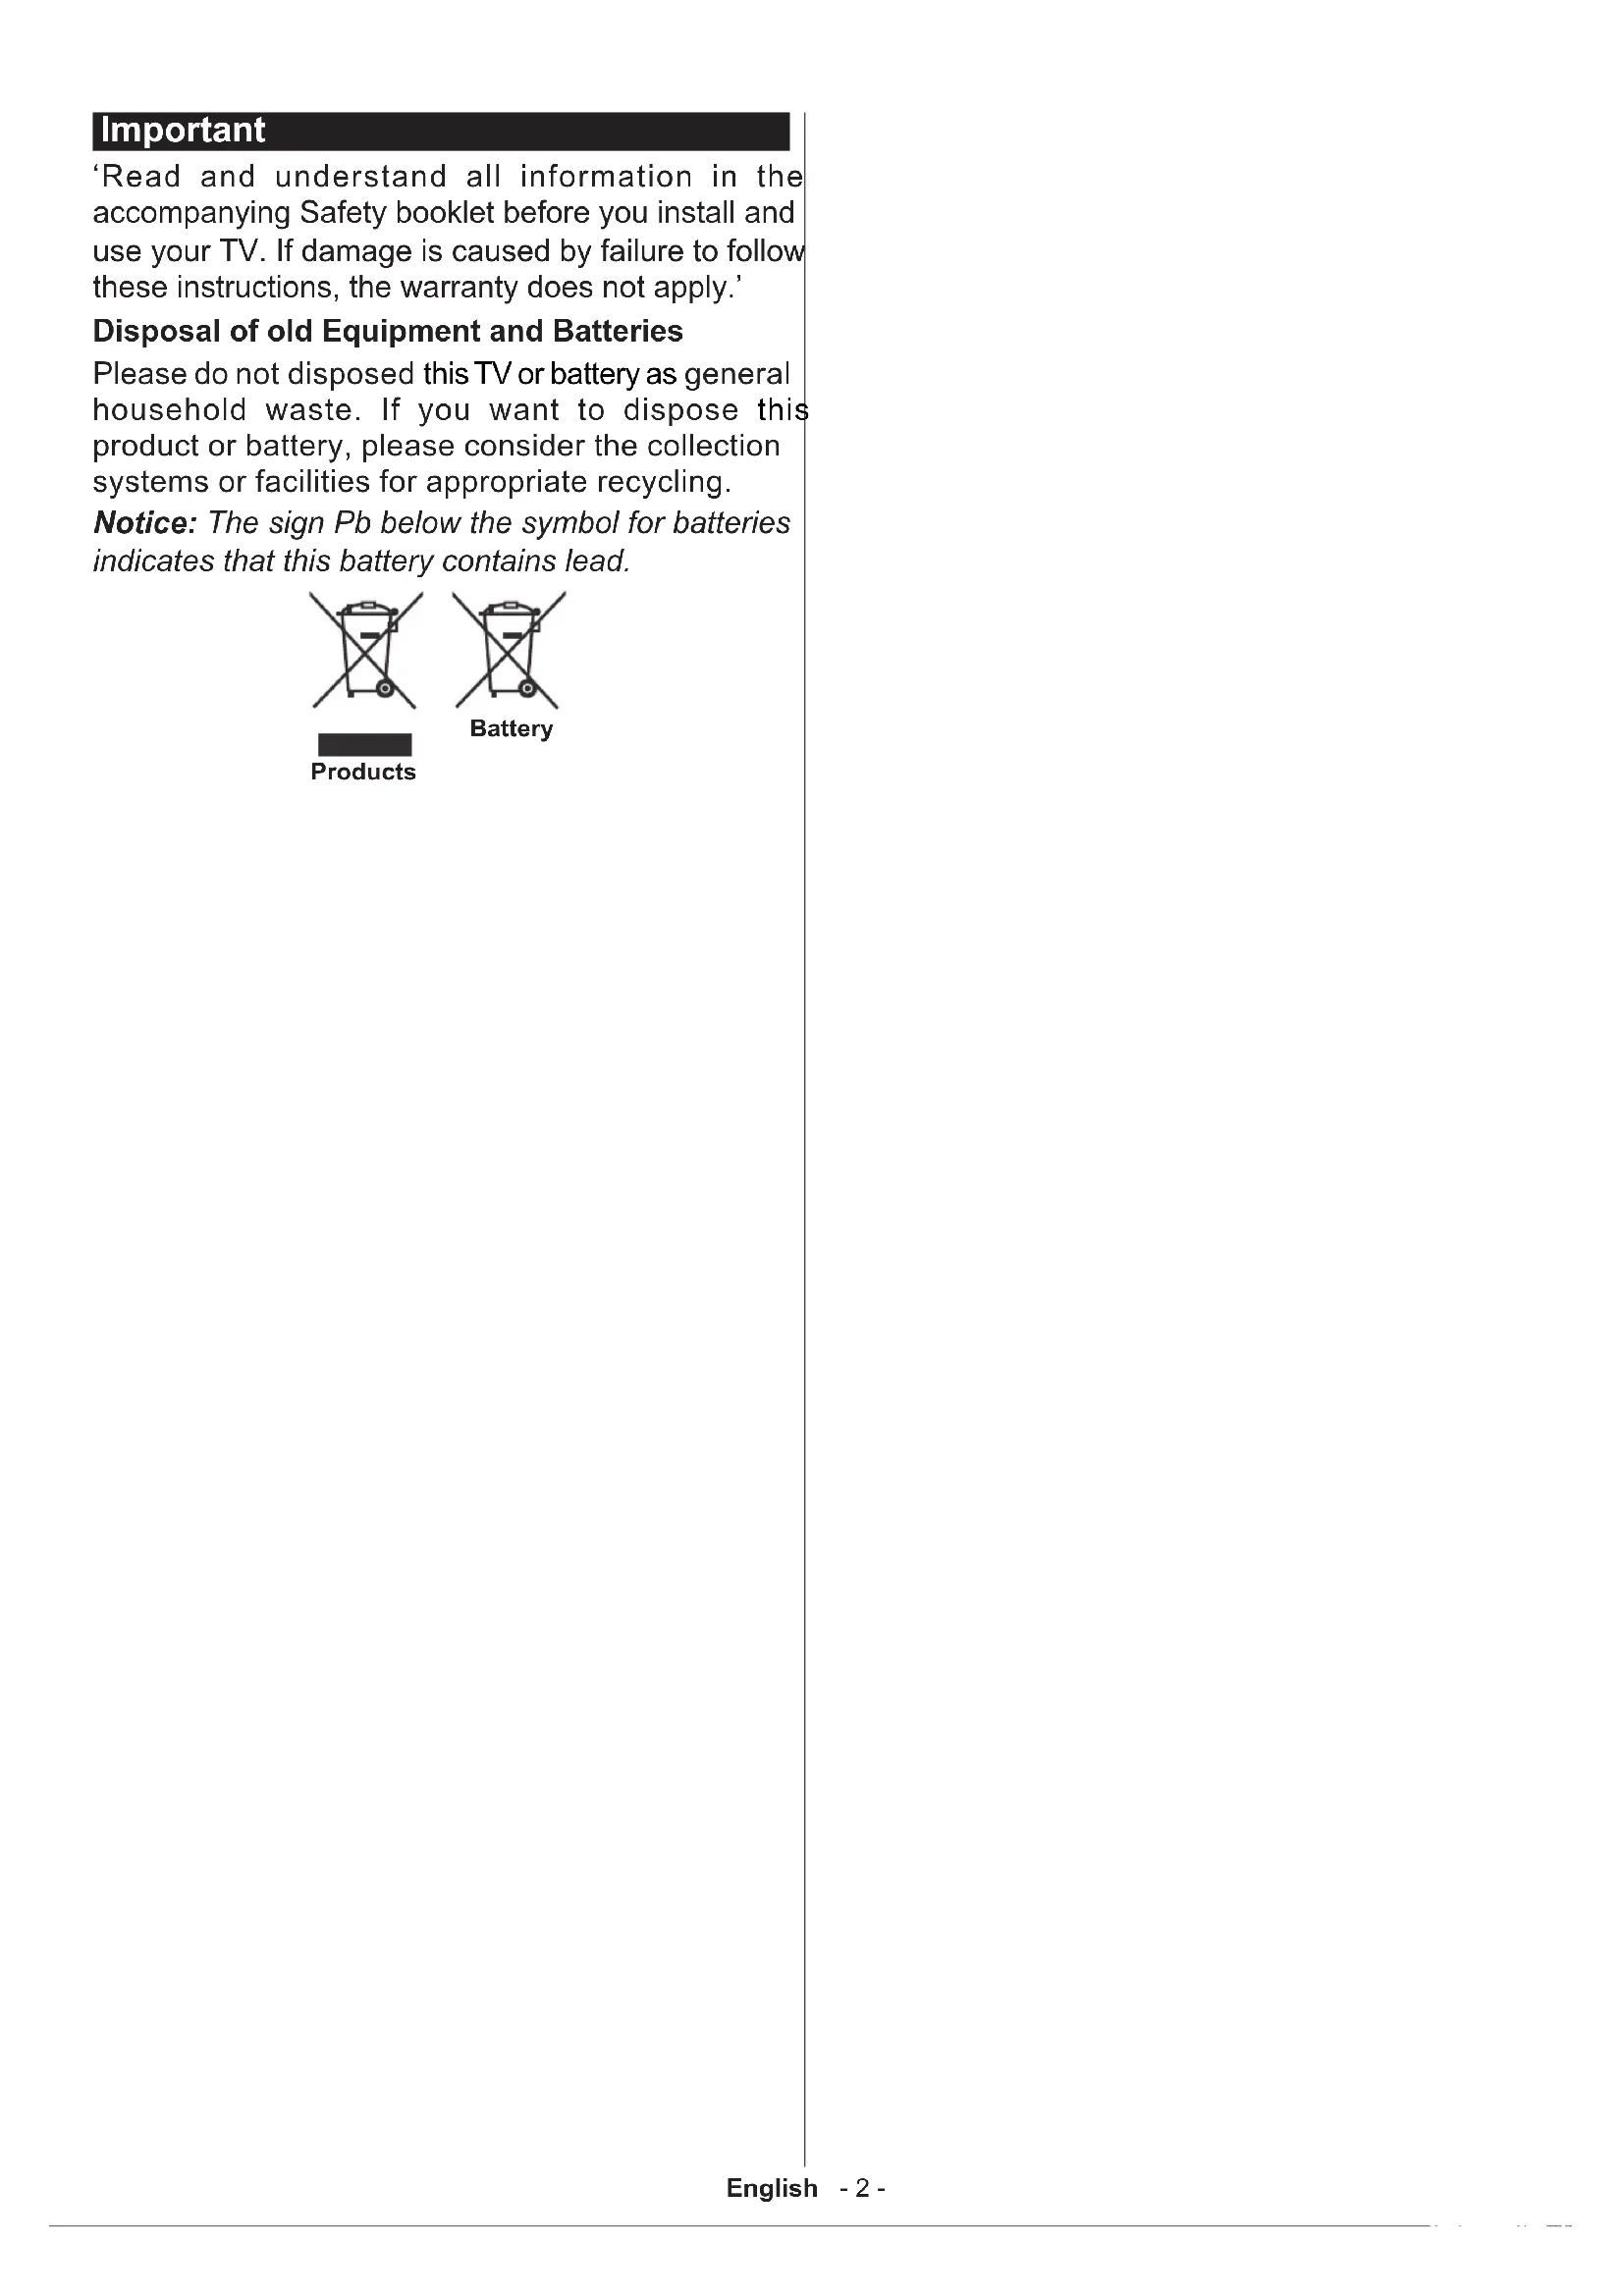
Important
Read and understand all information in the accompanying Safety booklet before you install and use your TV. If damage is caused by failure to follow these instructions, the warranty does not apply.
Disposal of old Equipment and Batteries
Please do not disposed this TV or battery as general household waste. If you want to dispose this product or battery, please consider the collection systems or facilities for appropriate recycling.
Notice: The sign Pb below the symbol for batteries indicates that this battery contains lead.

13/14

Battery
Products
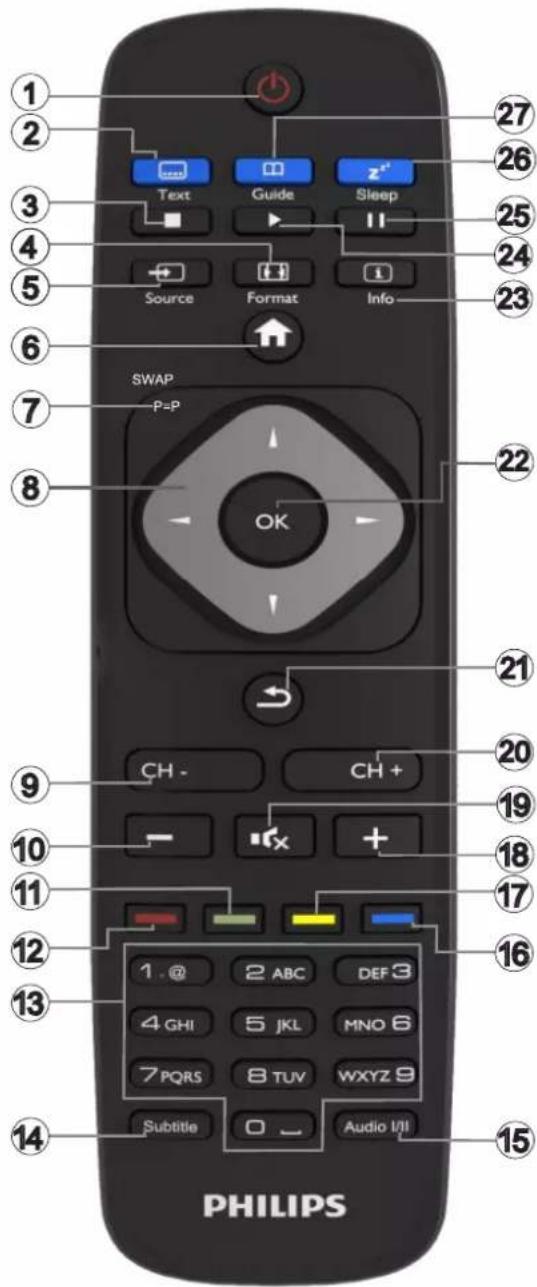
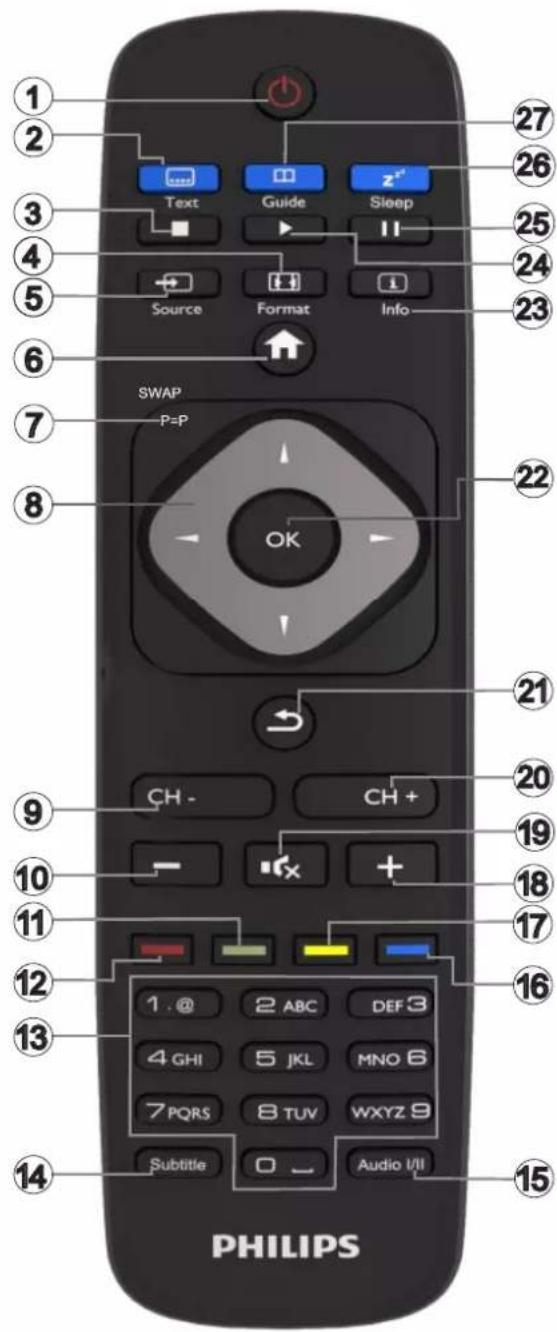
Remote Control
Teletext
Press Text button to enter. Press again to activate mix mode. Press once more to exit. Follow the instructions displayed on the screen.
Digital teletext
Press Text button to view digital teletext information. Operate it with the colored buttons, cursor buttons and OK button. The operation method may differ depending on the contents of the digital teletext. Follow the instructions displayed on digital teletext screen.
-
Standby: Switches On / Off the TV
-
Text: Displays teletext (where available), press again to superimpose the teletext over a normal broadcast picture (mix)
-
Stop: Stops the media being played
-
Screen: Changes the aspect ratio of the screen
-
Source: Shows all available broadcast and content sources
-
Menu: Displays TV menu
-
Swap: Quickly cycles between previous and current channels or sources If the Hotel Mode is set to On, a press of this button switches between the Network Channel Types DVB-T&Analogue and DVB-Cable&Analogue
-
Navigation buttons: Helps navigate menus, content etc. and displays the subpages in TXT mode when pressed Right or Left
-
Programme - / Page +
-
Volume -
-
Green button: Follow the on-screen instructions for coloured button functions
-
Red button: Follow the on-screen instructions for coloured button functions
-
Numeric buttons: Switches the channel, enters a number or a letter in the text box on the screen.
14.Subtitles:Turns subtitles on and off (where available)
-
Language: Switches between sound modes (analogue TV), displays and changes audio/subtitle language (digital TV, where available)
-
Blue button: Follow the on-screen instructions for coloured button functions
-
Yellow button: Follow the on-screen instructions for coloured button functions
-
Volume +
-
Mute: Completely turns off the volume of the TV
-
Programme + / Page -
-
Return/Back: Returns to previous screen, opens index page (in TXT mode)
-
OK: Confirms user selections, holds the page (in TXT mode), views channel list
-
Info: Displays information about on-screen content, shows hidden information (reveal - in TXT mode)
-
Play: Starts to play selected media
-
Pause: Pauses the media being played
-
Sleep: Sets your TV to shut down automatically.
-
EPG (Electronic programme guide): Displays the electronic programme guide
Note: The Remote Control range is approximately 7m / 23ft.
Notifications, features and accessories
Energy efficiency
This TV is designed with energy efficiency features:
- Energy Saving: You can apply a combination of energy saving picture settings. While you watch TV, press the Menu button and, the Energy Saving settings can be found in the Picture section of the Main Menu.
- Picture off mode: If you only want to listen to audio from the TV, you can switch off the display. Other functions continue to operate normally. While you watch TV, press Menu button and select Picture, and from there select the Energy Saving option. Press Right button while Auto option is selected or Left button while Custom option is selected. A message will be displayed on the screen. Select Proceed and press OK to turn the screen of immediately. If you don't press any button, the screen will be off in 15 seconds. Press any button on the remote or on the TV to turn the screen on again
Note: Screen Off option is not available if the Mode is set to Game. Disconnect your TV from the mains plug in case your TV is going to be inactive for a long time.
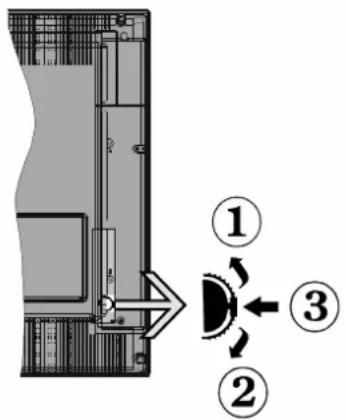
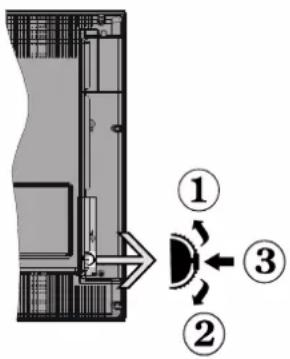
TV scroll button
The TV Scroll button on the side of the TV allows you to control the volume, change channels and put the TV into standby.
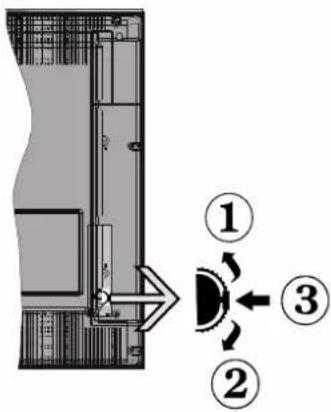
To change volume: Increase the volume by scrolling up. Decrease the volume by scrolling down.
To change channel:
- Press the middle of the scroll button in, the channel information banner will appear on screen.
- Scroll through the stored channels by pushing the button up or down.
To change source:
- Press the middle of the button in twice(for the second time in total), the source list will appear on screen.
- Scroll through the available sources by pushing the button up or down.
To switch the TV to standby: Press the middle of the button in and hold it down for a few seconds, the TV will turn into standby mode.
To switch the TV on from standby: Press the middle of the button in, the TV will turn on.
Notes:
If you turn the TV off, this circle starts again beginning with the volume setting.
Main menu OSD cannot be displayed via control button.
Switching on/off
To switch the TV on
To switch on the TV from standby mode either:
- Press the Standby button, Programme +/- or a numeric button on the remote control.
f Press the middle of the side function switch on the TV in.
Note: If the TV has been left on and not been operated for a while, the TV will go into standby. When you next switch-on, the following message will be displayed. "Standby Cause No Operation", Press OK to continue.
To switch the TV off
- Press the Standby button on the remote control or press the middle of the side function switch on the TV in and hold it down for a few seconds, the TV will switch into standby mode.
Note: To power down the TV completely, unplug the power cord from the mains socket.
First time installation
You will see the language selection screen when you first turn on your TV. Select your preferred language and press OK.
Note: If a USB device is connected to the TV, you can press the GREEN button on the remote before continuing, in order to load the NVRAM data (service list, preferences, etc.) from the USB device which is uploaded from another Philips Hotel TV. Refer to the "Copy To USB" and "Copy From USB" sections under the Hotel Mode title on the pages at the end of this manual.
If the correct software update file is pre-installed in the USB device, you can press the RED button on the remote before continuing, in order to upgrade your TV's software. The software update file should be named as "VES161HE_upgrade.bin" or "philips_upgrade_mb97.bin".
Software upgrade via an USB device can be done anytime by using the hidden key combination, "Menu1-5-0-5".
On the next screen, set your preferences using the directional buttons and when finished, press OK to continue.
You can set up your TV by following the First Time Installation (FTI) screen with the following selections.
Digital Aerial installation
If Digital Aerial broadcast search option is turned on, the TV will search for digital terrestrial broadcasts after other initial settings are completed.
Digital Cable installation
If Digital Cable broadcast search option is turned on, the TV will search for digital cable broadcasts after other initial settings are completed. According to your other preferences a confirmation message may be displayed before starting to search. For automatic installation in case your Cable network supplier supports a Network-ID based installation (e.g. Unitimedia), select Yes and press OK.
In case your Cable network supplier does not support a Network-ID based installation please select No, press OK and follow the instruction on the screen.
You can also select frequency ranges from this screen. Enter the frequency range manually by using the numeric buttons.
Note: Searching duration will change depending on the selected Search Step.
Analogue installation
If Analogue broadcast search option is turned on, the TV will search for analogue broadcasts after other initial settings are completed.
Additionally you can set a broadcast type as your favourite one. Priority will be given to the selected broadcast type during the search process and the channels of it will be listed on the top of the Channel List. When finished, press OK to continue.
Home Mode / Store Mode selection screen follows. It is recommended to select Home Mode for home use.
After the initial settings are completed TV will start to search for available broadcasts of the selected broadcast types.
While the search continues a message may appear, asking whether you want to sort channels according to the LCN^(*) . Select Yes and press OK to confirm.
(*) LCN is the Logical Channel Number system that organizes available broadcasts in accordance with a recognizable channel number sequence (if available).
After all the available stations are stored, scan results will be displayed. Press OK to continue. The Edit
Channel List will be displayed next. Press Menu button to quit Edit Channel List and watch TV.
Note: Do not turn off the TV while initializing first time installation. Note that, some options may not be available depending on the country selection.
Play media files from a USB drive
You can play photo, music and movie files stored on a USB disk by connecting it to your TV. Connect a USB disk to one of the USB inputs located on the side of the TV. Pressing the Menu button while in the Media Browser mode will access the Picture, Sound and Settings menu options. Pressing the Menu button again will exit from this screen. You can set your Media Browser preferences by using the Settings menu.
IMPORTANT! Back up your files before making any connections to the TV. The manufacturer will not be responsible for any file damage or data loss. Certain types of USB devices, for example, MP3 players or USB hard disk drives/memory sticks may not be compatible with this TV.
Media browser menu
| Loop/Shuffle Mode Operation | |
| Start playback with the Play button and activate | All files in the list will be continuously played in original order |
| Start playback with the OK button and activate | The same file will be played continuously (repeat) |
| Start playback with the Play button and activate | All files in the list will be played once in random order |
| Start playback with the Play button and activate | All files in the list will be continuously played in the same random order |
CEC
This function allows to control the CEC-enabled devices, that are connected through HDMI ports by using the remote control of the TV.
The CEC option in the Settings>More menu should be set as Enabled at first. Press the Source button and select the HDMI input of the connected CEC device from the Sources list menu. When new CEC source device is connected, it will be listed in source menu with its own name instead of the connected HDMI ports name(such as DVD Player, Recorder 1 etc.).
The TV remote is automatically able to perform the main functions after the connected HDMI source has been selected.
To terminate this operation and control the TV via the remote again, press and hold the "0-Zero" button on the remote control for 3 seconds. This feature can also be enabled or disabled under the Settings>More menu.
The TV supports also ARC(Audio Return Channel) feature. This feature is an audio link meant to replace other cables between the TV and the audio system (A/V receiver or speaker system).
When ARC is active, TV does not mute its other audio outputs automatically. So you need to decrease TV volume to zero manually, if you want to hear audio from connected audio device only (same as other optical or co-axial digital audio outputs). If you want to change connected device's volume level, you should select that device from the source list. In that case volume control keys are directed to connected audio device.
Note: ARC is supported only via the HDMI1 input.
System Audio Control
Allows an Audio Amplifier/Receiver to be used with the TV. The volume can be controlled using the remote control of the TV. To activate this feature set the Speakers option in the Settings>More menu as Amplifier. The TV speakers will be muted and the sound of the watched source will be provided from the connected sound system.
Note: The audio device should support System Audio Control feature and CEC option should be set as Enabled.
Change TV settings
To access the options listed below;
1- Press the Menu button
2-Highlight your selection
3- Press OK to confirm
Display options
Mode: Changes the picture mode to one of the following: Cinema, Game(), Sports, Dynamic and Natural.
(*) Game mode option may not be available depending on the current source selection.
Contrast: Sets the light and dark values of the image
Brightness: Sets the brightness value of the image.
Sharpness: Sets the sharpness value. A high sharpness value may result in a clearer, crispier image depending on the content.
Colour: Sets the color value.
Backlight: Controls the brightness of the backlight. The backlight function will be inactive if the Energy Saving is set to an option other than Custom.
Sound options
Volume: Adjusts volume level.
Equalizer: Changes the equalizer mode.
Balance: Adjusts whether the sound is coming mainly from the right or left speakers.
Headphone: Sets headphone volume. This option will be inactive if the Headphone/Lineout option is set to Lineout.
Sound mode: Sets the preferred sound mode.
AVL: Sets a limit to maximum volume output.
Headphone/Lineout: This option should be set to Headphone if you have headphones or Lineout if you have external amplifier connected to the headphone jack.
Dynamic bass: Enables or disables the Dynamic Bass. Increases the range of bass.
Digital Out: Sets digital out audio type.
Configuring parental settings
This feature is for restricting access to selected content. It is controlled by a pin number defined by you. These settings are located in the Settings>Parental menu.
Note: Default PIN can be set to 0000 or 1234. If you have defined the PIN(is requested depending on the country selection) during the First Time Installation use the PIN that you have defined.
Some options may not be available depending on the country selection in the First Time Installation.
Menu lock: Menu lock setting enables or disables the menu access.
Maturity lock (optional): If this option is set, TV gets the maturity information from the broadcast and if this maturity level is disabled, disables access to the broadcast.
Child lock (optional): When Child Lock is set, the TV can only be controlled by the remote control. In this case the control panel buttons will not work.
Guidance (optional): This setting enables or disables access some of the MHEG applications. Disabled applications can be released by entering the right PIN.
Set PIN: Defines a new PIN number.
Default CICAM PIN: This option will appear as greyed out if no CI module is inserted into the CI slot of the TV. You can change the default PIN of the CI CAM using this option.
Electronic program guide (EPG)
Some channels send information about their broadcast schedules. Press the Epg button to view the EPG menu.
There are 3 different types of schedule layouts available, Timeline Schedule, List Schedule and
Now/Next Schedule. To switch between them follow the instructions on the bottom of the screen.
Timeline Schedule
Zoom (Yellow button): Press the Yellow button to see events in a wider time interval.
Filter (Blue button): Views filtering options.
Select Genre (Subtitles button): Displays Select
Genre menu. Using this feature, you can search the program guide database in accordance with the genre. Info available in the program guide will be searched and results matching your criteria will be highlighted.
Options (OK button): Displays event options.
Event Details (Info button): Displays detailed information about selected events.
Next/Prev Day (Program + / - buttons): Displays the events of previous or next day.
Search (Text button): Displays Guide Search menu.
Now (Swap button): Displays current event of the highlighted channel.
List Schedule\*
(*) In this layout option, only the events of the highlighted channel will be listed.
Prev. Time Slice (Red button): Displays the events of previous time slice.
Next/Prev Day (Program +/- buttons): Displays the events of previous or next day.
Event Details (Info button): Displays detailed information about selected events.
Filter (Text button): Views filtering options.
Next Time Slice (Green button): Displays the events of next time slice.
Options (OK button): Displays event options.
Now/Next Schedule
Navigate (Directional buttons): Press the Directional buttons to navigate through the channels and events.
Options (OK button): Displays event options.
Event Details (Info button): Displays detailed information about selected events.
Filter (Blue button): Views filtering options.
Event Options
In EPG menu, press the OK button to open the Event Options menu.
Select Channel: In EPG menu, using this option, you can switch to the selected channel.
Set Timer on Event / Delete Timer on Event: After you have selected an event in the EPG menu, press the OK button. Select the Set Timer on Event option and press the OK button. You can set a timer for future events. To cancel an already set timer, highlight that event and press the OK button. Then select Delete Timer on Event option. The timer will be cancelled.
Update your TV
Navigate on your main menu, choose Settings>More, the version of the current software is displayed.
CAUTION: Do not install a lower version of software than the current version installed on your product. TP Vision cannot be held liable or be made responsible for problems caused by a software downgrade.
Update with USB
Before you update the software, make sure that you have:
- A USB storage device that has at least 256 megabytes of storage space, is FAT32 or DOS formatted and has its write protection disabled.
- Access to a computer with a USB connector and Internet access.
Navigate to www.philips.com/support, and follow the software update instructions.
Automatic update from digital broadcast
While the TV is connected to an aerial signal. If Automatic scanning in the Upgrade options menu is Enabled, the TV wakes up at 03:00 and searches broadcast channels for new software upgrades. If new software is found and downloaded successfully, the next time the TV powers up, it will have the new software version. To open the Upgrade options menu, enter the Settings>More menu, highlight Software upgrade and press the OK button.
Note: Do not unplug the power cord while led is blinking during the reboot process. If the TV fails to come on after the upgrade unplug the TV for 2 minutes and plug in again.
Troubleshooting & Tips
Tv will not turn on
Make sure the power cord is plugged in securely to wall outlet. Check if batteries are exhausted. Press the Power button on the TV.
Poor picture
- Check if you have selected the correct TV system.
- Low signal level can cause picture distortion. Please check antenna access.
-
Check if you have entered the correct channel frequency if you have done manual tuning.
-
The picture quality may degrade when two devices are connected to the TV at the same time. In such a case, disconnect one of the devices.
No picture
This means your TV is not receiving any transmission. Make sure the correct source has been selected.
- Is the antenna connected properly?
- Is the antenna cable damaged?
- Are suitable plugs used to connect the antenna?
- If you are in doubt, consult your dealer.
No sound
- Check if the TV is muted. Press the Mute button or increase the volume to check.
Sound may be coming from only one speaker. Check the balance settings from Sound menu.
Remote control - no operation
- The batteries may be exhausted. Replace the batteries.
Input sources - can not be selected
- If you cannot select an input source, it is possible that no device is connected. If not;
- Check the AV cables and connections if you are trying to switch to the input source dedicated to the connected device.
Specifications
| TV Broadcasting | PAL BG/DK/II' SECAM BG/DK/LL' |
| Receiving Channels VHF | (BAND I/III) - UHF (BAND U) - HYPERBAND |
| Digital Reception Fully integrated digital terrestrial-cable TV(DVB-T-C) (DVB-T2 compliant) | |
| Number of Preset Channels | 1000 |
| Channel Indicator On Screen Display | |
| RF Aerial Input 75 Ohm (unbalanced) | |
| Operating Voltage 220-240V AC, 50Hz. | |
| Audio German+Nicam Stereo | |
| Audio Output Power (WRMS.) (10% THD) | 2x8W |
| Power Consumption (W) | 75W |
| Weight (kg) | 11,60 |
| TV Dimensions DxLxH (with foot) (mm) | 220 x 1112 x 691 |
| TV Dimensions DxLxH (without foot) (mm) | 60/91 x 1112 x 653 |
| Display | 49" (124 cm) |
| Operation temperature and operation humidity: | 0°C up to 40°C, 85% humidity max |
PC input typical display modes
The following table is an illustration of some of the typical video display modes.
| Index | Resolution | Frequency |
| 1 | 50 85Hz | |
| 2 | 00 70Hz | |
| 3 | 80 60Hz | |
| 4 | 80 66Hz | |
| 5 | 80 72Hz | |
| 6 | 80 75Hz | |
| 7 | 80 85Hz | |
| 8 | 00 56Hz | |
| 9 | 00 60Hz | |
| 10 | 500 70Hz | |
| 11 | 500 72Hz | |
| 12 | 500 75Hz | |
| 13 | 500 85Hz | |
| 14 | 624 75Hz | |
| 15 | x768 60Hz | |
| 16 | x768 66Hz | |
| 17 | x768 70Hz | |
| 18 | x768 72Hz | |
| 19 | x768 75Hz | |
| 20 | x768 85Hz | |
| 21 | x864 60Hz | |
| 22 | x864 70Hz | |
| 23 | x864 75Hz | |
| 24 | x864 85Hz | |
| 25 | x870 75Hz | |
| 26 | x768 60Hz | |
| 27 | x768 60Hz | |
| 28 | x768 75Hz | |
| 29 | x768 85Hz | |
| 30 | x960 60Hz | |
| 31 | x960 75Hz | |
| 32 | x960 85Hz | |
| 33 | x1024 60Hz | |
| 34 | x1024 75Hz | |
| 35 | x1024 85Hz | |
| 36 | x1050 60Hz | |
| 37 | x1050 75Hz | |
| 38 | x1050 85Hz | |
| 39 | x900 60Hz | |
| 40 | x900 75Hz | |
| 41 | x1200 60Hz | |
| 42 | x1050 60Hz | |
| 43 | x1080 60Hz | |
| 44 | x1200 60Hz |
AV and HDMI signal compatibility
| Source | Supported Signals | Available | |
| EXT(SCART) | PAL O | ||
| SECAM O | |||
| NTSC4.43 O | |||
| NTSC3.58 O | |||
| RGB 50/60 | O | ||
| Side AV | PAL O | ||
| SECAM O | |||
| NTSC4.43 O | |||
| NTSC3.58 O | |||
| PC/YPbPr | 480i,480p | 60Hz | O |
| 576i,576p | 50Hz | O | |
| 720p | 50Hz,60Hz | O | |
| 1080i | 50Hz,60Hz | O | |
| HDMI | 480i,480p | 60Hz | O |
| 576i,576p | 50Hz | O | |
| 720p | 50Hz,60Hz | O | |
| 1080i | 50Hz,60Hz | O | |
| 1080p | 24Hz,25Hz,30Hz,50Hz,60Hz | O | |
Supported Video File Formats for USB Mode
| Extension Video | Codec SPEC (Resolution) & Bit Rate | |
| .dat, vob MPEG1 | /2 | 1080P@30fps - 40 Mbps |
| .mpg, .mpeg MP | EG1/2, MPEG4 | |
| .ts, .trp, .tp | MPEG1/2, H.264, AVS, MVC | H.264: 1080Px2@30fps - 62.5 Mbps, 1080P@60fps - 62.5 Mbps MVC: 1080P@30fps - 62.5 Mbps Other: 1080P@30fps - 40Mbps |
| .mp4, .mov, .3gpp, .3gp | MPEG1/2, MPEG4, H.263, H.264, Motion JPEG | |
| .avi MPEG1/2, | MPEG4, Sorenson H.263, H.263, H.264, WMV3, Motion JPEG | H.264: 1080Px2@30fps - 62.5 Mbps, 1080P@60fps - 62.5 Mbps Motion JPEG: 640x480@30fps - 10 Mbps Other: 1080P@30fps - 40 Mbps |
| .mkv MPEG1/2, | MPEG4, H.263, H.264, WMV3, Motion JPEG | |
| .asf Sorenson H | 263, H.264, WMV3, Motion JPEG | |
| .flv WMV3 1080P | @30fps - 40 Mbps | |
| .swf RV30/RV40 | 1080P@30fps - 40 Mbps | |
| .wmv | ||
Supported Picture File Formats for USB Mode
| Image Photo Resolution (width x height) | Remark | |
| JPEG | Base-line 15360x8640 | The limitation of max resolution depends on DRAM size |
| Progressive | 1024x768 | |
| PNG | non-interlace | 9600x6400 |
| interlace 1200x800 | ||
| BMP | 9600x6400 | |
| Extension Audio | Codec Bit Rate | Sample rate | |
| .mp3, | MPEG1/2 Layer1 32 | kbps ~ 448Kbps | 16KHz ~ 48KHz |
| MPEG1/2 Layer2 8Kbps | kbps ~ 384Kbps | ||
| MPEG1/2 Layer3 8Kbps | kbps ~ 320Kbps | ||
| .avi | MPEG1/2 Layer1 32 | kbps ~ 448Kbps | 16KHz ~ 48KHz |
| MPEG1/2 Layer2 8Kbps | kbps ~ 384Kbps | ||
| MPEG1/2 Layer3 8Kbps | kbps ~ 320Kbps | ||
| AC3 32Kbps ~ 640Kbps | kbps 32KHz, 44.1KHz, 48KHz | ||
| AAC, HEAAC 8KHz | ~ 48KHz | ||
| WMA 128bps ~ 320Kbps | kbps 8KHz ~ 48KHz | ||
| WMA 10 Pro M0 < 1 | 92kbps 48KHz | ||
| WMA 10 Pro M1 < 3 | 34kbps 48KHz | ||
| WMA 10 Pro M2 < 7 | 68kbps 96KHz | ||
| LPCM 64Kbps ~ 1.5 | kbps 8KHz ~ 48KHz | ||
| IMA-ADPCM, MS-ADPCM | 384Kbps 8KHz ~ 48KHz | ||
| G711 A/mu-law 64Kbps | ~ 128Kbps 8KHz | ||
| .asf | MPEG1/2 Layer1 32 | kbps ~ 448Kbps | 16KHz ~ 48KHz |
| MPEG1/2 Layer2 8Kbps | kbps ~ 384Kbps | ||
| MPEG1/2 Layer3 8Kbps | kbps ~ 320Kbps | ||
| WMA 128bps ~ 320Kbps | kbps 8KHz ~ 48KHz | ||
| WMA 10 Pro M0 < 1 | 92kbps 48KHz | ||
| WMA 10 Pro M1 < 3 | 34kbps 48KHz | ||
| WMA 10 Pro M2 < 768kbps 96KHz | |||
| .mkv, .mka | MPEG1/2 Layer1 32 | kbps ~ 448Kbps | 16KHz ~ 48KHz |
| MPEG1/2 Layer2 8Kbps | kbps ~ 384Kbps | ||
| MPEG1/2 Layer3 8Kbps | kbps ~ 320Kbps | ||
| AC3 32Kbps ~ 64Oks | kbps 32KHz, 44.1KHz, 48KHz | ||
| AAC, HEAAC 8KHz | ~ 48KHz | ||
| WMA 128bps ~ 320Kbps | kbps 8KHz ~ 48KHz | ||
| WMA 10 Pro M0 < 1 | 92kbps 48KHz | ||
| WMA 10 Pro M1 < 3 | 34kbps 18KHz | ||
| WMA 10 Pro M2 < 7 | 68kbps 96KHz | ||
| VORBIS | Up to 48KHz | ||
| LPCM 64Kbps ~ 1.5 | kbps 8KHz ~ 48KHz | ||
| IMA-ADPCM,MS-ADPCM | 384Kbps 8KHz ~ 48KHz | ||
| G711 A/mu-law 64Kbps | ~ 128Kbps 8KHz | ||
| FLAC | < 1.6Mbps | 8KHz ~ 96KHz | |
| .ts,trp,tp.dat,vob,mpg,mpeg | MPEG1/2 Layer1 32 | kbps ~ 448Kbps | 16KHz ~ 48KHz |
| MPEG1/2 Layer2 8Kbps | kbps ~ 384Kbps | ||
| MPEG1/2 Layer3 8Kbps | kbps ~ 320Kbps | ||
| AC3 32Kbps ~ 64oKbps | kbps 32KHz, 44.1KHz, 48KHz | ||
| EAC3 | 32Kbps ~ 6Mbps | 32KHz, 44.1KHz, 48KHz | |
| AAC, HEAAC 8KHz | ~ 48KHz | ||
| LPCM 64Kbps ~ 1.5 | kbps 8KHz ~ 48KHz |
| Extension Audio | Codec Bit Rate Sample rate | |
| .wav | MPEG1/2 Layer1 32Kbps ~ 448Kbps | 16KHz ~ 48KHzMPEG |
| MPEG1/2 Layer3 8Kbps ~ 320Kbps | ||
| LPCM 64Kbps ~ 1.5Mbps 8KHz ~ 48KHz | ||
| IMA-ADPCM,MS-ADPCM | 384Kbps 8KHz ~ 48KHz | |
| G711 A/mu-law 64Kbps ~ 128Kbps 8KHz | ||
| .3gpp, .3gp, .mp4, .mov, .m4a | MPEG1/2 Layer3 8Kbps ~ 320Kbps 16KHz ~ 48KHz | |
| AC3 32Kbps ~ 640Kbps | 32KHz, 44.1KHz,48KHz | |
| EAC3 32Kbps ~ 6Mbps | 32KHz, 44.1KHz,48KHz | |
| AAC, HEAAC 8KHz ~ 48KHz | ||
| VORBIS Up to 48KHz | ||
| LPCM 64Kbps ~ 1.5Mbps 8KHz ~ 48KHz | ||
| IMA-ADPCM,MS-ADPCM | 384Kbps 8KHz ~ 48KHz | |
| G711 A/mu-law 64Kbps ~ 128Kbps 8KHz | ||
| .flv | MPEG1/2 Layer3 8Kbps ~ 320Kbps 16KHz ~ 48KHz | |
| AAC, HEAAC 8KHz ~ 48KHz | ||
| .ac3 | AC3 32Kbps ~ 640Kbps | 32KHz, 44.1KHz,48KHz |
| AAC, HEAAC 8KHz ~ 48KHz | ||
| .swf | MPEG1/2 Layer3 8Kbps ~ 320Kbps 16KHz ~ 48KHz | |
| .ec3 | EAC3 32Kbps ~ 6Mbps | 32KHz, 44.1KHz,48KHz |
| .rm, .rmvb, .ra | AAC, HEAAC 8KHz ~ 48KHz | |
| LBR (cook) | 6Kbps ~ 128Kbps | |
| .wma, .wmv | WMA 128bps ~ 320Kbps 8KHz ~ 48KHz | |
| WMA 10 Pro M0 | < 192kbps | |
| WMA 10 Pro M1 | < 384kbps | |
| WMA 10 Pro M2 | < 768kbps | |
| .webm | VORBIS Up to 48KHz | |
Supported Subtitle File Formats for USB Mode
| Internal Subtitles | ||
| Extension | Container | Subtitle Code |
| dat, mpg,mpeg, hob | MPG, MPEG | DVD Subtitle |
| ts, trp, tp | TS | DVB Subtitle |
| mp4 | MP4 | DVD Subtitle UTF-8 Plain Text |
| mkv | MKV | ASS SSA UTF-8 Plain Text VobSub DVD Subtitle |
| External Subtitles | ||
| Extension | Subtitle Parser | Remark |
| .srt | Subrip | |
| .ssa/.ass | SubStation Alpha | |
| .smi SAMI | ||
| .sub | Subscriber MicroDVD DVDsussubtitleSystem SubIdx (VobSub) | Subscriber 1.0 & 2.0 Only |
| .txt | TMPlayer | |
Coepxahne
YBeDOMnHn, yHKn n akceccyapbl 16
3Heproc6epeKeHne 16
KhoNka npokpyTkTeJIeBn3opa 16
BkIIOueHne/BbIKIOueHne 16
IepBa yCTaHOBka 17
Bocnpo3BeDHeMeMa-paJIOB c USB-ycTpoiCTBa 17
Meho medna 6pay3epa. 18
CEC. 18
I3meHeHHe HacTpoEeTeJIeBn3opa. 19
Oto6paxaet onu.. 19
Onu 3Byka. 19
KoHcHpynpyET HacTpoiKn poDnteBckoro KOHTpOra. 19
3neKtpoHHa nporpaMa nepea (EPG)19
06HOBnHeBaWeroTeJIeBn3opa.20
IOnsck n yctpaHne HeNCnpaBHOCTeN peKoMeHaaun 21
TexHHueckne xapaKTepeNCTnKn. 21
TunuHbIe pexmbi n3o6paXeHn npi noKIOUeHNn PIK 22
COBmecTnMoCTb CnHaJIOB AV n HDMI.22
IopdepknaeMbie opMaTbIBnDeo-paJIOB dJa peKIma USB 23
Iopdepxmbaembe opMaTbI paioBc
n3o6paXeHnMn IpnpeXmua USB. 23
Iopdepxmbaembe opMaTbI 3ByKOBbIX paINOB
IpypeXmua USB 24
Iopndepxmbaembie opMaTbI paJIOBc cy6tntpamn dny pexima USB. 25
Baxxho
'PepeyctaHOBKOn n 3KcPnyatauue TeJeBn3opa BHNMaTeIbHo npOHTte N NOIMTe BCIO HΦopMaUIO, coDEpKaUyOcB 6poUope no 6e3OpacHOCTN. Bo3HKnHOBeHne NOBpeXDeHn B pe3yIbTaTe HeBbINOJIHeHn DaHHbIX INHCTpyKUn He 6yDet YBJIaTbcraPaHTnHbIM cNyuaem'.
YtJn3aun CTaporo 6opydoBAnHn 6atapeek
Ioxayncta,He ytJn3npuye TeOT TeJeBn3Op
Hnn 6batapeKn BmecTe C obbHbIMN 6bITOBbIMN
OTXoDAMn. Pn yTJn3aun N3deJnna Hnn 6batapeek
BOcNoJIb3yITEcb COOTBeTCTByIOUImN CNCTeMaMn
Hnn cpeIcTBamn C6opa dJa HaIJIeKaUeB TbotNuHOn
Ipepea60TK OTXoD0B.
Ppumeyaue: 3Naoyk Pb noCumboJom Ha 6amapeukax O3Haayem, ymo daHHa bamapeuka codepkum cBuneu.

H3dennne

NylbT dncTaHcNoHHoro ynpaBneHn
TeJIeTeKCT
HaxMnte KNONy Text, yTO6bI BOITN.ДЯakTNaCnpeXIMa "MNKC" HaxMnte Ha KNONky NOBTOPOHO. YTO6bI BbItn, HaxMnte KNONy eue pa3. CJeDynteHCTpyKqIaM, OTo6paKaembIM Ha 3KpaHe.
UnpoBOn TeIeTeKCT
HaXmnte KhoNky Text, YTO6bl npocmotpeb HhOpMaunu cnofoBOTeTKeCTa. Ynpabnayte 3Toi nHOpMauncne C NOMOUBIO CBETbIX KHOK, KHOOK CO CTpeJkamn N KHOKN OK MoxHo NCNoJIb3OBaTb pa3NJUHbIe CNOCoBly UnpaBHeHn B 3aBNCIMOCtN OT CODepKaHnra cnofoBOTeTKeCTa. CNeNyIte INHCTpyKzmaM, OTO6paKaembIM Ha ekpaHe cnofoBOrTeTeteKTCTa.
- Pexn m oxndaHn: BkIIOueHne/BbIKIOueHne TeJeBn30pa
- Tekt: OTo6paKaeteneTeKCT (npn HauNnu), HaxMute eue pa3 nna HanoXeHn Ta He TeKCTa Ha 0bUHoe TeneBn3NoHHoe n3o6paXeHne (CmeuHaHbI pexm).
- Cton:П配电ааet BocnpounBedeHne Medna-ФaINOB
- 3KpaH: IV3MeHReT COOTHOWeHne CToPOH 3KpaHa
- NtoHnK: Ioka3bIbAeT BCE DoCTyHbIe CtaHcIM BeaHnN N ICTOuHNK KOHTeHTa
- Menu:Отобрахене мени Телевизopa.
- NpecTaHOBka KaHApOB: NooepeHoe BKnHoyehne PpebIyux IN TeKyuix KaHaIOB HIN NCTOHNKOB EcIn TocTHnHcyhB peKm yctaHOBNeH KAc "BKn.", npn HaxKaTn 3ToN KHONKn pOnCxOAnT nepeKIOueHme MeKdy TnpAmn ceTeBbIX KaHApOB DVB-T&Analogue n DVB-Cable&Analogue
- Habnraunohnbie KhoNk: Nomoraet nepemeaatbcn NO MeHIO, KOHTeHTy u T.D. n OTo6paXaET noCTpaHnCbI B pexmte TXT npu HaxaTn KhoNkn "Bnpabo" uJn "BneBo"
9.Прорразмma-/Странца+ - PpOMKOCTb -
11.3eHnKa: BbINONHIne HNCTpyKuHn Ha 3KpaHe dIa NCIOJIb3OBAHn UBeTHbIX KHO
12.KpachnKa: BbINONHte HNCTpyKun Ha 3KpaHe nI INCIOJIb3OBAHn IBeTHbIX KHO - ΚύφοBBIe KONKη: Περεκλιουηνης ΚαHαλΑ, BΒΟД ΚύφPBι έπη 6yKBbl B TEΚΤΟВΟ MOKHe Ha 3kpaHe.
- cy6TnTpOB: BkIIOueHne n BBKIOueHne cy6TnTpOB (npn HAIuHn)
- Ra3bik: IpeekIIOyaeI peKIMbl 3Byka (aHaIorOBoe TeIeBnIeHne), OTo6paKaet n N3MeHReT Ra3bIK ayDNo/ cy6HTpOB (UnpoBOe TeIeBnIeHne, npu HAnuN)
16.CnHЯ KONka: BbINOJIHnte HNCTpyKuIN Ha 3KpaHe dIa NcNOJb3OBAHNA UBeTHbIX KHOHOK
17.KeJITaK HONKa:BbINOJIHnTe NHCtpyKuN Ha 3KpaHe dJa NCIOJIb3OBAHn YBeTHbIX KHONoK - p o m k o c t b +
- Be3 3Byka: IOnHocTbIO OTKIIouaET rPOMKOCTb TeIeBn3Opa
20.Поррамma + /Стравиca -
21.Bo3Bpat/Ha3ad:Bo3Bpat K npdeIyUeMy 3KpaHy, OTKpbBaHHe cTpaHnLbI yKa3aTeIa (B pexIme TXT) - OK: Повпевждени Сьбора Рлььбоветя, удахиванецчни (В рекиме TXT), посмотс сизка каналов
- Info :Отобрахении Инфорmaци O KOHTeHTe,показыBaemOM Ha ekpaHe (packpbItne Инфорmaци - В ржиме TXT)
24.Bocnpoun3BeDenHe:HaunHaet Bocnpoun3Bountb BBipahHbIe Medna-phiNbl - Pny3a: Ppekpa aet Bocnpoun3BedeHne MeHa-phiHOB
26.CpIeHn peKm: IporpaMmpyet TeJIeBn3Op Ha aBTOMaTneCKoe OTKIOueHne - EPG (3neKtpoHHa nporpamma nepea): OTo6paKeHne 3neKtpoHHo nporpamMbI nepea
Ppumeyane: Duaanao npabomby Ndy cocmaenem npumepno 7M/23 cyma.
YBeDOMIeHn,ФyHKuNn nakceccyapbl
3Heproc6epexeHne
B 3OM TeIeBn3ope ImeIoTc yHKuN, N03BOJIOUne OcyuecTBnTb 3Heproc6epexKeHne:
C6epexeHne 3Heprn: Bbl MoKeTe npImeHrKOMbHaun HAcTpoek 3Hepro3o4pEKTNBHOCTN306paXeHn.BoBpeM npocmOTpa TeJeBn3Opa HaxMITE Ha KhoNky Menu, HacTPOuKN PexMa 3Heproc6epexeHn MOyT 6bITb HaJeHbI B pa3dJe "1306paXeHne" rnaBHO MeHIO.
- Pexm OKnIOueHnN3o6paXeHn: EcnBam Heo6xOIMO TOIbKO npocnyuINBaHne aydno-phiJNoB, Bbl moKTe OTKnIOHT bncnne. Dpyrne cyHKcnn 6ydyT DOCTUINbI B o6bIChOM pexnme. Bo Bpem npocmotpa TeJeBn3Opa HaxmnTe KHOkPy Menu n Bb6epnte "N3o6paXeHne", 3aTeM Bb6epnte onuio "3heproc6peXeHne". HaxmnTe KHOkPy "Bnpabo", nocTe TOR, kak 6ydet Bb6paHa onuia "ABTO" (abTomatueckn peXm), nn KHOkPy "BJeBO" nocTe TOR, kak 6ydet Bb6paHa onuia "HactpanBaembIn". Ha ekpaHe noRbNTc coo6uHnE. Bb6epnte IPODOJXHTb n HaxmnTe OK, yTo6bl BbIKIOHTb TeJeBn3Op Ecnn He 6ydet haxata kaka-Jnbo KHOkKa, ekpaH OTKnIOHTcraYepe3 15 cekynd. HaxmnTe IIO6yIO KHOkPy Ha nyIbTe dNCTAHIOHHORO ynpabJIeHNr TeteBn3Opa, yTo6bl BKIOHTb ekpaH CHOBA.
PpumeyaHue: Ppu EKIOUeHuu peXuma "Napa" onuay "OmkIooHeue 3KpaHa" 6ydem hedocmynHO. Ecnu meJeBuzOp He 6ydem uCnonb3oambc8 meueHue dNumenbHo2o 8peMeHu, omKnIOUme e20 om cemu numaHua.
KhoNka npokpyTkTeJeBn3opa
KhoNka npokpyTk nTeJeBn3opa, pacnoJoxeHHa Ha ero 6okoboy qactn, no3BOJareT KOHTpOIpOBaTb rpOMKocTb, nepeKJIooYaT b KaHaJIb I nepeBOJntb TeJeBn3Op B pexIM OxNiDaHna.
N3meHHe rPOMKocTn: YBeJIuHBAuTe rPOMKOCTb HaxaTneM KHOKN IpOKpyTKn BBepx. YMeHbJaTe rPOMKOCTb HaxaTneM KHOKN IpOKpyTKn BHN3.
IpekeJIIOUeHne KaHaJIOB:
HaXMMTe Ha cpeHIOU qactb KHOPII pOKpyTKn, Ha 3KpaHe IPOBNTc6aHHeC INHOpMaunen O kaHane.
- HaXaTneM KHOKN BBePx INN BHN3 BbINOJHnTe
- npOKpyTKy COxpaHeHHbIX KaHaIOB.
IpeekluoyeHne nctouhka:
- Haxmnte Ha cpeHIOU qactb KhoNKn (BTOPO pa3 nonHOCTbIO), Ha 3KpaHe NOBITcN CXOJHbI CNUCOK.
- HaXaTHeM KHOpKn BBepx INN BHN3 BblNOJHЯTe npOKpyTKy DOCTynhBix NCTOCHNKOB.
IpeeknueHne TeleBn3opa B pexm OxndaHna. Haxmnte Ha ceHTpaIbHyIO qacTb KhoNk n ydepKnBaIte ee haxaToB TeueHne HeckoJbKnx cekynd, noka TeleBn3Op He nepeKnOuHTcB peXm OxndaHn.
YTo6bl BkIIOHTb TeJIeBn3Op n3 peXnMa OxndaHn:HaKmTe Ha cpeHIOU qAcTb KHOPIK, TEJIeBn3Op BKIOHTcR.
PpumeyaHua:
Ecnu meeneu3op 6ydem bIKIoyeh, yka3aHHbI uKn HauHemc 3aHOo, HauHa c Hacmpouku apomkocmu.
IpaHoe MeHIO OSD He MoXem 6bimb omobpaKeHo C NOMOsbIO KHOJOK ynpaBHeHu.
BkIIOUeHne/BbIKIOUeHne
Yto6bl BkIIOuHTb TeJIeBN3Op
BbBeIte TeIeBn3Op n3 peKIma OxNdaHnaJIIO6bIM n3 cNoocob:
- HaKMTe KHONky Pexm OxuaHna, Iporpamma +/- nnn uocnobyo KhONky Ha nybTe dNCTaHcHHO Horo ynpabHeHH.
- HaxmTe Ha cpeHIOu yacTb 6OKOBOro cyHKUHOHaIbHOrO nepeKluOyateJr Ha TeJeBn3ope.
PpumeyaHue: Ecnu meeneu3op ocmaenu He kCnnnyamupyemc8 meeyue yacob, mo OH nepeudem 8 pexum okuadnur. Ppu cnedyoue meknoyeHuu noaumc coo6ueHue:"Hepa6oyee cocmoaHue 8 c83uC pexumom okuadnur", HaXmume OK, umoBi npodoxkumb.
4To6bl BbIKNIOuHTb TeJeBN3Op
- Haxmte KhoNky Pexn m OxuaHna Ha nyIbTe dntaHcnoHHoro ynpabHeHn nn Haxmte Ha cpeHIOu YacTb 6OKOBOrO cyHKcNoHaNbHO rpeKIOUaTeJIHa TeJeBn3Ope, TTObI nepeKIOuHTb TeJeBn3Op B pexn m OxuaHna.
Ipumeyaue: Ira nonHOzo omKnIOUeHua numa-Hura meeeu3opa, omKnIOUcme cemeo uHyp u3 po3emku.
IepBa yctaHObKa
MeHIO MeDnA 6pay3epa
| Вкlioочице рекUMа "ЦкЛ/Перемшuaнue" | |
| НачнITE BOCPON3Bveedge c ПOMOULTБКHОПКI ВOCPON3Bveedge n akTINBIPuYTe | Вce phайы в сиске будун посторно ВOCPON3BOДNTьСЯВ первонаяльnomорядke. |
| НачнITE BOCPON3Bveedge c ПOMOULTБКHОПКI OK n akTINBIPuYTe | Будет посторно ВOCPON3BOДNTьСЯОДИN ТOT ЛЕ phай (nobToP) |
| НачнITE BOCPON3Bveedge c ПOMOULTБКHОПКI ВOCPON3Bveedge n akTINBIPuYTe | Вce phайы в сиске будун ВOCPON3BOДNTьСЯОДИN pa3 Вразбpos. |
| НачнITE BOCPON3Bveedge c ПOMOULTБКHОПКI ВOCPON3Bveedge n akTINBIPuYTe | Вce phайы в сиске будун посторно ВOCPON3BOДNTьСЯВ TOM ЛVE пождзвolyном поядke. |
CEC
3TaФyHKUINo3BONReYnpaBnTbC NOMOuIyNbTa DnCTaHcNHOHorO ynpaBHeHnTeJeBn3OpayctpOJCTBaMn,NoDepKNaIOUmHn CEC,KOTOpBIE NOKnHcyHbBpa3bEmblHDMI.
Onu CEC B MeHIO "HaCTpoiKn > BoJIbSe" ChaJa DoJXHa 6bIb yCTaHOBJeHa KaK "BKn." HaxMnte Ha KHOJky NcToHHNK I bIbEpIne BXoD HDMI noJKNIOUeHHoro yCTpoiCTBa CEC n3 MeHIO CnncOK NcTOHKnOB. Korda 6yDet nOdkJIooHeO yCTpoiCTBO NcTOHnKa CEC, OHO 6yDet oTo6paKaTbcra B MeHIO NcTOHnKa C CO6CTBeHHbIM Ha3BaHNem BMeCTO nOJKNIOUeHHbIX pa3bEmOB HDMI (DVD-nIeep, 3aNcblBAIOoee yCTpoiCTBO 1 n T.D.).
IyIbT dNCTaHcHOnHO rypabHeHnA BtOMaTnueckn CMOXeT BbIOJHrTB OCHOBHbIe cyHKuIN NocNe TOrO, KaK 6yIeT BbIbpaH nCToUHk HDMl.
Дязавршени данног onepaци n daNBheшero ynpablenen TeIeBn3Opom chepe nylbT nuctaHcnoHoro ynpablenen HaXmnte n ydepKnbaiTe B TeueHne 3 cekyHn Ha nyIbTe nCTaHcnoHoro ynpablenen KhONky "0-hoIb". 3TaФункцЯТakke MOxket 6bITb BKIOUcheHa nI N OTKIOUeHa C NOMOuBo MeHIO"Hactpoyn> BoIbSe".
Данны TeJIeBn3Op TAKKe NOДерЖиBaET ФункцIO ARC (PeBepCnBHy 3ByKOBoI KaHaI/Audio Return Channel). 3TaФункцЯЯВЯЯТСЗВуКOBыM 3BeHOM,претнэзнayeHHbIM ДЯ 3aMeHbIpyrnxKa6eNei Мжду TeJIeBn3OpOM n aYdNIO-CnCTeMoI (PpHemHK A/V nIIn akyctUnuecka cnCTema).
Korda 6ydeT BKNIOHe ha cyHKcna ARC, B TeJIeBn3Oppe He 6ydeT aBTOMaTHueCKN BKNIOueH pexm "6e3 3Byka" dIpyrX 3ByKObIX BbIBOdoB. Heo6xOIMo 6ydeT yMeHbUnTb rPOMKocT bTeJIeBn3Opa Do HJRA BpyHyIO, eCNI Bbl 3axOTnte cIyuaTb ayINO TOIbKO C NOkKnIOUeHHoro aydNO-yCTPOiCTBa (TaK JKe, KaN i C DpyrNX ONTIueCKNX IIN KOAKCnAJIbHbIX UcΦpOBbIX aydNO-BbIBOdoB). EcNI Bbl 3axOTnte N3MeHNtB rPOMKocT bNOkKnIOUeHHoro yCTPOiCTBa, HEo6xOIMo 6ydeT Bbl6paTb daHHoe yCTPOiCTBO n3 CnIcKa nCTOuHnKOB. B 3Tom cIyuae KhoNk ynpabJIeHnR rPOMKocTbIO cOnpJxKeHbl C NOkKnIOUeHHbIM aydNO-yCTPOiCTBOM.
IpumeaHue:ФyHKuA RCA noodepkuaemc moIbko uepe3 6xod HDMI1.
3BykoBoe ynpaBHeHne cHCTeMoI
Ду新股аетс ИСПОЛБ3OBAHNE C TeLEВИЗОРМ 3BykoBOrO yCnInTeJIa/peCnBepa.УnpabJIeHne rPOMKOCtBJMOKeT OCUJIecTBJIaTbCЯ C NOMOJIbIpyJIbTaДИCTaHcUHOrO ynpabJIeHnI YTeLEВИЗОр.AДЯ BKJIuOHeHnDAHHoФyHKUIN UCTaHOBITE ONUIIO "rPOMKOROBOpHTeN" B MeHIO "HaCTpoJKN>BoJIbSe" KaK "YcInInTeJIb". 3Byk rPOMKOROBOPTEJIe TELeBn3Opa 6yIeT
BbIKIIOUeH, IN I3 NODKIIIOUeHHoN 3ByKOBOI CnCTEmbl6yTe T cblIeH 3ByK nCTOuHnka npOCMOTpa.
Ipumeyane: Ayuo-ycmpoucmeo doJxho noodepeku-eamb yHKuO YnpaBneHue ayuo-paunmu cucmembl, u fyHKua CEC doJXHa 6bimb ycmaHOeHa KaK Bkn.
I3MeHeHHe HAcTpoE TeJIeBn3opa
IonyueHne doctyna K HnKeyka3aHHbIM ONUJAM;
1-HaMMTe KHONKy Menu.
2-BbIeJIte nyHKT, KOtOpBie Heo6xOaIMOBbI6paTb
3-HaKmTe OK nla noTBepkJeHnA.
OTo6paXaet onZnN
Pexm:ImMeHnepeXMa n3o6paXeHna OINHn3 cIeNyUxKnHOteaTp, Nrpa, cnopT, DnHaMnueckoe, n EctcTBehHoe n3o6paXeHne.
(*) Onuur "Pekum uapbl" Moxem 6bimb HeodcmynHou, 3aecumocmu om bibpaHnozo ucmouhka.
KoHTpactHOCTb: YcTaHaBnBaet KOHTpactHOCTb 1306paJxHn.
Rpkoctb: YcTaHaBnBaet Rpkoctb n306paXeHn.
Pe3KocTb: YcTaHaBnIBaet pe3KocTb n3O6paXeHn. BbICOKa pe3KocTb MoKeT oBeCneuBaTb YeTkoe, HacblIeHHoe n3O6paXeHne, B 3aBNCmOCTn OT KOHTeHTa.
UBeT:YcTaHAbJInBaet UBeTHOCTb N306paXeHHa.
IocBeTka: YcTaHabINBaet npKoCTb fOHOBOrIO 306paXeHn. FyHKUra NODCBETKn 6yDeT HeaKTNBHO,ecnn 3HeproC6epExeHne 6yDet yCTaHOBNEHO BpeKm HactpanBaemoe.
OnmN 3Byka
YcTaHOBnTB NHH-KoD: YcTaHaBnBaet HOBbI NHH-KoD.
ПИH-кoД CICAM ПОУмончи: 3Та onця 6удET bIdeNeHa cepbIM cBETOM, ecN B cNOT CI teNeBu3opa He 6ydeT BCtABNeH ModyЛb CI. C nomOuьIO daHHoI onци ПИH-кoД CICAM, nCnoJIb3yEmbl no YMOJUHnIO, MOKet 6bITb N3MeHeH.
3JIeKtpoHHa nporpaMma nepea (EPG)
HeKoTOpbIe KaHaJIbI cOePkaT HΦopMauIIO O rpa-Φnke Ix TpaHcInpOBaHn. HaxMnte KhoNkY EPG (3JIeKtpoHHa IporpAmma nepea) dIra IpocmOTpa MeHIO EPG.
CyueCTByeT 3 pa3nHbIX BnDa DocTynhbIX rpaNka pa3MeueHna — rpaNK BpeMeHHoJ uKaJIbI, rpaNK cncsKa n rpaNK "CeYac/DaJeE".ДЯpeKJIIOUeHnMa MeKdy HmM NblOJIHnTe INHcTpkyuIN, npNBedeHhBc B HxKHe Yactn 3kpaHa.
ГрафNK Временношкалы
MacstabopobHne (XeIaKnKa:HaXmTe XeIyIO KONky Ira npocmoTpa co6bITn B 6Oone WnpOKOM BpeMeHHOM INHTepBaJe.
A B T O M A T N U E C K O E O B H O B L E H N E C U N F P O B O Y C T A N C N T E J E B E U S A H N I
TeJIeBn3Op NOdkIIOueH K aHTeHHe. EcII nOnuia "A BToMaTnueCKe cKaHnpOBaHne" BKIOUeHa B MeHIO "Onuio6HOBLeHna",TO TeJIeBn3Op npocbinaeTcB 03:00 u BblOJHHaET NOnCK O6HOBLeHna nporpaMM Ha BeuaOuX KaHanaX.B Cnyae O6HApyKeHna IIO uero ycNeuHoi 3arpy3Kn npn CJeDyUoIeM BkIOUeHn NiTaHnra TeJIeBn3Op 3aNcyTITcR C HOBOB BepCnei nporpamMHoro oBeceueHnry. UTo6bI OTKpbItb MEHIO "Onuio6HOBLeHna", BOJNTe B MeHIO "HaCTpoKn>BoJbWe", BblJeJIte NYHKT "O6HOBLeHne IIO" HAXMITE KHOKNy OK.
Ppumeyaue: He omknloyaume melebu3op u3 3nekmpuueckou po3emku, k02da cbemoduod muaem, yka3b18a, ymo udem npoueecc nepe3a2py3ku. Ecnu melebu3op He 6o3obhoBun pa6omy nocne o6HOJIeHn, omKIOUcme e2o u3 3nekmpuueckou po3emku Ha 2 MuHymbl, a 3amem choea ekIIOUme.
IOnck uycTaPahHeHne HncnPaBHOCTeN peKoMeHdaZu
TeIeBn3Op He BkJIouaetcA
Y6eNTecb, YTO shHyp nHTaHnRA DOJXHBIM o6pa3OM BKIOUey H NaCTeHHyIO po3ETKy. IpoBepbTe, He cENI JN 6aTapeiKn. HaKMITE KONKy IITaHne Ha TeJIeBN3ope.
Hn3koe kaueCTBO n3o6paXeHna
- MoXeT 6bITb HEnpaBnIbHO Bbl6paHa TeJIeBn3IOH-Ha CnCTema.
Cna6bI CNrHn MoKeT npNBecTu K nCKaXeHn0 n3o6paXeHn. PpOBepbTe coeINHeHne aHTehHbI.
-Проверп,правиьно Ли Habстpoehа частота kaHaNoB, ecn Habстpoиka 6ыл na пponЗveDEн ВруЧую. - N3o6paXeHHe MOxET yxuDHTbcra, ecn K TeJeBn3Opy OndHOBpeMeHHO NOKNUOyeHbI DBa BHeuHNxycTPOcTBa. B 3OM cnyae cneJyET OTKNUOntB oNDHO BHeuHNx ycTPOcTB.
OTcyTCTByeT n3o6paXeHne
3TO O3Haayet, TTo TeJIeBn3Op He NOnyaaTe KaKOro-JIn6o CnHaJa. PpOBepbTe, TTo BbI BbIbpAnIpaBnIbHbIM IcTouHnK BXOJaEro CnHaJa.
- Bo3MOxHNO, HnpaBnIbHO nOdkJIoueHa aHTeHHa?
- MoXeT 6bIb NOBpeKdE h aHTeHHbI npoBOd
-Bo3MOxHo,INcNoIb3yEmbIe WTeKepeHHe NODXoJrT DnA CoEINHeHnC aHTeHHoN.
- Ecn y Bac cctb comHeHna, obpaTntecb K BaWemy MeCTHOMy npedCTaBNTeJIIO.
HeT 3Byka
- PpOBepbTe, He BkIIOueHa JN 6JIOKIpOBKa 3Byka HaxMnte Ha KHOKNy BLOKIpOBKa 3Byka NIN yBeJIINyBTE rPOMKOCTb.
3Byk cnblweH TOnbKO n3 OndHO rHaMka. IpoBepbTe HAcTPOK6aHaHcBA MeHIO 3Byka.
- Bo3moJHo, ceni 6aTapeiKn. Ipon3BeIte nx 3aMeHy.
HeBo3MOxHo BbI6paTb NCTOuHnK BXoHOrO cnHaJa
- Ecni Bbi He MoKeTe Bbl6paTb NCTOuHnK BXoJaIeCnIHana, BO3MOxHO, Het NOdkNIOUeHHbIX yCTpOInCTB. B npOTNBHom cnyuae;
- EcJn Bbl nbIaTeCb nepeKlnHcyTbcra Ha nCTOuHNK BXoHoro cunHa, npEHa3HaueHHoro dna noKJIoueHHoro yctpoiCTBa, npoBepbTe Ka6eNn AV n COeDInHeHn.
TexHnueckne xapaKTepcntKu
Digital antennainstallation:
Hvis Antenne-udsendelsessogning er aktiveret, vil fjernsynet soge after digitale jordbaserede udsendelser, after at andre indledende indstlinger er foretaget.
Digital kabelInstallation:
Premiere installation 53
Installation analogue
PC-invoernormaleweergavemodi 84
Filter (blå knapp): Viser alternative for filtering.
Filter (blå knapp): Viser alternative for filtering.
Hendelsesalternativer
Trykk OK i EPG-menyen for a gä inn i Hendelsevalg-menyen.
Velg kanal: I EPG-menyen kan du, ved hjelp av dette alternatively, bytte til den valgte kanalen.
Still inn tidsur ved hendelse / Slett tidsur pa hendelse: Etter at du har valgt en hendelse i EPG-menyen, trykk OK-knappen. Velg alternatively Still inn tidsur pa hendelse og trykk pa OK-knappen. Du kan sette et tidsur for fremtidige hendelser. For avbryte et allerede innstilt tidsur, ma du merke hendelsen og trykke pa OK-knappen. Velg deretter Slett tidsur pa hendelse-alternativet. Timeren vil bl avbrutt.
Oppdatere din TV
3MiHa HanaTsyBaHb TeneBi3opa 118
Iapametpn BiDobpaKeHHn 118
Iapametpn 3Byky 119
HanauTyBaHHa napameTpib 6aTbKicBcKoro KOHTpOIO. 119
EneKtpoHnn TeIerid (EPG) 119
OHOBHeHHaI3TeJIeBi3opa 120
Iouyik i ycyhennHa HecnpaBHOCTe Ta peKoMeHdauii 120
Tinobipexnmbiio6paeknBxihnx daHnX PIK 122
Cymichictb cnHaiB AV ta HDMI 123
IiTpmyBaHi oopMaTu faJIb y peKmI USB 124
Пдгмванi Форми phaиь 3обрахень дяпжу USB 124
PiTpmyBaHi fopMaTn faJIb ayIO nIpeXmMy USB 125
IiTpmyBaHi fopMaTn faJIIB cybTnTpIB dIpeXmMy USB 126
Baxnbo
Ipeed yctaHOIO i BnKOpNCtAHNm TeJeBizopa yBaXHO npOHTaTe Ta 3po3yMiIne BCIO IHOpMaio, 0o BnKlaDeHa y DoaHomy ByKeIeTI 3 nTaNb 6e3neKn. IapaHTi He NouPcEbCn Ha noWkoJKeHH, 0o BNHKn BHaCnIDOK HeDOTpMaHHn cNX IHCTpyKciN.
Ytulizacia craporo 6bnaHaHnTa 6aTapei
He BnKndaIte ue TeIeBizop a6o 6atapei pa30m 3i 3BnuaHIM N6yTOBUM CMIITAM. Uo6 yTuNl3yBaTu n ce npOdyKT a6o 6atapeH, 3BepHiTbCra Do CnCTEmN 36opy BiXODIB a6o DIO NiDpNcEMCTBa 3 nepepo6Kn BiINOBIDHNX BiXODIB.
Ipumimka: 3HaK Pb HnXy cMBOny 6aTape O3Haayc, 0o 6aTapeMiCTNTb CBNHeu.

Bnpo6n

AkymnyTOp
NytDnctaHIOHOKepyBaHH
TeJeteKCT
Uo6 ybiTn,HaTNCiTb KONky Text. Uo6 yBIMKHyTn 3miuaHn peXm,ue pa3 HaTNCiTb cIO KONky. Uo6 BuHTn 3 zuoro peXmMy,HaTNCiTb KONky ue pa3. OToPmYntecraHCTpykui Ha ekpaHi.
UΦpOBu TeJeTeKCT
Uo6 nepernnyu inopmaio y BuRnai u npbooro TeTekecy, HATNCHITb KhoNky Text. JnpoBtu 3 TeTekeCTOM BIKOPNCOTBynte KOJbOpOBI Ta KypcOHI KnaBiwi, a TAKOX KhoNky OK. MetoD pOboTu MoKe Pi3HHTncra 3aIexXHO BiD KOHTeHTy unpoBOrToTeTEkeCy. DToPmMyTecb IHcTpKciu, 10 BoIObpaKaIOTBc y BikHi unpoBOrTOteTEkeCy.
9. Nporpama -/CtopiHa +
- PexnOuyiKaBHH:YbIMKHeHH/ BImKHeHH TeJIeBi3opa
- Tekt: Biö6paeHHa TeIeKCTa; 3HOBy HaTNCHTb KHONKY, Uo6 haknactn Tekt Ha 306paeeHH nporpaM (MIC)
- Cton: 3ynHRe BiDtBopeHH Hocir
- EkpaH: 3miHIOe fOpMaT 3O6paXKeHHHa ekpaHi
- DkepeNo: Ioka3ye Bci Doctyn hi nporpam Ta DkepeNa
- MeHIO: BiO6paKye MeHIO TeNEbi3opa
- 3aima: WbniKe nepemKahHn MIX nonepedHim i nToOHm KaHaIaMn a6o dKepeIamn
Kpo PeknroTeB yBIMKHeHO, JIaxOM HaTNC KaHHaie KONMOXHa nepeMkataNc MIX HAcTyNHmTNnAmn KaHAniB TeBeXiHoi MepeXi: DVB-T&Analogue i DVB-Cable&Analogue - Habirauihi Khoi: Donomarae nepexoHTn no MeHIO, 3miTy i T. n., BiO6paJxye cy6ctopIHKn B pexmI TXT npn HATNCKAHHI Khoi BnpaB o6o BliBO
- Гунись -
11.3eJHa KhoJa: DToPmMyTeCb IHCTpyKci Ha ekpaHl 0do cyHKiKOJIbOpOBuX KHOJOK
12.YepBoHa KhONka: DToTpmyItec b IHctpyKci Ha ekpaHl 0do fYHKiKoNbOpOBHX KHOK - UΦpOBI KONK: ΠepeMnKaHaJI, BBOuNTb ΣΦpy a6o 6yKBy B TeKCTObe noJe He ekpaHI.
- 3oBhiHc cy6Tntpn: Bmkae a6o BmKAc cy6Tntpn (3a HaeBHocTi)
- MoBa: IpePmKaHHM iXk peKImAmN 3Byky (aHaIorObe Te- ne6aueHn), BiO6paXeHH Ta 3MiHa MOBn ayDio/cy6Tntpib (uΦpOBe Tene6aueHH, 3a HaABHOCTi)
16.CnH KONKa: DToPmMyITeCb IHCTpyKui Ha ekpaHI 0do OyHKui KOJIbOpOBnx KHONOK - KOBtA KONKa: IOpTpMMyTeCb iHCTpyKciHa eKpaHi 0do OyHKcI KOJIbOpOBuX KONOK
- Hictb +
- BmKHyTn 3Byk: NOBHcTIO BmMkae rYHcHtB TeneBisopa
- Nporpama +/CTopiHka -
- NObepHeHHaHa3aI: NepexiD no nonepeHbOro ekpaHy, BiKpNbAHnH iNdeKcHoi CTopiHN (y pexmTiXT)
- OK: Плдеверджени вибopy коростувача, Фikсваимастори (у рекимi TXT), порлд спнicky kahandib
- InΦopMaζη: Biδo6paxyε ΙnΦopMaζη Πno BiδTbOpOBaHm MaTeριαπ, nokayε npuxOBAhy ΙnΦopMaζη (po3kpNBae - y peKmTiXT)
- BiTbOpENH: BiTbOpENH o6paHoro eIemEnTy
- Pny3a: 3ynnHRe BiTbOpenhra
- Pexm CHy: BCTaHOBJIoe aBTOMaTnUHe BmNKaHHaTeJIeBi3opa
- EPG (EneKtpoHna nporpama nepea): BiKpBae eJekTpoHH nporpamy nepea
3ayexen: Dnblhcmb dnylmy ducmauuho20 KepybaHn cmaHoumb npubn3Ho 7M/23 yma.
NobidomJIeHHa, yHKuTa akcecyapn
EheproeΦekTnBnHicTh
TeIeB3Op po3po6nHn i3 NiTpIMKoO yHKci 36epexehnEhepi:
PexnM 36epxeHnEheprii: MoxHa 3actocobyBatn Kombinaio ehepro36epiraohux HacptpoNk 3o6paXeHHa. Iic yapc neperny Telebi3opa HatncihTb KHONky MeHIO; napametpn peKIMy 36epxeHHn Eheprii 3haxOJrTbcB po3diI 3o6paXeHHraNOBHOrMeHIO.
PexnBMnKaHn 36paXeHHa:KuO BxOye CnyxATn Nlue 3Byk 3 TeNeBizopa,ekpAmoKHa BMKHyTN.1Hsi cyHKui 6ydyTB npauOBaTn B HopMaIbHOMy pexnMI. B pexnMI nepeJyTeleBizHOi nepeaHi HATNCHTb KONKy MeHOBepiB NyKt 36paXeHHa,notIM 3 nepeNiky napameTpB B6epiB pexm 36epExHHa eHeprii. HatncHITb npaby KOnky, kUcBO napametp ABTomatnHu, a6o JIBy KOnky, kUcBO nB6paHO napameTp HaCTPOOBaHn. Ha ekpahi 3'ABNTbcn NOiDomLeHHa. 06 BMKHyTN ekpan HeraHo, B6epiB nyHKT PpOBoXHTn Ta HATNCHTb KONKy OK. JaKuo He HATNCAtn XODHy KOnKy, ekpaBMKHeTbcr Ype3 15 cekynd. 06 yBIMKHyTn ekpan, HATNCHTb 6ydb-ky KOnKy Ha npblti abo TeLeBizopi.
3ayexHH: Pekum BumKH. ekpaHy HeodcmyHui Ka 3HaueHH napamempy pexum cmaHOeNeHo 8 Pa. Ka o meeisop he bye bukopucmoeyamucmpuauiu yac, iD'edhaume uozo enkmpomepexi.
Khonka npokpyTkN TeNeBi3opa
KhoNka npokpyTKn Ha 6iHi nHaHeJI TeNeBi3Opa Do3BOJRApeYIIOBAtn rUHICTb, NepemNKaTI KaHaJI Ta nepeMnKaTI TeNeBi3Op y pexm OuykBaHHra.
PerylloBaHH pIBH rYHoCTi: rYHicTb 36IbIbWyETbcra IJnxOM npOKpyTKn Bropy. rYHicTb 3MeHwEeTbcra IJnxOM npOKpyTKn BHn3.
Uo6 3miHnTn KaHaJ:
HaTnCHiB cepeHIO qaCTINHy KHOKN pOKpyTKN,Ha ekpani 3'ABNTbcra IHcOpMauiHm 6aHep KaHany.
Cnncok 36epekeHnx KaHaJIb MOxHa npOKpyuBaTn Bropy a6o BnH3 7JnxOM HaTnCKaHH KHOKN.
Uo6 3miHHTn DxkepeNo:
-Дычи haTncHtB cepeHIO qactHy KhoNkn (3araJOM Bpyre) — Ha ekpaHI BiO6pa3ntbC cnICOKdxepen.
Cnncokdoctynnxdxepen moxha npokpybATNBropy a6o Bn3 7JnxOM HaTnCKaHHKHOKN.
Ioo6 nepemKHyTu TeJeBi3Op B pexnM OuyKaBHaHr: HATnCHiTb cepeHIO uactHy KhoNk i yTpmyTe ii npotrarom DeKiIbKOx ceyHd — TeJeBi3Op nepeiDe B pexnM OuyKaBHaHr.
Ioo6 yBIMKHyTN TeJeBI3Op, kNk 3HaXoNDtbcra B pexmIo ouikyBaHHa: HATNCHTb cepeHIO qactnHy KHONK — TeJIeBI3Op yBIMKHeTbcra.
PnmuItkn:
KuO Bu Bumkheme meeBizop, ue uukn noHembc 3aHOo, noUHaIOU 3 HanaumyBaHHra yuHocmi.
TOnoBHe ekpaHHe MeHIO He MoXHa buKnukamu KhoNkoYnpaBnIHn.
yBIMKHeHHBUMKHeHH
Uo6 yBIMKHyT TeNeBi3Op
Uo6 yBIMKHyTN TeIeBi3Op, kN 3NaXoNTbcB B peXnMI OuyyBaHHa:
Cnoatky HaTnCHiTB KONKy Pekm OuykBaHHa, a NOTIM KONKy Pporpama + / - a6o ufopoBy KONKy Ha npIbTi dNCTAHUIHOrO kepyBaHHa.
- Hatachitb cepenHy cyHKioHaIbHoro nepemka-ya Ha 6okobin nahei Tebe3opa.
3aybaxeHH: kuo meeei3op 3aunuec yimKHeH i Hm He Kopucmyeauncb dekui yac, biH nepeude pexum oukybaHH. Ipu hacymHomy BMUKaHH npucmpoio 3'reumbcra nobidomnHra: «PeXum ouikyeaHH uepe3 eicymhicmb cuuHaNy», dna npodoekeHH Hamuchimb OK.
BmKaHnTeJIeBi3opa
- HaTnCHiTB KHONKY Pexm OiyKyBaHHa 6o u nppoBy KhoNky Ha npbTi DnCTaHcHOrO KepyBaHHa, a6o HATnCHiTB cepeHIO KnaBiWy cyHKcioHaNbHO rnopeMnKaaya i yTpmyIte ii HaTnCHyTOIO npOTAROM DeKiNbKOx CeKyHd, Doku TeJIeB13Op He nepemKHeTbCBAPEXIM OuykBaHHa.
3aybaxen: 1o6 noBicmIO bumkhymu meebei-30p, biD'edhaume whyp kueeneHHa bd po3emku.
NouatKobayctahOBka
Kaio Baw npoBaJep Ka6eIbHoi MepeXi He niTpmye HalaWtBuHHa OCHOBi iDeHTnΦiKaTOpIB MepeXi, Bi6epItb Hi, HATNCHTb OK iDToPmYntecr IHctpyKzui Ha ekpaHI.
Ybomy Bikhi Moxha TaKoX O6paTn diana3OH qactOT BBeiTB diana3OH qactOT bpyHy cnpobmN KhoNkAmn Ha Ndk.
3ayexen: Tpuanicmb nowky 3anexumb biO6paHO2o KpOKy nowky.
BcTaHOBHeHHn iKIOUeHHn DO KaHaJIb aHaIorOBoro Tele6aueHH
Kuio Bn6paHO Tn MOBneHHA AnaorObe,nicra 3aBepweHHI HxN x NoaTKOBHX HacTPOIK dIy TeJIeBi3Opa CtaHe MoXJIbIM NOnyK KaHaJIb AHaNoROrBOrMOBNeHH.
Kpim Toro, MoXHa BCTaHOBnTu yIIO6JIeHn TUN MOBJIeHHa. PpiOpHTy npoUcci noUky 6yde BiDabatncs OcbahOMy TIny MOBHeHHa 3HaJdeHi KaHAnu cboTo TIny 6dyTb y CnNcKy KaHAniB nepShmN. Picna 3akIHueHHa HATNCHITb KhoNkO KdnnnpoDBKeHHa.
PicraBIO BIKpncbC BIKHO BN6opy Pekm dIM/ Pekm mara3nH. IJr DOMaunBo RIKOpncTaHHpeKomeHdyetbcBn6paTn Pekm dIM.
Iicra 3aBepseHHn NOaTKOBHX HacTPOIOK IJRA TeJIeBI3Opa NoHETbcr NOnyK DoCTynHnx KaHaJIIB O6paHx TINIB MOBHeHH.
Iid yac nowky moke 3'reumucn noiDomneHn i3 3anumom, yu cniod copmybamu kaHau 3a LCN(*). O6epimb biOnob Ta k i Hamuchimk Honky OK dny niOmbepdKeHH.
(*) LCN - ue cuscema no2iH0zo HymepybaHHa KaHaJIe, kA op2aHI3O8ye docmynHi KaHaJIu eIDnoBIOHO do po3nI3HaaHOI nocIioOBHocmi (y pa3i HaBbHocmi).
IicJra 36epeXeHHBaix DoCTyHnHex KaHaJIb Ha ekpaHI 3'ABNTbcra pe3yIbTaT nowky.ДЯ npOdoBXeHHaHTNCHiK Honky OK.IicJra cboRo BiO6pa3ntbcra MeHIO PeDaryBaHHcNcKy KaHaJIb.HaTNCiTb KHonky MeHIO,io6 BnITn 3peXmMy PedaryBaHHcNcKy KaHaJIb Ta noYaTI nepernJaTeNeBi3opa.
3ayexen: He eumkaume meenei3op y npoueci noamkooi ycmaHOeKu. 3eeHimb yBaay, zo deki napamempu moxymb bymu hedocmynHumu 3aJekocmi biD bupaHOi kpaIHU.
BiTbOpOBaHnMeia-paJiB 3 USB-dncka
Moxha BiTbOpHbAtn foToRaPcii, My3Nky i BiDe-0paHn, 36epiraOToBcHa USB-dncky, RaIIOiEHaTn Ioro Do TeLeBi3opa. NiEHaHTe USB-dnck Do Ondoro i3 BxIDnHex USB-po3'EmIB, 0o 3hAxOJaTbcra Ha 6iHi naneIi TeLeBi3opa. JaKIo HAtncHyTN KHOKNy MeHb BpeXmI Media-6pay3ep, CTaHyTB DOCTUHNMI NpHKTI MeHIO 3o6paxKeHHa, 3Byk Ta HanaTuBaHna. NobTopHe HATnCKaHHa KHOKN MeHIO 3aKpNBae NotOuHe BIKHO. Bu MoKeTe BCTaHOBHTu BaSi yNoDo6aHHa DInr Media-6pay3epa 3a DonOMOrO MeHIO HanaTuBaHHa.
Uo6 yBIMKHyTN peXIM ABTomatNue He BiDtBopeHn, BnDiJIiTb ueI NyHKT B MeHIO HanaWtYBaHHr i Bn6epiTb 3HaueHHy YBMKn. 3a DonOMOrO KHOONK Ha npMky. Picra yBIMKHeHHra Zboro peXmMy TeNeBi3opa BIKOHYeTBcra pOeDypa BNABJeHHra NiKlHoueHHx npicrpoIB USB i nowk media -paHnib.
B nepuy eepry BnKohyEcTbcra nowyk paJnib fOTo- rpaip. JaKuo paJnIB fOtorpaipiH He 3HaJdeHO, nporpama noUHae WyKatn BiDeoopaJn. JaKuo He 3HaJdeHO JODHOro BiDeoopaJny, nporpama noUHae WyKatn ayioopaJn.
IicraToro,ЯK 3HaJdeHoФaInДЯВiD TBOpEHnH,ΦopMaT UbOrOΦaIny6Ue BBaxKaTncRAK NOCTiHnBn6ip i KoxeHΦaInB UCbOMyΦopMaTi 6Ue BiD TBOpBOBaTnCBA HeCKIHueHHOMy ZnKnI. BnKOpNCTaHHpyNbTy DnCTaHciHOro KepyBaHHaDNr BNXOypeXmY i BVkoHAnHry IHnx Oepaui npuBoDntb Do3akInHeHHn Ppoecy BiD TBOpEHnФaIniB i nepepNaBHnA uKnly.
KtTeB3Op He MoKe 3HaHTN XODHOro Mei- a-pany, Ha ekpaHI BiO6paKaetbCra rOJOBHe MeHO media-bpay3epa. Uo6 BnKoHaTu nowyk paJnIB y BCix BknaDeHnx pankax B npncTpoI USB, BcTaHObit napamETp CTnIb noDaHHB 3HaueHHr Plockn.
3ayaxen: kmo meebiop nepebyac 6 pexum oukybaHH, uq yHKciE HeocmynHOIO.
BAKJNBO! Npei ndHaHnM Do TeNeBizopa 3po6tb pe3epBHy konio faijib. Bnpo6hNK He Hece BiINObiaIbHocTi 3a nowkoJxehnrauiB a60 Btpaty daHnx. DeaKi Tnnu USB-npncTroob (HanpnKnaD, MP3-nporpaBaui) abo USB-dnckn/naM'raTb MOKyTB BnBNTnC HecymichmN 3 cIM TeJeBizopom
MeHIO media-6pay3epa
3MiHa HaJaTaYBaHb TeJeBi3opa
ДяdoctунуdoHaBeDeHnX HnKYe napaMeTpib:
1-HaTnCHiTh KHONKy Menu
2-BnDinitb notpi6Hy onuio
3-HaTnCHiB KNONky OK nIy nIITBepKeHH
NapaMeTpN BiO6paXeHHN
Pexm: Obnpaetbcra oINH 3 HactynHX pexmiB 306paXeHHa: KIno, p(a^*) , Cnopt, DnHaMiuHni i PnpOHa nepeDaay KaIbOpy.
(*)Pexum Ipa moke 6ymu hedocmynHUM 3aJeXHO biD nomouho bu6opy dxepena.
Kohtpact:BcTaHOBJIIOCTbC83HaueHHcBITINX i TEMHIX BiTiHKiB 3O6paJxehn.
RckpaBicTB: BCTaHOBNIIOEbC8 3HaueHnraRCKpaBOcTi 3o6paXeHH.
YitKictb: BcTaHOBIOEtbcra pibeHb yITKOCTi. BnCOke 3HaueHHa YITKOCTi MoKe 3po6ntu 3o6paXeHHa 6IbU qITKIM Ta aCHM, 3aJIexHo BiD KOHTeHTy.
KoJIp: BcTaHOBJIIOeTbCra 3HaueHHa KOnbOpy.
PiicbivbaHH: PeryIooetbcraACKpaBictb niCbiuyBaHH. FyHKciPiCbiuyBaHH 6yde BIMKHeHa, kio npaMeTp pexmy 36epexeHH eheprii BCTaHOblno B 3NaueHH, BiMInHe Bi HactpoobAHn.
NapaMeTpN 3ByKy
IyHicTB: Perynioetbcra pBeHb ryHocTi.
EKBaIaI3ep:BcTaHOBIIeTbcpeKIM eKBaIaI3epa.
Banahc: PeryIIOeTbc8 6anaHc 3Byky mix npaBm i nibm dHaMikam.
Habywnku: BcTaHOBIOe pBeHb rYHocTi B Habywnkax. Uen npaMeTp 6yde HeakTNBHM, A KUO npaMeTp HabywnKn/IIHHN BuXiD BCTaHOBNEHO B3HaueHHJIHHN BuXiD.
Pexm 3Byky: BctaHOBIOCTbCpexm BiTBOpeHH 3Byky.
Функця AVL: BctaHOBIOCTbCЯ 6mexeHHaMaKcImaJIbHOI rYHOCTi.
HabyuHnKn/IIiHnBnXid:KIO BV BnKOpNCToByTe HabyuHnKn, cIe NapaMeTp cIiD BCTaHOBNTuB 3HaueHHa HabyuHnKn, a KIO DO rH3da dJa Ha-byuHnKiB nID'EDHaHm 3OBHiuHi NiDCNIIOBaU, cei napaMeTp cIiD BCTaHOBHTu B 3HaueHHa LiHnBuXid.
DnhamiHn 6ac: YBIMKHeHHa 6o BUMKHeHHa HAMiHnx Hn3bKnx YactOT. NocuHoeTbcra 6acobn diana3OH 3ByaHHa.
Ucpobn Bxid: 3aadaetbcra Tnp UcfoPORo BHXOy ayioocnHaIy.
HanaatybannnapametpiB 6aTbKIBcKoro KOHTpOIO.
Lc fyHKci npn3NaeHa dna o6mExeHHdoCTyn do Bn6paHOro 3miCTy. DocTy n KepyeTbcra o6paHm Bamn NiH-KODom. Li hanaTuBaHHra 3hAxOJaTBcB MaHIO HanaTuBaHH> BaTbKIBCkN KOHTpOJIb.
3ayexhen: PIN-ko 3a ymoaHnM - 000 a6o 1234. Kuo bu ecmahobunu PIN-kod (eumaaembcra 3aneKHO iD kpaIHU) npoueci Noyamkooi ycmaoheku, ukuopucmoeyume cmaHOeHu PIN-KoD.
IeRki onuio moxymb 6mu HeodocmynHi 3anexHo bId KpaHn, bu6paHOi nid yac Noyamkooi ycmaHOeKu.
БлOKуВаHHЯ MeHIO: HacTpoiKN 6IOKyBaHHЯ MeHIO BMKAHOb a6O BMNKaOTb DoCTyn DO MeHIO.
Bikobe obmexeHHa (doatkoBO): Kzio cei napametp yBIMKHeH, BiD TelemOBHO CTAHii
y TeIeBi3Op 6yde HAnxOuNTn iHΦopMaucij npo BiKObe 6mExeHHnpeRJy neBnX KaHaJIb, I kso DnB ViNobiDHorO BIKy nepErlaD neBHorO KaHany 3a6OpOHeHn, DocTyn Do cboRo KaHaNy BIMNKaCTbcra.
3axnCT BiD Doctyny DiteN (doaTKOBO): KUo BCTaHOJIeHOp npametp 3axnCT BiD DiTeN, KepyBaHHr TeJIeBI3OpOM MOKINBO TiIbKn 3a DOIOMORIO NylbTa DInCTaHcIIHorO KepyBaHH. B cIbOMy BUNaIK Ky KHONKn NylbTa ynpablnHH He cyHKIOHyBaTmMyTb.
Пд КОНТРОЕМ (ДОДАТКОВО) Рей понк ВIDКрИВа e a6o 3akpINAe ДocTyn DoпeВиx ДОДАТКIB MHEG. I6b BIDKpTN 3a6lOKOBaHI DoDAТКI, cIiD BBecTи npabINbHni PIN-KoI.
YcTaHOBka PIN-KoMy:BcTaHOBJIIOEeTbcra HObni PINKOd.
PIN-KoD CICAM 3a 3amOByBaHHaM: LcHnapameTp BiO6paXaEbCra cipm y pa3i, kKIO y cNoTI CI TeIeBI3opa He BCTaBHeN JODH N MOyJIb CI. 3a DonomoroTO UBOrO npaMeTpa MoxHa 3MiHHTu BCTaHOBHeHn 3a 3amOByBaHHaM PIN-KoD CI CAM.
EneKtpoHHn TeeneriD (EPG)
Dea KaHaPi nepeaToB iHOpMaio npo Cbi Po3Knad MOJIeHHa. 06 nepeIyTu MeHIO EKeTPOHH TeIerId, HATNCHTb KONky EPG.
E doctynm 3 BnD n ctpktypn BiO6paXeHn po3- knaI nporpam: XpoHOJorUHn po3KnaI, Cncoc nporpam Ta IotoUHa/HactynHa nporpama. IJIa nepemikahn MIX HmN dOpumyItec iHCTpyKcii Ha ekpaHI.
XpoHoiIoriyn po3KnaI
36inbweHn (XOBTA KhONka):HaTnCHiTB XOBTy KhoNky, 0o6 no6aHTn nOdiB Wnpwomy Yacobomy iIncepBani.
ΦiNbTp (CINHЯ KhoNka) Npernay napametpiB φiNbTpaui.
Bn6ip xahpy (KhONKa SUBTITLES): BiDopaaKxAeTbCmHIO Bn6ip xahpy. 3a DOnomoroU cieiФyHKuIMMOXHa 3dIChHOBaTN NOyuk y 6a3i DaHnx DOBIDHnka nporpam BiIDNOBIDHO Do XaHpy. Byde BNKOHaHO NOwYk DOCTynHO iHΦopMaui y DOBIDHky nporpam Ta BnDiJeHi pe3yJbTaTN, 0o BiIDNObIAHO TB BaWIM KpntepiM.
Iapametpn (Khonka OK): BiO6paXaEcTbc8 iHopmaucia npo nepedauly.
InΦopMaúri npo nepeáyu (Khônka INFO): BiDópbαKaæTbcra doknaHa iHΦopMaúri npo obopaHi nepeáu.
HacTynnn/nonepeDeni DeHb (KHOKN Pporpama +/-): BiO6paKaTbcN nepenik nepedau nonepeHboRo a6o HactynHoro dHra.
No pyk (Khonka TEXT): BiDobpaKae MeHIO NpUyK no nporpami.
3apa3 (KhONka SWAP): BiOobpaKaεTbcγ noToUHa nepeaça πiCbiyeHoro kaHany.
Cnncok nporpaM\*
(*) Y pa3i ubozo bapiAhmy cmpykmypu iidoobpaxa- cmbcra nepenik nepedau minbku bu6paHOZO kaHany.
PonepeHni yacobn npomixok (YEPBOHA KhoNka): BiO6paKaTbcn nepeJIk nepeDau nonepeHbOrO yacOBoro npomixky.
HacTynnn/nonepedni DeHb (KhONKn Pporpama +/): BiO6paKaTbcN nepenik nepedau nonepedHbo ro a6o HactynHoro dHra.
Infopmaia npo nepedauy (Khonka INFO): Bi do6paxkaetbca doknaHa Infopmaia npo obahi nepedaui.
ΦiNbTp (KhONKa TEXT): Npepernay napametpiB φiNbTpaui.
HacTyNHn YacOBn npomixkO (3EJIeHA Khonka): BiO6paKaεTbcN nepenik nepeauch HacTyHoro acoboro npomixky.
Iapametpn (Khonka OK): Biio6paXaTbcra iHopmaizipno nepedauly.
ItoTuHa/HacTynHa nporpama
Habiraia (KhONKn 3i cTpiIOvKaMn):ДЯ nepexOdy MIX KaHaJaMaN Ta nepeDaayam N KOpIcTuYTeCry KHO- nKaMn HAnpMyk.
Iapametpn (Khonka OK): BiO6paXaEcTbc8 iHOpMaucia npo nepedauly.
InΦopmaiznpo npepaqy (KhONka INFO): BiDobpaxaetbca DOKnaHa InΦopmaiznpo obahi nepeaqi.
ΦiNbTp (CINHЯ KhoNka) PererIa napametpiB φiNbTpaui.
Papametprn nepeaui
B MeHIO ENeKToHHN TeJIeI HaTnCHiTB KHOKNy OK i yBiNdIb y MeHIO Napametpn nepeaqi.
Bn6ip kaHany: 3a DonomoroU cIbO rpeKmU MeHIO EneKtpoHHN TeJIiD MoXHa nepeTn Do o6paHOrO kaHany.
BcTaHOBN TaMep Ha nepeaCy/BuaNT TaMep Ha nepeaCy: Picn Bn6opy nepeaCy IMeHIO EneKtpoHHN TeIerId HATNCHTb KhoNKy OK. OBeipTB npametp BcTaHOBN TaMep Ha nepeaCy i HATNCHTb KhoNKy OK. Bu MoKeTe BcTaHOBN TaMep Ha maBcyTHIO nepeaCy. Uo6 ckacyBaTN BxE 3aIIaHOBAHNI 3aNNC, oBeipTB nepeaCy Ta HATNCHTb KhoNKy OK. Notim oBeipTB NyHKT BuaNT TaMep Ha nepeaCy. TaMep bye BiMiHeNo.
OHOBJIeHHI3 TeJIeBi3opa
Iio6 BiO6pa3nTn NotouHy Bepciu nporpamHoro 3a-6e3neueHH, nepeiDb y roJIOBHe MeHIO i Bn6epiTB nyHKT HanaWtYBaHH > Binbwe.
YBAGA: He ecmaHOeIOme Huxuy 3a nomouHy epcio npoaspamH2O 3abe3neueHHy. TP Vision He Hece bIDnoiidaIbHocmi 3a npo6nemu, uO BuHuknU
8nacniidok 8cmahoeHnna nonepedhix bepciu npo2pamnozo 3a6e3neueHH.
OHOBJeHHI3 3 USB
IpeD noaTkom OHOBHeHHn IporpamHoro 3a6e3ne-ueHHn nepeKoHaTeC8, y Bac e:
- USB-npncptpi dny 36epiraHHra daHnx 06'emom npnhaMHI 256 mera6aHT nckOBoro npoctopy, BiΦopMaTOBaHn y faINOby cncTeMy FAT32 a6o DOS, 3 BmKHeHM 3axNCTOM BiD 3anCy.
-ДocTyнdoКOMn'IoTepa3nopTomUSBiDocTyndo IntepHeTy
Ipeenitb 3a aDpecoo www.philips.com/support i doTPmMyTecb iNCTpyKuii oOdo OHOBHeHn nporpaMHoro 3a6e3neuHn.
ABTomatnue OHOBHeHHa 3 ufoBux KaHaJIb
BnKohyeTbcra nicna nidKnHoueHHa TeNeBi3opa do aHTehHOro cHrHany. KaIIO npametp ABTomatuHe cKaHyBaHHa B MeHIO NapameTpno OHOBHeHH BCTAHOBHeHO B 3HaueHHa YbIMKHeHO,TeNEbi3Op BHXoNTb i3 peXmU chy o 03:00 i BMkAcTbcra nowyk KaHaJIIB MOBHeHH dJa 3aBaHTaKeHHa OHOBHeB. KaIIO 6yde 3HaJDeHO Ta ycPiUHO 3aBaHTaKeHO HOBe nporpaMHe 3a6e3neueHHa,nicra HAcTyHNO rYbIMKHeHH JxNBHeHHa Y TeNEbi3Opi Bxke 6yde BCTaHOBHeHa HOBa Bercia nporpaMHorO 3a6e3neueHHa. Uo6 BiIDKPITMu MeHIO NapameTpno OHOBHeHHa, yBi- DITb B MeHIO HanaTuBaHH > BInbwe,BuDinitb nyHKt OHOBHeHH nporpaMHorO 3a6e3neueHHa Ta HATNCiTB KhoNky OK.
3aybaKeHH: He bID'edHyUme meNeBisOp bID MepeKi nioac nepe3aHaMaJKeHH - noku 6nUmAc iDukamop. RaKo meNeBisOp He EMukaemcbn icNoHOeJIeHH, Bumkhimb uO2o Ha 2 xeunuH ma BBIMKHmb 3HOy.
Iouyk i ycyhennHa HecnpaBHOCTe Ta peKoMeHdaui
Tenebi3Op He BmkaCTbca
IpekoHaTeC, 0u wHyp KNBHeHHaHIO nIDeHaHn Do po3eKn. IpekoHaTeC, 0o 6aTapei He BuChaxKeHi. HATNCHTb KONKy XNBHeHHa TeneBi3opi.
Hn3bka kicTb 306paXeHHa
- IpekeohaTeec, 0o Bn6paHa npabnIbHa TeIeBi3iHa CnCTema.
- Hn3bKni piBHeH cnHaNy MOKe BnKJIInKaTn CNOTBOpeHHa 3o6paXeHHa. IpeBipTe aHTehy.
- IpepeBipTe npaBnIbHiCTb YacTOn KaHaNy (B pa3i pyHoi' HacTpOuKn).
3o6paXeHHa MoKe nOripuNTnCra, RaUo Do TeJIeBi3Opa OAnOuaCHO NiKlIOueHi DBA 3OBHIuHIX npIcTpoi. Ycbomy pa3i CnID BiDKNIOHTn OOnH i3 3OBHIuHIX npIcTpoIB.
BiDcyTHc 306paXKeHHa
- Lc e 03haue, 1o TeIeBi3Op He npuMaec HiaKoro cnHany. NepekoHaTecr, 1o Bn6paHe npaBnIbHe dxKepeNo.
- ANTeHa npueHaHa npabnIbHo?
- ηn He noIWKoJKeHn aHTeHn Ka6eJIb?
-Для пд'еднанна anTeHn BnKOpncTOBycTbCЯ npaBnIbHi po3'emN?
Bpa3i cymHIBIB 3BepHiTbcra do cboro noctaunb-Hnka.
BiCyTHi3ByK
- PepekoHaIteCra, 3yK Ha TeJIeBi3Opi He BmKHeHn. HATNCHTb KONKy BmKHeHHa603iNbWntb rYHICTb.
3Byk yTuN IuWe 3 OOnHO DNHaMiKa. NpeBipTe HanaStTyBaHn8 6aHaHCy B MeHIO 3ByK.
IyIbT dNCTaHciiHOro KepyBaHHra - He npauOc
MoxjInBo, po3pndnnc 6aTapei. 3amHItb 6aTapei.
Hemoxnbo 6paTn DxepeNo BXiDHoro cnHa-ny
-Якwo Bn He Moxe Te Bn6paTn DxepeNo BXOy, MOxNIBO, BiDcyTHi NiDKHIOUeHi npIcTpoI. Kaio Hi:
- IpepebiTe Ka6eni Ta nID'edHaHnA ayIO-BiDeo, kUO Bu HAMaraTeCra nepEMKHyTncr Ha DKepeNo BxIDHO To CnHany, 0o BiINOBiAc nID'edHaHOMy pnpCTpOHO
.
TexHiChi XapaKTepeNCTnKN
g06/111i: 1u Uuuu uuuu uuuu uuuu uuuu uuuu
(1)
OK: kki i 1i
i
aal cai aal yaiy ai tll g s iie cai gao galic:
(ailll)
aill bll l 1:
y
gill.
g j 1
yj jy r/pv ydo jocail (Lai:
aaiii
Jus 12a aagaiy jia aal yd g d iall gic 12
L USB jg jia aal gaiy 12
aill jay jay jay jay jay jay jay jay jay jay jay jay jay jay jay jay jay jay jay jay jay jay jay jay jay jay jay jay jay jay jay jay jay jay jay jay jay jay jay jay jay jay jay jay jay jay jay jay jay jay jjay jay jay jay jay jay jay jay jay jay jay jay jay jay jay jay jay jay jay jay jay jay jay jay jay jay jay jay jay jay jay jay jay jay jay jay jay jay jay jay jay jay jay jay jay jay jayj
"bin.mb9v
a USB
"5-0-5-1-Menu"" aieeall ie gao
OK le baiol oeiy1 jie, jaiill Jj j plsiuily duiiia biin
y
Jg jalilill kill. gjll dkiail
a 1000 1000 1000 1000 1000 1000 1000 1000 1000 1000 1000 1000 1000 1000 1000 1000 1000 1000 1000 1000 100
j jiall pliswU j jiall
AeBaa
J 100000000000000000000000000000000000000000000000000000000000
slll 111. jki Jj 111. jai jai jai jai jai jai jai jai jai jai jai jai jai jai jai jai jai jai jai jai jai jai jai jai jai jai jai jai jai jai jai jai jai jai jai jai jai jai jai jai jai jai jai jai jai jai jai jai jai jai jali kJ 111. 111. 111. 111. 111. 111. 111. 111. 111. 111. 111. 111. 111. 111. 111. 111. 111. 111. 111. 111. 111
aIg o jai
jj
Gall 11111111111111111111111
Cec HDMI Jd jz bia 1.
CEC Jz Jz d ic Jsall CEC
Jz Jz Jz Jz Jz Jz Jz Jz Jz Jz Jz Jz Jz Jz Jz Jz Jz Jz Jz Jz Jz Jz Jz Jz Jz Jz Jz Jz Jz Jz Jz Jz Jz Jz Jz Jz Jz Jz Jz Jz Jz Jz Jz Jz Jz Jz Jz Jz Jz Jz Jz
gus 1j jall oia gusll acl! sia jn jalil pc y
/ogull Jaaiua) gssal plbi jyjalll Jlsl Jldy . (cIeIaill pbi j. gial
Gall jg jy jolll y aai s jll o n g k l
111111111111111111111111 1111111111111111111111
Gall jg jia) jgsa jgsa jgsa jgsa jgsa jgsa jgsa jgsa jgsa jgsa jgsa jgsa jgsa jgsa jgsa jgsa jgsa jgsa jgsa jgsa jgsa jgsa jgsa jgsa jgsa jgsa jgsa jgsa jgsa jgsa jgsa jgsa jgsa jgsa
gall jn jy jilll g 1jaiu/iaa aieiy jy jiall oj jay jaliill 2j ne jaiill d 2g jaiiy
pS p. igall piao ie jall-olac y-lbillai i g tclaw
plbi jao sall n 30s 2g jy jy jy jy jalll cclaw g
. Jgall
bui yiu yiu yiu yiu yiu yiu yiu yiu yiu yiu yiu yiu yiu yiu yiu yiu yiu yiu yiu yiu yiu yiu yiu yiu yiu yiu yiu yiu yiu yiu yiu yiu yiu yiu yiu yiu yiu yiu yiu yiu yiu yiu yiu yiu yiu yiu yiu yiu yiu yiu yu
jai 1
olilj o jssll
J 1
ailll gailll aagglgssi. gialll gialll ggbwysy: gialll gialll
uusia jie jie ie jie aalall jis lla iiauuiu .Custom
gall
1 1 1 1 1 1 1 1 1 1 1 1 1 1 1 1 1 1 1 1 1 1 1 1 1 1 1 1 1 1 1 1 1 1 1 1 1 1 1 1 1 1 1 1 1 1 1 1 1 1 1
Jiaiall gall baiy:glal
AVL
J 11 J 11 aclaw 11 11 11 11 11 11 11 11 11 11 11 11 11 11
. 1000000000000000000000000000000000000000
:
y
y 11111111111111111111111111111111111
必须 a^2 ≥ 0
121.142 1 1 1 1 1 1 1 1 1 1 1 1 1 1 1 1 1 1 1 1 1
Jcilll (llll llaie llb) 1
Aissss sll sslls
J 1
aill jai jai jai jai jai jai jai
1glllglll/1yJg,aaalal Jgagaaalj
Aaiill Jaiilge Caiailll gaiy jayill
juliu jujui
jigssll jdaai gaiil gaiie
| النبات الحرفية | PAL BG/DK/II ‘SECAM BG/DK/LL |
| سيلة الحرفية | عربية) I/III). UHF ماء) VHF U). HYPERBAND |
| سيلة الحرفية | الصعة(/)/(الصعة/الصعة/الصعة) (DVB-T/C/S) ماء (DVB-T2 ماء) |
| الصعة/الصعة/الصعة | ... |
| الصعة/الصatoria | عيرسحال صعة |
| RFيّلّة | ( نورملاير بعس) VO |
| فَبْزَة | 0. . . . . . . . . . . . . . . . . . . . . . . . . . . . . . . . . . . . . . . . . . . . . . . . . . . . . . . . . . . . . . . . . . . . . . . . . . . . . . . . . . . . . . . . . . . . . . . . . . . . .. رطيرز |
| الصعة | German+Nicam Stereo |
| سيلة الحرفية! EXERCISE (THD % · ) (.WRMS) | 2x8W |
| الصعة/الصatoria | 75W |
| (مُّلَن) | 11,60 |
| الصعة/الصatoria (مُّلَن) (مُّلَن) (مُّلَن) (مُّلَن) (مُّلَن) (مُّلَن) (مُّلَن) (مُّلَن) (مُّلَن) (مُّلَن) (مُّلَن) (مُّلَن) (مُّلَن) (مُّlc) | 220 x 1112 x 691 |
| الصatoria | 60/91 x 1112 x 653 |
| الصatoria | 49" (124 cm) |
| الصatoria (الصatoria (الصatoria (الصatoria (الصatoria (الصatoria (الصatoria (الصatoria (الصatoria (الصatoria (الصatoria (الصatoria (الصatoria (الصatoria (الصatoria (الصatoria (الصatoria (الصatoria (الصatoria (الصatoria (الصatoria - - - - - - - - - - - - - - - - - - - - - - - - - - - - - - - - - - - - - - - - - - - - - - - - - - - - - - - - - - - - - - - - - - - - - - - - - - - - - - - - - - - - - - - - - - - - - - - - - - - - - |
J 1
| الإستعمال | الترجمة | الترجمة |
| 1 | x350 مgréان 85 | |
| 2 | x400 مgréان 70 | |
| 3 | x480 مgréان 60 | |
| 4 | x480 مgréان 66 | |
| 5 | x480 مgréان 72 | |
| 6 | x480 مgréان 75 | |
| 7 | x480 مgréان 85 | |
| 8 | x600 مgréان 56 | |
| 9 | x600 مgréان 60 | |
| 10 | 0x600 مgréان 70 | |
| 11 | 0x600 مgréان 72 | |
| 12 | 0x600 مgréان 75 | |
| 13 | 0x600 مgréان 85 | |
| 14 | 2x624 مgréان 75 | |
| 15 | 24x768 مgréان 60 | |
| 16 | 24x768 مgréان 66 | |
| 17 | 24x768 مgréان 70 | |
| 18 | 24x768 مgréان 72 | |
| 19 | 24x768 مgréان 75 | |
| 20 | 24x768 مgréان 85 | |
| 21 | 1152x864 | م的经典 60 |
| 22 | 1152x864 | م的经典 70 |
| 23 | 1152x864 | م的经典 75 |
| 24 | 1152x864 | م的经典 85 |
| 25 | 1152x870 | م的经典 75 |
| 26 | 30x768 مgréان 60 | |
| 27 | 30x768 مgréان 60 | |
| 28 | 30x768 مgréان 75 | |
| 29 | 30x768 مgréان 85 | |
| r. | 80x960 | م的经典 60 |
| r' | 80x960 | م的经典 75 |
| r" | 80x960 | م的经典 85 |
| r" | 1280x1024 | م的经典 60 |
| r" | 1280x1024 | م的经典 75 |
| r" | 1280x1024 | م的经典 85 |
| r" | 1400x1050 | م的经典 60 |
| r" | 1400x1050 | م的经典 75 |
| r" | 1400x1050 | م的经典 85 |
| r" | 40x900 | م的经典 60 |
| r. | 40x900 | م的经典 75 |
| r" | 1600x1200 | م的经典 60 |
| r" | 1680x1050 | م的经典 60 |
| r" | 1920x1080 | م的经典 60 |
| r" | 1920x1200 | م的经典 60 |
| الصباح | الإستعمال | الترجمة | |
| EXT(SCART) | PAL O | ||
| SECAM O | |||
| NTSC, , , , | O | ||
| NTSC', , , | O | ||
| 7. / 0 . RGB | O | ||
| الترجمة AV | PAL O | ||
| SECAM O | |||
| NTSC, , , | O | ||
| NTSC', , , | O | ||
| کانوره YPbPr | \( \text{€} \cdot p, \text{€} \cdot i \) | ملاويت O | |
| \( \text{€} \cdot \text{p}, \text{€} \cdot \text{i} \) | ملاويت O | ||
| \( \text{€} \cdot \text{p} \) | \( \text{€} \cdot \text{Hz}, \text{€} \cdot \text{Hz} \) | ||
| 1. \( \text{€} \cdot \text{i} \) | \( \text{€} \cdot \text{Hz}, \text{€} \cdot \text{Hz} \) | ||
| HDMI | \( \text{€} \cdot \text{p}, \text{€} \cdot \text{i} \) | ملاويت O | |
| \( \text{€} \cdot \text{p}, \text{€} \cdot \text{i} \) | ملاويت O | ||
| \( \text{€} \cdot \text{p} \) | \( \text{€} \cdot \text{Hz}, \text{€} \cdot \text{Hz} \) | ||
| 1 \( \cdot \) A \( \cdot \) i | \( \text{€} \cdot \text{Hz}, \text{€} \cdot \text{Hz} \) | ||
| 1. \( \cdot \) A \( \cdot \) p | \( \text{€} \cdot \text{Hz}, \text{€} \cdot \text{Hz} \) | O | |
| dat, vob. | /MPEG' | Mbps 4 - r - fps@1 . . . P |
| mpg, .mpeg. | ,MPEG' MPEG' | |
| ts, .trp, .tp. | ,MPEG' AVS, ,r.h.MVC | :Mbps MVC 4 - r - fps@1 . . . P ,Mbps 4 - r - fps@1 . . . P x r : r.h 4 - Mbps - r - fps@1 . . . P : Mbps Other 4 - r - fps@1 . . . P |
| ,mov, .mpz, rgp, rgpp. | ,MPEG' ,r.h,MPEG' Motion ,r.hJPEG | |
| avi. | ,MPEG' ,MPEG' Sorenson ,r.h,r.h ,WMVr,r.h Motion JPEG | Mbps Motion 4 - r - fps@1 . . . P ,Mbps 4 - r - fps@1 . . . P x r : r.h Mbps 4 - r - fps@1 . . . P : Mbps Other 4 - r - fps@1 . . . x r : JPEG |
| mkv. | ,MPEG' ,r.h,MPEG' ,WMVr,r.h Motion JPEG | |
| asf. | Sorenson ,r.h,r.h Motion ,WMVrJPEG | |
| flv. | WMVr | Mbps 4 - r - fps@1 . . . P |
| swf. | RVr./RVr· | Mbps 4 - r - fps@1 . . . P |
| wmv. |
USB gagla jgall cia
| سيرة الحد | العربية (عربية* محيى) وبيادت | الإستعمال | |
| JPEG | خانلانيس | 1047.x78. | DRAM محيى بعس علاء |
| الإستعمال | 1.48xV7A | ||
| PNG | ب直升 نشامبilib | 97...x78... | |
| م.... شامبilib | 17...x78... | ||
| BMP | 97...x78... | ||
| USB | |||
| الإستعمال | الإستعمال محيى بور صبياني | الإستعمال | |
| ,mpr. | \(^\dagger\text{舌}\)Kbps~Kbps | \(^\ddagger\text{KHz}\sim\text{17}^{\text{KHz}}\) | |
| \(^\dagger\text{舌}\)Kbps~Kbps | |||
| avi. | \(^\dagger\text{舌}\)Kbps~Kbps | \(^\ddagger\text{KHz}\sim\text{17}^{\text{KHz}}\) | |
| \(^\dagger\text{舌}\)Kbps~Kbps | |||
| \(^\dagger\text{Kbps}\sim\text{17}^{\text{KHz}}\) | |||
| AAC,HEAAC | \(^\ddagger\text{KHz}\sim\text{17}^{\text{KHz}}\) | ||
| WMA | \(^\ddagger\text{Kbps}\sim\text{17}^{\text{Kbps}}\text{KHz}\sim\text{17}^{\text{KHz}}\) | ||
| Pro M·1·WMA | \(^\ddagger\text{Kbps}\sim\text{17}^{\text{KHz}}\) | ||
| Pro M·1·WMA | \(^\ddagger\text{Kbps}\sim\text{17}^{\text{KHz}}\) | ||
| Pro M·1·WMA | \(^\ddagger\text{Kbps}\sim\text{17}^{\text{KHz}}\) | ||
| LPCM | \(^\ddagger\text{Mbp}\sim\text{17}^{\text{Kbps}}\text{KHz}\sim\text{17}^{\text{KHz}}\) | ||
| IMA-ADPCM,MS-ADPCM | \(^\ddagger\text{Kbps}\sim\text{17}^{\text{KHz}}\) | ||
| A/mu-law G'V' | \(^\ddagger\text{Kbps}\sim\text{17}^{\text{Kbps}}\text{KHz}\) | ||
| asf. | \(^\dagger\text{舌}\)Kbps~Kbps | \(^\ddagger\text{KHz}\sim\text{17}^{\text{KHz}}\) | |
| \(^\dagger\text{舌}\)Kbps~Kbps | |||
| WMA | \(^\ddagger\text{Kbps}\sim\text{17}^{\text{Kbps}}\text{KHz}\sim\text{17}^{\text{KHz}}\) | ||
| Pro M·1·WMA | \(^\ddagger\text{Kbps}\sim\text{17}^{\text{KHz}}\) | ||
| Pro M·1· WMA | \(^\ddagger\text{Kbps}\sim\text{17}^{\text{KHz}}\) | ||
| Pro M·1·WMA | \(^\ddagger\text{Kbps}\sim\text{17}^{\text{KHz}}\) | ||
| mkv.,mka. | \(^\dagger\text{舌}\)Kbps~Kbps | \(^\ddagger\text{KHz}\sim\text{17}^{\text{KHz}}\) | |
| \(^\dagger\text{舌}\)Kbps~Kbps | |||
| ACR | \(^\ddagger\text{Kbps}\sim\text{17}^{\text{Kbps}}\text{KHz}\),\(^\ddagger\text{KHz}\sim\text{17}^{\text{KHz}}\) | ||
| AAC,HEAAC | \(^\ddagger\text{KHz}\sim\text{17}^{\text{KHz}}\) | ||
| WMA | \(^\ddagger\text{Kbps}\sim\text{17}^{\text{Kbps}}\text{KHz}\sim\text{17}^{\text{KHz}}\) | ||
| Pro M·1·WMA | \(^{\ddagger\text{Kbps}\sim\text{17}^{\text{KHz}}}\) | ||
| Pro M·1·WMA | \(^\ddagger\text{Kbps}\sim\text{17}^{\text{KHz}}\) | ||
| Pro M·1·WMA | \(^\ddagger\text{Kbps}\sim\text{17}^{\text{KHz}}\) | ||
| VORBIS | \(^\ddagger\text{KHz}\text{Up to}\) | ||
| LPCM | \(^\ddagger\text{Mbps}\sim\text{17}^{\text{Kbps}}\text{KHz}\sim\text{17}^{\text{KHz}}\) | ||
| IMA-ADPCM | \(^\ddagger\text{Kbps}\sim\text{17}^{\text{Kbps}}\text{KHz}\sim\text{17}^{\text{KHz}}\) | ||
| MS-ADPCM | |||
| A/mu-law G'V' | \(^\ddagger\text{Kbps}\sim\text{17}^{\text{Kbps}}\text{KHz}\) | ||
| FLAC | \(^\ddagger\text{Mbps}\sim\text{17}^{\text{Kbps}}\text{KHz}\sim\text{17}^{\text{KHz}}\) | ||
| ts.,trp.,tp.,.dat.,vob.,.mpg.,.mpeg. | \(^\ddagger\text{舌}\)Kbps~Kbps | \(^\ddagger\text{KHz}\sim\text{17}^{\text{KHz}}\) | |
| \(^\ddagger\text{舌}\)Kbps~Kbps | |||
| ACR | \(^\ddagger\text{Kbps}\sim\text{17}^{\text{Kbps}}\text{KHz}\),\(^\ddagger\text{KHz}\sim\text{17}^{\text{KHz}}\) | ||
| EACR | \(^\ddagger\text{Mbps}\sim\text{17}^{\text{Kbps}}\text{Kbps}\) | ||
| AAC,HEAAC | \(^\ddagger\text{KHz}\sim\text{17}^{\text{KHz}}\) | ||
| LPCM | \(^\ddagger\text{Mbps}\sim\text{17}^{\text{Kbps}}\text{KHz}\sim\text{17}^{\text{KHz}}\) | ||
| wav. | ### | ### | ### |
| ### | ### | ||
| ### | ### | ||
| LPCM | ### | ### | |
| ,IMA-ADPCM | ### | ### | |
| MS-ADPCM | ### | ### | |
| A/mu-law GY11 | ### | ### | |
| rgp.,rgpp. mov.,.mp4. .m.a | ### | ### | ### |
| ### | ### | ### | |
| ACR | ### | ### | |
| EACR | ### | ### | |
| AAC,HEAAC | ### | ### | |
| VORBIS | ### | ### | |
| LPCM | ### | ### | |
| ,IMA-ADPCM | ### | ### | |
| MS-ADPCM | ### | ### | |
| A/mu-law GY11 | ### | ### | |
| flv. | ### | ### | ### |
| AAC,HEAAC | ### | ### | |
| acr. | ACR | ### | ### |
| AAC,HEAAC | ### | ### | |
| swf. | ### | ### | ### |
| ecr. | EACR | ### | ### |
| rm.,.rmvb.,. .ra | AAC,HEAAC | ### | ### |
| (LBR(cook) | ### | ### | |
| wma.,.wmv. | WMA | ### | ### |
| Pro M·1·WMA | ### | ### | |
| Pro M1·WMA | ### | ### | |
| Pro M1·WMA | ### | ### | |
| webm. | VORBIS | ### | ### |
USB
| الترجمة الحرفية الحرفية الحرفية | ||||
| الإستعمال | عربية | منزدانيالترجمة | ||
| dat, mpg, MPEG, vob | MPG, MPEG | DVD ↓ � � � � � � � � � � � � � � � � � � � � � � � � � � � � � � � � � � � � � � � � � � � � � � � � � � � � � � � � � � � � � � � � � � � � � � � � � � � � � � � � � � � � � � � � � � � � � � � � � � � � --- � � � � � � � � � � � � � � � � � � � � � � � � � � � � � � � � � � � � � � � � � � � � � � � � � � � � � � � � � � � � � � � � � � � � � � � � � � � � � � � � � � � � � � � � � � � � � � � � � � � ― � � � � � � � � � � � � � � � � � � � � � � � � � � � � � � � � � � � � � � � � � � � � � � � � � � � � � � � � � � � � � � � � � � � � � � � � � � � � � � � � � � � � � � � � � � � � � � � � � � � {\tt �} � � � � � � � � � � � � � � � � � � � � � � � � � � � � � � � � � � � � � � � � � � � � � � � � � � � � � � � � � � � � � � � � � � � � � � � � � � � � � � � � � � � � � � � � � � � � � � � � � � � mp‡ | MT‡ | DVB ↓ � � � � � � � � � � � � � � � � � � � � � � � � � � � � � � � � � � � � � � � � � � � � � � � � � � � � � � � � � � � � � � � � � � � � � � � � � � � � � � � � � � � � � � � � � � � � � � � � � � طَبَسَفَسَنَتُ †-UTF |
| mkv | MKV | ASS SSA http://www.mkv.org/VobSub DVD ↓ � � � � � � � � � � � � � � � � � � � � � � � � � � � � � � � � � � � � � � � � � � � � � � � � � � � � � � � � � � � � � � � � � � � � � � � � � � � � � � � � � � � � � � � � � � � � � � � � � � | ||
- Important
- Disposal of old Equipment and Batteries
- Remote Control
- Teletext
- Digital teletext
- Notifications, features and accessories
- Energy efficiency
- TV scroll button
- To change channel:
- To change source:
- Notes:
- Switching on/off
- To switch the TV on
- To switch the TV off
- First time installation
- Digital Aerial installation
- Digital Cable installation
- Analogue installation
- Play media files from a USB drive
- CEC
- System Audio Control
- Change TV settings
- Display options
- Sound options
- Configuring parental settings
- Electronic program guide (EPG)
- Timeline Schedule
- List Schedule\*
- Now/Next Schedule
- Event Options
- Update your TV
- Update with USB
- Automatic update from digital broadcast
- Troubleshooting & Tips
- Tv will not turn on
- Poor picture
- No picture
- No sound
- Remote control - no operation
- Input sources - can not be selected
- PC input typical display modes
- Supported Subtitle File Formats for USB Mode
- Coepxahne
- Baxxho
- NylbT dncTaHcNoHHoro ynpaBneHn
- TeJIeTeKCT
- UnpoBOn TeIeTeKCT
- YBeDOMIeHn,ФyHKuNn nakceccyapbl
- 3Heproc6epexeHne
- KhoNka npokpyTkTeJeBn3opa
- IpekeJIIOUeHne KaHaJIOB:
- IpeekluoyeHne nctouhka:
- PpumeyaHua:
- BkIIOUeHne/BbIKIOUeHne
- Yto6bl BkIIOuHTb TeJIeBN3Op
- 4To6bl BbIKNIOuHTb TeJeBN3Op
- IepBa yctaHObKa
- 3BykoBoe ynpaBHeHne cHCTeMoI
- I3MeHeHHe HAcTpoE TeJIeBn3opa
- OTo6paXaet onZnN
- OnmN 3Byka
- 3JIeKtpoHHa nporpaMma nepea (EPG)
- ГрафNK Временношкалы
- A B T O M A T N U E C K O E O B H O B L E H N E C U N F P O B O Y C T A N C N T E J E B E U S A H N I
- IOnck uycTaPahHeHne HncnPaBHOCTeN peKoMeHdaZu
- TeIeBn3Op He BkJIouaetcA
- Hn3koe kaueCTBO n3o6paXeHna
- OTcyTCTByeT n3o6paXeHne
- HeT 3Byka
- HeBo3MOxHo BbI6paTb NCTOuHnK BXoHOrO cnHaJa
- Digital antennainstallation:
- Digital kabelInstallation:
- Installation analogue
- Hendelsesalternativer
- Oppdatere din TV
- Baxnbo
- Ytulizacia craporo 6bnaHaHnTa 6aTapei
- NytDnctaHIOHOKepyBaHH
- TeJeteKCT
- UΦpOBu TeJeTeKCT
- Nporpama -/CtopiHa +
- NobidomJIeHHa, yHKuTa akcecyapn
- EheproeΦekTnBnHicTh
- Khonka npokpyTkN TeNeBi3opa
- Uo6 3miHnTn KaHaJ:
- PnmuItkn:
- yBIMKHeHHBUMKHeHH
- Uo6 yBIMKHyT TeNeBi3Op
- BmKaHnTeJIeBi3opa
- NouatKobayctahOBka
- BcTaHOBHeHHn iKIOUeHHn DO KaHaJIb aHaIorOBoro Tele6aueHH
- BiTbOpOBaHnMeia-paJiB 3 USB-dncka
- 3MiHa HaJaTaYBaHb TeJeBi3opa
- NapaMeTpN BiO6paXeHHN
- NapaMeTpN 3ByKy
- HanaatybannnapametpiB 6aTbKIBcKoro KOHTpOIO.
- EneKtpoHHn TeeneriD (EPG)
- XpoHoiIoriyn po3KnaI
- Cnncok nporpaM\*
- ItoTuHa/HacTynHa nporpama
- Papametprn nepeaui
- OHOBJIeHHI3 TeJIeBi3opa
- OHOBJeHHI3 3 USB
- ABTomatnue OHOBHeHHa 3 ufoBux KaHaJIb
- Iouyk i ycyhennHa HecnpaBHOCTe Ta peKoMeHdaui
- Tenebi3Op He BmkaCTbca
- Hn3bka kicTb 306paXeHHa
- BiDcyTHc 306paXKeHHa
- BiCyTHi3ByK
- IyIbT dNCTaHciiHOro KepyBaHHra - He npauOc
- Hemoxnbo 6paTn DxepeNo BXiDHoro cnHa-ny
- AeBaa
- jj
- y
Brand : PHILIPS
Model : 49HFL2839T
Category : TV