
S7 Duo - VCR Xblitz - Free user manual and instructions
Find the device manual for free S7 Duo Xblitz in PDF.
| Product type | VCR (video recorder) |
| Brand | Xblitz |
| Model | S7 Duo |
| Dimensions | 95 x 55 x 20 mm |
| Weight (with handle) | 120 g |
| Power supply | 5V / 1.5A (cigarette lighter charger) |
| Front recording resolution | Full HD 1920x1080p at 30 fps |
| Rear recording resolution | HD 1280x720p at 30 fps |
| Viewing angle | 170° |
| Screen | 3 inches |
| Memory | Micro SD card up to 64 GB class 10 |
| Connections | USB-C, AV |
| Main functions | Loop recording, G-sensor, parking mode, motion detection, rear camera, night mode, WDR |
| Maintenance | Clean with a soft cloth; do not use detergents or chemicals |
| Safety precautions | Use only the original 5V/1.5A charger; do not disassemble; operating temperature 0-35°C |
| Spare parts and repairability | Original accessories available; contact after-sales service |
| Warranty | 24 months |
| General information | Made from high-quality components; specifications subject to change without notice |
Frequently Asked Questions - S7 Duo Xblitz
User questions about S7 Duo Xblitz
0 question about this device. Answer the ones you know or ask your own.
Ask a new question about this device
Download the instructions for your VCR in PDF format for free! Find your manual S7 Duo - Xblitz and take your electronic device back in hand. On this page are published all the documents necessary for the use of your device. S7 Duo by Xblitz.
USER MANUAL S7 Duo Xblitz
Table of contents Spis tresci
| INSTRUJKCJA OBSLUGI | PL |
| USER MANUAL | EN |
| BENUTZERHANDBUCH | DE |
| NÁVOD K POUŽITÍ | CZ |
| HASZNÁLATI UTASÍTÁS | HU |
| POUŽÍVATELSKÁ PRÍRUČKA | SK |
| VARTOTOJO VADOVAS | LT |
| LIETOTAJA ROKASGRÁMATA | LV |
| KASUTUSJUHEND | ET |
| PŠKOBODCTBO 3A NOTPEŠNEJIÀ | BG |
| MANUALUL UTILIZATORULUI | RO |
| MANUEL DE L'UTILISATEUR | FR |
| MANUALE UTENTE | IT |
| MANUAL DEL USUARIO | ES |

PL
INSTRUKCJA OBSLUGI
WIDEOREJESTRATOR
Carefully read the enclosed operating instructions and safety notes before use to avoid accidental damage to the equipment or unintentional injury.
PURPOSE OF THE PRODUCT
The Xblitz S7 DUO car camera, together with the add-on camera, allows you to monitor the route of your vehicle from both the front and rear and record any traffic incidents. The video recorder is created from the highest quality components.
1. CONTENTS OF THE KIT
- Video recorder
- Rear-view camera
- Memory card reader
- Charger
- USB cable
- Handle
- Instructions
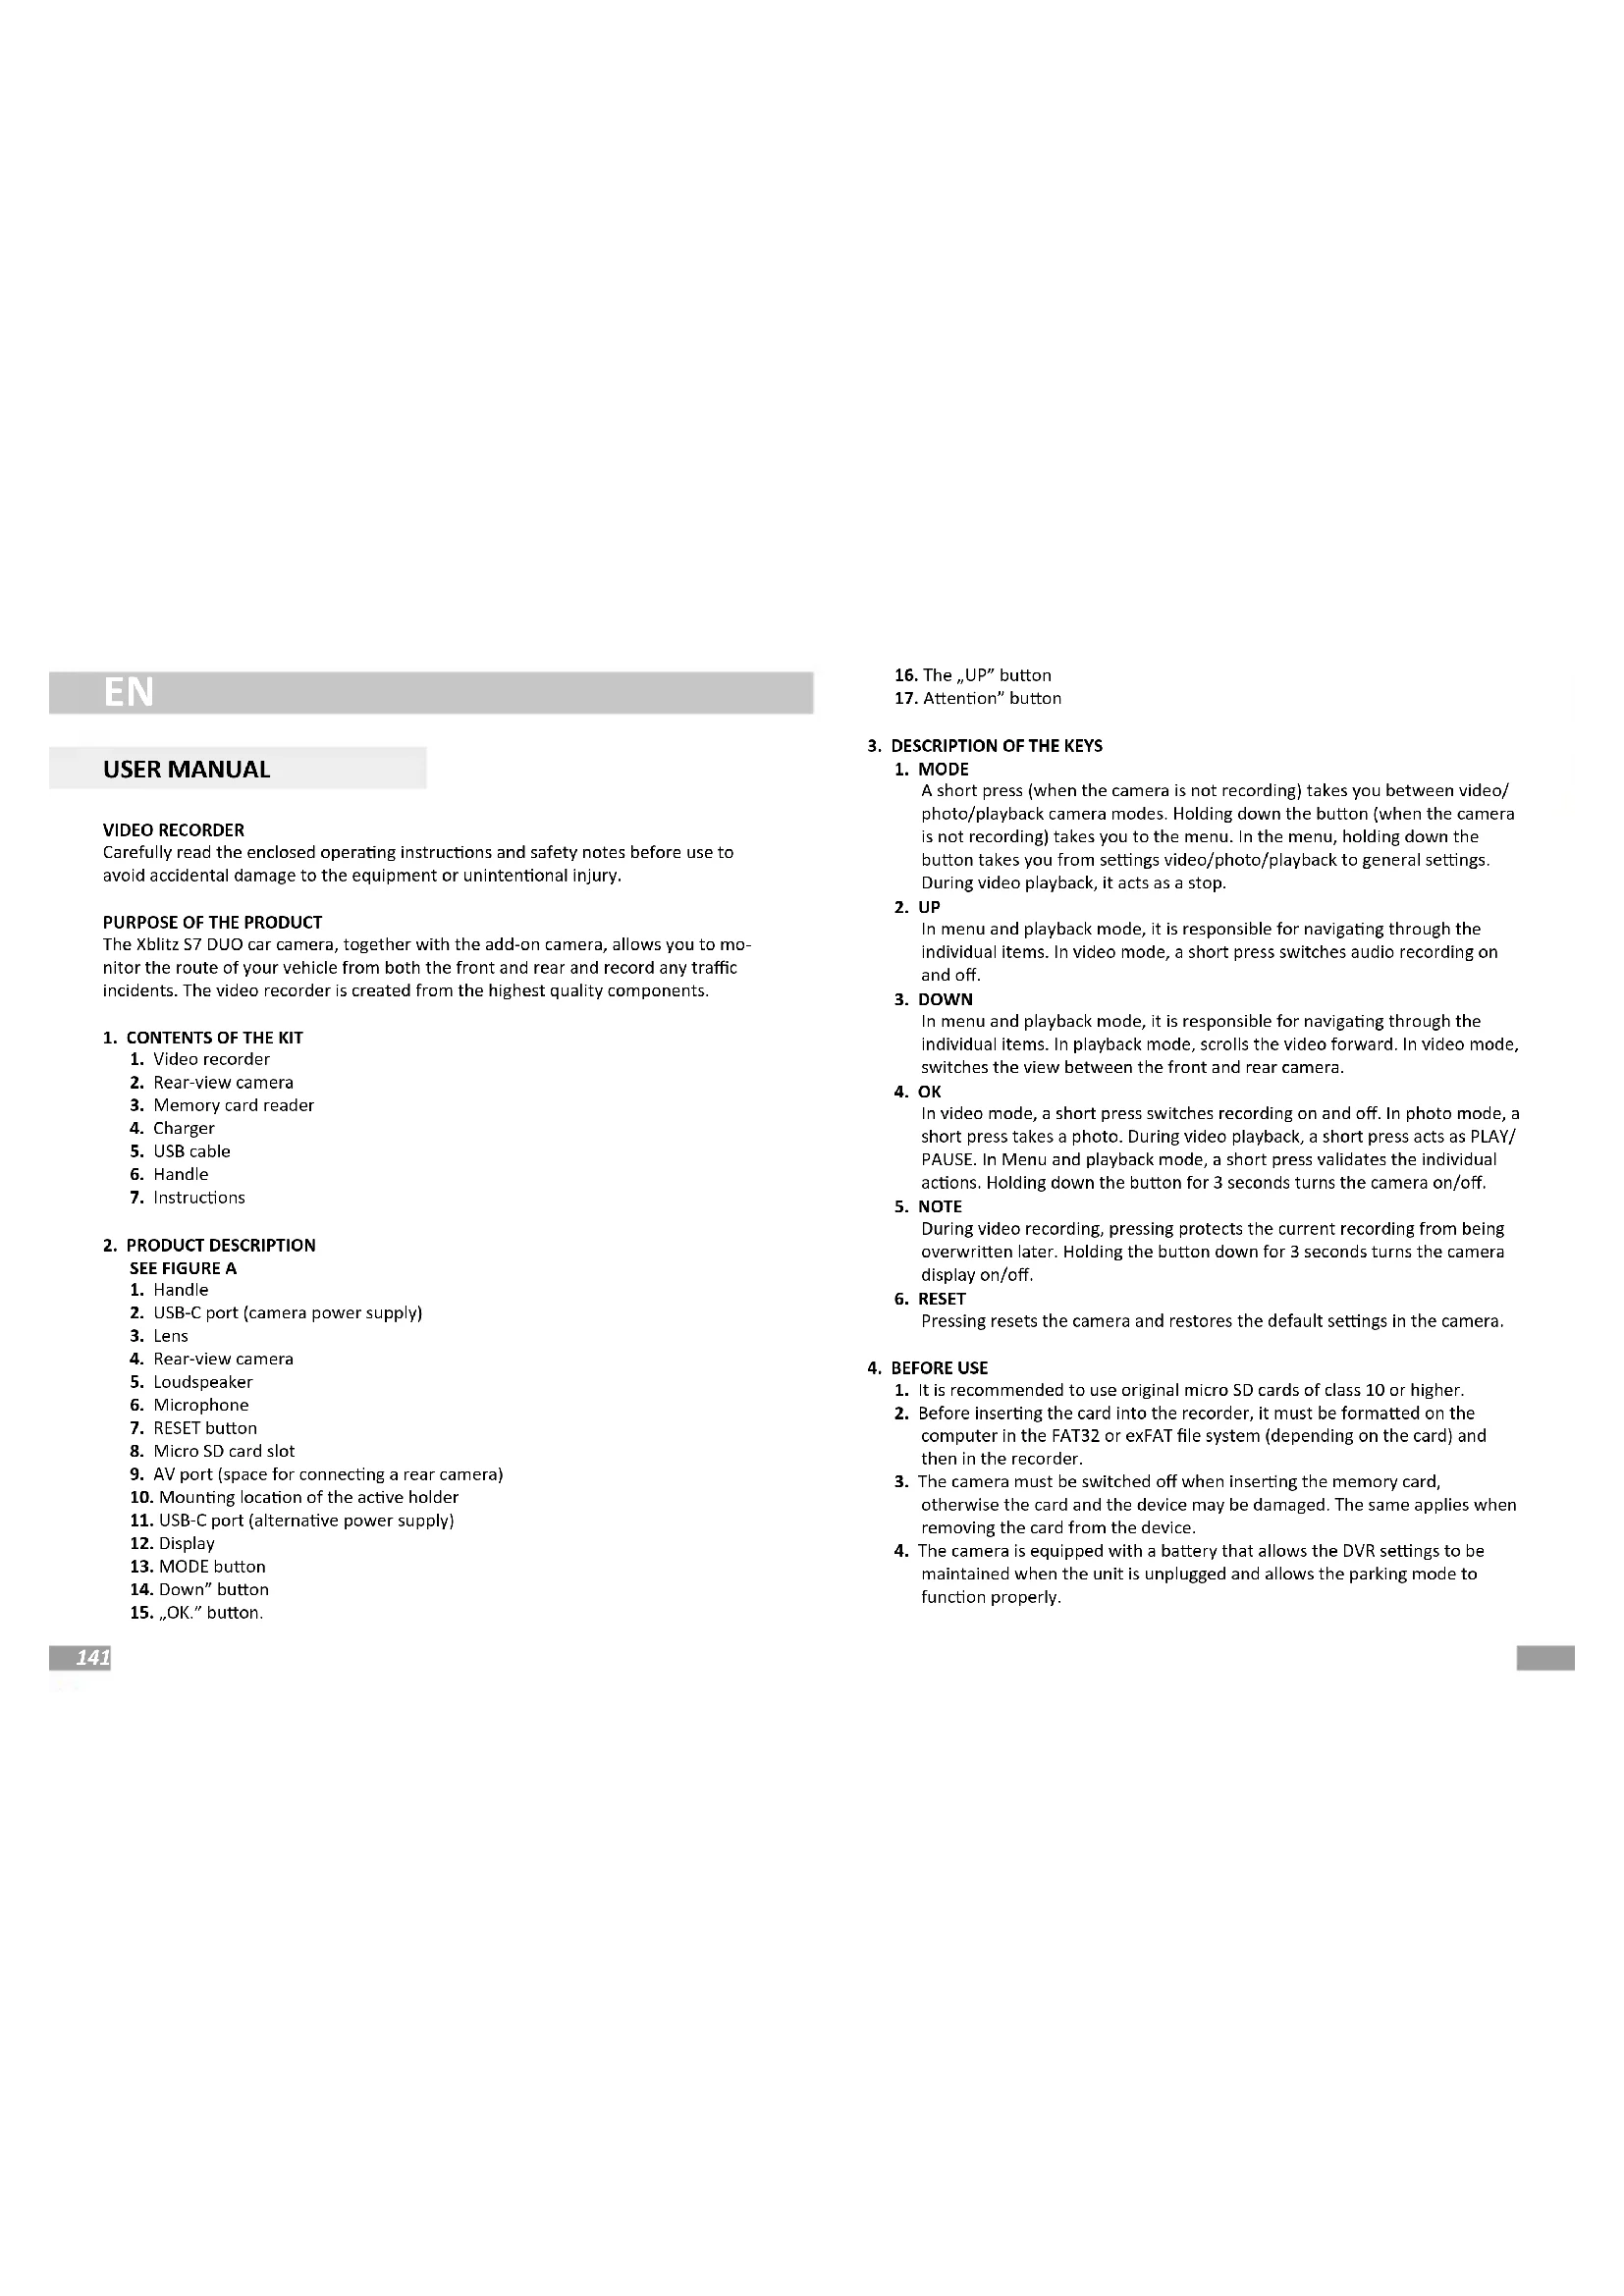
2.PRODUCT DESCRIPTION
SEE FIGURE A
- Handle
- USB-C port (camera power supply)
- Lens
- Rear-view camera
- Loudspeaker
- Microphone
- RESET button
- Micro SD card slot
- AV port (space for connecting a rear camera)
- Mounting location of the active holder
- USB-C port (alternative power supply)
- Display
- MODE button
- Down" button
-
OK. button.
-
The "UP" button
- Attention" button
3.DESCRIPTION OF THE KEYS
1. MODE
A short press (when the camera is not recording) takes you between video/ photo/playback camera modes. Holding down the button (when the camera is not recording) takes you to the menu. In the menu, holding down the button takes you from settings video/photo/playback to general settings. During video playback, it acts as a stop.
2. UP
In menu and playback mode, it is responsible for navigating through the individual items. In video mode, a short press switches audio recording on and off.
3. DOWN
In menu and playback mode, it is responsible for navigating through the individual items. In playback mode, scrolls the video forward. In video mode, switches the view between the front and rear camera.
4. OK
In video mode, a short press switches recording on and off. In photo mode, a short press takes a photo. During video playback, a short press acts as PLAY/ PAUSE. In Menu and playback mode, a short press validates the individual actions. Holding down the button for 3 seconds turns the camera on/off.
5. NOTE
During video recording, pressing protects the current recording from being overwritten later. Holding the button down for 3 seconds turns the camera display on/off.
6. RESET
Pressing resets the camera and restores the default settings in the camera.
4. BEFORE USE
- It is recommended to use original micro SD cards of class 10 or higher.
- Before inserting the card into the recorder, it must be formatted on the computer in the FAT32 or exFAT file system (depending on the card) and then in the recorder.
- The camera must be switched off when inserting the memory card, otherwise the card and the device may be damaged. The same applies when removing the card from the device.
-
The camera is equipped with a battery that allows the DVR settings to be maintained when the unit is unplugged and allows the parking mode to function properly.
-
When the memory card fills up, the oldest unprotected recordings are overwritten.
- It is recommended that the G - SENSOR option is set to the minimum, in order to avoid securing unnecessary material caused, for example, by uneven road surfaces and thus losing space on the memory card.
- Sound: the device has a built-in condenser microphone that records all ambient sounds. Sounds may overlap causing distortion.
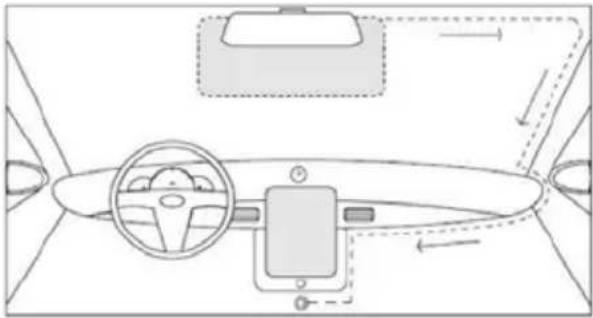
5. CAMERA INSTALLATION
SEE FIGURE B
- Choose where to mount the camera. It is best to position the camera so that the display preview shows as much of the area in front of the car as possible. Make sure the camera will not obstruct the driver's view while driving.
- Mount the bracket on the windscreen and then connect the camera to it.
- Route the USB cable as shown above.
- Connect the USB-C plug to the holder
- Place a second camera at the rear of the vehicle.
- Route the AV cable to the recorder so that it is not in the way while driving.
- Connect the AV plug to the AV port on the camera.
- Plug the charger into a 12/24 volt cigarette lighter socket.
INSTALLATION OF A REAR-VIEW CAMERA:
The mounting location of the additional camera included in the kit depends on your preference. The camera meets IP67 waterproof standards (weatherproof).
CONNECTION OF A REAR-VIEW CAMERA:
Connect the black cable provided to the AV port on the main unit. Drag it to where the secondary camera is mounted and plug it in. Make sure the main unit can see the secondary camera (if not, check that the cable is correctly inserted in both ports).
FITTING A REVERSING CAMERA:
The wires coming out of the rear camera should be connected to the reverse light supply wires (red = plus). Connecting in this way will result in a reversing camera. The outgoing installation should be well insulated and free from mechanical stress.
6. GETTING STARTED
- Insert a micro SD memory card formatted to the FAT32 or exFAT file system (depending on the memory card).
- Mount and connect the camera to the power supply.
- Set in the menu:
a. Date and time.
b. Loop recording (adjust recording time). If you disable loop recording, the
files will not be overwritten.
c. It is recommended to set the highest possible resolution.
d. Set the G-Sensor overload sensor to the lowest possible sensitivity so that the camera does not catch bumps in the road and secure unnecessary footage.
e. Adjust the rest of the settings according to your own preferences.
4. The camera will start recording automatically every time you switch it on (provided there is no permanent power supply in your car's cigarette lighter socket).
7. MAIN FEATURES OF THE CAMERA
1. Camera modes
The camera has 3 modes of operation.
Recording mode - in this mode, the camera records video.
Photo mode - in this mode, the camera takes photos.
Playback mode - view footage recorded by the camera.
2. Loop recording
The camera divides the recordings according to the selected time settings.
3. Resolution
The camera can record in several resolutions. The higher the resolution, the better the recording quality. Note: the better the quality of the recording, the more space will be used on the memory card.
4. G-sensor
Gravity sensor. When the sensor is activated at the time of a collision, the recording file is protected from being overwritten. It is recommended that the lowest available value is set, as at a higher value the camera may pick up shocks caused by
road irregularities.
5. Parking mode
When it is switched on the camera left in the car under power or until the battery in the camera is discharged, it picks up the shock of the car (for example during a parking bump), switches on and starts recording (recordings are automatically protected against overwriting). When driving, it is advisable to switch off parking mode as it can interrupt recorded video loops and take up space on the memory card.
6. Motion detection
When switched on and left in active power mode, the camera will record a short video when motion is detected.
7. Audio recording
The camera has a built-in microphone for recording ambient sounds.
8. Rear-view camera
The included rear-view camera can be used as a reversing camera. When properly connected, the image will automatically switch to the view from the additional camera when reverse gear is engaged.
8. MENU OPTIONS
VIDEO MODE:
- Night mode - allows you to enable or disable night mode recording.
- Resolution - allows you to change the resolution of the recorded video files.
- Loop recording - allows you to change the length of the recorded videos.
- Exposure - allows us to set the exposure correction of the recorded image, so we can avoid overexposure or underexposure.
- Motion detection - allows you to enable or disable the mode in which the camera starts recording video when motion is detected in front of it.
- Audio recording - allows you to enable or disable audio recording by the camera.
- Date stamp - allows you to enable or disable the display of the date and time on recorded videos.
- G-sensor - allows you to set the sensitivity of the gravity sensor.
- Parking mode - allows you to enable or disable parking mode.
PHOTO MODE:
- Resolution - allows you to set the resolution of the images taken.
- Quality - allows you to set the quality of the photos taken (the higher the quality, the more memory the photos will occupy).
- White balance - allows the camera parameters to be adjusted to the prevailing light.
4.ISO - allows you to change the sensitivity of the camera sensor to light. - Exposure - allows us to set the exposure correction of the images taken, so we can avoid over- or underexposure.
- Quick view - allows you to enable a brief display of the captured images on the camera screen.
- Date stamp - allows you to enable or disable the display of the date and time on captured images.
- Delete - allows you to delete a single file or all files.
PLAYBACK MODE:
- Delete - allows you to delete one or all recording files.
- Secure - allows you to secure and unprotect one or all of your recording files.
GENERAL OPTIONS:
-
Date/time - date and time settings.
-
Screen saver - set the time after which the device's display goes blank.
- Automatic switch-off - settings for the time after which the device will automatically switch off while not recording.
- System sounds - enable or disable menu navigation sounds.
- WDR (Wide Dynamic Range) - thanks to this function, using appropriate algorithms to analyse image exposure and dynamically change the value of underexposed and overexposed pixels, the camera is able to make underexposed elements visible in the image and accurately record the scene despite high contrast.
- Language - selection of menu language.
- Frequency - select the image refresh rate (50Hz or 60Hz) - 50Hz is the recommended setting.
- Format - format the micro SD card in the camera.
- Version - the software version of the camera.
- Default settings - restore the device to default settings.
9. PRECAUTIONS
- Do not disassemble the camera yourself or interfere with its construction. In the event of a malfunction, contact the service department.
- Use only original accessories.
- Only use the original charger supplied. The use of any other power supply may adversely affect battery performance.
- The device may not be used in contravention of the laws of your country or region.
- Permissible operating temperatures are 0-35 ^ C , storage: +5 to +45 ^ C , humidity: 5-90 ^ C without condensation.
- Do not subject the device to damage or impacts.
- Take care of the cleanliness of the product, especially the lens. Do not use detergents or chemicals when cleaning.
- Clean only when the unit is unplugged.
- Keep the device out of the reach of children.
- Do not expose the device to very high temperatures or fire.
- If you smell burnt plastic or electronics from the camera, unplug the unit as soon as possible and contact service.
10. FAQ
- Device does not switch on, screen flashes.
Before starting up, charge the unit's battery and check the connection in the cigarette lighter socket. -
The unit does not automatically switch on/off.
The reason for this behaviour may be the constant power supply in the cigarette lighter socket. -
Camera stops recording/does not overwrite recordings.
Check: G-SENSOR - a function by which recordings with recorded overloads (e.g. uneven pavement, braking, driving off a kerb or over a speed bump, etc.) are protected from being overwritten. If you use this function, you must periodically format the memory card on your computer and then on the camera. Ultimately, each file on the data carrier will be protected from being overwritten and the device will not be able to record a further route - it will not record in a loop. We suggest setting the sensor according to your driving style and road conditions. You can also disable the option completely, in which case each oldest file will be overwritten and the card will not need to be formatted periodically. After adjusting the function, remember to format the memory card. - The camera switches on and off.
Check: PARKING MODE/MONITOR and MOVEMENT DETECTION - function designed to operate while the vehicle is parked. Deactivate the functions, before setting off, as they can cause the camera to switch on and off and make random fragments of the route recordings. If the functions are deactivated, check if the fault occurs without a memory card inserted. - The camera records sections of the route/ randomly ongoing recordings. Check: MOVEMENT DETECTION - a function designed to operate while the vehicle is parked. You need to deactivate the function, before setting off, as it can cause the camera to switch on and off and make random fragments of the route recordings. If the function is deactivated, check if the fault occurs without a memory card inserted.
- The device shows the message "card full" or does not read the card. Check the "G-sensor" and "parking mode" functions and set them to minimum. The card must be formatted in the computer in the FAT32 or exFAT file system (depending on the card) and then in the recorder. Check also: Whether the selected card capacity and its specification (micro SD, class 10 - U1, V10 additionally recommended) is suitable for your device (we recommend using cards from reputable manufacturers, we recommend: Kingston, Samsung, Sandisk). If at any stage you encounter an error, replace the card with a new one from official distributors.
- The device records noisy, distorted, unclear sound.
The device has a highly sensitive microphone that records any ambient noises. The recorded sounds may overlap. Windscreen air vents can also distort the sound. - The device is not responding.
Press the Reset button briefly or return the device to factory settings. - There are transverse lanes in the footage.
Incorrect setting of the frame rate value. Set the frequency value to 50Hz or 60Hz depending on local settings. - Handle detaches from the glass/does not stick.
Degrease the surfaces well before mounting the holder on the glass.
Remember to avoid high temperatures, which can cause deformation of the holder, and damage to the recorder itself.
NOTES:
- G-SENSOR - a function by which recordings with recorded overloads (e.g. uneven pavement, braking, driving off a kerb or over a speed bump, etc.) are protected from being overwritten. If the user uses this function, you should perform periodic formatting of the memory card in the computer and then in the camera. Because ultimately, every file on the data carrier will be protected from being overwritten and the device will not be able to record the further route - it will not record in a loop. We suggest setting the sensor according to your driving style and road conditions. You can also disable this option completely, in which case each oldest file will be overwritten and the card will not be needs to be formatted periodically.
- PARKING MODE/MONITOR - a function designed to operate while the vehicle is parked, uses battery power if the DVR is fully charged - (if it has a built-in battery). In this case, the camera after when a shock is detected, it starts recording a video of a few seconds - until the battery is discharged. When using this function, bear in mind the device's battery needs to be charged when the function activates (starts). It should be deactivated functions, before setting off on a journey, as it may cause the camera to switch on and off and make random fragments of route footage.
*The constant power supply in the vehicle may cause this function to behave differently, e.g. leaving the camera on, which may drain the car battery. - MOVEMENT DETECTION - a function designed to operate while the vehicle is parked - requires constant power and the camera must remain switched on. The DVR will start recording automatically when motion is detected, and will stop recording a few seconds after the no movement in front of the camera lens. Please note that this function may lead to the car battery being discharged. You need to deactivate the function, before setting off, as it can cause the camera to switch on and off and make random fragments of route footage.
NOTE!
Use only the original charger with a charging current of 5V/1.5A. (Do not plug directly into a 220/230V socket). Failure to follow the instructions may damage the camera or lead to dangerous situations.
Due to continuous product improvement, the manufacturer reserves the right to make changes to the device and its kit without prior notice. Some functions described in this manual may differ slightly from reality.
11. SPECIFICATION
Processor: Generalplus 6248 | Recording resolution: Front camera: Full HD
1920x1080p/30fps, rear camera: HD 1280x720p/30fps | Sensor: SC2063 | Lens: 4G wide angle | Viewing angle: 170^ | Display: 3" | Memory: micro SD cards
Up to 64 GB Class 10 | Video recording format: AVI | WDR: Yes | Night mode: Yes | Power supply: 5V/1.5A | USB: USB-C | Microphone/speaker: Built-in | Battery: Built-in | Dimensions: 95x55x20 mm | Weight (with handle): 120g
12. WARRANTY/ COMPLAINS CARD
The product comes with a 24-month warranty. Warranty terms and conditions can be found at: https://xblitz.pl/gwarancja/
Complaints should be made using the complaint form found at:
Details, contact and service address can be found at: www.xblitz.pl.
Specifications and contents are subject to change without notice.
We apologise for any inconvenience.
DE
BEDIENUNGSANLEITUNG
VIDEO-RECORDER
12. TAPAHUOHHA KAPTAYKAPTAYPEKJIAMALUN
IpoDyKTbT c npednara c 24-MeceHa rapaHnra. rapaHnOHHne ycNoBnMoKTe Da HamepHTe Ha cnEHNnA aDpec: https://xblitz.pl/gwarancja/
Kan6Te Tpa6Ba Da ce noDaBt Upe3 OopMynpa 3a Ka6n, KoTo Ce HAMnpa Ha
serviciul de service.
10. INTREBÄRI FRECVENTE
KGK TREND Sp. z o.o. (formerly KGK Trade Sp. z o.o. Sp. K.) st. Ujastek 5b, 31-752 Cracow, Poland. Made in PRC

- Table of contents Spis tresci
- PL
- INSTRUKCJA OBSLUGI
- WIDEOREJESTRATOR
- PURPOSE OF THE PRODUCT
- CONTENTS OF THE KIT
- 2.PRODUCT DESCRIPTION
- SEE FIGURE A
- 3.DESCRIPTION OF THE KEYS
- MODE
- UP
- DOWN
- OK
- NOTE
- RESET
- BEFORE USE
- CAMERA INSTALLATION
- SEE FIGURE B
- INSTALLATION OF A REAR-VIEW CAMERA:
- CONNECTION OF A REAR-VIEW CAMERA:
- FITTING A REVERSING CAMERA:
- GETTING STARTED
- MAIN FEATURES OF THE CAMERA
- Camera modes
- Loop recording
- Resolution
- G-sensor
- Parking mode
- Motion detection
- Audio recording
- Rear-view camera
- MENU OPTIONS
- VIDEO MODE:
- PHOTO MODE:
- PLAYBACK MODE:
- GENERAL OPTIONS:
- PRECAUTIONS
- FAQ
- NOTES:
- NOTE!
- SPECIFICATION
- WARRANTY/ COMPLAINS CARD
- DE
- BEDIENUNGSANLEITUNG
- VIDEO-RECORDER
- TAPAHUOHHA KAPTAYKAPTAYPEKJIAMALUN
- INTREBÄRI FRECVENTE
Brand : Xblitz
Model : S7 Duo
Category : VCR