WL 1025 - Climate control TECHNOLINE - Free user manual and instructions
Find the device manual for free WL 1025 TECHNOLINE in PDF.

| Product Type | Indoor air quality monitor (CO₂, temperature, humidity) |
| Brand | TECHNOLINE |
| Model | WL 1025 |
| Power supply | DC 5.0V, 600mA via USB cable + built-in lithium battery |
| CO₂ measurement range | 400 to 5000 ppm |
| Temperature measurement range | -9.9°C to 50°C |
| Temperature resolution | 0.1°C |
| Humidity measurement range | 1% to 99% |
| Humidity resolution | 1% |
| TVOC measurement range | 0 to 9.999 mg/m³ |
| Display | Digital with adjustable backlight (4 levels) |
| Functions | 12/24 hour display, snooze alarm, CO₂ alarm, 24h history, CO₂ trend, min/max values |
| Calibration | Automatic and manual |
| Battery life | Several hours (depending on use) |
| Maintenance | Clean with a soft dry cloth. Avoid moisture and dust. |
| Safety | Indoor use only. Do not open the casing. Do not throw into fire. |
| Spare parts | Not available. For repair, contact customer service. |
| Compliance | Directive 2014/53/EU and ROHS 2011/65/EC |
Frequently Asked Questions - WL 1025 TECHNOLINE
User questions about WL 1025 TECHNOLINE
0 question about this device. Answer the ones you know or ask your own.
Ask a new question about this device
Download the instructions for your Climate control in PDF format for free! Find your manual WL 1025 - TECHNOLINE and take your electronic device back in hand. On this page are published all the documents necessary for the use of your device. WL 1025 by TECHNOLINE.
USER MANUAL WL 1025 TECHNOLINE
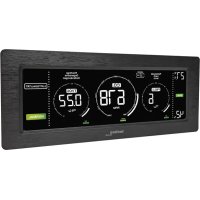
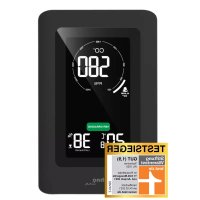
A1 – CO2 concentration alarm
A7 – CO2 concentration trend
A2 – 24 hour CO2 history
A8 - Low power indicator
A3 – Maximum values icon
A9 – Colored CO2 appraisal
A4 – Temperature
A10 – Minimum values icon
A5 – Alarm icon
A11 – Humidity
A6 – CO2 concentration
A12 - Time
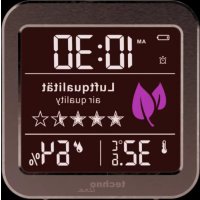
B - Case and buttons
B1 - "LIGHT (") button
B2 - "-" button
B3 - "+" button
B4 - "TIME ( )" button
B5 - DC power connection
B6 - "ON/OFF" power switch
Main functions
Quartz clock
12/24 hour time display
Alarm with 5-minute snooze function
- Display of indoor temperature in ^ C / ^ and humidity
- Display of CO2 concentration
MIN/MAX value memory for temperature, humidity and CO2
- Carbon dioxide (CO2) display as numbers and text
The 24-hour histogram of average CO2 concentration
- Trend display of carbon dioxide concentration
CO2 concentration alarm function
- Manual calibration for CO2 concentration and automatic calibration of CO2 alarm
- Four level backlight function (high-medium-low-off)
- Low power indication and charging indication of built-in lithium battery
EN2
Getting started: Use with USB adapter
- Use only the included USB adapter to connect a powered device with the WL 1025. Or use a standard DC 5.0V/1A USB-Adapter (not included) to connect the USB adapter cable to an household power socket.
- After connection to the DC power supply, push the switch "
" to the ON position to start the product. At this time, all the icons on the screen will be displayed, and make a double beep sound, before entering the normal working mode. 60-second countdown appears on the screen, indicating that the CO2 sensor is warming up.
Use with built-in battery
- When using DC power supply for power supply, the lithium battery inside the product will be charging. When the DC is disconnected, it will be switched to lithium battery for power supply, or it can be start directly with lithium battery power supply. A fully charged lithium battery ensures about 5 hours uninterrupted operation.
Notes
- The CO2 sensor will be initialized for about 60 seconds and then the CO2 values and displays will be updated and shown.
- Place the WL 1025 securely on a flat surface with enough free space on all sides. This way, the CO2 sensor and the thermo-hygro sensor within the WL 1025 can get the best results.
- It is recommended to use DC power supply for a long time, and try not to use the built-in lithium battery to low power.
Time and alarm time setting
- In normal display mode, hold the “ ” button for 3 seconds to enter the setting mode.
- Press the "+" or the "-" button to adjust the setting and press the " " button to confirm each setting. Keep the "+" or the "-" button pressed, to accelerate the process and reach the desired value more quickly.
- The setting sequence is shown as follows: 12/24 hour display -> hour -> minute -> alarm time hour -> alarm time minute -> °C/°F temperature unit -> exit
Note:
- The setting will automatically exit after 30 seconds without EN4
any adjustment from buttons and will return to display mode.
Turning alarm on/off:
- Press the " " button to turn the alarm on or off. The alarm icon is displayed as long as the alarm if turned on.
Alarm and snooze function:
- When alarm sounds, alarm icon is flashing. Press the “-” button to activate the snooze alarm (alarm icon keeps flashing on the LCD and alarm sounds again in 5 minutes) or any other button to stop the alarm. The alarm will sound at the same time of the next day.
- Press any button except the “ ” button during the active snooze function to stop the snooze alarm.
Note:
- The alarm will sound for 1 minute, before it automatically stops, if not interrupted by pressing any buttons.
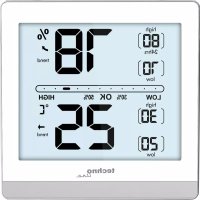
Temperature & humidity
- Temperature and humidity detection frequency is 5 seconds.
Maximum / minimum temperature & humidity
-
In normal display mode, press the "+" button to view maximum and minimum values of temperature, humidity and CO2. MAX will be displayed while viewing maximum values and MIN will be displayed while viewing minimum values.
-
Press and hold the "+" button for 2 seconds while viewing the max and min values, you can clear the max and min values and start recording again.
-
The maximum and minimum records will be automatically cleared and re-recorded at 0:00 each day.
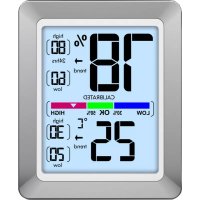
CO2 concentration and CO2 trend display
-
CO2 concentration is displayed by an 8 grid bar graph, who change accordingly to the measured CO2 value:
-
According to the change of carbon dioxide concentration, if it rises within one hour or more than or equal to 100 ppm, the arrow points up; if it drops within one hour or more than or equal to 100 ppm, the arrow points down; if it does not exceed 100 ppm within one hour, the arrow points flat.
-
Carbon dioxide concentration detection frequency is 5 seconds.
-
According to the current CO2 concentration value, there are four levels of CO2 appraisal:
EN6
EXCELLENT: 400 600 ppm;
GOOD: 601 ~ 1000 ppm;
MEDIUM: 1001 1500 ppm;
POOR: 1501~2000 ppm;
POOR is flashing: 2001 ppm and above
CO2 concentration in 24 hour history display
- CO2 concentration history is displayed by an 8 grid bar graph, who changes accordingly to the measured CO2 value:
8 Grid: 3501 ~ 5000 ppm
7 Grid: 2001 ~ 3500 ppm
6 Grid: 1501 ~ 2000 ppm
5 Grid: 1001-1500 ppm
4 Grid: 801 1000 ppm
3 Grid: 601 ~ 800 ppm
2 Grid: 501 600 ppm
1 Grid: 400 500 ppm
- The average CO2 concentration over 24 hours will be briefly shown in a bar chart: -24h, -18h, -12h, -9h, -6h, -3h, -0h.
Calibration of CO2:
EN7
The sensor has an automatic calibration and can therefore be used immediately. This usage variant is recommended. A manual calibration is also possible.
Manual calibration function:
- In normal display mode, press and hold the "+" button for 2 seconds to enter manual calibration mode. At this time, you can press "to confirm entry, or press" + "or do not press the button for 30 seconds to exit manual calibration mode.
- The operation time of manual calibration mode is 20 minutes. During the operation, you can press "+" to exit in advance.
Carbon dioxide concentration alarm:
- Press "--" to turn on or off the alarm function.
- Press and hold "--" for 2 seconds to enter the CO2 concentration alarm setting. The CO2 concentration value flashes. Press the "+" or the "-" button to adjust.
- Press " " to confirm and exit the setting mode, or you can also save the setting and exit the setting mode without pressing any button for 30 seconds at any time.
Notes:
-
Due to transportation, vibration, aging and other reasons, the carbon dioxide sensor may cause the zero drift and the detection accuracy is reduced. In order to restore the accuracy of the sensor, manual calibration can be adopted to correct the drift. During the calibration process, place the product in an environment with an outdoor atmospheric CO2 concentration level (about 400ppm) to ensure that the CO2 concentration in the environment is stable.
-
Due to transportation, vibration, aging and other reasons, the carbon dioxide sensor may cause zero drift and reduce the detection accuracy, so the sensor will correct the drift through the built-in automatic calibration algorithm. About 48 hours after sensor start, will be stored within 48 hours minimum carbon dioxide concentration values, to amend the basic value of the atmospheric environment outdoor carbon dioxide concentration (about 400ppm ), since the time of about 7 days, will be stored within 7 days of the lowest carbon dioxide concentration values, to amend the basic value of the atmospheric environment outdoor carbon dioxide concentration (about 400ppm ). The cycle was then repeated for 7 days. Please ensure that the CO2 concentration is reduced to the outdoor atmospheric level (about 400ppm ) within about 48 hours after the
sensor start and for each 7 days of continuous operation.
- Push the power switch to ON and connect the product with the USB-Adapter to a power source. This will be regarded as the sensor start. If the symbol of low power appears when the lithium battery is used for power supply, then it will be regarded as the sensor start after the DC is re-inserted for power supply.
- Automatic calibration function is suitable for people who are active in office, at home or do other non-all-weather activities and people who enjoy a good ventilated environment. It is not applicable to agricultural greenhouses, farms, warehouses and other places.
- During carbon dioxide detection, avoid product vibration and direct blowing on the sensor by strong winds, which may cause deviation of the carbon dioxide detection value.
Backlight brightness levels:
- Touch " " to switch backlight level, a total of four levels (high - medium - low - off).
Low power indicator:
- The low power indicator " " will be displayed, when the monitor has low battery power
EN10
- The product will turn off the backlight function, carbon dioxide detection function, etc. to ensure the continuous operation of the time function.
- Use the USB adapter to power the monitor and recharge the built-in battery to avoid losing previously made settings.
- In the process of built-in battery charging, the low power symbol " 1 is displayed scrolling, and the battery symbol is hidden after full.
Manual reset:
- Set the power slide to OFF to turn off the monitor and then move the power slide back to ON to turn on the monitor. This action will reset the monitor to factory settings.
- WL 1025 should not be placed in a polluted environment for a long time (eg: sealed boxes, contaminated environments).
- Before the WL 1025 is used, it should be placed in a well-ventilated environment to work for more than 1 hour to ensure accurate readings.
Troubleshooting:
- Do not touch the sensor or don't store the item in packaging materials with strong smell, so as not to affect
the accuracy of the sensor.
- WL 1025 should not be placed in a polluted environment for a long time (eg: sealed boxes, contaminated environments).
- Before the WL 1025 is used, it should be placed in a well-ventilated environment to work for more than 1 hours to ensure accurate readings.
Declaration of conformity
Hereby, Technotrade declares that this product WL 1025 is in compliance with the essential requirements and other relevant provisions of Directive 2014/53/EU and ROHS 2011/65/EC. The original EU declaration of conformity may be found at:
Product Specifications
Humidity measurement range: 1% 99%
Humidity resolution: 1%
Temperature measurement range: -9.9 50^ , lower than -9.9^ shows LL, higher than 50^ shows HH.
Temperature resolution: 0.1^
CO2 detection range: 400-5000 PPM
Power supply: DC 5.0V 500mA
EN12
Precautions
- This item is intended to be used only indoors.
- Do not subject the item to excessive force or shock.
- Do not expose the item to extreme temperatures, direct sunlight, dust or humidity.
- Do not immerse in water.
- Avoid contact with any corrosive materials.
- Do not dispose this item in a fire as it may explode.
- Do not open the inner back case or tamper with any components of this item.
Use the product only for its intended purpose!
Consideration of duty according to the law of electrical devices

This symbol means that you must dispose of electrical devices separated from the General household waste when it reaches the end of its useful life. Take your item to your local waste collection point or recycling centre. This applies
to all countries of the European Union, and to other European countries with a separate waste collection system.
B6 - Bouton coulissant - "ON/OFF"
MEDIUM: 1001-1500 ppm;
POOR: 1501-2000 ppm;
B6 – “ON/OFF”-schakelaar
MEDIUM: 1001 1500 ppm;
POOR: 1501~2000 ppm;
POOR knippert: 2001 ppm en hoger
'Laag vermogen'-indicator:
Voeding: DC 5,0 V 600 mA
MEDIUM: 1001 1500 ppm;
POOR: 1501 ~ 2000 ppm;
MEDIUM: 1001-1500 ppm;
POOR: 1 501-2 000 ppm;
Napajeni: 5,0 V DC 600 mA
MEDIUM: 1001-1500 ppm;
POOR: 1501-2000 ppm;
POOR miga: 2001 ppm iantiago