SV 7 Premium - Steam cleaner Kärcher - Free user manual and instructions
Find the device manual for free SV 7 Premium Kärcher in PDF.

| Product Type | Steam Cleaner |
| Brand | Kärcher |
| Model | SV 7 Premium |
| Dimensions (L x W x H) | 510 x 330 x 340 mm |
| Weight (without accessories) | 9.1 kg |
| Power Supply | 220-240 V, 50-60 Hz |
| Power consumption (boiler) | 1100 W |
| Nominal power (turbine) | 1100 W |
| Maximum steam pressure | 0.4 MPa |
| Heating time | 5 minutes |
| Maximum steam flow rate | 65 g/min |
| Boiler capacity | 0.45 L |
| Water tank capacity | 0.5 L |
| Water filter basin capacity | 1.2 L |
| Sound pressure level | 71 dB(A) |
| Protection class | I |
| Protection degree | IP X4 |
| Main functions | Suction, steaming, simultaneous suction + steaming |
| Included accessories | Steam hose, suction tubes, floor nozzle, hand nozzle, pencil jet nozzle, sofa nozzle, furniture brush, etc. |
| Safety | Safety lock, release button, automatic shut-off after 15 minutes of inactivity |
| Maintenance | Clean HEPA filter every 4 months, empty and clean water filter basin after use |
| Spare parts available | HEPA filter (ref. 2.860-229), round brush kit (ref. 2.860-231) |
| Warranty | According to distributor conditions, free repair for material or manufacturing defects |
Frequently Asked Questions - SV 7 Premium Kärcher
User questions about SV 7 Premium Kärcher
0 question about this device. Answer the ones you know or ask your own.
Ask a new question about this device
Download the instructions for your Steam cleaner in PDF format for free! Find your manual SV 7 Premium - Kärcher and take your electronic device back in hand. On this page are published all the documents necessary for the use of your device. SV 7 Premium by Kärcher.
USER MANUAL SV 7 Premium Kärcher
natural_image
Exterior view of a black and yellow vacuum cleaner (no text or symbols visible)Deutsch 5
English 16
Français 26
Italiano 37
Nederlands 48
Español 58
Português 68
Dansk 78
Norsk 87
Svenska 96
Suomi 105
Ελληνικά 114
Türkçe 125
Русский 135
Magyar 147
Čeština 157
Slovenščina 167
Polski 176
Românește 187
Slovenčina 197
Hrvatski 207
Srpski 217
Български 227
Eesti 238
Latviešu 248
Lietuviškai 257
Українська 267
Қазақша 278
العربية 300
Register and win! www.kaercher.com/register-and-win
EAC

59653010 (11/15)
flowchart
graph TD
    A["Document Layout"] --> B["Arrow 1"]
    A --> C["Arrow 2"]
    A --> D["Arrow 3"]
natural_image
Close-up of a black and gray electronic device with a curved arrow indicating rotation (no text or symbols)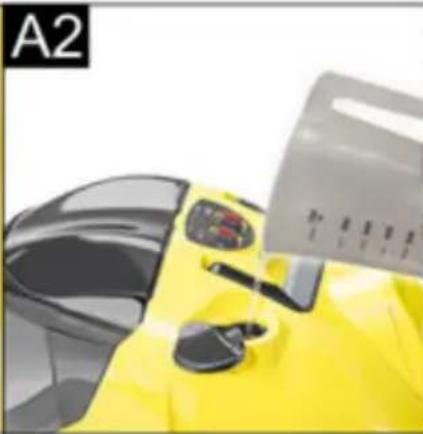
natural_image
Close-up of a yellow sports equipment with a black handle and control panel (no visible text or symbols)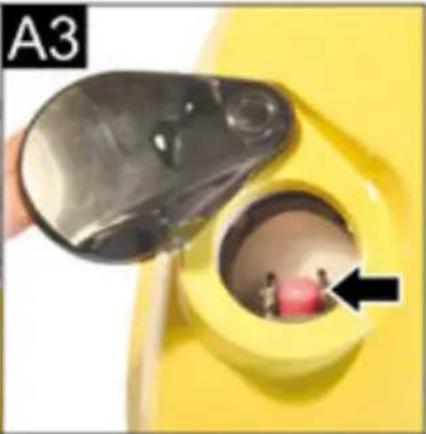
natural_image
Close-up of a hand holding a metallic object into a yellow container with a pink object inside, marked with an arrow (no text or symbols)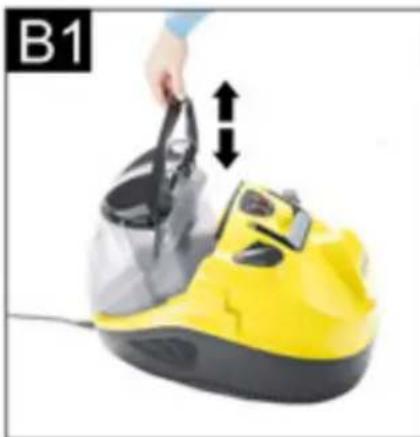
natural_image
Yellow and black electric vacuum cleaner with handle, shown in a photo (no text or symbols visible)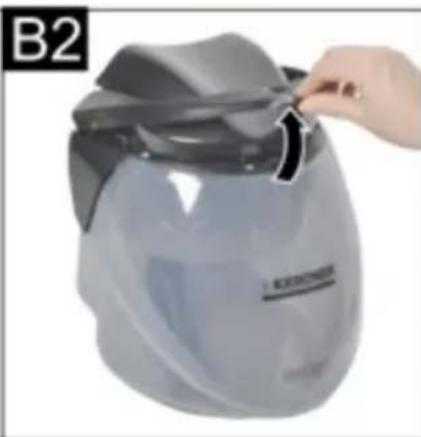
natural_image
Close-up of a hand adjusting a light blue and black plastic object, labeled 'B2' in top-left corner (no other text or symbols visible)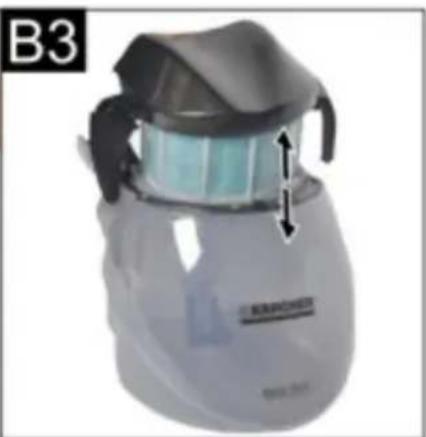
natural_image
Close-up of a white ceramic spray bottle with a black lid and blue visor, showing a measurement arrow (no text or symbols on the object itself)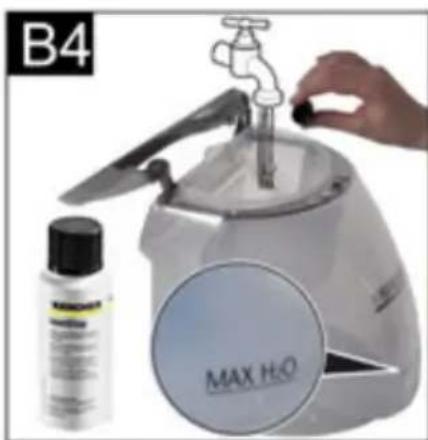

natural_image
Hand inserting a plug into a wall socket (no text or symbols visible)
natural_image
Diagram of a vacuum cleaner with multiple clamps, labeled D1 (no text or symbols on the diagram itself)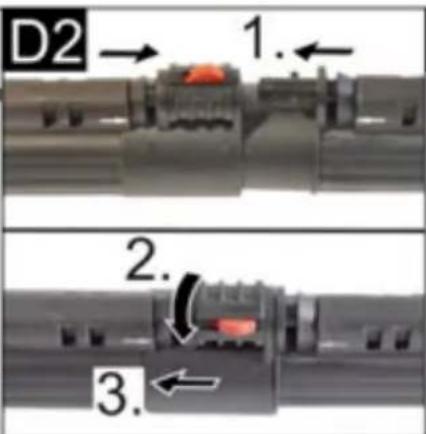

natural_image
Two-panel image showing a hand holding a black device, with arrows indicating movement or change (no text or symbols)
Inhaltsverzeichnis
1 Hauptschalter
Description of the Appliance EN 8
Preparing the Appliance EN 9
Operation EN 9
How to Use the Accessories EN 12
Care and maintenance EN 13
Troubleshooting EN 13
Technical specifications
EN 14
General information
Dear Customer,

Please read and comply with these original instructions prior to the initial operation of your appliance and store them for
later use or subsequent owners.
Proper use
This appliance is designed for domestic use only.
The machine is designed for generating steam and vacuum cleaning spilled liquids and solid substances according to the description in this Operating Instructions Manual.
The manufacturer is not responsible for any damages that may occur on account of improper use or wrong operations.
Symbols in the operating instructions
△DANGER
Immediate danger that can cause severe injury or even death.
⚠ WARNING
Possible hazardous situation that could lead to severe injury or even death.
△CAUTION
Possible hazardous situation that could lead to mild injury to persons or damage to property.
ATTENTION
Pointer to a possibly dangerous situation, which can lead to property damage.
Symbols on the machine

Steam
CAUTION - Danger of scalding
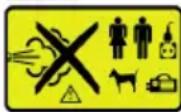
The steam jet may not be directed at persons, animals, live electrical equipment or at the appliance itself.
Only use this appliance to vacuum up spilled liquids. The appliance is not suitable for vacuuming liquids from containers.
Environmental protection

The packaging material can be recycled. Please do not place the packaging into the ordinary refuse for disposal, but arrange for the proper recycling.
Old appliances contain valuable materials that can be recycled. Please arrange for the proper recycling of old appliances. Please dispose your old appliances using appropriate collection systems.
Notes about the ingredients (REACH)
You will find current information about the ingredients at:
www.kaercher.com/REACH
Warranty
The warranty terms published by the relevant sales company are applicable in each country. We will repair potential failures of your appliance within the warranty period free of charge, provided that such failure is caused by faulty material or defects in manufacturing. In the event of a warranty claim please contact your dealer or the nearest authorized Customer Service centre.
Please submit the proof of purchase.
(See address on the reverse)
Spare parts
Use only original KÄRCHER spare parts. You will find a list of spare parts at the end of these operating instructions.
Safety instructions
Apart from the notes contained herein the general safety provisions and rules for the prevention of accidents of the legislator must be observed.
Any use of the machine in contravention with the following instructions will lead to warranty claims being rendered void.
⚠️DANGER
■ The appliance may not be used in areas where a risk of explosion is present.
■ If the appliance is used in hazardous areas the corresponding safety provisions must be observed.
■ Never use the appliance in pools containing water.
■ Do not level the steam jet directly at equipment that contains electrical components, such as the inside of ovens.
- Check the faultless condition of the appliance and the accessories before using it. Otherwise, the appliance must not be used. Please check in particular the power cord, the safety lock, and the steam hose.
If the power cord is damaged, please arrange immediately for the exchange by an authorized customer service or a skilled electrician.
■ Please arrange for the immediate exchange of a damaged steam hose. You may only use a steam hose that is recommended by the manufacturer (see spare parts list for the order number).
■ Never touch the mains plug and the socket with wet hands.
■ Never operate the machine bare-foot.
■ Do not touch the machine with wet hands or feet when the mains plug is inserted in the socket.
■ Never dip the machine, the cable or the plugs in water or other liquids.
■ Never use the appliance to clean objects containing hazardous substances (e.g. asbestos)
■ Never touch the steam jet from a short distance with your hands and never direct the steam jet to persons or animals (risk of scalds).
⚠ WARNING
■ The appliance may only be connected to an electrical supply which has been installed in accordance with IEC 60364.
■ The appliance may only be connected to alternating current. The voltage must correspond with the type plate on the appliance.
In wet rooms, e.g. bathrooms connect the appliance to sockets with a series connected RCD adapter.
■ Unsuitable electrical extension cables can be hazardous. Only use a splash-proof electrical extension cable with a minimum cross-section of 3x1 mm ^4 .
■ The connection between power cord and extension cable must not lie in water.
If couplings of the power cord or extension cable are replaced the splash protection and the mechanical tightness must be ensured.
■ The operator must use the appliance correctly. When working with the appliance, he must consider the local conditions and pay due care and attention to other persons, in particular children, who are nearby.
This appliance is not intended for use by persons with limited physical, sensory or mental capacities or lacking experience and/or skills, unless such persons are accompanied and supervised by a person in charge of their safety or they have received precise instructions on the use of this appliance and have understood the resulting risks.
■ Children may only use this appliance if they are over the age of 8 and supervised by a person in charge of their safety, or if they have received instructions on the use of this appliance and have understood the resulting risks.
■ Children must not play with this appliance.
■ Supervise children to prevent them from playing with the appliance.
■ Cleaning and user maintenance must not be performed by children without supervision.
■ Never leave the appliance unattended when it is in operation.
■ Be very careful while cleaning tiled walls with sockets.
■ Do not use the machine to vacuum clean acids or other solutions as they can damage the machine. Also do not suck in explosive powders or liquids as this can lead to explosion when these substances come in contact with the internal parts of the machine.
■ Do not suck in toxic substances
■ Do not suck in burning or glowing objects such as cigarette buds, ash or other burning or glowing materials.
■ Should the appliance fall down, it must be check by an authorised after sales service as internal disturbances could be present, which constrain the safety of the product.
CAUTION
■ Make sure that the power cable or extension cables are not damaged by running over, pinching, dragging or similar. Protect the power cable from heat, oil, and sharp edges.
■ Always switch off the machine and remove the plug while filling the machine with water.
■ Never fill solvents, solvent-containing liquids or undiluted acids (e.g. detergents, benzene, paint thinner, and acetone) into the water reservoir as these substances affect the materials used on the appliance.
■ The appliance must provide of a stable ground.
■ Do not place the machine or heat-sensitive surfaces.
■ Do not place the machine in the vicinity of swtich-on stoves, electrical ovens or other sources of heat.
■ Press the switches lightly and avoid using sharp objects such as pins, pens/pencils and similar objects.
■ Use and store the unit only in accordance with the specifications in the description and/or figure.
■ The steam switch must not be locked during the operation.
■ Please switch off the machine first using the main switch before disconnecting the machine from the mains.
■ To separate the machine from the mains, pull the plug and not the power cord.
■ Never wind the main cable around the machine, definitely not till the machine is still hot.
■ Protect the appliance from rain. Do not store outside.
Safety installations
Safety devices serve for the protection of the user and must not be put out of operation or bypassed with respect to their function.
Release button
■ The handle on the steam suction hose is equipped with a release button, which prevents accidental steam release.
In the event that the steam suction hose is shortly unattended during operation, it is recommended to activate the release button (push the stop button).
In order to trigger the steam release again, deactivate the release button (push the stop button again).
Description of the Appliance
The scope of delivery of your appliance is illustrated on the packaging. Check the contents of the appliance for completeness when unpacking.
In the event of missing accessories or any transport damage, please contact your dealer.
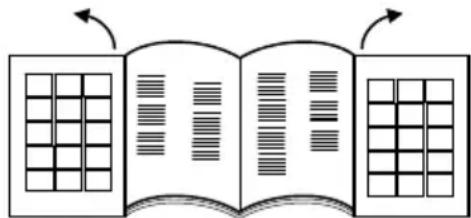
Please unfold the pages with the diagrams!
1 Main switch
2 Steam boiler switch
3 "Low water" - indicator lamp
4 Indicator lamp - Pressure level
5 Indicator lamps - vacuum performance
6 Transport handle, retractable
7 Filling nozzles for water tank
8 Steam regulation
9 Appliance connector with flap
10 Air exit grid
11 Rollers
12 Power cord
13 Mains cable compartment
14 Parking holder
15 EPA-filter
16 Lever for unhooking the HEPA filter
17 Water filter container
18 Handle for Water filter container
19 Water filter lid
20 Water filter inlay
21 Formed foam filter
22 Filter with micro-perforations
23 Pipe bender
Accessories
Steam accessories
A Steam suction hose
A1 Accessory plug
A2 Unlocking button
A3 Steam button
A4 Suction button
A5 Handle
A6 Steam plug
A7 Steam plug lock
B Steam suction pipes
B1 Parking position
B2 Lock lever
C Floor nozzle
C1 Brush strip insert
C2 Rubber lip insert
C3 Hard rubber insert
C4 Locking of the inserts
D Steam suction hand nozzle
D1 Window cleaning insert (wide)
D2 Window cleaning insert (narrow)
D3 Brush insert
D4 Terry cloth cover
E Steam suction detail nozzle
E1 Extension piece
E3 Round brush
Vacuuming accessories
E2 Upholstery nozzle (small)
F Crevice nozzle
G Upholstery nozzle (large)
H Furniture brush
Other accessories
I Measuring cup
J Pipe cleaning brush for pipes and suction hose
K Accessories bag
L Spare seals (O-ring set)
M Defoamer liquid (FoamStop)
Preparing the Appliance
Filling the Water Reservoir
Note
Regular tap water can be used.
As water naturally contains lime, which can lead to formation of scale over time, it is recommended to use a mixture that consists of 50% tap water and 50% distilled water.
ATTENTION
Material damage due to incorrect filling of the water tank.
→ Do not use condensation water from the drier!
→ Do not fill with detergent or other additives (for example fragrances)!
Do not use pure distilled water! Max. 50% distilled water and 50% tap water.
→ Do not use collected rain water!
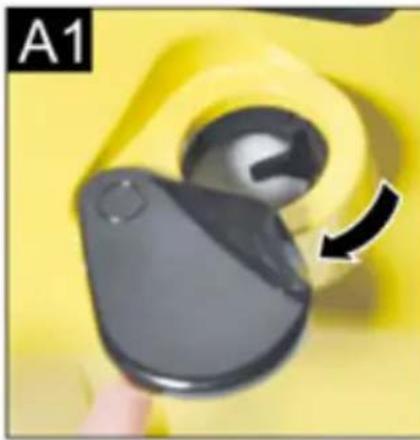
Illustration A 1
→ Pull the filler neck of the water tank towards the outside.
Illustration A 2
Illustration A 3
→ Fill the water tank with approx. 0.5 litres of water until the float, which indicates the maximum filling level, can be seen.
→ Close the water tank.
Note
The steam boiler is automatically supplied with water from the water tank. Prior to the initial start-up, the water tank must be filled twice.
Filling the water filter container
ATTENTION
Material damage due to empty water filter container.
→ Ensure that the water filter container is always filled during operation.
Illustration B 1
→ Lift the handle of the water container.
→ Pull out the water filter container.
Illustration B2
→ Turn the handle towards the back.
Illustration B 3
→ Remove the water filter insert.
Illustration B 4
→ Fill the water filter container with tap water until the water level indicator MAX H_2O is covered.
→ Add one cap full of the defoaming liquid (Foam-Stop) to the water filter reservoir.
Illustration B 3
→ Reinsert the water filter insert into the water filter container.
Illustration B2
→ Move the handle to its original position until it locks in place.
Illustration B 1
→ Insert the water filter container into the appliance using the handle.
Note: The functioning of the vacuum cleaner is based on the whirling of the suction air in the water filter. In the process, sucked-in materials and deposits of cleaning agents from floors get collected in the water bath. This can sometimes lead to the formation of foam. It is necessary to add a capful of the defoamer liquid to the water bath to avoid this situation. Slight foam formation is normal and does not hamper the functioning of the machine.
Operation
Always place the machine in a horizontal position during operation.
△CAUTION
Risk of injury due to accidental discharge of steam.
→ Ensure that the release button is always activated by the stop position during interruptions of work or when the appliance is not supervised.
Note
In order to continue the steam release, deactivate the stop position by pushing the button again.
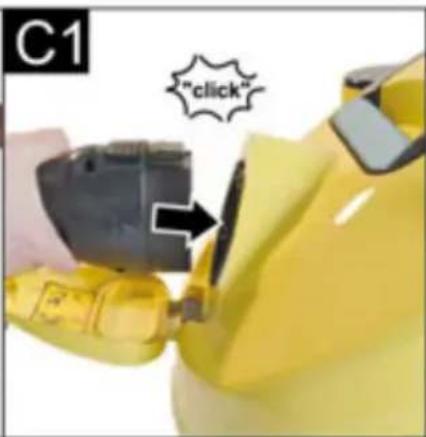
Illustration C1
→ Open the flap of the appliance connector.
→ Tightly insert the steam plug into the appliance connector. The plug must click into place audibly.
Illustration C2
→ Insert the mains plug into the socket.
Connecting the accessories
Illustration D1
→ All accessories can directly be attached to the handle or to the steam suction pipes.
Illustration D2
→ In order to connect the two extension tubes with each other, the direction of the arrow must be observed.
Accessories for steaming and vacuuming
Illustration D1
→ Connect the handle or the extension tube to the desired accessory.
Illustration D2
△CAUTION
Risk of injury on account of steam!
→ During the operation of the device, the locking le-vers must remain in the closed position!
→ The locking lever is in the middle, (position open).
To secure the accessories: Turn the locking lever to the right and slide it down (position closed).
→ Check accessory for safe connection prior to use.
To disconnect the accessories: Slide up the locking lever and turn it to the left.
→ The locking lever is now in the middle again, the accessories can be pulled apart.
Vacuum cleaning operation
You can use this appliance to vacuum dust as well as spilled liquids.
△CAUTION
Risk of injury due to accidental discharge of steam.
→ Activate release button.
Illustration E1
→ Push the main switch.
The first level of the indicator lamps for the suction performance starts to flash.
Illustration E2
→ Briefly push the suction button on the handle. The suction operation starts with the minimum performance. The first level of the indicator lamps for the suction performance is continuously on.
→ End suction operation: Press suction button again briefly.
Note
When you restart the suction function, the machine starts at with the previously selected suction performance.
Setting the vacuum cleaning performance
The setting of the suction performance depends on the surface to be cleaned.
Illustration E2
→ Push the suction button and hold it down.
→ The suction performance initially increases continuously and then decreases continuously after reaching the maximum power.
This is indicated by the indicator lamps for the suction performance.
| Level Material / surface | |
| 1 Curtains | |
| 2 Sofas and upholstery | |
| 3 Carpets / carpeted floors | |
| 4 Vacuuming floors or absorbing fluids | |
Note
The numbers indicating the levels correspond to the indication of the indicator lamps for the suction performance.
Water filter
If the waste water level in the water filter container has reached the maximum level, the vacuum cleaning function is automatically blocked. A higher speed of the motor is then audible. After 10 seconds, the appliances automatically switches to pause.
Illustration E1
→ Turn on the machine.
Illustration I
→ Drain the waste water from the water filter container.
Illustration B 4
→ After that, water must be refilled until the required water level is reached.
ATTENTION
Material damage due to immediate restart during the pause function.
To avoid damage to the air outlet filter, do not switch on the appliance during the pause function.
To continue the cleaning work, refer to Chapter "Emptying and cleaning the water filter container".
Steam operations
Illustration E1
→ Push the main switch. The first level of the indicator lamps for the suction performance starts to flash.
Illustration F1
→ Push the steam boiler switch, the switch lights up.
→ Wait until the indicator lamp for the pressure indication is on.
The appliance is now ready for steam operation.
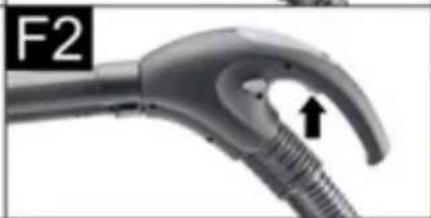
Illustration F2
→ Push the steam button on the handle. Steam is dispensed as long as the steam button is held down.
Illustration F1
→ To end the steam operation, push the steam boiler switch.
Setting the steam outflow
The steam discharge can be optimised by operating the rotary switch of the steam control.
Illustration F3
To increase the steam discharge: Turn the rotary switch in a clockwise direction.
To decrease the steam discharge: Turn the rotary switch in a counter-clockwise direction.
■ Mild steam: (Setting 1-2)
To sprinkle water on plants, clean fabrics, tapestries, upholstered furniture, etc.
■ Normal steam: (Setting 3)
For carpeted floors, carpets, window panes, floors.
■ Heavy steam: (Setting 4-5)
To remove hard dirt, stains and grease.
Filling the Water Reservoir
The water reservoir may be refilled at any time.
Note
If there is not enough water in the steam boiler, the pump automatically delivers water from the water tank into the steam boiler. If the water tank is empty, the pump can no longer fill the steam boiler and the steam tapping is blocked.
■ Water shortage in the water tank is indicated by the indicator lamp for water shortage and an audible signal.
■ To continue work, refer to Chapter "Filling the water tank".
Steam and vacuum cleaning operation
Illustration

→ Push the main switch.
The first level of the indicator lamps for the suction performance starts to flash.
Illustration

→ Push the steam boiler switch, the switch lights up.
→ Wait until the indicator lamp for the pressure indication is on.
The appliance is now ready for steam operation.
Illustration

Illustration

→ Simultaneously push the steam button and briefly the suction button on the handle.
The suction operation starts with the minimum performance and steam is discharged simultaneously.
For further use of the steam and vacuuming function see Chapter "Steaming operation and vacuuming operation"
Putting Down the Accessories
Illustration G
→ Place the steam suction pipe in the parking holder during interruptions of work.
Energy saver mode
If the appliance is not used for more than 15 minutes, it automatically changes into the standby mode and the boiler switches off.
The first stage of the indicator lamp for the suction performance starts to flash more slowly as with the normal switch-on of the suction indicators.
There are the following options for recommissioning:
Illustration

→ Switch the main switch off and back on.
or
Illustration

Illustration

→ Push the steam button or suction button for at least 3 seconds.
Finish operation
Illustration

→ Push the main switch.
Illustration

→ Separate the mains cable from the power supply system.
Illustration H
→ Disconnect the steam plug from the appliance. Hold the steam plug lock down and pull the steam plug out of the appliance connector.
Storing the Appliance
ATTENTION
Material damage due to a lack of cleaning the accessories after use.
→ Always thoroughly clean all accessories prior to storing the appliance.
→ Disconnect all accessories.
→ Rinse all accessories with clear water under a tap.
→ Rinse pipes and steam suction hose with clear water using the pipe cleaning brush.
→ Allow accessories to dry afterwards.
→ Store the appliance at a dry and frost-proof location.
Emptying and cleaning the water filter container
Illustration

→ Lift the handle of the water container.
→ Pull out the water filter container.
Illustration

→ Turn the handle towards the back.
→ Remove the water filter insert.
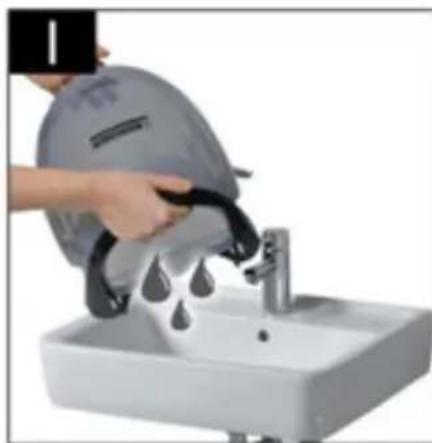
Illustration I
→ Draining the water filter container by tilting it towards the pouring device.
Illustration J
→ Pull the pipe bend off the filter casing with the grid with the micro-perforation until it is completely removed.
→ Remove all components and rinse them under running water.
Replace filter in case of damage.
Please contact the authorised customer service in order to purchase a new filter.
ATTENTION
Material damage due to incorrect installation of the pipe bend in the filter with the micro-perforation.
→ Upon installation insure that the arrow on the pipe bend matches the marking on the filter with the micro-perforation.
Illustration B 3
→ Reinsert the water filter insert into the water filter container.
Illustration B 1
→ Insert the water filter container into the appliance using the handle.
Illustration B 1
→ Move the handle to its original position until it locks in place.
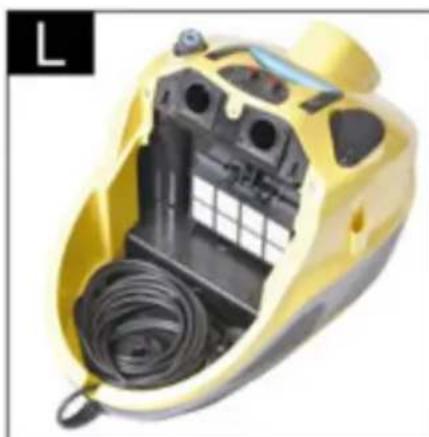
Illustration L
→ Evenly roll up the power cable and place it in the power cable compartment.
Illustration M
→ Put the water filter container back in its position and ensure that it is properly placed.
How to Use the Accessories
■ Please read the cleaning instructions of the manufacturer before treating leather, special fabrics and wooden surfaces and always do a trial on a sample or some hidden part. Let the steam-treated surface dry and then check whether there are any changes to the colour or form on account as reaction to the steam.
We recommend that you be very careful while cleaning wooden surfaces (furniture, doors, etc.) because long exposure to steam can damage the wax coating, the finish or the surface colours. Hence we recommend that you use steam only for short intervals or first clean the surface with a cloth that has been steam-moistened.
For highly sensitive surfaces (for e.g. synthetic materials, painted surfaces, etc.) we recommend that you use the steam function at the minimum performance level.
■ Cleaning of stainless steel: Avoid the use of abrasive brushes. Use hand nozzle with rubber lip or detail nozzle without a round brush.
Refreshing textiles
■ Always test the compatibility of the fabrics on a hidden spot prior to treating them with the appliance: Steam first, then allow to dry before checking for colour changes or deformation.
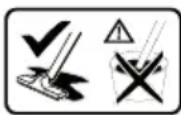
Floor nozzle
ATTENTION
Material damage if the setting of the steam level is too high.
→ Sensitive floors, such as parquet floors may only be cleaned with the highest suction performance and minimum steam level.
Application examples
■ Cleaning of large surfaces, floors made of ceramics, marble, parquet, carpets, etc.
■ Floor nozzle with brush strip insert: For etching and scrubbing down stubborn soiling.
■ Floor nozzle with rubber lip insert: For vacuuming up liquids from smooth surfaces.
■ Floor nozzle with hard rubber insert: Cleaning and refreshing of carpeting.
Mounting the attachments
Illustration D 3
→ Slide the locking mechanism of the floor nozzle outwards.
→ Put the insert into the bottom side of the brush.
→ To secure the insert, slide the locking mechanism inwards.
→ Removing the insert: Slide the locking mechanism outwards again.
→ Remove the insert.
Detail nozzle
The closer you hold the nozzle to the dirty spot, the higher the cleaning effect as temperature and pressure of the steam reach their maximum values immediately when they are emitted from the nozzle.
Application examples
■ The use of the detail nozzle is recommended for hard to reach areas.
■ Cleaning of stainless steel, window panes, mirrors and enamel surfaces.
■ Cleaning of corners on stairs, window frames, door posts, aluminium profiles.
■ Cleaning of fittings.
■ Cleaning of window shutters, radiators.
Detail nozzle and accessories
ATTENTION
Material damage (e.g. scratches on painted surfaces) due to the use of the round brush on sensitive surfaces.
→ Do not use the round brush on sensitive surfaces.
■ The round brush is suitable for stubborn soiling on especially small surfaces such as stove tops, roller shutters, tile joints, sanitary facilities, etc.
■ Extension: With this accessory an optimum cleaning of places that are particularly hard to reach is possible. Ideal for cleaning heaters, door posts, windows, roller shutters, sanitary facilities.
Hand nozzle
Application examples
The use of the hand suction nozzle is recommended for large glass and mirror surfaces, smooth surfaces in general or for the cleaning of textile surfaces, such as sofas, mattresses, etc.
Hand nozzle and accessories
■ Window cleaning insert wide: Window panes and surfaces of larger dimensions.
■ Window cleaning insert narrow: Window panes and surfaces of smaller dimensions.
■ Brush collar: For carpets, staircases, car interiors, textile surfaces in general (after carrying out a test on a hidden area). For abrasive cleaning and scrubbing.
■ Pull the terry cloth cover over the manual nozzle. Especially well-suited for small washable areas, shower stalls and mirrors.
Cleaning of Glass
ATTENTION
Material damage due to steam release onto cold window panes.
→ In seasons with particularly low temperatures, pre-warm the window panes by releasing steam with a distance of approx. 50 cm to the surface to be treated.
ATTENTION
Material damage due to steam release onto sealed spots of the window frame.
→ Do not level the steam at these spots.
→ Apply steam to the glass surface from a distance of approximately 20 cm until the surface is moistened evenly.
→ Switch off the steam supply.
→ Strip the glass surface web by web from top to bottom by means of the rubber lip and vacuum off.
→ Wipe the rubber lip and the lower window frame dry as necessary.
Upholstery nozzle (small)
It is suitable to vacuum up dirt from narrow surfaces, such as tile joints, door frames, roller shutter slits, etc.
Upholstery nozzle (large)
■ For cleaning textile surfaces such as sofas, arm-chairs, mattresses, car seats, etc..
Crevice nozzle
■ For edges, joints, heaters and hard to reach locations.
Furniture brush
■ For cleaning sensitive surfaces such as picture frames, books, etc..
Special accessories
Round brush kit (order No. 2.860-231) 4 round brushes for the detail nozzle.
HEPA Filter (Order No.. 2.860-229)
Care and maintenance
△DANGER
Mortal danger due to electric current.
→ Turn off the appliance and remove the mains plug prior to any care and maintenance work.
→ Allow device to cool down.
→ Repair works may only be performed by the authorised customer service.
Care
■ Do not set the brushes onto the bristles during cooling or drying so that they do not deform.
■ Use a moist cloth for cleaning the machine from the outside. Avoid using any solutions or cleaning agents as they can damage the plastic surface.
■ For cleaning the water filter container, see Chapter "Storing the appliance".
Maintenance
- Check the condition of the seals in the steam plug regularly. Replace them as necessary.
■ Perform the same check for the connection seals of the steam pipes and the handle.
HEPA filter
ATTENTION
Material damage due to incorrect cleaning of the HEPA filter.
→ When necessary, clean under running water only, do not wipe or brush down.
→ Removal of the water filter container, see Chapter "Filling the water filter container".
Illustration K
→ Lift the unhooking lever of the HEPA filter and remove the filter from the seating.
→ Rinse the HEPA filter under cold, running water.
→ Shake the filter carefully after cleaning so that any residual dirt or excess water is removed.
Note
Allow the HEPA filter to be air-dried by light and heat sources. Only reinstall the dry HEPA filter into the appliance.
■ Replace the HEPA filter in case of damage
■ The HEPA filter should be cleaned at intervals of 4 months.
■ Ensure the correct positioning of the HEPA filter in the holder.
■ Relock the HEPA filter by means of the lever.
Troubleshooting
Often, failures have simple causes and you can do the troubleshooting yourself using the following overview. If you are in doubt or if the failure is not listed here please contact the authorized customer service.
△DANGER
Mortal danger due to electric current.
→ Turn off the appliance and remove the mains plug prior to any care and maintenance work.
→ Allow device to cool down.
→ Repair works may only be performed by the authorised customer service.
Appliance does not vacuum
Power supply is interrupted
→ Remove the mains plug, check the connecting cable and the mains plug for damage.
Accessories/suction hose/suction pipes are clogged or kept shut
If accessories/suction hose/suction pipes are clogged or kept shut for more than 10 seconds, a vacuum develops and the electronics switches off the motor for safety reasons.
→ Turn off the appliance.
→ Remove blocking.
→ Turn on the machine.
Weak/diminishing suction power
Accessory is blocked
→ Accessories, suction hose or suction tubes are clogged, please remove the obstruction.
→ Clean water filter insert.
→ Change the water in the water filter container.
HEPA filter is soiled
→ Replace the HEPA filter.
Poor cleaning performance
Water in the water filter container is very dirty.
→ Change the water in the water filter container.
Water leaks out while sucking in fluids
The float switch is blocked.
→ Clean the lid of the water filter container.
The vacuum cleaner does not suck
Float switch is blocking.
→ Switch off the vacuum cleaner, ensure that the water level in the reservoir is correct and switch on the machine again.
Technical specifications
| Electrical connection | |
| Voltage 220-240 | V1~50-60 Hz |
| Protection class IP X4 | |
| Protective class I | |
| Performance data | |
| Boiler capacity 1100 W | |
| Rated power turbine 1100 W | |
| Max. steam pressure 0,4 MPa | |
| Heating time 5 Minutes | |
| Max. steam quantity 65 g/min | |
| Filling quantity | |
| Boiler capacity 0,45 l | |
| Water reservoir 0,5 l | |
| Water filter container 1,2 l | |
| Dimensions | |
| Length 510 mm | |
| Width 330 mm | |
| Height 340 mm | |
| Weight (without accessories) 9,1 kg | |
| Sound | |
| Sound pressure level (EN 60704-2-1) | 71 dB(A) |
Subject to technical modifications!
Table des matières
www.kaercher.com/REACH
Garantie
www.kaercher.com/REACH
Garanzia
1 Hoofdschakelaar
L Reservedichtingen (O-ring-set)
M Ontschuimvloeistof (FoamStop)
Voorbereiding
Watertank vullen
Tip
Accessoire is verstopt
www.kaercher.com/REACH
Garantía
www.kaercher.com/REACH
Garantia
www.kaercher.com/REACH
Garanti
1 Hovedafbryder
2 Kontakt til dampkedlen
3 Kontrollampe - Vandmangel
4 Kontrollampe - Trykindikator
5 Kontrollampe - Sugekapacitet
6 Transporthåndtaget, sammenfoldelig
7 Påfyldningsstuds vandtank
8 Dampregulering
9 Apparat-stikdåse med klap
10 Rist til luftudslip
11 Ruller
12 Netkabel
www.kaercher.com/REACH
Garanti
www.kaercher.com/REACH
Garanti
www.kaercher.com/REACH
Takuu
www.kaercher.com/REACH
Εγγύηση
www.kaercher.com/REACH
Garanti
www.kaercher.com/REACH
Гарантия
www.kaercher.com/REACH
Garancia
www.kaercher.com/REACH
Záruka
www.kaercher.com/REACH
Garancija
1 Glavno stikalo
2 Stikalo parnega kotlička
3 Kontrolna lučka - pomanjkanje vode
4 Kontrolna lučka - prikaz tlaka
5 Kontrolna lučka - sesalna moč
www.kaercher.com/REACH
Gwarancja
Mult stimate client,

www.kaercher.com/REACH
Garantie
www.kaercher.com/REACH
Záruka
→ Vymeňte filter HEPA.
www.kaercher.com/REACH
Jamstvo
www.kaercher.com/REACH
Garancija
U svakoj zemlji važe garantni uslovi koje je izdala naša nadležna distributivna organizacija. Eventualne smetnje na uređaju za vreme trajanja garancije uklanjamo besplatno, ukoliko je uzrok greška u materijalu ili proizvodnji. U slučaju koji podleže garanciji obratite se sa potvrdom o kupovini Vašem prodavcu ili najbližoj ovlašćenoj servisnoj službi. (Adresu ćete naći na poleđini)
Rezervni delovi
Upotrebljavajte samo originalne rezervne delove firme KÄRCHER. Pregled rezervnih delova naći ćete na kraju ovog uputstva za rad.
Sigurnosne napomene
1 Glavni prekidač
2 Prekidač parnog kotla
3 Indikator - nedostatak vode
4 Indikator - prikaz pritiska
5 Indikatori - usisna snaga
6 Preklopna transportna ručka
7 Nastavak za punjenje rezervoara za vodu
8 Regulacija pare
9 Utičnica uređaja sa poklopcem
10 Rešetka izduvnog vazduha
11 Točkići
12 Strujni kabal
13 Odeljak strujnog kabla
14 Držač za odlaganje
15 EPA filter
16 Poluga za odglavljivanje HEPA filtera
17 Posuda filtera za vodu
18 Ručka posude filtera za vodu
19 Poklopac filtera za vodu
20 Umetak filtera za vodu
21 Oblikovani sunderasti filter
22 Filter sa mikro-perforacijom
23 Zavijena cev
Pribor
Pribor za paru
A Crevo za usisavanje pare
A1 Utikač pribora
A2 Tipka za deblokiranje
A3 Taster za paru
A4 Taster za usisavanje
A5 Drška
A6 Parni utikač
A7 Bravica parnog utikača
B Cevi za usisavanje pare
→ Zamenite HEPA filter.
Učinak čišćenja se smanjuje
www.kaercher.com/REACH
Гаранция
1 Главен ключ
2 Ключ парен котел
3 Контролна лампа - недостиг на вода
www.kaercher.com/REACH
Garantii
www.kaercher.com/REACH
Garantija
1 Galvenais slēdzis
www.kaercher.com/REACH
Garantija
www.kaercher.com/REACH
Гарантія
1 Головний вимикач
www.kaercher.com/REACH
Кепілдеме
natural_image
Close-up of a medical or robotic device with a curved handle and threaded end, labeled 'E2' in the corner (no readable text or symbols beyond label)
natural_image
Close-up of a medical or laboratory device with a curved handle and threaded end (no visible text or symbols)
natural_image
Close-up of a yellow industrial rotary knob with a magnifying glass icon and control buttons (no readable text or symbols)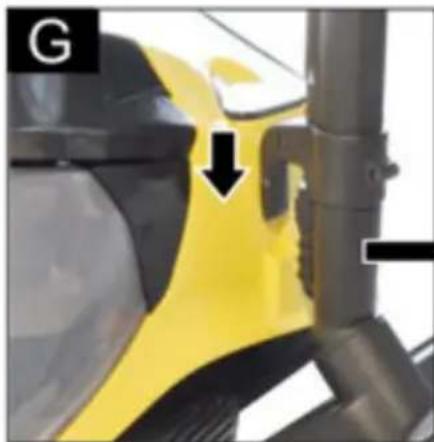
natural_image
Close-up of a yellow and black mechanical component with a black arrow pointing to a detail (no text or symbols visible)
natural_image
Close-up of a yellow and black vacuum cleaner with a curved handle, shown against a white background (no text or symbols visible)
natural_image
Person washing a sink with water droplets, no text or symbols visible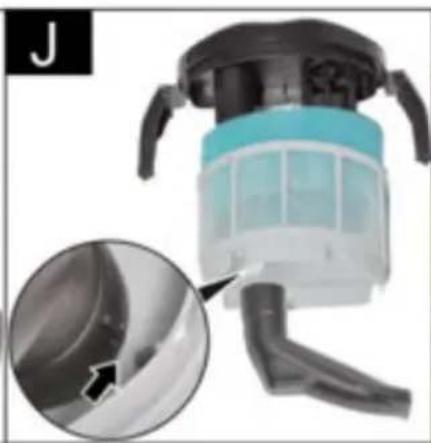
natural_image
Close-up of a robotic vacuum cleaner with a close-up inset showing internal components (no text or symbols visible)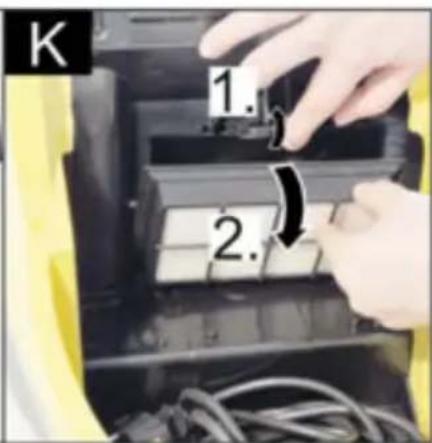
natural_image
Interior view of a yellow and black handheld device with visible internal components (no text or symbols)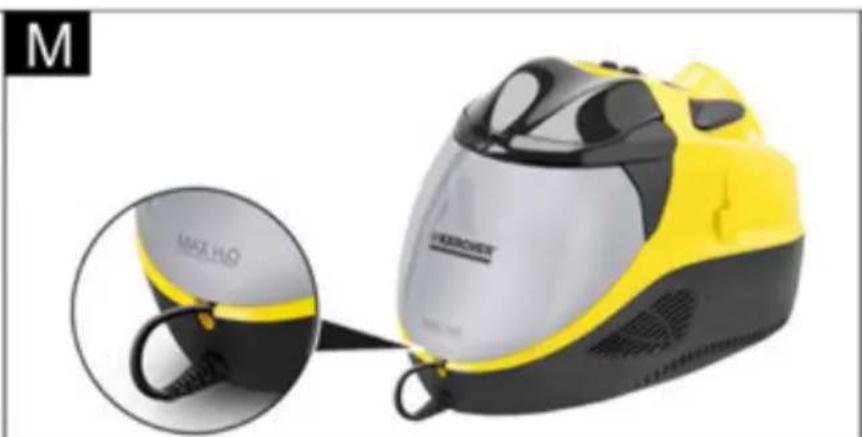
natural_image
Yellow and black electric vacuum cleaner with attached cable, shown in a close-up inset (no text or symbols visible on device body)
flowchart
graph TD
    A["Input Grid"] --> B["Output Grid"]
    B --> C["Output Output"]
    style A fill:#f9f,stroke:#333
    style B fill:#bbf,stroke:#333
    style C fill:#dfd,stroke:#333

natural_image
Icon showing a gear and wrench inside a square frame (no text or symbols)http://www.kaercher.com/dealersearch

71364 Winnenden (Germany)
Tel.: +49 7195 14-0
Fax: +49 7195 14-2212