
TGT Racestuur - Controller THRUSTMASTER - Free user manual and instructions
Find the device manual for free TGT Racestuur THRUSTMASTER in PDF.

| Product type | Racing wheel with force feedback |
| Brand | Thrustmaster |
| Model | T-GT (TGT Racestuur) |
| Power supply | T-TURBO power supply unit, 100-240V ~ 50/60Hz |
| Connectivity | Detachable USB, pedal connector, TH8A shifter connector |
| Pedal set included | Yes, 3 adjustable metal pedals (height, spacing, tilt) + optional Conical Rubber Brake MOD |
| Force feedback system | Yes, with 12 testable effects on PC |
| T-DFB effect system | Yes, compatible with PS4 in GT mode |
| Rotary selectors | 4 with push function |
| Mini-sticks | 2 |
| Buttons | D-pad, SHARE, OPTIONS, PS, MODE, sequential shifters |
| Rotation angle | 1080° |
| Automatic calibration | Yes, for the wheel and pedals |
| Internal cooling | Fan, automatically starts when powered on |
| Compatibility | PlayStation 4 (GT mode and OTHER mode), PC (USB selector in OTHER position) |
| Approximate weight | Approximately 5 kg (base + wheel) |
| Approximate base dimensions | 30 x 20 x 20 cm |
| Warranty | 2 years in EU, 1 year elsewhere (subject to local legislation) |
| Manufacturer | Guillemot Corporation S.A. |
| Maintenance | Clean with a dry cloth, do not use liquids. Do not obstruct the ventilation grilles. |
Frequently Asked Questions - TGT Racestuur THRUSTMASTER
User questions about TGT Racestuur THRUSTMASTER
0 question about this device. Answer the ones you know or ask your own.
Ask a new question about this device
Download the instructions for your Controller in PDF format for free! Find your manual TGT Racestuur - THRUSTMASTER and take your electronic device back in hand. On this page are published all the documents necessary for the use of your device. TGT Racestuur by THRUSTMASTER.
USER MANUAL TGT Racestuur THRUSTMASTER
To ensure that your T-GT racing wheel functions correctly with games, you may be required to install the game's automatic updates (available when your system is connected to the Internet).
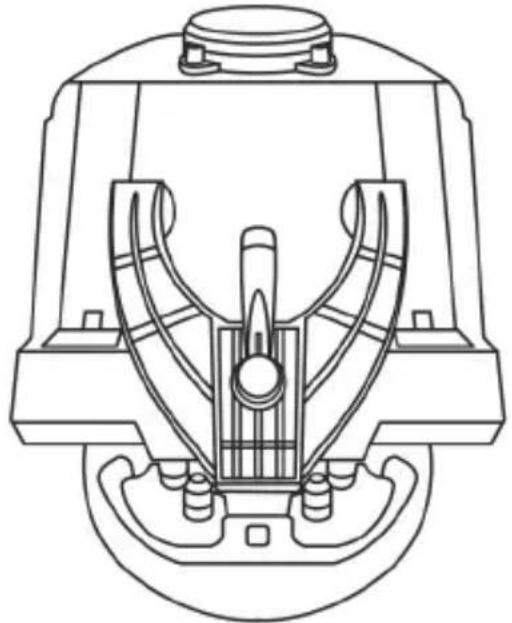
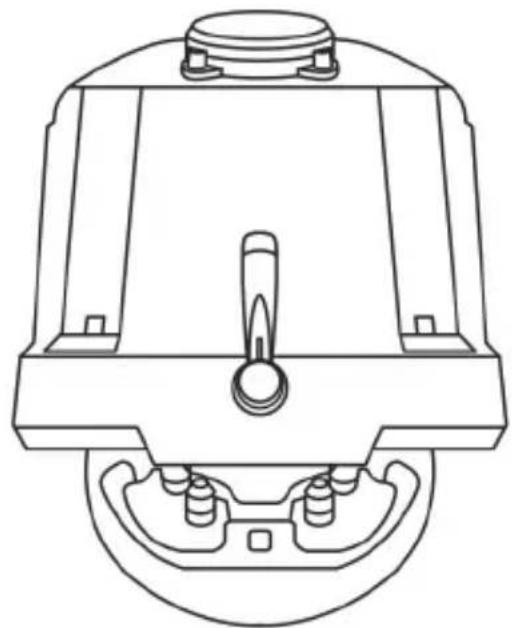
TECHNICAL FEATURES
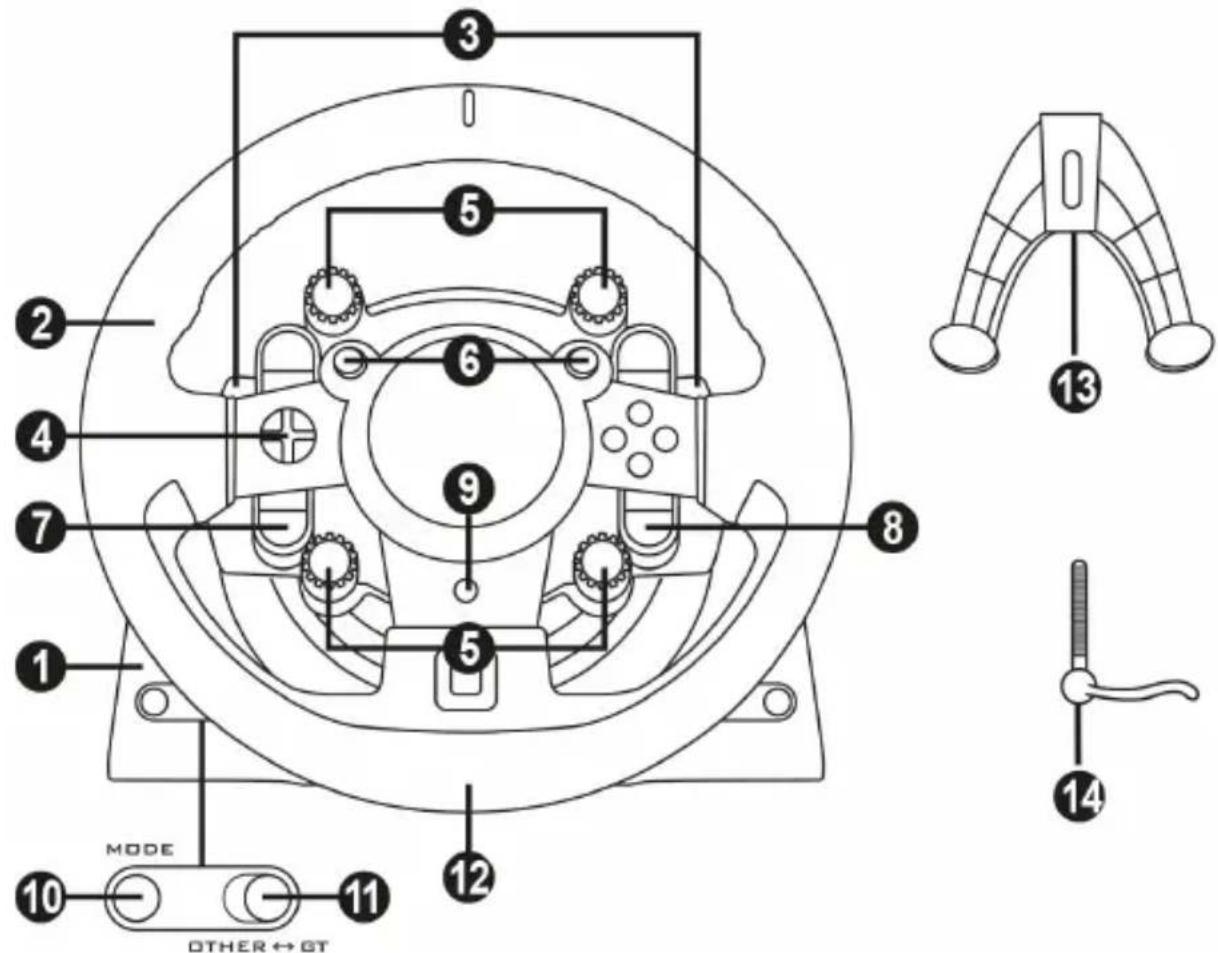
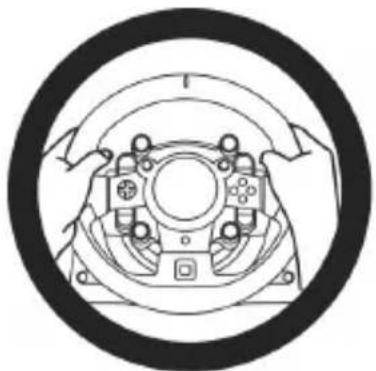
1 T-GT base
2 T-GT wheel
3 2 sequential paddle shifters (up & down)
4 Directional buttons
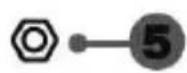
5 4 rotary selectors with Push function (compatible with the PS4TM system in GT mode and on PC)
6 2 mini-sticks (compatible with the PS4TM system in GT mode and on PC)
7 SHARE button
8 OPTIONS button
9 PS button
10 MODE button + red/green indicator light
11 Built-in USB sliding switch: OTHER / GT
12 Large threaded hole (for attachment system and fastening screw)
13 Attachment system
14 Metal fastening screw
*PC compatibility neither tested nor endorsed by Sony Interactive Entertainment Europe.
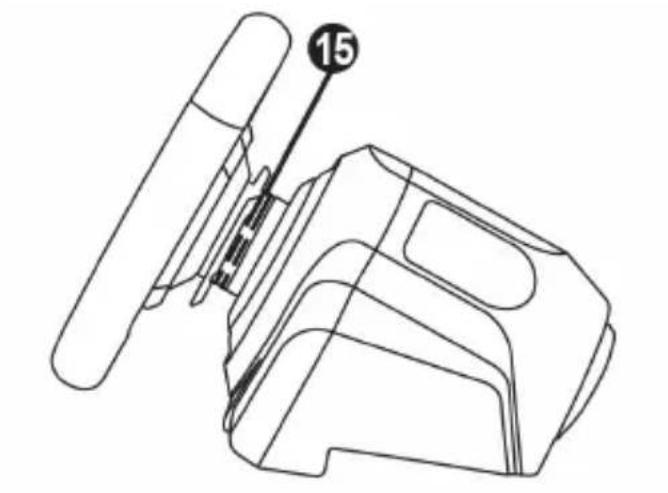


15 Thrustmaster Quick Release
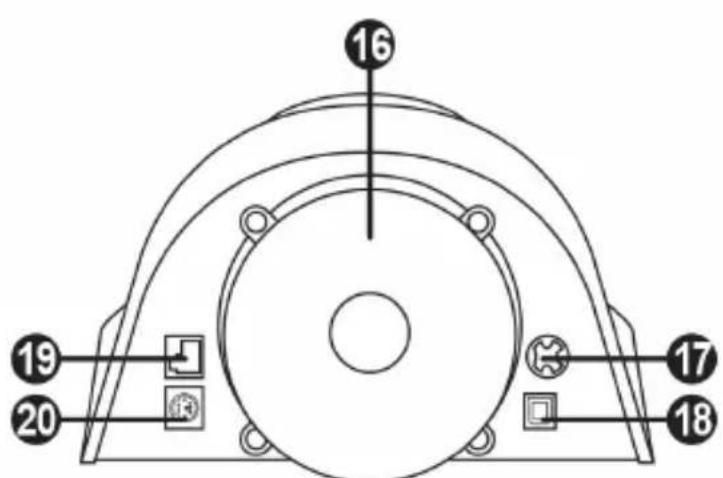
16 T-DFB effects system (only compatible with the PS4TM system in GT mode)
17 Connector for T-TURBO power supply
18 Connector for removable USB cable
19 Connector for pedal set
20 Connector for TH8A shifter (shifter sold separately)
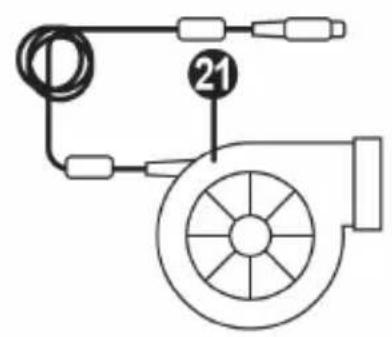
21 T-TURBO power supply
22 Power supply cable
23 Removable USB cable
PLUGGING THE WHEEL INTO AN ELECTRICAL OUTLET: PLEASE READ CAREFULLY!

Never plug the T-TURBO power supply into an electrical outlet with a different voltage! The
T-TURBO power supply's voltage is indicated on the label located above the female connector for the power supply cable.

Never connect a power supply other than the T-TURBO power supply to the T-GT base,
even if the connector is compatible! For example, never connect the power adapter for the T500 RS wheel to the T-GT base.
WARNING
Before using this product, please read this manual carefully and save it for later reference.

Warning - Electrical shock
- Keep the product in a dry location and do not expose it to dust or sunlight.
- Do not twist or pull on the connectors and cables.
- Do not spill any liquid on the product or its connectors.
- Do not short-circuit the product.
- Never dismantle the product; do not throw it onto a fire and do not expose it to high temperatures.
- Do not use a power supply cable other than the one provided with your racing wheel.
- Do not use the power supply cable if the cable or its connectors are damaged, split or broken.
- Make sure that the power supply cable is properly plugged into an electrical outlet, and properly connected to the connector at the rear of the racing wheel's base.
- Do not open up the racing wheel: there are no user-serviceable parts inside. Any repairs must be carried out by the manufacturer, its authorised representative or a qualified technician.
- Only use attachment systems/accessories specified by the manufacturer.
- If the racing wheel is operating abnormally (if it is emitting any abnormal sounds, heat or odours), stop using it immediately, unplug the power supply cable from the electrical outlet and disconnect the other cables.
- If you will not be using the racing wheel for an extended period of time, unplug its power supply cable from the electrical outlet.
- The electrical outlet must be located near the equipment and must be easily accessible.

Air vents
Make sure not to block any of the air vents on the racing wheel's base. For optimal ventilation, make sure to do the following:
- Position the wheel's base at least 10c m away from any wall surfaces.
- Do not place the base in any tight spaces.
- Do not cover the base.
- Do not let any dust build up on the air vents.

For safety reasons, never use the pedal set with bare feet or while wearing only socks on your feet.
THRUSTMASTER © DISCLAIMS ALL RESPONSIBILITY IN THE EVENT OF INJURY RESULTING FROM USE OF THE PEDAL SET WITHOUT SHOES.

Warning - Injuries due to Force Feedback and repeated movements
Playing with a Force Feedback racing wheel may cause muscle or joint pain. To avoid any problems:
- Avoid lengthy gaming periods.
- Take 10 to 15 minute breaks after each hour of play.
- If you feel any fatigue or pain in your hands, wrists, arms, feet or legs, stop playing and rest for a few hours before you start playing again.

Warning - Injuries due to Force Feedback and repeated movements (continued)
- If the symptoms or pain indicated persist when you start playing again, stop playing and consult your doctor.
- Keep out of children's reach.
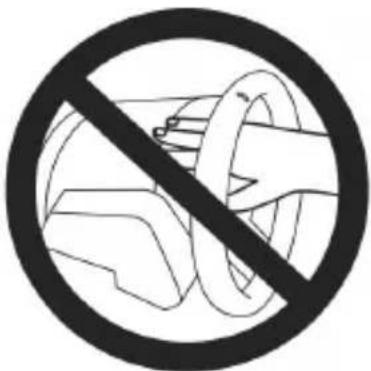
- During gameplay, always leave both hands correctly positioned on the wheel without completely letting go.
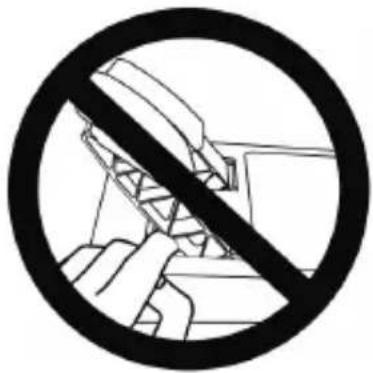
- During gameplay, never place your hands or your fingers under the pedals or anywhere near the pedal set.
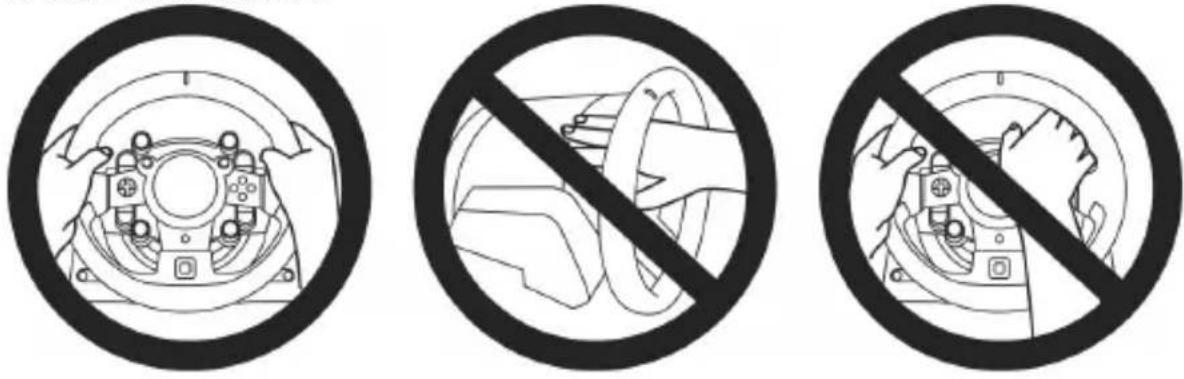
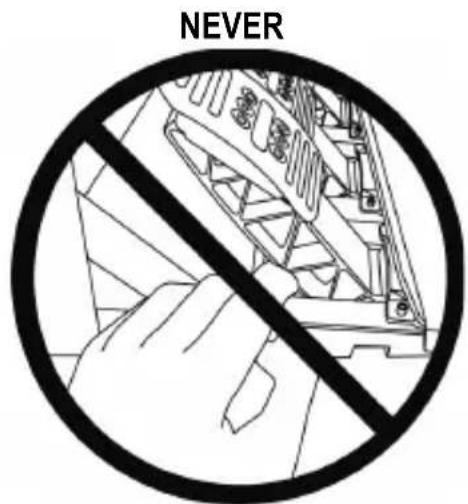
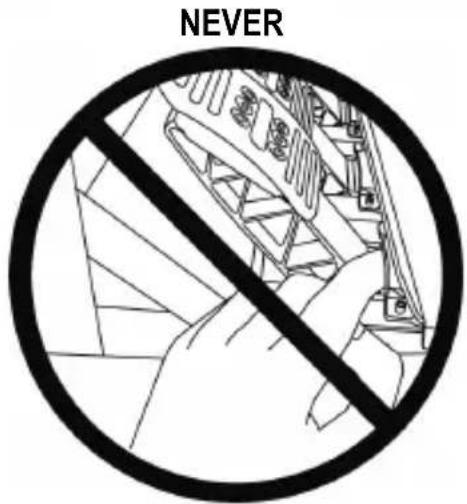
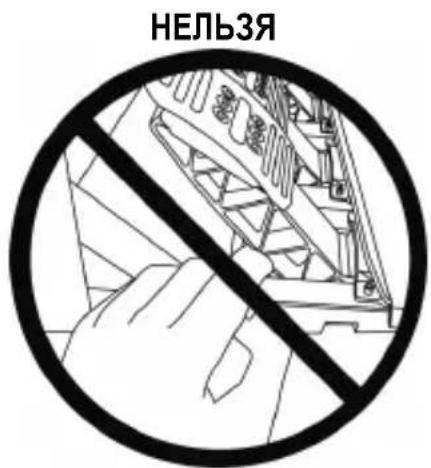
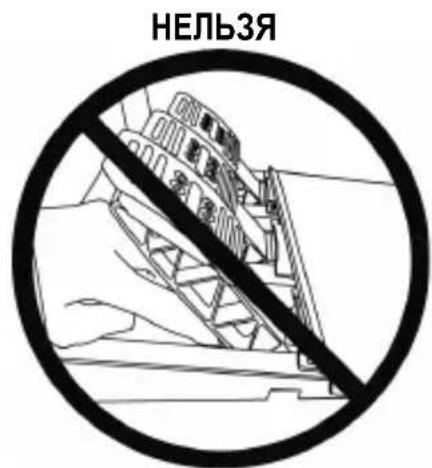
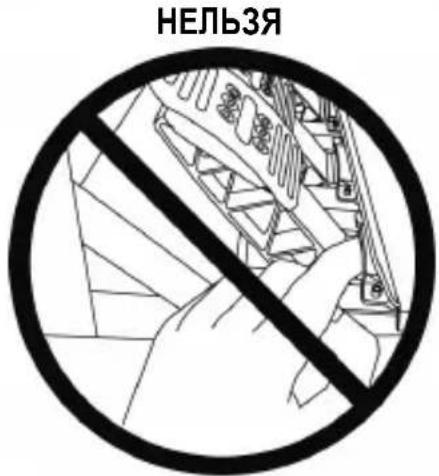
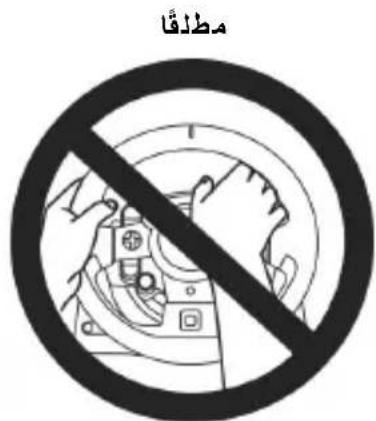
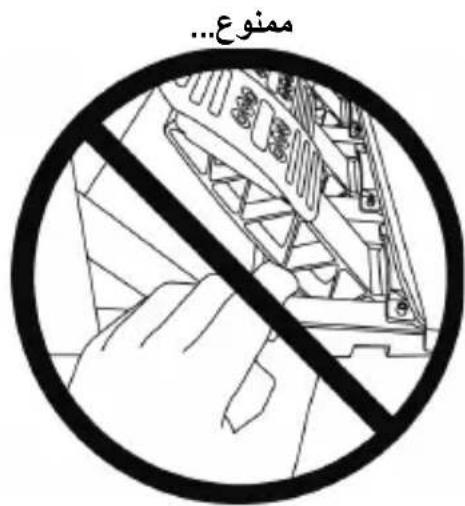
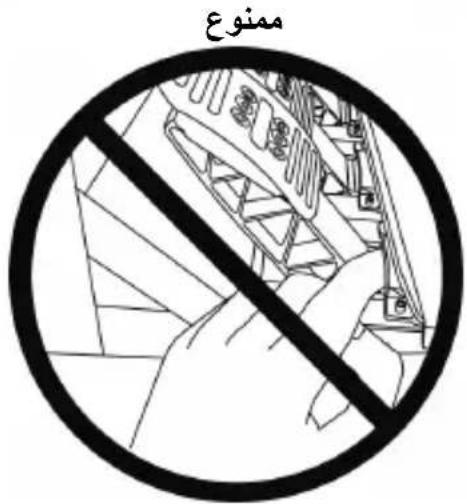
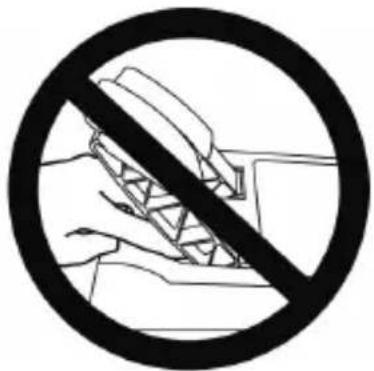
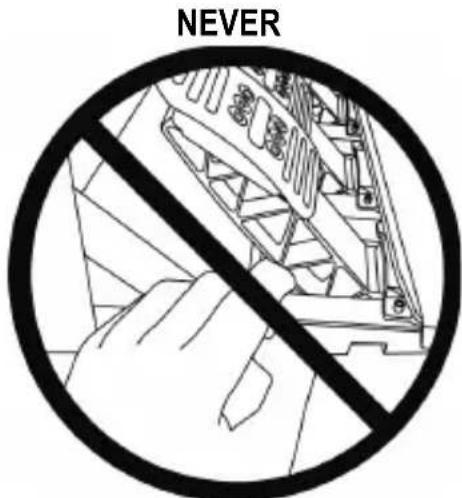
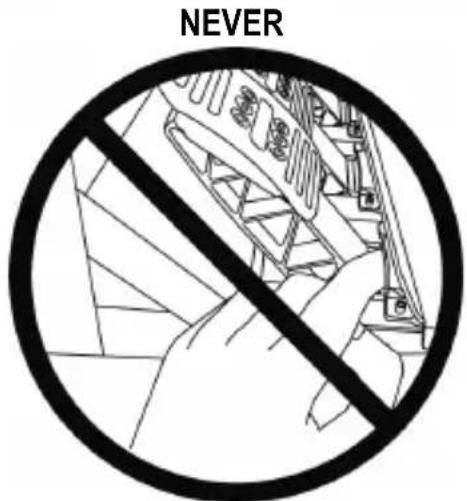
- During calibration and gameplay, never place your hand or your arm through the openings in the racing wheel.
- Make sure that the racing wheel's base is properly secured, as per this manual's instructions.

Product to be handled only by users 16 years of age or older
HEAVY PRODUCT
Be careful not to drop the product on yourself or on anyone else!
ALWAYS NEVER NEVER
- Keep the pedal set out of children's reach.
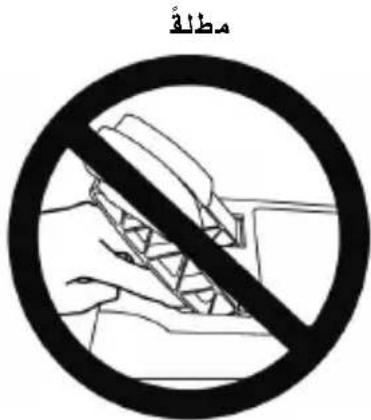
- During gameplay, never place your fingers on or anywhere near the sides of the pedals.
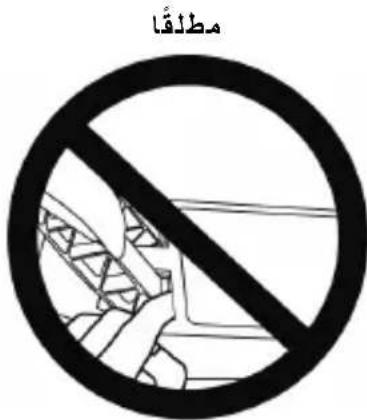
- During gameplay, never place your fingers on or anywhere near the pedal's rear base.
- During gameplay, never place your fingers on or anywhere near the pedal's front base.

NEVER

NEVER

NEVER

Warning - Pedal set pinch hazard when not playing
- Store the pedal set in a safe place, and keep it out of children's reach.
UPDATING YOUR RACING WHEEL'S FIRMWARE
The firmware included in your racing wheel's base can be updated to a more recent version featuring product enhancements.
To display the firmware version that your racing wheel is currently using and update it if required: on PC, visit http://support.thrustmaster.com. Click Racing Wheels / T-GT, then select Firmware and follow the instructions describing the download and installation procedure.
Important note:
On PC, the USB sliding switch (11) on the racing wheel's base must always be set to the "OTHER" position.
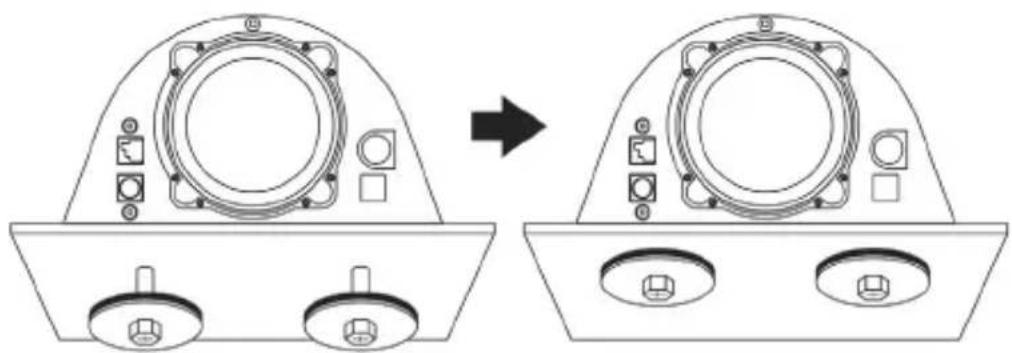
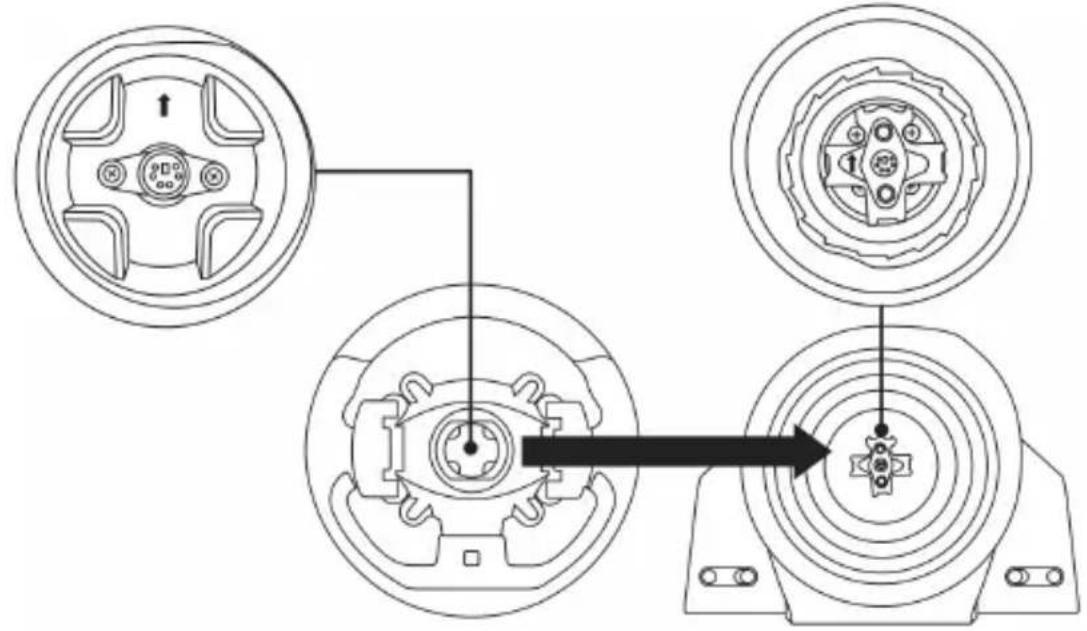
INSTALLING THE WHEEL ON ITS BASE
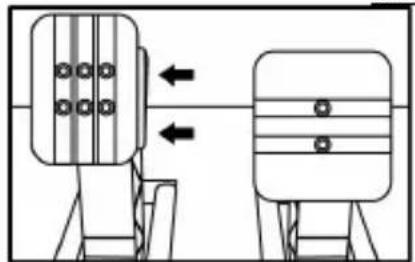
Align the connector positions using the arrows:
Base (1) connector: Arrow pointing upwards
Racing wheel (2) connector: Arrow pointing upwards
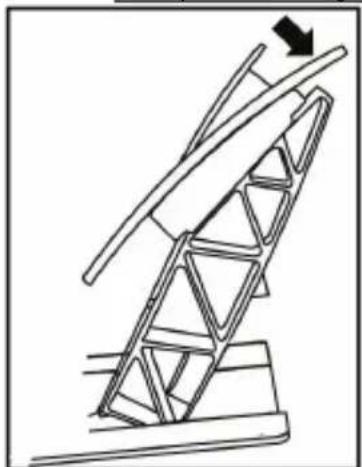
Once the connectors are correctly positioned, simply rotate the Thrustmaster Quick Release (15) device's ring anticlockwise, while holding the racing wheel (2) in position.
Then, tighten the ring as much as you can: to do so, hold the ring in position and rotate the racing wheel clockwise.
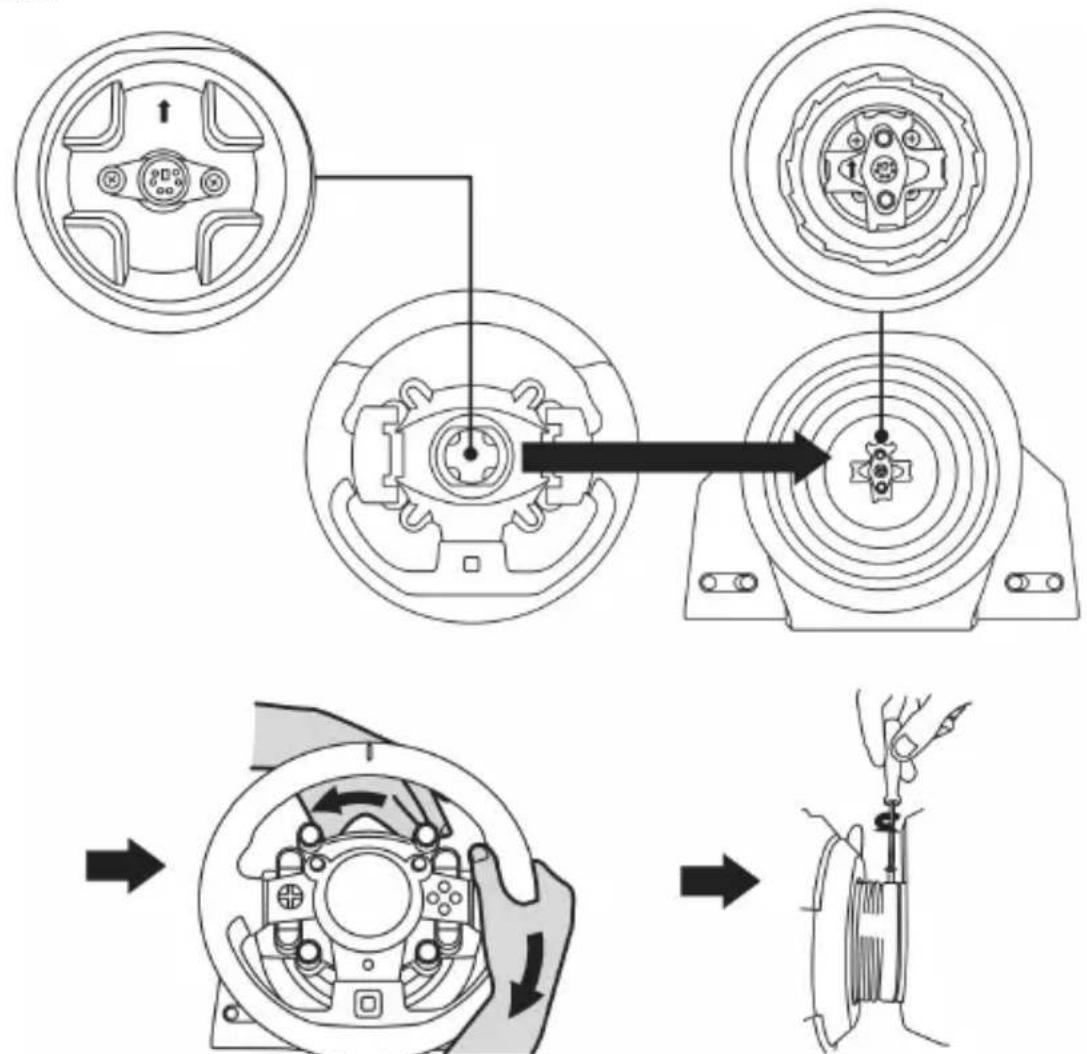
Once you have installed the wheel, rotate it 180^ (when facing the wheel, the GT logo should be upside down) to access the small attachment screw located on the ring of the Thrustmaster Quick Release (15) device. Use a large Phillips screwdriver to tighten the small attachment screw (do not use excessive force), turning it clockwise.

When using a Philips screwdriver, ensure NOT to use excessive force
when tightening the small attachment screw!
Stop turning the screw as soon as you feel some resistance.
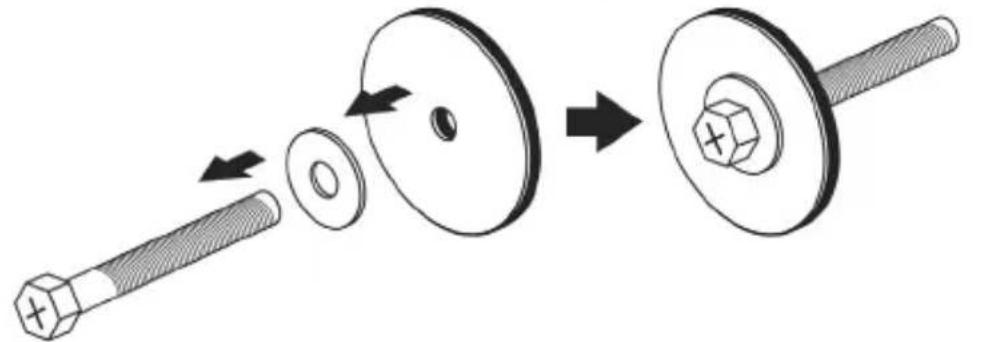
ATTACHING THE RACING WHEEL
Attaching the racing wheel's base to a cockpit
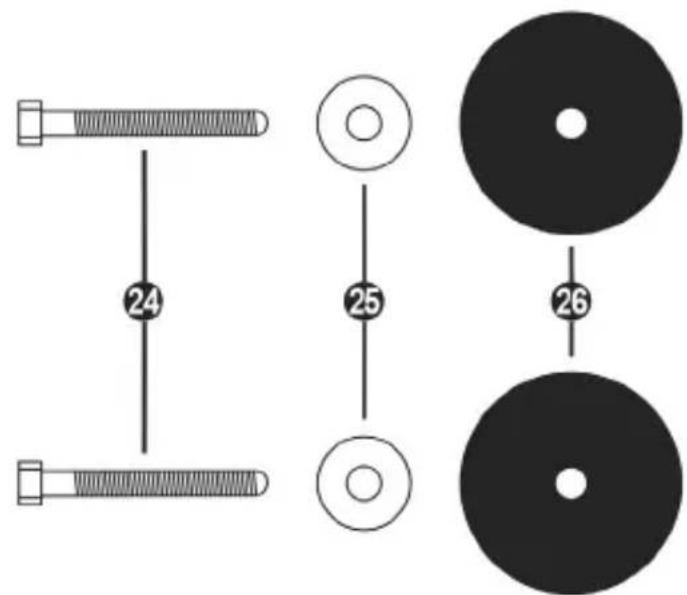
24 2 M6-type hexagon head/Phillips-head bolts
25 2 washers
26 2 mounting discs (metal on one side, and textured rubber on the other)
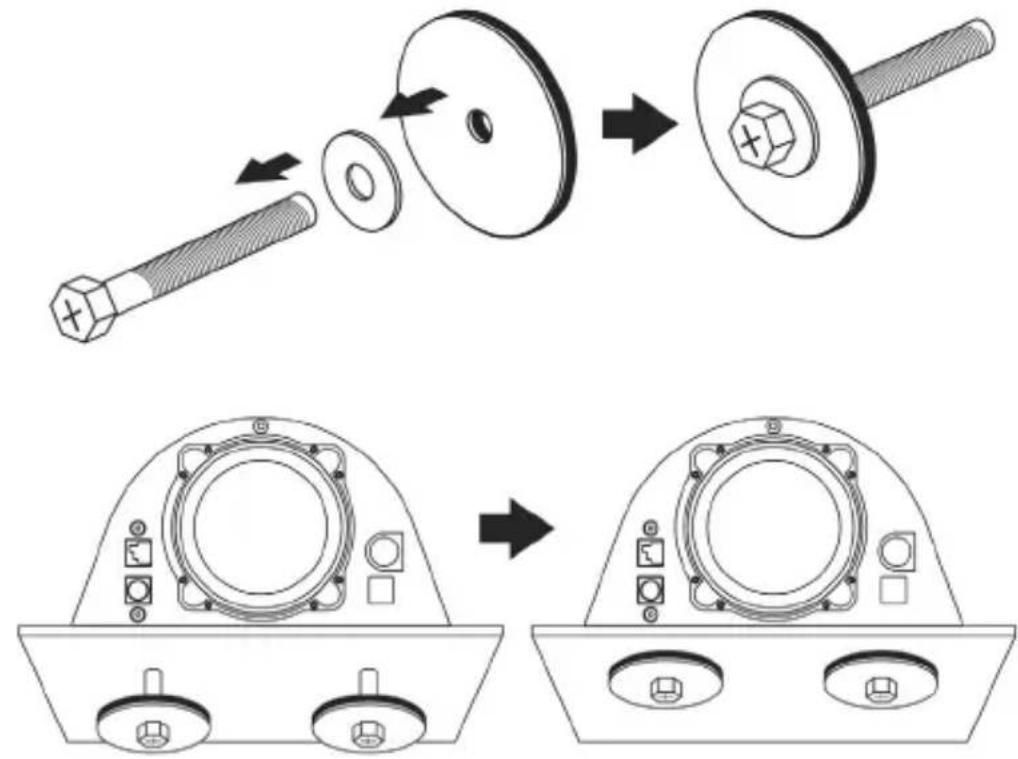
- Position the washers (25) on the metal sides of the mounting discs (26), and insert the M6-type hexagon head/Phillips-head bolts (24).
- Place the racing wheel's base on the cockpit shelf.
- Using a 10 mm wrench key or a Phillips-head screwdriver, screw the cockpit mounting kit into the cockpit shelf and into the 2 small screw threads located on the underside of the wheel.
ATTENTION:
- Do not remove the foam pads located on the underside of the racing wheel's base! The foam pads amplify the effects of the T-DFB system when the wheel is attached.
- The textured rubber side of the mounting discs (26) must imperatively be positioned facing the cockpit shelf = never position the metal side facing the cockpit shelf.
Attaching the racing wheel to a table or a desktop
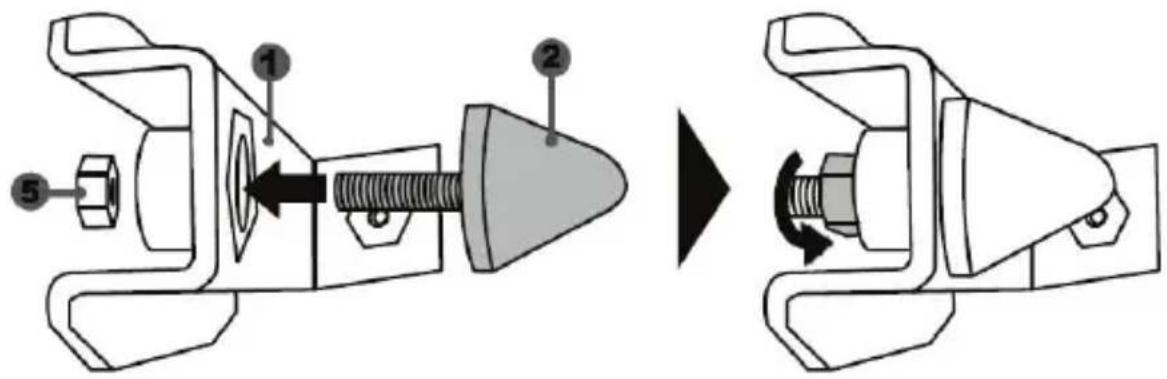
- Place the racing wheel on a table or any other horizontal, flat and stable surface.
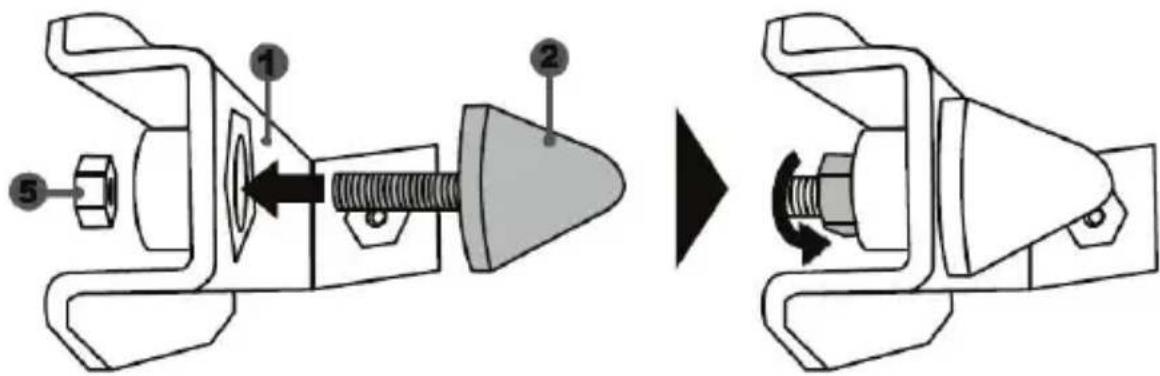
- Insert the fastening screw (14) in the attachment system (13), then tighten the device by turning the screw anticlockwise, so that it feeds into the large threaded hole (12) located beneath the racing wheel, until the wheel is perfectly stable.
ALWAYS NEVER


WARNING:
- Never tighten the screw alone, without the attachment system in place (this could damage the racing wheel).
- Do not remove the foam pads located on the underside of the racing wheel's base! The foam pads amplify the effects of the T-DFB system when the wheel is attached.
| ATTACHMENT / REMOVAL | DIRECTION |
| To tighten: Turn the screw anticlockwise | |
| To release: Turn the screw clockwise |
SETTING UP THE RACING WHEEL FOR PS4TM
- Connect the pedal set to its connector (19) located at the rear of the racing wheel's base.
- Connect the T-TURBO power supply (21) to its connector (17).
- Connect the power supply cable (22) to the T-TURBO power supply, and plug the cable into an electrical outlet with the same voltage.
- Set the USB sliding switch (11) to the "OTHER" or "GT" position, depending on the PS4™ game you are using.
- Connect the removable USB cable (23) to its connector (18) and to one of the USB ports on the PS4™ system.
- Once your PS4™ system is powered on, your racing wheel will calibrate itself.
- Press the PS button (9) on the racing wheel, and log in to your Sony Entertainment Network account in order for your wheel to be functional. You are now ready to play!
Important notes:
- Don't forget to press the PS button (9) on the racing wheel, in order for your wheel to be functional.
- The USB sliding switch (11) on the wheel's base must always be set to the proper position ("OTHER" or "GT") before connecting the racing wheel's USB cable to your system. To change the sliding switch's position: disconnect the USB cable, and then set the switch to the appropriate position before reconnecting the USB cable to the system.
- The list of PlayStation®4 games compatible with the T-GT (along with the required position for the USB sliding switch (11) according to the game you are using) is available here: http://support.thrustmaster.com (in the Racing Wheels/T-GT section). This list is updated regularly.
USB SLIDING SWITCH (11) IN THE "OTHER" POSITION
FOR PS4™ GAMES APART FROM GT SPORT
When the USB sliding switch (11) is set to the "OTHER" position:
- The wheel is recognized in most games as a T300 RS wheel.
- The 4 rotary selectors with Push function (5) are not functional.
- The 2 mini-sticks (6) are not functional.
- The Force Feedback system is functional, but the T-DFB effects system (16) is not.
USB SLIDING SWITCH (11) IN THE "GT" POSITION
FOR THE GAME GT SPORT (AND OTHER FUTURE GT GAMES)
When the USB sliding switch (11) is set to the "GT" position:
- The wheel is recognized as a T-GT wheel.
- The 4 rotary selectors with Push function (5) are functional.
- The 2 mini-sticks (6) are functional.
- The Force Feedback system, and the T-DFB effects system (16), are both functional at the same time. In the GT Sport game's options, the power level of each system can be adjusted independently.
SETTING UP THE RACING WHEEL FOR PC*
*PC compatibility neither tested nor endorsed by Sony Interactive Entertainment Europe.
For more information, visit http://support.thrustmaster.com.
AUTOMATIC RACING WHEEL AND PEDAL SET CALIBRATION
The wheel automatically self-calibrates when you plug the racing wheel into an electrical outlet and connect the racing wheel's USB connector to the system.
During this phase, the racing wheel will rotate quickly towards the left and the right, covering a 1080 degree angle, before stopping at the center.

WARNING:
Never touch the racing wheel during the self-calibration phase! (This could result in improper calibration and/or personal injuries.)
AUTOMATIC CALIBRATION OF THE PEDAL SET
Never connect the pedal set to the racing wheel's base (or disconnect it from the base) when it is connected to the system or during gameplay (this could result in improper calibration).
Always connect the pedal set before connecting the racing wheel to the system.
Once the racing wheel's calibration is complete and the game has been started, the pedals are automatically calibrated after a few presses.

WARNING:
Never press the pedals during the racing wheel's self-calibration phase or while a game is loading! (This could result in improper calibration.)
If your racing wheel and/or pedal set do not function correctly, or if they seem to be improperly calibrated:
Power off your system and completely disconnect the racing wheel. Then reconnect all cables (including the power supply cable and the pedal set), and restart your system and your game.
INTERNAL COOLING SYSTEM FOR THE WHEEL'S BASE
The internal cooling system for the wheel's base
- starts working when the wheel is powered on.
- switches off after a few minutes of inactivity when the internal temperature cools down to a low level.
- switches on again when you use the wheel.
MODE BUTTON AND INDICATOR LIGHT (10)
MODE button for the pedal set
You can electronically swap the accelerator and clutch pedals.
To do so, simply press the MODE button (10) for 2 seconds.
The racing wheel's internal memory stores whether the pedals have been swapped around or not.
| GAS AND CLUTCH PEDALS | Colour of the MODE indicator light (10) |
| NORMAL | RED |
| SWAPPED AROUND | GREEN |
Other information regarding the MODE button
To learn more about the MODE button and indicator light, please visit http://support.thrustmaster.com. Click Racing Wheels / T-GT, and then select Manual or FAQ.
HELP FILES AND FAQs
Please visit http://support.thrustmaster.com. Click Racing Wheels / T-GT, and then select Manual or FAQ.
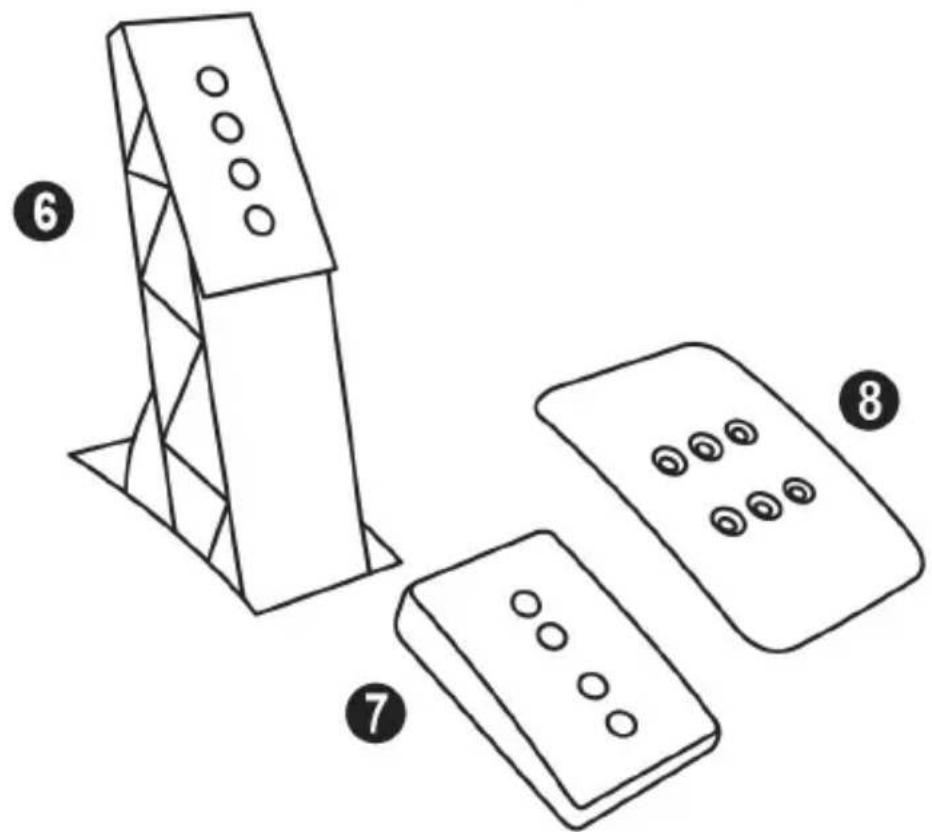
T-GT EDITION PEDAL SET

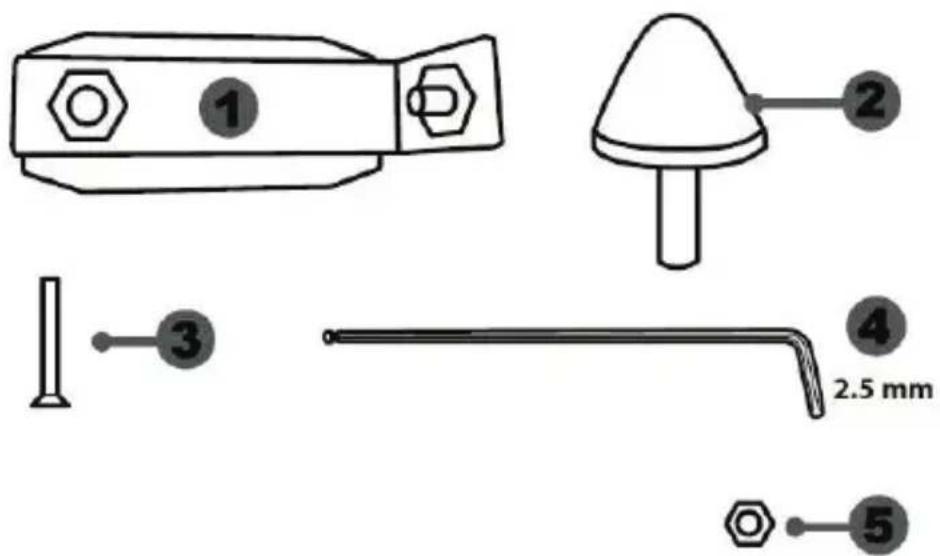
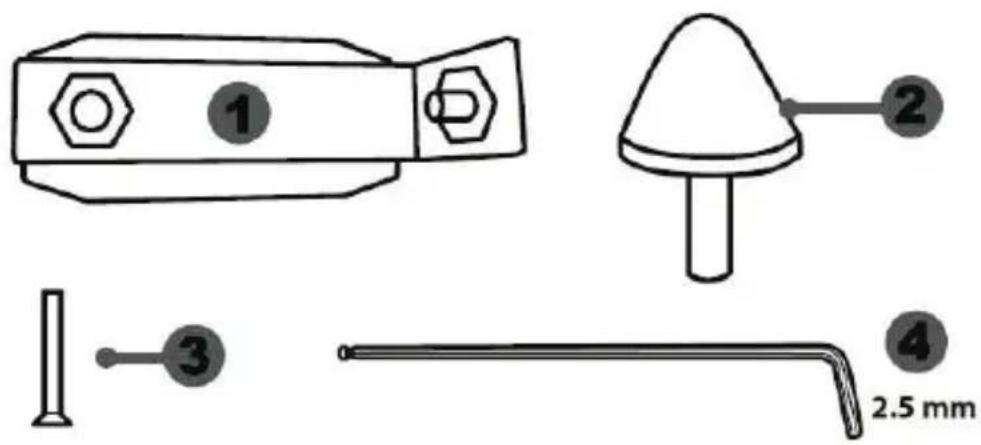
TECHNICAL FEATURES
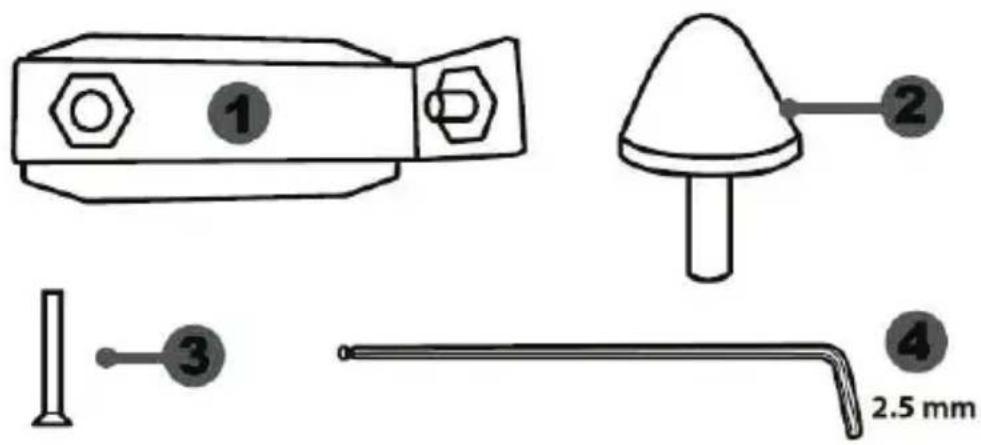
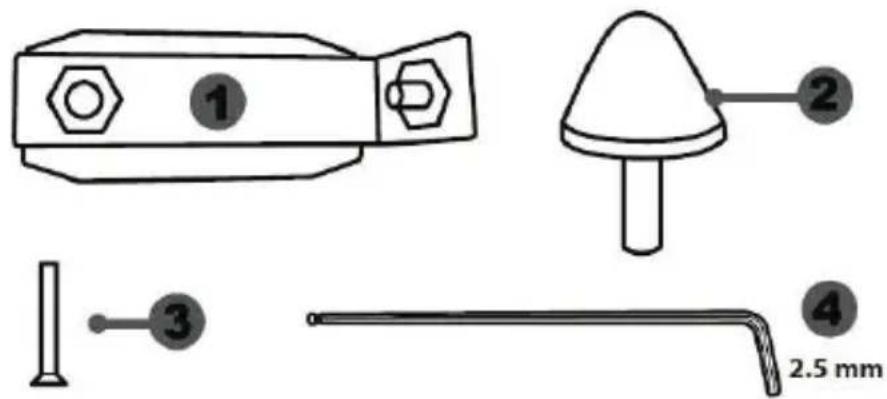
1 Metal support for conical stop (not installed by default)
4 2.5 mm Allen key (included)
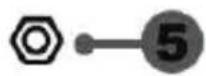
2 Conical stop
5 Position adjustment nut for conical stop
3 Attachment screw for metal support

6 Metal pedal arm
8 Metal pedal head
7 Plastic head support
WARNING
Before using this product, be sure to read these instructions carefully and save them for future reference.

For safety reasons, never use the pedal set with bare feet or while wearing only socks on your feet.
THRUSTMASTER® DISCLAIMS ALL RESPONSIBILITY IN THE EVENT OF INJURY RESULTING FROM USE OF THE PEDAL SET WITHOUT SHOES.

Warning - Pedal set pinching hazard during gaming sessions
- Keep the pedal set out of the reach of children.
- During gaming sessions, never place your fingers or thumbs on or near the sides of the pedals.
- During gaming sessions, never place your fingers or thumbs on or near the rear base of the pedals.
- During gaming sessions, never place your fingers or thumbs on or near the front base of the pedals.

AUTOMATIC CALIBRATION OF PEDALS

- Never connect or disconnect the pedal set from the base of the wheel when the wheel is connected to a PS4™ system or to a PC, or during gaming sessions, to avoid calibration problems.
= Always connect the pedal set to the wheel before connecting the wheel to a PS4™ system or to a PC. - Once the wheel has self-calibrated and the game has started, the pedals automatically calibrate themselves after being pressed a few times.
- Never press on the pedals when the wheel is self-calibrating or when your game is starting up, to avoid calibration problems.
- If the pedals are not functioning correctly or appear to be improperly calibrated, power off your system, completely disconnect your wheel, then reconnect all of the cables (including the power supply cable and the pedal set cable), power the system back on and restart your game.
ATTACHING THE PEDAL SET TO A COCKPIT
- Attach the pedal set using the small screw threads located on the underside of the pedal set.
- Screw two M6 screws (not included) into the cockpit's pedal support plate and into the two small screw threads located on the underside of the pedal set.
Important: The length of the two M6 screws must not exceed the thickness of the cockpit's pedal support plate plus an additional 10mm , to avoid damaging the pedal set's internal components.
ADJUSTING THE PEDAL SET
Each of the three pedals includes:
- A metal head (8) with multiple perforations (nine for the accelerator - two for the brake - six for the clutch).
- A plastic head support (7) (placed between the head and the arm) with four perforations.
- A metal pedal arm (6) with four perforations.

ATTENTION: To avoid any calibration problems, be sure to always disconnect your wheel's USB cable from the PS4™ system before making any adjustments to your pedal set.
Adjusting the HEIGHT of the 3 pedals
- Using the included 2.5 mm Allen key (4),unscrew the two screws holding the metal head (8) and its support (7) in place.
- Select your preferred height position, then replace and re-tighten the screws so that the metal head (8) and its support (7) are held firmly in place.
Examples illustrating the accelerator pedal:

Low position

High position
Adjusting the SPACING of the accelerator pedal and the clutch pedal
- Using the included 2.5 ~mm Allen key (4), unscrew the two screws holding the metal head (8) and its support (7) in place.
- Select your preferred position (to the left, centered, or to the right), then replace and re-tighten the screws so that the metal head (8) and its support (7) are held firmly in place.

Examples illustrating the clutch pedal:
Left position
Centered position (default)
Right position
Number of possible spacing positions per pedal:
- Three for accelerator pedal
- Three for clutch pedal
Adjusting the INCLINATION of the 3 pedals
- Using the included 2.5 ~mm Allen key (4), unscrew the two screws holding the metal head (8) and its support (7) in place.
- Turn the plastic head support (7) 180^ , then replace and re-tighten the screws so that the metal head (8) and its support (7) are held firmly in place.
Examples illustrating the accelerator pedal:
Less inclined position
More inclined position (default)
Number of possible inclination positions per pedal:
-
Two for accelerator pedal
-
Two for brake pedal
- Two for clutch pedal
Installing the conical stop ("CONICAL RUBBER BRAKE" mod)
This modification (or "mod") is not essential, and is not installed by default. This means that the brake pedal functions perfectly even if the mod is not installed.
This mod lets you experience a different feeling and resistance when braking. It's up to you whether or not to install it, depending on your own preferences.
- Screw the conical stop (2) onto its metal support (1).
- Screw the position adjustment nut (5) onto the bottom (onto the conical stop's screw thread).
- Position the unit at the back of the brake pedal's arm.

- Using the included 2.5mm Allen key (4), attach the unit using the attachment screw (3) and the small central screw thread located on the underside of the pedal set.
The "CONICAL RUBBER BRAKE" mod is now installed!
Adjusting the brake pedal's RANGE of travel and STRENGTH of resistance
By slightly unscrewing the nut (5), you can further strengthen the resistance of the brake pedal by moving the conical stop (2) closer to the back of the pedal's arm (if necessary, use a 14mm wrench or pliers to re-tighten the nut and maintain the selected position). The closer the conical stop is positioned to the back of the pedal's arm, the greater the strength of resistance will be.
Note: When the conical stop is very close to the back of the brake pedal's arm, you may experience difficulties in reaching the maximum calibration value. Should that be the case:
- Slowly, press very hard on the brake pedal so as to reach the maximum value (if necessary, stand very briefly on the pedal – just for a second), then release the pressure; or else
- Move the conical stop a bit farther away from the back of the brake pedal's arm.
CONSUMER WARRANTY INFORMATION
Worldwide, Guillemot Corporation S.A., whose registered office is located at Place du Granier, B.P. 97143, 35571 Chantepie, France (hereinafter "Guillemot") warrants to the consumer that this Thrustmaster product shall be free from defects in materials and workmanship, for a warranty period which corresponds to the time limit to bring an action for conformity with respect to this product. In the countries of the European Union, this corresponds to a period of two (2) years from delivery of the Thrustmaster product. In other countries, the warranty period corresponds to the time limit to bring an action for conformity with respect to the Thrustmaster product according to applicable laws of the country in which the consumer was domiciled on the date of purchase of the Thrustmaster product (if no such action exists in the corresponding country, then the warranty period shall be one (1) year from the original date of purchase of the Thrustmaster product).
Notwithstanding the above, rechargeable batteries are covered by a warranty period of six (6) months from the date of original purchase.
Should the product appear to be defective during the warranty period, immediately contact Technical Support, who will indicate the procedure to follow. If the defect is confirmed, the product must be returned to its place of purchase (or any other location indicated by Technical Support).
Within the context of this warranty, the consumer's defective product shall, at Technical Support's option, be either replaced or returned to working order. If, during the warranty period, the Thrustmaster product is subject to such reconditioning, any period of at least seven (7) days during which the product is out of use shall be added to the remaining warranty period (this period runs from the date of the consumer's request for intervention or from the date on which the product in question is made available for reconditioning, if the date on which the product is made available for reconditioning is subsequent to the date of the request for intervention). If permitted under applicable law, the full liability of Guillemot and its subsidiaries (including for consequential damages) is limited to the return to working order or the replacement of the Thrustmaster product. If permitted under applicable law, Guillemot disclaims all warranties of merchantability or fitness for a particular purpose.
This warranty shall not apply: (1) if the product has been modified, opened, altered, or has suffered damage as a result of inappropriate or abusive use, negligence, an accident, normal wear, or any other cause unrelated to a material or manufacturing defect (including, but not limited to, combining the Thrustmaster product with any unsuitable element, including in particular power supplies, rechargeable batteries, chargers, or any other elements not supplied by Guillemot for this product); (2) if the product has been used for any use other than home use, including for professional or commercial purposes (game rooms, training, competitions, for example); (3) in the event of failure to comply with the instructions provided by Technical Support; (4) to software, said software being subject to a specific warranty; (5) to consumables (elements to be replaced over the product's lifespan: disposable batteries, audio headset or headphone ear pads, for example); (6) to accessories (cables, cases, pouches, bags, wrist-straps, for example); (7) if the product was sold at public auction.
This warranty is nontransferable.
The consumer's legal rights with respect to laws applicable to the sale of consumer goods in his or her country are not affected by this warranty.
Additional warranty provisions
During the warranty period, Guillemot shall not provide, in principle, any spare parts, as Technical Support is the only party authorized to open and/or recondition any Thrustmaster product (with the exception of any reconditioning procedures which Technical Support may request that the consumer carry out, by way of written instructions – for example, due to the simplicity and the lack of confidentiality of the reconditioning process – and by providing the consumer with the required spare part(s), where applicable).
Given its innovation cycles and in order to protect its know-how and trade secrets, Guillemot shall not provide, in principle, any reconditioning notification or spare parts for any Thrustmaster product whose warranty period has expired.
Liability
If permitted under applicable law, Guillemot Corporation S.A. (hereinafter "Guillemot") and its subsidiaries disclaim all liability for any damages caused by one or more of the following: (1) the product has been modified, opened or altered; (2) failure to comply with assembly instructions; (3) inappropriate or abusive use, negligence, an accident (an impact, for example); (4) normal wear; (5) the use of the product for any use other than home use, including for professional or commercial purposes (game rooms, training, competitions, for example). If permitted under applicable law, Guillemot and its subsidiaries disclaim all liability for any damages unrelated to a material or manufacturing defect with respect to the product (including, but not limited to, any damages caused directly or indirectly by any software, or by combining the Thrustmaster product with any unsuitable element, including in particular power supplies, rechargeable batteries, chargers, or any other elements not supplied by Guillemot for this product).

COPYRIGHT
© 2017 Guillemot Corporation S.A. All rights reserved. Thrustmaster® is a registered trademark of Guillemot Corporation S.A.
Licensed for sale in Europe, Africa, Middle East, Russia, India and Oceania. For use exclusively with PlayStation®4.
All other trademarks and brand names are hereby acknowledged and are property of their respective owners. Illustrations not binding. Contents, designs and specifications are subject to change without notice and may vary from one country to another. Made in China.
Manufactured and distributed by Guillemot Corporation S.A.
TouchSense® technology licensed from Immersion Software Ireland Limited. Protected by one or more of the U.S. Patents found at the following address: www.immersion.com/patent-marking.html, and other patents pending.
ENVIRONMENTAL PROTECTION RECOMMENDATION
In the European Union and Turkey: At the end of its working life, this product should not be disposed of with standard household waste, but rather dropped off at a collection point for the disposal of Waste Electrical and Electronic Equipment (WEEE) for recycling.
This is confirmed by the symbol found on the product, user manual or packaging. Depending on their characteristics, the materials may be recycled. Through recycling and other forms of processing Waste Electrical and Electronic Equipment,
you can make a significant contribution towards helping to protect the environment.
Please contact your local authorities for information on the collection point nearest you.
For all other countries: Please adhere to local recycling laws for electrical and electronic equipment.
Retain this information. Colours and decorations may vary.
Plastic fasteners and adhesives should be removed from the product before it is used.
www.thrustmaster.com
*Applicable to EU and Turkey only


T·GT
INFORMATIONS RELATIVES A LA GARANTIE AUX CONSOMMATEURS
T-GT EDITION-PEDALSET

TECHNISCHE MERKMALE
EINBAU DES PEDALSETS IN EIN COCKPIT
ANPASSEN DES PEDALSETS
www.thrustmaster.com
USB-SCHUIFSCHEKELAAR (11) IN DE STAND "OTHER"
VOOR PS4™-GAMES MET UITZONDERING VAN GT SPORT
T-GT EDITION-PEDAALSET
DE PEDAALSET AAN EEN COCKPIT BEVESTIGEN
www.thrustmaster.com
www.thrustmaster.com
www.thrustmaster.com
FIXAR O CONJUNTO DE PEDAIS A UM COCKPIT
- Fixe o Conjunto de pedais utilizing as��enas roscas de parafusos situadas na parte inferior do conjunto de pedais.
- Enrosque bois parafusos M6 (não incluídos) na chapa de apoio do Conjunto de pedais e nas das��enhas roscas de parafusos situadas na parte inferior do Conjunto de pedais.
www.thrustmaster.com
TEXHNUECKNEXAPAKTEPNUKNI

1 Ba3a cnCTembl T-GT
2 Pynb T-GT
3 2 neneKTkoBbIX nepeKIOUaTeJIa (BBepx IN BHN3)
4 MHORON03NIOHNaKHOIIka
5 4 NOBOPOTbIX peryIaTOpa c HaxIMHOH KHOIKOI (coMecmumocmb cucmemOu PS4TM e peKume GT u Ha PIK)
6 2 MUNH-ДКОИCTNka (coeMecmumocmb c cucmemou PS4TM e pekume GT u Ha PIK)
7 Khonka SHARE
8 Khoonka OPTIONS
9 KhoNka PS
10 KhoNka MODE +KpacHbI/3eJIeHbI INHdNKaTOp
11 BcTpoeHHbI nepeKIOUaTeIb USB-BxOJa: OTHER/GT
12 Pe3b6a NOB 6OJIbIOW BnHT (JINA CNTeMbI KpENJIeHnI KpENEHXHO BnHTa)
13 CnCTema KpeIeHna
14MetaJIINueckn KpeNexKhbI BnHT


15 Cnctema Kpennne Hn Thrustmaster Quick Release
16 CucTeMa 3oΦeKToB T-DFB (coMecmumocmb c mucmou PS4TM moIbko e peXume GT)
17 Pa3bem nla 6noka nntaHn T-TURBO
18 Pa3bEm dIa CBemHO r USB-ka6eJra
19 Pa3bEm nIeJaIbHoro 6noka
20 Pa3bEm dIe neepKIOUaTeTn TH8A (nepeKIOUaMeIb npuObpeMaemc oMdeIbHo)
21 Bnok nntaHn T-TURBO
22 KaebJIb 6Ioka nITaHnIa
23 CbemHbI USB-ka6eb
ПОДКЛIOЧЕНЕ РУLEBOИ ССТЕМБI K ЗЛЕKTPOРО3ETKE BHIMATEЛьно ПОЧТITE CЛЕДУЮUCEE!

Hu e koem cnyae He noeknooyaume 6nok numahur T-TURBO K 3nekmpocemu c
Hedonycumbm Hnpanxehuem! Dorycmumoe Hanpaxehue 6noka numaHua T-TURBO yka3aHo Ha npIbke Had 2he3dOm dna nodKnoueHura KaBena.

Hu e koem cnyuee He noeknlouaume K 6a3e T-GT uHou 6nok numaHua, kpoeme T-TURBO,
daxe cnyae coemecmu pa3bema! B yacmHocmu, hnel3n nooknouamb K base T-GT cemeo adanme npyra T500 RS.
PPEyPPEKDEHNA
Ipeed 3Kcnpnyataunei daHHoro n3deHnBHNMaTeJIbHO O3HaKOMbTEcB C HAcTOrauei INHCTpyKUeN coxpaHnte ee Ha 6yue.

BHHMaHHe - onachocTb nopaxeHn 3JleKtpnuecknM TOKOM!
*I3dJIe NcpeDyET xpaHHTb B cyXOM MecTe, I36eRa nonaHa Ha Hero nbJIn n COJHeuHO CBeTa.
He donyckaetcpepekyuBaHne pa3beMoB n Ka6eNe; Ka6eN HeJIb3r TaHyTb.
He donyckaetc npaandahe kndkoctn Ha n3deJne n ero pa3bembl.
He donyckaetc kopotkoe 3ambikaHne B ceni n3dJIIn.
3anpezaetcpa3bnpaTb n3dene, bpoCaTb n3dene B OROH b IOBepraTb erO BO3dienCTBnIO BblCOKnx TemnepaTyp.
He donyckaetcnaocnoIb3ObaHne dpyrnx kaBeNei nItaHn, Kpome KaBeJIa, BXoJaUeRo B KOMnJIeKT pyJeBOv CnCTeMbI.
HeJIb3a IcNoJIb3OBA Tb Ka6eIb NITaHn, ecIn OH nIe erop a3beMbI NOBpeKdEhbl, nOTpeckaINCb nIe cIOMaHbI.
* Y6eIntecb, yTo Ka6eIb NITaHnI DOnJXHbIM O6pa3OM NOpKIIuOeH K 3JIeKTpopo3eTke I K pa3BeMy Ha 3aIHei CTOpOHe 6a3bl pyJeBoro KOleca.
HeNb3a BCKpbIbATb CnCTeMy pyNeBOrO KOleca — B HeN HeT DeTaJIe, KOTOpbIe MOryT O6CnyKINBaTbcr
Nonb3OBaTeJIeM. Пюбо PMoHT DoJKeH BblIOJIHrTbCR pOn3BOJNTeJIeM, erO aBTOPI3OBaHHbIM
PpeIcTaNtEJIeM ИИ N KBaJIuФицIpOBaHHbIM TEXHueCKIM CneUaJIInCTOM.
Дусяается История Толбко ОдобpeHHbIX Рочь Bodintelem Систем Креленя и akceccyapob.
*B cIyuae HeHOpMaJIbHOro 4ynKUIOHINPOBaHnRA pyNeBOJ CnCTEmbl (PpN BO3HNKHOBeHHN NOCTOPOHHX 3ByKO, nepepebe IIN 3aNaXe) CneJeT HemeJeHNO PpeKpaNTb NcONb3OBAHHe CnCTEmbl, BbIKIOHTb Ka6eNb PtAnHn I3 PO3eTKN INOTCOeHNHTb BCE OCTaJIbHbIE Ka6eNl.
* Ecnn npednonaraetc, yTo pyneBaar cncTeMa He 6yndet nCnOlb3OBaTbcs npoDOnKnteHoe BpeMn, OTKIouHTe Ka6enb PNTAHnO rO p03ETKn.
* 3Jektpop03eTka DOnkHa HaxOuNTbcra NObIn3oCTn OT CnCTEmb I B yIo6Hom DoCTyne.

BeHTnlaIauIOHbIe OTBepcTna
He onyckaetc 6nokipobAHne BENTINLAIOHbIX OTBepTn Ha 6a3e pyneBOI cNCTembl. IJIg oBeceueHn ONtumalbHOB BHTINLAUIN BBINOHNTE CJeDyUOuNe yka3AHn:
- pa3meuaine 6a3y pyna ha pacctoHn He Mehee 10 cm ot cTeH;
- He pa3meuTe 6a3y B CTeCHEHOM IPOCTpaHCTBe;
- HUHcEM He HaKpbIBaNTe 6a3y;
- He donyckaJIte cKoJIneHnI NBIIH Na BEHTNIJIaUHOHHbIX OTBepCTmX.

I3 coo6paXeHn 6e3OaNacHOCTn HIKoRda He hAXmMaTe Ha neJaIN 6ocOHorOIuHORoB HOKe (6e3 o6yBu).
KOMIIAHNA THRUSTMASTER OTKA3bIBAETC ROT JIOBOI OTBETCTBEHHOCTN B CJIyAE IONJYEHIN TPABMbI B PE3yIbTATE HAXIMAHNA HA IENADJH HEOBytBMH HOrAMN.

BhimaHne - pnck TpaBMnpoBaHn B pe3yJbTaTe NOBTOPOUHXc DBNXeHn
DeiCTBnCnIOBOO6paTHoCBa3N
IcnoJIb3OBAHHe pyneBOcncTeMbICnIOBOO6paTHoCBra3bMOKeT Bbl3BaTb 60JIb MBiUax IINCycTaBax.CobTeI NO npedOTBpaueHIO npo6Jem CO 3dOpOBbeM:
- He npoBOuTe 3a ngoi npoOJIxnteJIbHoe BpeM;
* nocne kaxdo r o yaca nrgbI delaIte 10-15-mnHyThbI nepepbIB;
*ecnB KnCTx, 3aIyCTbIx, npEbnIeYbIx, cTOnax IIN Horax NOBInacb yctaloctb IIN 60JIb, npeKpaTInTe INpy u OTdoXHInTe B TeueHne HeckOJIbKnx Yacob, npexde Yem CHOBA npNCTynITb K nIpe.
*ecnBbIeuyKa3aHHbIe npu3HaKn IpOraBnIOTc CHOBa npu BO3BpaUeHm K nIrp, ppeKpaTnte nRpy m o6paNTecb K BpaCy; - Dépçxnte cncTemy BHe DoCTyNa DeTei;
* BO Bpemn npbI npaBnIbHO paCnoJaraTe oBe pyKn Ha pyJeBOM KOneCe n He N03BOJrTe emy Bpaatcbc 6eckoHtpoNbHo;
* BO Bpem Irgbl Hn B Koem Cnyae He 3acobbBaIe pykn nnn naIbIi POn NeaJIH N He depKHTe nx PraDM C neJaIbHbIM 6JOKOM;
* BO BpeM KAnIbObKN Hn Irgbl Hn B Koem CJIyuae He 3acOBbBaIte pyKn B pyJeBOe KOJecO;
* oBecneyTe HAdExHnyo 6a3bl pyIeBOrO KOleCa B COOTBeTCTBm C yKa3aHnMaMn B INHCTpyKuIN NO 3KcNpyatauIN.

He donyckaetcncnoB30BaHne n3dennn nnamMOnoKe 16 neT

TAXENO N3DENNE
He poHraTe n3dennie Ha c6b nnHa dpynx nuc!

PABINbHO
HEnb3r

HENb3
- DépçKIte neǎaJIbHbI 6JOK BHe DoCTyNa deteɪ.
- Bo Bpemn Hn B KOem cnyuae He KnaDnte naBcBi Ha neDanu n He 3acOBbBaIte nx C 60Kobix cTOpOH neDanbHoro 6noka.
* BoBpeMn Hn B KOem Cnyae He 3acOBbBaIe nx C3aNn B 6a3y neaIbHoro 6Joka. - Bo Bpem iRpbH N B Koem cnyae He 3acobbBaIte Hx cnepeDn B 6a3y neJaIbHoro 6noka.
HEJIb3J
HEnb3
HEnb3a

PpeynpexdeHne - BO3MOxHO cKaTne neaJbHorO 6Noka BO BpeM npocToA
- XpaHNTe peaJIbHbI 6JOK B 6e3OanCHOM MCTe BHE 3OHbI DOCTyPa DeTei.
OBHOBJEHNE IPOUINBKN PYJEBOTO KOJEA
IpoWNbky B 6a3e pyneBoro KOleca MoXHO o6HOBnTb Do 6oJee N03dHeBercn, coepkaueycoBepseHCTBOBaHn.
He npunaraTe ue3mepbIX ycHn npn 3aTgBaHn MaIoro KpeNekHO BRHTa
(c nomoubbo OTBepTkn Phillips)!
Ppekpatnte 3aTnBahnne, KaK ToJIbKO noUyBCTByeTe cOnpoTnBJeHne
YCTAHOBKA PYJEBOI CNTEMBI
3aKpennneHne 6a3bI pyNeBoro KOleca Ha KOKnITE
24 2 BnHTa C wecTnIpaHHbIMI rOIOBkAMN Tnna M6/Phillips
25 2aai6b1
26 2 MOHTaXbIX DnCKa (c OdHoi CToPOhbl - MeTaN, c dpyro - TeKCTypuPoBaHHa pe3Ha)
- Пинохiteшь (25) KMOTaXHbIM DnCKaM C MetaJIINueCKOCTOPHO (26) N BCTaBBTe BHTbC WECTIgpaHHbIM rONOBkAMTNa M6/Phillips (24).
- Pa3mecntte 6a3y pyneBoro KOJeca Ha uTke KOKnTa.
- C NOMOUIBO 10-MM raeuHoro KInOua HnKpeCToo6pa3HOI OTBepTKn npNKpyTHe MOHTaXHbIKOMIIeKT K nAHeJI NKOKNtA N K 2 He6oJbUIM pe3b6oBbIM OTBepCTnM Ha HxKHei CTopoHepyJEBOI CNCTeMbI.
BHIMAHNE!
-HeIb3a CHIMMaTb npOKnaKn 3n NeHb Ha HnXHe CTOPOHe 6a3bl pyJeBOc nCTEmbl! 3TN npOKnaKn ycINIBaOT 3dpeKtbl cNCTEmbl T-DFB pRy yCTaHOBHeHOM pYne.
- CToPOHa MOHTaXHbIX DnCKOB C TeKCTypuPoBaHHo Pe3HHo (26) 06a3aTeNbHO DoJXHa 6bITb O6paueHa K NaHeN KOKnTa = H N B KOeM Cnyae He NOBopauBaIte DnCKN K KOKnTy MEaJIneUeCKO CTOpOH.
Pa3meueHne pyNeBoro KOleca Ha cTone.
- PAcnoJoxHnTe roHOuHbI pyIb Ha cTone nIN INHOr rOpN3OHTaJIbHOr pIOCKoN yCTOuHBONIOBepxHOCTn.
2.BCTaBbTe KpeNexHbI BnHT (11) B CnCTeMy KpeNneHnA (10) n HadeXHo 3aΦnKcnpynte pyJIb, 3aTnBaB BnHT npOTNB YacBOB CTpeJIKN, TaK YTO6bl OH BOWeB B 6OJIbWoeppe3b6oBOe OTBePCTne (9), PaCNoJoxEHHoe HnKe Pylr.
INPABINbHO HEJb3a
BHIMAHNE!
- Henb3a3akpyuBaTb BnHT 6e3 cnCTembl KpenneHn! (B npomueHom cnyae eo3MOxHo noBpeXdeHue pyneo bu Cucmembl.)
-HeIb3a CHIMATb npOKnAKn n3 neHbHa HnXHei CTOpOe 6a3bl pyJeBOB CnCTEmbl! 3TV npOKnAKn YcINIBaIOT 3dpeKtbl CNCTEmbl T-DFB pNv yCTaHOBHeHOM PVne.
| UCTAHOBKA / DEMOHTAJ | НAPРABLEHNE |
| Фиksацья Зakрочаиме euHM npomue часов смpenku | |
| ОCLAБЛЕНИЕ Pacrkочаиме euHM no часов смpenku |
HACTPOIKA PYJIeBOI CnCTEMbl IJRA PS4TM
- NpdknHHTe neaIbHbI 6Jok K pa3bemy (19) Ha 3aIHei cToPOHe 6a3bl pyneBoro KOleca.
2.ПоdkлочитблokпнтунгT-TURBO(21)кразьему(17). - Пдкночиke ka6eь 6noka nHTaHn (22) K 6noky nHTaHn T-TURBO n K 3JIeKtpopo3eKe c yKa3aHHbIM HanpJxKeHnEM.
- Пераздente pepeknuataJIb USB-BxoJa (11) B noLoXeHne OTHER nIg GT, B 3aBnCmOCTn OT nCnoJb3yEmoIrpbI PS4TM.
- Поdkночи Te cbeMHbI USB-ka6eIb (23) K pa3bemy (18) n K oDHomy n3 USB-nopTOB cnCTembl PS4TM.
- Nocne BkIIOUeHn CnCTembl PS4TM BbINOJIHReTc ABTOKaIIb6pOBka pyNeBOrO KOJeca.
- Haxmte KhoNky PS (9) Ha pyneBOu CnCTeMe n BOiDITE B CBOIO yyeTHyIO 3aIncb Sony Entertainment Network dnn BkIoueHn FyHKUHOHaJIbHOcTn pyneBOu CnCTeMbI. TeneB cce zomoeo dna uapbl!
Baxho!
- He 3a6ydbTe haxaTb KhONky PS (9) ha pyneBOi cnCTeMe dIyBKnIOHnI yHKcNOHaJIbHOCTn pyneBOi cnCTeMbI.
-пеклочаю USB-Bxoda (11) на 6a3e руньо Кoleca obязатьно дожен 6bITb nepebeden B npabnilbhoe полхени (OTHER ИИ GT) петд подкшунем к систeme USB-kaбеля.
Длги Измени положеня поеклiouslyаелу OTcoeHnHTe USB-кавь и поевEDNTe nepeknoyateь B hyxhoe положенie, nocle chOba nodklouHTe USB-кавь к KOHcOJI.
-ПерецьnpдяPlayStation®4, coBmecTmblx cpyneBoi cnCTeMoT T-GT (c yka3aHnem Heo6xodmoro noJoxeHnna nepeKlnuoyateLЯ USB-BxoJa (11) B COOTBeTCTBnC nCnoJIb3yEmoI npoi) moXHo NaHTN 3deCb: http://support.thrustmaster.com (В pa3dene Racing Wheels/T-GT). 3TO T cncoK peryIrpHo obHOBnJeTcra.
NEPEKJIIOUATEJIb USB-BXODA (11) B NOJIOXEHN OTHER
BcpoeHHa cHema oxlaXdHn In 6a3bI pyJ:
- Naunhaet paobTaB npn BkHoueHnn pyJIA;
- BbIKIIOUaETcA NOcHe HeCKoJIbKIN MmHyT 6e3dEInCTBn, KOrDa BHyTpEnHnY TempePaTypa yCTpoiCTBa NaAdaET Do Hn3KOrO yPoBn;
-CHOBA BKNIOUOaETC npN INCNOb3OBaHn pyJIA.
KHONKA IN INHДИКATOP MODE(10)
Khonka MODE nja neaJbHoro 6loka
PyIeBa cIcTeMa coBMeCTmAm c neJaIbHbIMn 6IokAmn Thrustmaster c TpeMn neJaIaMn;Ha KOToPbIX MoXHO 3JIeKTPoHHbIM cIocObOM IomEHaTb MeCTAmN neJaII cIeIeHnI rA3a.
Длг STORO DOCTaTOHNO HaxaTb KhoNkY MODE (10) Ha 2ceK.
Bo BCTpoEHHO nAMrTn pyJIeBOu cNCTeMbI COxpaHraIOc TaHHbIe O nepeHoce IeJaJIe.
TEXHNUECKNEXAPAKTEPNUKNI

1 Metannuecka 63a nno KOHycoobpa3HOro cTOnopa (no ymoJauHIO He ycmaHOBneHa)
2Kohycoo6pa3HbI cToOp
3 KpeIeKHHBn BnHT nI MaTALnuecko 6a3bI
4 6-tpaHHbI KIOU 2,5 MM (B KOMJIneKTe)
5 PerynipoBouHa raKa dKa KOhycoo6pa3HOrO cTOnopa

6MetaIInueckn pbuar neaann
7Пл actikobar npoknaKa
8 Metannnecka ne daNb
BHIMAHHE!
IpepeI ekcnnyatau mei daHHoro n3deHnB HnMaTeNbHO O3HaKOMbTEcB C hAcToaue HNCTpyKneu coxpaHnte ee ha 6dyuee.

I3 coo6paXeHn 6e3OpacHOCTN HIKoRda He HaxmMaTe Ha neJaH 6ocO HOro nn HoroB HOCKe (6e3 o6yBN). KOMNAHn THRUSTMASTEROTKA3bIBAETCn OT JIOBOI OTBETCTBEHHOCTN B CInyAE NOLUyeHENr TPABMbI B PE3yJIbTATE HAXIMAHn HA INDAJIH HEOBytBIMn HOAMn.

PpeynpeKdHne - onaCHOctb 3aueMJIeHnI neaIbHbIM 6LOKOM BO Bpem Irpbl
- XpaHnte neJaIbHbI bIOK BHe doCTyna deTei.
*Bo Bpemr Hn B Koem Cnyae He KlaaHte NaIbUpyk Nn HOr Ha NeJaN I He 3acOBbBaTe IN c60Kobix CTopoH neaHbHoro 6Joka.
*BoBpemrHnB Koem Cnyae He KlaInte PauIbIpyK IIN HOR Ha NeJaIN HHe 3acOBbIaTe INC 3aHEn CTOpOHJIpeJaIbHO6Joka.
*BoBpMaIrpblHBNKoemCnyae He KlaInte PnIbUpyk IIN Hor Ha neJaIN Hne 3acOBbBaTe IN CpepeHNe CTOpOHbI neJaIbHoro 6JIOka.
ABTOMATUÇECKA KAJINBPOBKA PΕDAJIΕN

-Bo n36exaHne npoBem c kaIb6pOBKoHn B KOe Cnyae He noKIOUaTe H He OTKIOUaTe neJaIbHbI 6Iok OT 6a3bl pyJra, noka pyJeBa r CnCTema noKIOUeHa K PS4TM nnn Pk, a TaKKe BO BpeMa Irpbl.
= ΠeДаьньи 6пOK сеДуET пДКПЮЧаТь к руневос сИСтЕм, прждчем она 6удт поДКПЮЧЕн
К PS4™ ини ПК.
- После abtokanibpokn рул n 3anyska irpbi abTOMaTnueckn HeCKoIbKIMn HaxaTnMn Ha nepaJI 3anyskaetcraabTOMaTnuecka kani6pOBKa nepaJIeN.
-Bo n36exaHne npoBlem c KaIbpoBkoHn B Koem clyuae He haxMaTe Ha neJaN BO BpeM aBtOKaIIbpoBKN I BO BpeM 3aNycka uRpbI.
- Ecπn πeānH He pa6oTaIOT DoJXhBIM Obpa3OM nIi KaKyTcH HeBepHO OTKaJIb6pOBAHHbIMN, BbIKIIOHTe KOHCOJIb, NOJIHOCTbIO OTCoeDINHITe pyJeByIO CNTeMy 3aHOBO NODKJIIOHTe BCE Ka6eJIi (B TOM YIcSe Ka6eJIb PITAHm I Ka6eJIb πeJaIbHOrO 6L0ka, BKJIIOHTe KOHCOJIb I nepe3aIyCTnte irpy.
3AKPENJIEHNE PEAJIbHOro BJOKA B KOKNITE
- 3akpenite peaJIbHbI 6nok c nmoUbIO He6oJbuxpe3b6OBbIX OTBepCTn Ha erO HxHei NOBepXHOCTN.
- 3akpytnte Dba BnHTa M6 (He BXoJrT B KOMnJIeKr) B nlouaKny dny neJaIbHorO 6noka n B dBa He6oJIbXnx BnHTOBbIX OTBepCTna Ha HnKHeN CTOpOHe neJaIbHorO 6noka.
Baxho!ДинанВИNTOB M6 He DoJnxHa npeBbIaTb TOnuHn PLoaAdKn 6OJIbWe Yem Ha 10 MM BO n36exahne nobpejdeHn BHytpenHnx DeTaJe nepaIbHoro 6NoKa.
PEYUNPOBKA PEAJIbHORO BLOKA
KoHCTpykUneJaIeN:
- MeTaalIuecka IIOUaJaKa neJaN (8) C HeCKoJIbKIMM OTBepCTnA M (9 OTBepCTn Ha neJaN ra3a, 2 — Ha neJaN TopMo3a, 6 — Ha neJaN CuenJeHna);
- nlaactNKOBa npoknaJa dny nloaakn (7) (kpeNTcMexdy nloaakn npbYarom) c YeTbIPbMa OTBepCTnAM;
-MetaJIInueckn pbIur gn peJaII (6) C YeTbIpBm OTBepCTnAM.

BHIMAHHE! Bo n36eJahne npo6Iem c KaJIbpoBkoI o6a3aTeIbHo OTKIOUaIte USB-ka6eIb ot cnCTeMbI PS4TM, npexde Yem KaK-NIbO peryInpOBaTb neaJIbHbI 6Iok.
PerynipoBka Tpex neaen no BblCOTE
- C nOMOJIbO BXoJIeBO B KOMIIeKT WecTnIRpaHHOrO KJIIOHa 2,5 MM (4) OTKpyTInTe 2 BNHTa, ydePKNBaIOxM eTAnIIuYeCKyIO NIOUaDky (8) IN POKNaDky (7).
- BbI6epnte HxKHyIO BbcOTy neaJIu n 3aHOBO 3akpyTnte BNHTbl dJn JxcKcaun MeTaNJIueckOINPOUAdKn (8) n npoknaKn (7).
PpimepbpeynpovKn neaRa3a:

HnKHe nolokhene
BbICOKoe noJIOKeHne
PerynpoBka PACCTOHHmexdy neaJMa r3a n cenJeHn
- C nOMOsbBxOaIeBO KOMnIeK T IecTnIpaHOro KIOUa 2,5 MM (4) OTKpyTnte 2 BnHTa, ydePknBaIOuX MeaJIInueckyIO NIOuaADKy (8) INpOKnaDky (7).
- BbI6epnte HxHoe noIOxHne neaII (cIeBa, no cHTpy nII CNpaBa) n 3aHOBO 3akpyTnte BnHTbl IJRA JECKCAUIM MetaIIuueckO IIIOuaKn (8) n IpoknaKn (7).
PpimepbpepynpovBn neaann cuenenHna:
JIeBOe noJIOXKeHne
LcEHpaJIbHoe noIOJKeHne (no yMoJU.)
Ppaboe noJoxeHne
KoJIHcTeB0 BO3MOXhBIX NIOJOKeHn IIN peaI:
-3Дляпедлгаза;
-3ДЯпадисцеленя.
Perynilopobka YIJA HAKIOHA Tpex neaen
- C nOMOsbBxOJaIeBO B KOMnJIeKT WeCTnIpaHOrO KInOa 2,5 MM (4) OTKpyTnte 2 BNHTa, ydePknBaIOx MeTAnIIueckyIO NIOuaADKy (8) INpOKnaDky (7).
-Повернite ппаctнковую пркладу (7) Ha 180°и 3aHOBO 3akpyTITE BnHTbI ДяжecTKOJФИКcaцMuMeTaJIHnueckoI ПLOUaKIN (8)и пркlaKIN (7).
PpimepbpeynpOBn neaIra3a:
YrJnHaKNoHa MeHbSe
YrOHaKnOHa 6oNbWe (no yMoNo.)
KoJIueCTBO BO3MOxHbIX IOLOXKeHn DЯ peJaN:
Bce octaHbIe TOBaHbIe 3HaKn YBnIOTc Co6CTBeHHOCTbIO COOTBeTCTBYUx BnaJeNbIeB.
IINIOCTpaun MOrT He COOTBeTCTBOBaTb BHeuHemy BuNyΦyHKUmaK KOHKpeTHoro 3dEInna.
CoepKaHne, KOHCTpyKUINu INTexHNueCKNe XapaKTepNCtIKN IN3DeJINr MOrYT 6bITb IN3MeHeHbI 6e3 npedBapNTeJIbHO rYBeDOMJIeHn I 3aBcT rOT cTpaHbI pno6peTeHn. CdeNaHO B Kntae.
Pon3BeNo npacnpoctpaHareTcKomnaHnei Guillemot Corporation S.A.
TexHONorIa TouchSense® no liuenceMOn OT Kopnpaun Immersion Software Ireland Limited. 3auniueHo ODNIM NIN HeCKoJIbKUMn NaTeHTamN CUSA, C KOToPbIMN MOxHO O3HaKOMITbcr Ha caTHe www.immersion.com/patent-marking.html, n dpyrUmN NaTeHTamN, oXnDaUcIMN paccMOrpenia.
Pn noB3OBaHm n3deJInem yHTbIaNte CJeDyIOoee: CBeta nn3aH MOrTy pa3NJHaTbCra.
IbnKOBbIE CTJKN IN KneNkyo NENTy CNeDyeT CHrTB pepeINcNoB3OBAHnEM n3dennia.
www.thrustmaster.com

EAC
immersion.
T·GT
Euyεipidio xρησης
ПОНДОПОIHSH:
Tia va a i i t e oTI n T-GT I O U P I oWToa E KAe TAIyviOI,IOwC XpeiaOTei va EYkataoTnOeTe TIC autoatec EvnpoeiC tou Kae TAIyviOu (Eivai diaeoiMa otav to ouotma PAixviDiovivai ouvodepevn oTo Internet).
TEXNIKA XAPAKTHPIETIKA

IPOsAPTHsH TOY SET TQN IENTAA E OEsH OdHFOY
- Ppooapntnoe to oet twv nevtalx npoiottoivtac ta ikpa otteipwata biowpatoc oTo katw epooc tou oet twv nevtal.
- Biodwote TIC duo biides M6 (ev πeipiauavovtai) eoa aTn v tnpiaeic otnpiEnc tou TEVTaA OTn thon tou oynou kai eoa aTTO ta duo mikpa OTIEpWata biowv Tou piokovta OTO katw peoc tou oET TWV TVETA.
www.thrustmaster.com
^* Iaxuéi Móvo e EEE Kai Toupkia


T·GT
Kullanma Kilavuzu

UYARI:
T-GT EDITION PEDAL SETI

TEKNIK ÖZELLLIKLER
www.thrustmaster.com
www.thrustmaster.com
J 1 J 1 J 1 J 1 J 1 J 1 J 1 J 1 J 1 J 1 J 1 J 1 J 1 J 1 J 1 J 1 J 1 J 1 J 1 J 1 J 1 J 1 J 1 J 1 J 1 J 1 J 1 J 1 J 1 J 1 J 1 J 1 J 1 J 1 J
1 1 1 1 1 1 1 1 1 1 1 1 1 1 1 1 1 1 1 1 1 1 1 1 1 1 1 1 1 1 1 1 1 1 1 1 1 1 1 1 1 1

A
15 10 10 j
()
JbS y
1 1

16 200000000000000000000000000000000000000000000000

1 1
Jabj Jglio jc l aol gall ae gaoa lii
iio 1


Jabj Jgliae jie 1y 1aal 2ai jka aai jia jia
a aalaae aee
i 1
T-GT < Racing Wheels http://support.thrustmaster.com Ff
a + b = 3
OTHER 5) USB
glaiee
aaiy 1
奇数 ( k - 1) ÷ 2k = k
:
Thrustmaster Quick jll l 1
(15)
clwaljieol

PS4"GT "OTHER" (11) USB USB
gai
USB 18) (23) USB
.PS4TM
PS4TM 6
10 9)PS jll 7
USB USB "GT" "OTHER")
1 1 1 1 1 1 1 1 1 1 1 1 1 1 1 1 1 1 1 1 1 1 1
USB
TGT 4
http://support.thrustmaster.com:la (11) USB
(T-GT/da)
"OTHER" (11) USB
GT 4aPS4TM
"OTHER" (11) USB
. T300 RS alal y
(5)
(6) jj jll jll jll J
.(16)T-DFB 工 _ 工 Force Feedback
"GT" (11) USB
GTGT
:"GT" 11 USB
T-GT aloc puly ilzell j
(5) 4
(6)
i 1
(16) T-DFB Force Feedback
gge gge gge gge gge gge gge gge gge gge gge gge gge gge gge gge gge gge gge gge gge gge gge gge gge gge gge gge gge gge gge gge gge gge gge gge gge gge gge gge gge gge gge
*
. Sony Interactive Entertainment Europe
http://support Thrustmaster.com
aagaae aegaae
USB 1080 a j 1080 a j 1080 a j 1080 a j 1080 a j 1080 a j 1080 a j 1080 a j 1080 a j 1080 a j 1080 a j 1080 a j 1080 a j 1080 a j 1080 a j 2

1 1
(a)
aagaae aegaae aee
y 1

iulgill lalba hizy
Jaii jai i jai aia Jaiiaiaiaiaiaiaiaiaiaiaiaiaiaiaiaiaiaiaiaiaiaiaiaiaiaiaiaiaiaiaiaiaiaiaiaiaiaiaiaiaiaiaiaiaiaiaiaiaiaiaiaiaia
()
a 1 1 1 1 1 1 1 1 1 1 1 1 1 1 1 1 1 1 1 1 1 1 1 1 1 1 1 1 1 1 1 1
aaii iie
alldololglldll
alall Jusitie Jolll
ailll llll llll llll llll llll
aIzaii iisui Iiaie 120 Jaa
(10) MODE
aIgLOG MODE
3 3 3 3 3 3 3 3 3 3 3 3 3 3 3 3 3 3 3 3 3 3 3 3 3 3 3 3 3 3 3 3 3 3 3 3 3 3 3
MODE (10)
y 1
| (10) MODE loun mahr jous | doussy |
| dour | goudy |
| dour | caesareous |
MODE JJ
J 1
Manual T-GT < Racing Wheels http://support.thrustmaster.com
.FAQ
aaiiaaiiaaiiaaiiaaiiaaiiaaiiaaiiaaiiaaiiaaiiaaiiaaiiaaiiaaiiaaiiaaiiaaiiaaiiaaiiaaiiaaiiaaiiaaiiaaiiaaiiaaiiaaiiaaiiaaiiaaiiaaiiaaiiaaiiaaiiaaiiaaiiaaiiaaiiaaiiaaiiaaiiaaiiaaiiaaiiaaiiaaiiaaiiaaiiaaiiaai
T-GT < Racing Wheels http://support.thrustmaster.com
.FAQ Manual
T-GT EDITION

a
()2.54 1
1 1
(/y/ () 2 2
3
aaiiaai 8
6 7
1

Baa Bg j 1 1 1 1 1 1 1 1 1 1 1 1 1 1 1 1 1 1 1 1 1 1 1 1 1 1 1 1 1 1 1 1 1 1
y 1

j jll jll jll jll jll jll jll jll jll jll jll jll
a a a a a a a a a a a a a a a a a a a a a a a


PS4TM
PS4TM
a 1000000000000000000000000000000000000000000000000000
aill 1
-
y 2
i 1
aill jg glll 1 (c)glg
a
aalwglll aeg gagaae gall bllgall gall gall gall gall gall gall gall gall gall gall gall gall gall gall gall gall gall gall gall gall gall gall gall gall gall gall gall gall gall gall gall gall gall gall gall gall gall gall gall gall gall gall gall gall gall gall gall gall gall gall
aalal al aegn no galllll
10 1
aalal al aegaae alal calsy juiy iil plo
(7) (8) 2.5 12.5 12.5 12.5 12.5 12.5 12.5 12.5 12.5 12.5 12.5 12.5 12.5 12.5 12.5 12.5 12.5 12.5 12.5 12.5 12.5 0
a1gdsiaicall cllalgl 3
3
LwJb
(7) 180° (7)
aJislaiaal Jaaalg 2
E aJ2
C aJ2
Jai aJ2
"1
ggo (Jldll 1s giaiaall jc) caiill gaiiaill lccg gao n daaiae al. .(jdl Technical Support Jw:http://support.thrustmaster.com
i111
http://support.thrustmaster.com 11111111111111111111111111111111111111111
a00000000000000000000000000000000000000000000000000000000000000000000000000000000000
C 1! A a a a a a a a a a a a a a a a a a a a a a a a a a a a a a a a a a a a a a a a a a a a a a a a a a a a a a a a a a a a a a a a a a a a a a a a a aa
gaii jia iie aie
("Guillemot' p m Bp Lgall GUILEMOT Corporation S.A a 1
J.
Place du Granier, B.P. 97143, 35571 Chantepie, France g y
J.
Thrustmaster j
J.
Thrustmaster j
Thrustmaster j
Thrustmaster j
Thrustmaster j
Thrustmaster j
Thrustmaster j
Thrustmaster j
Thrustmaster j
Thrustmaster j
Thrustmaster j
Thrustmaster j
Thrustmaster j
Thrustmaster j
Thrustmaster j
Thrustmaster j
Thrustmaster j
Thrustmaster j
Thrustmaster j
Thrustmaster j
Thrustmaster j
Thrustmaster J
Thrustmaster j
Thrustmaster j
Thrustmaster j
Thrustmaster j
Thrustmaster j
Thrustmaster j
Thrustmaster j
Thrustmaster j
Thrustmaster j
Thrustmaster j
Thrustmaster j
Thrustmaster j
Thrustmaster j
Thrustmaster j
Thrustmaster j
Thrustmaster j
Thrustmaster j
Thrustmaster j
Thrustmaster j
Thrustmasterj
Thrustmasterj
Thrustmasterj
Thrustmasterj
Thrustmasterj
Thrustmasterj
Thrustmasterj
Thrustmasterj
Thrustmasterj
Thrustmasterj
Thrustmasterj
Thrustmasterj
Thrustmasterj
Thrustmasterj
Thrustmasterj
Thrustmasterj
Thrustmasterj
Thrustmasterj
Thrustmasterj
Thrustmasterj
Thrustmaster j
Thrustmaster 211 211 211 211 211 211 211 211 211 211 211 211 211 211 211 211 211 211 211 211 211 211 211 21
(2) (Gullemot
y
(3) : (Jiaall Jssg Caijll g
Jalil) 5yjui Jai jie (5 )
g wlll lclaw g plaii y sly alall yie cilyjbllls: ziiall joc o jia JxLgSxiw pi yill 6) (wlll aclaw aallln jydl
(7):
Jgill Jy jiaial
y
S OBC = S COD + S_ BOC
s
Gullemot 1
Pd 1234567890
J 1
aai jai aai jai (g) aai gaa
Guillemot 1
Thrustmaster
.
a
Gg (Guillemot" y b Lg Jg) Guillemot Corporation S.A. 5
(3) 4c gao all cai jil (2) 10j 1
Jaiy jieiill dyl (4) ((jlll Jw gle pui) i jiaill jll y jil
jaiyagall jg 1111111111111111111111111111111111
Gullemot 45
()
J 2
Thrustmaster
Guillemot
.
j
Thrustmaster®. 2017 Guillemot Corporation S.A.
isJil. Guillemot C
g
4 PlayStation
Cai jia zai ci xi yao jia xue yao jia gao jia jia jia jia jia jia jia jia jia jia jia jia jia jia jia jia jia jia jia jia jia jia jia jia jia jia jia jia jia jia jia jia jia jia jia jia jia jia jia
. Guillemot Corporation S.A. a
Immersion Software Ireland Limited TouchSense®
j 1
aillss
ylll 4n 111 111 111 111 111 111
y
.(WEEE)
www.thrustmaster.com
L 1


T·GT
User Manual

WARNING:
To ensure that your T-GT racing wheel functions correctly with games, you may be required to install the game's automatic updates (available when your system is connected to the Internet).
TECHNICAL FEATURES

1 T-GT base
2 T-GT wheel
3 2 sequential paddle shifters (up & down)
4 Directional buttons
5 4 rotary selectors with Push function (compatible with the PSA^TM system in GT mode and on PC)
6 2 mini-sticks (compatible with the PS4TM system in GT mode and on PC)
7 SHARE button
8 OPTIONS button
9 PS button
10 MODE button + red/green indicator light
11 Built-in USB sliding switch: OTHER / GT
12 Large threaded hole (for attachment system and fastening screw)
13 Attachment system
14 Metal fastening screw


15 Thrustmaster Quick Release
16 T-DFB effects system (only compatible with the PS4TM system in GT mode)
17 Connector for T-TURBO power supply
18 Connector for removable USB cable
19 Connector for pedal set
20 Connector for TH8A shifter (shifter sold separately)
21 T-TURBO power supply
22 Power supply cable
23 Removable USB cable
PLUGGING THE WHEEL INTO AN ELECTRICAL OUTLET: PLEASE READ CAREFULLY!

Never plug the T-TURBO power supply into an electrical outlet with a different voltage! The
T-TURBO power supply's voltage is indicated on the label located above the female connector for the power supply cable.

Never connect a power supply other than the T-TURBO power supply to the T-GT base,
even if the connector is compatible! For example, never connect the power adapter for the T500 RS wheel to the T-GT base.
WARNING
Before using this product, please read this manual carefully and save it for later reference.

Warning - Electrical shock
- Keep the product in a dry location and do not expose it to dust or sunlight.
- Do not twist or pull on the connectors and cables.
- Do not spill any liquid on the product or its connectors.
- Do not short-circuit the product.
- Never dismantle the product; do not throw it onto a fire and do not expose it to high temperatures.
- Do not use a power supply cable other than the one provided with your racing wheel.
- Do not use the power supply cable if the cable or its connectors are damaged, split or broken.
- Make sure that the power supply cable is properly plugged into an electrical outlet, and properly connected to the connector at the rear of the racing wheel's base.
- Do not open up the racing wheel: there are no user-serviceable parts inside. Any repairs must be carried out by the manufacturer, its authorized representative or a qualified technician.
- Only use attachment systems/accessories specified by the manufacturer.
- If the racing wheel is operating abnormally (if it is emitting any abnormal sounds, heat or odors), stop using it immediately, unplug the power supply cable from the electrical outlet and disconnect the other cables.
- If you will not be using the racing wheel for an extended period of time, unplug its power supply cable from the electrical outlet.
- The electrical outlet must be located near the equipment and must be easily accessible.

Air vents
Make sure not to block any of the air vents on the racing wheel's base. For optimal ventilation, make sure to do the following:
- Position the wheel's base at least 10c m away from any wall surfaces.
- Do not place the base in any tight spaces.
- Do not cover the base.
- Do not let any dust build up on the air vents.

For safety reasons, never use the pedal set with bare feet or while wearing only socks on your feet.
THRUSTMASTER © DISCLAIMS ALL RESPONSIBILITY IN THE EVENT OF INJURY RESULTING FROM USE OF THE PEDAL SET WITHOUT SHOES.

Warning - Injuries due to Force Feedback and repeated movements
Playing with a Force Feedback racing wheel may cause muscle or joint pain. To avoid any problems:
- Avoid lengthy gaming periods.
- Take 10 to 15 minute breaks after each hour of play.
- If you feel any fatigue or pain in your hands, wrists, arms, feet or legs, stop playing and rest for a few hours before you start playing again.

Warning - Injuries due to Force Feedback and repeated movements (continued)
- If the symptoms or pain indicated persist when you start playing again, stop playing and consult your doctor.
- Keep out of children's reach.
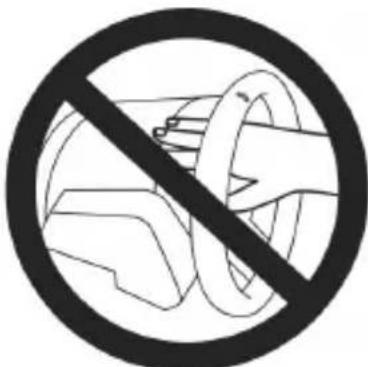
- During gameplay, always leave both hands correctly positioned on the wheel without completely letting go.
- During gameplay, never place your hands or your fingers under the pedals or anywhere near the pedal set.
- During calibration and gameplay, never place your hand or your arm through the openings in the racing wheel.
- Make sure that the racing wheel's base is properly secured, as per this manual's instructions.

Product to be handled only by users 16 years of age or older

HEAVY PRODUCT
Be careful not to drop the product on yourself or on anyone else!
ALWAYS
NEVER

NEVER
- Keep the pedal set out of children's reach.
- During gameplay, never place your fingers on or anywhere near the sides of the pedals.
- During gameplay, never place your fingers on or anywhere near the pedal's rear base.
- During gameplay, never place your fingers on or anywhere near the pedal's front base.
NEVER
NEVER

NEVER

Warning - Pedal set pinch hazard when not playing
- Store the pedal set in a safe place, and keep it out of children's reach.
UPDATING YOUR RACING WHEEL'S FIRMWARE
The firmware included in your racing wheel's base can be updated to a more recent version featuring product enhancements.
To display the firmware version that your racing wheel is currently using and update it if required: on PC, visit http://support.thrustmaster.com. Click Racing Wheels / T-GT, then select Firmware and follow the instructions describing the download and installation procedure.
Important note:
On PC, the USB sliding switch (11) on the racing wheel's base must always be set to the "OTHER" position.
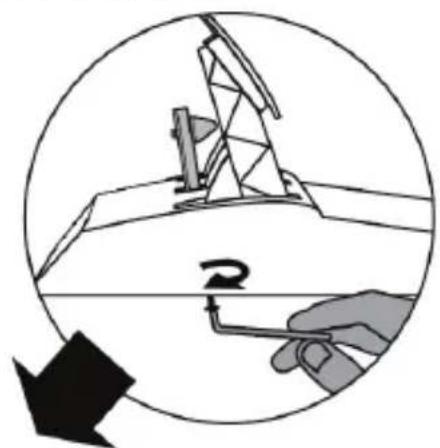
INSTALLING THE WHEEL ON ITS BASE
Align the connector positions using the arrows:
Base (1) connector: Arrow pointing upwards
Racing wheel (2) connector: Arrow pointing upwards
Once the connectors are correctly positioned, simply rotate the Thrustmaster Quick Release (15) device's ring counterclockwise, while holding the racing wheel (2) in position.
Then, tighten the ring as much as you can: to do so, hold the ring in position and rotate the racing wheel clockwise.
Once you have installed the wheel, rotate it 180^ (when facing the wheel, the GT logo should be upside down) to access the small attachment screw located on the ring of the Thrustmaster Quick Release (15) device. Use a large Phillips screwdriver to tighten the small attachment screw (do not use excessive force), turning it clockwise.

When using a Philips screwdriver, ensure NOT to use excessive force
when tightening the small attachment screw!
Stop turning the screw as soon as you feel some resistance.
ATTACHING THE RACING WHEEL
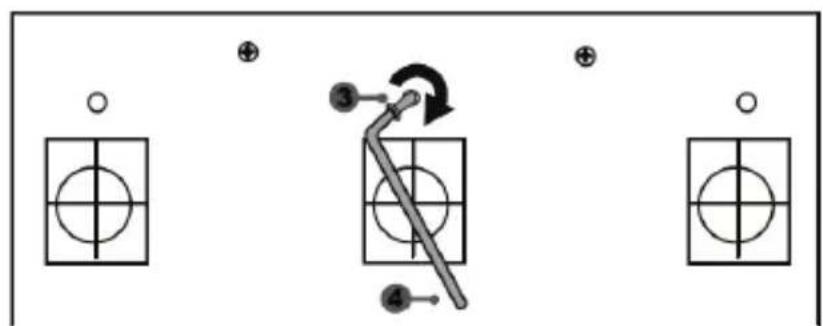
Attaching the racing wheel's base to a cockpit
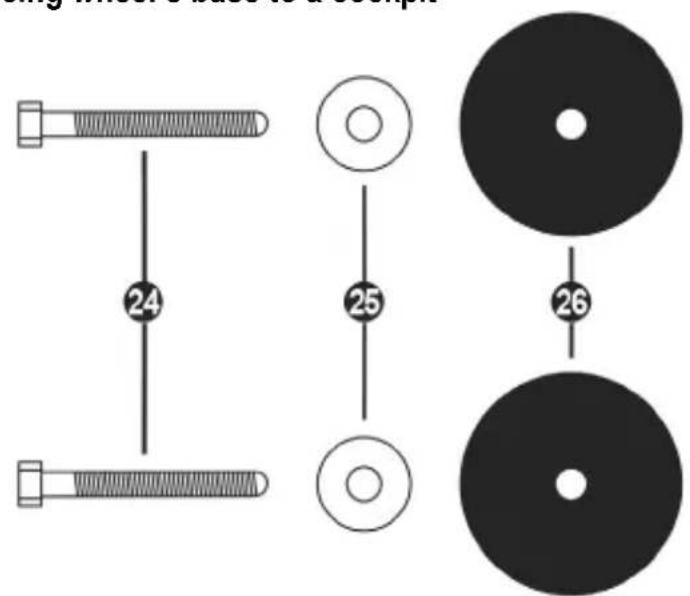
24 2 M6-type hexagon head/Phillips-head bolts
25 2 washers
26 2 mounting discs (metal on one side, and textured rubber on the other)

- Position the washers (25) on the metal sides of the mounting discs (26), and insert the M6-type hexagon head/Phillips-head bolts (24).
- Place the racing wheel's base on the cockpit shelf.
- Using a 10 mm wrench key or a Phillips-head screwdriver, screw the cockpit mounting kit into the cockpit shelf and into the 2 small screw threads located on the underside of the wheel.
ATTENTION:
- Do not remove the foam pads located on the underside of the racing wheel's base! The foam pads amplify the effects of the T-DFB system when the wheel is attached.
- The textured rubber side of the mounting discs (26) must imperatively be positioned facing the cockpit shelf = never position the metal side facing the cockpit shelf.
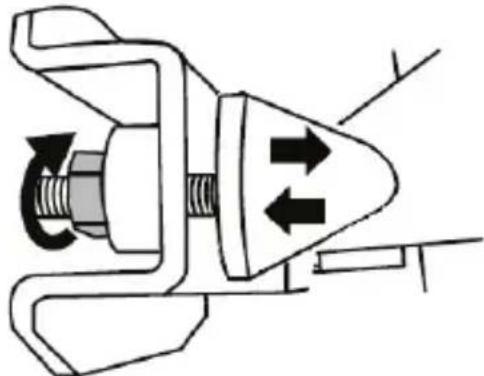
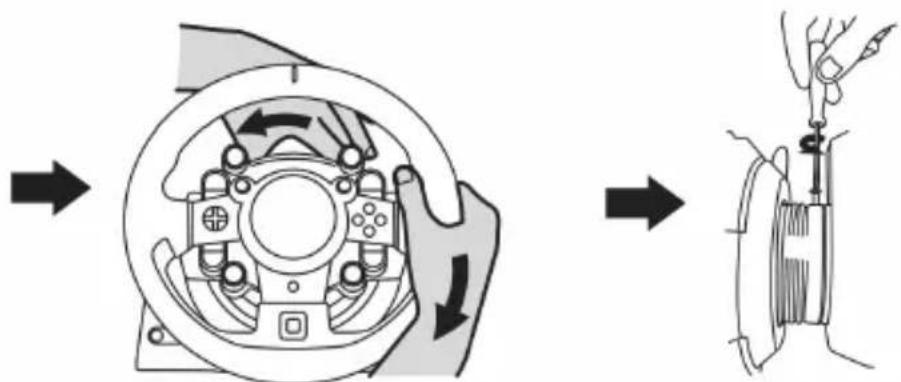
Attaching the racing wheel to a table or a desktop
- Place the racing wheel on a table or any other horizontal, flat and stable surface.
- Insert the fastening screw (14) in the attachment system (13), then tighten the device by turning the screw anticlockwise, so that it feeds into the large threaded hole (12) located beneath the racing wheel, until the wheel is perfectly stable.
ALWAYS NEVER
WARNING:
- Never tighten the screw alone, without the attachment system in place (this could damage the racing wheel).
- Do not remove the foam pads located on the underside of the racing wheel's base! The foam pads amplify the effects of the T-DFB system when the wheel is attached.
| ATTACHMENT / REMOVAL | DIRECTION |
| To tighten: Turn the screw anticlockwise | |
| To release: Turn the screw clockwise |
SETTING UP THE RACING WHEEL FOR PLAYSTATION®4
- Connect the pedal set to its connector (19) located at the rear of the racing wheel's base.
- Connect the T-TURBO power supply (21) to its connector (17).
- Connect the power supply cable (22) to the T-TURBO power supply, and plug the cable into an electrical outlet with the same voltage.
- Set the USB sliding switch (11) to the "OTHER" or "GT" position, depending on the PS4™ game you are using.
- Connect the removable USB cable (23) to its connector (18) and to one of the USB ports on the PS4™ system.
- Once your PS4™ system is powered on, your racing wheel will calibrate itself.
- Press the PS button (9) on the racing wheel, and log in to your Sony Entertainment Network account in order for your wheel to be functional. You are now ready to play!
Important notes:
- Don't forget to press the PS button (9) on the racing wheel, in order for your wheel to be functional.
- The USB sliding switch (11) on the wheel's base must always be set to the proper position ("OTHER" or "GT") before connecting the racing wheel's USB cable to your system. To change the sliding switch's position: disconnect the USB cable, and then set the switch to the appropriate position before reconnecting the USB cable to the system.
- The list of PlayStation®4 games compatible with the T-GT (along with the required position for the USB sliding switch (11) according to the game you are using) is available here: http://support.thrustmaster.com (in the Racing Wheels/T-GT section). This list is updated regularly.
USB SLIDING SWITCH (11) IN THE "OTHER" POSITION
FOR PS4™ GAMES APART FROM GT SPORT
When the USB sliding switch (11) is set to the "OTHER" position:
- The wheel is recognized in most games as a T300 RS wheel.
- The 4 rotary selectors with Push function (5) are not functional.
- The 2 mini-sticks (6) are not functional.
- The Force Feedback system is functional, but the T-DFB effects system (16) is not.
USB SLIDING SWITCH (11) IN THE "GT" POSITION
FOR THE GAME GT SPORT (AND OTHER FUTURE GT GAMES)
When the USB sliding switch (11) is set to the "GT" position:
- The wheel is recognized as a T-GT wheel.
- The 4 rotary selectors with Push function (5) are functional.
- The 2 mini-sticks (6) are functional.
- The Force Feedback system, and the T-DFB effects system (16), are both functional at the same time. In the GT Sport game's options, the power level of each system can be adjusted independently.
SETTING UP THE RACING WHEEL FOR PC
Important notes:
- On PC, the USB sliding switch (11) on the racing wheel's base must always be set to the OTHER position.
- On PC, the 2 mini-sticks (6) are functional.
- On PC, the 4 rotary selectors with Push function (5) are functional.
-
On PC, the Force Feedback system is functional, but the T-DFB effects system (16) is not.
-
Go to http://support.thrustmaster.com to download the drivers and the force feedback software for PC. Click Wheels / T-GT, then select Drivers.
- Once the download is complete, launch the installation, and follow the on-screen instructions to connect the wheel's USB plug to your computer and complete the installation.
- Once the installation is complete, click Finish and restart your computer.
- Select Start / All Programs / Thrustmaster / FFB Racing Wheel / Control Panel to open the Game Controllers window.
The Game Controllers window displays the racing wheel's name Thrustmaster T-GT Racing Wheel with the status OK.
-
Click Properties to configure your wheel in the T-GT control panel:
-
Test Input tab: allows to test and view the 25 action buttons, 4 rotary selectors with Push function, directional buttons, wheel axes, 2 mini-sticks axes, pedals axes, and to adjust the wheel's rotation angle in your PC games.
- Test Forces tab: allows to test 12 force feedback effects.
- Gain Settings tab: allows to adjust the power of the force feedback effects in your PC games.
You are now ready to play!
General notes:
- On PC, click OK to close the Game Controllers window before launching the game.
- On PC, the adjustments made in the Game Controllers window will only be saved on your computer (hence they will have no effect on the PlayStation 4 system).
- Your wheel's firmware version is displayed in the upper right-hand corner of the T-GT control panel tabs.
AUTOMATIC RACING WHEEL AND PEDAL SET CALIBRATION
The wheel automatically self-calibrates when you plug the racing wheel into an electrical outlet and connect the racing wheel's USB connector to the system.
During this phase, the racing wheel will rotate quickly towards the left and the right, covering a 1080 degree angle, before stopping at the center.

WARNING:
Never touch the racing wheel during the self-calibration phase! (This could result in improper calibration and/or personal injuries.)
AUTOMATIC CALIBRATION OF THE PEDAL SET
Never connect the pedal set to the racing wheel's base (or disconnect it from the base) when it is connected to the system or during gameplay (this could result in improper calibration).
Always connect the pedal set before connecting the racing wheel to the system.
Once the racing wheel's calibration is complete and the game has been started, the pedals are automatically calibrated after a few presses.

WARNING:
Never press the pedals during the racing wheel's
self-calibration phase or while a game is loading!
(This could result in improper calibration.)
If your racing wheel and/or pedal set do not function correctly, or if they seem to be improperly calibrated:
Power off your system and completely disconnect the racing wheel. Then reconnect all cables (including the power supply cable and the pedal set), and restart your system and your game.
INTERNAL COOLING SYSTEM FOR THE WHEEL'S BASE
The internal cooling system for the wheel's base starts working when the wheel is powered on, and only switches off when the wheel's USB port is no longer powered.
MODE BUTTON AND INDICATOR LIGHT (10)
MODE button for the pedal set
You can electronically swap the accelerator and clutch pedals.
To do so, simply press the MODE button (10) for 2 seconds.
The racing wheel's internal memory stores whether the pedals have been swapped around or not.
| GAS AND CLUTCH PEDALS | Color of the MODE indicator light (10) |
| NORMAL | RED |
| SWAPPED AROUND | GREEN |
Other information regarding the MODE button
To learn more about the MODE button and indicator light, please visit
http://support.thrustmaster.com. Click Racing Wheels / T-GT, and then select Manual or FAQ.
HELP FILES AND FAQs (NOT INCLUDED IN THIS MANUAL)
Please visit http://support.thrustmaster.com. Click Racing Wheels / T-GT, and then select Manual or FAQ.
T-GT EDITION PEDAL SET

TECHNICAL FEATURES

1 Metal support for conical stop (not installed by default)
4 2.5 mm Allen key (included)
2 Conical stop
5 Position adjustment nut for conical stop
3 Attachment screw for metal support

6 Metal pedal arm
8 Metal pedal head
7 Plastic head support
WARNING
Before using this product, be sure to read these instructions carefully and save them for future reference.

For safety reasons, never use the pedal set with bare feet or while wearing only socks on your feet.
THRUSTMASTER® DISCLAIMS ALL RESPONSIBILITY IN THE EVENT OF INJURY RESULTING FROM USE OF THE PEDAL SET WITHOUT SHOES.

Warning - Pedal set pinching hazard during gaming sessions
- Keep the pedal set out of the reach of children.
- During gaming sessions, never place your fingers or thumbs on or near the sides of the pedals.
- During gaming sessions, never place your fingers or thumbs on or near the rear base of the pedals.
- During gaming sessions, never place your fingers or thumbs on or near the front base of the pedals.

AUTOMATIC CALIBRATION OF PEDALS

- Never connect or disconnect the pedal set from the base of the wheel when the wheel is connected to a PS4™ system or to a PC, or during gaming sessions, to avoid calibration problems.
= Always connect the pedal set to the wheel before connecting the wheel to a PS4™ system or to a PC. - Once the wheel has self-calibrated and the game has started, the pedals automatically calibrate themselves after being pressed a few times.
- Never press on the pedals when the wheel is self-calibrating or when your game is starting up, to avoid calibration problems.
- If the pedals are not functioning correctly or appear to be improperly calibrated, power off your system, completely disconnect your wheel, then reconnect all of the cables (including the power supply cable and the pedal set cable), power the system back on and restart your game.
ATTACHING THE PEDAL SET TO A COCKPIT
- Attach the pedal set using the small screw threads located on the underside of the pedal set.
- Screw two M6 screws (not included) into the cockpit's pedal support plate and into the two small screw threads located on the underside of the pedal set.
Important: The length of the two M6 screws must not exceed the thickness of the cockpit's pedal support plate plus an additional 10mm , to avoid damaging the pedal set's internal components.
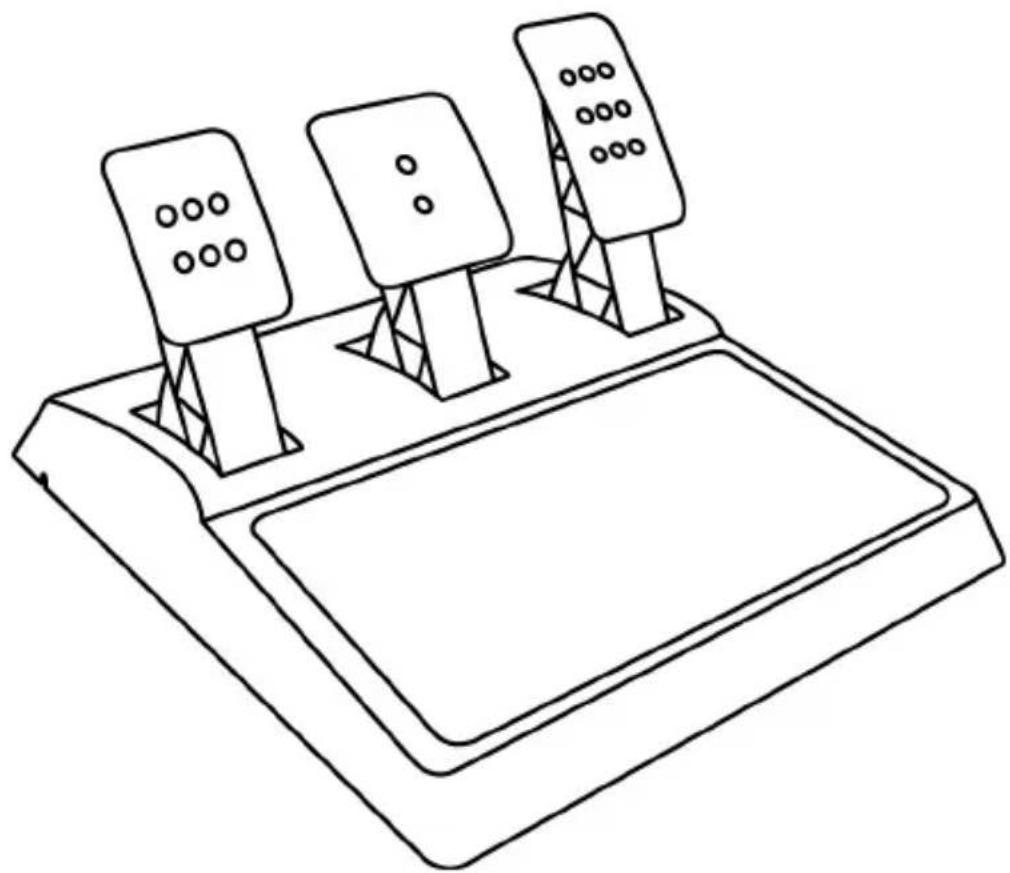
ADJUSTING THE PEDAL SET
Each of the three pedals includes:
- A metal head (8) with multiple perforations (nine for the accelerator - two for the brake - six for the clutch).
- A plastic head support (7) (placed between the head and the arm) with four perforations.
- A metal pedal arm (6) with four perforations.

ATTENTION: To avoid any calibration problems, be sure to always disconnect your wheel's USB cable from the PS4™ system before making any adjustments to your pedal set.
Adjusting the HEIGHT of the 3 pedals
- Using the included 2.5 ~mm Allen key (4), unscrew the two screws holding the metal head (8) and its support (7) in place.
- Select your preferred height position, then replace and re-tighten the screws so that the metal head (8) and its support (7) are held firmly in place.
Examples illustrating the accelerator pedal:

Low position

High position
Adjusting the SPACING of the accelerator pedal and the clutch pedal
- Using the included 2.5 ~mm Allen key (4), unscrew the two screws holding the metal head (8) and its support (7) in place.
- Select your preferred position (to the left, centered, or to the right), then replace and re-tighten the screws so that the metal head (8) and its support (7) are held firmly in place.
Examples illustrating the clutch pedal:
Left position

Centered position (default)

Right position
Number of possible spacing positions per pedal:
- Three for accelerator pedal
- Three for clutch pedal
Adjusting the INCLINATION of the 3 pedals
- Using the included 2.5 ~mm Allen key (4), unscrew the two screws holding the metal head (8) and its support (7) in place.
- Turn the plastic head support (7) 180^ , then replace and re-tighten the screws so that the metal head (8) and its support (7) are held firmly in place.
Examples illustrating the accelerator pedal:

Less inclined position
More inclined position (default)
Number of possible inclination positions per pedal:
-
Two for accelerator pedal
-
Two for brake pedal
- Two for clutch pedal
Installing the conical stop ("CONICAL RUBBER BRAKE" mod)
This modification (or "mod") is not essential, and is not installed by default. This means that the brake pedal functions perfectly even if the mod is not installed.
This mod lets you experience a different feeling and resistance when braking. It's up to you whether or not to install it, depending on your own preferences.
- Screw the conical stop (2) onto its metal support (1).
- Screw the position adjustment nut (5) onto the bottom (onto the conical stop's screw thread).
- Position the unit at the back of the brake pedal's arm.
- Using the included 2.5mm Allen key (4), attach the unit using the attachment screw (3) and the small central screw thread located on the underside of the pedal set.
The "CONICAL RUBBER BRAKE" mod is now installed!
Adjusting the brake pedal's RANGE of travel and STRENGTH of resistance
By slightly unscrewing the nut (5), you can further strengthen the resistance of the brake pedal by moving the conical stop (2) closer to the back of the pedal's arm (if necessary, use a 14mm wrench or pliers to re-tighten the nut and maintain the selected position). The closer the conical stop is positioned to the back of the pedal's arm, the greater the strength of resistance will be.
Note: When the conical stop is very close to the back of the brake pedal's arm, you may experience difficulties in reaching the maximum calibration value. Should that be the case:
- Slowly, press very hard on the brake pedal so as to reach the maximum value (if necessary, stand very briefly on the pedal – just for a second), then release the pressure; or else
- Move the conical stop a bit farther away from the back of the brake pedal's arm.
CONSUMER WARRANTY INFORMATION
Worldwide, Guillemot Corporation S.A., whose registered office is located at Place du Granier, B.P. 97143, 35571 Chantepie, France (hereinafter "Guillemot") warrants to the consumer that this Thrustmaster product shall be free from defects in materials and workmanship, for a warranty period which corresponds to the time limit to bring an action for conformity with respect to this product. In the countries of the European Union, this corresponds to a period of two (2) years from delivery of the Thrustmaster product. In other countries, the warranty period corresponds to the time limit to bring an action for conformity with respect to the Thrustmaster product according to applicable laws of the country in which the consumer was domiciled on the date of purchase of the Thrustmaster product (if no such action exists in the corresponding country, then the warranty period shall be one (1) year from the original date of purchase of the Thrustmaster product).
Notwithstanding the above, rechargeable batteries are covered by a warranty period of six (6) months from the date of original purchase.
Should the product appear to be defective during the warranty period, immediately contact Technical Support, who will indicate the procedure to follow. If the defect is confirmed, the product must be returned to its place of purchase (or any other location indicated by Technical Support).
Within the context of this warranty, the consumer's defective product shall, at Technical Support's option, be either replaced or returned to working order. If, during the warranty period, the Thrustmaster product is subject to such reconditioning, any period of at least seven (7) days during which the product is out of use shall be added to the remaining warranty period (this period runs from the date of the consumer's request for intervention or from the date on which the product in question is made available for reconditioning, if the date on which the product is made available for reconditioning is subsequent to the date of the request for intervention). If permitted under applicable law, the full liability of Guillemot and its subsidiaries (including for consequential damages) is limited to the return to working order or the replacement of the Thrustmaster product. If permitted under applicable law, Guillemot disclaims all warranties of merchantability or fitness for a particular purpose.
This warranty shall not apply: (1) if the product has been modified, opened, altered, or has suffered damage as a result of inappropriate or abusive use, negligence, an accident, normal wear, or any other cause unrelated to a material or manufacturing defect (including, but not limited to, combining the Thrustmaster product with any unsuitable element, including in particular power supplies, rechargeable batteries, chargers, or any other elements not supplied by Guillemot for this product); (2) if the product has been used for any use other than home use, including for professional or commercial purposes (game rooms, training, competitions, for example); (3) in the event of failure to comply with the instructions provided by Technical Support; (4) to software, said software being subject to a specific warranty; (5) to consumables (elements to be replaced over the product's lifespan: disposable batteries, audio headset or headphone ear pads, for example); (6) to accessories (cables, cases, pouches, bags, wrist-straps, for example); (7) if the product was sold at public auction.
This warranty is nontransferable.
The consumer's legal rights with respect to laws applicable to the sale of consumer goods in his or her country are not affected by this warranty.
Additional warranty provisions
During the warranty period, Guillemot shall not provide, in principle, any spare parts, as Technical Support is the only party authorized to open and/or recondition any Thrustmaster product (with the exception of any reconditioning procedures which Technical Support may request that the consumer carry out, by way of written instructions - for example, due to the simplicity and the lack of confidentiality of the reconditioning process - and by providing the consumer with the required spare part(s), where applicable).
Given its innovation cycles and in order to protect its know-how and trade secrets, Guillemot shall not provide, in principle, any reconditioning notification or spare parts for any Thrustmaster product whose warranty period has expired.
In the United States of America and in Canada, this warranty is limited to the product's internal mechanism and external housing. In no event shall Guillemot or its affiliates be held liable to any third party for any consequential or incidental damages resulting from the breach of any express or implied warranties. Some States/Provinces do not allow limitation on how long an implied warranty lasts or exclusion or limitation of liability for consequential or incidental damages, so the above limitations or exclusions may not apply to you. This warranty gives you specific legal rights, and you may also have other rights which vary from State to State or Province to Province.
Liability
If permitted under applicable law, Guillemot Corporation S.A. (hereinafter "Guillemot") and its subsidiaries disclaim all liability for any damages caused by one or more of the following: (1) the product has been modified, opened or altered; (2) failure to comply with assembly instructions; (3) inappropriate or abusive use, negligence, an accident (an impact, for example); (4) normal wear; (5) the use of the product for any use other than home use, including for professional or commercial purposes (game rooms, training, competitions, for example). If permitted under applicable law, Guillemot and its subsidiaries disclaim all liability for any damages unrelated to a material or manufacturing defect with respect to the product (including, but not limited to, any damages caused directly or indirectly by any software, or by combining the Thrustmaster product with any unsuitable element, including in particular power supplies, rechargeable batteries, chargers, or any other elements not supplied by Guillemot for this product).
DECLARATION OF CONFORMITY
CANADIAN COMPLIANCE NOTICE: this Class B digital apparatus meets all requirements of the Canadian Interference-Causing Equipment Regulations.
USA COMPLIANCE NOTICE: this equipment has been tested and found to comply with the limits for a Class B digital device, pursuant to Part 15 of the FCC rules. Operation is subject to the following two conditions:
(1) This device may not cause harmful interference, and
(2) This device must accept any interference received, including interference that may cause undesired operation.
These limits are designed to provide reasonable protection against harmful interference in a residential installation. This equipment generates, uses and can radiate radio frequency energy and, if not installed and used in accordance with the instructions, may cause harmful interference to radio communications. However, there is no guarantee that interference will not occur in a particular installation. If this equipment does cause harmful interference to radio or television reception, which can be determined by turning the equipment on and off, the user is encouraged to try to correct the interference by one or more of the following measures:
-
Reorient or relocate the receiving antenna.
-
Increase the separation between the equipment and receiver.
- Connect the equipment into an outlet on a circuit different from that to which the receiver is connected.
- Consult the dealer or an experienced radio/TV technician for help.
THRUSTMASTER
TECHNICAL SUPPORT
http://support.thrustmaster.com

COPYRIGHT
© 2017 Guillemot Corporation S.A. All rights reserved. Thrustmaster® is a registered trademark of Guillemot Corporation S.A.
Manufactured & distributed under license from Sony Interactive Entertainment America LLC.
Playstation, the PS family logo, PS3, PS4 and "Ox" are registered trademarks of Sony Interactive Entertainment Inc. All rights reserved.
Gran Turismo and Gran Turismo logo are registered trademarks or trademarks of Sony Interactive Entertainment Inc.
All other trademarks and brand names are hereby acknowledged and are property of their respective owners. Illustrations not binding. Contents, designs and specifications are subject to change without notice and may vary from one country to another. Made in China.
TouchSense® Technology licensed from Immersion Software Ireland Limited. Protected by one or more of the U.S. Patents found at the following address www.immersion.com/patent-marking.html and other patents pending.
ENVIRONMENTAL PROTECTION RECOMMENDATION
Please adhere to local recycling laws for electrical and electronic equipment.
Retain this information. Colors and decorations may vary.
Plastic fasteners and adhesives should be removed from the product before it is used.
www.thrustmaster.com


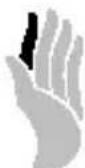
immersion.

T·GT
INFORMATIONS RELATIVES A LA GARANTIE AUX CONSOMMATEURS
www.thrustmaster.com


immersion.

T·GT
Manual del usuario

ADVERTENCIA:
www.thrustmaster.com


immersion.

T·GT
PARASISTEMASPLAYSTATION®3-PLAYSTATION®4
Manual do Usuário
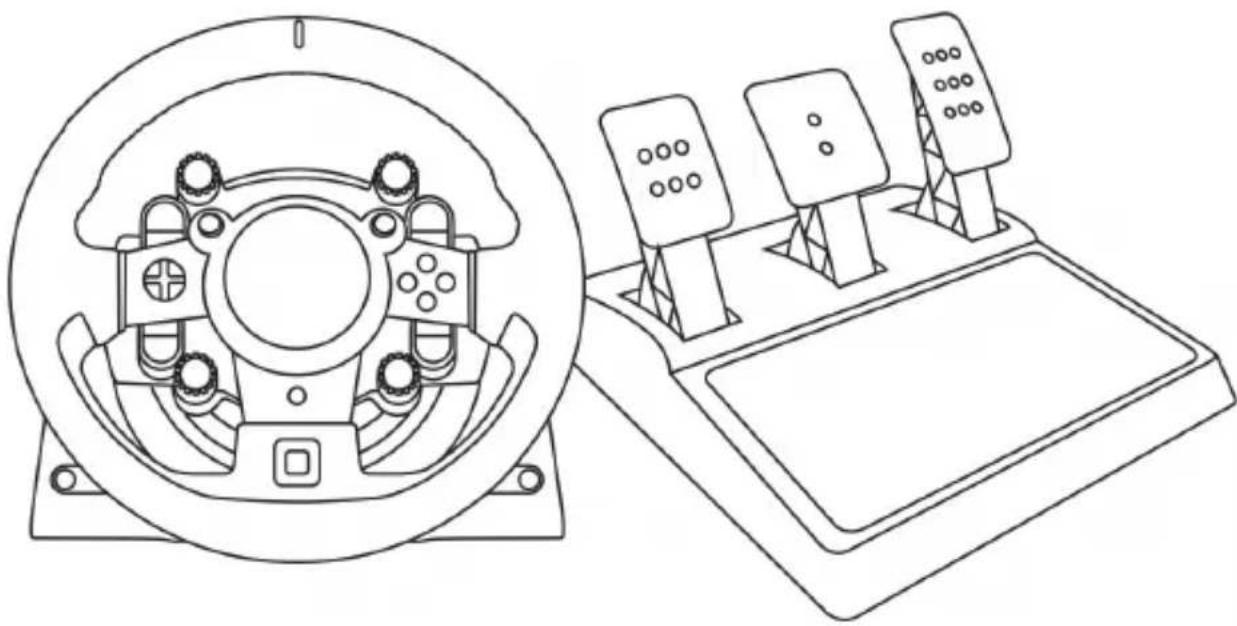
ATENÇA:
SELETOR USB (11) NA POSICAO "OTHER"
PARA JOGOS DE PS4™ QUE NÃO SEJAM GT SPORT
Quando o seletor USB (11) estiver na posicao "OTHER":
FIXAR O CONJUNTO DE PEDAIS A UM COCKPIT
- Fixe o Conjunto de pedais utilizing as pequeas roscas de parafusos situadas na parte inferior do Conjunto de pedais.
- Enrosquedoes parafusos M6 (não incluidos) na chapa de apoio do Conjunto de pedais e nas das��enhas roscas de parafusos situadas na parte inferior do coniunto de pedais.
www.thrustmaster.com


immersion.

T·GT
一一沙一木二一
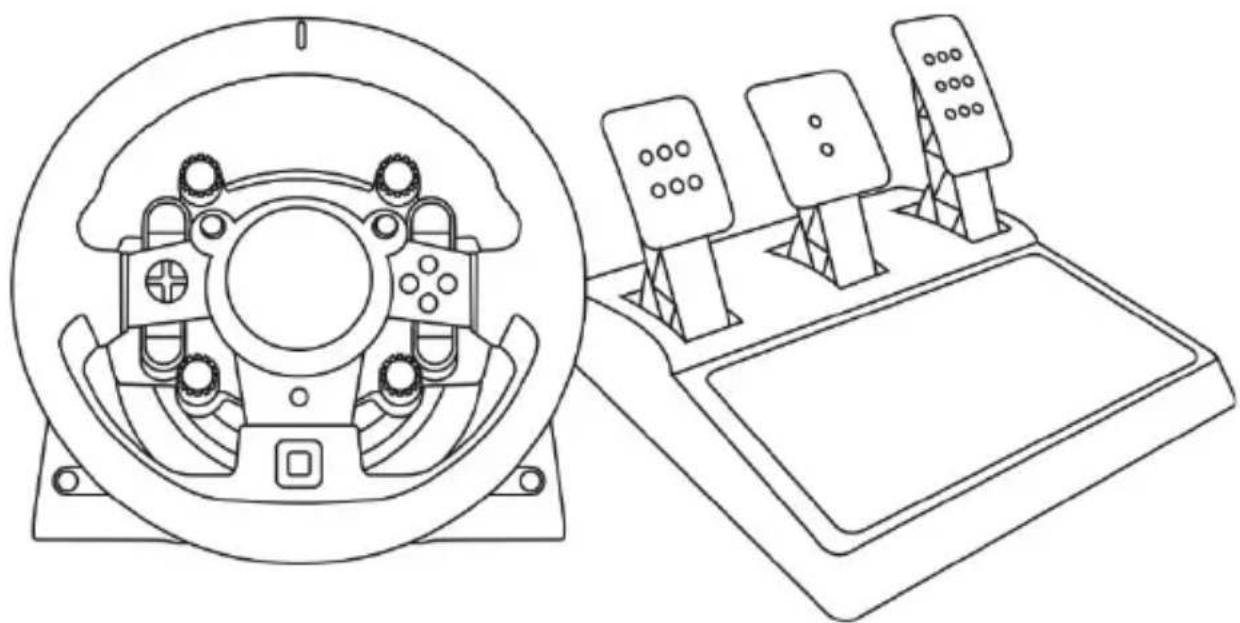
警告:
All rights reserved.
Gran Turismo, “Gr兰トリスモ” and Gran Turismo logo are registered trademarks or trademarks of Sony Interactive Entertainment Inc.
www.thrustmaster.com Made in China.

:外箱

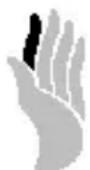
immersion.
T·GT
用户手册
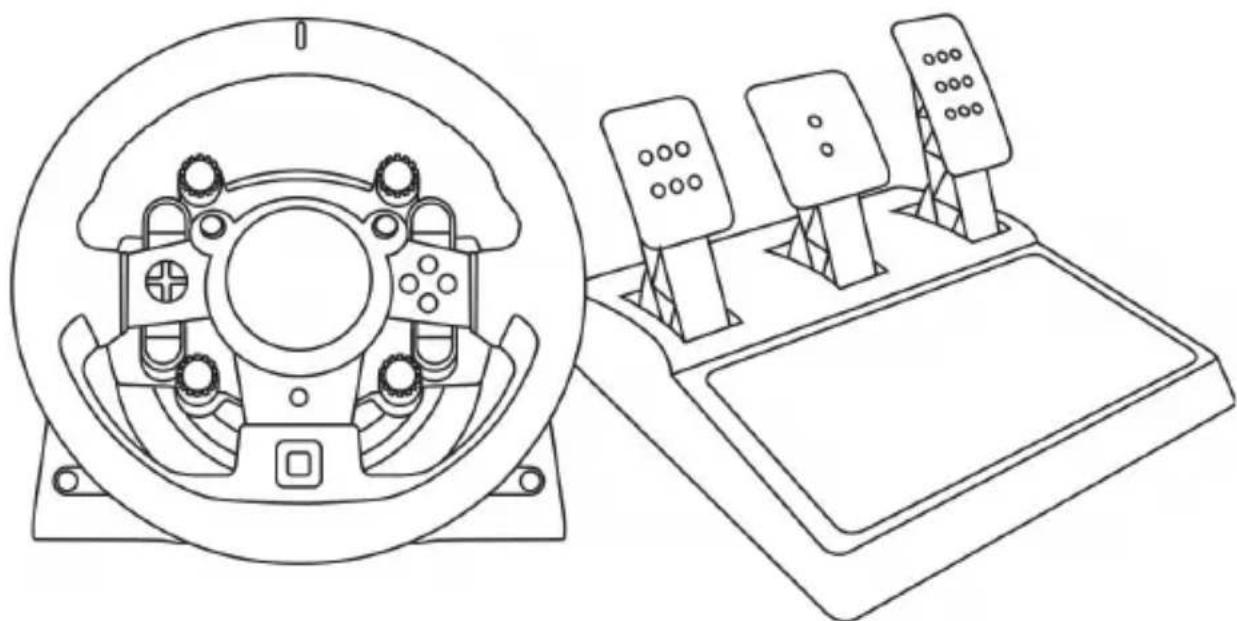
警告:
ReiHnIe HnIe HnIe HnIe HnIe HnIe HnIe HnIe HnIe HnIe HnIe HnIe HnIe HnIe HnIe HnIe HnIe HnIe HnIe HnIe HnIe HnIe HnIe HnIe HnIe HnIe
-ReiHnTtBbIStmJnEeNnBnPnTnBnTnBnTnBnTnBnTnBnTnBnTnBnTnBnTnBnTnBnTnBnTnBnTnBnTnBnTnBnTnBnTnBnTnBnTnBnTnBnTnBnTnBnTnBnTnBnTnBnTn
- 号云的自关 26)是
TeiIeIeIaNnKcHgEeRieIeHnHnBnHn
- Rei\$h h#e i# 2
- 祖日卜(14) 肆书 13) 事上, 求人来
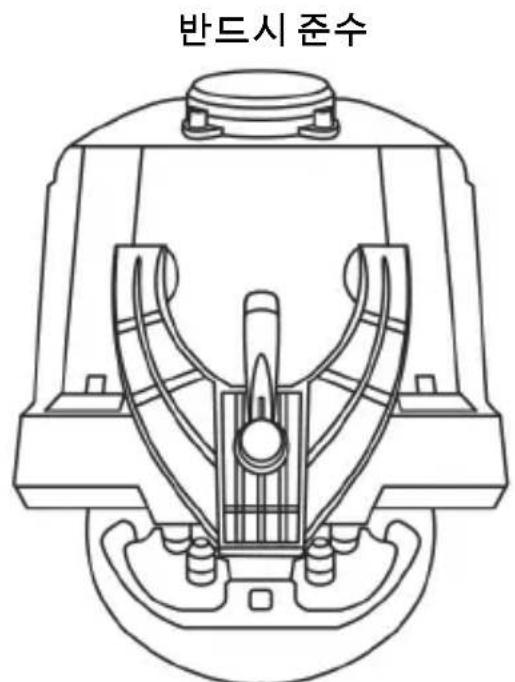
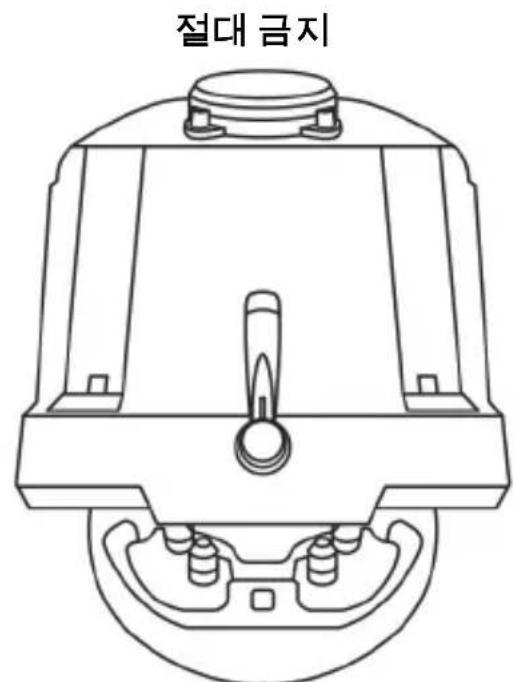
#
-부chantsisstleitlreIj
(L)
ReiHnienBHeIsMmEeHcNnTnIaSiH!n
ReiHnIeHJtJFJFJFJFJFJFJFJFJFJFJFJFJFJFJFJFJFJFJFJFJFJFJFJFJFJFJFJFJFJFJFJFJ
Reiinien 10000000000000000000000000000000000000000000000000000000000000000000000
i) 1080

者告保定有同在通阿,莱思用
(0/)
対挡総連自動報錯
2 原爆爆爆爆爆爆爆爆爆爆爆爆爆爆爆爆爆爆爆爆爆爆爆爆爆爆爆爆爆爆爆爆爆爆爆爆爆爆爆爆爆爆爆爆爆爆爆爆爆爆爆爆爆爆爆爆爆
3 錞令 于时当下 肆中 汪

6 同今印门
8 鋼歓庁嘔連
7 普拉斯専連三贝贝
#
iJ 1

Anextanh sangue wihhe pnd tte hiee d anl bne ngmaln sin en nate aen stochzit
Msi. HTRUSTMASTER"n isnil bei i eial tte to akchlo rorre bngshn beupse
dahpe hienh chmldto jtj l

To ensure that your T-GT racing wheel functions correctly with games, you may be required to install the game's automatic updates (available when your system is connected to the Internet).
TECHNICAL FEATURES
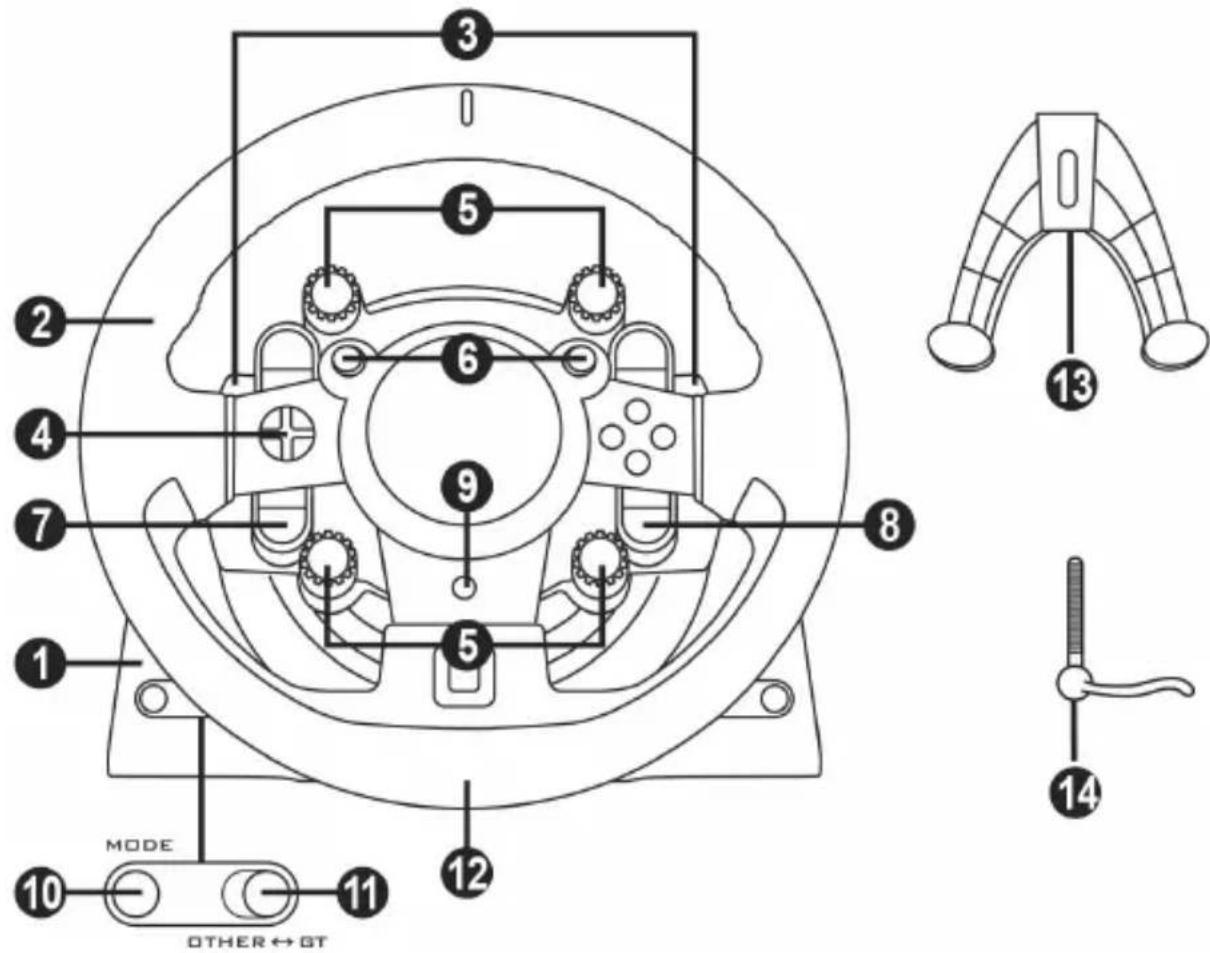
1 T-GT base
2 T-GT wheel
3 2 sequential paddle shifters (up & down)
4 Directional buttons
5 4 rotary selectors with Push function (compatible with the PS4TM system in GT mode and on PC)
6 2 mini-sticks (compatible with the PS4^TM system in GT mode and on PC)
7 SHARE button
8 OPTIONS button
9 PS button
10 MODE button + red/green indicator light
11 Built-in USB sliding switch: OTHER / GT
12 Large threaded hole (for attachment system and fastening screw)
13 Attachment system
14 Metal fastening screw


15 Thrustmaster Quick Release
16 T-DFB effects system (only compatible with the PS4TM system in GT mode)
17 Connector for T-TURBO power supply
18 Connector for removable USB cable
19 Connector for pedal set
20 Connector for TH8A shifter (shifter sold separately)
21 T-TURBO power supply
22 Power supply cable
23 Removable USB cable
PLUGGING THE WHEEL INTO AN ELECTRICAL OUTLET: PLEASE READ CAREFULLY!

Never plug the T-TURBO power supply into an electrical outlet with a different voltage! The
T-TURBO power supply's voltage is indicated on the label located above the female connector for the power supply cable.

Never connect a power supply other than the T-TURBO power supply to the T-GT base,
even if the connector is compatible! For example, never connect the power adapter for the T500 RS
wheel to the T-GT base.
WARNING
Before using this product, please read this manual carefully and save it for later reference.

Warning - Electrical shock
- Keep the product in a dry location and do not expose it to dust or sunlight.
- Do not twist or pull on the connectors and cables.
- Do not spill any liquid on the product or its connectors.
- Do not short-circuit the product.
- Never dismantle the product; do not throw it onto a fire and do not expose it to high temperatures.
- Do not use a power supply cable other than the one provided with your racing wheel.
- Do not use the power supply cable if the cable or its connectors are damaged, split or broken.
- Make sure that the power supply cable is properly plugged into an electrical outlet, and properly connected to the connector at the rear of the racing wheel's base.
- Do not open up the racing wheel: there are no user-serviceable parts inside. Any repairs must be carried out by the manufacturer, its authorized representative or a qualified technician.
- Only use attachment systems/accessories specified by the manufacturer.
- If the racing wheel is operating abnormally (if it is emitting any abnormal sounds, heat or odors), stop using it immediately, unplug the power supply cable from the electrical outlet and disconnect the other cables.
- If you will not be using the racing wheel for an extended period of time, unplug its power supply cable from the electrical outlet.
- The electrical outlet must be located near the equipment and must be easily accessible.

Air vents
Make sure not to block any of the air vents on the racing wheel's base. For optimal ventilation, make sure to do the following:
- Position the wheel's base at least 10c m away from any wall surfaces.
- Do not place the base in any tight spaces.
- Do not cover the base.
- Do not let any dust build up on the air vents.

For safety reasons, never use the pedal set with bare feet or while wearing only socks on your feet.
THRUSTMASTER © DISCLAIMS ALL RESPONSIBILITY IN THE EVENT OF INJURY RESULTING FROM USE OF THE PEDAL SET WITHOUT SHOES.

Warning - Injuries due to Force Feedback and repeated movements
Playing with a Force Feedback racing wheel may cause muscle or joint pain. To avoid any problems:
- Avoid lengthy gaming periods.
- Take 10 to 15 minute breaks after each hour of play.
- If you feel any fatigue or pain in your hands, wrists, arms, feet or legs, stop playing and rest for a few hours before you start playing again.

Warning - Injuries due to Force Feedback and repeated movements (continued)
- If the symptoms or pain indicated persist when you start playing again, stop playing and consult your doctor.
- Keep out of children's reach.
- During gameplay, always leave both hands correctly positioned on the wheel without completely letting go.
- During gameplay, never place your hands or your fingers under the pedals or anywhere near the pedal set.
- During calibration and gameplay, never place your hand or your arm through the openings in the racing wheel.
- Make sure that the racing wheel's base is properly secured, as per this manual's instructions.

Product to be handled only by users 16 years of age or older

HEAVY PRODUCT
Be careful not to drop the product on yourself or on anyone else!
ALWAYS
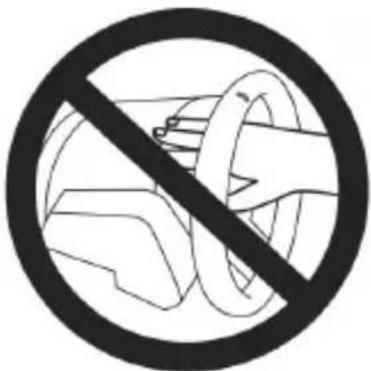
NEVER
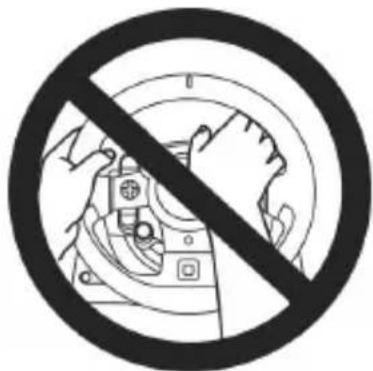
NEVER
- Keep the pedal set out of children's reach.
- During gameplay, never place your fingers on or anywhere near the sides of the pedals.
- During gameplay, never place your fingers on or anywhere near the pedal's rear base.
- During gameplay, never place your fingers on or anywhere near the pedal's front base.

NEVER

NEVER
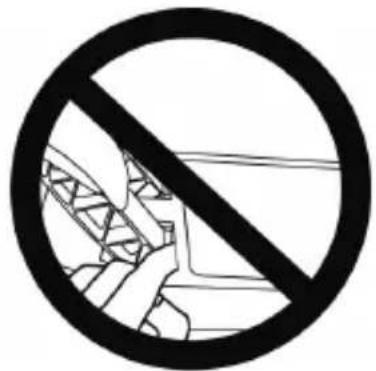
NEVER

Warning - Pedal set pinch hazard when not playing
- Store the pedal set in a safe place, and keep it out of children's reach.
UPDATING YOUR RACING WHEEL'S FIRMWARE
The firmware included in your racing wheel's base can be updated to a more recent version featuring product enhancements.
To display the firmware version that your racing wheel is currently using and update it if required: on PC, visit http://support.thrustmaster.com. Click Racing Wheels / T-GT, then select Firmware and follow the instructions describing the download and installation procedure.
Important note:
On PC, the USB sliding switch (11) on the racing wheel's base must always be set to the "OTHER" position.
INSTALLING THE WHEEL ON ITS BASE
Align the connector positions using the arrows:
Base (1) connector: Arrow pointing upwards
Racing wheel (2) connector: Arrow pointing upwards
Once the connectors are correctly positioned, simply rotate the Thrustmaster Quick Release (15) device's ring counterclockwise, while holding the racing wheel (2) in position.
Then, tighten the ring as much as you can: to do so, hold the ring in position and rotate the racing wheel clockwise.

Once you have installed the wheel, rotate it 180^ (when facing the wheel, the GT logo should be upside down) to access the small attachment screw located on the ring of the Thrustmaster Quick Release (15) device. Use a large Phillips screwdriver to tighten the small attachment screw (do not use excessive force), turning it clockwise.

When using a Philips screwdriver, ensure NOT to use excessive force
when tightening the small attachment screw!
Stop turning the screw as soon as you feel some resistance.
ATTACHING THE RACING WHEEL
Attaching the racing wheel's base to a cockpit
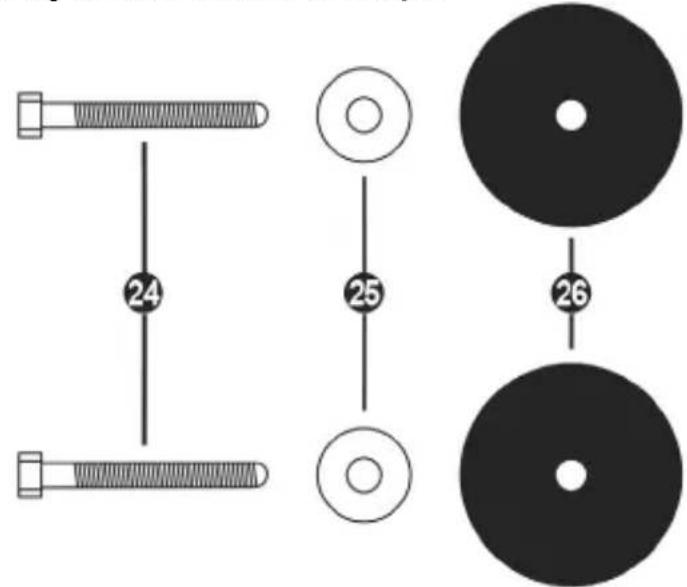
24 2 M6-type hexagon head/Phillips-head bolts
25 2 washers
26 2 mounting discs (metal on one side, and textured rubber on the other)

- Position the washers (25) on the metal sides of the mounting discs (26), and insert the M6-type hexagon head/Phillips-head bolts (24).
- Place the racing wheel's base on the cockpit shelf.
- Using a 10 mm wrench key or a Phillips-head screwdriver, screw the cockpit mounting kit into the cockpit shelf and into the 2 small screw threads located on the underside of the wheel.
ATTENTION:
- Do not remove the foam pads located on the underside of the racing wheel's base! The foam pads amplify the effects of the T-DFB system when the wheel is attached.
- The textured rubber side of the mounting discs (26) must imperatively be positioned facing the cockpit shelf = never position the metal side facing the cockpit shelf.
Attaching the racing wheel to a table or a desktop
- Place the racing wheel on a table or any other horizontal, flat and stable surface.
- Insert the fastening screw (14) in the attachment system (13), then tighten the device by turning the screw counterclockwise, so that it feeds into the large threaded hole (12) located beneath the racing wheel, until the wheel is perfectly stable.
ALWAYS NEVER
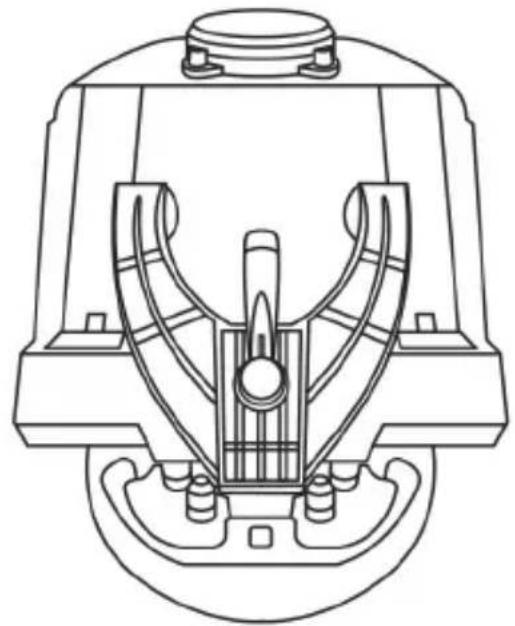
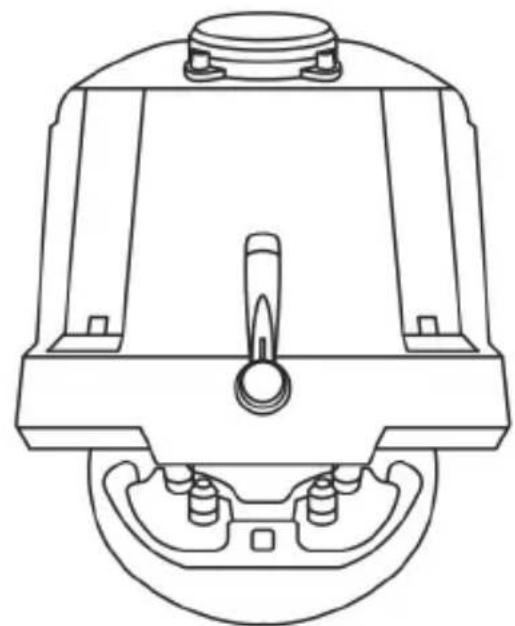
WARNING:
- Never tighten the screw alone, without the attachment system in place (this could damage the racing wheel).
- Do not remove the foam pads located on the underside of the racing wheel's base! The foam pads amplify the effects of the T-DFB system when the wheel is attached.
| ATTACHMENT / REMOVAL | DIRECTION |
| To tighten: Turn the screw anticlockwise | |
| To release: Turn the screw clockwise |
SETTING UP THE RACING WHEEL FOR PLAYSTATION®4
- Connect the pedal set to its connector (19) located at the rear of the racing wheel's base.
- Connect the T-TURBO power supply (21) to its connector (17).
- Connect the power supply cable (22) to the T-TURBO power supply, and plug the cable into an electrical outlet with the same voltage.
- Set the USB sliding switch (11) to the "OTHER" or "GT" position, depending on the PS4™ game you are using.
- Connect the removable USB cable (23) to its connector (18) and to one of the USB ports on the PS4™ system.
- Once your PS4™ system is powered on, your racing wheel will calibrate itself.
- Press the PS button (9) on the racing wheel, and log in to your Sony Entertainment Network account in order for your wheel to be functional. You are now ready to play!
Important notes:
- Don't forget to press the PS button (9) on the racing wheel, in order for your wheel to be functional.
- The USB sliding switch (11) on the wheel's base must always be set to the proper position ("OTHER" or "GT") before connecting the racing wheel's USB cable to your system. To change the sliding switch's position: disconnect the USB cable, and then set the switch to the appropriate position before reconnecting the USB cable to the system.
- The list of PlayStation®4 games compatible with the T-GT (along with the required position for the USB sliding switch (11) according to the game you are using) is available here: http://support.thrustmaster.com (in the Racing Wheels/T-GT section). This list is updated regularly.
USB SLIDING SWITCH (11) IN THE "OTHER" POSITION
FOR PS4™ GAMES APART FROM GT SPORT
When the USB sliding switch (11) is set to the "OTHER" position:
- The wheel is recognized in most games as a T300 RS wheel.
- The 4 rotary selectors with Push function (5) are not functional.
- The 2 mini-sticks (6) are not functional.
- The Force Feedback system is functional, but the T-DFB effects system (16) is not.
USB SLIDING SWITCH (11) IN THE "GT" POSITION
FOR THE GAME GT SPORT (AND OTHER FUTURE GT GAMES)
When the USB sliding switch (11) is set to the "GT" position:
- The wheel is recognized as a T-GT wheel.
- The 4 rotary selectors with Push function (5) are functional.
- The 2 mini-sticks (6) are functional.
- The Force Feedback system, and the T-DFB effects system (16), are both functional at the same time. In the GT Sport game's options, the power level of each system can be adjusted independently.
AUTOMATIC RACING WHEEL AND PEDAL SET CALIBRATION
The wheel automatically self-calibrates when you plug the racing wheel into an electrical outlet and connect the racing wheel's USB connector to the system. During this phase, the racing wheel will rotate quickly towards the left and the right, covering a 1080 degree angle, before stopping at the center.

WARNING:
Never touch the racing wheel during the self-calibration phase! (This could result in improper calibration and/or personal injuries.)
AUTOMATIC CALIBRATION OF THE PEDAL SET
Never connect the pedal set to the racing wheel's base (or disconnect it from the base) when it is connected to the system or during gameplay (this could result in improper calibration).
Always connect the pedal set before connecting the racing wheel to the system.
Once the racing wheel's calibration is complete and the game has been started, the pedals are automatically calibrated after a few presses.

WARNING:
Never press the pedals during the racing wheel's self-calibration phase or while a game is loading! (This could result in improper calibration.)
If your racing wheel and/or pedal set do not function correctly, or if they seem to be improperly calibrated:
Power off your system and completely disconnect the racing wheel. Then reconnect all cables (including the power supply cable and the pedal set), and restart your system and your game.
INTERNAL COOLING SYSTEM FOR THE WHEEL'S BASE
The internal cooling system for the wheel's base
- starts working when the wheel is powered on.
- switches off after a few minutes of inactivity when the internal temperature cools down to a low level.
- switches on again when you use the wheel.
MODE BUTTON AND INDICATOR LIGHT (10)
MODE button for the pedal set
You can electronically swap the accelerator and clutch pedals.
To do so, simply press the MODE button (10) for 2 seconds.
The racing wheel's internal memory stores whether the pedals have been swapped around or not.
| GAS AND CLUTCH PEDALS | Color of the MODE indicator light (10) |
| NORMAL | RED |
| SWAPPED AROUND | GREEN |
Other information regarding the MODE button
To learn more about the MODE button and indicator light, please visit http://support.thrustmaster.com. Click Racing Wheels / T-GT, and then select Manual or FAQ.
HELP FILES AND FAQs (NOT INCLUDED IN THIS MANUAL)
Please visit http://support.thrustmaster.com. Click Racing Wheels / T-GT, and then select Manual or FAQ.
SETTING UP THE RACING WHEEL FOR PC*
UPDATING YOUR RACING WHEEL'S FIRMWARE
*PC compatibility not tested nor endorsed by Sony Interactive Entertainment, Inc.
For more information, visit http://support.thrustmaster.com.
T-GT EDITION PEDAL SET

TECHNICAL FEATURES
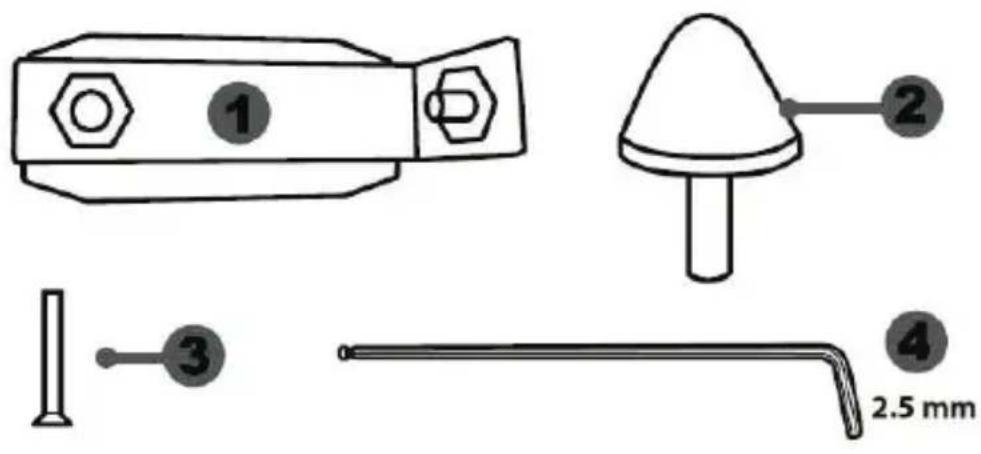

1 Metal support for conical stop (not installed by default)
4 2.5 mm Allen key (included)
2 Conical stop
5 Position adjustment nut for conical stop
3 Attachment screw for metal support

6 Metal pedal arm
8 Metal pedal head
7 Plastic head support
WARNING
Before using this product, be sure to read these instructions carefully and save them for future reference.

For safety reasons, never use the pedal set with bare feet or while wearing only socks on your feet.
THRUSTMASTER® DISCLAIMS ALL RESPONSIBILITY IN THE EVENT OF INJURY RESULTING FROM USE OF THE PEDAL SET WITHOUT SHOES.

Warning - Pedal set pinching hazard during gaming sessions
- Keep the pedal set out of the reach of children.
- During gaming sessions, never place your fingers or thumbs on or near the sides of the pedals.
- During gaming sessions, never place your fingers or thumbs on or near the rear base of the pedals.
- During gaming sessions, never place your fingers or thumbs on or near the front base of the pedals.


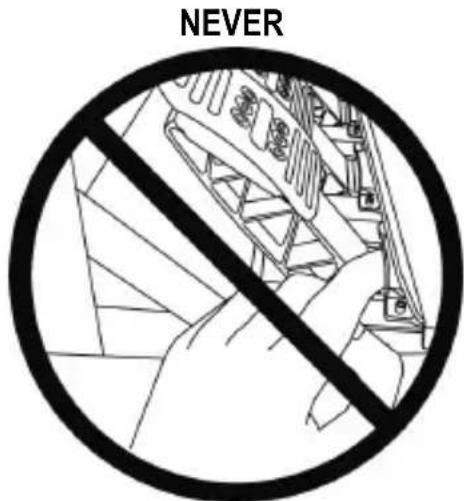
AUTOMATIC CALIBRATION OF PEDALS

- Never connect or disconnect the pedal set from the base of the wheel when the wheel is connected to a PS4™ system or to a PC, or during gaming sessions, to avoid calibration problems.
= Always connect the pedal set to the wheel before connecting the wheel to a PS4™ system or to a PC. - Once the wheel has self-calibrated and the game has started, the pedals automatically calibrate themselves after being pressed a few times.
- Never press on the pedals when the wheel is self-calibrating or when your game is starting up, to avoid calibration problems.
- If the pedals are not functioning correctly or appear to be improperly calibrated, power off your system, completely disconnect your wheel, then reconnect all of the cables (including the power supply cable and the pedal set cable), power the system back on and restart your game.
ATTACHING THE PEDAL SET TO A COCKPIT
- Attach the pedal set using the small screw threads located on the underside of the pedal set.
- Screw two M6 screws (not included) into the cockpit's pedal support plate and into the two small screw threads located on the underside of the pedal set.
Important: The length of the two M6 screws must not exceed the thickness of the cockpit's pedal support plate plus an additional 10mm , to avoid damaging the pedal set's internal components.
ADJUSTING THE PEDAL SET
Each of the three pedals includes:
- A metal head (8) with multiple perforations (nine for the accelerator - two for the brake - six for the clutch).
- A plastic head support (7) (placed between the head and the arm) with four perforations.
- A metal pedal arm (6) with four perforations.
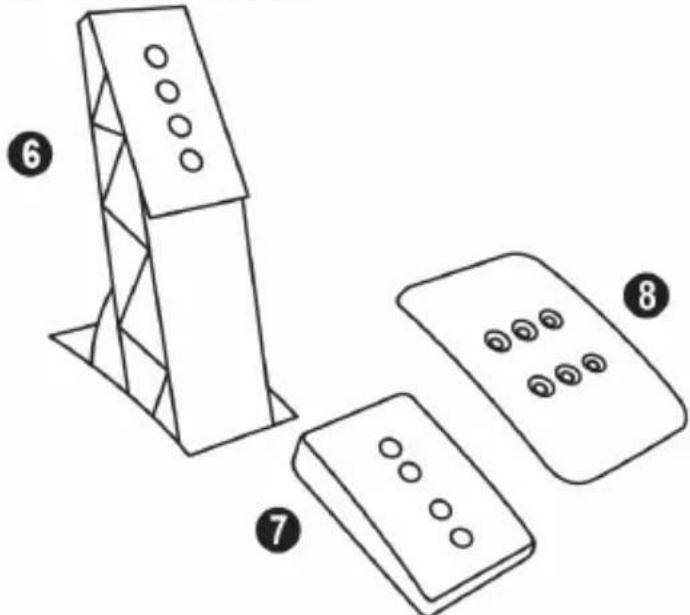
ATTENTION: To avoid any calibration problems, be sure to always disconnect your wheel's USB cable from the PS4™ system before making any adjustments to your pedal set.
Adjusting the HEIGHT of the 3 pedals
- Using the included 2.5 ~mm Allen key (4), unscrew the two screws holding the metal head (8) and its support (7) in place.
- Select your preferred height position, then replace and re-tighten the screws so that the metal head (8) and its support (7) are held firmly in place.
Examples illustrating the accelerator pedal:

Low position
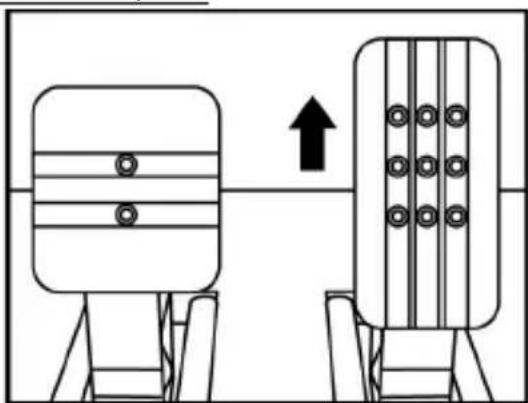
High position
Adjusting the SPACING of the accelerator pedal and the clutch pedal
- Using the included 2.5 ~mm Allen key (4), unscrew the two screws holding the metal head (8) and its support (7) in place.
- Select your preferred position (to the left, centered, or to the right), then replace and re-tighten the screws so that the metal head (8) and its support (7) are held firmly in place.
Examples illustrating the clutch pedal:

Left position
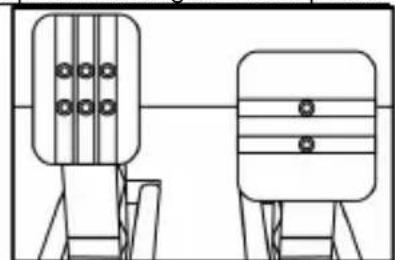
Centered position (default)
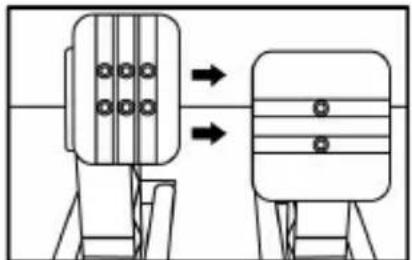
Right position
Number of possible spacing positions per pedal:
- Three for accelerator pedal
- Three for clutch pedal
Adjusting the INCLINATION of the 3 pedals
- Using the included 2.5 ~mm Allen key (4), unscrew the two screws holding the metal head (8) and its support (7) in place.
- Turn the plastic head support (7) 180^ , then replace and re-tighten the screws so that the metal head (8) and its support (7) are held firmly in place.
Examples illustrating the accelerator pedal:

Less inclined position
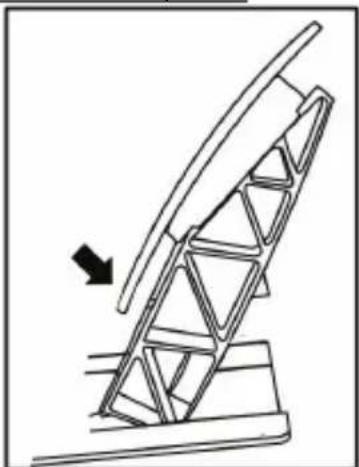
More inclined position (default)
Number of possible inclination positions per pedal:
-
Two for accelerator pedal
-
Two for brake pedal
- Two for clutch pedal
Installing the conical stop ("CONICAL RUBBER BRAKE" mod)
This modification (or "mod") is not essential, and is not installed by default. This means that the brake pedal functions perfectly even if the mod is not installed.
This mod lets you experience a different feeling and resistance when braking. It's up to you whether or not to install it, depending on your own preferences.
- Screw the conical stop (2) onto its metal support (1).
- Screw the position adjustment nut (5) onto the bottom (onto the conical stop's screw thread).
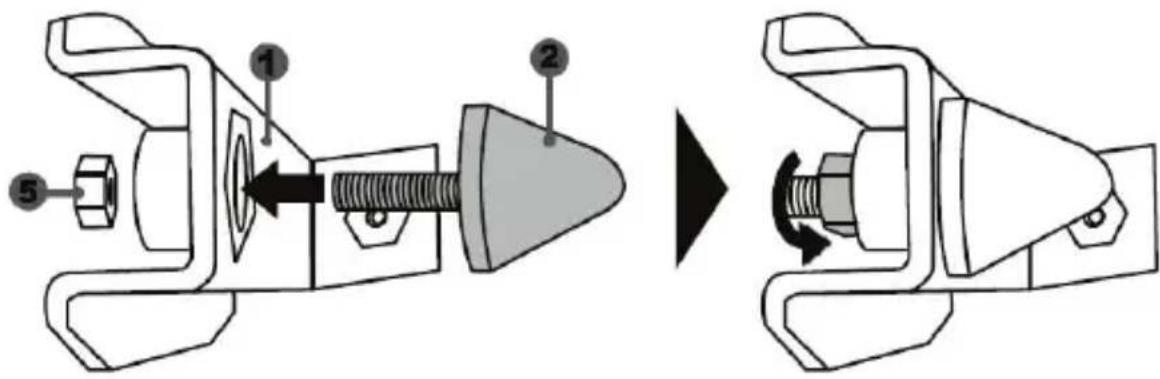
- Position the unit at the back of the brake pedal's arm.

- Using the included 2.5mm Allen key (4), attach the unit using the attachment screw (3) and the small central screw thread located on the underside of the pedal set.
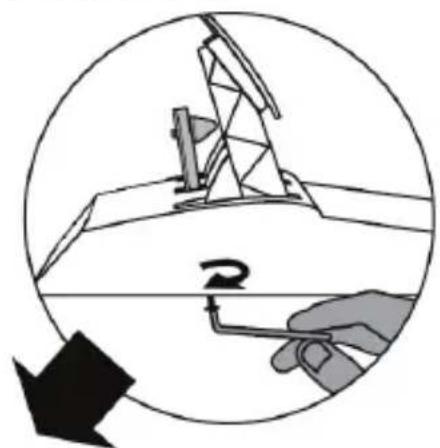
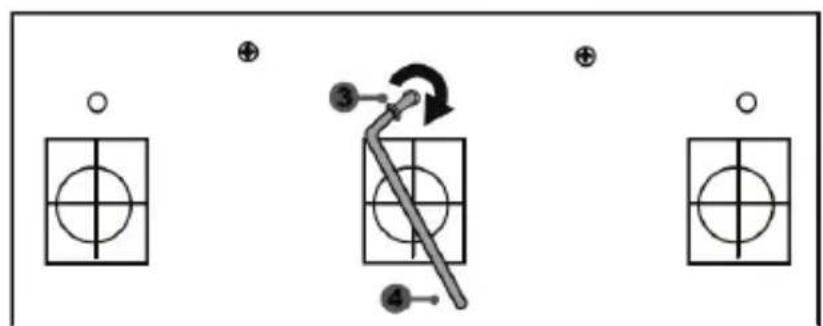
The "CONICAL RUBBER BRAKE" mod is now installed!
Adjusting the brake pedal's RANGE of travel and STRENGTH of resistance
By slightly unscrewing the nut (5), you can further strengthen the resistance of the brake pedal by moving the conical stop (2) closer to the back of the pedal's arm (if necessary, use a 14mm wrench or pliers to re-tighten the nut and maintain the selected position). The closer the conical stop is positioned to the back of the pedal's arm, the greater the strength of resistance will be.
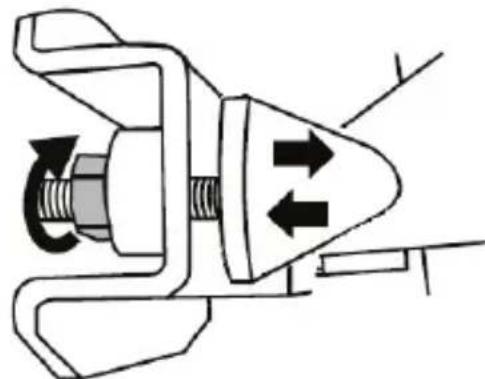
Note: When the conical stop is very close to the back of the brake pedal's arm, you may experience difficulties in reaching the maximum calibration value. Should that be the case:
- Slowly, press very hard on the brake pedal so as to reach the maximum value (if necessary, stand very briefly on the pedal – just for a second), then release the pressure; or else
- Move the conical stop a bit farther away from the back of the brake pedal's arm.
CONSUMER WARRANTY INFORMATION
Worldwide, Guillemot Corporation S.A., whose registered office is located at Place du Granier, B.P. 97143, 35571 Chantepie, France (hereinafter "Guillemot") warrants to the consumer that this Thrustmaster product shall be free from defects in materials and workmanship, for a warranty period which corresponds to the time limit to bring an action for conformity with respect to this product. In the countries of the European Union, this corresponds to a period of two (2) years from delivery of the Thrustmaster product. In other countries, the warranty period corresponds to the time limit to bring an action for conformity with respect to the Thrustmaster product according to applicable laws of the country in which the consumer was domiciled on the date of purchase of the Thrustmaster product (if no such action exists in the corresponding country, then the warranty period shall be one (1) year from the original date of purchase of the Thrustmaster product).
Notwithstanding the above, rechargeable batteries are covered by a warranty period of six (6) months from the date of original purchase.
Should the product appear to be defective during the warranty period, immediately contact Technical Support, who will indicate the procedure to follow. If the defect is confirmed, the product must be returned to its place of purchase (or any other location indicated by Technical Support).
Within the context of this warranty, the consumer's defective product shall, at Technical Support's option, be either replaced or returned to working order. If, during the warranty period, the Thrustmaster product is subject to such reconditioning, any period of at least seven (7) days during which the product is out of use shall be added to the remaining warranty period (this period runs from the date of the consumer's request for intervention or from the date on which the product in question is made available for reconditioning, if the date on which the product is made available for reconditioning is subsequent to the date of the request for intervention). If permitted under applicable law, the full liability of Guillemot and its subsidiaries (including for consequential damages) is limited to the return to working order or the replacement of the Thrustmaster product. If permitted under applicable law, Guillemot disclaims all warranties of merchantability or fitness for a particular purpose.
This warranty shall not apply: (1) if the product has been modified, opened, altered, or has suffered damage as a result of inappropriate or abusive use, negligence, an accident, normal wear, or any other cause unrelated to a material or manufacturing defect (including, but not limited to, combining the Thrustmaster product with any unsuitable element, including in particular power supplies, rechargeable batteries, chargers, or any other elements not supplied by Guillemot for this product); (2) if the product has been used for any use other than home use, including for professional or commercial purposes (game rooms, training, competitions, for example); (3) in the event of failure to comply with the instructions provided by Technical Support; (4) to software, said software being subject to a specific warranty; (5) to consumables (elements to be replaced over the product's lifespan: disposable batteries, audio headset or headphone ear pads, for example); (6) to accessories (cables, cases, pouches, bags, wrist-straps, for example); (7) if the product was sold at public auction.
This warranty is nontransferable.
The consumer's legal rights with respect to laws applicable to the sale of consumer goods in his or her country are not affected by this warranty.
Additional warranty provisions
During the warranty period, Guillemot shall not provide, in principle, any spare parts, as Technical Support is the only party authorized to open and/or recondition any Thrustmaster product (with the exception of any reconditioning procedures which Technical Support may request that the consumer carry out, by way of written instructions - for example, due to the simplicity and the lack of confidentiality of the reconditioning process - and by providing the consumer with the required spare part(s), where applicable).
Given its innovation cycles and in order to protect its know-how and trade secrets, Guillemot shall not provide, in principle, any reconditioning notification or spare parts for any Thrustmaster product whose warranty period has expired.
In the United States of America and in Canada, this warranty is limited to the product's internal mechanism and external housing. In no event shall Guillemot or its affiliates be held liable to any third party for any consequential or incidental damages resulting from the breach of any express or implied warranties. Some States/Provinces do not allow limitation on how long an implied warranty lasts or exclusion or limitation of liability for consequential or incidental damages, so the above limitations or exclusions may not apply to you. This warranty gives you specific legal rights, and you may also have other rights which vary from State to State or Province to Province.
Liability
If permitted under applicable law, Guillemot Corporation S.A. (hereinafter "Guillemot") and its subsidiaries disclaim all liability for any damages caused by one or more of the following: (1) the product has been modified, opened or altered; (2) failure to comply with assembly instructions; (3) inappropriate or abusive use, negligence, an accident (an impact, for example); (4) normal wear; (5) the use of the product for any use other than home use, including for professional or commercial purposes (game rooms, training, competitions, for example). If permitted under applicable law, Guillemot and its subsidiaries disclaim all liability for any damages unrelated to a material or manufacturing defect with respect to the product (including, but not limited to, any damages caused directly or indirectly by any software, or by combining the Thrustmaster product with any unsuitable element, including in particular power supplies, rechargeable batteries, chargers, or any other elements not supplied by Guillemot for this product).
DECLARATION OF CONFORMITY
CANADIAN COMPLIANCE NOTICE: this Class B digital apparatus meets all requirements of the Canadian Interference-Causing Equipment Regulations.
USA COMPLIANCE NOTICE: this equipment has been tested and found to comply with the limits for a Class B digital device, pursuant to Part 15 of the FCC rules. Operation is subject to the following two conditions:
(1) This device may not cause harmful interference, and
(2) This device must accept any interference received, including interference that may cause undesired operation.
These limits are designed to provide reasonable protection against harmful interference in a residential installation. This equipment generates, uses and can radiate radio frequency energy and, if not installed and used in accordance with the instructions, may cause harmful interference to radio communications. However, there is no guarantee that interference will not occur in a particular installation. If this equipment does cause harmful interference to radio or television reception, which can be determined by turning the equipment on and off, the user is encouraged to try to correct the interference by one or more of the following measures:
-
Reorient or relocate the receiving antenna.
-
Increase the separation between the equipment and receiver.
- Connect the equipment into an outlet on a circuit different from that to which the receiver is connected.
- Consult the dealer or an experienced radio/TV technician for help.
THRUSTMASTER
TECHNICAL SUPPORT
http://support.thrustmaster.com

COPYRIGHT
© 2017 Guillemot Corporation S.A. All rights reserved. Thrustmaster® is a registered trademark of Guillemot Corporation S.A.
“PlayStation”, “PSA” and “OxO” are registered trademarks of Sony Interactive Entertainment Inc.
Gran Turismo and Gran Turismo logo are registered trademarks or trademarks of Sony Interactive Entertainment Inc.
All rights reserved.
All other trademarks and brand names are hereby acknowledged and are property of their respective owners. Illustrations not binding. Contents, designs and specifications are subject to change without notice and may vary from one country to another. Made in China.
TouchSense® technology licensed from Immersion Software Ireland Limited. Protected by one or more of the U.S. Patents found at the following address: www.immersion.com/patent-marking.html, and other patents pending.
ENVIRONMENTAL PROTECTION RECOMMENDATION
Please adhere to local recycling laws for electrical and electronic equipment.
Retain this information. Colors and decorations may vary.
Plastic fasteners and adhesives should be removed from the product before it is used.
www.thrustmaster.com


immersion.


- TECHNICAL FEATURES
- PLUGGING THE WHEEL INTO AN ELECTRICAL OUTLET: PLEASE READ CAREFULLY!
- WARNING
- Warning - Electrical shock
- Air vents
- Warning - Injuries due to Force Feedback and repeated movements
- Warning - Injuries due to Force Feedback and repeated movements (continued)
- UPDATING YOUR RACING WHEEL'S FIRMWARE
- Important note:
- INSTALLING THE WHEEL ON ITS BASE
- ATTACHING THE RACING WHEEL
- ATTENTION:
- Attaching the racing wheel to a table or a desktop
- ALWAYS NEVER
- WARNING:
- SETTING UP THE RACING WHEEL FOR PS4TM
- Important notes:
- USB SLIDING SWITCH (11) IN THE "OTHER" POSITION
- FOR PS4™ GAMES APART FROM GT SPORT
- USB SLIDING SWITCH (11) IN THE "GT" POSITION
- FOR THE GAME GT SPORT (AND OTHER FUTURE GT GAMES)
- SETTING UP THE RACING WHEEL FOR PC*
- AUTOMATIC RACING WHEEL AND PEDAL SET CALIBRATION
- AUTOMATIC CALIBRATION OF THE PEDAL SET
- INTERNAL COOLING SYSTEM FOR THE WHEEL'S BASE
- MODE BUTTON AND INDICATOR LIGHT (10)
- MODE button for the pedal set
- Other information regarding the MODE button
- HELP FILES AND FAQs
- T-GT EDITION PEDAL SET
- Warning - Pedal set pinching hazard during gaming sessions
- AUTOMATIC CALIBRATION OF PEDALS
- ATTACHING THE PEDAL SET TO A COCKPIT
- ADJUSTING THE PEDAL SET
- Adjusting the HEIGHT of the 3 pedals
- Adjusting the SPACING of the accelerator pedal and the clutch pedal
- Adjusting the INCLINATION of the 3 pedals
- Installing the conical stop ("CONICAL RUBBER BRAKE" mod)
- Adjusting the brake pedal's RANGE of travel and STRENGTH of resistance
- CONSUMER WARRANTY INFORMATION
- Additional warranty provisions
- Liability
- COPYRIGHT
- ENVIRONMENTAL PROTECTION RECOMMENDATION
- T·GT
- INFORMATIONS RELATIVES A LA GARANTIE AUX CONSOMMATEURS
- T-GT EDITION-PEDALSET
- EINBAU DES PEDALSETS IN EIN COCKPIT
- ANPASSEN DES PEDALSETS
- USB-SCHUIFSCHEKELAAR (11) IN DE STAND "OTHER"
- VOOR PS4™-GAMES MET UITZONDERING VAN GT SPORT
- T-GT EDITION-PEDAALSET
- DE PEDAALSET AAN EEN COCKPIT BEVESTIGEN
- FIXAR O CONJUNTO DE PEDAIS A UM COCKPIT
- TEXHNUECKNEXAPAKTEPNUKNI
- ПОДКЛIOЧЕНЕ РУLEBOИ ССТЕМБI K ЗЛЕKTPOРО3ETKE BHIMATEЛьно ПОЧТITE CЛЕДУЮUCEE!
- PPEyPPEKDEHNA
- BHHMaHHe - onachocTb nopaxeHn 3JleKtpnuecknM TOKOM!
- BeHTnlaIauIOHbIe OTBepcTna
- BhimaHne - pnck TpaBMnpoBaHn B pe3yJbTaTe NOBTOPOUHXc DBNXeHn
- DeiCTBnCnIOBOO6paTHoCBa3N
- OBHOBJEHNE IPOUINBKN PYJEBOTO KOJEA
- YCTAHOBKA PYJEBOI CNTEMBI
- BHIMAHNE!
- Pa3meueHne pyNeBoro KOleca Ha cTone.
- INPABINbHO HEJb3a
- HACTPOIKA PYJIeBOI CnCTEMbl IJRA PS4TM
- Baxho!
- NEPEKJIIOUATEJIb USB-BXODA (11) B NOJIOXEHN OTHER
- KHONKA IN INHДИКATOP MODE(10)
- Khonka MODE nja neaJbHoro 6loka
- BHIMAHHE!
- ABTOMATUÇECKA KAJINBPOBKA PΕDAJIΕN
- 3AKPENJIEHNE PEAJIbHOro BJOKA B KOKNITE
- PEYUNPOBKA PEAJIbHORO BLOKA
- KoHCTpykUneJaIeN:
- PerynipoBka Tpex neaen no BblCOTE
- PerynpoBka PACCTOHHmexdy neaJMa r3a n cenJeHn
- Perynilopobka YIJA HAKIOHA Tpex neaen
- ПОНДОПОIHSH:
- TEXNIKA XAPAKTHPIETIKA
- IPOsAPTHsH TOY SET TQN IENTAA E OEsH OdHFOY
- UYARI:
- T-GT EDITION PEDAL SETI
- ()
- MODE
- T-GT EDITION
- LwJb
- "1
- gaii jia iie aie
- s
- a
- SETTING UP THE RACING WHEEL FOR PLAYSTATION®4
- SETTING UP THE RACING WHEEL FOR PC
- You are now ready to play!
- General notes:
- HELP FILES AND FAQs (NOT INCLUDED IN THIS MANUAL)
- DECLARATION OF CONFORMITY
- THRUSTMASTER
- TECHNICAL SUPPORT
- ADVERTENCIA:
- ATENÇA:
- SELETOR USB (11) NA POSICAO "OTHER"
- PARA JOGOS DE PS4™ QUE NÃO SEJAM GT SPORT
- 警告:
- TeiIeIeIaNnKcHgEeRieIeHnHnBnHn
- #
- ReiHnIeHJtJFJFJFJFJFJFJFJFJFJFJFJFJFJFJFJFJFJFJFJFJFJFJFJFJFJFJFJFJFJFJFJFJ
- 対挡総連自動報錯
Brand : THRUSTMASTER
Model : TGT Racestuur
Category : Controller