Grand Elite 3 Connect - Baby monitors Luvion - Free user manual and instructions
Find the device manual for free Grand Elite 3 Connect Luvion in PDF.
| Technical Specifications | 3.5-inch color screen, resolution 320 x 240 pixels, infrared night vision, range up to 300 meters. |
|---|---|
| Features | Wi-Fi connectivity, mobile app compatibility, two-way audio, built-in lullabies. |
| Usage | Easy installation, use with or without app, ability to monitor multiple cameras. |
| Maintenance | Regular lens cleaning, firmware updates via the app. |
| Security | Data encryption, secure access via password, notifications on motion detection. |
| General Information | Powered by rechargeable battery, 8 hours autonomy, 2-year warranty. |
Frequently Asked Questions - Grand Elite 3 Connect Luvion
User questions about Grand Elite 3 Connect Luvion
0 question about this device. Answer the ones you know or ask your own.
Ask a new question about this device
Download the instructions for your Baby monitors in PDF format for free! Find your manual Grand Elite 3 Connect - Luvion and take your electronic device back in hand. On this page are published all the documents necessary for the use of your device. Grand Elite 3 Connect by Luvion.
USER MANUAL Grand Elite 3 Connect Luvion
natural_image
White Luvion 3 smart camera with blue base (no visible text or symbols on device body)
natural_image
Digital tablet displaying a sleeping baby with a white stuffed toy, no visible text or symbols on the device itself.
text_image
HANDLEIDING INSTRUCTION MANUAL MANUAL D'INSTRUCTIONS INSTRUKCJA NÁVOD K OBSLUZE ИНСТРУКЦИИ BENUTZERHANDBUCHQUICK GUIDE: FIGUREN EN VERKORTE HANDLEIDING/ FIGURES AND QUICK GUIDE / FIGURES ET GUIDE D'UTILISATION RAPIDE / FIGURAS Y GUÍA RÁPIDA / ABBILDUNGEN UND SCHNELLANLEITUNG / RYSUNKI I KRÓTKI PRZEWODNIK / OBRÁZKY A RYCHLÝ PRŮVODCE / KPAT-KOE ОПИСАНИЕ УСТРОЙСТВА / ABBILDUNGEN UND SCHNELLINSTALLATION......4
NEDERLANDS....10
ENGLISH 22
FRANÇAIS....34
POLSKI....46
ČEŠTINA....58
РУССКИЙ....70
DEUTSCH....82
PRODUCTOVERZICHT/ PRODUCT LAYOUT / DESCRIPTION DU PRODUIT / OPIS PRODUKTU / NÁKRES VÝROB-KU / УСТРОЙСТВО СОСТОИТ ИЗ ДВУХ ЧАСТЕЙ / PRODUKTBESCHREIBUNG
Power Supply - Using AC Power
text_image
Technical diagram showing a device connected to an electrical outlet with labeled parts ① and ②Fig 3.

text_image
Fig 4.- MONITOR KNOPPEN / MONITOR BUTTONS / BOUTONS DU MONITEUR / PRZYCISKI ZNAJDUJĄCE SIĘ NA MONITORZE / TLAČÍTKA MONITORU / КНОПКИ УПРАВЛЕНИИ МОНИТО-PA / MONITORTASTEN
2.1 Volume instellen / Volume Setting / Réglage du volume/ Ustawienie głośności / Nastavení hlasitosti / Регулятор громкости / Lautstärke einstellen

natural_image
Illustration of a child in bed inside a tablet device, with a hand adjusting the screen (no text or symbols present)Fig 5.
2.2 Terugspreek functié/ TalkBack Function/Fonctfom de réponsé/funkcjà mówienia/FunkdeJunkre Zpětného hovoru (oboustměrného)/ Обратная связь / TalkBack Funktion

text_image
Diagram illustrating a hand interacting with a device screen and its interface, showing signal icons and control buttons.Fig 6.
- TOUCH SCREEN MENU OPTIES / TOUCH SCREEN MENU OPTIONS / OPTIONS DU MENU DE L'ÉCRAN TACTILE / OPCJE W MENU EKRANU DOTYKOWEGO / VOLBY MENU DOTYKOVÉ OBRAZOVKY / ПАРАМЕТРЫ МЕНЮ СЕНСОРНОГО ЭКРАНА / TOUCHSCREEN MENÜOPTIONEN

natural_image
Illustration of a sleeping person on a tablet device with control buttons and a 24°C display (no text or symbols on the diagram itself)Fig 7.
3.1 Alleen geluid modus / Sound only function / Fonction audio seulement / Funkcja samego dźwięku / Funkce pouze zvuk / Режим радионяни (энергосбережение) / Nur-Ton-Funktion

text_image
24℃Fig 8.
natural_image
Illustration of a hand interacting with a tablet displaying a sleeping person's face, no text or symbols present.Fig 9.
natural_image
Illustration of a tablet device displaying three icons: a person with wind/sun, a sun, and a house (no text or symbols)Fig 12.
4.1 VOX functie (Activeren van monitor d.m.v. geluid) /VOX (Voice-Operated Transmission) Function / Fonction VOX (Transmission á commande vocale) / Funkcja VOX (przesył obsługiwany głosem) / Funkce VOX (Zvukem-Aktivovaný Přenos) / Режим VOX (датчик звука) / VOX (Sprachgesteuerte Aktivierungsfunktion)
natural_image
Two stylized devices, one tablet and one smartphone, shown in line art style (no text or symbols)iPhone, iPad, Android smartphone or Android tablet

natural_image
Line drawing of a remote control camera with a cylindrical sensor and antenna (no text or symbols)Luvion Connect

Wi-Fi Router
6.3 Download'en start de Luvión Connect app.
text_image
Diagram showing three labeled steps of a device with icons and directional arrows, likely illustrating a step-by-step process.A3
text_image
1. Tap search & select your Wi-Fi network 2. Enter the password of Wi-Fi network Wi-Fi network Password NextA5

text_image
Wi-Fi network setup will complete in 2 minutesA6

text_image
Camera OnlineA7
7 PROBLEEM & OPLOSSING
text_image
3 feet (1meter) adapter cable baby unit 3 feet (1meter)This device is for indoor use only
NL
BOX CONTENTS:
- 1 camera
- 1 monitor
• 2 power adapters
• 1 screw, 1 plug en 2 cable binders - This user manual
• WIFI/APP pairing quickstart manual
PRODUCT LAYOUT
Camera (Fig. 1)
- Light sensor
- Microphone
- Lens
- Infrared LEDs
- Speaker
- Power adapter plug
- Pairing button (to connect the camera to the router)
- Antenna
- Temperature sensor
- Power indicator LED
Monitor (Fig. 2)
- LCD screen
- Volume indicator LEDs
- VOX indicator LED
- Power indicator LED
- Volume up button
- Volume down button
- Microphone
- Power ON/OFF switch
- Antenna
- Menu button
- Talkback button
- Speaker
- Power adapter plug
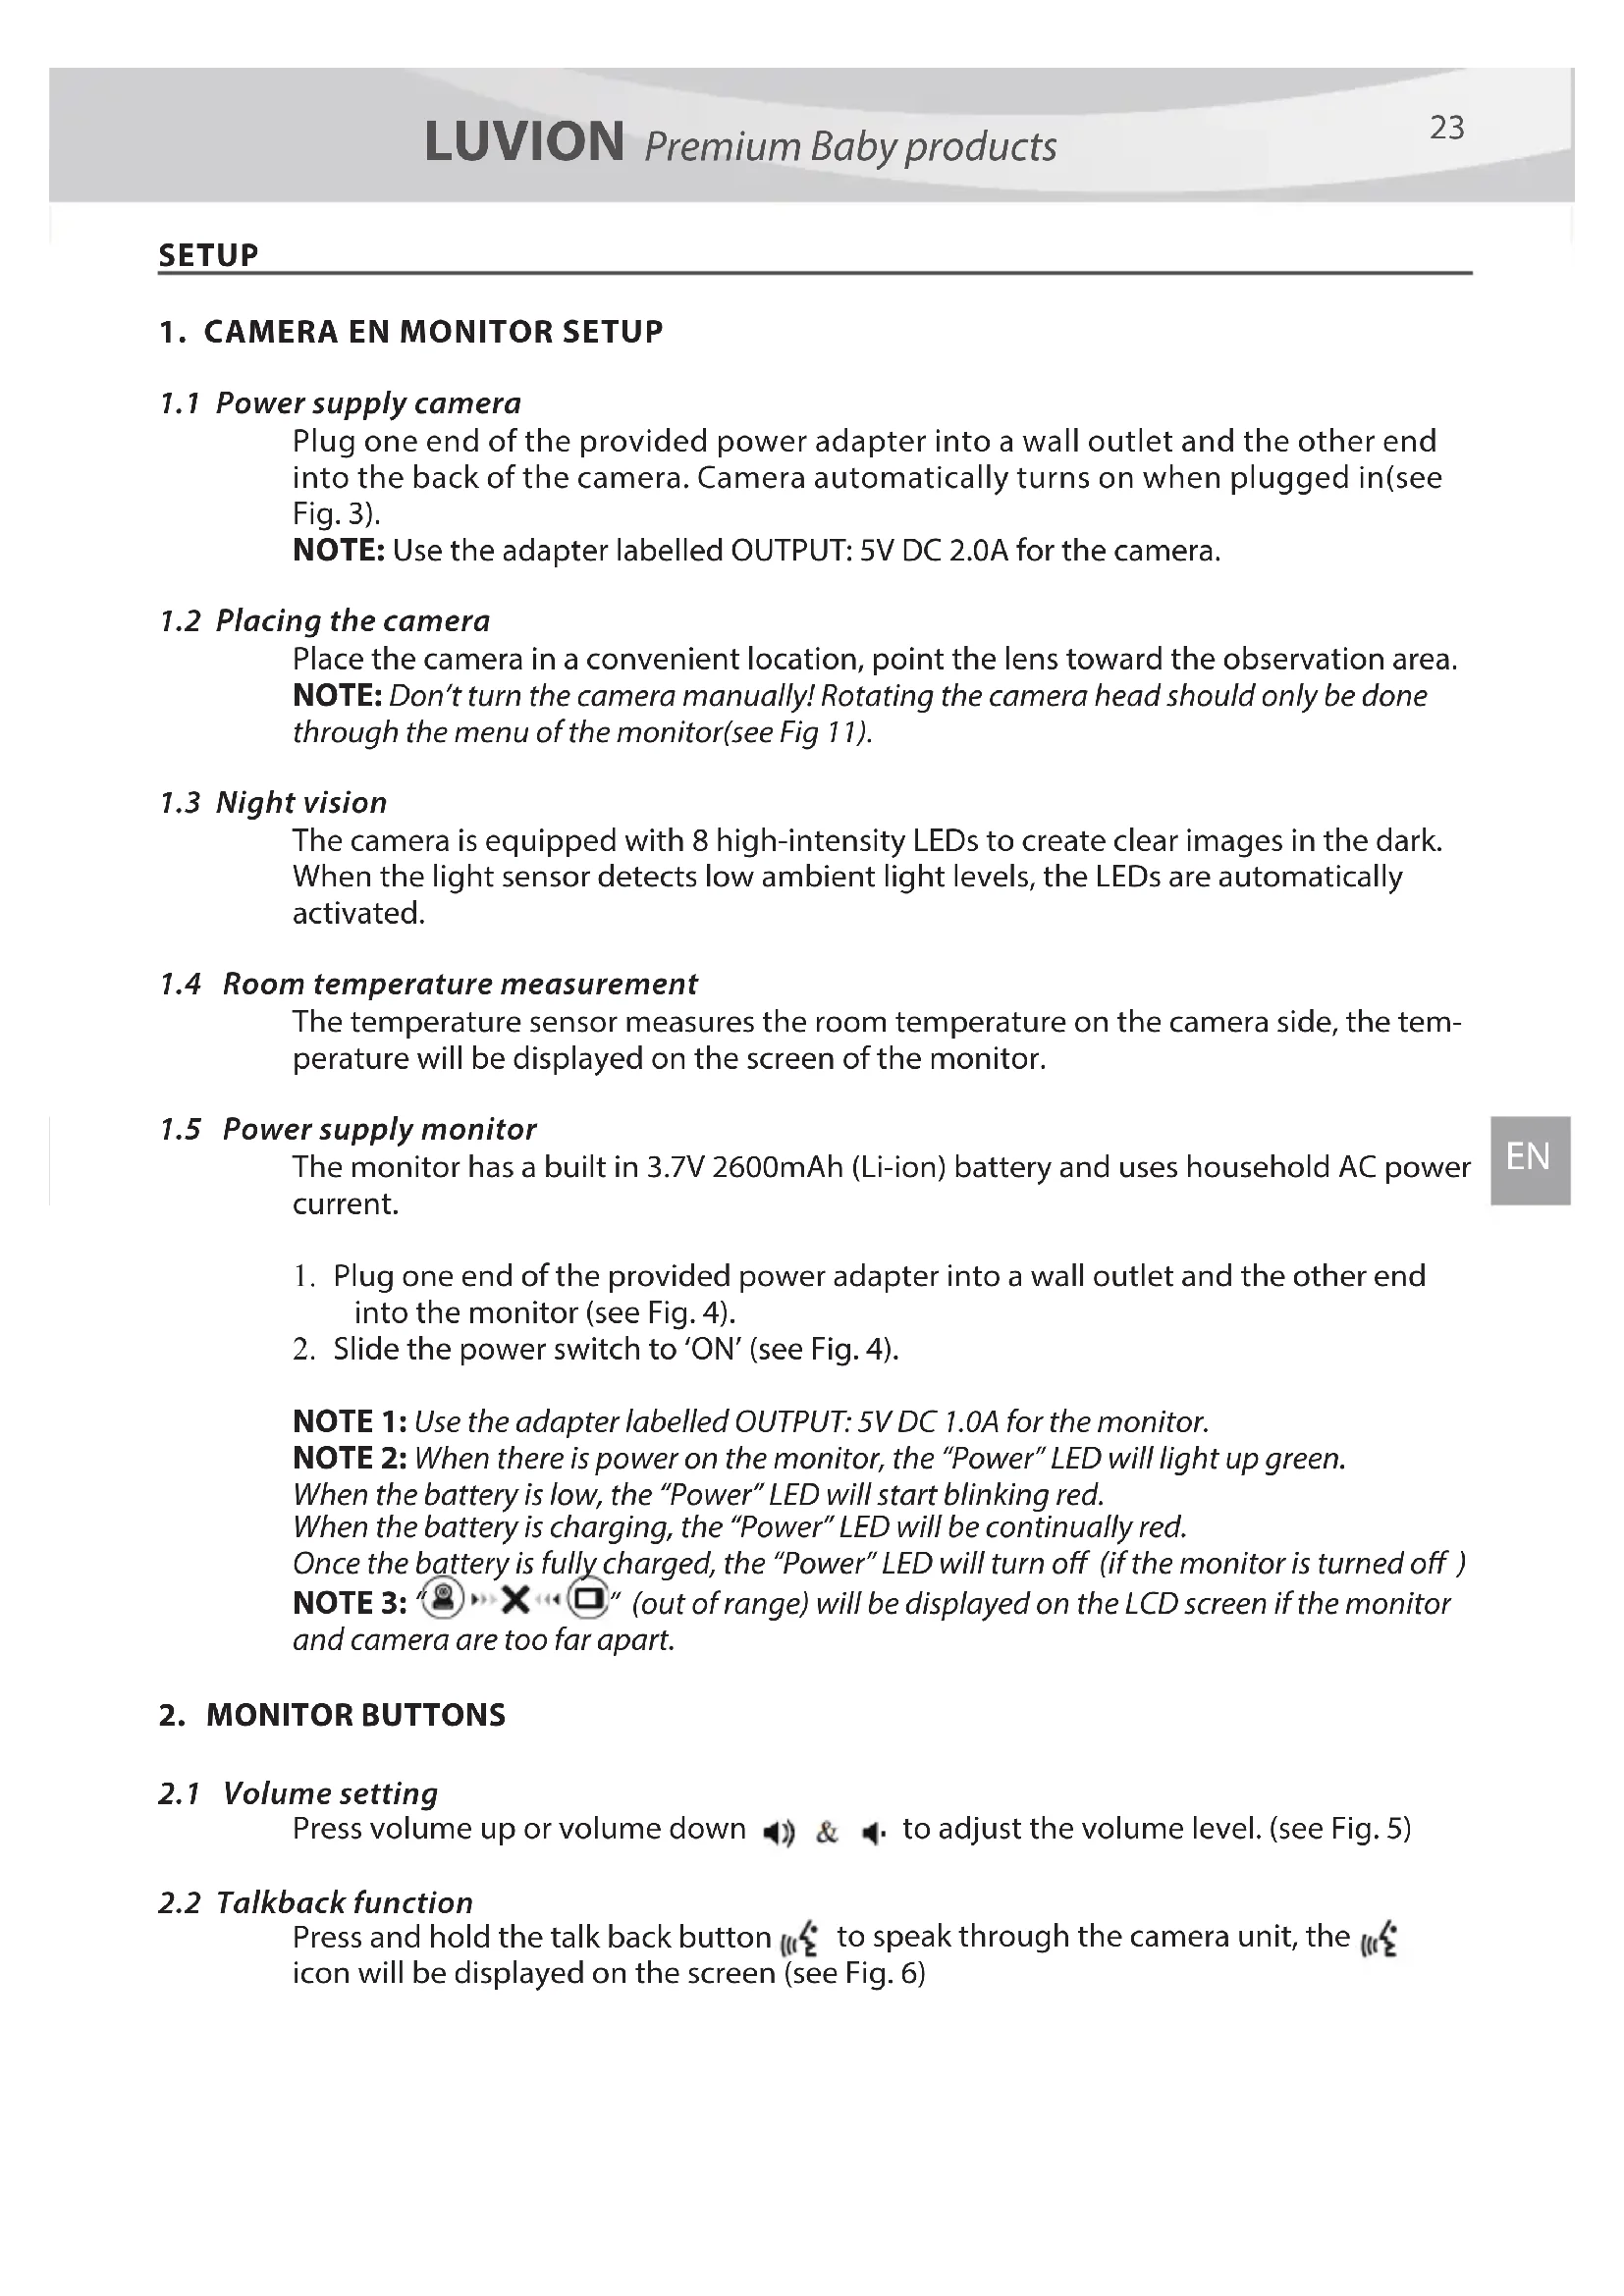
SETUP
1. CAMERA EN MONITOR SETUP
1.1 Power supply camera
Plug one end of the provided power adapter into a wall outlet and the other end into the back of the camera. Camera automatically turns on when plugged in(see Fig. 3).
NOTE: Use the adapter labelled OUTPUT: 5V DC 2.0A for the camera.
1.2 Placing the camera
Place the camera in a convenient location, point the lens toward the observation area.
NOTE: Don't turn the camera manually! Rotating the camera head should only be done through the menu of the monitor(see Fig 11).
1.3 Night vision
The camera is equipped with 8 high-intensity LEDs to create clear images in the dark. When the light sensor detects low ambient light levels, the LEDs are automatically activated.
1.4 Room temperature measurement
The temperature sensor measures the room temperature on the camera side, the temperature will be displayed on the screen of the monitor.
1.5 Power supply monitor
The monitor has a built in 3.7V 2600mAh (Li-ion) battery and uses household AC power current.
- Plug one end of the provided power adapter into a wall outlet and the other end into the monitor (see Fig. 4).
- Slide the power switch to 'ON' (see Fig. 4).
NOTE 1: Use the adapter labelled OUTPUT: 5V DC 1.0A for the monitor.
NOTE 2: When there is power on the monitor, the "Power" LED will light up green.
When the battery is low, the "Power" LED will start blinking red.
When the battery is charging, the "Power" LED will be continually red.
Once the battery is fully charged, the "Power" LED will turn off (if the monitor is turned off)
NOTE 3: "☐" (out of range) will be displayed on the LCD screen if the monitor and camera are too far apart.
2. MONITOR BUTTONS
2.1 Volume setting
Press volume up or volume down 🔊 & 🔑 to adjust the volume level. (see Fig. 5)
2.2 Talkback function
Press and hold the talk back button 12 to speak through the camera unit, the icon will be displayed on the screen (see Fig. 6)
3. TOUCH SCREEN MENU OPTIONS
- Tap the screen and the touch screen menu will be displayed on the right side of your screen (see Fig. 7).
- Tap on the menu function you wish to adjust to select it.
NOTE: Touch screen settings need to be completed within 5 seconds. After 5 seconds the screen will return to live view automatically.
3.1 Sound only mode
Tap the icon to activate the sound only mode. The video feed will then be turned off after 10 seconds, the sound stay on. When you touch the screen the screen will be activated for 15 seconds. (see Fig. 8)
3.2 Zoom function
Tap the zoom 🔒 icon once to enter zoom mode, the screen will display 2x zoom image, tap the zoom 🔒 icon again to return to normal (non-zoomed) view (see Fig. 9).
3.3 Music Function
You can play 3 different lullabies with the camera.
- Tap the music 🎧 icon on your screen and choose the song you want to be played on the camera (see Fig. 10).
- To turn the music off again tap the music 🎯 icon again and select the bottom option (see Fig. 10).
3.4 Camera Pan/Tilt remote control function
On the monitor you can remotely control the camera. The camera head has the ability to rotate up, down, right and left. Tap the up or down icons on your screen to move the camera up or down. Tap the left or right icons on your screen to move the camera to the left or right (see Fig. 11).
NOTE: The monitor will be in silent mode when the camera rotates.
4. MENU OPTIONS
- Press the menu button on top of the monitor to display the main menu on the screen.
- The main menu contains 3 submenus (see Fig. 12).
4.1 VOX-function (Activating the monitor by sound)
-
Select VOX 🎨 in the menu of the monitor. Here you can activate the VOX mode, when 'ON' is selected the VOX mode is active and when 'OFF' is selected the VOX mode is not active. When VOX mode is active the screen will automatically turn off after 10 seconds, the VOX-LED 🔊 on the side of the screen will then light up (see Fig. 13).
-
When the sound level near the camera reaches the pre-set level (see Fig. 13), the screen will automatically re-activate. After 20 seconds the screen will automatically turn off again.
- The VOX-Sensitivity can be set to three different levels, high 🔍, medium and low 🔍, the higher the sensitivity the lower the sound level needs to be at the camera side for the monitor to activate.
4.2 Brightness settings
To adjust the screens brightness you select the 🎨 icon in the menu, here you can make the screen brighter by tapping + or darker by tapping the - (see Fig. 14).
4.3 Temperature settings
- Select the temperature settings submenu in the menu screen, here you can choose if you want the temperature to be displayed in Celsius or Fahrenheit (see Fig. 15).
- You can also set the temperature range for the temperature alert. If you select "Alert On" to activate the temperature alert, a warning sound will be emitted by the monitor unit when the measured temperature is outside the pre-set parameters. (See Fig. 15).
5. STATUS INFORMATION
The status bar will be displayed on the top of the screen (See Fig. 16).
- Signal strength indicator
- Temperature alert on/off indicator
- Room temperature indicator
- Zoom in indicator
- Audio only mode indicator
- Music indicator
- Mute indicator
- Talkback indicator
- Battery status / charging indicator
6. TELEPHONE/TABLET SETUP
6.1 Check up on your baby anytime and anywhere you want!

flowchart
graph TD
    A["Luvion Connect"] -->|Wireless Signal| B["Wi-Fi Router"]
    B --> C["Smartphone, Tablet"]
    D["Monitor"] -->|Wireless Signal| B
    B --> E["Internet"]
6.2 Before you start you need

natural_image
Two stylized devices, one tablet and one smartphone, shown in line art style (no text or symbols)iPhone, iPad, Android smartphone or Android tablet

natural_image
Line drawing of a remote control camera with a cylindrical sensor and antenna (no text or symbols)Luvion Connect

Wi-Fi Router
6.3 Download'and run the Luvion Connect app
Android: Go to the Google Play Store and search for 'Luvion Connect' and install. iOS: Go to the App Store and search for 'Luvion Connect' and install.

text_image
LUVION® Premium BabyproductsQR

text_image
QR code image containing encoded data, no visible human-readable textANDROID

text_image
QR code image containing encoded data, no visible human-readable textQR
iOS
6.4 Add and connect camera wirelessly to your router
- Tap the 📷 icon to add the camera. Tap the icon above 'connecting camera to the internet' (see A1 on the next page).
- Plug one end of the provided power adapter into a wall outlet and the other end into the camera.
- The camera will automatically turn on after connecting the power adapter, after 30 seconds the camera will be ready.
- Tap to go to the next step (see A2 on the next page).
Press and hold the PAIR button on the camera until the LED indicator light start blinking in green (+- 5 seconds).
- Tap → to go to the next step (see A3 on the next page).
NOTE 1: If your monitor is on, the monitor will disconnect and reconnect in approximately 5 seconds.
NOTE 2: If the camera was registered to your app previously, the new pairing will overwrite the previous registration.

text_image
Connecting camera to the internet Add camera by unique IDA1

flowchart
graph TD
    A["Start"] --> B["Step 1"]
    B --> C["Step 2"]
    C --> D["Return"]
A2

text_image
Diagram showing three labeled steps of a device operation: click, press, and return with directional arrows.A3
- a. Press the 'home button' on your phone and go to 'settings'
b. Go to 'Wi-Fi' (If Wi-Fi is turned off, please turn it back on).
c. Tap on the name of the camera 'LuvionConnect-XXXXXX' in your Wi-Fi list.
d. After the camera is connected, please return to the LuvionConnect app.
NOTE: In the Android app you can also use the WiFi hot key, after choosing the name of the camera from the WiFi list and use the back key of your phone (bottom right) to return to the app.
(Also see A4)

flowchart
graph TD
    A["Wi-Fi network setup will complete in 2 minutes"] --> B["1: iPhone icon"]
    B --> C["2: Smartphone icon"]
    C --> D["3: Laptop icon"]
    D --> E["4: Go to iOS's Wi-Fi section and select the camera name (Starts with "LuvionConnect_XXXXXX"). Then come back here."]
    E --> F["5: iPhone icon"]
    F --> G["6: Bluetooth icon"]
    G --> H["7: Go to Android's WIFI section and select the camera name (Starts with "LuvionConnect_XXXXXX"). Then come back here."]
iOS
Android
A4
- The app/camera will scan all available Wi-Fi networks within range. Select your home Wi-Fi network and enter the correct password for this Wi-Fi network. (See A5 on the next page).
NOTE: Please make sure you enter the correct password for the Wi-Fi network otherwise a connection error may occur.
NOTE 2: It can take a few minutes before the camera is connected to your Wi-Fi network.
- In the app you will now see the new camera added to the list, tap the camera here to start watching the live video feed. (see A7)
NOTE: If your monitor is on during this process, the monitor will disconnect from the camera and automatically reconnect in around 10 seconds.

text_image
1. Tap search & select your Wi-Fi network 2. Enter the password of Wi-Fi network Wi-Fi network Password NextA5

text_image
Wi-Fi network setup will complete in 2 minutesA6

text_image
Camera Online iA7
6.5 Start screen app (see A8)
- Camera name
- Connection status
- Settings menu
- Refreshing the screen
- Close the app
- Add camera
- App information

text_image
5 Camera Online 1 2 3 6 i 7A8
6.6 Live videoisbreakfunctionst(sea A9)e A9)
- Back: Tap the back icon to go back to the start screen.
- Temperature measurement: The temperature will be displayed here, below the live view.
- Photo: Tap the photo icon to take a picture and save it to your smartphone/tablet.
- Video: Tap the video icon to start/stop a video recording. (each video recording can be a maximum of 3 minutes)
NOTE: Photos and videos will be stored on the internal memory of your smartphone or tablet.
-
Photo/video album: Tap the map icon to view and manage your videos/photos. To remove photos/videos on android devices tap and hold the photo/video, on iOS you press edit at the top of the screen.
-
Volume: Tap the speaker icon to adjust the volume.
-
Pan/Tilt remote control: Tap the up ▲, down ▼, left △ and right icons to rotate the camera
-
Talk back: Tap the icon once to activate talk back toward the camera. Tap again to close the talk back connection.
NOTE: While talk back is activated the sounds from the camera side won't be available in the app.

text_image
-28 °CA9
6.7 The app settings menu functions
Tap the setting icon 🎨 on the start screen (see A7)
-
Name: Camera name, tap the icon to change the name of the camera.
-
Password: Enter the correct password to access the camera.
-
UID: Each camera has a unique ID(UID). By sharing this UID code and your password you can share the video feed.
-
Temperature: Tap the switch icon to switch between Celsius and Fahrenheit. The value that is shown on the switch is currently selected.
-
Notifications: Tap the switch 📄 icon next to 'Sound' and 'Temp' to activate or deactivate push notifications based on sound and/or temperature. If active you will receive a push notification from the app when the sound or temperature reaches the level that you have set on the monitor.
-
Delete camera: Tap the bin 📄 icon to remove the camera from the app.
-
Change password: Tap the lock 📋 icon to change the password. This icon will only be available when your phone is connected to the same network as the camera. The default password is '12345678', change the default password when you first use the camera!

text_image
Device Setting 1 Name Camera 2 Password Show Password 3 UID 000C430CBD99B1 4 Temp. 5 Notification Sound Temp. 6 7 A106.8 LED indicator (camera)
| Indication | Status |
| Blinking Green | Camera is ready for pairing |
| Solid Green | Camera is linked to the Internet |
| Solid Orange | Lost connection to the Internet |
| Solid Red | Lost connection to the Wi-Fi router (refer to troubleshooting 7.5) |
7 TROUBLESHOOTING
7.1 No video on the monitor
- Make sure the camera's power plug is pushed all the way in.
• Make sure the monitor has enough battery power and is turned on. - Restart your camera, please unplug the power adapter and reconnect. The will reboot and restart within 25 seconds.
- If the power indication LED is on but only the audio can be heard, the sound only or VOX mode could be active. Press the menu button to turn the screen back on. For instructions to turn these functions off please check section 3.1 (Sound only) or 4.1 (VOX) of this manual.
7.2 (Noise) Interference on your monitor
• Make sure there is at least a 5 feet (1.5m) distance between the camera and other 2.4GHz products, such as Wi-Fi routers, Bluetooth devices or microwave ovens.
- When a microwave or oven is in a direct line between the camera and monitor this can negatively influence the signal strength. To solve this make sure the device is no longer in a direct line between the camera and the monitor or turn it off.
- Make sure the camera and the monitor are within range of each other (The range is maximum 300 meters in open field or around 50 meters inside a house).
7.3 Camera has no connection with the app
- Timeout: Make sure your smartphone or tablet is connected to a Wi-Fi router or 4G network.
• Offline: Make sure the camera is on and connected to the internet.
7.4 Video problems inside the app
• No video play: Please check the camera status on the app's start screen.
• Video streaming is not smooth: The video performance is related to your internet bandwidth and possible interference.
7.5 The camera's LED indicator stays solid red
The camera has failed to connect to the Wi-Fi router or the connection was lost.
- Please make sure your Wi-Fi router is working correctly and then restart your camera, please unplug the power adapter and reconnect.
- Make sure the camera is paired with your Wi-Fi router with the correct password for the Wi-Fi router. If you are not sure, please delete the camera from the app and follow the steps from section 6.4 of this manual again.
- Please make sure the camera is within Wi-Fi range. Please move the camera closer to the Wi-Fi router and try again.
7.6 Forgot your password (app)
- Please delete camera from the start screen list and proceed the steps from section 6.4 of this manual again.
CARE AND MAINTENANCE
- Keep all parts and accessories out of children's reach.
- Fingerprints or dirt on the lens surface can adversely affect camera performance. Avoid touching the lens surface with your fingers.
- Avoid touching the lens surface with your fingers.
• Use a soft, dry cloth to wipe off the lens. - Keep the camera dry. Precipitation, humidity and other liquids contain minerals that will corrode electronic circuits.
• Do not use or store in dusty, dirty areas. - Do not store in hot areas. High temperature can shorten the life of electronic devices and warp or melt certain plastics.
- Do not store in very cold areas. When the system warms up (to its normal temperature), moisture can form inside the case, this could damage the electronic circuit boards.
- Do not attempt to open the case! Non-expert handling of the device may damage the system and the warranty is voided.
- Avoid dropping or strong shocks
• Use this product only with the included power adapters or provided as an accessory.
• Do not overload electrical outlets or extension cords this can result in fire or electric shock
• The system operates on 2.4 GHz.
SAFETY PRECAUTIONS
Follow these safety precautions to avoid injuries associated with baby monitor cords:
• Make sure the baby unit and AC adapter cords are always out of reach from the baby, at least 3 feet (1 meter) away.
Note: It's important even if your baby is not yet standing or mobile.
- Never place the camera or cables inside the baby's bed.

text_image
3 feet (1meter) adapter cable baby unit 3 feet (1meter)• Make sure the adapter cords are safely tucked away. Bundle long wires using tape or cable clips.
• Use a wireless baby monitor to avoid risk of strangulation.
• Never use extension cords with AC adapters. Only use the AC adapters provided.
General safety precautions:
- Read the user manual carefully and follow the instructions.
- Keep the manual for future reference.
- Please ensure the heat can dissipate easily; never cover the baby-unit, parent unit and or power adapter.
- Make sure the wires can't get damaged and make sure you can't be tripped by them.
- Keep small parts out of children's reach.
- This product is not a toy, don't let children play with it.
• This baby monitor is not a replacement for parental oversight. - Don't use the monitor in close proximity to water.
- Test this baby monitor and all its functions before use, to ensure you are familiar with all it functions.
- Never touch the power contact points with sharp or metal objects.
SPECIFICATIONS
| Camera | Monitor | ||
| Frequency | 2.4 GHz | Frequency | 2.4 GHz |
| Image Sensor | CMOS image sensor | Display | 4.3” TFT LCD touch screen |
| Lens | f 2.8mm, F 2.0 | Display colors | Full-color |
| IR LED | 8 pcs | Brightness Control | 8 levels |
| Dimensions | 85(W) x 110(H) x 100(D) mm | VOX | Voice activation, Audio mode |
| Weight | 223g | Dimensions | 128(W) x 90(H) x 45(D) mm |
| Power Adapter | Input: 100-240V AC, 50/60Hz, 0.5AOutput: 5.0V DC, 2.0A | Weight | 209g |
| Power Adapter | Input: 100-240V~0.2A, 50/60Hz 12-16VA | ||
| Operating temperature | 0°C~40°C (32°F ~ 104°F ) | Output: 5.0V DC, 1.0A | |
| Battery Capability | 3.7V, 2600mAh (Li-ion) | ||
| Operating temperature | 0°C ~ 40°C (32°F ~ 104°F ) | ||
Specifications subject to change without prior notice
This item is in compliance with the essential requirements and other relevant provisions of European Directives. The declaration of conformity is available through: https://www.luvion.nl/doc/Grand-Elite-3-Connect
FCC Statement
This equipment has been tested and found to comply with the limits for a Class B digital device, pursuant to Part 15 of the FCC Rules. These limits are designed to provide reasonable protection against harmful interference in a residential installation. This equipment generates, uses and can radiate radio frequency energy and, if not installed and used in accordance with the instructions, may cause harmful interference to radio communications. However, there is no guarantee that interference will not occur in a particular installation. If this equipment does cause harmful interference to radio or television reception, which can be determined by turning the equipment off and on, the user is encouraged to try to correct the interference by one or more of the following measures:
• Reorient or relocate the receiving antenna
- Increase the separation between the equipment and receiver
- Connect the equipment into an outlet on a circuit different from that to which the receiver is connected
- Consult the dealer or an experienced radio/TV technician for help
This device complies with Part 15 of the FCC Rules. Operation is subject to the following two conditions: (1) this device may not cause harmful interference, and (2) this device must accept any interference received, including interference that may cause undesired operation.
Caution
- To comply with FCC RF exposure compliance requirements, a separation distance of at least 20 cm must be maintained between the antenna of this device and all persons.
- This Transmitter must not be co-located or operating in conjunction with any other antenna or transmitter.
- Changes or modifications to this unit not expressly approved by the party responsible for compliance could void the user authority to operate the equipment.
CONTENUS DE LA BOÎTE:
4.3 Temperature settings
natural_image
Two stylized devices, one tablet and one smartphone, shown in line art style (no text or symbols)iPhone, iPad
Android smartphone ou Android Tablette

natural_image
Line drawing of a remote control camera with a cylindrical sensor and antenna (no text or symbols)Luvion Connect

Routeur Wi-Fi
text_image
LUVION® Premium BabyproductsQR

text_image
QR code image containing encoded data, no visible human-readable textANDROID

text_image
QR code image containing encoded data, no visible human-readable textQR
ios
text_image
Connecting camera to the internet Add camera by unique IDA1

flowchart
graph TD
    A["Start"] --> B["Step 1"]
    B --> C["Step 2"]
    C --> D["→"]
A2

text_image
Diagram showing three labeled steps of a device with icons and directional arrows, likely illustrating a step-by-step process.A3
text_image
Wi-Fi network setup will complete in 2 minutes
text_image
Go to iOS's Wi-Fi section and select the camera name (Starts with *LuvionConnect_XXXXXX) Then come back here.iOS

text_image
Go to Android's WIFI section and select the camera name (Starts with "LuvionConnect_XXXXXX"). Then come back here.Android

natural_image
Simple line drawing of a device with speaker, wireless signal, and tablet (no text or symbols)A4
text_image
1. Tap search & select your Wi-Fi network 2. Enter the password of Wi-Fi network Wi-Fi network Password NextA5

text_image
Wi-Fi network setup will complete in 2 minutesA6

text_image
Camera Online iA7
text_image
3 feet (1meter) adapter cable baby unit 3 feet (1meter)natural_image
Two stylized devices, one tablet and one smartphone, shown in line art style (no text or symbols)iPhone, iPad
Android smartfon
i Android Tablet

Luvion Connect

Ruter Wi-Fi
text_image
Connecting camera to the internet Add camera by unique IDA1

flowchart
graph TD
    A["Start"] --> B["Step 1"]
    B --> C["Step 2"]
    C --> D["End"]
A2

text_image
Diagram showing three labeled mechanical components with directional arrows, including a 5s mark and a circular arrow symbol.A3
text_image
Wi-Fi network setup will complete in 2 minutes
text_image
Go to iOS's Wi-Fi section and select the camera name (Starts with *LuvionConnect_XXXXXX) Then come back here.iOS

text_image
Go to Android's WIFI section and select the camera name (Starts with "LuvionConnect_XXXXXX"). Then come back here.Android

natural_image
Simple line drawing of a device with speaker, wireless signal, and tablet (no text or symbols)A4
text_image
1. Tap search & select your Wi-Fi network 2. Enter the password of Wi-Fi network Wi-Fi network Password NextA5

text_image
Wi-Fi network setup will complete in 2 minutesA6

text_image
Camera OnlineA7
text_image
3 feet (1meter) adapter cable baby unit 3 feet (1meter)natural_image
Two stylized devices, one tablet and one smartphone, shown in line drawing style (no text or symbols)iPhone, iPad, Android smartphone or Android tablet

natural_image
Line drawing of a mechanical device with a cylindrical component and a base (no text or symbols)Luvion Connect

Wi-Fi Router
6.3 Stáhfiólt a spustit aplikaci Luvión Connect
text_image
Connecting camera to the internet UID Add camera by unique IDA1

flowchart
graph TD
    A["Start"] --> B["Step 1"]
    B --> C["Step 2"]
    C --> D["Return Arrow"]
A2

text_image
Diagram showing three labeled mechanical or electrical components with directional arrows, including a switch labeled Sg.A3
text_image
Wi-Fi network setup will complete in 2 minutes
text_image
Go to iOS's Wi-Fi section and select the camera name (Starts with "LuvionConnect_XXXXXX") Then come back here.iOS

text_image
Go to Android's WIFI section and select the camera name (Starts with "LuvionConnect_XXXXXX"). Then come back here.Android

natural_image
Simple line drawing of a device with a speaker, wireless signal, and smartphone (no text or symbols)A4
text_image
1. Tap search & select your Wi-Fi network 2. Enter the password of Wi-Fi network Wi-Fi network Password NextA5

text_image
Wi-Fi network setup will complete in 2 minutesA6

text_image
Camera OnlineA7
text_image
adapter cable 3 feet (1meter) baby unit 3 feet (1meter)This device is for indoor use only
CZ
В КОМПЛЕКТ ВХОДИТ:
natural_image
Two stylized devices, one tablet and one smartphone, shown in line art style (no text or symbols)natural_image
Line drawing of a remote control device with a spherical head and antenna (no text or symbols)Luvion Connect

WIFI роутер
text_image
LUVION® Premium BabyproductsQR
ANDROID
QR
iOS

text_image
QR code image containing encoded data, no visible human-readable text
text_image
QR code image containing encoded data, no visible human-readable texttext_image
Connecting camera to the internet UID Add camera by unique IDA1

flowchart
graph TD
    A["Start"] --> B["Step 1"]
    B --> C["Step 2"]
    C --> D["End"]
A2

text_image
Diagram showing three labeled steps of a device with icons and directional arrows, likely illustrating a process or operation.A3
text_image
Wi-Fi network setup will complete in 2 minutes
text_image
Go to iOS's Wi-Fi section and select the camera name (Starts with "LuvionConnect_XXXXXX") Then come back here.iOS

text_image
Go to Android's WIFI section and select the camera name (Starts with "LuvionConnect_XXXXXX"). Then come back here.Android

natural_image
Simple line drawing of a device with speaker, wireless signal, and smartphone (no text or symbols)A4
text_image
1. Tap search & select your Wi-Fi network 2. Enter the password of Wi-Fi network Wi-Fi network Password NextA5

text_image
Wi-Fi network setup will complete in 2 minutesA6

text_image
Camera OnlineA7
text_image
3 feet (1meter) adapter cable
text_image
baby unit 3 feet (1meter)This device is for indoor use only
RU
INHALT:
natural_image
Icon of two smartphones, one larger and one smaller, with no text or symbols present.iPhone, iPad, Android smartphone or Android tablet

natural_image
Line drawing of a remote control device with a cylindrical sensor and antenna (no text or symbols)Luvion Connect

Wi-Fi Router
text_image
LUVION® Premium BabyproductsQR
ANDROID
QR
iOS

text_image
QR code image containing encoded data, no visible human-readable text
text_image
QR code image containing encoded data, no visible human-readable texttext_image
Connecting camera to the internet UID Add camera by unique IDA1

flowchart
graph TD
    A["Start"] --> B["Step 1"]
    B --> C["Step 2"]
    C --> D["End"]
A2

text_image
Diagram showing three steps of a device operation: step 1 with hand press, step 2 with device, and step 3 with directional arrow.A3
text_image
Wi-Fi network setup will complete in 2 minutes
text_image
Go to iOS's Wi-Fi section and select the camera name (Starts with "LuvionConnect_XXXXXX") Then come back here.iOS

text_image
Go to Android's WIFI section and select the camera name (Starts with "LuvionConnect_XXXXXX"). Then come back here.Android

natural_image
Simple line drawing of a device with speaker, wireless signal, and tablet (no text or symbols)A4
text_image
1. Tap search & select your Wi-Fi network 2. Enter the password of Wi-Fi network Wi-Fi network Password NextA5

text_image
Wi-Fi network setup will complete in 2 minutesA6

text_image
Camera Online iA7
text_image
3 feet (1meter) adapter cable baby unit 3 feet (1meter)This device is for indoor use only
Luvion Premium Babyproducts
Delft, The Netherlands
Visit us on www.Luvion.com