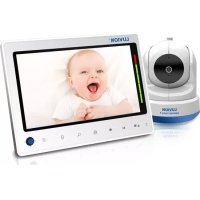
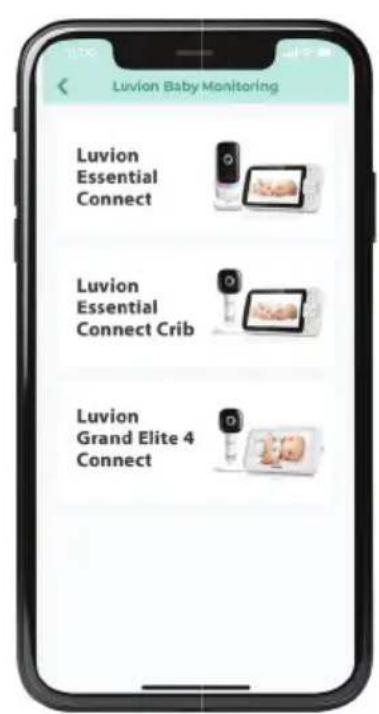
Essential Connect - Baby monitors Luvion - Free user manual and instructions
Find the device manual for free Essential Connect Luvion in PDF.
| Product type | Connected baby monitor (babyphone) |
| Brand | Luvion |
| Model | Essential Connect |
| Screen (parent unit) | 5 inch TFT LCD diagonal |
| Camera resolution | 1 million pixel color CMOS sensor |
| Power supply (parent unit) | AC adapter 5V/1000mA; rechargeable Li-ion battery 3.8V 2100mAh |
| Power supply (baby unit) | AC adapter 5V/1000mA (included) |
| Radio frequencies | 2.4 GHz (2400-2483.5 MHz) |
| Night vision | Yes, with 8 infrared LEDs, black and white image |
| Maximum range | Up to 300 meters in open field (reduced by obstacles) |
| Main features | Digital zoom (2x), multicolor night light (7 colors + loop), volume control, programmable alarm, temperature display, walkie-talkie, screen dimmable |
| WiFi connectivity | Yes, via HubbleClub for partners app (Android 8.0+ / iOS 12.0+) |
| Maximum number of cameras | Up to 4 cameras (baby units) per monitor |
| Operating temperature | 5°C to 40°C |
| Maintenance and cleaning | Clean with a soft, dry cloth. Do not use abrasive products or liquids. |
| Safety | Keep cords out of baby's reach (more than 1 meter). Do not place the baby unit in the crib. Use only the supplied adapters. |
| Spare parts and repairability | AC adapters and battery available through Luvion customer service. For any repair, contact the retailer or Luvion representative. |
| General information | Indoor use only. Warranty: keep proof of purchase. Manual available for download at notice-facile.com. |
| Dimensions (parent unit) | Approximately 15 x 10 x 3 cm (estimate) |
| Dimensions (baby unit) | Approximately 12 x 8 x 8 cm (estimate) |
| Weight (parent unit) | Approximately 250 g (estimate) |
| Weight (baby unit) | Approximately 150 g (estimate) |
Frequently Asked Questions - Essential Connect Luvion
User questions about Essential Connect Luvion
0 question about this device. Answer the ones you know or ask your own.
Ask a new question about this device
Download the instructions for your Baby monitors in PDF format for free! Find your manual Essential Connect - Luvion and take your electronic device back in hand. On this page are published all the documents necessary for the use of your device. Essential Connect by Luvion.
USER MANUAL Essential Connect Luvion
natural_image
LUVION digital device displaying a sleeping baby on a screen, alongside a smart home control panel (no visible text or symbols on device body)INSTRUCTION MANUAL
HANDLEIDING
MANUEL D'INSTRUCTIONS
BEDIENUNGSANLEITUNG


ENGLISH....4
NEDERLANDS....22
FRANÇAIS....40
DEUTSCH....59
INTRODUCTION
Thank you for purchasing the Luvion Essential Connect baby monitor. From now on you can always see and hear your baby. This Connected Baby Monitor let you see your baby from the included monitor, or from your smartphone. Watch over and communicate with your baby from anywhere in the world.
Make sure you always keep your original proof of purchase. For warranty cases you will always be asked to show a copy of your proof of purchase. For warranty claims you can contact the Luvion dealer or the local Luvion representative. More information can be found at www.luvion.com.
This manual contains all the information you need, to be able to use this Luvion Essential Connect baby monitor safely and with pleasure. Before using the baby monitor, we recommend that you read this manual carefully. We ask for your extra attention for the safety instructions.
PACKAGE CONTENTS:
• 1 x Monitor (Parent Unit)
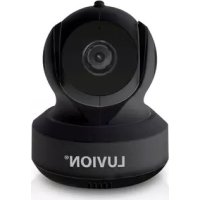
- 1 x Wi-Fi® Camera (Baby Unit)
- 1x Quick start guide
• 1 x Power adaptor for Parent Unit
• 1 x Power adaptor for Baby Unit
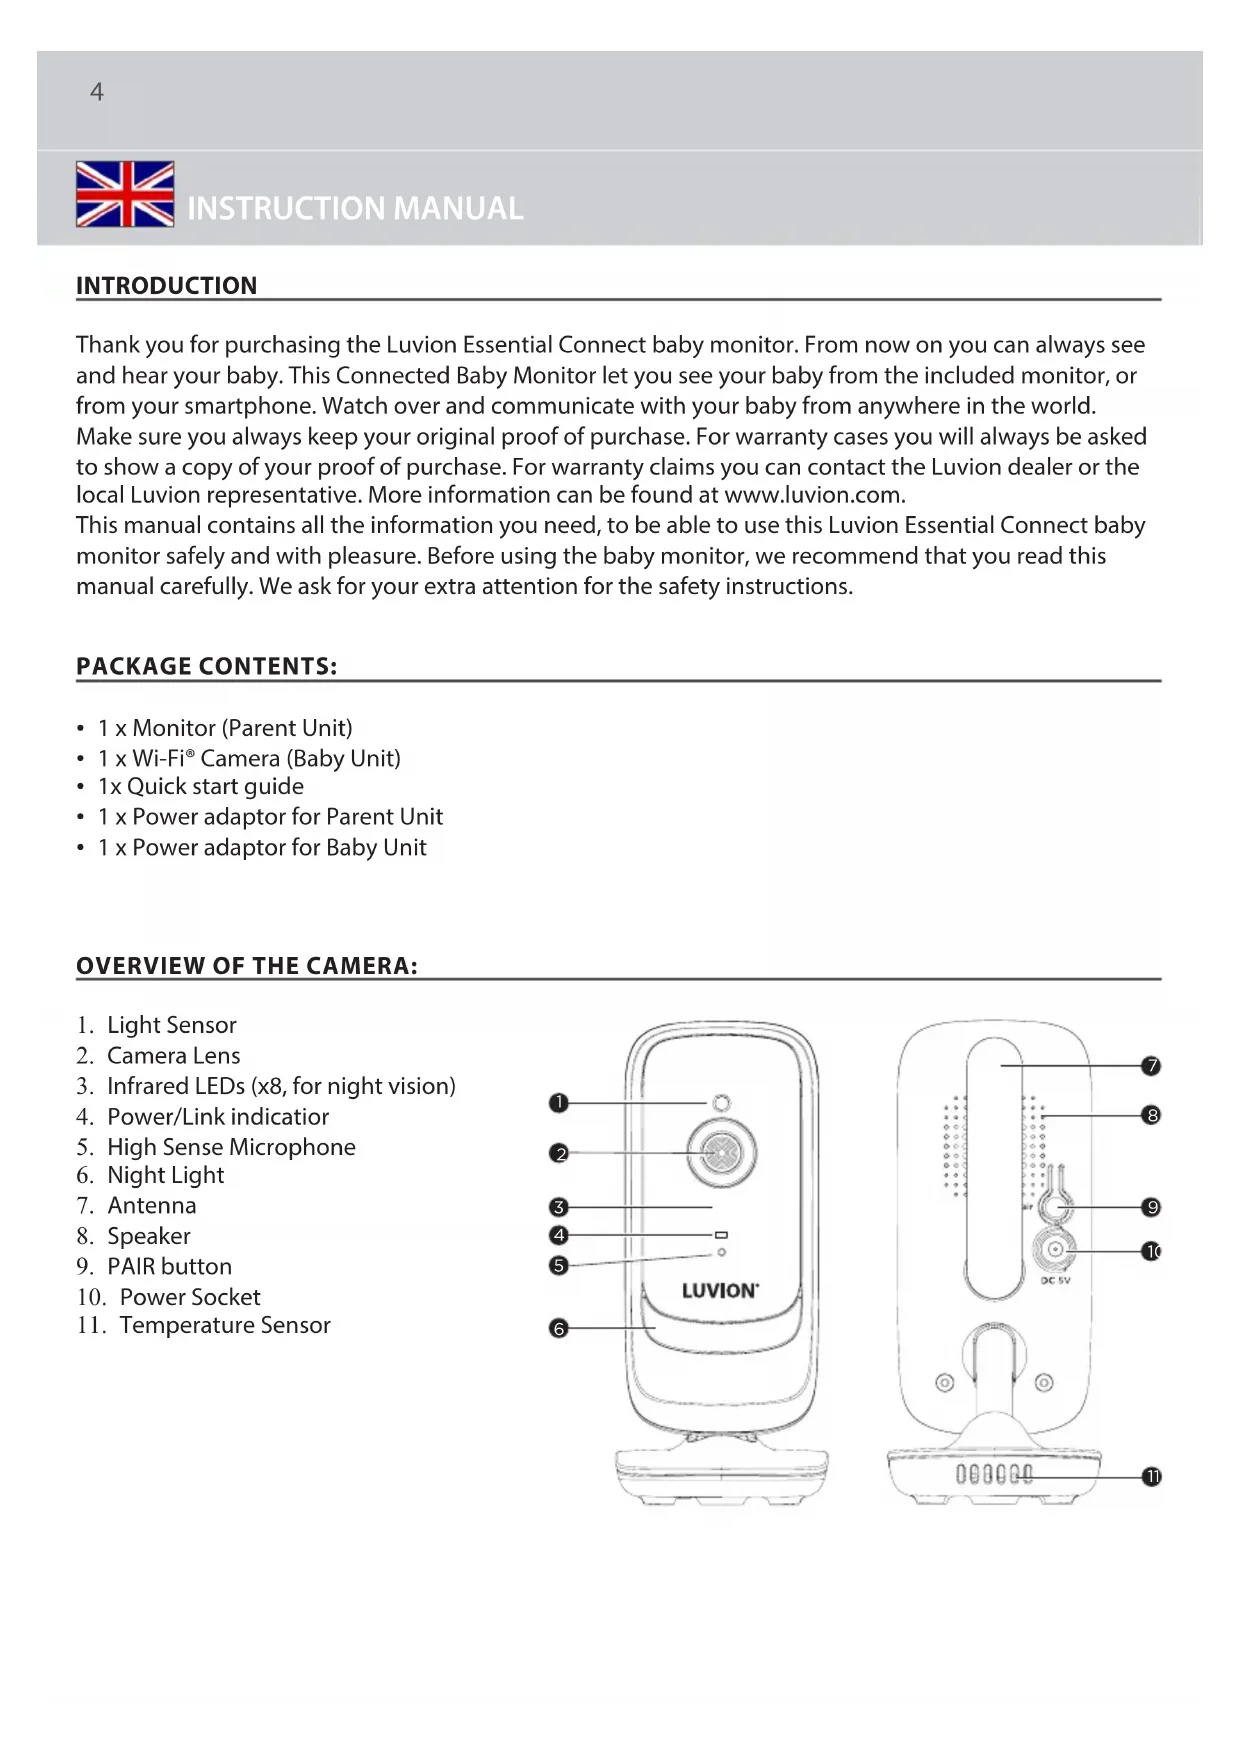
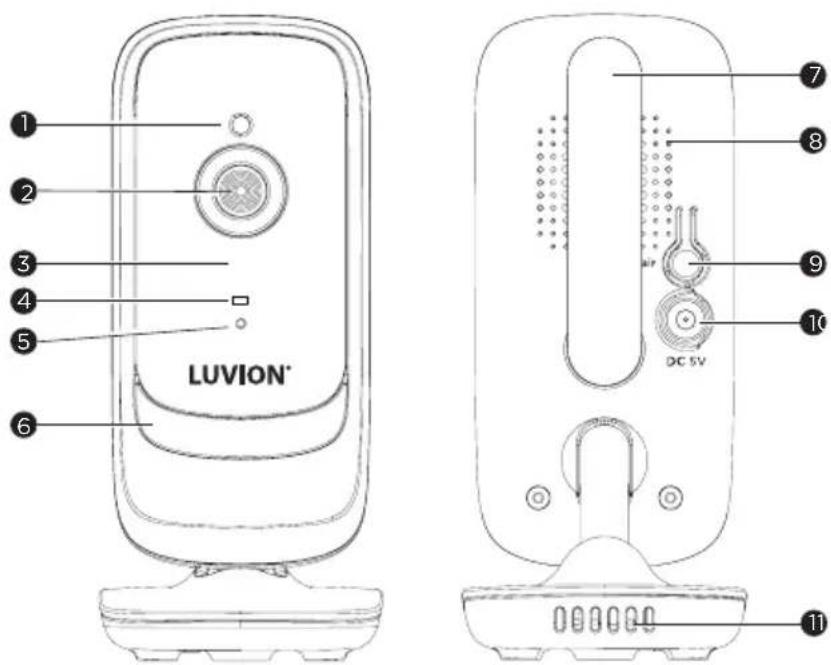
OVERVIEW OF THE CAMERA:
- Light Sensor
- Camera Lens
- Infrared LEDs (x8, for night vision)
- Power/Link indication
- High Sense Microphone
- Night Light
- Antenna
- Speaker
- PAIR button
- Power Socket
- Temperature Sensor
OVERVIEW OF THE MONITOR:
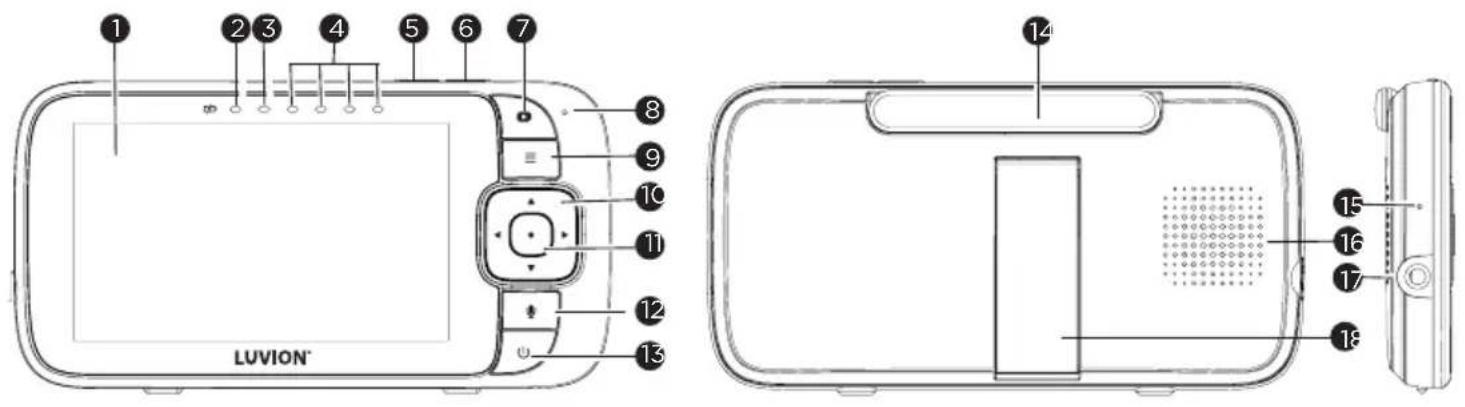
- Display (LCD screen)
- Charging LED RED when mains power connected.
- Parent Unit ON/OFF LED (Green)
- Sound Level indicators (Green, Amber, Red, Red) Show the sound level detected by the Baby Unit the louder of sound detected, the more LEDs light up.
- Volume - Press to decrease Volume level.
- Volume + Press to increase Volume level.
- Display ON/OFF button ▶ Press to turn the LCD screen ON/OFF (Note: audio is maintained.)
- Microphone
- MENU button Press to open / close the Menu options.
- Navigation button ▲MoveUp/Down/Right/Left menu options.
- OK button ●
- TALK button press and hold to speak to your baby.
- Power button ⏻ Press and Hold to turn the Parent Unit ON/OFF.
- Antenna
- RESET pin hole (recessed - use small pin)
- Speaker
- Power Socket
- Stand
IMPORTANT GUIDELINES FOR INSTALLING YOUR BABY MONITOR
- To use your camera (baby unit) and the monitor (Parent Unit) together, you must be able to establish a radio link between them, and the range may be affected by environmental conditions.
• Any large metal object, like a refrigerator, a mirror, a filing cabinet, metallic doors or reinforced concrete between the camera and the monitor may block the radio signal. - The signal strength may also be reduced by other solid structures, like walls or electrical equipment, such as radios, TVs, computers, cordless or mobile phones, fluorescent lights or dimmer switches.
- Use of other 2.4 GHz products, such as wireless networks (Wi-Fi® routers), Bluetooth® systems, or microwave ovens, may cause interference with this product, so keep the Baby Monitor at least 1.5 metres (5 feet) from these types of products, or turn them off if they appear to be causing interference.
- If the signal is weak, try moving the monitor and/or the camera to different positions in the rooms.
OVERVIEW OF THE DISPLAY ICONS
| ICON DESCRIPTION | |
| [1] | Signal Level (4 Levels) |
| [2] | Night Vision Mode (Video also changes to Black/White). |
| [3] | Indicates the screen off timer is set. |
| [4] | Volume Level Control (5 Levels). |
| [5] | No Baby Unit detected. |
| [6] | Battery Level Indication (4 Levels). |
| [7] | Zoom Level Control (1X, 2X). |
| [8] | Night Light |
| [9] | LCD Brightness Level Control (5 Levels). |
| [10] | Alarm Setting (2h, 3h, 4h, 5h or 6h)On status bar, indicates alarm set, and when flashing, that alarm time has been reached or missed. |
| [CTB6] | Temperature scale select (°C/°F)Readings display in WHITE, but turn RED if >29 °C / 84 °F or < 14 °C / 57 °F.Displays HH °C / °F if >36 °C / 97 °F.Displays LL °C / °F if < 1 °C / 34 °F. |
| [11] | Set Screen Off Timer (Off ×5 mins, 30 mins, 60 mins). |
| [12] | Add Camera |
| [13] | Delete Camera |
| [14] | View multiple cameras on screen. Available when you have more than 1 Camera (Baby Unit). |
1. SAFETY INSTRUCTIONS:

WARNING:
STRANGULATION HAZARD - Keep the unit and adaptor cord more than 1 metre from the cot and out of the baby's reach. NEVER place Baby Unit or cords within the cot. Secure the cords more than 1 metre away from the baby's reach. Never use extensioncords with AC Adaptors. Only use the AC Adaptors provided.
This Baby Monitor is compliant with all relevant standards regarding electromagnetic fields and is, when handled as described in the User's Guide, safe to use. Therefore, always read the instructions in this User's Guide carefully before using the device.
- Adult assembly required. Keep small parts away from children when assembling.
- This product is not a toy. Do not allow children to play with it.
- This Baby Monitor is not a substitute for responsible adult supervision.
-
Keep this user's guide for future reference.
-
Keep the cords out of reach of children.
- Do not cover the Baby Monitor with a towel or blanket.
• Test this monitor and all its functions so that you are familiar with it prior to actual use. - Do not use the Baby Monitor in damp areas or close to water.
• Do not install the Baby Monitor in extreme cold or heat, direct sunlight, or close to a heat source. - Only use the chargers and power adaptors provided. Do not use other chargers or power adaptors as this may damage the device and battery pack.
- Only insert a battery pack of the same type.
- Do not touch the plug contacts with sharp or metal objects.
- Connect the power adaptors to easily accessible electrical sockets.
• Read and keep the instructions. All the safety and operating instructions should be read before use. - This device is designed for indoor use only.
- Don't use the units if the cord or plug is damaged.
- Don't attempt to repair or adjust any of the electrical or mechanical functions of the unit. If you do, the guarantee will be made void.
WARNING:
There is a risk of explosion if the battery is replaced by an incorrect type. Dispose of used batteries according to their instructions. To reduce risk of fire or burns.
- Do not attempt to disassemble, or service the battery pack.
- Do not crush, puncture, short external contacts, or dispose of in fire or water.
- Do not heat above 60 °C (140°F).
- Use specific charger only.
- Replace only with the battery pack designated for this product.
2. GETTING STARTED
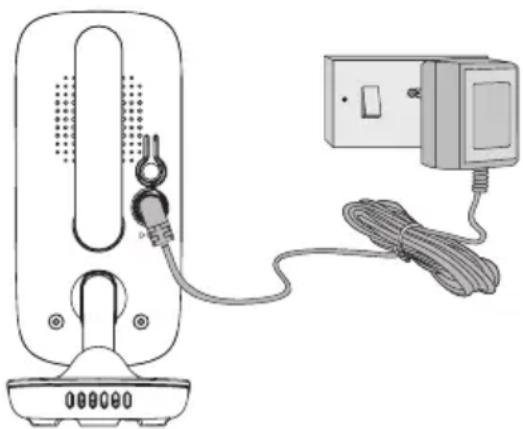
2.1 Connecting the power supply for the Camera (Baby Unit)
- Insert the DC plug of the power adaptor into the DC socket on the back of the Baby Unit.
- Connect the other end of the power adaptor to mains power.
- The Green power indicator lights when the baby unit is on.
natural_image
Diagram of a portable device connected to an electrical outlet cable (no text or symbols present)Note:
Only use the power adaptor (5VDC, 1000mA) provided.
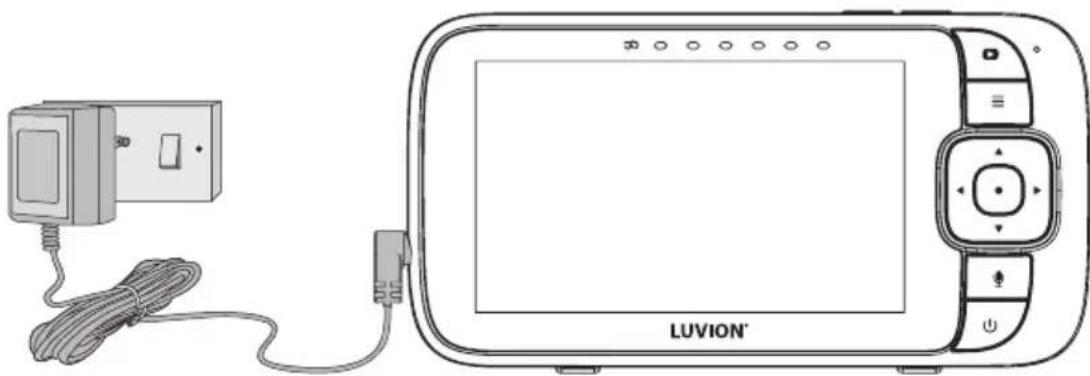
2.2 Connecting the power supply for the Monitor (Parent Unit)
The monitor contains a rechargeable battery (Lithium ion 2100mAh). This allows you to move the monitor without losing the link and picture from the camera. We recommend charging the monitor for at least 16 hours before first use, and when the monitor indicates the battery is low.
- Connect the small plug of the power adapter to the monitor and the other end to mains power. Only use the enclosed adapter (5VDC/1000mA).
- Press and hold the ⏻ button to turn the Parent unit on, the Parent unit and Baby unit are automatically linked and ready to use.
natural_image
Line drawing of a LUVION brand electronic device connected to a cable via cable (no text or symbols on the device body)Note:
When the Baby and Parent Units are both turned on and within range, the Parent Unit should show a colour image from the Baby Unit camera, but if the room is dark, the image will be in black and white, with an icon showing the Baby Unit is in Night Vision mode.
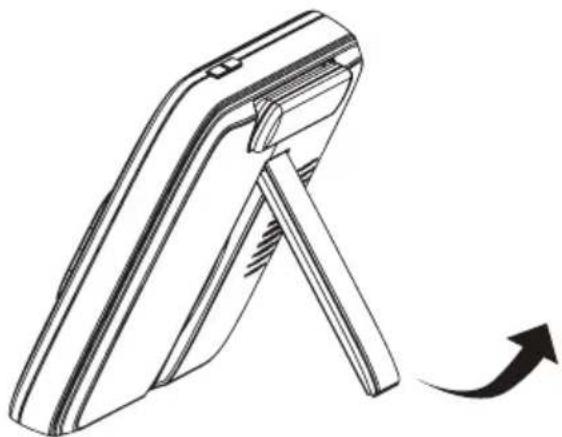
2.3 Desktop Stand of the Monitor
- The monitor comes with a desktop stand attached to the back of the monitor.
• To place the monitor on a desk, simply pull out the stand, as shown.
natural_image
Line drawing of a smartphone stand with an arrow indicating rotation (no text or symbols)Note:
Place the monitor on a flat, even surface.
3. USING THE BABY MONITOR
Please read these instructions carefully, and be aware that this baby monitor is only intended as an aid. It is not a substitute for responsible, correct parental supervision.
Note:
Do not place the Baby Unit within the baby's reach! If there is interference with the picture or sound, try moving the units to different locations, and ensure they are not close to other electrical equipment.
3.1 Power on or off the Parent Unit
Press and hold ⏻ to turn on the Parent Unit. The Power indicator light turns on. Press and hold ⏻ again to turn off the Parent Unit. The Power indicator light turns off.
Note:
If you place the parent and Baby Units too close together, you may hear echoing sounds and interference. This is not a fault. The units are designed to be operated at some distance apart, (e.g. in separate rooms) so move the units further apart.
3.2 Turn off the Parent Unit screen
You can turn on or off the Parent Unit screen without powering off the Parent Unit. You can still hear sound from the Baby Unit. Short Press ⏻ on the Parent Unit to turn off the screen. Press any key on the Parent Unit to turn on the screen again.
3.3 Night Vision Mode
The Baby Unit has infra-red LEDs for picking up clear images in the dark. When the built-in light sensor on the front of the unit detects a low level of ambient light, the LEDs will activate automatically and the screen on the Parent Unit will display in black and white. The ⬇ icon will be displayed at the top of the screen.
3.4 Talk Mode
Press and hold the TALK button on the Parent Unit to talk to your baby through the Baby Unit's speaker. The icon will be displayed at the top of the LCD screen.
3.5 Adjust the speaker volume for Parent Unit
You can adjust the speaker volume from Volume 1 to Volume 5, or turn it off. Press ▲ or ▼ on the Parent Unit when it is in camera viewing mode. When the speaker volume is set to off, the screen displays 📋
3.6 Zoom
You can zoom in or out while viewing the image from Baby Unit.
- Press to Zoom in.
-
Press and hold ◀, ▶⊕, or ▲◀+ or ▼◀-, to move the zoomed image left, right, up or down correspondingly.
-
Press to zoom out.
3.7 Set Night Light
- Press when the Parent Unit is in camera viewing mode.
- Press ◀ or ▶ to scroll to 🔍 and press ● button.
- Press to choose On, then press button.
3.7.1 Night Light brightness control
- When √ (On) is selected, you can scroll ▲+ or ▼- to select 🔊 and confirm with ● button. There are 3 brightness levels for selection.
3.7.2 Night Light colour control
- When √ (On) is selected, you can scroll ▲+ or ▼- to select ⬆ and confirm with ● button.
- Scroll ▲◀+ or ▼◀- to select one of the 7 colours or ⏻ auto looping.
3.7.3 Set timer for Night Light
- When the Night Light is On, press ▲+ or ▼to-select and confirm with button, you can scroll ▲+ to select night light off after 5h\~9h and confirm with button
- Press to confirm and exit.
3.8 Adjust the LCD brightness of the Parent Unit
You can adjust the brightness of the Parent Unit screen from Level 1 to Level 5.
- Press ≡ when the Parent Unit is in camera viewing mode. is displayed and press button.
- Press to adjust the brightness.
- Press button to confirm your selection.
3.9 Set the alarm on the Parent Unit
You can use the Parent Unit to set the alarm as a reminder for you to take care of your baby.
Turn on and set the alarm when it is currently off:
- Press when the Parent Unit is in camera viewing mode.
- Press ◀ or ▶ to scroll to and press button.
- Press ▲+ or ▼- to choose √ (On), then press ● button.
- Press ▲+ or ▼- to choose 2h, 3h, 4h, 5h or 6h. (The default setting is Alarm OFF.)
- Press button to confirm your selection.
- If an alarm time is selected Ⓤ will appear on the display and, after the alarm time is reached, the parent unit will beep about every 10 seconds and flash the alarm icon, until any button is pressed.
3.10 Temperature Setting
- Press the button and the menu bar will pop up.
- Press the or until is highlighted.
- Press the button to show the temperature options.
The temperature setting ⚠ / ∥/ will pop up.
Temperature Format J_F^ to select either °C Centigrade or °F Fahrenheit.
Temperature Limit to define the High temperature limit MAX (25-39°C/77-102°F) and Low temperature limit MIN (10-24°C/50-76°F).
Temperature Alert ⚠ Turn the temperature alert √(On), the Parent Unit will beep and display Temperature High 📋 or Temperature Low 📋 when the temperature at the Baby Unit is detected above or below the maximum or minimum temperature limits you set.
- Press the ▲◀+ or ▼◀- to select your setting and confirm by pressing the ● button.
3.11 Set the screen off time of the Parent Unit
You can set the screen off time of the Parent Unit after being in idle mode for a particular time interval.
- Press when the Parent Unit is in camera viewing mode.
- Press ◀ or ▶ to scroll to 📋 and press ● button.
- Press ▲+ or ▼- to select 60m, 30m, 5m or OFF for the parent unit video to turn off after 5 mins, 30 mins or 60 mins if no buttons have been pressed.
- Press button to confirm your selection.
- The audio will remain on, and you can press any button to turn the video screen back on.
Note:
If there are multiple cameras in scan mode, the audio will switch about every 30 seconds.
3.12 Pair and replace extra new Baby Unit
The Baby Units and Parent Unit provided are already paired. You can add or replace a Baby Unit in your video and audio monitoring system. You can pair a maximum of four Baby Units to your Parent Unit. Each new Baby Unit must be paired to the Parent Unit before use.
To pair and replace a Baby Unit:
- Press when the Parent Unit is in camera viewing mode.
- Press ◀ or ▶⊕ to scroll to ⊕ and press ● button.
- Press ▲+ or ▼- to choose a desired Baby Unit number, then press ● button. The pairing mode starts.
- Turn on the new Baby Unit, and then immediately press and hold Pair button until the Power/Link indicator turns on.
Note:
If you choose an occupied Baby Unit slot, the new Baby Unit will replace the existing Baby Unit.
3.13 Delete a Baby Unit
You can choose to remove a paired Baby Unit from the Parent Unit.
- Press when the Parent Unit is in camera viewing mode.
- Press ◀ or ▶ to scroll to .
- Press ▲+ or ▼- to select the desired Baby Unit (Cam1, 2, 3 or 4).
- Press ● button, then ◀ or ▶ to choose YES (√) or NO (X).
- Press button to confirm your selection.
Note:
You cannot delete a Baby Unit if it is the only one paired.
3.14 Multi-Camera Use
Up to 4 cameras can be paired with the Parent Unit, and if more than one camera is linked to the Parent Unit, you can select which camera to view or set it in Patrol mode where the Parent Unit automatically steps through the paired cameras about every 15 seconds.
Note:
The audio from a camera is only heard at the Parent Unit when that camera is selected.
To change the camera being viewed:
- Press ● button when the Parent Unit is in camera viewing mode to step through the paired cameras, 1, 2, 3, 4, with the selected option shown on the screen.
4. WI-FI® INTERNET VIEWING
4.1 Minimum System Requirements
Android™ System
- Version 8.0 or above
iPhone®/iPad® iOS
• Version 12.0 or above
High Speed (Wi-Fi®) Internet
- At least 0.6 Mbps upload bandwidth per camera (you can test your internet speed on this site: http://www.speedtest.net)
4.2 Getting started - Connecting Devices
How does it work?
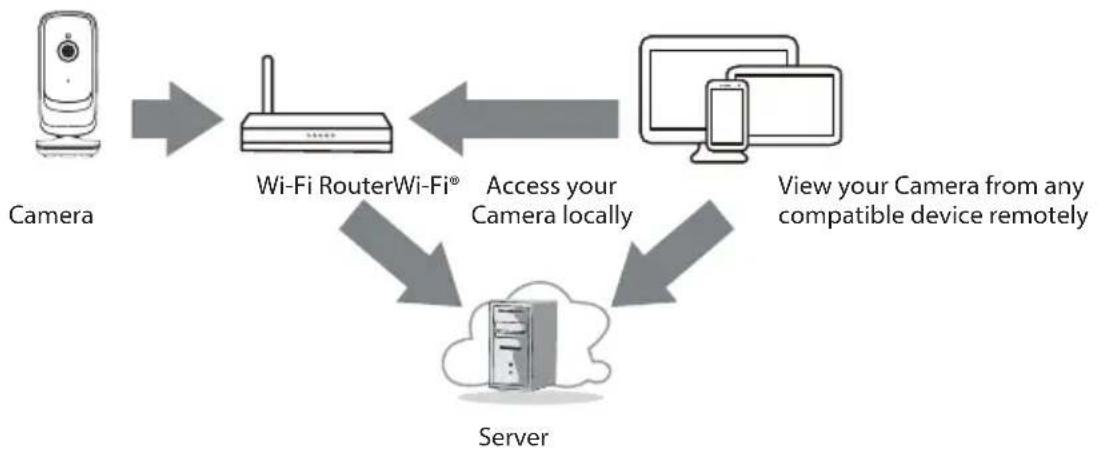
flowchart
graph TD
    A["Camera"] --> B["Wi-Fi RouterWi-Fi®"]
    B --> C["Server"]
    C --> D["View your Camera from any compatible device remotely"]
    B <-->|Access your Camera locally| C
When a user tries to access the Camera, our server authenticates the user's identity and permits access to the Camera.
4.3 Setup
Connect the Wi-Fi ^® Camera to the Power Adaptor, then plug into mains power. The Camera must be within range of the Wi-Fi ^® router with which you want to connect. Make sure the password of the router is available for entering during the in-app setup process.
Status of LED Indication:
• Pair / Setup state: LED is Flashing Green.
- Unconnected state: LED is Flashing Red.
- Connected state: LED is Solid Green.
Note:
You can only setup via a compatible smartphone or tablet only.
4.4 User Account and Camera Setup on Android™ Devices or iPhone®/iPad®
What you need
- Wi-Fi® Camera Unit
• Power adaptor for the Camera
• Device with Android™ system version 8.0 and above - Or iPhone®/iPad® with iOS version 12.0 and above
4.4.1 Power ON and Connect the Camera
- Switch the parent unit off before connect the camera to Wi-Fi®.
- Connect the power adaptor to mains power and insert the plug into the power socket on the back of the Camera Unit, the unit turns on.
4.4.2 Download the HubbleClub for partners App
- Scan the QR code with your smart device and download the HubbleClub for partners App from the App Store for iOS devices or from the Google Play™ Store for Android™ devices.
• Install the HubbleClub for partners App on your device.


4.4.3 Sign up with Hubble Club for partners on your smart device
- Ensure that your smart device is connected to your Wi-Fi® router.
- Run the HubbleClub for partners App, tap Create Account, read through the Privacy Policy, Terms and Conditions, by signing up you agree to our terms of service, tap Done.
- Follow the steps to enter your account information and sign up (fig 1, fig 2, fig 3)
Note:
If you already have a HubbleClub for partners App account, please tap Log in to go to the next steps.
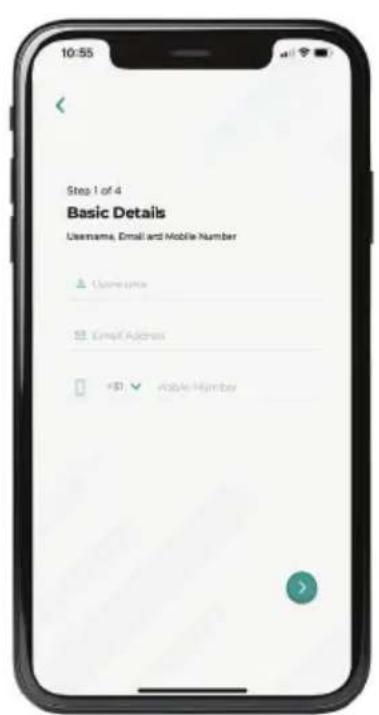
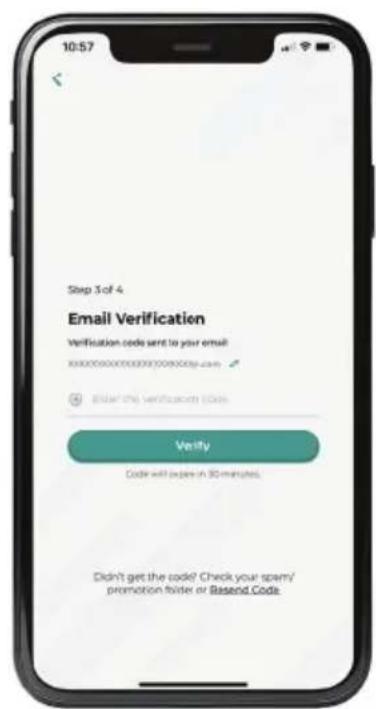
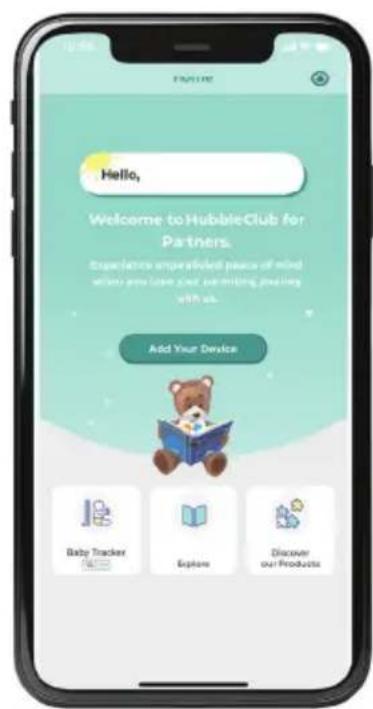
Fig 1 Fig 2 Fig 3
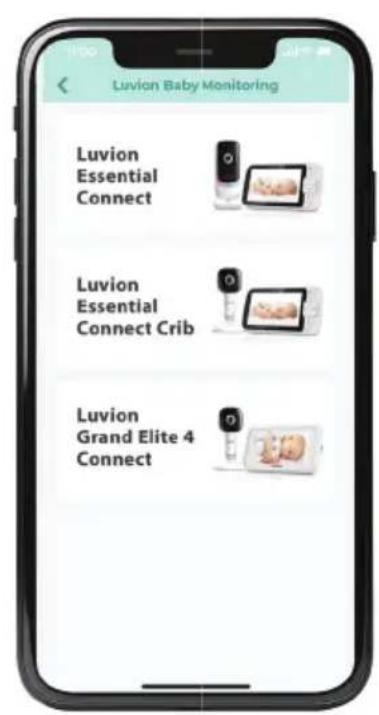
4.4.4 Add the Camera to your account
- Log in your Hubble for partners Account by entering "User Name" and "Password"
- Tap Add Your Device on the screen of your device to add new Camera
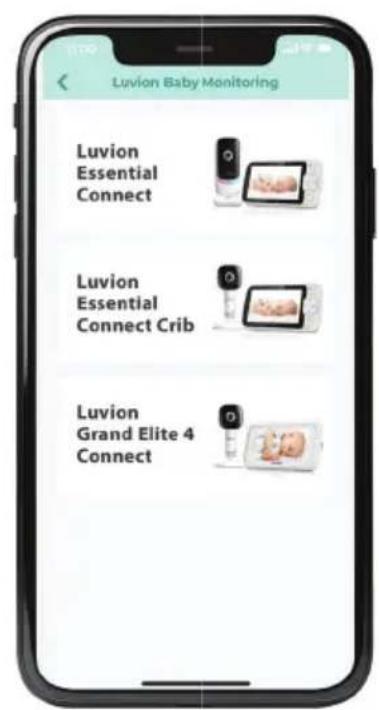
- Select LUVION® (fig 4)
- Select Luvion Essential Connect (fig 5)
- Enter the Wi-Fi® password of your own Wi-Fi® network
- Make sure the Parent unit (monitor) is switched off for the next step.
• Power on the camera - Press and hold the pair button on your camera until you hear "Ready for Pairing"
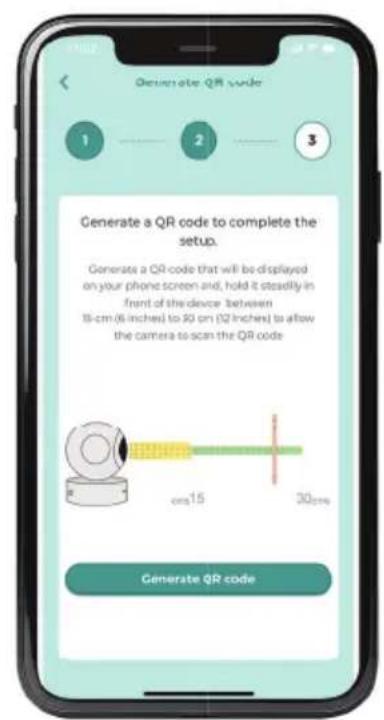
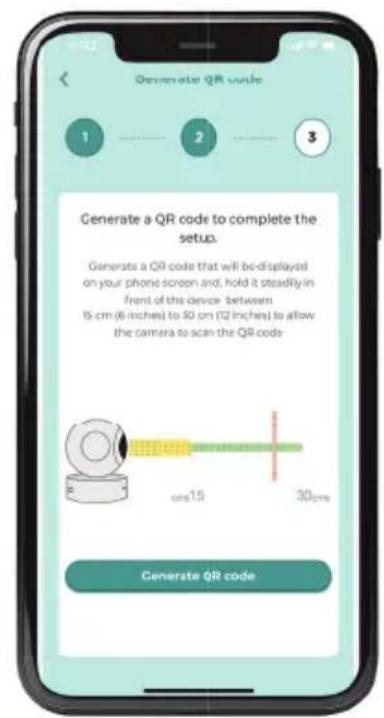
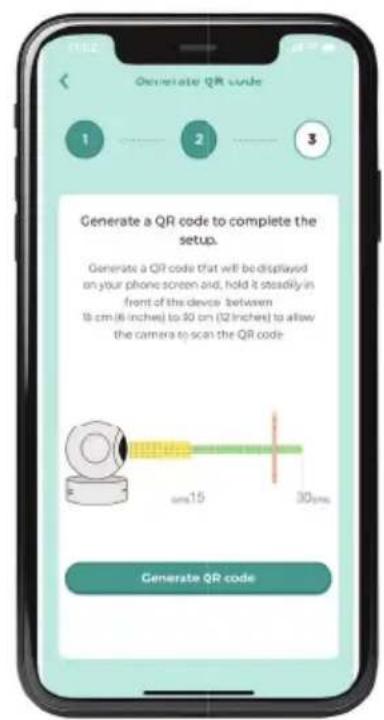
- Generate the QR code to complete the setup.
- Hold the screen of your phone with the QR code steadily in front of the camera, between 15cm and 30cm and wait for the confirmation message (fig 6)
- You can give a name to your camera when your camera has been successfully connected.
Please contact the Luvion customer service or refer to the online instruction videos if you still experience problems setting up your Luvion Essential Connect camera.
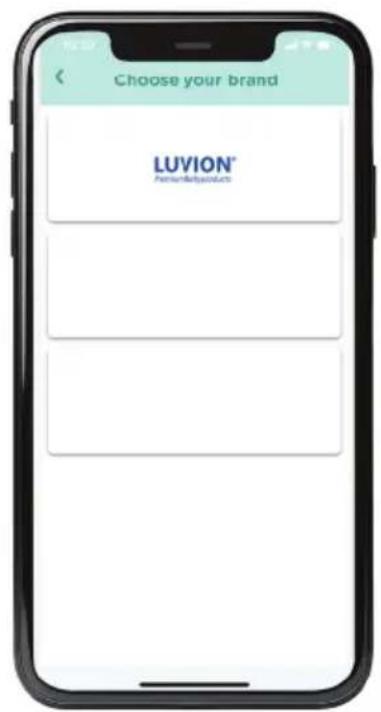
Fig 4 Fig 5 Fig 6


5. DISPOSAL OF THE DEVICE (ENVIRONMENT)
At the end of the product life cycle, you should not dispose of this product with normal household waste. Take this product to a collection point for the recycling of electrical and electronic equipment. The symbol on the product, user's guide and/or box indicates this. Some of the product materials can be re-used if you take them to a recycling point. By reusing some parts or raw materials from used products you make an important contribution to the protection of the environment. Please contact your local authorities in case you need more information on the collection points in your area. The internal battery should be disposed of with the Parent unit in an environmentally-friendly manner according to your local regulations.
6. CLEANING
Clean the Baby Monitor with a slightly damp cloth or with an anti-static cloth. Never use cleaning agents or abrasive solvents.
Cleaning and care
- Do not clean any part of the product with thinners or other solvents and chemicals – this may cause permanent damage to the product which is not covered by the warranty.
- Keep the Baby Monitor away from hot, humid areas or strong sunlight, and don't let it get wet.
- Every effort has been made to ensure high standards of reliability for your Baby Monitor. However, if something does go wrong, please do not try to repair it yourself – contact Customer Service for assistance.
IMPORTANT
Always switch off and disconnect the power adaptor before cleaning your baby monitor.
7. HELP
Display
No display
- Try recharging the battery pack.
- Reset the Units. Unplug both the Units' electrical power, then plug them back in.
• Is the Unit switched on? - Press and hold the ON/OFF button on the Parent Unit for 3 seconds to switch it ON.
- Is the correct camera selected? Change the camera number, if necessary.
- Is the video display turned on? Press the VIDEO ON/OFF button to turn it ON.
- When operating using batteries only, the display will go blank after 5 minutes or 15 minutes or 30 minutes to save power (depending on video settings). The Unit is still active and will give you audio alerts. You can reactivate the screen by pressing any button.
Registration
If the Baby Unit has lost its link with the Parent Unit
- If the Baby Unit is too far away it may be going out of range, so move the Baby Unit closer to the Parent Unit.
- Reset both the Parent Unit and Baby Unit by disconnecting them from the electrical power.
Wait about 15 seconds before reconnecting. Allow up to one minute for the Baby Unit and the Parent Unit to synchronize.
• See 3.12 Registration (Pairing), if there is a need to re-register the Units.
Interference
Noise interference on your Parent Unit
- Your Baby and Parent Units may be too close. Move them further apart.
- Make sure there is at least 1 to 2m between the 2 Units to avoid audio feedback.
- If the Baby Unit is too far away, it may be out of range. Move the Baby Unit closer to the Parent Unit.
• Make sure that the Baby and Parent Units are not near other electrical equipment, such as a television, computer or cordless/mobile telephone. Move the Baby Unit or Parent Unit 3 feet away from other electrical equipment. - Use of other 2.4 GHz products, such as wireless networks (Wi-Fi® routers), Bluetooth™ systems, or microwave ovens, may cause interference with this product. Keep the Baby Unit or Parent Unit at least 3 feet away from these types of products, or switch them off if they appear to be causing interference.
- If the signal is weak, try moving the Parent and/or Baby Unit to different positions in the rooms.
Noise interference on your device
- To avoid background noise or echoes, ensure that there is enough distance between your device and the Wi-Fi® Camera Unit.
- Use of other 2.4 GHz products, such as Bluetooth™ systems or microwave ovens, may cause interference with this product. Keep the Wi-Fi® Camera Unit at least 3 feet away from these types of products, or switch them off if they appear to be causing interference.
Lost connection
- Check your Wi-Fi® settings. If necessary, reconnect your Wi-Fi®. Ensure that the Wi-Fi® Camera Unit is switched ON. Wait a few minutes to make the connection with the Wi-Fi® system.
If you forgot your password
- If you do not remember your password, tap Forgot Password and submit your e-mail address. A new password will be sent to your e-mail address immediately.
Troubleshooting for Wi-Fi® Internet Viewing
| Category Problem Description | tion / Error Solution | |
| App Cannot find my product | at "Add Camera". | There are more Hubble Apps. Check if you downloaded the correct App "HubbleClub for partners", make sure to pick the right brand: Luvion. |
| Account I am unable to log | n even after registration. | Please check your user name and password. |
| Account I receive an error m | message say- ing: "Email ID is not registered". | Please ensure that you have registered with us. Tap Create Account to create an account. |
| Account What do I do if I for | got my password? | Click on the "Forgot Password" link on your AndroidTM or iOS appli- cation. An email will be sent to your registered email address. |
| Account I am unable to receive | a new password although I have used the "Forgot password" option. | 1. The e-mail might have been sent to your Junk Mail Folder. Please check your Junk Mail Folder.2. There might be a delay in get- ting your e-mail. Please wait a few minutes and refresh your email account. |
| Connectivity Issues I get a m | message: We are having problems accessing your camera. This could be due to lack of internet connection. Please wait and try again later. | 1. Please try again in a few minutes.This could be because of any issue with your internet connection.2. If the problem remains, please restart your Camera to check if this fixes the problem.3. Please restart your WIFI Router. |
| Viewing Camera When I am | in "remote mode", the video stops after 5 minutes. How do I view for longer? | When you are accessing your Camera via a network different from your home network (over the internet) your video times out after 5 minutes. You can click on the Camera again from the AndroidTM/ iOS application to start streaming again. If you are accessing from your webbrowser, then you can press on the Reload button to start viewing your Camera video stream again. |
| Features The sound alert setting threshold is not right. | You can Adjust Sound Sensitivity to trigger notifications under Camera Setting menu. | |
| Setting Up While I am adding a new Camera to my account, I am not able to find any Cameras to add. | If you are trying to add a Camera which has previously been added into your account or another account, you will first have to reset the Camera. Switch the parent unit off before connecting the camera to Wi-Fi®. | |
| General What is the significance of the camera LED? | Pair / Setup state: LED is Flashing Green.Unconnected state: LED is Flashing Red-connected state: LED is Solid Green.Green: The camera is live streaming.LED Off - Power off / User turn off by Camera App setting. | |
| Connectivity issues I am not able to access my Camera. | Please check if the Camera is within Wi-Fi® range. Please try to move the Camera closer to the router for better Wi-Fi® connectivity and try again. | |
| Setting Up During setup on devices for AndroidTM and iOS, I am not able to find my Camera during the last step and the setup fails. | Please reset the Camera to setup mode and try again. Press and hold the PAIR button on the side of the camera until you hear a beep and voice prompt 'Ready for pairing'.When the Camera LED is off, this indicates that it is in setup mode.Add camera in HubbleClub for partners App. | |
| Connectivity Issues Even though I am accessing my Camera from the same Wi-Fi® network, I still find my Camera is shown as remote. I can only access it for 5 minutes at a time. | Please check your wireless router settings. For example, for some routers there is an option called Wireless Isolation. Please disable this option. | |
| Camera When I try to view the Camera, I get a prompt for Camera firmware upgrade. What should I do? | Please upgrade your firmware. This takes around 5 minutes. We push upgrades from time to time to improve the Camera features. | |
| General Which platforms are supported for accessing my Camera? | Minimum requirement: AndroidTM8.0 iPhone®/iPad® iOS version 12.0 | |
| General I do not hear any sound when I am accessing a remote Camera. | You can tap on the speaker icon in the video stream screen to hear audio. By default the audio is not ON when you are accessing a remote Camera. | |
| General What is the meaning of “Local Camera” and “Remote Camera”? | When you are accessing your Camera from the same wireless network (Home) in which it is configured, it is a Local Camera. When you are accessing your Camera away from your home it is a Remote Camera. You may be using 3G, 4G or 4G LTE or a Wi-Fi® connection outside of your home. | |
| General How do I download the App for AndroidTM and iOS devices? | AndroidTM:Open the Google Play Store on your AndroidTM device.Select Search Type in “Hubble-Club for partners“The results will show the Hubble for partners AppSelect to install it iOS Device:Open the App StoreTMSelect SearchType in “HubbleClub for partners“The results will show the Hubble for partners AppSelect to install it | |
| Setting up When the video is cut off, the application attempts to reconnect and this results in lost sound and choppy video. | You will need to turn off the Auto Lock function of your device to ensure continuous video/audio streaming. | |
| Features How many users can access the Camera at one time? | If you are accessing in Local Mode, two users are supported, after two users all streaming will go through the remote server. This allows for unlimited user access to a single Camera at one time. | |
| Connectivity issues I found interference caused by my other webcam devices. | Video streaming performance is related to internet bandwidth, especially if you have 2 or more video streaming devices that are working through the same router. | |
9. TECHNICAL SPECIFICATIONS
Baby unit (camera)
Frequency: 2400 MHz to 2483.5 MHz
Operating temperature: 5°C - 40°C
Image sensor: Colour CMOS 1M Pixels
Maximum RF Power: 20dBm
Power Adapter: Input: 100-240VAC, 50/60Hz, 150mA
Output: DC5V, 1000mA
WARNING
Use only with supplied power supply.
Parent Unit (monitor)
Frequency: 2400 MHz to 2483.5 MHz
Operating temperature: 5°C - 40°C
Display: 5" diagonal TFT LCD
Maximum RF Power: 20dBm
Brightness control: 5 steps
Power Adaptor: Input: 100-240VAC, 50/60Hz, 150mA
Output: DC5V, 1000mAh
WARNING
Use only with provided power supply.
Battery rating: TMB i9300
3.8V 2100mAh Li-ion
WARNING
Do not use non-rechargeable batteries for the Parent Unit.
Risk of explosion if battery is replaced by an incorrect type.
Dispose of used batteries according to the instructions.
Specifications are subject to change without prior notice.
10. DECLARATION OF CONFORMITY
Luvion declares that the radio equipment type Luvion Essential Connect is in compliance with Directive 2014/53/EU. The full text of the EU declaration of conformity is available at: luvion.com/doc/essential-connect
INTRODUCTIE
natural_image
Diagram of a portable electronic device connected to a wall-mounted power strip (no text or symbols visible)natural_image
Line drawing of a Luvion device connected to a cable and power cord (no text or symbols on the device body)Opmerking:
natural_image
Line drawing of a mobile phone stand with an arrow indicating direction (no text or symbols)Opmering:
flowchart
graph TD
    A["Camera"] --> B["Wi-Fi RouterWi-Fi®"]
    B --> C["Server"]
    C --> D["View your Camera from any compatible device remotely"]
    B <-->|Access your Camera locally| C

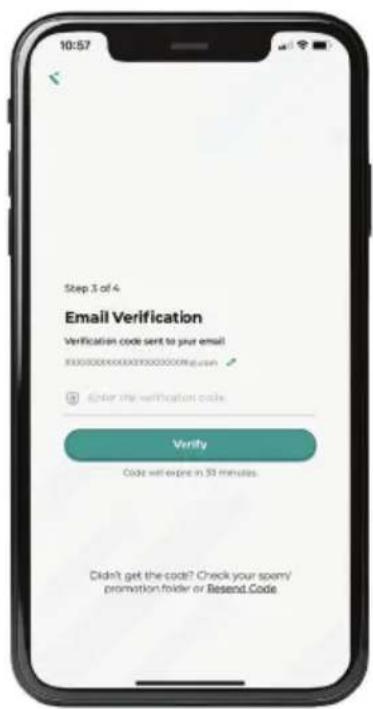

Fig 1 Fig 2 Fig 3
Fig 4 Fig 5 Fig 6
5. HET APPARAAT WEGGOOIEN (MILIEU)
7. PROBLEEM & OPLOSSING
Beeldscherm
Geen beeld
Troubleshooting for Wi-Fi® Internet Viewing
luvion.com/doc/essential-connect

This device is for indoor use only
INTRODUCTION
natural_image
Line drawing of a LUVION brand remote control unit connected to a cable via cable (no text or symbols on device body)Note:
natural_image
Line drawing of a mobile phone stand with an arrow indicating rotation (no text or symbols)Note:
flowchart
graph TD
    A["Camera"] --> B["Wi-Fi RouterWi-Fi®"]
    B --> C["Server"]
    C -->|View your Camera from any compatible device remotely| D["Computer"]
    B -->|Access your Camera locally| C

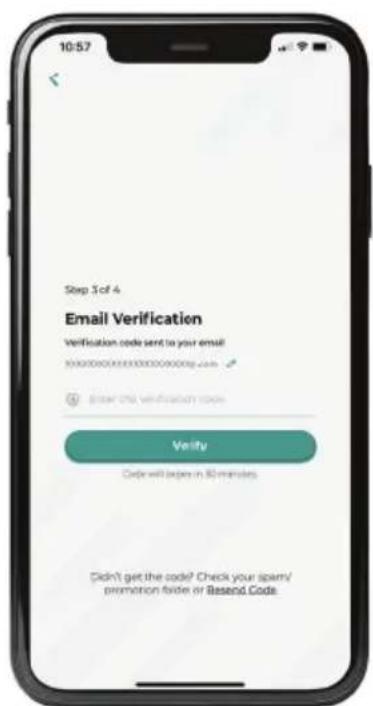
Fig 1 Fig 2 Fig 3
Fig 4 Fig 5 Fig 6
©
Inscription
luvion.com/doc/essential-connect

There is a risk of explosion if the battery is replaced by an incorrect type. Dispose of used batteries according to their instructions. To reduce risk of fire or burns.
natural_image
Diagram of a portable device connected to an electrical outlet cable (no text or symbols present)natural_image
Line drawing of a LUVION brand electronic device connected to a cable and power cord (no text or symbols on the device body)Hinweis:
natural_image
Line drawing of a mobile phone stand with an arrow indicating rotation (no text or symbols)flowchart
graph TD
    A["Camera"] --> B["Wi-Fi RouterWi-Fi®"]
    B --> C["Server"]
    C -->|View your Camera from any compatible device remotely| D["Computer"]
    B -->|Access your Camera locally| C

Fig 1 Fig 2 Fig 3
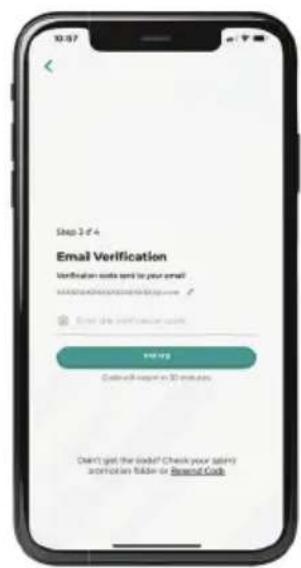

Fig 4 Fig 5 Fig 6
5. ENTSORGUNG DES GERÄTES (UMWELT)
This device is for indoor use only