Prestige Touch 3 - Baby monitors Luvion - Free user manual and instructions
Find the device manual for free Prestige Touch 3 Luvion in PDF.

| Product Type | Baby monitor with camera (up to 4 cameras) |
| Brand | Luvion |
| Model | Prestige Touch 3 |
| Dimensions (baby unit) | 85 x 105 x 112 mm |
| Screen size (monitor) | 7 inches (17.78 cm) |
| Screen resolution | 800 x 480 pixels |
| Power supply (monitor) | 5 V DC 2 A |
| Power supply (camera) | 5 V DC 1 A |
| Range (line of sight) | 300 m |
| Frequency | 2.4 GHz (Wi-Fi 802.11 b/g/n) |
| Night vision | LED IR up to 5 m (automatic activation) |
| Viewing angle (camera) | 63° (FOV), pan: 135° left/right, tilt: 90° up / 20° down |
| Digital zoom | 2x |
| Video recording | On micro SD card (max 256 GB, not included) |
| Main functions | Two-way audio (Talk), lullabies, remote night light, VOX mode, scanning, temperature detection with alarm, LED sound indicator |
| Operating temperature | -10 °C to 40 °C |
| Safety | Minimum distance 1.5 m between camera and child; use only provided Luvion adapters; do not expose to moisture; do not disassemble yourself |
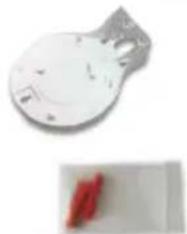
| Kit contents | 1 monitor, 1 camera, 2 power adapters, 1 mounting frame, 1 mounting kit (screws and wall plugs) |
| Repairability | Battery replaceable only by qualified personnel; contact Luvion |
| Recycling | Do not dispose of with household waste; take to an official collection point |
Frequently Asked Questions - Prestige Touch 3 Luvion
User questions about Prestige Touch 3 Luvion
0 question about this device. Answer the ones you know or ask your own.
Ask a new question about this device
Download the instructions for your Baby monitors in PDF format for free! Find your manual Prestige Touch 3 - Luvion and take your electronic device back in hand. On this page are published all the documents necessary for the use of your device. Prestige Touch 3 by Luvion.
USER MANUAL Prestige Touch 3 Luvion
Baby Unit (Camera) Ouder Unit (Monitor) Adapters Pluggen, schroeven


& montageframe
EXTRA CAMERA'S
OPNAME LIJST > OPNAME LIJST

This device is for indoor use only
Thank you for purchasing the Luvion Prestige Touch 3. Now, you will be able to see and hear your baby (or even more babies/children by using up to three additional camera's) everywhere in and around the house.
Please keep the original dated sales receipt for your administration and proof of warranty. For service and warranty issues, you will always be asked for a copy. For warranty issues, you may contact your Luvion dealer or your local Luvion distributor. More information can be found on our website: www.luvion.com.
This user manual provides you with all information necessary for a safe, pleasant, and easy use of the Luvion Prestige Touch 3. Before use, we ask you to thoroughly read this user manual. We ask for your special attention for the safety instructions below.
LUVION
Delft, The Netherlands
www.luvion.com
SAFETY INSTRUCTIONS
- Keep small parts away from children.
- This product is not intended as a toy. Please refrain children from playing with the product.
- This product is not intended as a substitute for adult supervision.
Only use the original supplied power chargers. - Do not use the product in humid conditions or nearby water.
Always keep the camera and any cords of the power adapters at least 1,5 meter away from the baby.
Only use the product between 10^ - 35^ - Do not attempt to open the product yourself or you may void your warranty, please contact your local dealer or distributor.
Batteries:
- Important: Fully charge the battery before first use, to ensure an optimal battery capacity.
CONTENTS OF PACKAGE
The Prestige Touch 3 includes the following components:
- 1 x parent unit (monitor)
- 1 x baby unit (camera)
- 1 x power adapter for the parent unit
- 1 x power adapter for the baby unit
- 1x baby unit mounting frame
- 1 x wall plugs and screws
Check the package to confirm that you have received the complete system, including all components listed above.
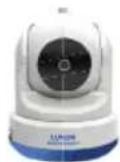
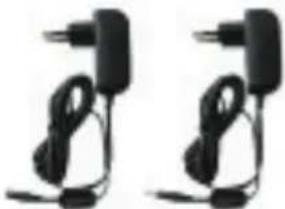
Baby Unit (Camera) Parent Unit (Monitor) Adapters Plugs, Screws &
Mounting Frame
EXTRA CAMERAS
The Luvion Prestige Touch 3 supports the use of up to four cameras. Now you can monitor multiple children or rooms at the same time.
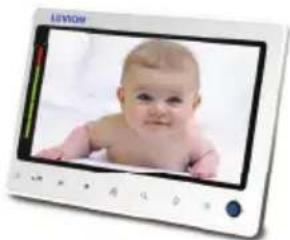
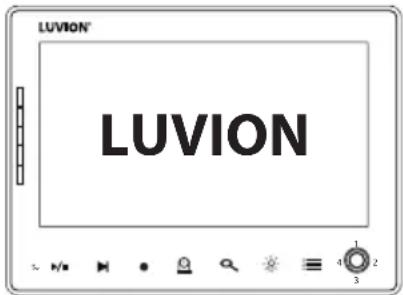
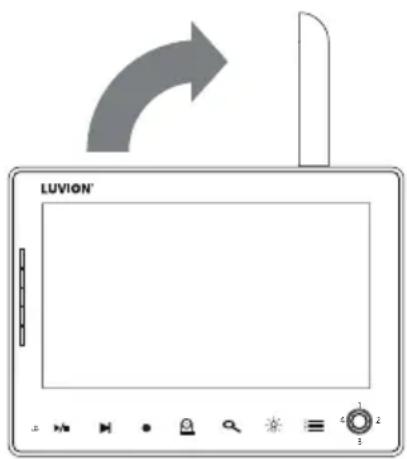
OVERVIEW OF PARENT UNIT (MONITOR)
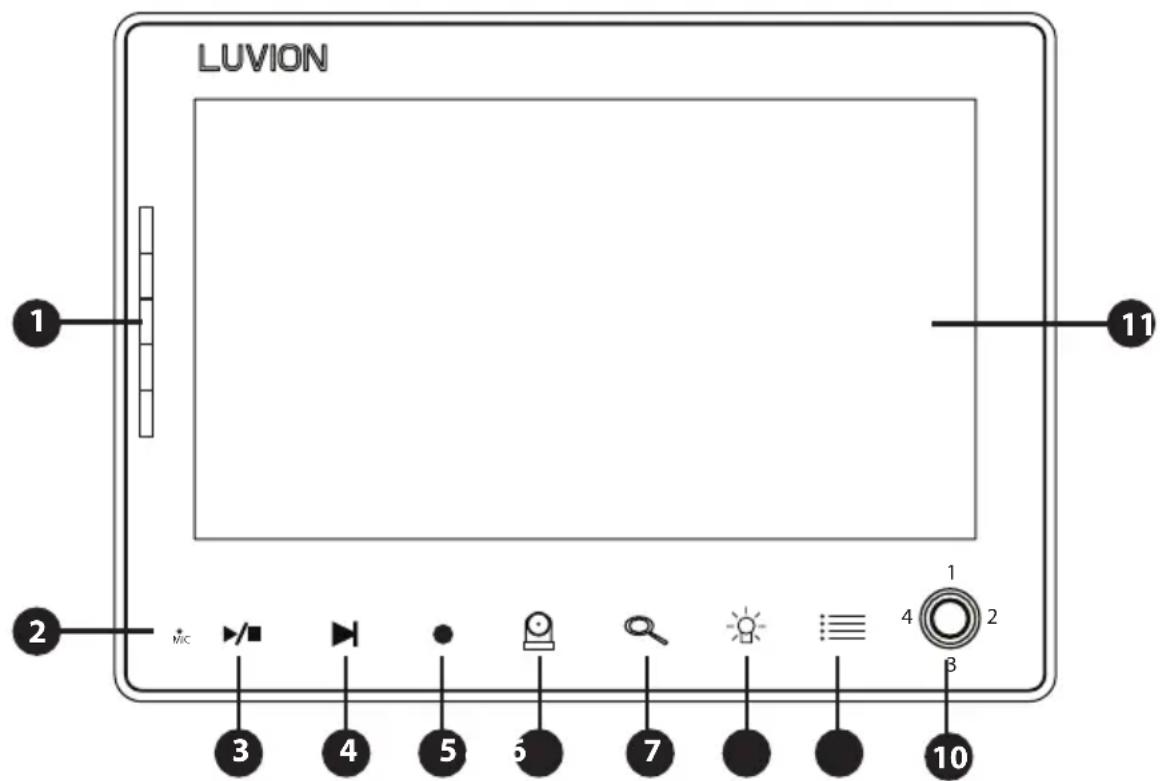
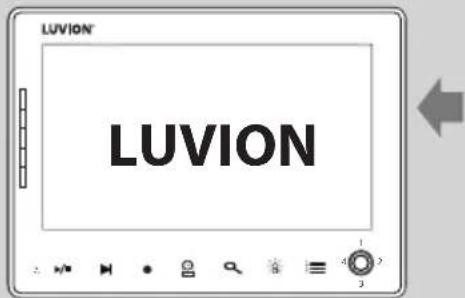
Front view
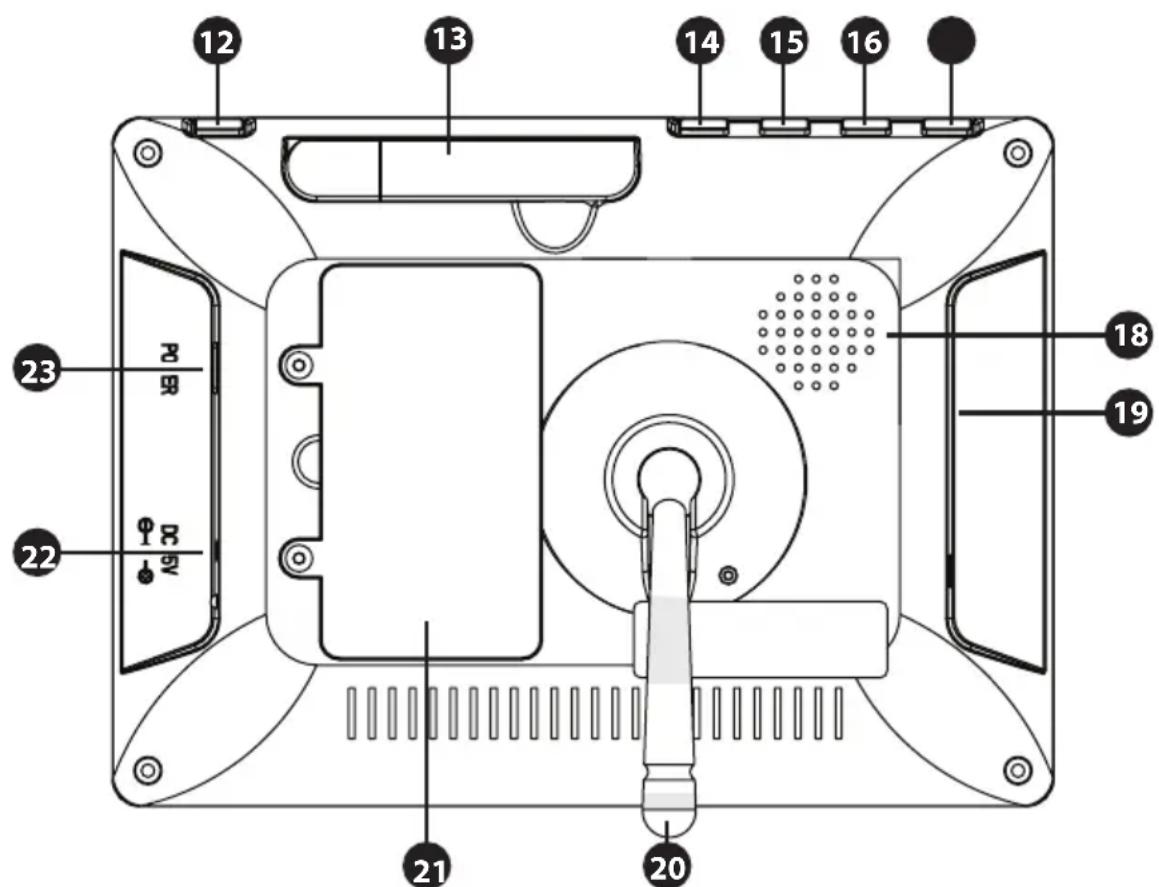
Back view
- Power LED and Sound Bar - The first LED indicates whether the parent unit is switched on. The other LED's indicate the level of sound detected by the baby unit. The amount of LED's that are lit up indicate the intensity of the detected sound.
- Microphone The sounds detected by this microphone will be transmitted to the baby unit (camera) when the Talk button is pressed.
- Play/Pause Play/Stop a lullaby, the unit will automatically play through all lullabies.
- Next Song button Skips to the next lullaby.
- Record button Use this button to capture a video recording. A micro SD-card (is required to capture a recording. When activated, the recording icon will now appear on the screen.
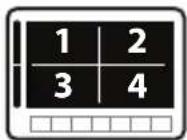
- Cam button Press the Cam button to switch between the different cameras connected to the parent unit. The channel indicator identifies the different cameras.
- Zoom button Press this button to zoom in on the video. The video will then be doubled in size. 2X will appear on the screen. When the video is magnified, you can use the joystick to navigate to parts of the video that are outside the range of the screen. Press zoom again to exit zoom mode.
- Night light / delete button Our baby units are fitted with a special night light to comfort your child. Press this Button to remotely (de-)activate the night light of the baby unit (When multiple baby units are in use, the night light of the unit of which the video is currently displayed on the screen is controlled). The night light icon will appear on the screen when the night light of the baby unit is activated. / Press this button when you're in the recording fi le list to delete a recording fi le.
- Menu button Use the Menu button to open the main menu. Use it in a menu to close a menu (or move up a level) without saving any new settings.
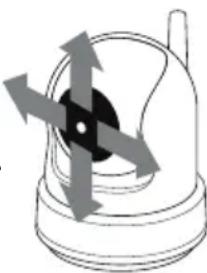
- Joystick Use the joystick to move the camera lens of the baby unit and within in the menu to change a selection. Press the joystick within the menu to confirm a selection and to save your setting. Press the joystick to enter the recording file list.
- Screen 7^ TFT LCD Screen.
- Talk button Press this button to speak through the baby unit to your child. Wait before speaking until the Talk icon is displayed on the screen. You can change the volume in the camera menu. When multiple cameras are used, you will speak only through the baby unit that is being displayed on the screen.
- Antenna Sends & receives data to the baby unit.
- Increase button Press this button to increase the volume of the monitor
- Decrease button Press this button to decrease the volume of the monitor
- VID OFF button Press the video button to switch to the sound only mode. In this mode the screen is turned off. Press the button again to return from the sound only mode to the sound and video mode.
- Scan button When this button is pressed, the screen is turned off. During this time the parent unit will continuously scan the baby unit (or multiple baby units). When a sound is detected, the parent unit will become active. The screen is turned back on, now you can see what happens in the baby room. You can adjust the sound sensitivity for this detection with the rotary knob at the side of the camera. After the parent unit has detected sound it will take about 5 seconds to switch back to the scan mode. Except when the sound is continuously detected. In that case the monitor will be activated for another 5 seconds. There are 2 reasons to use the scan button: 1- to prevent you from being disturbed by the bright LCD screen, or 2- to save energy. Press the scan button again to deactivate the scanmode.
- Speaker Produces the sound from the baby unit.
- Micro SD Slot Insert a Micro SD card (Not included) in this slot to enable the recording functions. The parent unit supports SD cards with memory up to 256 GB.
- Foot Enables you to position the parent unit on a fl at surface.
- Battery compartment This compartment allows the battery to be replaced. Only use original Luvion batteries.
- DC in Connect the included DC 5V power adapter to power and/or charge the parent unit.
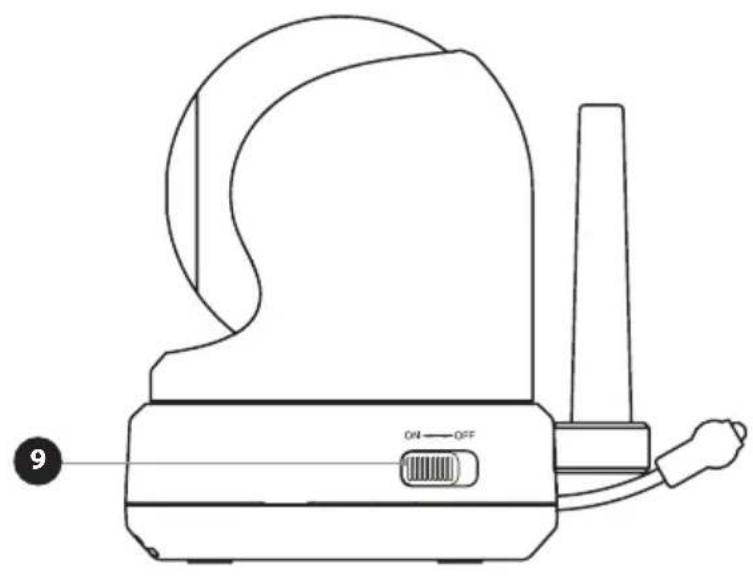
- On/Off button Turns the parent unit ON or OFF.
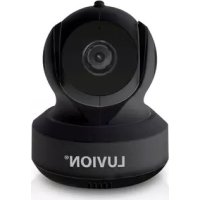
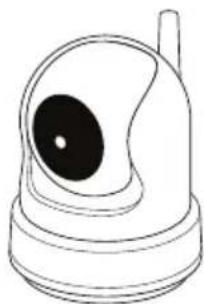
OVERVIEW OF BABY UNIT (CAMERA)
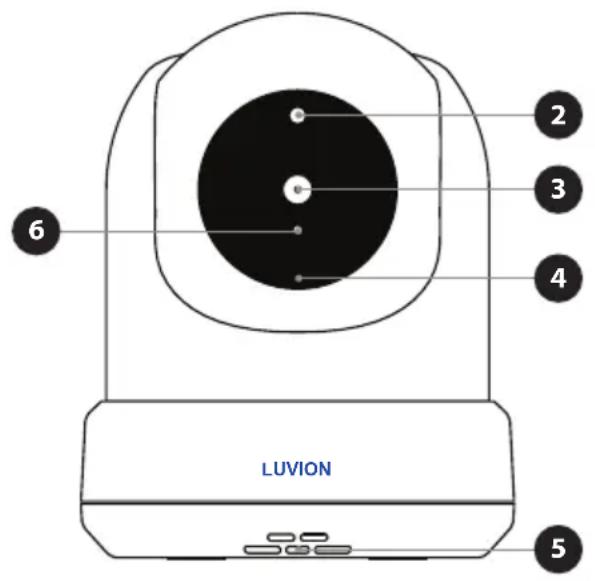
BACK VIEWFRONT VIEW
- Temperature sensor The measured ambient temperature is displayed on the screen of the parent unit.
- Light Sensor Allows the baby unit to correct itself under changing light conditions.
- Camera lens Detects the visual environment and sends this to the parent unit.
- Microphone Detects sound and sends this to the parent unit.
- Speaker Enables the ability to talk to your child over distance and to play lullabies.
- IR LED's Allows for 5m distance of night vision, automatically activates within low lights conditions.
BOTTOM VIEWSIDE VIEW
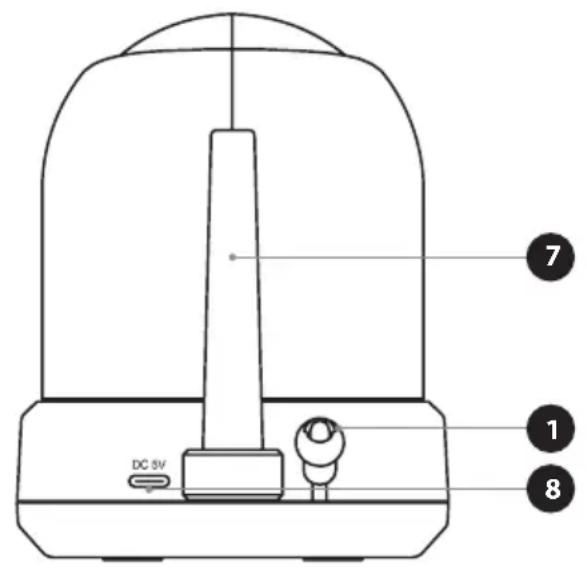
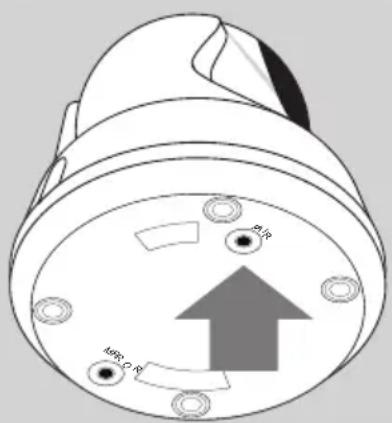
- Antenna Sends data to and receives data from the parent unit.
- Power input Input for the Luvion USB-C power adapter.
- On/Off button Press and hold to switch the baby unit on/off.
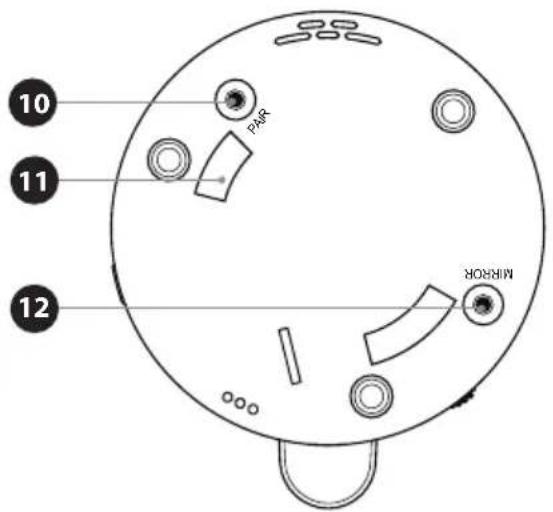
- Pairing button Establishes a new connection between the baby and parent unit during the pairing process. Pairing should be used when installing an additional camera or when the monitor does not recognize the baby unit. Consult page 37 for more information on the pairing process.
- Mounting frame connectors Connects the baby unit to the included mounting frame, which can be attached to a wall or ceiling.
- Mirror button Flips the image of the video upside down. Press this button when the baby unit is mounted upside down, e.g. on a ceiling.
INSTALLING THE PARENT UNIT (MONITOR)
- Carefully unpack the parent unit (monitor).
- Connect the power adapter to the parent unit and power socket. The parent unit will start charging. During first use, please allow the unit to completely charge to ensure optimal battery capacity.
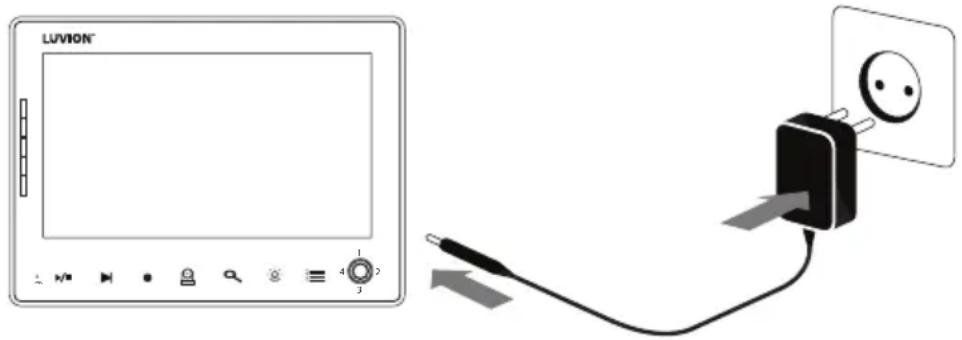

NOTE: CHARGE THE PARENT UNIT COMPLETELY BEFORE FIRST USE.
- Press and hold the on/off button. The screen will now show the Luvion introduction screen.
INSTALLING THE BABY UNIT (CAMERA)
Before you install the baby unit (camera), carefully plan where and how you want to position it. Make sure that you take in account the length of the power cable and the position of the power socket, because the baby unit (camera) needs to be connected to the power grid.
- Carefully unpack the baby unit (camera).
- Place the baby unit in the preferred position. You can place the baby unit on a table/cabinet, or you can mount it on a wall or ceiling. You can use the mounting frame to mount the camera on a wall or ceiling. With the provided plugs and screws.

NOTE: Before permanently installing the baby unit (camera), make sure that the wireless connection between the baby unit and parent unit is sufficient. Verify this when both the parent unit and baby unit are placed in the positions from which you would like to use them.

NOTE: Avoid installing the baby unit near walls or other obstruction between the baby and parent unit. For a good sound sensitivity and image it is recommended to place the baby unit between a 1,5-3m distance.

Wall mounted Ceiling mounted Wall mounted (upside down)

NOTE: If you mount the baby unit on the ceiling (upside down), use the mirror button at the bottom of the camera to flip the video image of the camera.
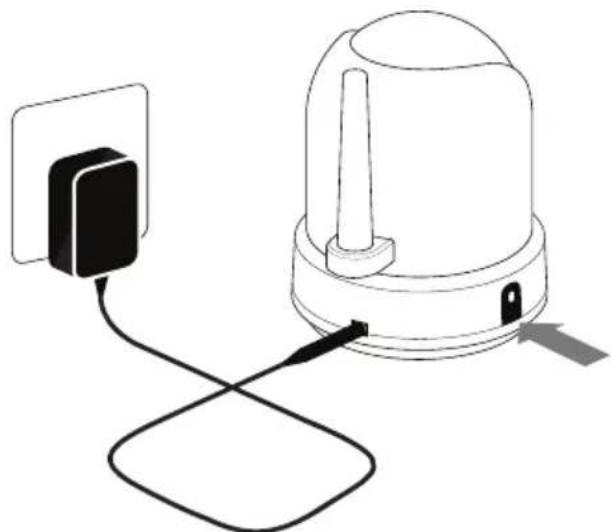
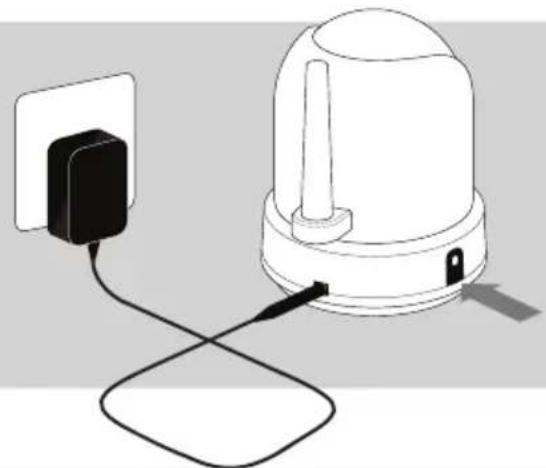
- Connect the power adapter to the baby unit and a power socket.
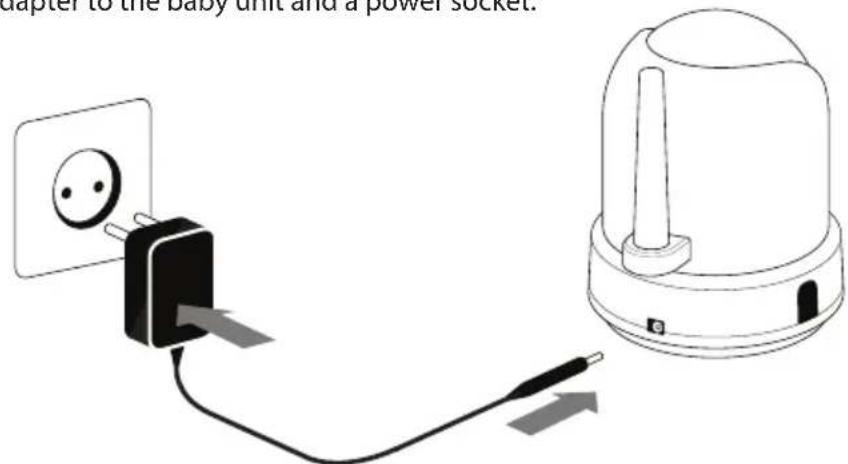
- Press and hold the on/off button to switch the baby unit on. The power LED will now light up.
The parent unit will display the video of the baby unit, when both are switched on and within range of each other. The message "Out of range" will be displayed on the screen of the parent unit when the baby unit is outside the range of the parent unit or when the baby unit is not switched on or recognized.
USING THE SYSTEM
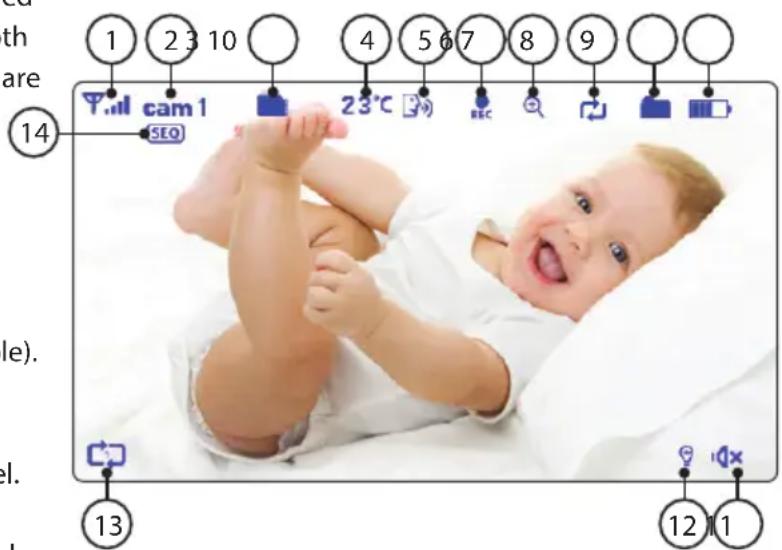
The video of the baby unit will be displayed on the screen of the parent unit when both are switched on. The icons on the screen are explained below.
- Signal indicator The signal indicator shows the strength of the connection between units. no bars indicate a poor signal and 4 bars indicate the strongest signal (see table).
- Channel indicator The channel indicator displays the current channel. Press the CA M button (page 4) to switch between the diff erent channels.
- SD card indicator The SD icon will appear when an SD card has been properly inserted in the SD slot of the parent unit.
- Temperature indicator Displays the temperature measured by the baby unit.
| Signal sterkte Indicator | Waarschuwing | |
| Perfect | Y | None |
| Good | Y | None |
| Fair | Y | None |
| Low | Y | Out of Range |
| No Signal | Y | Out of Range |
- 'Talk'-indicator Appears when the talk button is pressed. You can now talk through the baby unit.
- Record indicator Appears when a video is being recorded. Press the 'REC' button again to stop the recording.
- Zoomindicator Indicates that the video from the baby unit is zoomed in.
- Overwrite indicator when you have selected "yes" for the SD-card overwrite function. The icon will be displayed on the screen.
- New file indicator This icon will appear and flicker when a new video has been recorded but has not yet been watched. The SD icon will start to flash on screen when the SD card is full.
- Battery indicator Indicates the battery life of the parent unit.
- Sound indicator When the volume has been decreased to mute, the mute icon will be displayed on the screen. Press the volume button to increase the volume.
- Night light indicator Is being displayed when the night light on the baby unit is activated.
-
Lullaby indicator When the play lullaby button is pressed the lullaby indicator is displayed on the screen. Press next to switch between songs.
-
Sequence indicator This icon will appear when the monitor will automatically switch between the different channels.
OUT OF RANGE WARNING
When the baby unit is positioned too far away from the parent unit, the warning message "Out of Range" will appear on the screen of the parent unit and the video will start to flicker. When there is no connection between the baby and the parent unit, the screen of the parent unit will be black and display the warning message "Out of Range".
To improve the range of the baby monitor, move the antenna of the baby monitor upwards.

NOTE: If moving the baby and parent unit closer together does not help, try pairing the baby and parent unit. see Pairing chapter.
OUT OF RANGE
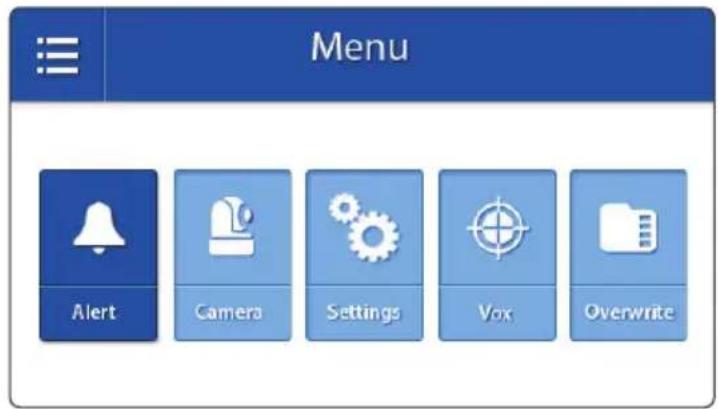
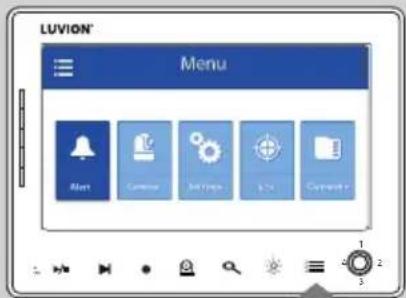
MENU
Open the menu of the Luvion Prestige Touch 3 to change device settings.
Press the menu button on the parent unit to open the menu.
Move the joystick to the left/right to select a submenu.
Press the Joystick to confirm a selection,marked dark blue,and open a submenu.
MENU>ALERT
The Luvion Prestige Touch 3 has a temperature alert. Use this submenu to change the volume of this alert.
Move the joystick to the left or right to increase/decrease the alarm volume. To mute, empty the bars all the way down.
Press the joystick to save your setting.
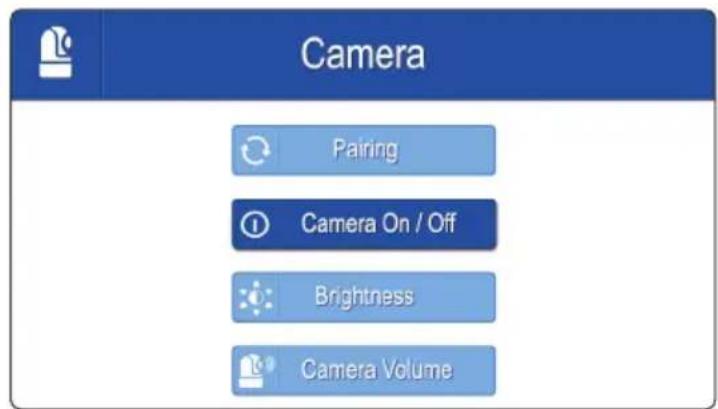
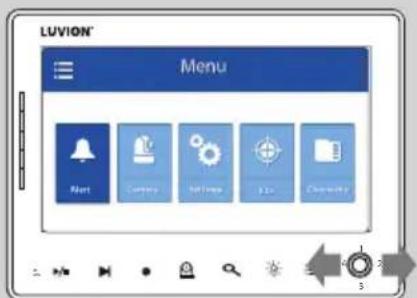
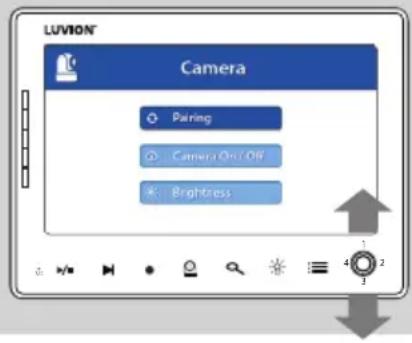
MENU >CAMERA
You can change the camera (baby monitor) setup in this menu.
Move the joystick to the up/down to select a submenu.
Press the Joystick to confirm a selection and to open a submenu.
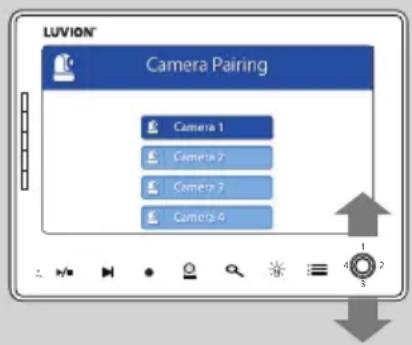
MENU >CAMERA > PAIRING
You can use the pairing function to restore the connection/or make a new connection between the baby unit and parent unit. It also enables you to connect additional baby units to the parent unit. For more info see page 37 & 38.
Move the joystick up or down to change the camera channel you would like to pair.
Press the joystick to confirm your selection.
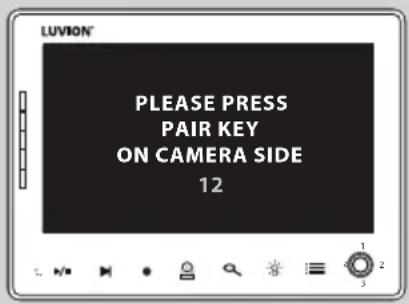
The parent unit will count down. Briefly press

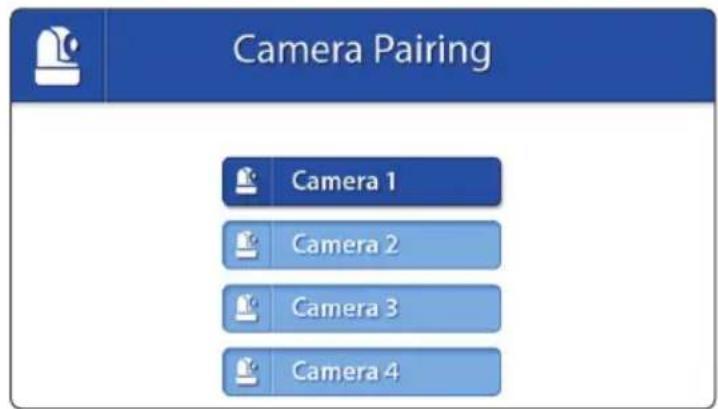
the pair button on the baby unit during this time.

NOTE: It is highly recommended to pair the baby units to the parent unit before permanently mounting them.
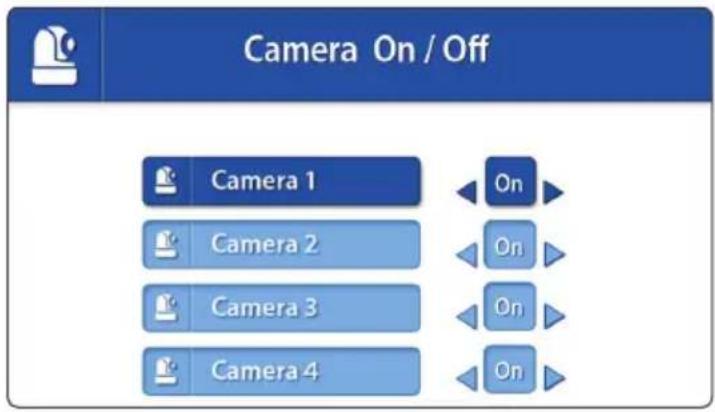
You can activate or deactivate individual cameras in this menu
Move the joystick up or down to select the camera you would like to (de)activate.
Move the joystick to the left or right to activate or deactivate the camera
Press the joystick to save your setting.
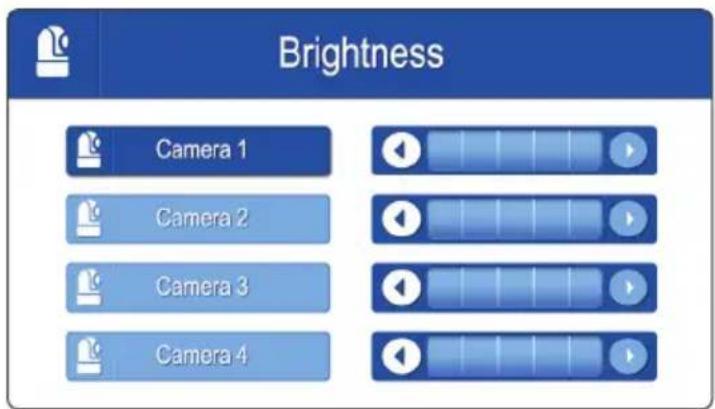
MENU >CAMERA > BRIGHTNESS
You can change the brightness of the baby unit video in this menu. When the image of the video is too dark, try to increase the brightness.
The minimum Brightness is no bars and the maximum Brightness is 5 bars.
Move the joystick to the left or right to increase/decrease the brightness.
Press the joystick to confirm your setting.
You can adjust the sound produced by the baby unit in this menu. Affects the baby unit only, e.g. the volume of a lullaby or the 'Talk back' function.
MENU> SETTINGS
You can change the settings in this menu.
Move the joystick to the up/down/left/ right to select a submenu.
Press the Joystick to confirm a selection and to open a submenu.
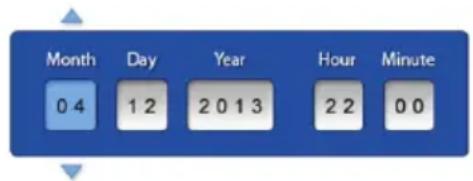
MENU>SETTINGS DATE&TIME
The Date & Time are used to name recorded videos.
Move the joystick left and right to select an input field.
Move the joystick up and down to change the value of the input fi eld.
Press the joystick to confirm your selection.
MENU>SETTINS > FORMATSDCARD
Use this menu to delete all the data stored on the Micro SD card currently inserted in the parent unit (monitor).
Move the joystick up and down to select Yes/No.
Press the joystick to confirm your selection.
MENU> SETTINGS DEFAULT SETTINGS
Use this menu to restore the Default Settings (factory settings).
Move the joystick up and down to select Yes/No.
Press the joystick to confirm your selection.
Settings

Date & Time

Language

Format SD Card

Temp. Unit

Default Settings

Temp. alert range

Date & Time

Format SD Card
All stored files will be deleted

Yes

No

Default Settings

NOTE: Restoring the Default Settings will not affect the pairing settings. The baby unit(s) will remain paired with the parent unit..
MENU>SETTINGS>LANGUAGE
The default language of the menus of the parent unit is English. However, Dutch and French are also available. Use this menu to change the menu language.
Move the joystick up and down to select a language.
Press the joystick to confirm your selection.
Language

Nederlandds

English

Français
MENU> SETTINGS>TEMPERATURE DISPLAY UNIT
The baby unit (camera) is equipped with a temperature sensor. This temperature is displayed on the parent unit (monitor). Use this menu to select the preferred unit. You can choose between Degrees Celsius or Fahrenheit.
Move the joystick up and down to select a temperature display unit
Press the joystick to confirm your selection.
MENU>SETTINGS>TEMP.ALERT RANGE
The baby unit (camera) is equipped with a temperature sensor. You can set a temperature alert to get notified when the temperature is either too cold/hot. This feature is not intended as a substitute for adult supervision.
Move the joystick to the up and down to move between Low Temperature and High Temperature and the On and Off buttons.
Move the joystick to the right to increase the temperature and to the left to decrease it.
When the Low and High Temperature are correctly set:
To set the alarm navigate to the On button
Temp. Display Unit

Celsius

Fahrenheit
Temp. Alert Range
Low Temperature
High Temperature
On
1
5 C
1
9 C
Off
and press the joystick. To turn off the alarm navigate to the Off button and press the joystick.
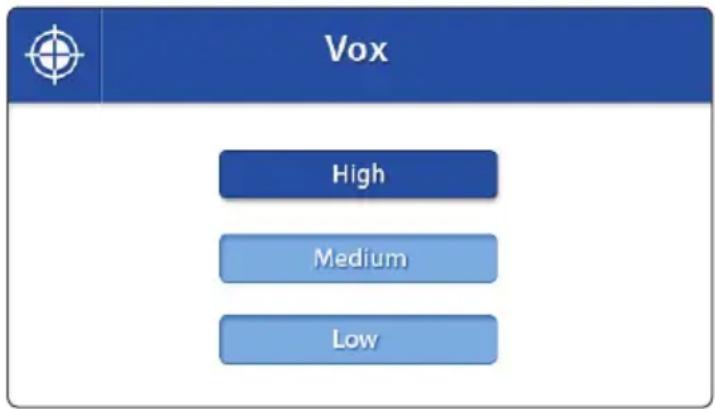
Adjust sensitivity Power Save (sensitivity - VOX)
Press menu buton
Choose VOX
Choose from the menu options [High] [Medium] [Low] to set the sensitivity.
When VOX sensitivity is set higher, softer sounds will be detected.
MENU>OVERWRITE
You can overwrite earlier recorded fi les when the memory SD card is full.
Move the joystick up and down to select Yes/No.
Press the joystick to confirm your selection.

NOTE: When the overwrite function is enabled the overwrite icon will appear on the screen..
You can play back and manage recording fi les in the recording fi les list.
Press the joystick te enter the recording fi le list.
Move the joystick to select a recording, press the joystick to play back a recording.
Move the joystick to the left or to the right to rewind or fast forward a recording.
Use the menu button to go back.
Use the Night light / Delete button to delete a recording.
Use the menu button to leave the Recording fi le list.
File Overwrite
Overwrite recorded files when memory is full

Yes

No
Recording File List
| Sun. | Mon. | Tue. | Wed. | Thu. | Fri. | Sat. |
| 1 | 2 | 3 | 4 | 5 | ||
| 6 | 7 | 8 | 9 | 10 | 11 | 12 |
| 13 | 14 | 15 | 16 | 17 | 18 | 19 |
| 20 | 21 | 22 | 23 | 24 | 25 | 26 |
| 27 | 28 | 29 | 30 | 31 |
Recording File List
| 2019.03.22 | |
| 16:18:34 | |
| 16:16:40 | |
PAIRING
Use the Pairing function to connect a baby unit (camera) to the parent unit (monitor). Up to 4 baby units can be connected to the monitor. They need to be paired on a different channel.
1
Switch the baby unit (camera) on by holding down the power button until the Power LED turns green.
2
Hold and press the On/Off button to switch the parent unit (monitor) on.
3
Press the menu button.
4
Move the joystick to the left or right to select the CAMERA menu.
Press the joystick to open the CAMERA menu.
5
Move the joystick up or down to select pairing.
Press the joystick to open the pairing menu.
6
Move the joystick up or down to select the desired pairing channel.
Press the joystick to confirm your selection.
7
A countdown will be displayed on the screen.
Briefly press the baby unit (camera) pair button to pair the baby unit (camera) to the parent unit (monitor).
The video from the camera should now be displayed on screen.
TROUBLESHOOTING
If you have any problems with the Luvion Prestige Touch 3, there is often a quick and simple solution.
Please try the following:
Problem Solution
| No video from the baby unit | 1. Check the power supply of the baby unit. Make sure the power adapter is plugged in and the green power LED is switched on. 2. Make sure that the parent unit is switched on. 3. Make sure that the baby unit is in range of the parent unit. 4. Make sure that the parent unit is not in the audio only mode (press the power button shortly to exit the audio only mode) 5. Make sure that the parent unit is not in the VOX mode. |
| The video is dropping / I have a constant low reception / "Buiten Bereik" message | 1. Move the baby unit closer to the parent unit. 2. Try repositioning the baby and/or parent unit (away from walls) to improve the reception. 3. Place the antenna of the parent unit in the upright position. 4. (re-)Pair the parent unit with the baby unit (see pairing chapter) |
| Audio problems 1. Make sure | that the volume on the parent unit is not muted. Press the + volume button on the parent unit to increase the volume. 2. Make sure that there is sound within range of the baby unit microphone. 3. If the unit emits a loud, screeching noise, move the baby and parent unit further apart. |
| The video is or has become choppy | 1. The video may become choppy when a lower frame rate is experienced (i.e. 10 frames per second instead of 15 frames per second). 2. Try moving the baby unit closer to the parent unit. 3. Remove obstructions between the baby and parent unit. 4. Place the antenna of the parent unit in the upright position. |
| The battery of the parent unit runs out very fast | Use the power save mode or replace the battery with a new original Luvion battery. Original batteries can be acquired at your local luvion dealer. |
| The image is upside down Use | use the videoswitch on the bottom of the camera unit to flip the image. (see Overview baby unit). |
TECHNICAL SPECIFICATIONS
| General Specifications | |
| Operating Frequency Range 2.4GHz | |
| Transmitting Power 14dBm@802.11g/n, 18dBm@802.11b | |
| Receiving Sensitivity -91dBm(Wi-Fi) | |
| Type of Modulation 802.11g/n | |
| Data Rate WiFi (802.11b/g/n) | |
| Transmitting Distance 300 m (The transmission range of the wireless signal may weaken according to your environment.) | |
| Baby unit (camera) | |
| Image Sensor Type 1/4" Color CMOS Image sensor | |
| Effective Pixels 1280(H) x 720 (V) | |
| Image Resolution/Frame Rate 15 fps | |
| White Balance Auto | |
| Lens 3.0mm, F2.0 | |
| Field of View 63° (FOV) 53° (H) 31° (V) | |
| IR On/Off | 15-25 Lux Off, 5-15 Lux On |
| IR LED Type/Nacht Vision | 5m 940nm |
| Speaker Output | 0.5 W Max |
| Power Requirement | 5V DC 1A |
| Operating Temperature Range | - 10° ~ 40° |
| Operating Humidity Range | 80% HR |
| Environment Rating | N/A (for indoor use only) |
| Dimensions | 85 x 105 x 112mm |
| Regulation Compliance | FCC/CE |
| Camera Housing Material | Plastic |
| Motory Type Stepping motor | |
| Moving Angle | Up 90° Down 20° Left/Right 135° |
| Parent unit (monitor) | |
| LCD Panel Size 7" / 17,78 cm | |
| LCD Resolution H: 800 px, V: 480 px | |
| Power Requirement 5 Vdc 2A +/- 5 % | |
| Operating Temperature - 10° ~ 40° | |
| Operating Humidity 0% ~ 85% | |
·NOTE
Outdoor use in France, Italy, Russia and Ukraine is not allowed
Recycling
- Do not dispose this product (and accessories) with normal household waste at the end of its life. Hand in the product at an offi cial collection point for recycling or at the shop where you buy a comparable product.
- The batteries should be handed in at an offi cial collection point or in the appropriate waste bins
CE
This device is for indoor use only
This item is in compliance with the essential requirements and other relevant provisions of Directive 2014/53/EU.
All specifications are subject to change without notice.
This item is in compliance with the essential requirements and other relevant provisions of European
Directives. The declaration of conformity is available through:
https://www.luvion.com/doc/Prestige-Touch-3/
TABLE DES MATIÈRES
| INTRODUCTION | 62 | |||
| CONSIGNES | DE | SECURITÉ | 62 | |
| CONTENU | DU | KIT | ||
| CAMÉRAS | SUPPLEMENTAIRES | 63 | ||
| INSTRUCTIONS APPAREIL PARENTS (MONITEUR) 64 | ||||
| INSTRUCTIONS APPAREIL BÉBÉ (CAMÉRA) 66 | ||||
| MISE EN ROUTE | 68 | |||
| MENU | 72 | |||
| COUPLAGE | 77 | |||
| PROBLEMES ET SOLUTIONS | 79 | |||
| SPÉCIFICATIONS | TECHNIQUES | 80 | ||
INTRODUCTION
This device is for indoor use only
All stored files will be deleted

Yes

No

Default Settings

This device is for indoor use only
Delft, The Netherlands
www.luvion.com
SIKKERHETSREGLER
- Hold små deler unna barn.
- Dette Produktet er ikke et leketøy. Vennligst ikke la barn leke med Produktet.
- Dette Produktet er/DDke ment som en erstatting for tilsyn fra voksne.
- Bruk bare de originale, medfølgende laderne.
- Ikke bruk Produktet i faktige forhold erler i nærhet av vann.
- Hold alltid kameraet og ledningene til stromadaptere minst 1,5 meter unna babyen.
Bruk bare Produktet mellom 10^ - 35^ - Ikke forsök Å apne produitet selv, da dette kan ugyldiggjore garantien. Om=noe er galt, vær vennlig Å kontakte din lokale forhandler eller distributør.
Batterier:

Veggmontert Takmonter Veggmontert (opp-ned)

All stored files will be deleted

Yes

No

Default Settings

Overwrite recorded files when memory is full

Yes

No
Recording File List
| Sun. | Mon. | Tue. | Wed. | Thu. | Fri. | Sat. |
| 1 | 2 | 3 | 4 | 5 | ||
| 6 | 7 | 8 | 9 | 10 | 11 | 12 |
| 13 | 14 | 15 | 16 | 17 | 18 | 19 |
| 20 | 21 | 22 | 23 | 24 | 25 | 26 |
| 27 | 28 | 29 | 30 | 31 |
Recording File List
| 2019.03.22 | |
| 16:18:34 | |
| 16:16:40 | |
SAMMENKOBLING
This device is for indoor use only
Dette elementet er i samsvar med de grunnleggende krav og øvrige relevante krav i Direktiv 2014/53/EU.
Luvion Premium Babyproducts
Visit us at:
www.Luvion.com