Sib Evo Dolby Atmos - Speaker FOCAL - Free user manual and instructions
Find the device manual for free Sib Evo Dolby Atmos FOCAL in PDF.
| Product Type | 2-way satellite speaker with integrated Dolby Atmos driver |
| Brand | Focal |
| Model | Sib Evo Dolby Atmos |
| Configuration | 2-way bass-reflex + upward-firing full-range driver (Atmos) |
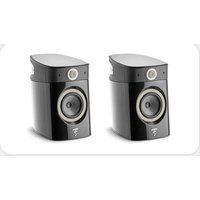
| Drivers | 13 cm Polyflex woofer, 19 mm fabric dome tweeter, 10 cm full-range driver |
| Frequency Response (+/- 3 dB) | 90 Hz to 20 kHz |
| Cut-off at -6 dB | 75 Hz |
| Sensitivity (2.83 V/1 m) | 90 dB |
| Nominal Impedance | 6 Ohms |
| Crossover Frequency | 3.5 kHz |
| Recommended Amplifier | 25 - 200 W |
| Dimensions (H x W x D) | 295 x 195 x 190 mm |
| Unit Weight | 3.25 kg |
| Power | Passive, requires external amplifier |
| Main Features | Dolby Atmos technology, adjustable tilt, wall-mountable, can be used horizontally as center channel |
| Pack Contents (5.1.2) | 3 Sib Evo satellites + 2 Sib Evo Dolby Atmos satellites + Cub Evo subwoofer + mounting accessories |
| Care and Cleaning | Dust with dry microfiber cloth, stains with damp cloth only |
| Safety | Do not use solvents, detergents, alcohols or corrosive products |
| Spare Parts and Repairability | Optional accessories: Hip Evo stand. Warranty via online registration |
| General Information | Recommended break-in period (20 hours at moderate level) |
Frequently Asked Questions - Sib Evo Dolby Atmos FOCAL
User questions about Sib Evo Dolby Atmos FOCAL
0 question about this device. Answer the ones you know or ask your own.
Ask a new question about this device
Download the instructions for your Speaker in PDF format for free! Find your manual Sib Evo Dolby Atmos - FOCAL and take your electronic device back in hand. On this page are published all the documents necessary for the use of your device. Sib Evo Dolby Atmos by FOCAL.
USER MANUAL Sib Evo Dolby Atmos FOCAL
| Type Two-way compact bass-reflex loudspeaker | |
| Speaker 5" (13cm) Polyflex woofer | 3/4" (19mm) soft dome tweeter |
| Frequency Response (+/-3dB) 70Hz to 25kHz | |
| Low frequency point -6dB 66Hz | |
| Sensibility (2.83V/1m) 90dB | |
| Nominal Impedance 6 Ohms | |
| Crossover Frequency 3.5kHz | |
| Recommended Amplifier Power 25 - 200W | |
| Dimensions (HxWxD) 9 | 15/16" x6 3/8" x6 3/8" (252x162x162mm) |
| Weight (unit) 4lbs (1.8kg) | |
Sib Evo Dolby Atmos*
| Type | Two-way bass-reflex loudspeaker | Fullrange sealed loudspeaker |
| Speakers 5" (13cm) Polyflex woofer | 3/4" (19mm) soft dome tweeter | 4" (10cm) full-range speaker |
| Frequency Response (+/-3dB) | 65Hz to 25KHz | 90Hz to 20KHz |
| Low frequency point -6dB | 60Hz | 75Hz |
| Sensibility (2.83V/1m) | 90dB | 90dB |
| Nominal impedance | 6 Ohms | 6 Ohms |
| Crossover Frequency | 3.5kHz | |
| Recommended Amplifier Power | 25 - 200W | |
| Dimensions (HxWxD) | 115/8" x 71/16" x 71/2" (295x195x190mm) | |
| Weight (unit) 7lbs (3.25 kg) |
SIB EVO - SIB EVO DOLBY ATMOS®
Please validate your Focal-JMlab warranty, it is now possible to register your product online: www.focal.com/warranty

Package Contents:
Sib Evo 2.0
- 2 Sib Evo satellite loudspeakers pre-mounted to their base
- 2 wall mounting systems
-1 Allen key
-1usermanual
Sib Evo Dolby Atmos* 2.0
- 2 Sib Evo Dolby Atmos satellite loudspeakers pre-mounted to their base.
- 2 wall mounting systems
-1 Allen key
-1usermanual
Sib Evo 5.1
- 5 Sib Evo satellite loudspeakers pre-mounted to their base
- 2 wall mounting systems
-1 Allen key - 1 Cub Evo subwoofer
- 1 slip-resistant sticker for using one of the Sib Evo satellite loudspeakers as a centre loudspeaker
- 1 instruction manual for Sib Evo/Sib Evo Dolby Atmos
- 1 instruction manual for Cub Evo subwoofer
Sib Evo Dolby Atmos 5.1.2
- 3 Sib Evo satellite loudspeakers pre-mounted to their base
- 2 Sib Evo Dolby Atmos satellite loudspeakers pre-mounted to their base.
- 2 wall mounting systems
-1 Allen key - 1 Cub Evo subwoofer
- 1 slip-resistant sticker for using one of the Sib Evo satellite loudspeakers as a centre loudspeaker
- 1 instruction manual for Sib Evo/Sib Evo Dolby Atmos
- 1 user manual for Cub Evo subwoofer
Optional: an stand, Hip Evo, is available for Sib Evo and Sib Evo Dolby Atmos satellite loudspeakers.
A - Sib Evo in a Stereo Setup
In order to balance response, place the Sib Evo loudspeakers the same distance away from the listening point. A minimum height of 30^ (75cm) is recommended in order to obtain a coherent soundstage (fig. A1).
You can adjust the angle of inclination of the loudspeakers according to your listening point.
To adjust the angle of inclination, simply loosen the screw under the base and adjust as required. Once you have the desired angle, tighten the screw to secure the loudspeaker to its base. (fig. A3).
B - Sib Evo in a 5.1 Home Cinema Setup
1- Centre loudspeaker:
To use the Sib Evo satellite loudspeaker as a centre loudspeaker, unscrew the rubber base from the loudspeaker, stick the slip-resistant sticker in place (as shown in fig. B1) and position the loudspeaker horizontally central to the base (fig. B2). The centre loudspeaker must be positioned the same distance away from the front left and right loudspeakers. Turn the logo clockwise until it appears upright (figs. B2 and B3).
2- Adjusting the angle of inclination:
Sib Evo is supplied with the base pre-mounted.
However, you can adjust the angle of inclination of the loudspeaker according to your listening point. To adjust the angle of inclination, simply loosen the screw under the base and adjust as required as shown above. Once you have the desired angle, tighten the screw to secure the loudspeaker to its base (fig. A3).
C - Sib Evo in a 5.1.2 Dolby Atmos* Home Cinema Setup
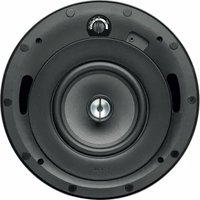
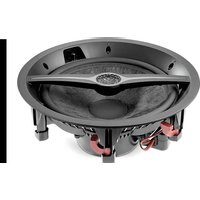
The 5.1.2 pack features two Sib Evo Dolby Atmos® satellite loudspeakers certified by Dolby. These satellite loudspeakers are equipped with two speaker drivers, one of which is fired towards the ceiling to provide Dolby Atmos® effects. Dolby Atmos® technology offers true 3D sound by including a vertical dimension, that's to say the propagation of sound waves emitted from a new source: the ceiling. This new dimension provides even more precision and realism for a multichannel experience worthy ofcinemas (figs.C1 et C2).
1- Centre loudspeaker:
To use the Sib Evo satellite loudspeaker as a centre loudspeaker, unscrew the rubber base from the loudspeaker, stick the slip-resistant sticker in place (as shown in fig. B1) and position the loudspeaker horizontally central to the base (fig. B2). The centre loudspeaker must be positioned the same distance away from the front left and right loudspeakers. Turn the logo clockwise until it appears upright (figs. B2 and B3).
2- Adjusting the angle of inclination:
All the loudspeakers in the Sib Evo packs are supplied with their bases pre-mounted.
The Sib Evo Dolby Atmos® loudspeaker is already mounted to its base according to Dolby Atmos® recommendations.
However, you can adjust the angle of inclination of the loudspeaker according to your listening point.
- For a listening point less than 6.5 feet away (2m): tilt the loudspeakers back.
- For a listening point more than 8 feet away (2.5m): tilt the loudspeakers forward.
To adjust the angle of inclination, simply loosen the screw under the base and adjust as required as shown above. Once you have the desired angle, tighten the screw to secure the loudspeaker to its base (fig. A3).
CAUTION: with a Dolby Atmos® installation, it is advised not to have any obstacles (shelves, lights, etc.) less than 3 feet (1m) above the Sib Evo Dolby Atmos® loudspeaker that could impede the reflection of Dolby Atmos® sound off the ceiling.
SIB EVO - SIB EVO DOLBY ATMOS®
User Manual
14
D - Wall-Mounting
1- Remove the base from the loudspeaker by unscrewing the screw underneath the base.
Caution: keep the screw to one side as it will be used again in step 3 (fig. D1).
2- Route the cable through the intended opening on the wall-mount and fix to the wall using the 3 screws supplied (fig. D2).
3- Position the loudspeakers on the wall-mount and secure in place using the screw put to the side in step 1 (figs. D2, D3).
4- Connect the cables (see E - Connections).
Fig. 5- Incline the loudspeaker according to your installation and secure in place by tightening the screw underneath the ball joint using the Allen key supplied (fig. D5).
E-Connections
Connect your Sib loudspeakers to the amplifier using a hi-fi quality cable with a cross-section area of between 0.75mm^2 and 2mm^2 and with the polarity marked on one of the conductors.
Respect the polarity making sure to connect the "+" terminal on the amplifier to the "+" terminal on the corresponding loudspeaker.
Repeat the operation for the "-" terminals (fig. E1).
For the Sib Evo Dolby Atmos® satellite speakers, respect the conductors indicated on the back of the satellites, the forward firing speaker driver corresponds to the bottom connectors, and the Dolby Atmos® upward-firing speaker driver corresponds to the top connectors (figs. E2, E3).
SIB EVO - SIB EVO DOLBY ATMOS®
User Manual
15
F - Audio/video amplifier settings:
We highly recommend configuring your Sib loudspeakers in "SMALL" mode in your audio/video amplifier menu.
Recommendations:
-
If your amplifier is equipped with an auto-calibration function, make sure that your amplifier has the latest firmware.
-
If you configure the amplifier manually, we highly recommend:
- setting the cut-off frequency to 80Hz
- doubling the distance of the Atmos® loudspeakers compared to the front speaker drivers.
- increasing the level until you obtain the desired result.
G - Subwoofer
For reproducing low frequencies, we recommend Cub Evo subwoofer.
H-Break-in period
The speaker drivers used in Sib Evo loudspeakers are complex mechanical components which require a break-in period in order to operate at their best and to become acclimatised to the temperature and humidity of your environment. The length of time this takes can vary depending on the conditions and may extend over several weeks.
To reduce this break-in period, we recommend operating your subwoofer for about 20 consecutive hours at medium volume, with music which is rich in bass. Once the loudspeaker's characteristics have totally stabilised, you will be able to enjoy the full potential of your loudspeakers.
I - Maintenance
Only clean Sib Evo loudspeakers with a dry microfibre cloth. If a loudspeaker is dirty, we recommend simply cleaning it with a damp microfibre cloth.
Never use solvents, detergents, alcohol-based or corrosive products, scrapers or scourers to clean the surface of the loudspeaker. Only wipe delicately and never press down hard.
SIB EVO - SIB EVO DOLBY ATMOS®
A - Sib Evo in stereo
B - Sib Evo in Home Cinema 5.1
A - Sib Evo in stereo
B - Sib Evo in Home Cinema 5.1
X: It means the harmful material in at least the parts of a homogeneous material content beyond the limited requirements given in GB/T 26572.
SπfFJ#J#J#J#J#J#J#J#J#J#J#J#J#J#J#J#J#J#J#J#J#J#J#J#J#J#J#J#J#J#J#J#J#J#J#J#J#J#J#J#J#J#J#J#J#J#J#J#J#J#J #
Sib Evo - Sib Evo Dolby AtmoS®
家装 电话
45
B-SibEvo言人5.1
1-中興國
Sib Evo vii#e 100000000000000000000000000000000000000000000000000000000000000000000000000000
2- 钩木部 正義:
F-0diO/BIIDIoAMPFOE:
Sib SfiIeRoiOiO/ BiiDIO RoAeF EeNduo'sMALL"MoEro Seelengh eon to Ranlachnni.
图注
aal aal aal aal aal aal aal aal aal aal aal aal aal
(Ar. JSll) 2011
Dolby Atmos o,1,4 jzua Sib Evo -c
Ladai 4y y sRy Sdy gJe jie laa Jd. Dolby no daSib Evo Dolby Atmos Cllw Aclaw 0,1,4 aja Jaia
(D) Dolby Atmos 1
Jn Jn Jn Jn Jn Jn Jn Jn Jn Jn Jn Jn Jn Jn Jn Jn Jn Jn Jn Jn Jn Jn Jn Jn Jn Jn Jn Jn Jn Jn Jn Jn Jn Jn Jn Jn Jn Jn Jn Jn
CgC.1J5
a:jsallacold-1
(B1) SjLbSg aLs jLi slall gll sI aclaw g aibll salei i jyral aeaw SiB Evo ciilll aeow plasiny
(BB. Js) aclw jie oaiy
S ADB = S COD + S BDO - S COD
Sib Evo a jg d gdoa
Dolby Atmos yie sib Evo Dolby Atmos eel
a a a a a a a a a a a a a a a a a a a a a a a a a a
(Ar.5kill) 6eell aldeclalll
Sib Evo aclaw g j 1a 2 1e (la g c j 1j 1a 1j 1j) jilg g j j Dolby Atmos
Dolby Atmos
Sib Evo - Sib Evo Dolby AtmoS®
isunial
54
bila 1
.(D1.
(DY Jd) d jai d aill g i jll piai y baill gl cai all k jai bilall g ciill all jalll Jn
(DyDy.
()
.(D)Jgall Jzalldjduy Jauad Jgall gdlge 1
山
a 10000000000000000000000000000000000000000000000000000000000
aill aclll 3" + " joll: iall 3" + " iall oll bll jy jj jil jil
E
Sib Evo Dolby Atmos
(E, E. J. D. D. D. D. D. D. D. D. D. D. D. D. D. D. D. D. D. D. D. D. D. D. D. D. D. D. D. D. D. D. D. D. D. D. D. D. D. D. D. D. D. D. D. D. D. D. D. D. D. D.
Sib Evo - Sib Evo Dolby AtmoS®
二 i -
55
:
"SMALL" Sib clalb
:
aiaai 1
Lai sllii ylll bally sllal